K1EL WKUSB User manual

WKUSB
with WinKeyer3
User Manual
www.k1el.com

K1EL WKUSB with WinKeyer3 User Manual WKUSB
WKUSB User Manual 12/20/2017 Rev 1.0 Page 2
Introduction
This document will describe WKUSB and its various interfaces. All the information you will need
to connect WKUSB to your station will be included in this manual along with specific guides for
getting it working with N1MM+ Logger, HRD/DM780, N3FJP AC Log, and MRP40.
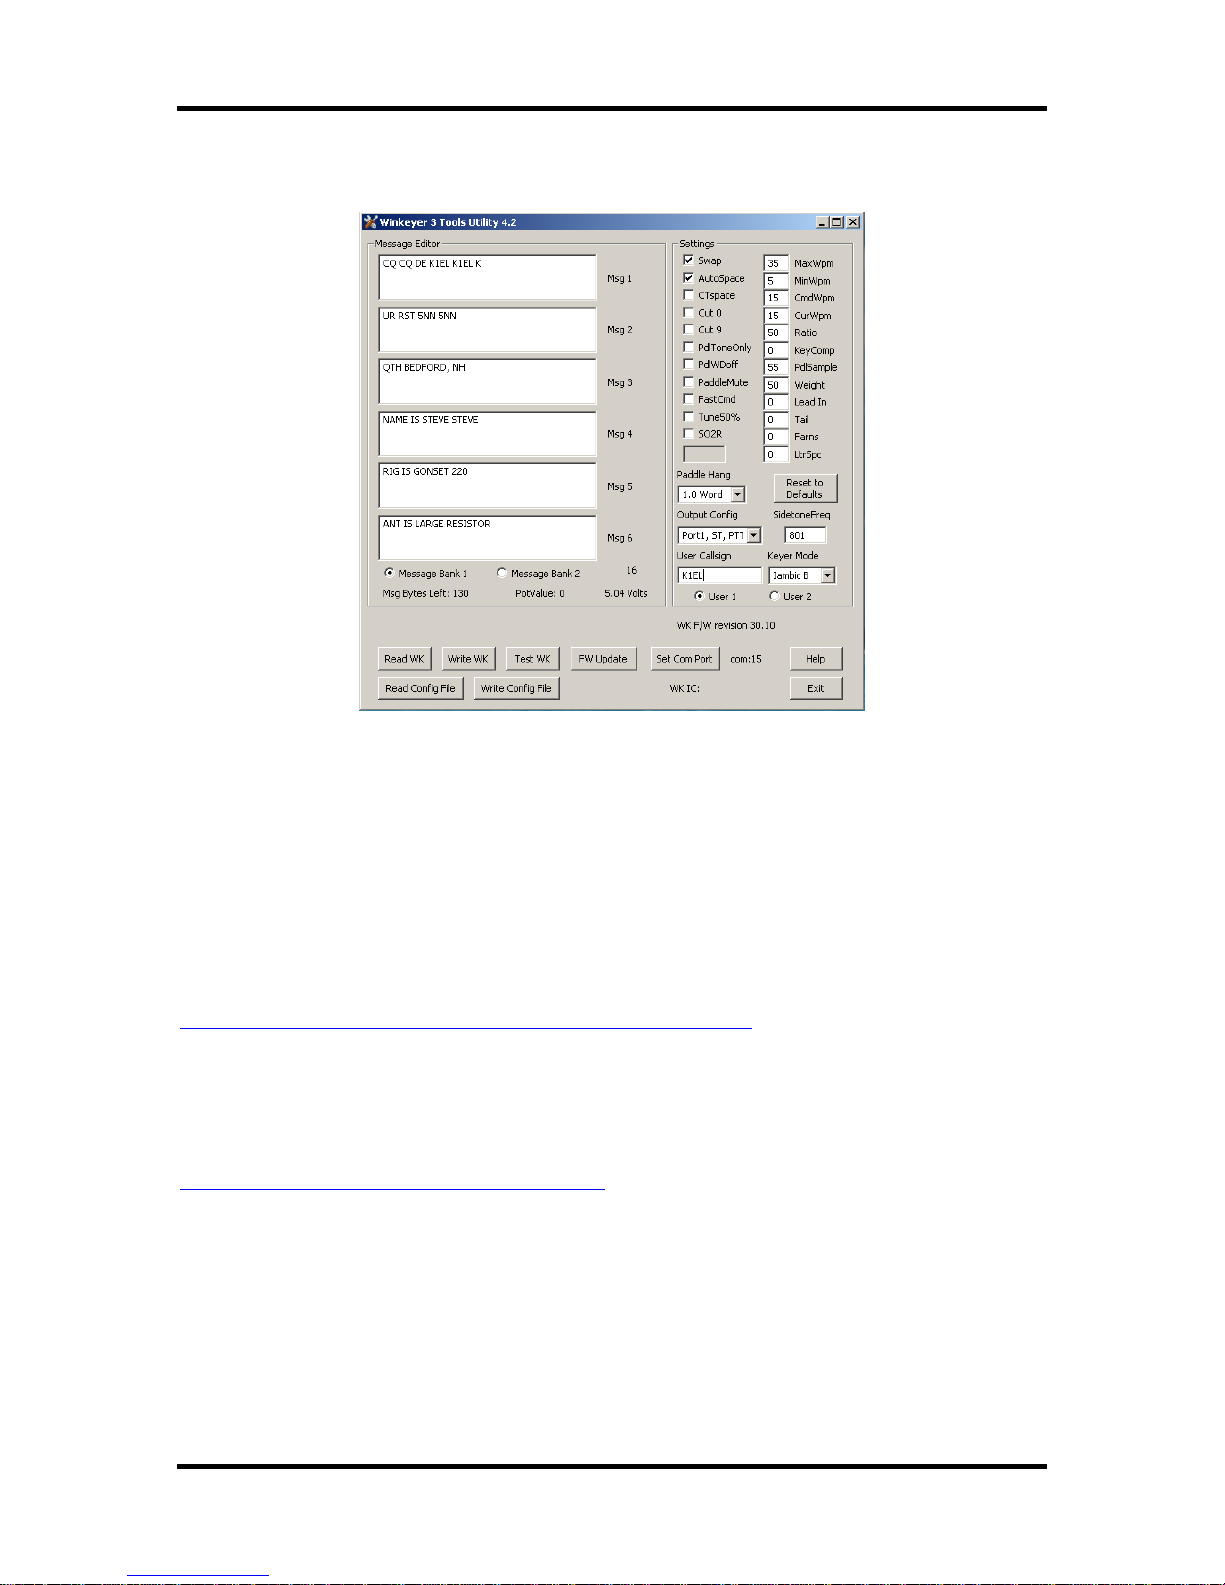
What is WinKeyer and why do I need it ?
Due to timing latencies inherent in multi-threaded operating systems like MS Windows, it is very
difficult to generate accurately timed Morse in software. All it takes is a higher priority task to
demand service and Morse generation will be delayed which results in wrongly timed dits, dahs,
or the spacing between them. A WinKeyer based device, like WKUSB, attaches to a PC’s USB
port and appears as a serial com port to an application running on the PC. The application,
instead of generating Morse in software, sends the letters to WinKeyer. The application has full
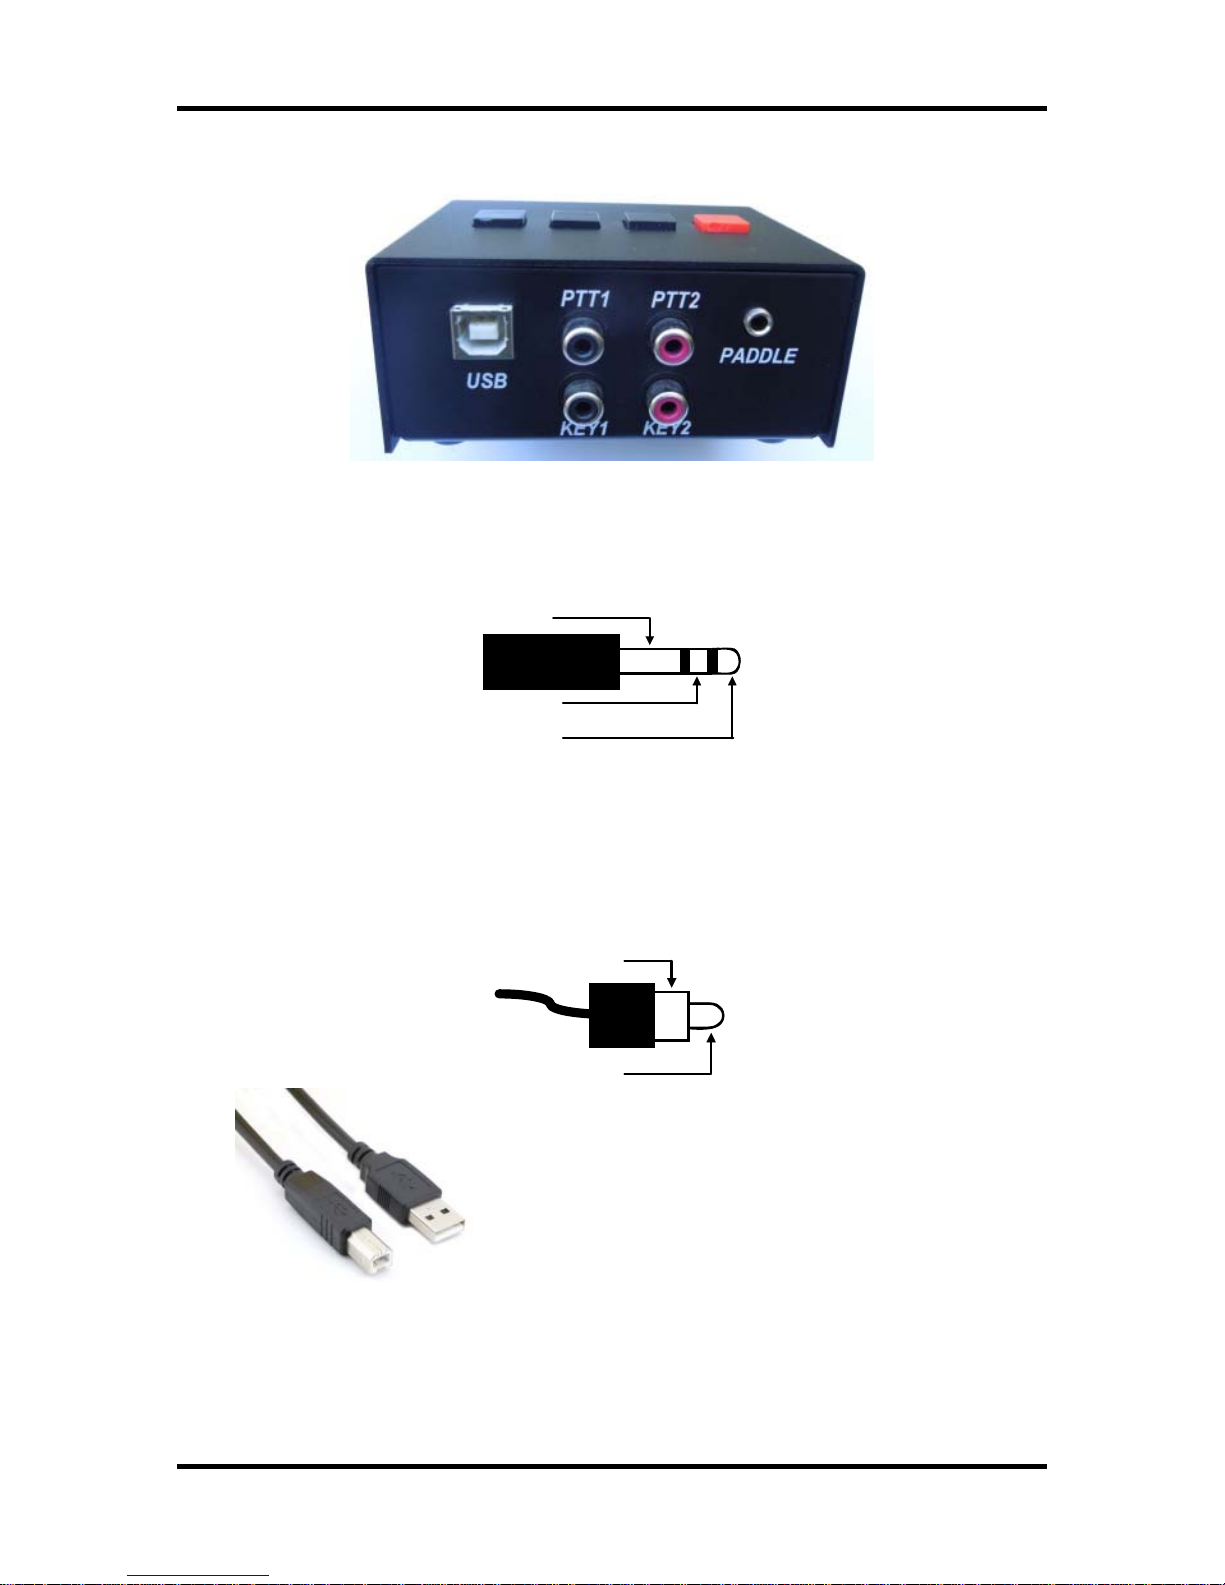
control over sending speed as well as weighting, spacing, and PTT generation. WKUSB has a
paddle interface so a user can break in immediately to handle fast exchanges in contest
situations. Electrically isolated keying outputs provide safety and prevent ground loops. Two
separate keying outputs allow the user to run two different radios from one keyer without
swapping cables. The feature list below shows some of the advanced options supported by
WinKeyer. Some WinKeyer products also provide a speed potentiometer interface so that an
operator can instantly dial any speed desired.
WKUSB Features
•USB 2.0 Interface with Mini type 3 connector •Uses K1EL’s latest WK3 IC
•Iambic CW Paddle Interface •Adjustable Speed 5-99 WPM
•Iambic A, B, Ultimatic & “Bug” paddle modes •Adjustable Weighting and dit/dah ratio
•Two separate keying outputs •Adjustable Keying Compensation
•Two separate PTT outputs •Adjustable Letterspacing
•Solid state relay outputs rated at 350V @120 mA •Adjustable PTT lead in and tail delays
•160 character input buffer •Optional autospacing
•Runs off USB and/or 3 internal AAA batteries •Metal enclosure with RFI filtering
•ESD protection on paddle input •Power supply monitoring
•Firmware can be updated over USB •160 character input buffer
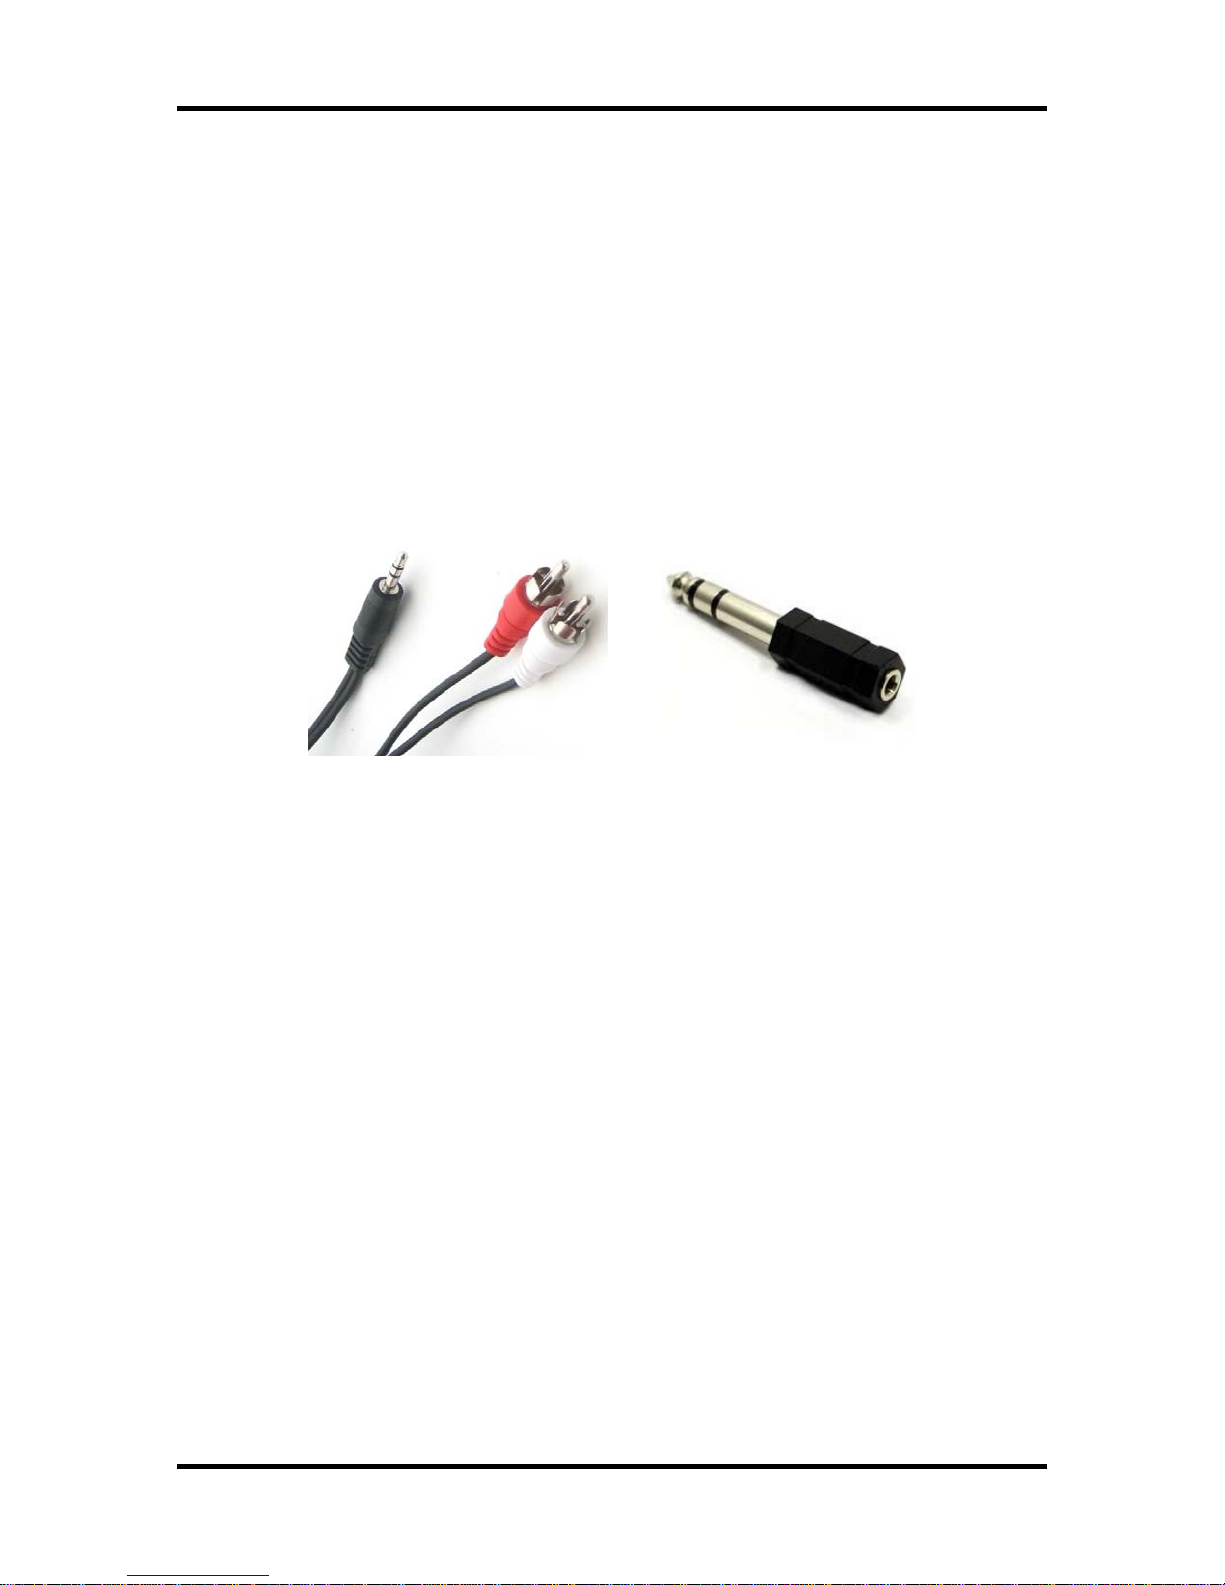
•Embedded commands •Inexpensive cabling options
•Farnsworth spacing option •Adjustable dit/dah ratio
•Front Panel Speed Control •Adjustable speed pot range
•Sidetone output with adjustable frequency •Paddle only sidetone
•Standalone Keyer Operation •Twelve stackable memory slots
•HSCW and QRSS Capability •Single Op Two Radio (SO2R) Support
•Standalone Practice Mode •Automatic beacon capability
•Works with any logging or contest application that supports Winkeyer !
Let’s Get Started ! - USB drivers
Don’t plug WKUSB into your PC until you have read this paragraph !!
WK uses a USB interface IC manufactured by FTDI. This is one of the most popular and reliable
USB devices in existence. We depend on FTDI’s expertise and they do an excellent job in
maintaining reliable USB drivers that run on various platforms and interface to their controllers.
Most current model PCs now ship with an FTDI USB driver preinstalled so you can just plug
WKUSB in and you are good to go. However, we highly recommend reading through Appendix A
for our recommended install procedure which may save you some trouble. Just to be clear, there
is nothing special about installing a USB driver for WKUSB. If you have USB device experience
and are familiar with the process, feel free to proceed on your own.

K1EL WKUSB with WinKeyer3 User Manual WKUSB
WKUSB User Manual 12/20/2017 Rev 1.0 Page 3
WKUSB Connections
The four central RCA jacks are keying outputs. The connector on the left is the USB connector
and the connector on the right is an 1/8” stereo jack which accepts paddleset input. The paddle
can be an iambic or side swiper type. A bug is not acceptable. The paddle inputs are activated
when switched to common ground (GND). The paddle connector needs to be wired this way:
GND
DAH
DIT
The RCA jacks provide two keying and two PTT outputs. The output selection can be done by
software or paddle command in standalone mode. Likewise, PTT is enabled or disabled the same
way. These outputs are isolated from WKUSB ground and all other WKUSB signals by optically
coupled solid state relays. The outputs can switch voltages up to +/- 350 V at up to 120 mA and
provide a 5000 volt isolation from WKUSB electrics. An output connector, either key or PTT,
needs to be wired this way:
GROUND
KEY or PTT
WKUSB contains no user serviceable or configurable jumpers, Please do not tamper with or
modify the internal circuitry of WKUSB as this will void the unit’s warranty and may result in
unsafe operating conditions.
The USB connector is designed to mate with a Type A to B
cable. This cable type is shown at left and is most
commonly used with printers. If necessary the cable can be
purchased from Hamcrafters. The interface will run at USB
1.0 and 2.0 speeds but is not compatible with USB 3.0.

K1EL WKUSB with WinKeyer3 User Manual WKUSB
WKUSB User Manual 12/20/2017 Rev 1.0 Page 4
Let’s actually run WKUSB !
Once the USB driver is installed and you have plugged WK into your PC, you can determine
WK’s port assignment using K1EL’s WKscan app: http://www.hamcrafters2.com/WKscan.html
WKscan Tutorial
Once you know WK’s com port, you are ready to run WKdemo.
WKdemo tutorial
WK3DEMO is a general purpose test
application that can exercise all of WKUSB’s
capabilities:
http://www.hamcrafters2.com/WK3demo.html
Once the application is installed, start it up and
you will see the dialog box show at left. All you
need to do to get started is to configure the
serial communications port. Click on Setup and
the com port selection list is shown. Only the
currently active USB com ports are shown.
Select a WK com port identified by WKscan.
You can click on ? in the upper right for a very
brief help menu.
Click on Open to connect to WKUSB. If all is
well, the Open pushbutton will change to Close
and the WK IC version will be displayed. Click
on Setup again and this time you the Setup
dialog box will be displayed as shown on the
next page. This presents all of WK3’s various
configuration options which can be modified to
your requirements.
After you have installed WKscan, start it
up and you will see the dialog box
shown at left. Click Scan and WKscan
will display all of the serial ports found
on the system. The ports will either be
identified as unassigned, in use, or
attached to a WK device. In this example
we have a WinKeyer1 device on COM2
and a WinKeyer3 device on COM4.
Yes, multiple WKs can be operated from
a single PC using two applications.

K1EL WKUSB with WinKeyer3 User Manual WKUSB
WKUSB User Manual 12/20/2017 Rev 1.0 Page 5
Click Cancel for now and go back to the main dialog box. Type into the lower keyboard entry
window and you will hear the text sent in Morse sidetone from the internal mini speaker. Enable
Serial Echo in Setup and what you type will be echoed in the upper text window as it is sent.
Now hook up some paddles and test paddle entry. If Paddle Echo is enabled, letters entered on
the paddles will be echoed in the upper text window. Use the Setup Dialog to try different keying
options. You probably noticed that if you change settings on the Setup dialog box, you have click
Done and return to the main application to transfer those new settings to WKUSB.
The sidetone frequency can be changed as well as specifying whether it should be used for
paddle entry only. An exact frequency selection is not always possible, it will round to the closest
one it can do. There are several speed pot options, Speed Pot Lock forces WKUSB to only use
the speed pot for speed control. When Speed Pot Lock is unchecked, the Up/Down arrows next
to the WPM readout on the main dialog box can adjust the speed or you can directly enter a
speed in the WPM edit box. In other words, speed is controlled solely by the host application.
This is how the majority of PC logging and contest applications operate. Speed is controlled by
keyboard commands, macros, or messages with embedded speed commands. The name of the
game in contesting is to have one central user focus, that being the keyboard.
Although WKtest packs a lot of power in a small app, it is meant to be a hardware test tool. It
gives you a good idea of what WKUSB is capable of and assures you that it is operating properly.
The next logical step is to move on to a ‘real’ application, such as N1MM+. Before that we will
look the WK3tools application and how standalone operation works.
WK3tools application
Normally when a WinKeyer device is not connected to a host application it will run in standalone
mode. WKUSB can be powered over the USB port or by a set of internal batteries. WKUSB in
standalone provides a complete Morse keyer with lots of capabilities. Originally, configurations
changes could only be made using commands entered on the paddles. While it still has this
capability, WK3tools allows you to make these changes from a PC application.
http://www.hamcrafters2.com/WK3tools.html

K1EL WKUSB with WinKeyer3 User Manual WKUSB
WKUSB User Manual 12/20/2017 Rev 1.0 Page 6
After installation, start the application and the following dialog box will appear:
It will be empty since you haven’t read in WK’s current configuration settings. When WK is
powered up for the very first time, all settings are loaded with defaults. To view these, connect
WK to your PC, set the ComPort, and click on ReadWK. After a couple of seconds the dialog box
will be updated to show you the current settings:
Now you can go in and tailor the standalone settings the way you want. The biggest timesaver is
the ability to load messages. A tally of available message storage left is shown below the
message text windows. Even though the WK box has only four message pushbuttons, it has the

K1EL WKUSB with WinKeyer3 User Manual WKUSB
WKUSB User Manual 12/20/2017 Rev 1.0 Page 7
capability to handle 12 messages in two banks. Don’t forget that you have to write the messages
back to WK with the WriteWK button. If you want to test them, press the buttons on top of WK.
Once you have saved messages and settings, they are ready for use. You can now disconnect
WK from the PC. You don’t need to use WK3tools again until you want to make changes. Don’t
forget you can still make changes to WK settings by using paddle commands. A detailed
description of standalone paddle commands can be found in Appendix D.
Restoring Factory Settings
This control is provided to restore original default settings. All of the control settings are initialized
and messages are erased. Don't forget to write new settings back to WK when you are done.
Help File
A separate help document for WK3tools can be downloaded from the WK3tools webpage:
http://www.hamcrafters2.com/files/WK3ToolsOperationGuide.pdf
Upgrading WKUSB Firmware
WK3tools is used to install new firmware revisions in the field. A special webpage is provided for
WK3 upgrade information:
http://www.hamcrafters2.com/WK3upgrade.html

K1EL WKUSB with WinKeyer3 User Manual WKUSB
WKUSB User Manual 12/20/2017 Rev 1.0 Page 8
WKUSB FAQ #1: What is Standalone Mode and how is it different than Host Mode?
The original Serial WinKeyer1 was designed to operate only while connected to a PC, under
control of a PC based application, this is Host Mode. WinKeyer1 obtained power directly from the
PC over unused RS232 control lines; if it was disconnected from a PC, it was inoperative. Soon
hams started putting batteries in WinKeyers and using them standalone, in other words, not
connected to a PC. This spawned many requests to add features to make a standalone WK more
useful. When WKUSB was designed, we decided to include a complete ‘second’ keyer in the box
and Standalone Mode was born. This second keyer shares the core ‘K1EL Keyer Engine’ with
Host Mode but in other respects it is independent. It can operate on battery power or connected
to a PC. It has its own settings memory and 12 message slots. Commands can be issued via
paddle commands or through the use of WK3tools. Standalone settings do not influence Host
Mode settings. In Host Mode, keyer settings are stored on the PC by the application and are
loaded when you connect to WKUSB. In Standalone Mode the settings reside in EEPROM inside
WKUSB. If you disconnect from an application, WKUSB will automatically go into Standalone
mode and revert back to the saved settings from EEPROM.
WKUSB FAQ #2: Are the internal batteries required if always connected to a PC?
When WKUSB is plugged into a PC, power is automatically switched over to USB power by a
diode switch.
In other words, WKUSB can operate with or without batteries. With batteries out, you can only
use it when connected to a PC USB port. When first plugged in it will start up in standalone mode
and then change over to host mode when you start up an application that uses WKUSB. In host
mode, the PC app has control of WKUSB settings and messages. If you close the application
down, WKUSB will remain powered but will revert back to standalone mode settings. If you start
another host application up WKUSB will go back into host mode.
With batteries installed, the functionality is identical with the exception that you can unplug
WKUSB from your PC and operate independently in standalone mode. Avoid disconnecting
WKUSB while it actively controlled by a host application, this can cause the application to get
confused and possibly hang. To be safe, always close the application before removing WKUSB.

K1EL WKUSB with WinKeyer3 User Manual WKUSB
WKUSB User Manual 12/20/2017 Rev 1.0 Page 9
Connecting WKUSB-SMT to your station
Minimally all you need to do is connect the USB cable from WKUSB to a USB port on your PC
and connect the key output to the keying input on your rig. Since WKUSB performs the keying
function it drives your rig in the same manner as a straight key. In other words there are only two
leads, ground and key control. For that reason a keying cable is quite easy to build.
Hamcrafters sells a WKUSB universal keying cable kit that covers 95% of keying requirements.
Keying cable details
An RCA plug is required at one end and the other end will have a connector that will mate to your
rig’s key input. Usually this is a ¼ inch phone plug, we recommend using a stereo plug. A two
wire cable is all that is required to key a typical transceiver. Plug the RCA side into either KEY1 or
KEY2 and the other side directly into your transceiver’s key input jack. On the transceiver end,
the key line goes to tip and ground goes to the sleeve.
GROUND
No Connect
KEYLINE
sleeve
tip
ring
Transceiver/Transmitter end of cable
Make sure you disable the radio’s internal keyer, if it has one, and set it up for straight key
operation. It’s always a good idea to test your keying cable before using it with WK. Plug the
cable into your transceiver and leave the keyer end unconnected. Now set up your transceiver for
transmit and then short the keyer cable end, tip to sleeve, with a clip lead. If this doesn’t work
then either the cable is not made correctly or the radio is not in break in mode. If you get dits or
dahs, then the keyer in the radio is still enabled. Some transceivers want you to use a stereo plug
even if the internal keyer is disabled, it’s a good idea to use a stereo connector at the radio end
no matter what and leave the ring unconnected.
If you want to key a transmitter with vacuum tube finals, WKUSB will work fine because it has a
solid state keying relay rated for +\-350V switching at 120ma. This covers grid block keying but it
probably will NOT be suitable for cathode keying. In any case always check the transmitter’s
manual for keying requirements before plugging WKUSB in.
WKUSB’s RCA connectors are electrically isolated from WKUSB’s enclosure and ground. This
means that you can directly connect your transceiver to WKUSB with PC attached and not worry
about ground loops or RF getting into your PC through WKUSB.
PTT Connection
PTT will not be used in most radio setups. It is provided to run an external antenna switch or to
pre-key a linear amplifier. If you are just driving a barefoot transceiver, PTT will not be required.
If you do need PTT, then WKUSB provides useful functionality. PTT is asserted before KEY and
is held for the entire transmit interval. Both lead-in and tail delays are adjustable. The PTT
connections are wired the same as the KEY, make sure that PTT is enabled in your configuration.

K1EL WKUSB with WinKeyer3 User Manual WKUSB
WKUSB User Manual 12/20/2017 Rev 1.0 Page 10
Paddle Connection
If you decide to use a set of keying paddles with WKUSB, they plug into the paddle jack input on
the rear of the unit. An 1/8 inch stereo jack is used on WKUSB, if your paddles have a 1/4 inch
size plug an adapter cable will be necessary.
WK3demo is useful for verifying that WKUSB is keying your rig properly. If you run into problems,
make sure you have selected the correct key output port. This is done in the Output Config
control in the WKdemo setup dialog box. Also check to make sure the connector is fully plugged
into the WKUSB jack. The tune function is useful for signal tracing.
A cheap path to a keying cable
In today’s world of phones and portable music players, RCA to 1/8” stereo connectors are very
easy to find and are inexpensive. If your transceiver requires an 1/8” keying plug you are done. If
it needs a 1/4” plug, purchase an 1/8” to 1/4” stereo adapter.
The point is that you can come up with just about any cable you need by juggling cable types and
adapters. Or buy one of our cable kits from us.
Note that 3.5mm and 1/8” connectors are the same size, so don’t let that confuse you.

K1EL WKUSB with WinKeyer3 User Manual WKUSB
WKUSB User Manual 12/20/2017 Rev 1.0 Page 11
Troubleshooting hints
1) When I apply power to WKUSB I don’t get the initial R sent in sidetone. This means that
that the WK3 IC is not starting up. If you are running off batteries make sure you have the
battery holder wired connected to the right place and batteries in correctly. Also make
sure the isn’t a missing solder connection on the sidetone speaker or circuitry.
2) WKUSB won’t key my radio. First check to make sure your keying cable is wired correctly
and then check to make sure it is plugged into one of the KEY outputs. If you have it
plugged into KEY2, try KEY1 or vice versa.
3) I get dits or dahs only or the CW output is garbled. This usually happens when you have
not disabled your transceiver’s internal keyer. You want to enable straight key mode. In
most transceivers this function is controlled by menu selection, check your user manual.
4) When I plug WKUSB in or install batteries, I get one R in sidetone but nothing else works
after that. This is a sign that one of the dit or dah paddles is stuck low. Remove the
paddle connector and see if that clears the problem. We have seen cases where a
conductive solder flux (organic core) has not been cleaned off and this causes various
shorts on the board. Give the board good leaning with a water based flux remover if you
used organic core solder.
5) When I try to run WKUSB from WK3demo I get the error message Attach WK: No Echo.
This means that the com port selected was a valid one but not the one that WKUSB is
connected to. Recheck your port selection using WKscan.
6) WKUSB is plugged in but WKscan does not show a com port with a WK device. This is a
sign that either a USB driver has not been installed or the USB hardware on WKUSB is
not working. It could be a bad USB cable, missed solder connection on the USB
connector, a solder short on the USB connector, or bent pin inside the USB connector.
Note that the USB interface is factory tested before a board is shipped so if it doesn’t
work the places to look for trouble are limited to the connector and cable. It could be that
the USB cable is not fully inserted at either WKUSB or at the PC.
7) WKUSB has batteries installed but does not respond to pushbuttons when disconnected
from the PC and will not connect to a PC application. Early versions of WK3 can hang if
they are running on batteries and are disconnected from a PC while connected to a host
application. You can clear the hang by removing and reinstalling the batteries. This issue
was fixed in version 30.10 for the SMT version and 30.60 for the DIP version.

K1EL WKUSB with WinKeyer3 User Manual WKUSB
WKUSB User Manual 12/20/2017 Rev 1.0 Page 12
Theory of Operation
This section will briefly describe how WKUSB works. As shown in the block diagram below, the
host PC is connected to WKUSB over a USB com port. WKUSB receives commands and Morse
letters from the PC. Letters will be sent in accurately timed Morse.
PC to WKUSB Block Diagram
Commands modify WKUSB’s operation in some way, for example changing operating speed,
pausing transmission, or asking for status. Commands and Morse letters are processed
differently in WKUSB. Morse is put into a FIFO* buffer memory that allows the host to send data
ahead of the Morse being sent. The size of this buffer is 160 bytes. Since there can be a
considerable delay from host input to Morse output, commands bypass the input FIFO and are
acted upon immediately. This allows changes to be made while sending is underway.
* First In First Out; bytes are taken out in the order they were put in.
Data and Command Flow inside WKUSB
Since there are times when you don't want commands to take effect immediately, WKUSB allows
commands to be buffered. This means that the command is placed in the serial buffer mixed with
Morse and won’t be acted on until it comes out of the buffer. An example would be sending two
words at two different speeds, the first at 15 WPM and the second at 20 WPM. By placing a
buffered speed command between the words, the speed will not be changed until the first word is
completely sent.
WKUSB will send data back to the host for processing. There are four reasons this will happen:
1) lnform the host of a WKUSB status change.
2) Inform the host of a speed pot or pushbutton change.
3) Respond to a request for status from the host.
4) Echo Morse as it’s being sent by message or by paddles.
160
byte
FIFO
Input
Parser
USB Serial
Input
Command
Bypass
to input processing
Morse &
Buffered
Commands
Host
PC
WKmini
Commands
& Data
Keyboard
KEY1
Test LED
Keyer Paddle
Display
USB
USB
PTT1/KEY2
AUX
PDL
OUT

K1EL WKUSB with WinKeyer3 User Manual WKUSB
WKUSB User Manual 12/20/2017 Rev 1.0 Page 13
Paddle Input Priority
WKUSB accepts input from either host port or paddle. Paddle input will always take priority and
will interrupt host data, automatically clearing WKUSB’s serial input buffer. When a paddle break-
in occurs, any additional serial data that arrives from the host will be processed, but will be
ignored unless it is an immediate command. After paddling ceases, WKUSB will pause for one
word space time before it resumes serial data transmission.
USB Sense
WKUSB is able to sense when the host PC it is connected to goes into standby and it will go into
standby as well. It will stay in this state until the PC comes out of standby. It then wakes up and
resumes. The caveat is that the host application must be able to properly handle standby and not
close any of its active serial ports. If the host app does not reliably handle standby then set the
PC’s settings so that it will not be allowed to time out and go into standby.
Serial Baud Rate
WK’s standard baud rate is 1200 baud with an alternate baud rate of 9600 selected by command.
This is all handled by the host application so there is no need or requirement to set the USB
port’s baud rate, stop bit, or parity settings. All of these things are configured automatically by the
host application when it opens WKUSB for use.
Reset WK3/Restore Factory Defaults
There are cases when a host app misbehaves and can corrupt WKUSB’s basic setup
parameters. We know of no app that does this but when under heavy use with RF floating around
unexpected things can happen, ESD is another issue that can cause this to happen. The easiest
way to restore WKUSB’s EEPROM settings is through WK3tools. Unplug WKUSB from the PC
and then plug it back in after 10 seconds. Start up WK3tools, set the com port and click WKtest to
be sure it can connect. Then simply click Reset to Defaults followed by WriteWK.
ASCII Code Assignments, Prosign Mapping
WKUSB maps several unused ASCII codes to standard prosigns as shown in the table below.
Some abbreviations are not mapped (null), WKUSB will ignore these. Codes below 0x20 are
commands, 0x30 to 0x39 are numerals 0-9, 0x41 to 0x5A are letters A-Z. All codes above 0x5D
are ignored except for | (0x7c) which is the ½ dit pad code.
ASCII Hex Prosign ASCII Hex Prosign
0x20 Is space . 0x2E Is period
! 0x21 Is mapped to (null) / 0x2F Is mapped to DN
“ 0x22 Is mapped to RR : 0x3A Is mapped to KN
# 0x23 Is mapped to (null) ; 0x3B Is mapped to AA
$ 0x24 Is mapped to SX < 0x3C Is mapped to AR
% 0x25 Is mapped to (null) = 0x3D Is mapped to BT
& 0x26 Is mapped to (null) > 0x3E Is mapped to SK
‘ 0x27 Is mapped to WG ? 0x3F Is question
( 0x28 Is mapped to KN @ 0x40 Is mapped to AC
) 0x29 Is mapped to KK [ 0x5B Is mapped to AS
* 0x2A Is mapped to (null) \ 0x5C Is mapped to DN
+ 0x2B Is mapped to AR ] 0x5D Is mapped to KN
, 0x2C Is comma | 0x7C Is ½ dit pad
- 0x2D Is mapped to DU

K1EL WKUSB with WinKeyer3 User Manual WKUSB
WKUSB User Manual 12/20/2017 Rev 1.0 Page 14
N1MM Interfacing
You will first need to know your WKUSB’s comport assignment, if you don’t know it, follow the
WKscan Tutorial on page 4.
Now start up N1MM+ and click on the Config Tab and then select the entry as shown:
This brings up the Configurer dialog box. This is where devices attached to N1MM+ are set up.
For this example we will set up a WinKeyer device on COM2.
1) Select COM2 from the drop down box.
2) Specify that it is a CW device by clicking the CW/Other checkbox
3) Continue on to the Com Port setup dialog box by clicking Set

K1EL WKUSB with WinKeyer3 User Manual WKUSB
WKUSB User Manual 12/20/2017 Rev 1.0 Page 15
Clicking Set brings up the Com2 configuration dialog box. All we need to do here is click the
WinKey checkbox, leave all the other settings as is.
Now click OK to close the Com2 configuration dialog box which brings us back the Configurer
dialog box. Here we select the Winkey tab as illustrated below:
Clicking on the Winkey tab brings up the WinKeyer specific configuration dialog box which is
shown on the next page.

K1EL WKUSB with WinKeyer3 User Manual WKUSB
WKUSB User Manual 12/20/2017 Rev 1.0 Page 16
There are very descriptive hints on most of the controls.
Winkey 2 options also apply to WK3 based keyers.
Disable Paddle Only Sidetone for initial testing purposes.
Winkey Speed Control has three options:
1) Ignore Speed Pot which only allows the host to control sending speed
2) Use Speed Pot which tells the host that the speed pot will set sending speed
3) Paddle & Keyboard where the host controls only the message speed
Lead and tail settings apply to PTT delay Keying compensation adjusts dit and dah spacing
relative to sending speed.
Hang Time is similar to PTT tail except that it is proportional to sending speed.
When you are finished, click OK and then another OK to close the Configurer. Now that we are
back to N1MM+ main control dialog box we can do some WKUSB testing. First off select CW
mode by clicking on a band in the CW column:

K1EL WKUSB with WinKeyer3 User Manual WKUSB
WKUSB User Manual 12/20/2017 Rev 1.0 Page 17
Now on the PC's keyboard enter CTL-T to put WKUSB into tune mode. Cancel tune mode by
entering CTL-T a second time. With tune enabled you should hear sidetone coming from
WKUSB. Now either enter CTL-K or select the CW Key Window as shown:

K1EL WKUSB with WinKeyer3 User Manual WKUSB
WKUSB User Manual 12/20/2017 Rev 1.0 Page 18
The CW keyboard window is now displayed and you can type into it to send letters to WKUSB.
Note that when the Send CW window is up, the main N1MM+ dialog box is disabled. For a final
test, turn the speed pot and you should see the CW Speed display in the main N1MM+ dialog box
change. (This assumes that the speed pot has been enabled in the Winkey configuration dialog
box)
That's it for basic N1MM+ and WKUSB testing. Now it's time to learn all the amazing features in
N1MM+ for setting up messages and getting up to speed with automatic CW contest exchanges.

K1EL WKUSB with WinKeyer3 User Manual WKUSB
WKUSB User Manual 12/20/2017 Rev 1.0 Page 19
HRD Interface Guide
You will first need to know your WKUSB’s comport assignment, if you don’t know it, follow the
WKscan Tutorial on page 4. Be sure to close WKscan and keep WKUSB plugged in.
Start HRD and click on the DM780 icon in the upper left corner of the application. If it’s not visible,
you may have to enable program view as show on the left. (View->Program)
DM780 takes a few moments to start up, once it does, select CW mode from the mode list and
then from the CW tab, select CW(Winkey):

K1EL WKUSB with WinKeyer3 User Manual WKUSB
WKUSB User Manual 12/20/2017 Rev 1.0 Page 20
This brings up the Winkeyer dialog box which has multiple tabs with many configuration choices.
We will start with the Keyer Tab where we set WK’s com port, and then click Connect.
Now Connect changes to Connected and items in the dialog box are no longer grayed out. If you
click Auto-connect, DM780 will re-connect to Winkeyer automatically on startup.
A slider allows you to change WinKeyer speed
while you are in this dialog box for testing.
Keyer mode displays a choice of paddle input
options. Iambic B is the most often used so that
is the default. If you select Ultimatic, three
different variants for this mode are enabled
Autospace applies to paddle input only while
contest spacing applies to message sending.
When contest spacing is on, wordspaces are
reduced to 6 dit times vs. standard 7 dit times.
Select paddle echoback and paddle entry will
be displayed in with message sending. When
paddle watchdog is on, transmit is disabled
after 128 consecutive dits or dahs.
Paddle swap allows you to select dits on the
right paddle instead of left.
Serial loopback must be on in order for DM780
to keep track of outgoing Morse.
If you click on Test, a canned message will be
sent with status displayed.
This manual suits for next models
1
Table of contents
Popular Receiver manuals by other brands

Sony
Sony ICF-SW1005 Operating lnstructions

Erone
Erone SEL2641 433 Z1 quick start guide

Williams Sound
Williams Sound Hearing Helper PFM 350 RCH Specifications

Pioneer
Pioneer Elite VSX-43TX operating instructions

Samsung
Samsung SWA-5000 user manual

Flying Industry Development
Flying Industry Development S2UW-DC-ANT3 user manual