Kadeka KADT17S User manual

Kadeka The Toaster KADT17S Instruction Manual
Specifications
Thank you for your purchase.
Please read all the instructions
in this manual carefully before
the use of the product.
Safety Precautions
General Safety Guideline
Product Description
Operating Instruction
Preparing Water Tank
Auto Cooking Mode
Manual Cooking
Storage and Care
Trouble Shooting Guide
Limited Warranty
P2
P3
P4
P6
P7
P8
P9
P10
P11
P12
Table of Content
Model Number
Voltage
Power Consumption
Cord Length
Packing Dimension
Product Dimension
Weight
Temperature
Accessories
KADT17S
220-240V~ / 50-60Hz
1460W – 1740W
Approximately 1.0m
46cm (W) x 45cm (D) x 33cm (H)
40cm (W) x 41cm (D) x 26cm (H)
6.7kg
60°C to 230°C
1 x Crumb Tray, 1 x Bake Tray, 1 x Bake Grill

Important Safety Precautions
IMPORTANT SAFETY INSTRUCTIONS - READ CAREFULLY AND
KEEP FOR FUTURE REFERENCE
Do not immerse the appliance, power supply cord or plug in
water or any other liquid to protect against electric shock
If the power supply cord or plug is damaged, the appliance
must not be operated until it has been repaired by a
competent person
Do not put foreign objects into the appliance. It may cause
electric shock or abnormal operations resulting in injury
Only allow children to use the toaster without supervision
when adequate instructions have been given so that the
child is able to use the toaster in a safe way and
understands the hazards of improper use
Do not let the cord touch hot surfaces, be near hot gas or
electric burners or be in a heated toaster
Do not use any accessories other than the accompany
ones provided within the packaging
Do not use for any other purposes apart from cooking
Do not touch hot surfaces. Always use the knobs and
handles
Do not use outdoors
Do not insert any oversized food or metal utensils as they
may create a fire or risk of electric shock
Do not store any item on the top of the appliance when in
operation
Do not clean with metal scouring pads as it can break off
and get in contact with electrical parts thereby creating a
risk of electric shock
Do not use containers that are made of materials other
than metal or glass
Do not cover any part of the toaster with metal foil as it may
cause overheating
Do not store any materials other than the accompany
accessories in the appliance when not in use.

1. To read the instruction manual before using the appliance
2. All warnings and cautions on the appliance and in the instruction
manual must be followed
3. The appliance should not be used near water for example, near a sink,
bathtub, swimming pool, etc.
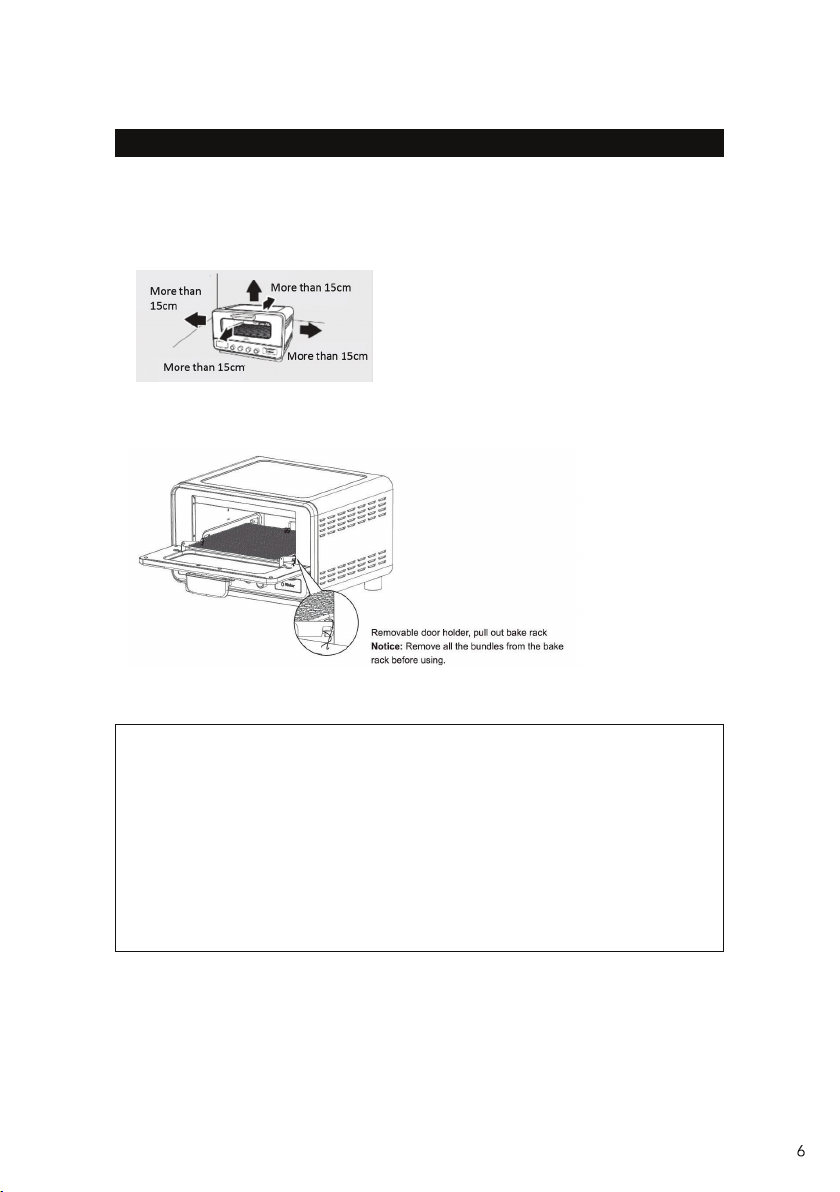
4. The appliance should be situated such that its location does not
interfere with its ventilation.
5. The appliance should be situated away from heat sources such as
stoves, radiators or other equipment that produces heat.
6. The appliance should be connected to a power supply only of the type
that is described in the instruction manual.
7. Precautions must be taken to ensure that grounding of the appliance is
not compromised.
8. Power supply cords should be routed such that they are not likely to be
walked on or tangled by items placed upon or against them.
9. The appliance should be cleaned as per instructed in the manual
10. The power supply cord should be unplugged from the outlet when left
unused for a long period of time
11. Care should be taken to ensure that foreign objects or liquids are not
spilled into the openings of the appliance
12. The appliance should be serviced by a competent person when:
a. The power supply cord or plug has been damaged
b. Foreign objects or liquid have entered into the equipment
c. The appliance has been exposed to rain
d. The appliance exhibits a marked change in performance
e. The appliance has been dropped or damaged
13. There should be no attempts to service the equipment beyond that
described in the manual. All servicing should be performed by a
competent person.
General Safety Guidelines

Product Description
1
2
45678
9
3
8
10 11
Crumb Tray
Bake Grill
Door Handle
Glass Door
Digital Display
Function Control Knob
Temperature Control Knob
Timer Knob
Humidifier Function Knob
Crumb Tray
Water Tank
Bake Grill
Bake Tray
1
2
3
4
5
6
7
8
9
10
11
• Place the bake tray on the bake grill before use. Do
not place the bake tray directly on the heating element.
• To clean the crumb tray if it is dirty before use

Product Description
The Accompany Accessories
The Electronic Control Panel
Bake Tray
Bake Grill
Crumb Tray
• Use it by placing it on the grill
• You may consider laying an aluminum foil over it
during cooking to prevent it from being dirty easily
• To be installed at all times except during
servicing or maintenance
• To ensure that it has been installed before use
of the appliance
Power Button: Press the
button to turn on and off.
Menu Knob: You can
select the different options
by turning the knob
Start/Stop
Button/Manual
Functions:
You can start/stop
by pressing the
button or rotate it
to select the
manual functions
Timer Button: Adjust the
time by rotating the knob
Water Tank
Temperature Button:
Adjust the temperature
between 60°C to 230°C
by rotating the knob

Preparation before use
1. Place the appliance on a stable and horizontal table with proper
clearance distances as shown below
2. Insert the crumb tray
3. Remove the fasteners from the bake grill
4. Plug the power supply cord into an electrical outlet
Operating Instructions
When using for the first time, take note of the following
• Remove the accompanying accessories and clean them.
Thoroughly dry them before re-assembling back into the toaster
• After re-assembling, we recommend that you turn it to the maximum
temperature for 15 minutes to eliminate any packing oil
• Ensure that the knobs are in the original position before
putting any food in
• The heating element will turn red as the temperature goes up. In
order to prevent over-cooking, you may like to stay beside the toaster

1. Pull out the water tank, remove the lid and fill it up with water to the
maximum line before cooking
2. After cooking, pull out the water tank, remove the lid and discard the
water and wash the water tank for hygiene purposes. Allow it to dry
sufficiently before inserting it back.
Preparing the Water Tank
• During use of the humidifier function, if there is a lack
of water, an indicator will flash and alarm will sound.
If there is insufficient water, the humidifier function will
stop. In order to rectify it, pull out the water tank and
refill it. Kindly press the “Start/Stop” knob to restart
the appliance.
• Do not put more water than the MAX line
• Do not put too little water as if might not be sufficient for
the operation of the humidifier function. It is recommended
to fill it up to the MAX line every time before use.
• Do not put anything other than water into the water tank
as it may cause a malfunction
• Do not move the appliance after adding the water as it
may cause a malfunction.
Fill water into the water tank before
using the humidifying function.
(Purified water is recommended) The maximum water volume is 42ml.

How to operate the Auto Cooking Mode
1. Press the power button to turn on the power of the appliance
2. Turn the knob to select a menu. The temperature and time are
configured automatically based on the selection of the menu
3. Press the Start/Stop button to activate the cooking
4. Once the cooking has completed, an “End” will be displayed on the
electronic control panel
5. After cooking, take out the cooked food. Be mindful that it will be
hot so do consider the use of toaster gloves to prevent any
occurrence of burns.
*Allow the toaster to cool down with door opened for at least 10:00 mins
between each toasting session
Auto Cooking Mode
Auto Cooking Menu
Menu
Toast (2 Slices)
Toast (4 Slices)
Reheat
Pizza
Frozen Snacks
Onigiri
Baked Rice
Grill
Cookies
Cake
Humidifier
Yes
Yes
Yes
Temperature
230°C
230°C
200°C
230°C
230°C
230°C
200°C
230°C
180°C
160°C
Time
4:00 mins
5:00 mins
8:00 mins
8:00 mins
10:00 mins
7:30 mins
20:00 mins
10:00 mins
10:00 mins
20:00 mins

1. Press the power button to turn on the power and set the temperature.
Set the temperature by turning the knob. The temperature can be set
from 60°C to 230°C
2. Set the cooking time by turning the time setting knob. The time can
be set between 1 minute to a maximum of 1 hour
3. Turn the convection/humidifier knob to select your preferred manual
cooking mode
4. Once the cooking has completed, an “End” will be displayed on the
electronic control panel
5. After cooking, take out the cooked food. Be mindful that it will be hot
so do consider the use of toaster gloves to prevent any occurrence
of burns.
Manual Cooking
Manual Cooking Settings
Setting Convection Humidifier Usage
Convection off/Humidifier off
Direct heating by using the
upper and lower heating
elements
Convection on/Humidifier on
Moisture will be added to
make the dish juicy
Convection off/Humidifier on
Allows you to make soft
adjustments to your cooking
using humidifier
Convection on/Humidifier off
Using convection allows
even baking which is
suitable for confectionary,
crispy items, etc
X X
O O
X O
O X

IMPORTANT: Before cleaning any part, be sure that the appliance is
off, unplugged and cool. Always dry parts thoroughly before using
toaster after cleaning.
1. Clean the outside of the appliance with a damp cloth and dry
thoroughly. A non-abrasive liquid may be used for stubborn stains.
Rinse and dry thoroughly. Do not use metal scouring pads or
abrasive cleaners that will scratch the surface.
2. Clean the Glass Door with a cloth or sponge dampened with warm
water. Dry thoroughly.
3. Remove the Bake Grill, Bake Tray & Crumb Tray. Wash in soapy
water and dry thoroughly.
4. Do not use abrasive cleaners or metal scouring pads to clean the
Back Rack, Bake Tray & Crumb Tray. For stubborn stains, clean
with a nylon or polyester mesh pad and a mild, non-abrasive
cleaner. Rinse and dry thoroughly.
CAUTION: Do not use spray-on or other toaster cleaners as they may
cause electrical damage.
Storage and Care
Cleaning
1. Unplug appliance and allow it to cool before storing.
2. Do not store it while it is hot or still plugged in.
3. Do not wrap the power supply cord tightly around the appliance.
4. Do not put any stress on the power supply cord as it
may cause damage.
Storage

Trouble-shooting Guide
The following situations are normal and are not signs that the appliance
is malfunctioning.
Issue
1. Display Nothing appears on the
display
(A) Turn the dial
(B) Check power plug
is connected
(C) Check fuse or
circuit breaker is
functioning properly.
Water is being
pumped to the steam
generator. This is
normal.
This will eventually
disappear.
This is not a
malfunction and is
normal.
This is normal.
Noise when using the
humidifying function
When using the toaster
for the first time, there
may be smell.
It is the sound of the
heater regulating the
internal temperature.
Steam from the boiler
or moisture in the food
may come out of the
door during cooking.
2. Noise / Sound
3. Smoke / Odour
4. Clicking noise
caused by the heater
turning on and off
during cooking.
5. Steam comes out
of the door
Possible Cause(s) Remedy

Limited Warranty
Kadeka will charge a repair fee or fee for replacing an accessory or repairing
a cosmetic defect if the damage to the unit or accessory was caused by the
customer. Items this stipulation covers include:
• Door, handles, or control panel that are dented, scratched or broken
• Broken or missing accessories that accompany the appliance.
Use this toaster only for its intended purposes described in this instruction
manual. Warnings and important safety instructions in this manual do not
cover all possible conditions and situations may occur. It is your responsibility
to use common sense, caution, and care when installing, maintaining, and
operating your toaster.
Use this appliance only for cooking food. It is intended for domestic use only.
Do not heat any textile or cushions filled with grains. The manufacturer
cannot be held liable for damage caused by improper or incorrect use of the
appliance. To avoid deterioration of the appliance surface and hazardous
situation, always keep the appliance clean and well-maintained.
Table of contents