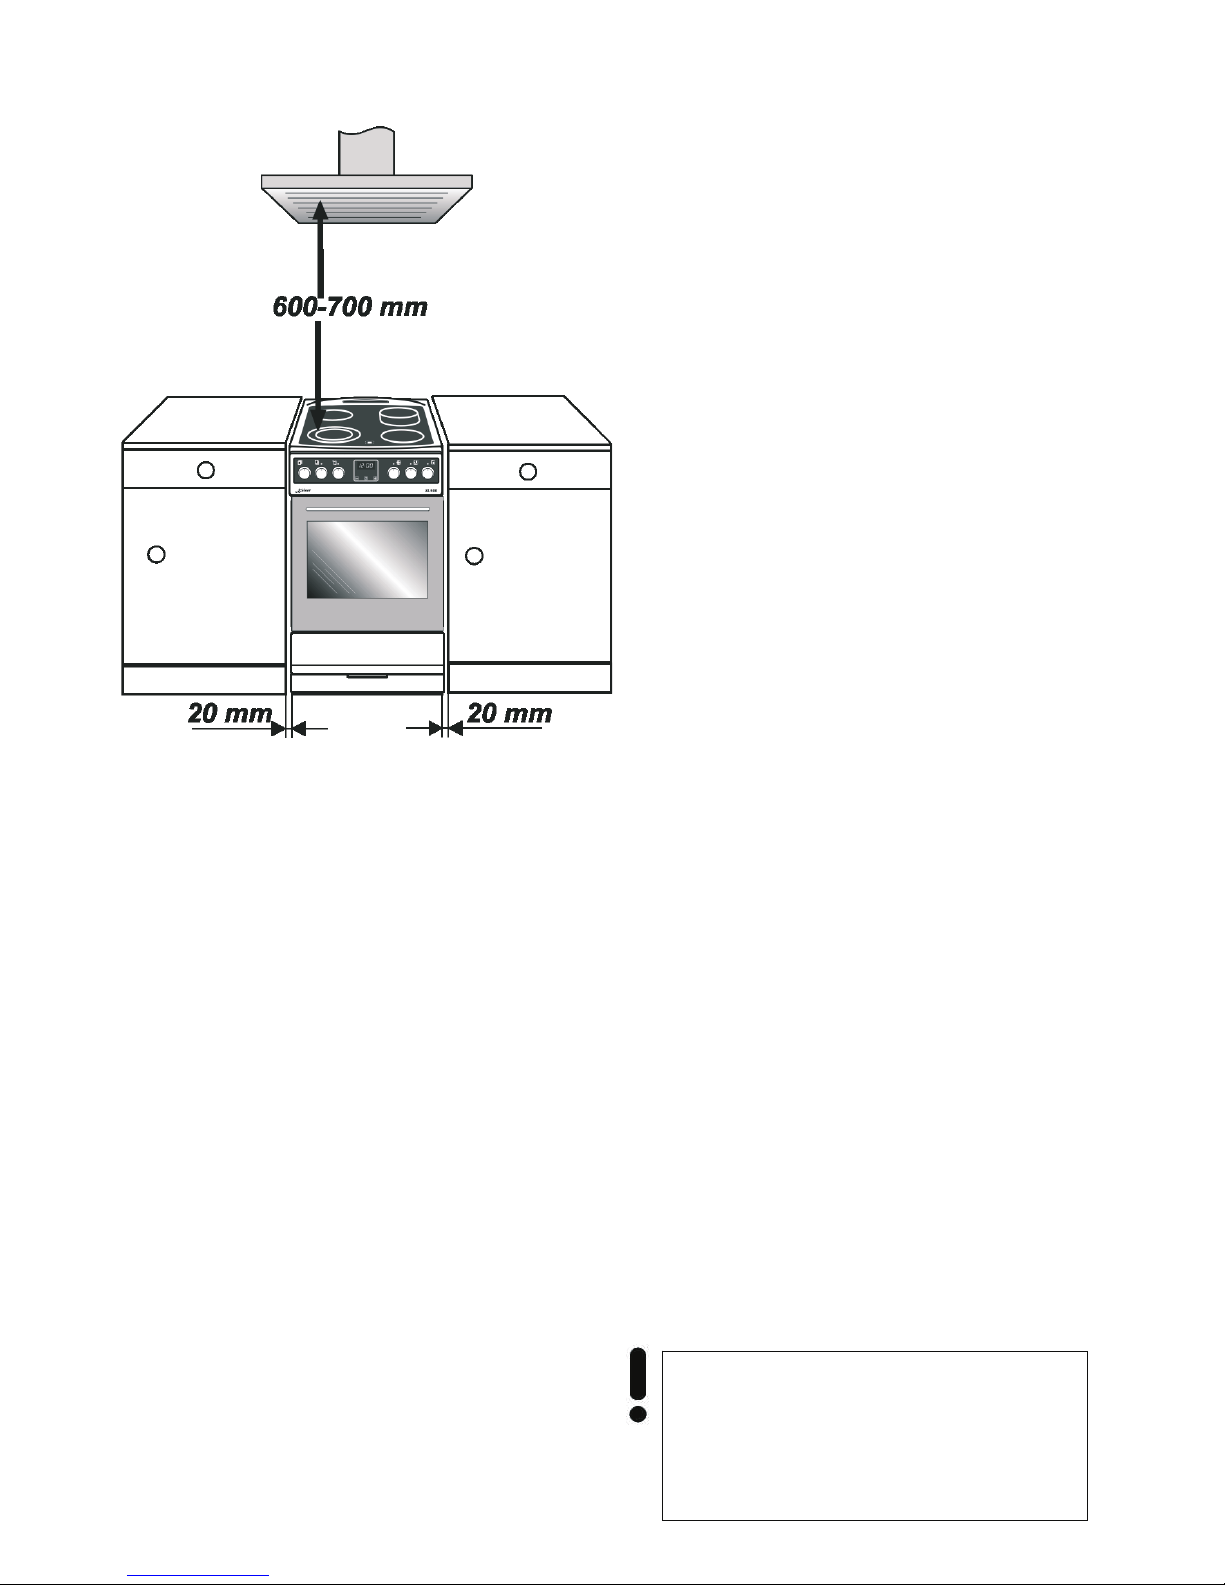
Kaiser HC 5 Series User manual

USER MANUAL
GEBRAUCHSANWEISUNG
ИНСТРУКЦИЯ ПО ОБСЛУЖИВАНИЮ И ЭКСПЛУАТАЦИИ
EN
DE
RU
HC 5..
HE 5..
ELEKTRIC COOKER
ELEKTROHERD
ЭЛЕКТРИЧЕСКАЯ ПЛИТА

2
EN
DEAR CUSTOMER,
thank you for purchasing this Kaiser product.
We are convinced that you have made the right choice.
The appliance satisfies the high quality demands and
corresponds to comprehensive international standards.
Having been designed by the best European designers,
the modern appearance of the cooker is sure to be a
splendid interior decoration of your kitchen.
The cooker is intended to realize even your most
complicated cookery projects.
Please read these instructions carefully before starting
operation to be sure to obtain optimum performance.
The following recommendations are aimed to protect
you from possible inconveniences which can occur as a
result of the wrong operation and, at the same time,
reduce the consumption of electric energy. Proper
operation and maintenance provide a longer service life
of the unit and make cooking a pleasure.
The Kaiser cookers fulfill the main norms of safety,
hygiene and environment protection in correspondence
with the EU directives and are certified according to EU
norms and standards (DIN ISO 9001, ISO 1400),
standards of Russia (Gosstandart) and the CIS.
The company’s policy is aimed at constant improvement
of product quality. Modifications made to the design and
equipment result in exclusively positive changes in
operating qualities of the appliances. The right for
changes in the products is reserved by the manufacturer.
We wish you an effective use of the Kaiser product.
Yours faithfully,
OLAN-Haushaltsgeräte
Berlin Germany
The appliances under present operating instructions are designed for
domestic and not industrial use.

3
DE RU
LIEBE KUNDIN, LIEBER KUNDE,
wir danken Ihnen für den Erwerb unserer Technik.
Wir sind überzeugt, dass Sie eine richtige Wahl
getroffen haben. Dieses Produkt entspricht den hohen
Forderungen zur Qualität und den modernsten
internationalen Standards. Das Gerät wird Ihnen Ihre
Kochprojekte ermöglichen, während sein modernes
Aussehen, das von den besten europäischen Designern
entwickelt worden ist, zum Prachtstück Ihrer Küche
wird.
Bitte lesen Sie die Bedienungsanleitung vor Gebrauch
aufmerksam durch. Die Beachtung von Empfehlungen
schützt Sie von eventuellen Unannehmlichkeiten, die als
Folge der falschen Nutzung des Herdes auftreten
können sowie ermöglicht Ihnen den Stromverbrauch zu
reduzieren. Der Herd bringt Ihnen viel Vergnügen auf
lange Zeit, wenn der Gebrauch der vorliegenden
Bedienungsanleitung entsprechen wird.
Unsere Herde entsprechen den Hauptforderungen der
Sicherheit, der Hygiene und des Umweltschutzes, laut
den Direktiven der EU, was mit Zertifikaten DIN ISO
9001, ISO 1400, entsprechend den im Rahmen der EU
geltenden Normen, bestätigt ist, und genauso auch den
Anforderungen von Gosstandart in Russland und
Standards anderer GUS Ländern, was durch die
Identifikationszertifikate bestätigt ist.
Mit den Gedanken der ständigen Verbesserung der
Qualität unserer Herde sind Änderungen bei Design
und Einrichtung, die nur zu positiven Veränderungen
der technischen Eigenschaften führen, vom Hersteller
vorbehalten.
Wir wünschen Ihnen die effektive Nutzung unseres
Produkts.
Hochachtungsvoll
OLAN-Haushaltsgeräte
Berlin Germany
Wir Informieren Sie, dass unsere Herde, die der Gegenstand der
vorliegenden Bedienungsanleitung sind, sind ausschließlich für den
häuslichen Gebrauch vorbestimmt.
ɍȼȺɀȺȿɆɕɃ ɉɈɄɍɉȺɌȿɅɖ,
ɛɥɚɝɨɞɚɪɢɦ ȼɚɫ ɡɚ ɩɪɢɨɛɪɟɬɟɧɢɟ ɧɚɲɟɣ ɬɟɯɧɢɤɢ.
Ɇɵ ɭɜɟɪɟɧɵ, ɱɬɨ ȼɵ ɫɞɟɥɚɥɢ ɩɪɚɜɢɥɶɧɵɣ ɜɵɛɨɪ.
Ⱦɚɧɧɵɣ ɩɪɨɞɭɤɬ, ɭɞɨɜɥɟɬɜɨɪɹɸɳɢɣ ɫɚɦɵɦ ɜɵɫɨɤɢɦ
ɬɪɟɛɨɜɚɧɢɹɦ ɢɨɬɜɟɱɚɸɳɢɣ ɦɢɪɨɜɵɦ ɫɬɚɧɞɚɪɬɚɦ,
ɩɨɡɜɨɥɢɬ ȼɚɦ ɥɟɝɤɨ ɜɨɩɥɨɬɢɬɶ ɜɫɟ ȼɚɲɢ
ɤɭɥɢɧɚɪɧɵɟ ɫɩɨɫɨɛɧɨɫɬɢ, ɚɟɝɨ ɫɨɜɪɟɦɟɧɧɵɣ ɜɢɞ,
ɪɚɡɪɚɛɨɬɚɧɧɵɣ ɥɭɱɲɢɦɢ ɟɜɪɨɩɟɣɫɤɢɦɢ
ɞɢɡɚɣɧɟɪɚɦɢ, ɜɟɥɢɤɨɥɟɩɧɨ ɭɤɪɚɫɢɬ ȼɚɲɭ ɤɭɯɧɸ.
ɪɨɫɢɦ ȼɚɫ ɜɧɢɦɚɬɟɥɶɧɨ ɩɪɨɱɢɬɚɬɶ ɢɧɫɬɪɭɤɰɢɸ
ɩɨ ɨɛɫɥɭɠɢɜɚɧɢɸ ɢɷɤɫɩɥɭɚɬɚɰɢɢ ɞɨ ɩɭɫɤɚ
ɭɫɬɪɨɣɫɬɜɚ. ɋɨɛɥɸɞɟɧɢɟ ɫɨɞɟɪɠɚɳɢɯɫɹ ɜɧɟɣ
ɪɟɤɨɦɟɧɞɚɰɢɣ ɡɚɳɢɬɢɬ ȼɚɫ ɨɬ ɜɨɡɦɨɠɧɵɯ
ɧɟɩɪɢɹɬɧɨɫɬɟɣ ɩɪɢ ɧɟɩɪɚɜɢɥɶɧɨɣ ɷɤɫɩɥɭɚɬɚɰɢɢ
ɩɥɢɬɵ, ɚɬɚɤɠɟ ɩɨɡɜɨɥɢɬ ȼɚɦ ɭɦɟɧɶɲɢɬɶ ɪɚɫɯɨɞ
ɷɥɟɤɬɪɨɷɧɟɪɝɢɢ. ȿɫɥɢ ɷɤɫɩɥɭɚɬɚɰɢɹ ɩɥɢɬɵ ɛɭɞɟɬ
ɫɨɨɬɜɟɬɫɬɜɨɜɚɬɶ ɧɚɫɬɨɹɳɟɣ ɢɧɫɬɪɭɤɰɢɢ, ɧɚɲɚ
ɩɥɢɬɚ ɛɭɞɟɬ ɪɚɞɨɜɚɬɶ ȼɚɫ ɞɨɥɝɨɟ ɜɪɟɦɹ.
ɇɚɲɢ ɩɥɢɬɵ ɩɨɥɧɨɫɬɶɸ ɫɨɨɬɜɟɬɫɬɜɭɟɬ ɨɫɧɨɜɧɵɦ
ɬɪɟɛɨɜɚɧɢɹɦ ɛɟɡɨɩɚɫɧɨɫɬɢ, ɝɢɝɢɟɧɵ ɢɡɚɳɢɬɵ
ɨɤɪɭɠɚɸɳɟɣ ɫɪɟɞɵ, ɫɨɝɥɚɫɧɨ ɞɢɪɟɤɬɢɜɚɦ
ȿɜɪɨɩɟɣɫɤɨɝɨ ɋɨɸɡɚ, ɱɬɨ ɩɨɞɬɜɟɪɠɞɟɧɨ
ɫɟɪɬɢɮɢɤɚɬɚɦɢ DIN ISO 9001, ISO 1400, ɜ
ɫɨɨɬɜɟɬɫɬɜɢɢ ɫɧɚɫɬɨɹɳɢɦɢ ɧɨɪɦɚɦɢ,
ɞɟɣɫɬɜɭɸɳɢɦɢ ɧɚ ɬɟɪɪɢɬɨɪɢɢ ȿɜɪɨɩɟɣɫɤɨɝɨ
ɫɨɨɛɳɟɫɬɜɚ, a ɬɚɤɠɟ ɩɨɥɧɨɫɬɶɸ ɨɬɜɟɱɚɸɬ ɜɫɟɦ
ɬɪɟɛɨɜɚɧɢɹɦ Ƚɨɫɫɬɚɧɞɚɪɬɚ Ɋɨɫɫɢɢ ɢɫɬɚɧɞɚɪɬɨɜ
ɞɪɭɝɢɯ ɫɬɪɚɧ ɋɇȽ, ɱɬɨ ɩɨɞɬɜɟɪɠɞɚɟɬɫɹ
ɫɟɪɬɢɮɢɤɚɬɚɦɢ ɫɨɨɬɜɟɬɫɬɜɢɹ.
ɋɦɵɫɥɶɸ ɨɞɚɥɶɧɟɣɲɟɦ ɩɨɜɵɲɟɧɢɢ ɬɟɯɧɢɱɟɫɤɢɯ ɢ
ɷɤɫɩɥɭɚɬɚɰɢɨɧɧɵɯ ɯɚɪɚɤɬɟɪɢɫɬɢɤ ɧɚɲɢɯ ɩɥɢɬ ɦɵ
ɨɫɬɚɜɥɹɟɦ ɡɚ ɫɨɛɨɣ ɩɪɚɜɨ ɧɚ ɜɧɟɫɟɧɢɟ ɢɡɦɟɧɟɧɢɣ ɜ
ɞɢɡɚɣɧ ɢɭɫɬɪɨɣɫɬɜɨ, ɜɥɢɹɸɳɢɯ ɬɨɥɶɤɨ
ɩɨɥɨɠɢɬɟɥɶɧɨ ɧɚ ɩɨɬɪɟɛɢɬɟɥɶɫɤɢɟɤɚɱɟɫɬɜɚ ɢ
ɫɜɨɣɫɬɜɚ ɩɪɨɞɭɤɬɚ.
ɀɟɥɚɟɦ ȼɚɦ ɷɮɮɟɤɬɢɜɧɨɝɨ ɩɨɥɶɡɨɜɚɧɢɹ ɩɪɨɞɭɤɬɨɦ
ɧɚɲɟɣ ɮɢɪɦɵ.
ɍɜɚɠɚɸɳɢɣ ȼɚɫ
OLAN-Haushaltsgeräte
Berlin Germany
ɂɧɮɨɪɦɢɪɭɟɦ, ɱɬɨ ɧɚɲɢ ɩɥɢɬɵ, ɹɜɥɹɸɳɢɟɫɹ ɩɪɟɞɦɟɬɨɦ
ɧɚɫɬɨɹɳɟɣ ɂɧɫɬɪɭɤɰɢɢ, ɩɪɟɞɧɚɡɧɚɱɟɧɵ ɢɫɤɥɸɱɢɬɟɥɶɧɨ ɞɥɹ
ɞɨɦɚɲɧɟɝɨ ɩɨɥɶɡɨɜɚɧɢɹ.

4
EN
CONTENTS
INSTALLATION INSTRUCTIONS 6
Electrical connection 6
Installation 8
Preparation 8
BRIEF DESCRIPTION 10
Location drawing 10
Control panel 12
EQUIPMENT 14
Cooking zones and relevant
operating elements 14
Cooking zones control 16
Glass-ceramic cooking area 18
Multifunction oven control 20
Operation functions of the oven 22
The oven 28
Electronic programmable control
Touch control 30
PRACTICAL ADVICE 44
CLEANING AND SERVICING 52
ENVIROMENTAL COMPATIBILITY 62

5
DE RU
INHALTSVERZEICHNIS
MONTAGEANWEISUNG 7
Stromanschluss 7
Einbau des Herdes 9
Vorbereitung 9
KURZBESCHREIBUNG 11
Gesamtansicht 11
Bedienblende 13
AUSSTATUNG 15
Kochfeld mit entsprechenden
Bedienelementen 15
Kochfeldersteuerung 17
Gebrauch vom Glaskeramikkochfeld 19
Steuerung von Multifunktionsbackofen 21
Betriebsfunktion des Backofens 23
Gebrauch vom Backofen 29
Elektronische Programmierung
Touch control 31
PRAKTISCHE EMPFEHLUNGEN 45
PFLEGE UND WARTUNG 53
UMWELTVERTRÄGLICHKEIT 63
ɈȽɅȺȼɅȿɇɂȿ
ɂɇɋɌɊɍɄɐɂə ɉɈ ɆɈɇɌȺɀɍ 7
ɉɨɞɤɥɸɱɟɧɢɟ ɤɷɥɟɤɬɪɨɫɟɬɢ 7
ɍɫɬɚɧɨɜɤɚ 9
ɉɨɞɝɨɬɨɜɤɚ 9
ɄɊȺɌɄɈȿ ɈɉɂɋȺɇɂȿ 11
ȼɧɟɲɧɢɣ ɜɢɞ 11
ɉɚɧɟɥɶ ɭɩɪɚɜɥɟɧɢɹ 13
ɈȻɈɊɍȾɈȼȺɇɂȿ 15
ɇɚɝɪɟɜɚɬɟɥɶɧɚɹ ɩɨɜɟɪɯɧɨɫɬɶ ɫɷɥɟɦɟɧɬɚɦɢ
ɭɩɪɚɜɥɟɧɢɹ 15
ɍɩɪɚɜɥɟɧɢɟ ɪɚɛɨɬɨɣ ɧɚɝɪɟɜɚɬɟɥɶɧɵɯ
ɩɨɥɟɣ 17
ɉɨɥɶ ɨɜɚɧɢɟ ɤɟɪɚɦɢɱɟɫɤɨɣ
ɩɨɜɟɪɯɧɨɫɬɶɸ 19
ɍɩɪɚɜɥɟɧɢɟ ɪɚɛɨɬɨɣ ɦɧɨɝɨɮɭɧɤɰɢɨɧɚɥɶɧɨɝɨ
ɞɭɯɨɜɨɝɨ ɲɤɚɮɚ 21
Ɋɚɛɨɱɢɟ ɮɭɧɤɰɢɢ ɞɭɯɨɜɨɝɨ ɲɤɚɮɚ 23
ɉɨɥɶ ɨɜɚɧɢɟ ɞɭɯɨɜɵɦ ɲɤɚɮɨɦ 29
ɗɥɟɤɬɪɨɧɧɨɟ ɩɪɨɝɪɚɦɦɢɪɭɸɳɟɟ ɭɫɬɪɨɣɫɬɜɨ
Touch control 31
ɉɊȺɄɌɂɑȿɋɄɂȿ ɋɈȼȿɌɕ 45
ɈȻɋɅɍɀɂȼȺɇɂȿ ɂɍɏɈȾ 53
ɈɏɊȺɇȺ ɈɄɊɍɀȺɘɓȿɃ ɋɊȿȾɕ 63

6
EN
INSTALLATION INSTRUCTIONS
ELECTRICAL CONNECTION
Before connecting the stove to the mains power
supply, make sure that:
xThe supply voltage corresponds to the
specifications on the data plate on the front
of the stove.
xThe mains supply has an efficient
grounding in compliance with all applicable
laws and regulations.
Correct grounding is a legal requirement. If the
appliance is not pre-fitted with a power cable
and/or plug, use only suitable cables and plugs
capable of handling the power specified on the
appliance's data plate and capable of resisting
heat. The power cable should never reach the
temperature 50°C at any point along its length.
If the appliance is to be connected directly to
mains terminals, fit a switch with minimum
aperture of 3 mm between the contacts. Make sure
that the switch is of sufficient capacity for the
power specified on the appliance's data plate, and
compliant with applicable regulations. The switch
must not break the yellow-green earth wire. The
outlet or switch must be easily accessible.
Attention! The manufacturer declines all
responsibility for damage or injury if the
above instructions and safety precautions
are not respected.

7
DE RU
MONTAGEANWEISUNG
STROMANSCHLUSS
Vor der Durchführung des Stromanschlusses muss
sichergestellt werden, dass:
xdie Eigenschaften des Stromnetzes mit den
Werten auf dem angebrachten Typenschild
auf der hinteren Wand des Herdes
übereinstimmen,
xdas Stromnetz gemäß den geltenden
Bestimmungen und Rechtsvorschriften
geerdet ist.
Die Erdung ist eine notwendige Voraussetzung der
Nutzung des Gerätes. Falls der Herd nicht mit
Kabel und\ oder Netzstecker ausgestattet ist, muss
geeignetes Material verwendet werden, das der auf
dem Typenschild auf der hinteren Wand des
Gerätes angegebenen Stromaufnahme und der
Betriebstemperatur entspricht. Das Kabel darf an
keiner Stelle keinesfalls eine Temperatur von über
50°C erreichen.
Wenn ein direkter Netzanschluss gewünscht wird,
muss ein allpoliger Schalter mit Kontaktöffnung von
min. 3mm vorgesehen werden, der erlaubt das
Gerät vom Netz zu trennen. Der Schalter muss
den technischen Daten der geltenden Vorschriften
entsprechen (das gelb-grüne Erdungskabel darf
nicht vom genannten Schalter unterbrochen
werden). Der Stecker bzw. der allpolige Schalter
müssen bei installiertem Gerät problemlos
zugänglich sein.
ɂɇɋɌɊɍɄɐɂə ɉɈ ɆɈɇɌȺɀɍ
ɉɈȾɄɅɘɑȿɇɂȿ ɄɗɅȿɄɌɊɈɋȿɌɂ
ɉɟɪɟɞ ɩɨɞɤɥɸɱɟɧɢɟɦ ɩɥɢɬɵ ɤɷɥ. ɫɟɬɢ,
ɧɟɨɛɯɨɞɢɦɨ ɭɛɟɞɢɬɶɫɹ, ɱɬɨ:
xɩɚɪɚɦɟɬɪɵ ɫɟɬɢ ɫɨɨɬɜɟɬɫɬɜɭɸɬ ɞɚɧɧɵɦ ɜ
ɬɚɛɥɢɱɤɟ ɧɚ ɚɞɧɟɣ ɫɬɟɧɤɟ ɩɥɢɬɵ,
xɷɥ. ɫɟɬɶ ɚ ɟɦɥɟɧɚ ɜɫɨɨɬɜɟɬɫɬɜɢɢ ɫ
ɞɟɣɫɬɜɭɸɳɢɦɢ ɩɪɟɞɩɢɫɚɧɢɹɦɢ.
Ɂɚ ɟɦɥɟɧɢɟ ɹɜɥɹɟɬɫɹ ɧɟɨɛɯɨɞɢɦɵɦ ɭɫɥɨɜɢɟɦ
ɩɪɚɜɢɥɶɧɨɣ ɷɤɫɩɥɭɚɬɚɰɢɢ. ȿɫɥɢ ɩɥɢɬɚ ɧɟ
ɨɛɨɪɭɞɨɜɚɧɚ ɤɚɛɟɥɟɦ ɢ/ɢɥɢ ɲɬɟɤɟɪɨɦ,
ɩɪɢɦɟɧɹɣɬɟ ɬɨɥɶɤɨ ɦɚɬɟɪɢɚɥɵ,
ɫɨɨɬɜɟɬɫɬɜɭɸɳɢɟ ɞɚɧɧɵɦ, ɭɤɚ ɚɧɧɵɦ ɜ
ɬɚɛɥɢɱɤɟ ɧɚ ɚɞɧɟɣ ɫɬɟɧɤɟ ɩɪɢɛɨɪɚ, ɤɨɬɨɪɵɟ
ɦɨɝɭɬ ɮɭɧɤɰɢɨɧɢɪɨɜɚɬɶ ɜɪɚɛɨɱɟɦ ɪɟɠɢɦɟ
ɬɟɦɩɟɪɚɬɭɪ. Ʉɚɛɟɥɶ ɧɢ ɜɤɨɟɦ ɫɥɭɱɚɟ ɧɟ
ɞɨɥɠɟɧ ɧɚɝɪɟɜɚɬɶɫɹ ɜɵɲɟ ɬɟɦɩɟɪɚɬɭɪɵ ɛɨɥɟɟ
50°ɋ.
ȼɫɥɭɱɚɟ ɩɨɞɫɨɟɞɢɧɟɧɢɹ ɧɟɩɨɫɪɟɞɫɬɜɟɧɧɨ ɤɷɥ.
ɫɟɬɢ, ɧɟɨɛɯɨɞɢɦɨ ɢɫɩɨɥɶ ɨɜɚɬɶ ɫɩɟɰɢɚɥɶɧɵɣ
ɚɜɬɨɦɚɬɢɱɟɫɤɢɣ ɜɵɤɥɸɱɚɬɟɥɶ ɫɚ ɨɪɨɦ ɦɟɠɞɭ
ɤɨɧɬɚɤɬɚɦɢ ɧɟ ɦɟɧɟɟ 3 ɦɦ, ɩɨ ɜɨɥɹɸɳɢɣ
ɨɬɫɨɟɞɢɧɹɬɶ ɩɪɢɛɨɪ ɨɬ ɫɟɬɢ, ɫɨɨɬɜɟɬɫɬɜɟɧɧɨ
ɬɟɯɧɢɱɟɫɤɢɦ ɞɚɧɧɵɦ ɞɟɣɫɬɜɭɸɳɢɯ
ɩɪɟɞɩɢɫɚɧɢɣ (ɠɟɥɬɨ - ɟɥɟɧɵɣ ɤɚɛɟɥɶ
ɚ ɟɦɥɟɧɢɹ ɧɟ ɞɨɥɠɟɧ ɩɪɟɪɵɜɚɬɶɫɹ ɞɚɧɧɵɦ
ɜɵɤɥɸɱɚɬɟɥɟɦ). ɒɬɟɤɟɪ ɢɥɢ ɚɜɬɨɦɚɬɢɱɟɫɤɢɣ
ɜɵɤɥɸɱɚɬɟɥɶ ɧɚ ɩɪɚɜɢɥɶɧɨ ɭɫɬɚɧɨɜɥɟɧɧɨɦ
ɩɪɢɛɨɪɟ ɞɨɥɠɟɧ ɛɵɬɶ ɜɫɟɝɞɚ ɥɟɝɤɨ ɞɨɫɹɝɚɟɦ.
ȼɧɢɦ ɧɢɟ! ɂ ɝɨɬɨɜɢɬɟɥɶ ɧɟ ɧɟɫɟɬ
ɧɢɤɚɤɨɣ ɨɬɜɟɬɫɬɜɟɧɧɨɫɬɢ, ɟɫɥɢ ɩɪɢ
ɭɫɬɚɧɨɜɤɟ ɩɪɢɛɨɪɚ ɧɟ ɫɨɛɥɸɞɚɸɬɫɹ ɜɫɟ
ɜɵɲɟɩɪɢɜɟɞɟɧɧɵɟ ɩɪɟɞɩɢɫɚɧɢɹ.
Achtung! Der Hersteller ist nicht haftbar,
wenn bei der Installation des Gerätes alle
obenangeführten Anweisungen nicht
befolgt werden.

8
EN
INSTALLATION
Before using your new appliance, make sure to fit
it properly. By fixing the adjustable feet in a proper
position, you can keep the upper surface strictly
horizontally and, thus, avoid backlash. For this
purpose, take out the drawer at the bottom.
The cooker is intended to be build up into kitchen
furniture, however, only up to the height of the
working plate, i.e. fixing up higher than 850 mm
from the floor level is unreasonable.
All materials used for furniture panels should be
heat resistant at the temperature 100°C minimum.
Breach of this regulation can result in distortion or
ungluing of panel coverings. To avoid heat
distortion of the furniture panels, ensure that the
space between the contact surfaces is not less
than 2 cm.
Please mount the fume extractor hood at about
600-700 mm above the cooking surface (see
installation instructions for your fume extractor
hood).
PREPARATION
Clean the oven thoroughly with soapy water and
rinse well. Fit schelf support side rails and place in
wire shelves and backing trays.
Operate the oven for about 30 minutes at
maximum temperature to burn off all traces of
grease which might otherwise create unpleasant
smells when cooking.
Important !!!
Safety precaution: before cleaning the oven,
disconnect the plug from the electrical outlet or the
power cable from the oven. Do not use acid or
alkaline substances to clean the oven (lemon juice,
vinegar, salt, tomatoes etc.). Do not use chlorine
based products, acids or abrasive products to
clean the painted surfaces of the oven.
Attention! Set the time on the clock before
you can use the oven.
(See chapter „Electronic programmable
control“).
If the time is not set, the oven cannot be
operated.

9
DE RU
EINBAU DES HERDES
Vor Gebrauch stellen Sie den Herd richtig auf,
durch Drehen von Stützfüßen erreichen Sie die
horizontale Lage der Oberfläche des Herdes. Dafür
nehmen Sie den unteren Kasten heraus.
Der Herd darf in die Reihe von Möbeln nur bis zu
der Höhe der Arbeitsoberfläche der Möbel, d.h.
850 mm vom Fußboden eingebaut werden. Einbau
über diese Höhe ist unzweckmäßig. Die
Küchenmöbel soll Verkleidung haben, die für die
Temperatur 100°ɋgeeignet ist. Die
Nichtübereinstimmung mit dieser Bedingung kann
zur Deformation der Oberfläche oder Lösung der
Verkleidung der Möbel bringen. Wenn Sie davon
nicht überzeugt sind, über welche thermische
Standhaftigkeit die Möbel verfügt, ist es notwendig,
den Herd in die Möbel so einzubauen, dass der
Abstand von 2 cm zwischen dem Herd und der
Möbel erhalten bleibt.
Der Abstand zwischen den Heizoberflächen des
Herdes und Abzugshaube soll voraussichtlich 600-
700 mm sein (siehe die Bedienungsanleitung für
Ihre Abzugshaube).
VORBEREITUNG
Vor dem ersten Gebrauch muss der Backofen
gründlich mit Seifenwasser gesäubert und
anschließend mit klarem Wasser abgewaschen
werden. Die mitgelieferten Einhängegitter auf die
Seitenwände einbauen und die Gitter und Bleche
aufstellen. Den Backofen für etwa 30 Minuten auf
Höchsttemperatur aufheizen, auf diese Weise
werden alle fetthaltigen Bearbeitungsrückstände
eliminiert, die beim ersten Backen unangenehme
Gerüche verursachen könnten.
Wichtig !!!
Als Sicherheitsvorkehrung muss vor jeder
Reinigung des Backofens immer das Stromnetz
abgeschaltet werden.
Zum Reinigen dürfen keine sauren oder
alkalischen Substanzen verwendet werden
(Zitronensaft, Essig, Salz, usw.). Chlorhaltige
Produkte (Bleichmittel u. s. w.) sind ebenfalls zu
vermeiden, dies gilt vor allem für die Reinigung der
emaillierten Oberflächen.
ɍɋɌȺɇɈȼɄȺ
Ⱦɨ ɧaɱaɥɚ ɩɨɥɶ oɜɚɧɢɹ ɩɪɚɜɢɥɶɧɨ ɭɫɬɚɧɨɜɢɬɟ
ɩɥɢɬɭ, ɜpaɳeɧɢeɦoɩɨpɧɵɯ ɧoɠeɤɞɨɛɟɣɬɟɫɶ
ɝɨɪɢ ɨɧɬɚɥɶɧɨɝɨ ɩɨɥɨɠɟɧɢɹ ɩɨɜɟɪɯɧɨɫɬɢ ɩɥɢɬɵ.
Ⱦɥɹ ɷɬɨɝɨ ɜɵɧɶɬɟ ɧɢɠɧɢɣ ɹɳɢɤ.
ɉɥɢɬɚ ɦɨɠɟɬ ɛɵɬɶ ɜɫɬɪɨɟɧɚ ɜɪɹɞ ɦɟɛɟɥɢ
ɬɨɥɶɤɨ ɞɨ ɜɵɫɨɬɵ ɪɚɛɨɱɟɣ ɩɨɜɟɪɯɧɨɫɬɢ ɦɟɛɟɥɢ,
ɬ.ɟ. 850 ɦɦ ɨɬ ɩɨɥɚ. Ɂɚɫɬɪɨɣɤɚ ɜɵɲɟ ɷɬɨɝɨ
ɭɪɨɜɧɹ ɧɟɰɟɥɟɫɨɨɛɪɚ ɧɚ. Ɇɟɛɟɥɶ ɞɥɹ
ɚɫɬɪɨɣɤɢ ɞɨɥɠɧɚ ɢɦɟɬɶ ɨɛɥɢɰɨɜɤɭ
ɜɵɞɟɪɠɢɜɚɸɳɭɸ ɬɟɦɩɟɪɚɬɭɪɭ 100°ɋ.
ɇɟɫɨɨɬɜɟɬɫɬɜɢɟ ɷɬɨɦɭ ɭɫɥɨɜɢɸ ɦɨɠɟɬ ɩɪɢɜɟɫɬɢ
ɤɞɟɮɨɪɦɚɰɢɢ ɩɨɜɟɪɯɧɨɫɬɢ ɢɥɢ ɨɬɤɥɟɢɜɚɧɢɸ
ɨɛɥɢɰɨɜɤɢ ɦɟɛɟɥɢ. ȿɫɥɢ ȼɵ ɧɟ ɭɜɟɪɟɧɵ ɜɬɨɦ,
ɤɚɤɨɣ ɬɟɩɥɨɜɨɣ ɫɬɨɣɤɨɫɬɶɸ ɨɛɥɚɞɚɟɬ ɦɟɛɟɥɶ,
ɩɥɢɬɭ ɫɥɟɞɭɟɬ ɜɫɬɪɨɢɬɶɜɦɟɛɟɥɶ ɫɨɯɪɚɧɹɹ ɩɪɢ
ɷɬɨɦ ɪɚɫɫɬɨɹɧɢɟ ɨɤɨɥɨ 2 ɫɦ.
Ɋɚɫɫɬɨɹɧɢɟ ɦɟɠɞɭ ɧɚɝɪɟɜɚɬɟɥɶɧɵɦɢ
ɩɨɜɟɪɯɧɨɫɬɹɦɢ ɩɥɢɬɵ ɢɜɵɬɹɠɧɵɦ ɭɫɬɪɨɣɫɬɜɨɦ
ɞɨɥɠɧɨ ɛɵɬɶ ɨɪɢɟɧɬɢɪɨɜɨɱɧɨ 600-700 ɦɦ
(ɫɦɨɬɪɢɬɟ ɢɧɫɬɪɭɤɰɢɸ ɤȼɚɲɟɦɭ ɜɵɬɹɠɧɨɦɭ
ɭɫɬɪɨɣɫɬɜɭ).
ɉɈȾȽɈɌɈȼɄȺ
ɉɟɪɟɞ ɩɟɪɜɵɦ ɩɨɥɶ ɨɜɚɧɢɟɦ ɬɳɚɬɟɥɶɧɨ
ɨɱɢɫɬɢɬɶ ɞɭɯɨɜɤɭ ɦɵɥɶɧɵɦ ɪɚɫɬɜɨɪɨɦ ɢɯɨɪɨɲɨ
ɩɪɨɦɵɬɶ ɞɨɫɬɚɬɨɱɧɵɦ ɤɨɥɢɱɟɫɬɜɨɦ ɜɨɞɵ.
ɇɚɜɟɫɢɬɶ ɧɚ ɛɨɤɨɜɵɟ ɫɬɟɧɤɢ ɩɨɫɬɚɜɥɹɟɦɵɟ ɜ
ɤɨɦɩɥɟɤɬɟ ɥɟɫɬɧɢɱɤɢ ɢɭɫɬɚɧɨɜɢɬɶ ɧɚ ɧɢɯ
ɪɟɲɟɬɤɢ ɢɩɪɨɬɢɜɧɢ. ȼɬɟɱɟɧɢɟ ɩɪɢɦɟɪɧɨ 30
ɦɢɧɭɬ ɩɪɨɝɪɟɬɶ ɞɭɯɨɜɤɭ ɩɪɢ ɦɚɤɫɢɦɚɥɶɧɨɣ
ɬɟɦɩɟɪɚɬɭɪɟ, ɩɪɢ ɷɬɨɦ ɧɟɣɬɪɚɥɢ ɭɸɬɫɹ ɜɫɟ
ɠɢɪɨɫɨɞɟɪɠɚɳɢɟ ɜɟɳɟɫɬɜɚ, ɢɫɩɨɥɶ ɭɟɦɵɟ ɩɪɢ
ɩɪɨɢ ɜɨɞɫɬɜɟɧɧɨɣ ɨɛɪɚɛɨɬɤɟ ɢ ɞɟɥɢɹ, ɤɨɬɨɪɵɟ
ɦɨɝɭɬ ɨɛɭɫɥɨɜɢɬɶ ɩɨɹɜɥɟɧɢɟ ɧɟɩɪɢɹɬɧɵɯ ɚɩɚɯɨɜ
ɩɪɢ ɩɟɪɜɨɦ ɩɪɢɝɨɬɨɜɥɟɧɢɢ ɛɥɸɞ.
ȼ ɠɧɨ !!!
ȼɤɚɱɟɫɬɜɟ ɦɟɪɵ ɩɪɟɞɨɫɬɨɪɨɠɧɨɫɬɢ
ɧɟɨɛɯɨɞɢɦɨ ɩɟɪɟɞ ɤɚɠɞɨɣ ɱɢɫɬɤɨɣ ɞɭɯɨɜɤɢ
ɨɬɤɥɸɱɚɬɶ ɟɟ ɨɬ ɫɟɬɢ. ɇɟ ɩɪɢɦɟɧɹɣɬɟ ɞɥɹ
ɱɢɫɬɤɢ ɤɢɫɥɨɬɨ - ɢɥɢ ɳɟɥɨɱɟɫɨɞɟɪɠɚɳɢɯ
ɜɟɳɟɫɬɜ (ɭɤɫɭɫ, ɫɨɤ ɥɢɦɨɧɚ, ɫɨɥɶ ɢɬ.ɞ.). ɇɢ ɜ
ɤɨɟɦ ɫɥɭɱɚɟ ɧɟ ɩɪɢɦɟɧɹɣɬɟ ɬɚɤɠɟ
ɯɥɨɪɨɫɨɞɟɪɠɚɲɢɟ ɫɪɟɞɫɬɜɚ (ɨɬɛɟɥɢɜɚɸɳɢɟ ɢ
ɬ.ɞ.). Ɉɫɨɛɟɧɧɨ ɷɬɨ ɧɭɠɧɨ ɢɦɟɬɶ ɜɜɢɞɭ ɩɪɢ
ɱɢɫɬɤɟ ɷɦɚɥɢɪɨɜɚɧɧɵɯ ɩɨɜɟɪɯɧɨɫɬɟɣ ɞɭɯɨɜɨɤ.
Achtung! Vor dem ersten Gebrauch des
Backofens muss die aktuelle Tageszeit
eingestellt werden. (siehe Kapitel
„Elektronische Programmierung.“).
Ohne eingestellte Uhr funktioniert der
Backofen nicht!
ȼɧɢɦ ɧɢɟ!ɉɟɪɟɞ ɩɟɪɜɵɦ
ɢɫɩɨɥɶ ɨɜɚɧɢɟɦ ɞɭɯɨɜɤɢ ɧɟɨɛɯɨɞɢɦɨ
ɜɵɫɬɚɜɢɬɶ ɬɟɤɭɳɟɟ ɜɪɟɦɹ ɧɚ ɱɚɫɚɯ (ɫɦ.
ɪɚ ɞɟɥ „ɗɥɟɤɬɪɨɧɧɨɟ ɩɪɨɝɪ ɦɦɢɪɭ-
ɸɳɟɟ ɭɫɬɪɨɣɫɬɜɨ“). ȼɩɪoɬɢɜɧɨɦ
ɫɥɭɱɚɟ ɞɭɯɨɜɤɚ ɧɟ ɛɭɞɟɬ ɪɚɛɨɬɚɬɶ !

10
EN
BRIEF DESCRIPTION
LOCATION DRAWING
Arrangement of functional assemblies
1. Cooking hob with cooking zones
2. Knobs of the cooking zones control
3. Knobs of the oven temperature control
4. Knobs of the oven operating functions
5. Pilot light ON / OUT (yellow)
6. Oven
7. Drawer
8. Oven temperature - pilot light (red)
9. Control panel
10. Electronic programmable control
Depending on the technical equipment, different
models are provided with different control panels
and relevantly arranged operating elements.
1
8
6
7
2
3
10
5
9
2
4
1
8
2
3
6
7
10
5
9
2
4

11
DE
RU
KURZBESCHREIBUNG
GESAMTANSICHT
Anordnung von Funktionsbaugruppen
1. Kochfeld mit Kochzonen
2. Drehregler der Kochzonen
3. Drehregler des Backofentemperaturreglers
4. Drehregler der Backofenbetriebsfunktionen
5. Betrieb - Kontrollleuchte ON/OFF (gelb)
6. Backofen
7. Schublade
8. Backofentemperatur - Kontrollleuchte (rot)
9. Bedienblende
10. Elektronische Programmierung
Verschiedene Modelle, je nach ihrer technischen
Ausrüstung, sind mit verschiedenen Bedienblenden
versehen, an denen die Bedienelemente sinnvoll
angeordnet sind.
ɄɊȺɌɄɈȿ ɈɉɂɋȺɇɂȿ
ȼɇȿɒɇɂɃ ȼɂȾ
ɉɪɢɦɟɪɧɨɟ ɪ ɡɦɟɳɟɧɢɟ ɮɭɧɤɰɢɨɧ ɥɶɧɵɯ
ɭɡɥɨɜ
1. ȼɚɪɨɱɧɚɹ ɩɨɜɟɪɯɧɨɫɬɶ ɫ
ɧɚɝɪɟɜɚɬɟɥɶɧɵɦɢ ɩɨɥɹɦɢ
2. Ɋɭɱɤɢ ɭɩɪɚɜɥɟɧɢɹ ɧɚɝɪɟɜɚɬɟɥɶɧɵɯ ɩɨɥɟɣ
3. Ɋɭɱɤɚ ɬɟɪɦɨɪɟɝɭɥɹɬɨɪɚ ɞɭɯɨɜɤɢ
4. Ɋɭɱɤɚ ɜɵɛɨɪɚ ɪɟɠɢɦɚ ɪɚɛɨɬɵ ɞɭɯɨɜɤɢ
(ɪɚɛɨɱɢɯ ɮɭɧɤɰɢɣ)
5. Ʉɨɧɬɪɨɥɶɧɚɹ ɥɚɦɩɨɱɤɚ ɪɚɛɨɬɵ ɩɥɢɬɵ
(ɠɟɥɬɚɹ)
6. Ⱦɭɯɨɜɨɣ ɲɤɚɮ
7. ȼɵɞɜɢɠɧɨɣ ɹɳɢɤ
8. Ʉɨɧɬɪɨɥɶɧɚɹ ɥɚɦɩɨɱɤɚ ɪɚɛɨɬɵ ɞɭɯɨɜɤɢ
(ɤɪɚɫɧɚɹ)
9. ɉaɧeɥɶ ɭɩɪɚɜɥɟɧɢɹ
10. ɗɥɟɤɬɪɨɧɧɨɟ ɩɪɨɝɪɚɦɦɢɪɭɸɳɟɟ
ɭɫɬɪɨɣɫɬɜɨ
Ɉɬɞɟɥɶɧɵɟ ɦɨɞɟɥɢ, ɜɚɜɢɫɢɦɨɫɬɢ ɨɬ ɢɯ
ɬɟɯɧɢɱɟɫɤɨɝɨ ɨɛɨɪɭɞɨɜɚɧɢɹ, ɢɦɟɸɬɪɚ ɥɢɱɧɵɟ
ɩɚɧɟɥɢ ɭɩɪɚɜɥɟɧɢɹ ɫɫɨɨɬɜɟɬɫɬɜɟɧɧɨ
ɪɚ ɦɟɳɟɧɧɵɦɢ ɧɚ ɧɢɯ ɷɥɟɦɟɧɬɚɦɢ ɭɩɪɚɜɥɟɧɢɹ.

12
EN
CONTROL PANEL
Models XL 500: Control Panel
with mechanical timer
Models XL 500: Control Panel
with electronic programmable control
1. Knobs of cooking zones
2. Knobs of the oven temperature control
3. Knobs of the oven operating functions
4. Control light ON/OFF (yellow)
5. Oven operation - Control light (red)
6. Timer (if available)
7. Electronic programmable control
8. Button « -»
9. Button “Function selection”
10. Button « +»
Models XL 500 Platin: Control Panel with
electronic programmable control
1. Knobs of cooking zones
-
„Push“
2. Knobs of the oven temperature control
-
„Push“
3. Knobs of the oven operating functions
-
„Push“
2 6 3
1 1
45
1
4 7 5
1
28910 3

13
DE RU
BEDIENBLENDE
Bedienblende von Modellen XL 500
mit Kurzzeitwecker
Bedienblende von Modellen XL 500
mit elektronischer Programmierung
1.
Drehregler
fürKochzonen
2. Drehregler “Backofentemperatur”
3. Drehregler “Backofenbetriebsfunktionen”
4. Kontrollleuchte ON/OFF (gelb)
5. Backofenbetrieb Kontrollleuchte (rot)
6. Kurzzeitwecker (falls vorhanden)
7. Elektronische Programmierung
8. Drucktaste « -»
9. Betriebdrucktaste
10. Drucktaste « +»
Die Besonderheiten der Bedienblende von
Modellen XL 500 Platin mit elektronischer
Programmierung
1.
Drehregler
fürKochzonen -
«Push»
2. Drehregler “Backofentemperatur” –
«Push»
3. Drehregler “Backofenbetriebsfunktionen” –
«Push»
ɉȺɇȿɅɖ ɍɉɊȺȼɅȿɇɂə
ɉ ɧɟɥɢ ɭɩɪ ɜɥɟɧɢɹ ɦɨɞɟɥɟɣ XL 500 ɫ
ɦɢɧɭɬɧɢɤɨɦ
ɉ ɧɟɥɢ ɭɩɪ ɜɥɟɧɢɹ ɦɨɞɟɥɟɣ XL 500
ɫɫɟɧɫɨɪɧɵɦ ɷɥɟɤɬɪɨɧɧɵɦ
ɩɪɨɝɪ ɦɦɢɪɭɸɳɢɦ ɭɫɬɪɨɣɫɬɜɨɦ
1. Ɋɭɱɤɢ ɭɩɪɚɜɥɟɧɢɹ ɧɚɝɪɟɜɚɬɟɥɶɧɵɦɢ
ɩɨɥɹɦɢ
2. Ɋɭɱɤɚ “Ɍɟɪɦɨɪɟɝɭɥɹɬɨɪɚ ɞɭɯɨɜɤɢ”
3. Ɋɭɱɤɚ “Ɋɟɠɢɦ ɪɚɛɨɬɵ ɞɭɯɨɜɤɢ”
4. Ʉɨɧɬɪɨɥɶɧɚɹ ɥɚɦɩɨɱɤɚ ȼɤɥ/ȼɵɤɥ (ɠɟɥɬ.)
5. Ʉɨɧɬɪɨɥɶɧɚɹ ɥɚɦɩɨɱɤɚ ɪɚɛɨɬɵ ɞɭɯɨɜɤɢ
(ɤɪɚɫɧ.)
6. Ɇɢɧɭɬɧɢɤ (ɩɪɢ ɧɚɥɢɱɢɢ)
7. ɗɥɟɤɬɪɨɧɧɨɟ ɩɪɨɝɪɚɦɦɢɪɭɸɳɟɟ
ɭɫɬɪɨɣɫɬɜɨ
8. Ʉɧɨɩɤɚ « -»
9. Ʉɧɨɩɤɚ ɜɵɛɨɪɚ ɮɭɧɤɰɢɣ
10. Ʉɧɨɩɤɚ « +»
Ɉɫɨɛɟɧɧɨɫɬɢ ɩ ɧɟɥɢ ɭɩɪ ɜɥɟɧɢɹ ɦɨɞɟɥɟɣ
XL 500 Platin ɫɷɥɟɤɬɪɨɧɧɵɦ
ɩɪɨɝɪ ɦɦɢɪɭɸɳɢɦ ɭɫɬɪɨɣɫɬɜɨɦ
1.
Ɋɭɱɤɢ ɭɩɪɚɜɥɟɧɢɹ ɧɚɝɪɟɜɚɬɟɥɶɧɵɦɢ
ɩɨɥɹɦɢ -
ɭɬɚɩɥɢɜɚɟɦɵɟ «Push»
2. Ɋɭɱɤɚ “Ɍɟɪɦɨɪɟɝɭɥɹɬɨɪɚ ɞɭɯɨɜɤɢ” -
ɭɬɚɩɥɢɜɚɟɦɚɹ «Push»
3. Ɋɭɱɤɚ “Ɋɟɠɢɦ ɪɚɛɨɬɵ ɞɭɯɨɜɤɢ” -
ɭɬɚɩɥɢɜɚɟɦɚɹ «Push»

14
EN
EQUIPMENT
COOKING ZONES AND RELEVANT
OPERATING ELEMENTS
HC 50040*, HC 50070*, HC 50080*, HC 513 N
1.
Knob of the cooking zone
in front (left)
Ø180 mm 1,7 kW
2.
Knob of the cooking zone
behind (left)
Ø145 mm 1,2 kW
3.
Knob of the cooking zone
behind (right)
Ø180 mm 1,7 kW
4.
Knob of the cooking zone
in front (right)
Ø145mm 1,2 kW
HC 5132 N, HC 5162 N, HC 5172, HC 50082
1. Knob of the cooking zone in front (left)
Ø120/Ø180 mm 1,7 kW
2. Knob of the cooking zone behind (left)
Ø145 mm 1,2 kW
3. Knob of the cooking zone behind (right)
Ø140/250 mm2,0 kW
4. Knob of the cooking zone in front (right)
Ø145 mm 1,2 kW
HE 5011*..., HE 5081*…
1.
Knob of the electric plate
in front (left)
Ø180 mm 2,0 kW
2.
Knob of the electric plate
behind (left)
Ø145 mm 1,0 kW
3.
Knob of the electric plate
behind (right)
Ø180 mm 1,5 kW
4.
Knob of the electric plate
in front (right)
Ø145 mm 1,0 kW
* -
Modification
123 4
1 2 3
4
123 4
1 2 3 4
1 2 34

15
DE RU
AUSSTATUNG
KOCHFELD MIT ENTSPRECHENDEN
BEDIENELEMENTEN
HC 50040*, HC 50070*, HC 50080*, HC 513 N
1. Drehreglerfür Kochzonevornelinks
Ø180 mm 1,7 kW
2.
DrehreglerfürKochzonehinten links
Ø145 mm 1,2 kW
3.
DrehreglerfürKochzonehintenrechts
Ø180 mm 1,7 kW
4.
DrehreglerfürKochzonevornerechts
Ø145 mm 1,2 kW
HC 5132 N, HC 5162 N, HC 5172, HC 50082
1.
Drehregler
für Kochzone vorne links
Ø120/Ø180 mm 1,7 kW
2.
Drehregler
für Kochzone hinten links
Ø145 mm 1,2 kW
3.
Drehregler
für Kochzone hinten rechts
Ø140/250 mm 2,0 kW
4.
Drehregler
für Kochzone vorne rechts
Ø145 mm 1,2 kW
HE 5011*..., HE 5081*…
1. Drehreglerfür
Kochplatte
vornelinks
Ø180 mm 2,0 kW
2.
Drehreglerfür
Kochplatte
hinten links
Ø145 mm 1,0 kW
3.
Drehreglerfür
Kochplatte
hintenrechts
Ø180
mm 1,5 kW
4.
Drehreglerfür
Kochplatte
vornerechts
Ø145 mm 1,0 kW
* -
Die Modifikationen
ɈȻɈɊɍȾɈȼȺɇɂȿ
ɇȺȽɊȿȼȺɌȿɅɖɇȺə ɉɈȼȿɊɏɇɈɋɌɖ ɋ
ɗɅȿɆȿɇɌȺɆɂ ɍɉɊȺȼɅȿɇɂə
HC 50040*, HC 50070*, HC 50080*, HC 513 N
1. Ɋɭɱɤɚ ɭɩɪɚɜɥɟɧɢɹ ɧɚɝɪɟɜɚɬɟɥɶɧɵɦ
ɩɨɥeɦ- ɩepeɞɧɟɟ ɥɟɜɨɟ
Ø180 mm 1,7 ɤȼɬ
2. Ɋɭɱɤɚ ɭɩɪɚɜɥɟɧɢɹ ɧɚɝɪɟɜɚɬɟɥɶɧɵɦ
ɩɨɥeɦ- ɚɞɧɟɟ ɥɟɜɨɟ
Ø145 mm 1,2 ɤȼɬ
3. Ɋɭɱɤɚ ɭɩɪɚɜɥɟɧɢɹ ɧɚɝɪɟɜɚɬɟɥɶɧɵɦ
ɩɨɥeɦ- ɚɞɧɟɟ ɩɪɚɜɨɟ
Ø180 mm 1,7 kW
4. Ɋɭɱɤɚ ɭɩɪɚɜɥɟɧɢɹ ɧɚɝɪɟɜɚɬɟɥɶɧɵɦ
ɩɨɥeɦ- ɩɟɪɟɞɧɟɟ ɩɪɚɜɨɟ
Ø145 mm 1,2 ɤȼɬ
HC 5132 N, HC 5162 N, HC 5172, HC 50082
1. Ɋɭɱɤɚ ɭɩɪɚɜɥɟɧɢɹ ɧɚɝɪɟɜɚɬɟɥɶɧɵɦ
ɩɨɥeɦ- ɩepeɞɧɟɟ ɥɟɜɨɟ
Ø120/Ø180 mm 1,7 ɤȼɬ
2. Ɋɭɱɤɚ ɭɩɪɚɜɥɟɧɢɹ ɧɚɝɪɟɜɚɬɟɥɶɧɵɦ
ɩɨɥeɦ- ɚɞɧɟɟ ɥɟɜɨɟ
Ø145 mm 1,2 ɤȼɬ
3. Ɋɭɱɤɚ ɭɩɪɚɜɥɟɧɢɹ ɧɚɝɪɟɜɚɬɟɥɶɧɵɦ
ɩɨɥeɦ- ɚɞɧɟɟ ɩɪɚɜɨɟ
Ø140/250 mm 2,0 ɤȼɬ
4. Ɋɭɱɤɚ ɭɩɪɚɜɥɟɧɢɹ ɧɚɝɪɟɜɚɬɟɥɶɧɵɦ
ɩɨɥeɦ- ɩɟɪɟɞɧɟɟ ɩɪɚɜɨɟ
Ø145 mm 1,2 ɤȼɬ
HE 5011*..., HE 5081*…
1. Ɋɭɱɤɚ ɭɩɪɚɜɥɟɧɢɹ ɧɚɝɪɟɜɚɬɟɥɶɧɵɦ
ɷɥɟɦɟɧɬɨɦ - ɩepeɞɧɢɣ ɥɟɜɵɣ
Ø180 mm 2,0 ɤȼɬ
2. Ɋɭɱɤɚ ɭɩɪɚɜɥɟɧɢɹ ɧɚɝɪɟɜɚɬɟɥɶɧɵɦ
ɷɥɟɦɟɧɬɨɦ - ɚɞɧɢɣ ɥɟɜɵɣ
Ø145 mm 1,0 ɤȼɬ
3. Ɋɭɱɤɚ ɭɩɪɚɜɥɟɧɢɹ ɧɚɝɪɟɜɚɬɟɥɶɧɵɦ
ɷɥɟɦɟɧɬɨɦ - ɚɞɧɢɣ ɩɪɚɜɵɣ
Ø180 mm 1,5 ɤȼɬ
4. Ɋɭɱɤɚ ɭɩɪɚɜɥɟɧɢɹ ɧɚɝɪɟɜɚɬɟɥɶɧɵɦ
ɷɥɟɦɟɧɬɨɦ - ɩɟɪɟɞɧɢɣ ɩɪɚɜɵɣ
Ø145 mm 1,0 ɤȼɬ
* -
Ɇɨɞɢɮɢɤɚɰɢɢ

16
EN
COOKING ZONES CONTROL
The cooking zones control is achieved by means
of knobs 1,2,3and 4set up on the control panel
of the cooker 5.
The graphic symbols above the knobs indicate
which cooking zone is controlled by the selected
knob.
To switch on or regulate a cooking zone:
xturn the knob clockwise counter clockwise
6,
xset up the knob in the position 7.
The knobes enable fluent heat supply to the
cooking zones.
The double field heating elements are steered by
the energy control with the integrated switch of the
outer field.
By means of the knob 8you can ensure the fluent
heat supply only to the inner cooking zone. To
switch off the outer field:
xturn knob clockwise against the stop 9and
let it go.
By this moment you can control the fluent heat
supply to both inner and outer cooking zones.
To switch off the cooking zones set up the knob
in the position „0“ 10.
To control the heat supply in case of the control
panel equipped with sunk knobs Push:
xpush the knob slightly and let it go.
The knob will come out of the control panel.
To countersink the knob:
xpush the knob as far as it will go and let it
go.
6
12 3 4
5
7
9
8
10

17
DE RU
KOCHFELDERSTEUERUNG
Die Kochzonensteuerung erfolgt mit Hilfe von
Drehregler 1,2,3und 4, die auf der Bedienblende
des Herdes eingerichtet sind 5.
Die graphischen Symbole, die sich neben den
Drehreglern der Kochzonen befinden, zeigen,
welche Kochzone von dem gewählten Drehregler
verwaltet wird.
Zum Einschalten oder zur Regulierung einer
Kochzone müssen Sie wie folgt vorgehen:
xdrehregler gegen den Uhrzeigersinn drehen
6,
xden Drehregler in ausgewählte Position
bringen 7.
In dem Drehbereich kann man fließend die Menge
der Wärmezufuhr zum Geschirr regulieren.
Die Heizelemente mit dem doppelten Feld werden
durch den Energieregler gesteuert, der mit dem
eingebauten Schalter des Außenfeldes
ausgestattet ist.
In dem Drehbereich bis zum Symbol 8kann man
fließend die Menge der Wärmezufuhr zum Geschirr
nur von innerem Kochfeld regulieren.
Zum Einschalten des Außenfeldes:
xDrehregler bis zum Anschlag im
Uhrzeigersinn umdrehen 9und loslassen.
Von diesem Moment kann man fließend die Menge
der Wärmezufuhr zum Geschirr von beiden
Kochfeldern (inneres und äußeres) regulieren
Zum Abschalten beider Kochfeldern den
Drehregler in die Position „0“ bringen 10.
Wenn die Bedienblende Ihres Backofens mit
Drehreglern Push (versenkbare Drehregler)
ausgestattet ist, ist zur Steuerung mit diesen
Drehreglern nötig:
xden Drehregler vorsichtig drücken und
loslassen.
Drehregler wird aus der Bedienblende
herauskommen.
Um den Drehregler wieder zu versenken:
xden Drehregler vorsichtig bis zum Anschlag
drücken und loslassen.
ɍɉɊȺȼɅȿɇɂȿ ɊȺȻɈɌɈɃ
ɇȺȽɊȿȼȺɌȿɅɖɇɕɏ ɉɈɅȿɃ
ɍɩɪɚɜɥɟɧɢɟ ɪɟɠɢɦɨɦ ɪɚɛɨɬɵ ɧɚɝɪɟɜɚɬɟɥɶɧɵɯ
ɩɨɥɟɣ ɨɫɭɳɟɫɬɜɥɹɟɬɫɹ ɩɨɜɨɪɨɬɨɦ ɪɭɱɟɤ 1,2,3
ɢ4, ɭɫɬɚɧɨɜɥɟɧɧɵɯ ɧɚ ɩɚɧɟɥɢ ɭɩɪɚɜɥɟɧɢɹ
ɤɭɯɨɧɧɨɣ ɩɥɢɬɵ 5.
Ƚɪɚɮɢɱɟɫɤɢɟ ɨɛɨ ɧɚɱɟɧɢɹ, ɭɫɬɚɧɨɜɥɟɧɧɵɟ
ɪɹɞɨɦ ɫɪɭɱɤɚɦɢ ɭɩɪɚɜɥɟɧɢɹ ɧɚɝɪɟɜɚɬɟɥɶɧɵɦɢ
ɩɨɥɹɦɢ ɩɨɤɚ ɵɜɚɸɬ, ɤɚɤɢɦ ɧɚɝɪɟɜɚɬɟɥɶɧɵɦ
ɩɨɥɟɦ ɭɩɪɚɜɥɹɟɬ ɜɵɛɪɚɧɧɚɹ ɪɭɱɤɚ.
Ⱦɥɹ ɜɤɥɸɱɟɧɢɹ ɧɚɝɪɟɜɚɬɟɥɶɧɨɝɨ ɩɨɥɹ ɢɥɢ
ɪɟɝɭɥɢɪɨɜɤɢ ɦɨɳɧɨɫɬɢ ɧɚɝɪɟɜɚɬɟɥɶɧɨɝɨ ɩɨɥɹ
ɫɥɟɞɭɟɬ:
xɩɨɜɟɪɧɭɬɶ ɪɭɱɤɭ ɩɪɨɬɢɜ ɱɚɫɨɜɨɣ ɫɬɪɟɥɤɟ
6,
xɭɫɬɚɧɨɜɢɬɶɪɭɱɤɭ ɜɢ ɛɪɚɧɧɨɟ
ɩɨɥɨɠɟɧɢɟ 7.
ȼɩɪɟɞɟɥɚɯ ɪɟɝɭɥɹɬɨɪɚ ɜɨ ɦɨɠɧɚ ɩɥɚɜɧɚɹ
ɪɟɝɭɥɢɪɨɜɤɚ ɤɨɥɢɱɟɫɬɜɚ ɬɟɩɥɚ ɧɚɝɪɟɜɚɬɟɥɶɧɨɝɨ
ɩɨɥɹ.
ɇɚɝɪɟɜɚɬɟɥɶɧɵɟ ɷɥɟɦɟɧɬɵ ɫɞɜɨɣɧɵɦ ɩɨɥɟɦ
ɭɩɪɚɜɥɹɸɬɫɹ ɩɪɢ ɩɨɦɨɳɢ ɪɟɝɭɥɹɬɨɪɚ ɫɨ
ɜɫɬɪɨɟɧɧɵɦ ɜɵɤɥɸɱɚɬɟɥɟɦ ɜɧɟɲɧɟɝɨ ɩɨɥɹ.
ȼɩɪɟɞɟɥɚɯ ɩɨɥɨɠɟɧɢɣ ɪɟɝɭɥɹɬɨɪɚ 8, ɜɨ ɦɨɠɧɚ
ɩɥɚɜɧɚɹ ɪɟɝɭɥɢɪɨɜɤɚ ɤɨɥɢɱɟɫɬɜɚ ɬɟɩɥɚ ɬɨɥɶɤɨ
ɜɧɭɬɪɟɧɧɟɝɨ ɩɨɥɹ.
Ⱦɥɹ ɜɤɥɸɱɟɧɢɹ ɜɧɟɲɧɟɝɨ ɧɚɝɪɟɜɚɬɟɥɶɧɨɝɨ
ɩɨɥɹ:
xɪɭɱɤɭ ɩɨɜɟɪɧɭɬɶ ɞɨ ɭɩɨɪɚ ɩɨ ɱɚɫɨɜɨɣ
ɫɬɪɟɥɤɟ 9ɢɨɬɩɭɫɬɢɬɶ.
ɋɷɬɨɝɨ ɦɨɦɟɧɬɚ, ɜɨ ɦɨɠɧɚ ɩɥɚɜɧɚɹ
ɪɟɝɭɥɢɪɨɜɤɚ ɨɛɨɢɯ ɧɚɝɪɟɜɚɬɟɥɶɧɵɯ ɩɨɥɟɣ
(ɜɧɭɬɪɟɧɧɟɝɨ ɢɜɧɟɲɧɟɝɨ).
Ⱦɥɹ ɨɬɤɥɸɱɟɧɢɹ ɨɛɨɢɯ ɩɨɥɟɣ ɭɫɬɚɧɨɜɢɬɶ ɪɭɱɤɭ
ɜɩɨɥɨɠɟɧɢɢ „0“ 10.
ȿɫɥɢ ȼɚɲɚ ɞɭɯɨɜɤɚ ɨɛɨɪɭɞɨɜɚɧɚ ɪɭɱɤɚɦɢ Push
(ɭɬɨɩɥɟɧɵɦɢ ɜɩɚɧɟɥɢ), ɬɨ ɞɥɹ ɭɩɪɚɜɥɟɧɢɹ
ɷɬɢɦɢ ɪɭɱɤɚɦɢ ɧɟɨɛɯɨɞɢɦɨ:
xɨɫɬɨɪɨɠɧɨ ɧɚɠɚɬɶ ɧɚ ɪɭɱɤɭ ɢɨɬɩɭɫɬɢɬɶ
ɟɺ.
Ɋɭɱɤɚ ɜɵɣɞɟɬ ɢ ɩɚɧɟɥɢ.
Ⱦɥɹ ɬɨɝɨ ɱɬɨɛɵ ɜɧɨɜɶ ɭɬɨɩɢɬɶ ɪɭɱɤɭ:
xɨɫɬɨɪɨɠɧɨ ɧɚɠɚɬɶ ɧɚ ɪɭɱɤɭ ɞɨ ɭɩɨɪɚ ɢ
ɨɬɩɭɫɬɢɬɶ.

18
EN
GLASS CERAMIC COOKING AREA
To provide efficient heating, please only use flat
bottom pans whose diameter is the same or
slightly bigger than that of the heating area.
Avoid overflows; reduce the heat supply as far as
the liquid begins to boil.
Don’t leave empty pots and pans on the heating
surface; be sure to switch off the cooking zone
after you have removed the receptacles from the
heating area.
In case of even a slight fracture on the cooking
surface, disconnect the electric power supply
immediately.
Maintenance
Ceramic cook field
First of all, remove stray food bits and grease
drops from the cooking surface with the help of the
special scraper. Clean the hot area thoroughly with
„Cera Clen“, „Eilfix“ or other similar products by
means of a paper towel. Rinse with water again
and dry with a clean cloth. To avoid any possible
damage to the surface, pieces of melted aluminium
foil or plastics, remains of sugar or highly
sacchariferous food have to be immediately
removed from the hot cooking area by means of
the special scraper.
For this purpose, the use of any abrasive sponges
or irritating chemical detergents such as oven
sprays or spot removers is not allowed.
Electric heating zone
Clean the heating zones only by means of a dry
cloth. Use standard washing-up liquids only. While
cleansing, occasionally add a drop of vegetable oil.
Residual heat indicator
As soon as the surface temperature of a cooking
zone exceeds 50 °C, the corresponding control
light 1indicates the rest warmth and, thus, warns
of a possible skin-burn. After having switched off
the heating elements, you can still use the rest
warmth for about 5-10 min. to warm up food or
keep the cooked food warm.
Attention: Steam escape slits 2in the rear
edge of the cooking field serve to let out the
steam from the oven. The slits must be
always kept free. Don’t touch with the hands
– ambustion danger!
1
2

19
DE
RU
GEBRAUCH VOM
GLASKERAMIKKOCHFELD
Für den Gebrauch der Kochzonen empfehlen sich
Töpfe mit geradem Boden und gleichem oder nur
wenig größerem Durchmesser.
Vermeiden Sie das Überlaufen von Flüssigkeiten,
indem Sie nach Erreichen des Siedepunktes oder
Erhitzen der Flüssigkeit die Wärmezufuhr
zurückschalten.
Lassen Sie die Kochzonen nicht ohne Topf oder
mit leeren Töpfen eingeschaltet.
Sobald ein Riss in der Oberfläche sichtbar wird,
ist das Gerät sofort vom Versorgungsnetz zu
trennen.
Instandhaltung
Glaskeramikkochfeld
Vor allem Essensreste und Fettspritzer von der
Kochoberfläche mit einem Schaber entfernen.
Danach die warme Fläche mit „Cera Clen“ ɢɥɢ
„Eilfix“ und Küchenpapier säubern, dann mit
Wasser abwaschen und einem sauberen Lappen
trocknen. Spuren von Aluminiumfolie,
Plastikgegenständen, Zucker oder stark
zuckerhaltigen Speisen müssen sofort von der
warmen Kochfläche mit einem Schaber entfernt
werden um mögliche Schäden der
Keramikoberfläche zu vermeiden.
Auf keinen Fall Schwämme oder Scheuerlappen
verwenden; den Gebrauch von aggressiven
chemischen Putzmitteln oder Fleckenreinigern
vermeiden.
Elektrokochplatten
Reinigen Sie Ihre Elektrokochplatten nur mit der
trocknen Serviette oder mit dem üblichen
Waschmittel.
Ab und zu kann man einen Tropfen Pflanzenöl
auftragen.
Restwärme-Anzeige
Solange eine Kochzone eine Oberflächen-
temperatur von mehr als 50 °C hat, leuchtet zur
Warnung die entsprechende Kontroll- Lampe 1auf,
und warnt damit vor Verbrennungsgefahr. Man
kann diese Restwärme nach dem Ausschalten der
Wärmezufuhr noch eine begrenzte Zeit, ca. 5-10
Min. zum Warmhalten von Speisen nutzen.
Restwärmeanzeige funktioniert sowohl für normale
als auch für Zweikreis- Kochzonen.
ɉɈɅɖɁɈȼȺɇɂȿ ɄȿɊȺɆɂɑȿɋɄɈɃ
ɉɈȼȿɊɏɇɈɋɌɖɘ
Ɋɟɤɨɦɟɧɞɭɟɬɫɹ ɩɪɢɦɟɧɟɧɢɟ ɩɨɫɭɞɵ ɫɩɥɨɫɤɢɦ
ɞɧɨɦ ɢɪɚ ɦɟɪɨɦ ɨɞɢɧɚɤɨɜɵɦ ɢɥɢ ɥɢɲɶ
ɧɟ ɧɚɱɢɬɟɥɶɧɨ ɛɨɥɶɲɢɦ, ɱɟɦ ɫɚɦɨ
ɧɚɝɪɟɜɚɬɟɥɶɧɨɟ ɩɨɥɟ.
ɂ ɛɟɝɚɣɬɟ ɜɵɛɟɝɚɧɢɹ ɠɢɞɤɨɫɬɢ, ɭɦɟɧɶɲɚɹ ɩɨ
ɦɟɪɟ ɟɟ ɚɤɢɩɚɧɢɹ ɫɬɟɩɟɧɶ ɧɚɝɪɟɜɚ.
ɇɟ ɨɫɬɚɜɥɹɣɬɟ ɜɤɥɸɱɟɧɧɵɦ ɧɚɝɪɟɜɚɬɟɥɶɧɨɟ
ɩɨɥɟ ɛɟ ɩɨɫɭɞɵ ɢɥɢ ɫɨ ɫɬɨɹɳɟɣ ɧɚ ɧɟɦ ɩɭɫɬɨɣ
ɩɨɫɭɞɨɣ.
ȼɫɥɭɱ ɟ, ɟɫɥɢ ȼɵ ɡ ɦɟɬɢɬɟ ɞ ɠɟ
ɧɟɡɧ ɱɢɬɟɥɶɧɭɸ ɬɪɟɳɢɧɭ ɧ ɫɬɟɤɥɨ-
ɤɟɪ ɦɢɱɟɫɤɨɣ ɩɨɜɟɪɯɧɨɫɬɢ, ɬɨɬɱ ɫ
ɨɬɤɥɸɱɢɬɟ ɩɥɢɬɭ ɨɬ ɷɥɟɤɬɪɨɫɟɬɢ.
ɍɯɨɞ
ɋɬɟɤɥɨ-ɤɟɪ ɦɢɱɟɫɤɢɟ ɩɨɜɟɪɯɧɨɫɬɢ
ɉɪɟɠɞɟ ɜɫɟɝɨ ɭɞɚɥɢɬɶ ɫɩɨɜɟɪɯɧɨɫɬɢ ɫɤɪɟɛɤɨɦ
ɨɫɬɚɬɤɢ ɩɢɳɢ ɢɤɚɩɥɢ ɠɢɪɚ, ɚɬɟɦ ɬɟɩɥɭɸ
ɩɨɜɟɪɯɧɨɫɬɶ ɨɱɢɫɬɢɬɶ ɫɚɥɮɟɬɤɨɣ ɫ
ɩɪɢɦɟɧɟɧɢɟɦ ɦɨɸɳɢɯ ɫɪɟɞɫɬɜ „Cera Clen“ ɢɥɢ
„Eilfix“, ɨɛɦɵɬɶ ɱɢɫɬɨɣ ɜɨɞɨɣ ɢɩɪɨɬɟɪɟɬɶ ɧɚɫɭɯɨ
ɱɢɫɬɨɣ ɦɹɝɤɨɣ ɬɪɹɩɤɨɣ.
ɋɥɟɞɵ ɚɥɸɦɢɧɢɟɜɨɣ ɮɨɥɶɝɢ, ɩɥɚɫɬɢɤɚ, ɫɚɯɚɪɚ
ɢɥɢ ɫɚɯɚɪɨɫɨɞɟɪɠɚɳɟɣ ɩɢɳɢ ɞɨɥɠɧɵ ɛɵɬɶ
ɧɟɦɟɞɥɟɧɧɨ ɭɞɚɥɟɧɵ ɫɤɪɟɛɤɨɦ ɫɟɳɺ ɬɺɩɥɨɣ
ɩɨɜɟɪɯɧɨɫɬɢ, ɱɬɨɛɵ ɢ ɛɟɠɚɬɶ ɜɨ ɦɨɠɧɵɯ
ɩɨɜɪɟɠɞɟɧɢɣ ɩɨɜɟɪɯɧɨɫɬɢ.
ɇɢ ɜɤɨɟɦ ɫɥɭɱɚɟ ɧɟ ɢɫɩɨɥɶ ɭɣɬɟ ɞɥɹ ɷɬɢɯ
ɰɟɥɟɣ ɦɨɱɚɥɤɢ ɢɥɢ ɝɪɭɛɵɟ ɬɪɹɩɤɢ. ɂ ɛɟɝɚɣɬɟ
ɩɪɢɦɟɧɟɧɢɹ ɯɢɦɢɱɟɫɤɢ ɚɤɬɢɜɧɵɯ ɱɢɫɬɹɳɢɯ
ɫɪɟɞɫɬɜ ɤɚɤ, ɧɚɩɪɢɦɟɪ, ɩɹɬɧɨɭɞɚɥɢɬɟɥɶ.
ɗɥɟɤɬɪɢɱɟɫɤɢɟ ɧ ɝɪɟɜ ɬɟɥɶɧɵɟ ɷɥɟɦɟɧɬɵ
ɉɪɨɢ ɜɨɞɢɬɟ ɱɢɫɬɤɭ ɧɚɝɪɟɜɚɬɟɥɶɧɵɯ ɷɥɟɦɟɧɬɨɜ
ɜɫɟɝɞɚ ɬɨɥɶɤɨ ɫɭɯɨɣ ɫɚɥɮɟɬɤɨɣ ɢɥɢ
ɫɬɚɧɞɚɪɬɧɵɦ ɫɪɟɞɫɬɜɨɦ ɩɨ ɭɯɨɞɭ. Ɍɚɤɠɟ ɦɨɠɧɨ
ɩɟɪɢɨɞɢɱɟɫɤɢ ɧɚɧɨɫɢɬɶɤɚɩɥɸ ɪɚɫɬɢɬɟɥɶɧɨɝɨ
ɦɚɫɥɚ.
ɂɧɞɢɤ ɬɨɪ ɧ ɝɪɟɜ ɩɨɥɹ
Ⱦɨ ɬɟɯ ɩɨɪ ɩɨɤɚ ɧɚɝɪɟɜɚɬɟɥɶɧɨɟ ɩɨɥɟ ɢɦɟɟɬ
ɬɟɦɩɟɪɚɬɭɪɭ ɛɨɥɶɲɟ ɱɟɦ 50 °C, ɫɜɟɬɢɬɫɹ
ɢɧɞɢɤɚɬɨɪ 1ɫɨɨɬɜɟɬɫɬɜɭɸɳɟɝɨ ɩɨɥɹ, ɢ
ɩɪɟɞɨɫɬɟɪɟɝɚɟɬ ɜɦɟɫɬɟ ɫɬɟɦ ɨɬ ɨɩɚɫɧɨɫɬɢ
ɨɠɟɝɚ. ɉɨɫɥɟ ɨɬɤɥɸɱɟɧɢɹ ɪɚ ɨɝɪɟɜɚ ɦɨɠɧɨ
ɢɫɩɨɥɶ ɨɜɚɬɶ ɨɫɬɚɬɨɱɧɨɟ ɬɟɩɥɨ ɟɳɟ ɩɪɢɦɟɪɧɨ
5-10 ɦɢɧ. ɧɚɩɪ. ɞɥɹ ɪɚ ɨɝɪɟɜɚ ɢɥɢ ɩɨɞɞɟɪɠɤɢ ɜ
ɬɟɩɥɨɦ ɫɨɫɬɨɹɧɢɢ ɛɥɸɞ. ɂɧɞɢɤɚɬɨɪ ɧɚɝɪɟɜɚ
ɞɟɣɫɬɜɭɟɬ ɜɪɚɜɧɨɣ ɫɬɟɩɟɧɢ ɧɚ ɜɫɟ ɧɨɪɦɚɥɶɧɵɟ
ɢɪɚɫɲɢɪɟɧɧɵɟ ɩɨɥɹ.
ȼɧɢɦ ɧɢɟ: ɑɟɪɟ ɳɟɥɢ ɞɥɹ ɜɵɯɨɞɚ ɩɚɪɚ
2ɧɚ ɚɞɧɟɣ ɤɪɨɦɤɟ ɜɚɪɨɱɧɨɣ
ɩɨɜɟɪɯɧɨɫɬɢ ɜɵɯɨɞɢɬ ɩɚɪ, ɤɨɬɨɪɵɣ
ɜɨ ɧɢɤɚɟɬ ɜɞɭɯɨɜɨɦ ɲɤɚɮɭ. ɗɬɢ ɳɟɥɢ
ɜɫɟɝɞɚ ɞɨɥɠɧɵ ɛɵɬɶ ɫɜɨɛɨɞɧɵɦɢ. ɇɟ
ɩɪɢɛɥɢɠɚɣɬɟɫɶ ɪɭɤɚɦɢ – ɨɩɚɫɧɨɫɬɶ
ɨɠɟɝɚ!
Achtung: Durch die Dampfaustritts-Schlitze
2an der Hinterkante des Kochfeldes
entweicht der Dampf, der im Backraum
entsteht. Diese Schlitze müssen immer frei
gehalten werden. Halten Sie die Hände
davon fern – Verbrennungsgefahr!

20
EN
MULTIFUNKTION OVEN CONTROL
Oven operation functions are controlled by the
knob 1operation mode and knob 2
temperature controls set up on the control panel.
The graphic symbols on the knobes indicate the
selected operation modes.
To switch off the oven, set up the knob 1
operating mode and the knob 2temperature
control in position „0“.
For more comfort, you can use the electronic
programmable control 4, which enables to run
the oven in automatical, half automatical or
manual cycle.
After the selected oven temperature has been
achieved, the red control light goes out.
If it is necessary to put the dish into a pre-heated
oven, do it after the red control light has gone out.
The red control light can also be on if the knob is
set in the position to illuminate the oven. In this
position, however, the heating element of the oven
is off.
If the control panel of your oven is equipped with
sunk knobes Push, to control the heat supply:
xPush the knob slightly and let it go
The knob will come out of the control panel.
To countersink the knob:
xPush the knob as far as it will go and let it
go.
* for models with control electronic programmable control
and programmer
Important! The activation of the oven is
indicated by yellow 3and red 5control
lights.
345
21
1
2
Other manuals for HC 5 Series
1
This manual suits for next models
13
Table of contents
Other Kaiser Kitchen Appliance manuals