9
RUFRDE
Das Netzkabel ist mit dem dreikontakt-
geerdeten Stecker für die Versorgung
Ihrer Sicherheit ausgestattet. Es muss
in die Steckdose des Erdungstyps
gesteckt werden, der den Normen
entspricht, die die Installation der
elektrischen Ausrüstung in Ihrem Land
regulieren sowie den jeweiligen lokalen
Normen. Nehmen Sie den Erdungs-
kontakt nicht heraus und verwenden
Sie den Zweikontaktadapter nicht.
Verwenden Sie das Kabel, das zusam-
men mit dem Kühlschrank geliefert wird
(tauschen Sie es nicht aus). Wenn das
Kabel beschädigt ist, muss es von der
qualifizierten Fachkraft sofort ersetzt
werden.
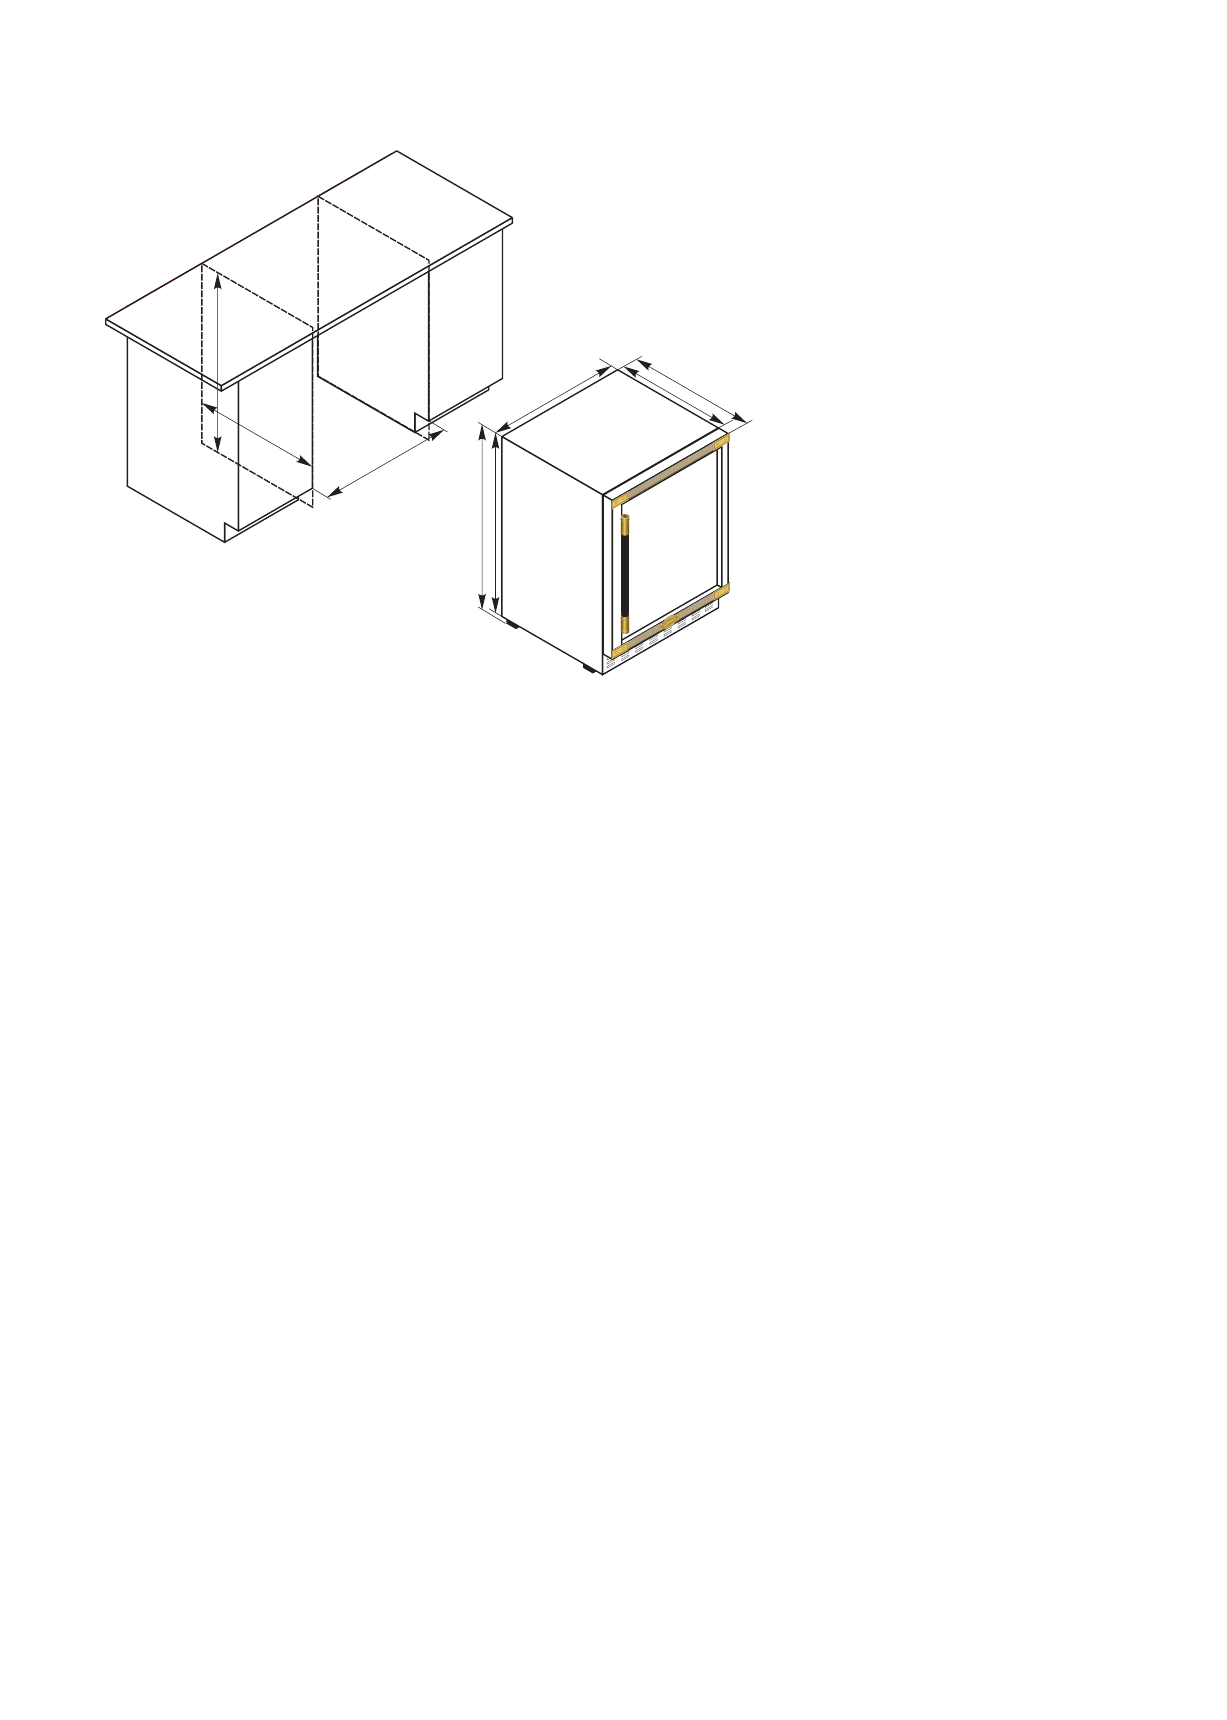
INSTALLATION
• Das Gerät auspacken. das die Türen
und die Ausstattung schützende
Klebeband entfernen. Eventuell
verbliebene Kleberreste mit einem
milden Reinigungsmittel entfernen;
• Die Polsterteile der Verpackung aus
geschäumtem Polystyrol nicht
wegwerfen. Sollte erneuter Geräte-
transport nötig sein, so ist das Kühl-
und Gefriergerät mit Hilfe dieser
Polystyrolelemente und der Folie
einzupacken und mit einem Klebe-
band zusichern;
ERDUNG
• Das Geräteinnere und die Ausstat-
tungselemente mit lauwarmem
Wasser unter Zusatz eines Geschirr-
spülmittels abwaschen und trocknen
lassen;
• Beim Aufstellen neben einem
anderem Kühlgerät ist ein seitlicher
Mindestabstand von 2 cm erforder-
lich;
• Das Kühl- und Gefriergerät in einem
trockenen und belüftbaren Raum
aufstellen. Nicht direkter Sonnenbe-
strahlung aussetzen. Nicht in der
Nähe von Wärmequellen wie Herde,
Heizkörper, usw., aufstellen. Wenn
das Aufstellen neben einerWärme-
quelle unvermeidbar ist, verwenden
Sie eine geeignete Isolierplatte oder
halten Sie folgende Mindestabstän-
de ein: zu Elektro- oder Gasherden
u.ä. – ca. 3 cm, zu Öl- oder Kohlean-
stellherden – ca. 30 cm;
• Conserver l'emballage de couver-
ture en polystyrène; les éléments en
papier et les rubans autocollants
utilisé pour protéger le réfrigérateur
pendant sa transportation;
Le cordon d'alimentation possède une
fiche a trois bouts incluant la mise à la
terre de sécurité. Il doit être connecté à
une prise murale conforme aux normes
régissant les installations électriques
dans votre pays, ainsi que toute
réglementation locale. Ne supprimez
pas le bout de mise à la terre prévu sur
la prise, n'utilisez pas'adaptateur a
deux bouts, et ne jamais effectuer un
raccordement électrique sur le disposi-
tif. Utilisez le cordon électrique fourni
avec l'équipement (ne le changer en
aucun cas). Si le cordon est endomma-
gé il doitêtre immédiatement remplacé
par un électricien spécialisé.
MISE À LA TERRE
INSTALLATION
• Retirer l'emballage et la bande
autoadhésive utilisée pour protéger
les portes et les accessoires; Utiliser
du savon pour éliminer tout résidu de
colle sur les surface;
• Laver l'intérieur du réfrigérateur et
ses accessoires avec de l'eau
chaude et du liquide à vaisselle puis
essuyer sec;
• Lors de l'installation du réfrigérateur
à proximité d'un autre réfrigérateur
ou d'un congélateur, prévoir une
distance de séparation latérale d'au
moins 2cm;
• Placer le réfrigérateur dans un
endroit sec et bien ventilé à l'abri des
rayons directs du soleil et à une
distance suffisante des sources de
chaleur telles qu'une cuisinière, un
radiateur, etc. Si cette condition ne
peut être satisfaite, utilisez une
plaque isolante appropriée lors de
l'installation du réfrigérateur près
des sources de chaleur ou prévoir
une distance de sécurité par rapport
aux sources de chaleur: pour une
cuisinière – 3 cm; pour un cuiseur à
pétrole ou au charbon – 30 cm;
• Внутреннюю полость холодильни-
ка а также элементы оснастки
следует промыть тёплой водой
добавляя к ней жидкость для
мойки посуды а затем вытереть
досуха;
• Помещая холодильник рядом с
другим либо рядом с морозилкой,
необходимо не менее 2 см между
их боковыми стенками;
Шнур питания оснащен трехконтак-
тной заземленной вилкой для
обеспечения Вашей безопасности.
Ее следует включать в розетку
заземляемого типа в соответствии с
нормами, регулирующими установку
электрооборудования в Вашей
стране, а также любыми местными
нормами. Не вынимайте заземляю-
щий контакт и не используйте
д ву х к о н т а к т н ый п е р ехо д н ик .
Используйте шнур, поставляемый
вместе с холодильником (не меняйте
его). Если шнур поврежден, он
должен быть немедленно заменен
квалифицированным специалистом.
• Поместить холодильник в сухом,
проветриваемом помещении, на
место без доступа солнечных
лучей, с соблюдением соотве-
тственного расстояния от источни-
ков тепла таких, как: кухонная
плита, батареи центрального
отопления, и т.п. Если же послед-
нее условие является невыполни-
мым, тогда устанавливая холо-
дильник вблизи источников тепла
следует применить соответствен-
ную изоляционную пластину, либо
учесть следующие расстояние от
источников тепла: от кухонной
плиты – 3 см; от печей отопляемых
маслом либо углём –30 см;
ЗАЗЕМЛЕНИЕ К ЭЛЕКТРОСЕТИ
• Удалить упаковку изделия и
самоприклеивающееся ленты,
которыми предохранены двери и
оснастка; остатки клея удалить с
помощью моющих средств;
• Сохранить упаковочные элемен-
ты из пенополистирола; в случае
необход и м о с т и транспорта
холодильника они, фольга и
самоприклеивающаяся лента
будут пригодны для предохране-
ния и упаковки;
УСТАНОВКА
Achtung! Im Interesse Ihrer
Sicherheit muss der Kühlschrank
unbedingt geerdet sein. Wenn keine
Erdung vorhanden ist, wenden Sie
sich an eine qualifizierte Fachkraft.
Attention! La mise à la terre doit
être prévue votre sécurité. Si votre
installation n'a pas de mise à la terre,
contacter un technicien qualifié
Внимание! В целях Вашей
безопасности необходимо зазем-
ление. Если заземление отсутству-
ет, следует обратиться к квалифи-
цированному специалисту.
!!!