Tensai 150 User manual

Caves de vinho
Wine cellar
Cave à vin
Cavas de vino
MANUAL DE INSTRUÇÕES
INSTRUCTION MANUAL
MANUEL D´INSTRUCTRION
MANUAL DE INSTRUCCIONES

Parabéns
Adquiriu uma cave de vinhos cuidadosamente desenvolvida para conservar e envelhecer o seu vinho por um longo
período.
Poderá também usá-la para estabilizar a temperatura do seu vinho à temperatura desejada para ser servido. Para este
efeito, apenas terá de ajustar eletronicamente a temperatura.
Este aparelho é destinado exclusivamente para armazenamento de vinho.
Leia por favor atentamente este manual e guarde-o para consultas futura.
Contém informações importantes para a instalação, uso e manutenção do seu aparelho.
Envelhecer o vinho
O envelhecimento de vinhos com sucesso é um processo delicado. Qualquer mudança brusca de temperatura, variação
na qualidade de vedação das rolhas por humidade insuficiente, exposição à luz (particularmente radiação UV) ou
vibração anormal pode alterar a qualidade do vinho.
A temperatura de maturação recomendada para o envelhecimento de vinhos é entre 10ºC e 14ºC. A humidade relativa
deve ser superior a 50%. Abaixo destes valores a qualidade de vedação das rolhas pode ficar comprometida.
Por outro lado, a humidade excessiva irá danificar as etiquetas das suas garrafas.
Como explicado mais à frente, o controlador está pré-definido para 12ºC e 65% de humidade relativa. No entanto, é
sempre possível ajustar estes valores às condições de acordo com suas necessidades.
Servir o vinho
A temperatura recomendada para servir o vinho branco é entre 6ºC e 10ºC. O vinho tinto é normalmente servido entre
15ºC e 18ºC.
Consulte um bom manual de referência ou use as informações do rótulo do vinho para ajustar a temperatura correta a
um vinho específico que deseja servir.
Capacidade da garrafa
O número de garrafas que pode colocar na sua cave de vinhos foi calculado em função da disposição padrão das
prateleiras e de acordo com o aparelho e a dimensão da garrafa padrão definida na norma EN 62552: 2013.
No capítulo "Disposição das prateleiras" apresentamos uma visão geral de como esta disposição foi calculada, bem
como outras disposições opcionais para poder aumentar o número de garrafas armazenadas ou simplesmente mudar a
posição das prateleiras.
PT

ATENÇÃO Leia cuidadosamente este
manual, uma vez que ele garante a
correta instalação, utilização e
manutenção do seu aparelho.
- A sua cave de vinhos foi construída de acordo com
as Normas Internacionais de Segurança
(2014/35/EU).
Esta também contempla padrões de prevenção e
eliminação de interferências de rádio (2014/30/EU).
- O fabricante reserva-se no direito de modificar as
características dos modelos sem aviso prévio.
- Alguns modelos podem não dispor da totalidade
dos acessórios assinalados.
Aviso: Este aparelho deve ser ligado à terra.
1. Este aparelho não deve ser instalado ao ar livre,
mesmo se a área estiver protegida por uma
cobertura. Deixar o aparelho exposto à chuva outra
condição climática é extremamente perigoso.
2. Este aparelho pode ser utilizado por crianças com
mais de 8 anos e por pessoas com capacidades
físicas, sensoriais ou mentais reduzidas, ou por
pessoas com falta de experiência ou conhecimento,
se tiverem tido formação ou instrução em relação à
utilização do aparelho de forma segura e
compreenderem os perigos envolvidos. As crianças
não devem brincar com o aparelho. A limpeza e a
manutenção do equipamento não devem ser feitas
por crianças sem supervisão.
3. Nunca tocar ou manusear este aparelho com os
pés descalços, ou com as mãos ou os pés molhados.
4. Não é aconselhável a utilização de extensões ou
fichas múltiplas. Se o aparelho for instalado entre
móveis, verificar se o cabo elétrico não fica dobrado
nem pressionado de forma perigosa.
5. Nunca puxar o cabo de alimentação nem o
aparelho para o desligar da tomada da parede: é
muito perigoso.
6. Não tocar nos componentes internos de
refrigeração, principalmente com as mãos molhadas
sob risco de sofrer queimaduras ou ficar ferido.
7. Não limpar nem efetuar operações de
manutenção antes de desligar o aparelho da tomada
de eletricidade. Não é suficiente colocar o
controlador de temperatura na posição desligado
para eliminar todos os riscos elétricos.
8. Antes de se desfazer do seu eletrodoméstico
velho, retire a eventual fechadura para evitar que
crianças a brincar possam ficar trancadas dentro do
aparelho. Além disso, se o aparelho for novo e com
fechadura, mantenha a chave fora do alcance de
crianças.
9. No caso de avaria, leia o capítulo "Resolução de
problemas", para verificar se é possível resolver a
eventual avaria. Não tente proceder à reparação
mexendo nos componentes internas do aparelho.
10. Na eventual necessidade de substituição o cabo
de alimentação, o mesmo deve ser feito pelo
fabricante, agente autorizado ou pessoas
qualificadas para evitar perigo e garantir a
conformidade elétrica.
11. Não utilize aparelhos elétricos no interior do
aparelho, excetuando os recomendados pelo
fabricante.
Não utilize aparelhos mecânicos ou quaisquer
outros para acelerar o processo de
descongelamento, excetuando os recomendados
pelo fabricante.
12. Não armazenar neste aparelho substâncias
explosivas tais como aerossóis contendo gases
propulsores inflamáveis.
13. Este aparelho destina-se a ser utilizado em
ambiente doméstico e similares tais como:
- Áreas de cozinha reservadas ao pessoal de lojas,
oficinas e outros ambientes profissionais;
- Casas de campo e à utilização por clientes de
hotéis, motéis e outros ambientes de carácter
residencial;
- Ambientes do tipo quarto de hotel;
- À restauração e outras aplicações similares exceto
a retalho.
14. No final da vida útil do aparelho - que contém
gases inflamáveis, tais como o ciclopentano na
espuma de isolamento e possivelmente R600a
(isobutano) no circuito de refrigeração, é necessário
proceder a sua eliminação de acordo com a
legislação em vigor (REEE). O consumidor deve
contactar as entidades locais ou os pontos de venda,
para solicitar informação referente à sua entrega
para reciclagem.
15. Não danificar o circuito de refrigeração.
16. Mantenha as aberturas de ventilação do
aparelho ou da estrutura desobstruídas.
SEGURANÇA
4
Para garantir um bom funcionamento bem como um
consumo reduzido de energia, é importante que a
instalação seja feita corretamente.
Condições gerais
Não coloque o seu aparelho em locais que possam
inundar.
Evite projeções de água no painel de comando ou nas
costas do aparelho.
Ventilação
O compressor e o condensador emitem calor,
necessitando de boa ventilação. Os ambientes com pouca
ventilação não são adequados. Neste sentido o aparelho
deve ser instalado num compartimento dotado com uma
abertura, tal como uma janela ou uma porta para o
exterior por forma a garantir a renovação de ar. Para
garantir um bom funcionamento, no caso dos
equipamentos de livre instalação deve ser deixada uma
distância de pelo menos 10 cm entre as suas laterais e
móveis ou paredes de fundo.
Temperatura e humidade ambiente
A temperatura ambiente deve estar de acordo com a
classe climática do aparelho. Verifique na placa de
caraterísticas qual a classe do seu aparelho e compare-a
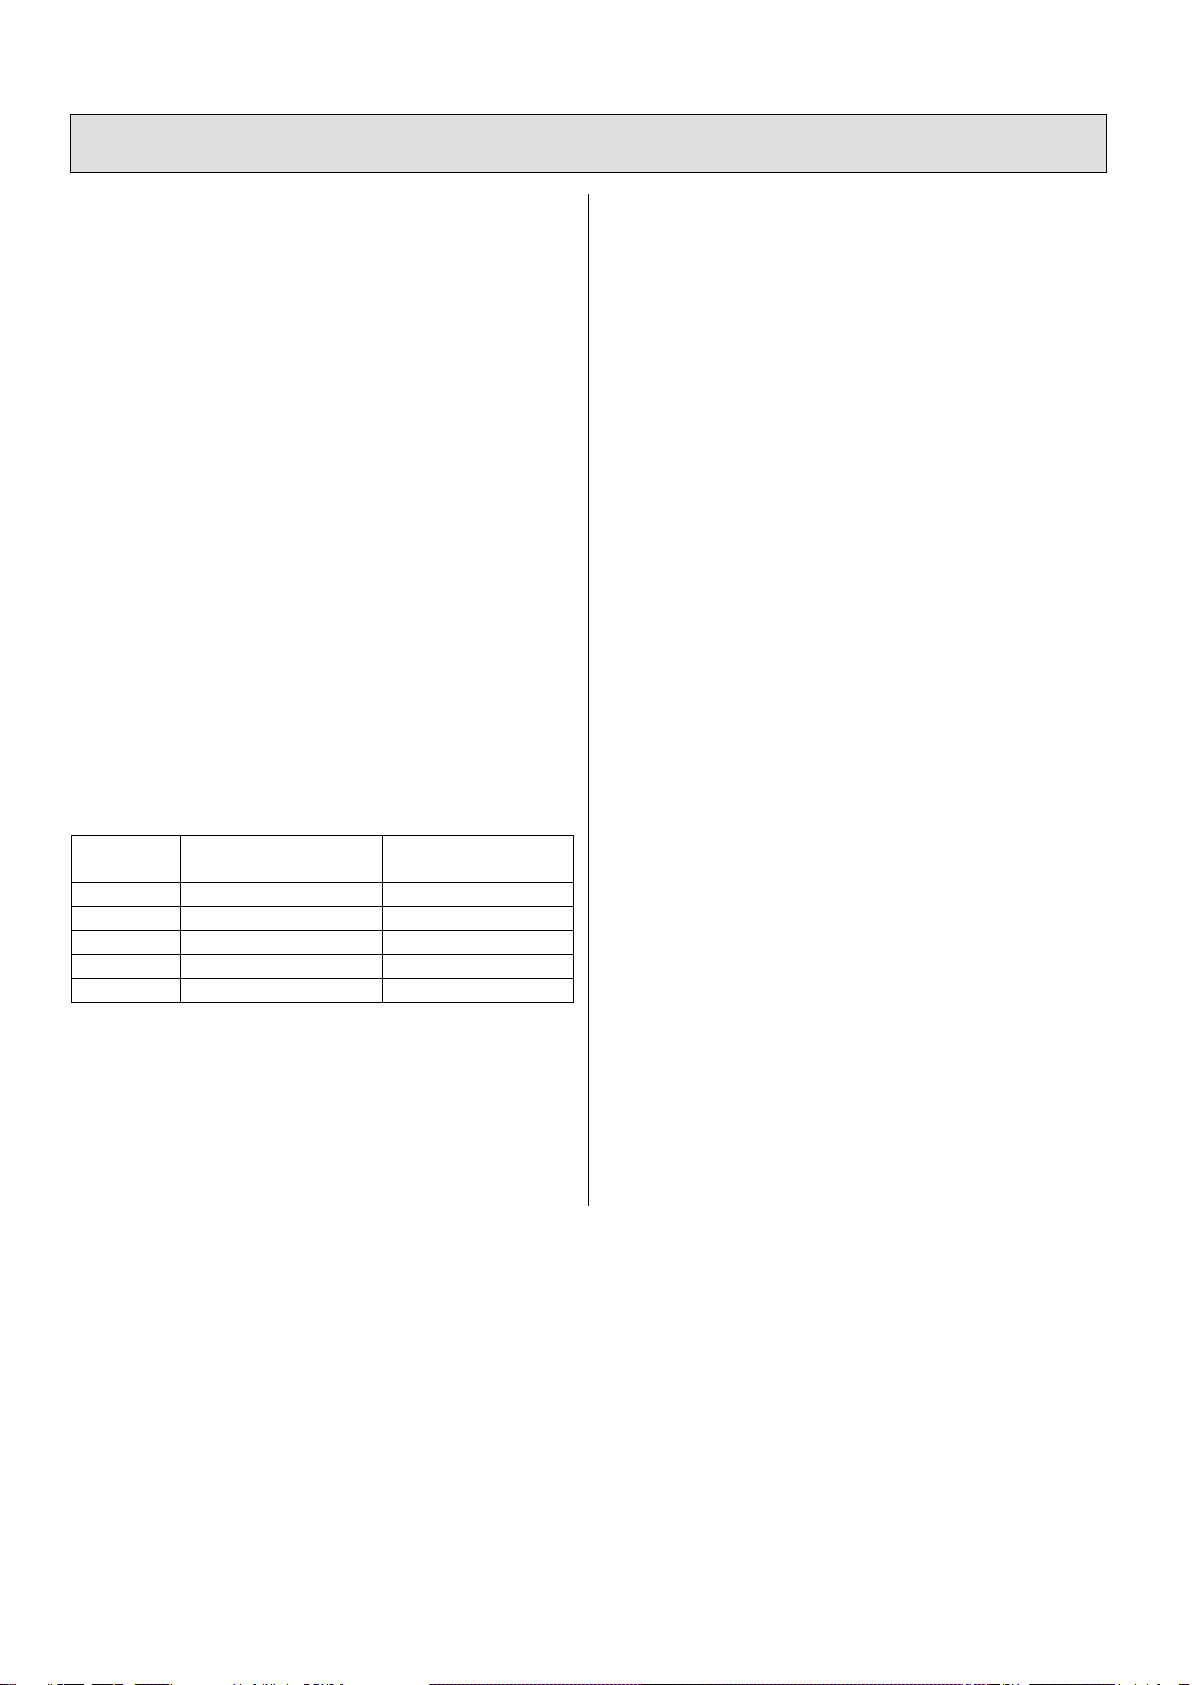
com a seguinte tabelas:
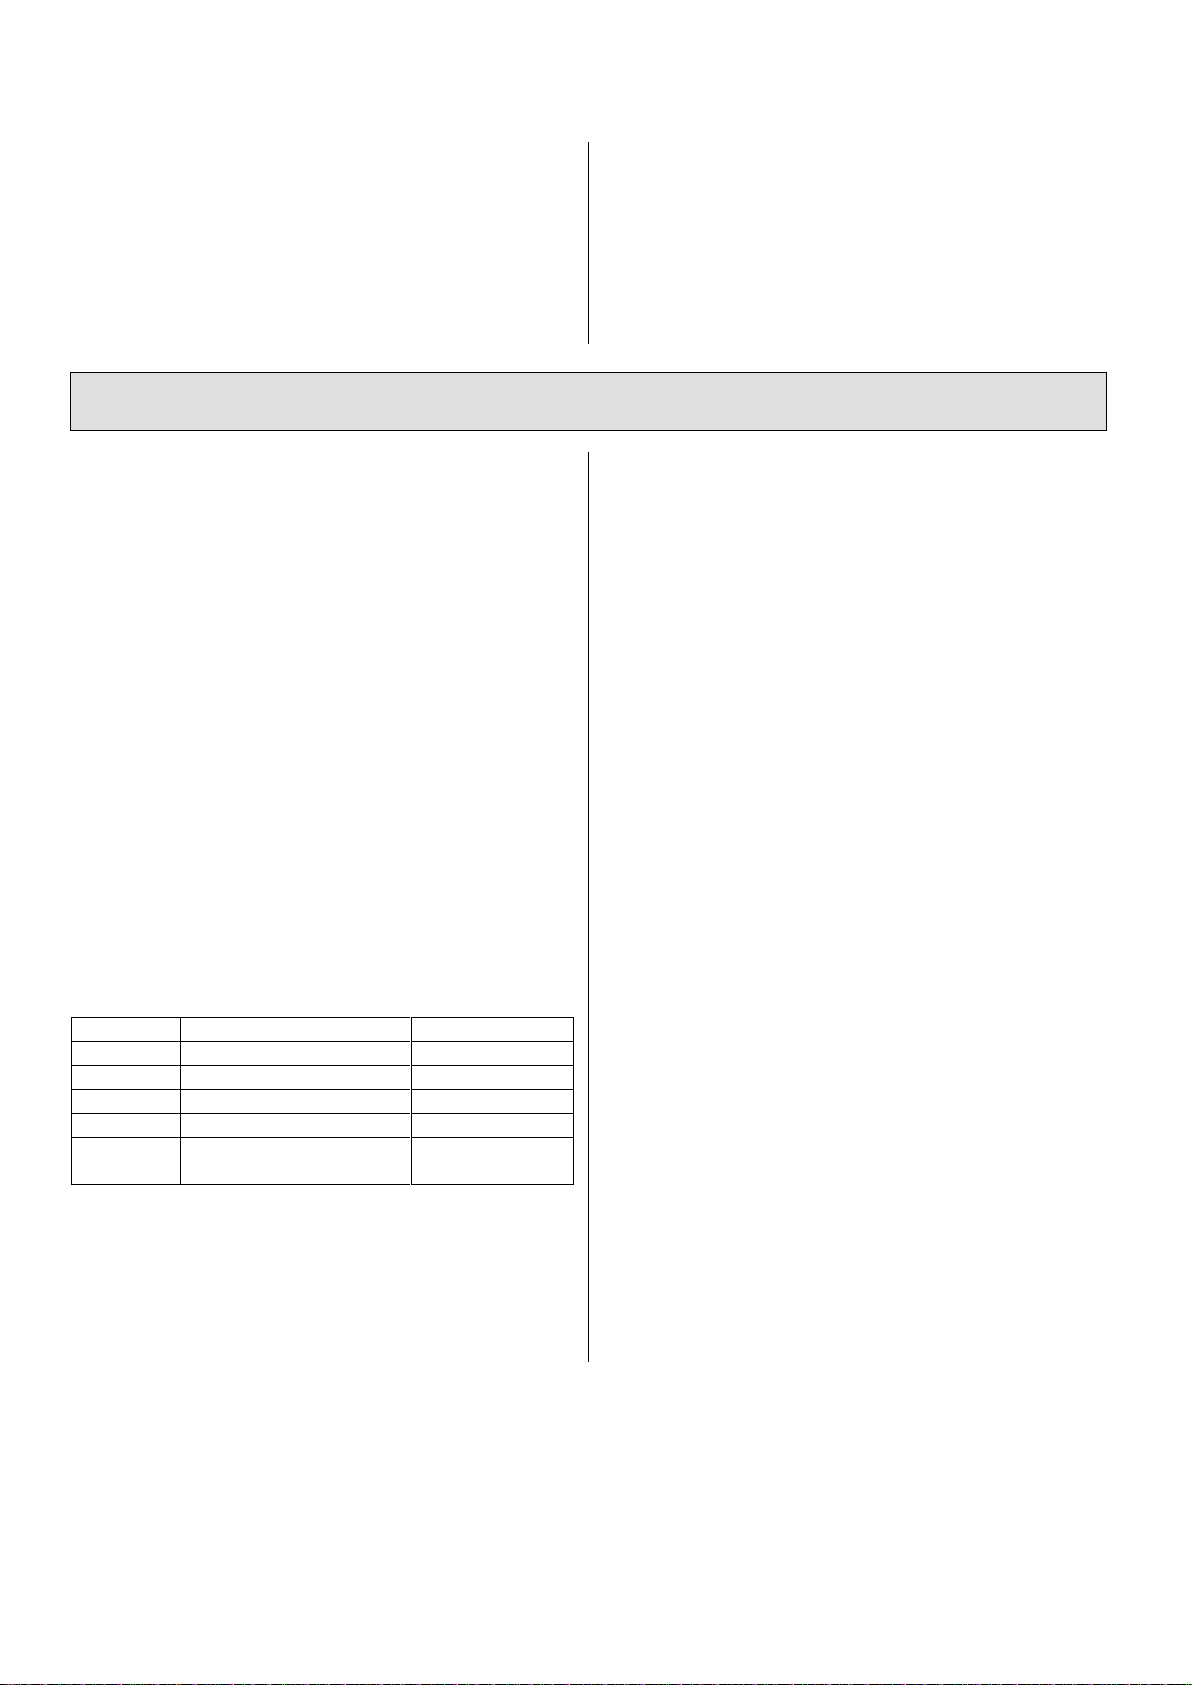
Símbolo
Classe
Temperatura
ambiente
SN
Subnormal
+10 to +32ºC
N
Normal
+16 to +32ºC
ST
Subtropical
+16 to +38ºC
T
Tropical
+16 to +43ºC
SN-T
Subnormal-tropical
+10 to +43ºC
Para lá deste campo normativo o seu aparelho trabalhará
corretamente mesmo a temperaturas próximas dos 0ºC.
A humidade relativa ambiente deverá estar entre os 50 e
os 75%, fora deste campo o seu aparelho fará os possíveis
para atingir a humidade interna configurada, dependendo
da carga e da temperatura configurada, mas não estarão
garantidas as condições configuradas para estes casos.
Afastado do calor
Evite posicionar o aparelho num lugar exposto
diretamente à luz solar, ao lado de um fogão ou qualquer
outra fonte de calor.
Distanciador de parede (pag.39 / IMG 1)
Antes de colocar a sua unidade em posição, deverá
instalar o distanciador de parede no topo das costas do
aparelho. Desaperte ligeiramente os dois parafusos, insira
o distanciador e volte a apertar novamente os parafusos
até que a peça fique bem presa.
Nivelamento do aparelho
O seu aparelho deve ser instalado numa superfície plana,
estável e isenta de vibrações.
Coloque-o em posição e ajuste os pés dianteiros
(apertando ou desapertando-os) de modo a nivelar o seu
aparelho. Recomendamos a utilização de um nível de
bolha para esta operação.
Limpeza
Antes de ligar a ficha de alimentação, limpe o
compartimento e os acessórios com uma solução de água
e detergente suave.
Ligações elétricas e à terra
Antes de proceder à ligação elétrica, deve verificar se a
tensão indicada na placa de características que se
encontra no interior do aparelho, corresponde à tensão da
instalação elétrica da casa e se a tomada está equipada
com uma ligação à terra standard de acordo com a lei em
vigor relativa à segurança das instalações.
Se não existir ligação à terra adequada, o fabricante
declinará toda e quaisquer responsabilidades sobre
eventuais danos materiais e/ou pessoais em caso de
avaria. Não utilizar fichas ou adaptadores múltiplos.
Posicione o aparelho de modo a poder alcançar
facilmente a ficha de ligação à tomada elétrica.
Potência insuficiente
A tomada elétrica deve ser adequada ao valor da potência
máxima do aparelho, indicada na placa de características
colocada no interior do aparelho.
INSTALAÇÃO
5
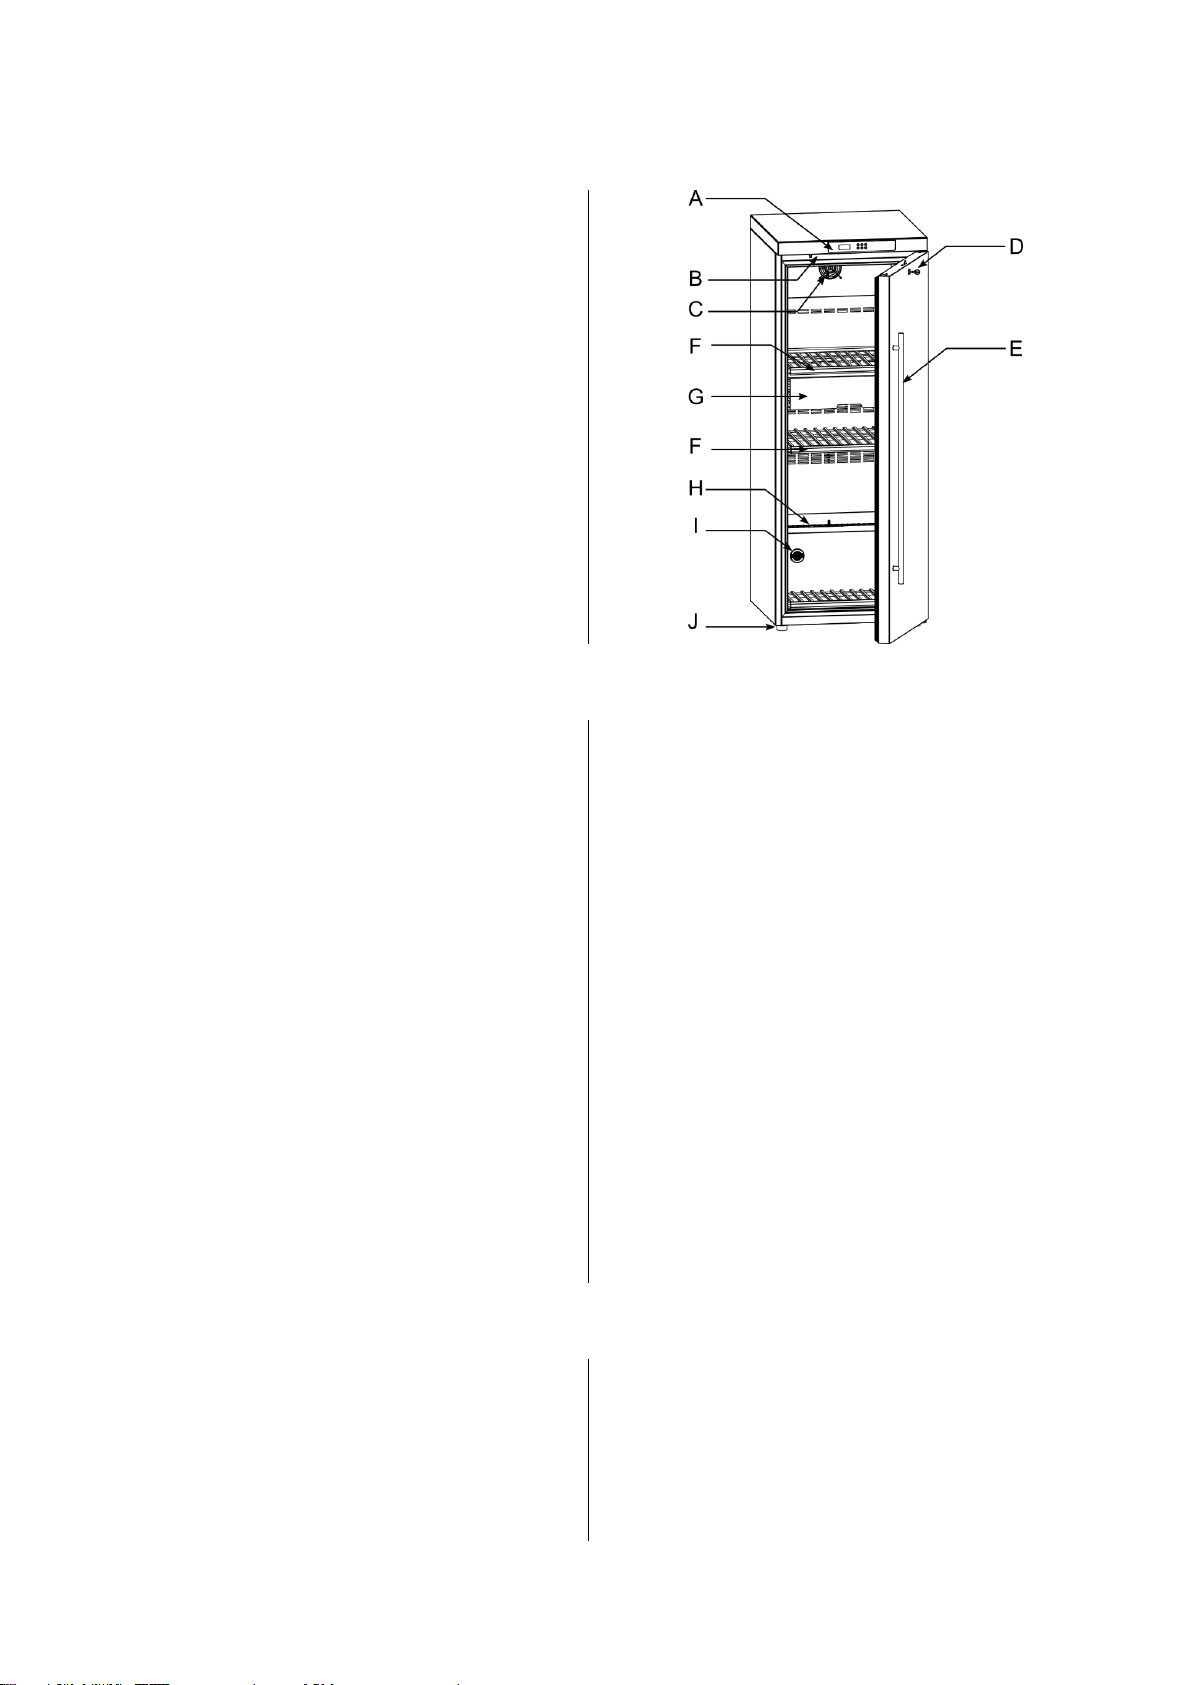
O APARELHO
A - Controlador de Temperatura e Humidade
B - Iluminação LED
C - Ventilador Interno
D - Fechadura da Porta (*)
E - Puxador Porta
F - Prateleiras para Garrafas
G - Gaveta “Selection”
H - Dreno e Furo de Descarga
I - Filtro de Carvão
J - Pés Ajustáveis e Rodas
(*) não disponível em todos os modelos
COMO PÔR A FUNCIONAR O APARELHO
Antes de colocar em funcionamento o aparelho, leia e
respeite as secções “Segurança” e “Instalação”. O
aparelho não deve ser ligado imediatamente após o
seu transporte.
Duas horas é o mínimo tempo aconselhado para permitir
que o óleo do compressor regresse à sua posição original.
Instalar ou remover prateleiras
Retire os materiais de embalagem, verifique se os
suportes estão completamente encaixados e se as
prateleiras estão bem apoiadas. Se necessitar de mover
ou inserir novas prateleiras siga o capítulo “Mover ou
adicionar prateleiras”.
Instalação do filtro de carvão (pag.39 / IMG 2)
Alinhe e insira o filtro fornecido no suporte
correspondente.
Verificar o escovilhão de limpeza do dreno
(pag.39 / IMG 3)
O espigão de limpeza é fornecido encaixado no furo de
descarga de água. Verifique se o mesmo se encontra em
posição.
Ligar o seu aparelho
Ligue a ficha de alimentação elétrica e aguarde alguns
segundos para o controlador iniciar, (no visor indicará
uma serie de traços). Após o arranque o controlador
mostrará a temperatura e humidade interna ou apenas um
ponto luminoso na zona inferior, neste caso pressione o
botão ligar (18) para o ativar. Programe o controlador
para a temperatura desejada se diferente de 12ºC, para
isso veja o capítulo “Programação do controlador”.
Carregar com garrafas
A disposição das garrafas deve respeitar a carga máxima
admitida por prateleira. A carga não deve estar em
contacto com a parede interior traseira do aparelho nem
da parede interior da porta e deve ser distribuída o mais
uniformemente possível evitando concentrar todas as
garrafas no topo ou na base do aparelho.
As prateleiras deslizantes não devem ser carregadas com
mais de dois níveis. O nível superior deve ser carregado
de modo a que, ao puxar a prateleira, as garrafas não
caiam.
Nunca extraia simultaneamente mais de uma prateleira
deslizante.
POUPANÇA DE ENERGIA E AMBIENTE
Instale corretamente o aparelho
Significa que a unidade deve ser instalada afastada de
fontes de calor, ou de luz solar direta e num espaço bem
ventilado.
Mantenha a porta fechada
Abra a sua unidade apenas quando necessário - sempre
que abrir a porta grande quantidade de ar frio irá se
perder. Para repor as condições internas o compressor
terá de funcionar e consumir energia.
Verifique o vedante da porta
Mantenha o vedante da porta limpo e flexível para que
ele isole corretamente e garanta que não exista fuga de ar
frio.

6
Configurar a temperatura e humidade
interna
Respeite as recomendações. Configurações de
temperatura ou humidades extremas irão consumir mais
energia.
Respeito pelo ambiente
O seu aparelho não usa qualquer gás contendo CFC ou
HCFC, o agente de expansão da espuma isolante e o
refrigerante são inofensivos para a camada de ozono e
não contribuem para o efeito de estufa.
Desembalar
Toda a embalagem é composta por materiais recicláveis.
Depois de desembalar, selecione e encaminhe todos os
materiais desnecessários para um ecoponto.
Resíduos elétricos e eletrónicos
Os resíduos elétricos e eletrónicos devem ser descartados
apropriadamente. Se necessitar de descartar um antigo
aparelho contacte por favor o seu revendedor ou os
serviços camarários locais.
CONFIGURAÇÃO DO CONTROLADOR
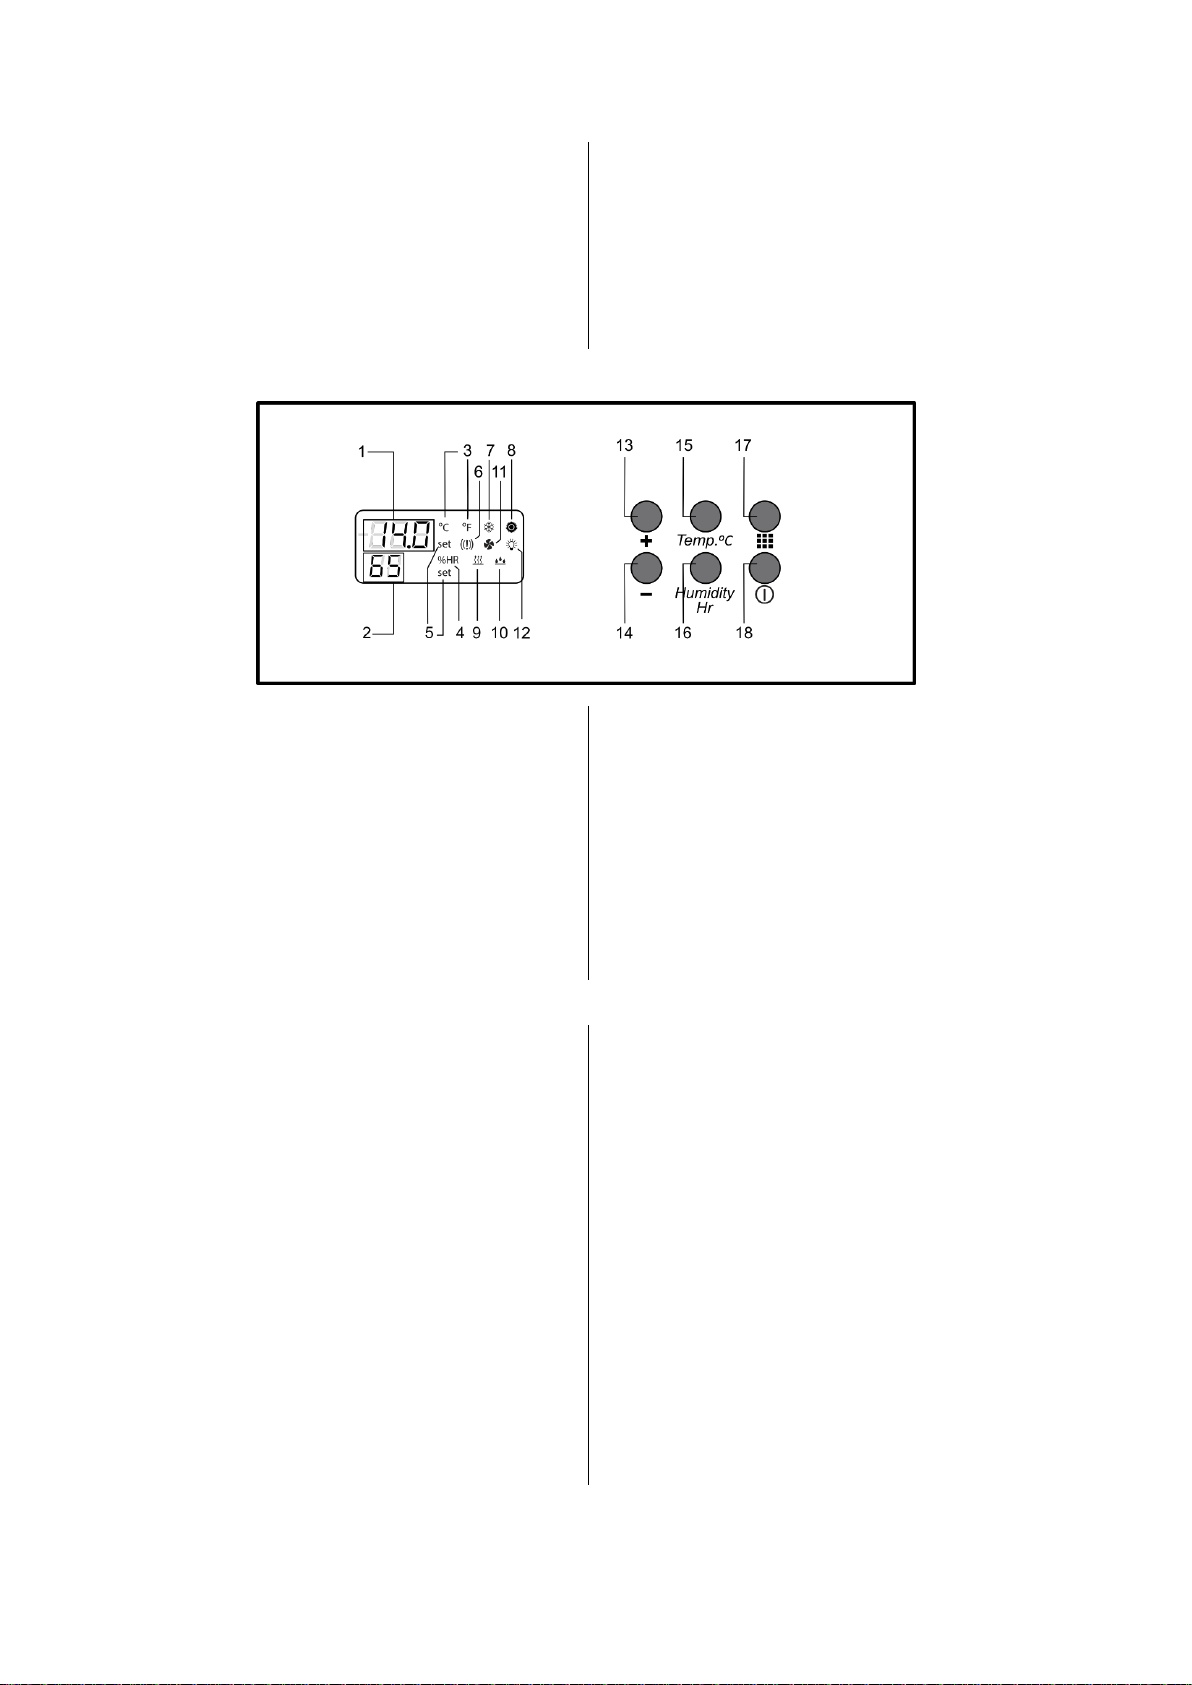
1 - Indicação temperatura interna
2 - Indicação humidade relativa interna
3 - Unidade da temperatura
4 - Unidade da humidade
5 - Indicador de configuração (temperatura /
humidade)
6 - Sinalizador Falha / Alarme –acende se presente um
alarme
7 - Sinalizador compressor –aceso se o compressor
estiver a trabalhar, a piscar se ativo o atraso de “ciclo
curto”
8 - Sinalizador de resistência –aceso se resistência
ativa
9 - Desumidificação em curso
10 - Humidificação em curso
11 - Sinalizador ventilador –aceso se ventilador a
trabalhar
12 - Sinalizador LED - aceso se iluminação ligada
13 - Botão incrementa
14 - Botão decrementa
15 - Ajuste temperatura interna
16 - Ajuste humidade interna
17 - Botão filtro de carvão
18 - Botão liga / desliga –pressionar para parar ou ativar
o aparelho
Ajuste de temperatura
A temperatura interna pré-definida é de 12ºC, esta é a
temperatura usual para envelhecimento. Pode, contudo,
ajustar a temperatura da sua cave para um valor entre 5º
e 20ºC.
Pressionando o botão de ajuste temperatura (15), o valor
atual (1) e o sinal de configuração (5) ficam a piscar.
Ajuste o valor de temperatura interna para o desejado
usando o botão para incrementar (13) e decrementar (14)
e confirme a sua escolha pressionando o botão (15).
Não é possível escolher valores fora do campo de
trabalho do aparelho.
Se um novo valor não for introduzido dentro de 30
segundos, o controlador retoma o valor inicial e o
indicador de configuração (5) apaga-se.
Se um novo valor for introduzido, mas não confirmado,
após 30 segundos o controlador assume o novo valor e
retoma ao modo normal.
Ajuste de humidade
O valor pré-definido é de 65%, para manter as qualidades
de vedação das rolhas e evitar a degradação dos rótulos
das garrafas, a humidade relativa no interior do aparelho
deve idealmente estar entre 60 e 75%. Pode, contudo,
ajustar este valor entre 50 e 75%. O aparelho tomará as
ações necessárias para ajustar a humidade interna ao
valor programado. Considere, contudo, uma tolerância de
10% que dependendo da carga e das condições do local
onde está instalado o aparelho.
Pressionando o botão de ajuste da humidade (16), o valor
atual (2) e a indicação de configuração (5) ficam a piscar.
7
Ajuste o valor de humidade relativa interna para o
desejado usando o botão para incrementar (13) e
decrementar (14) e confirme a sua escolha pressionando
o botão (16).
Não é possível escolher valores fora do campo de
trabalho do aparelho.
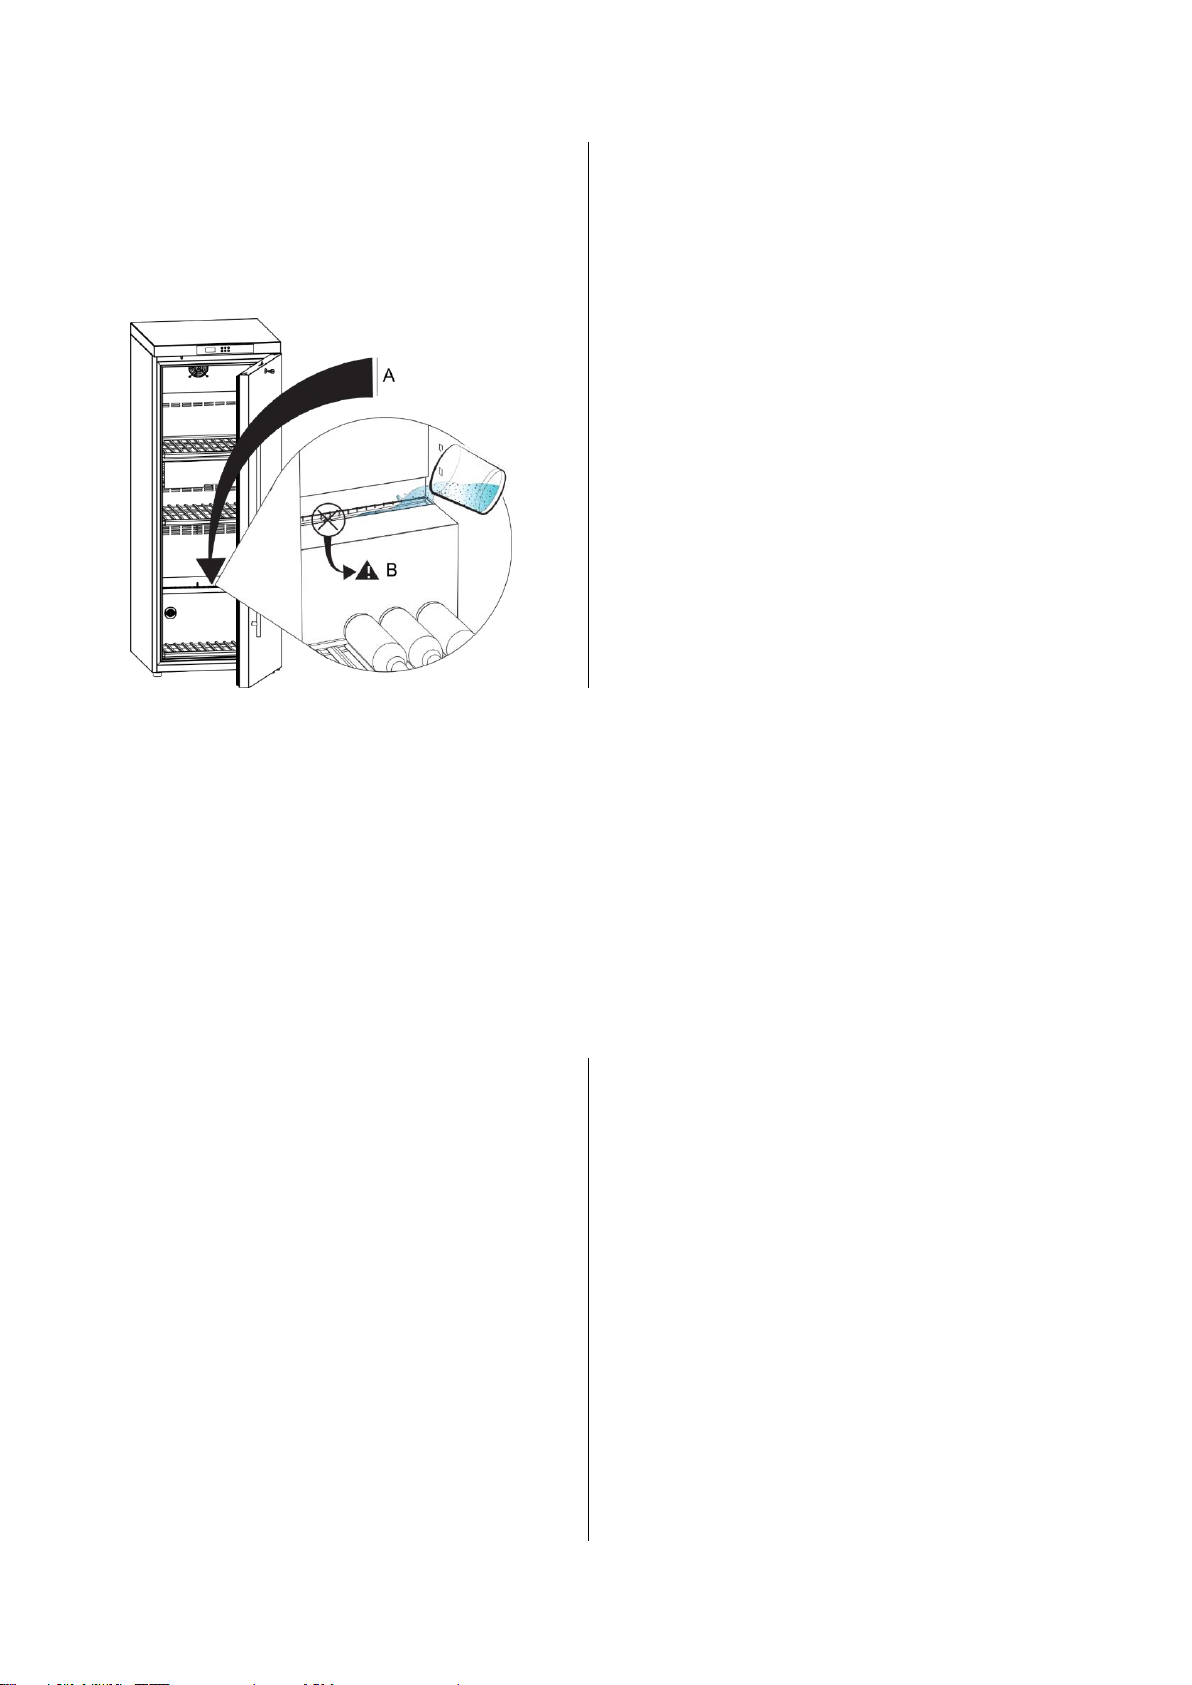
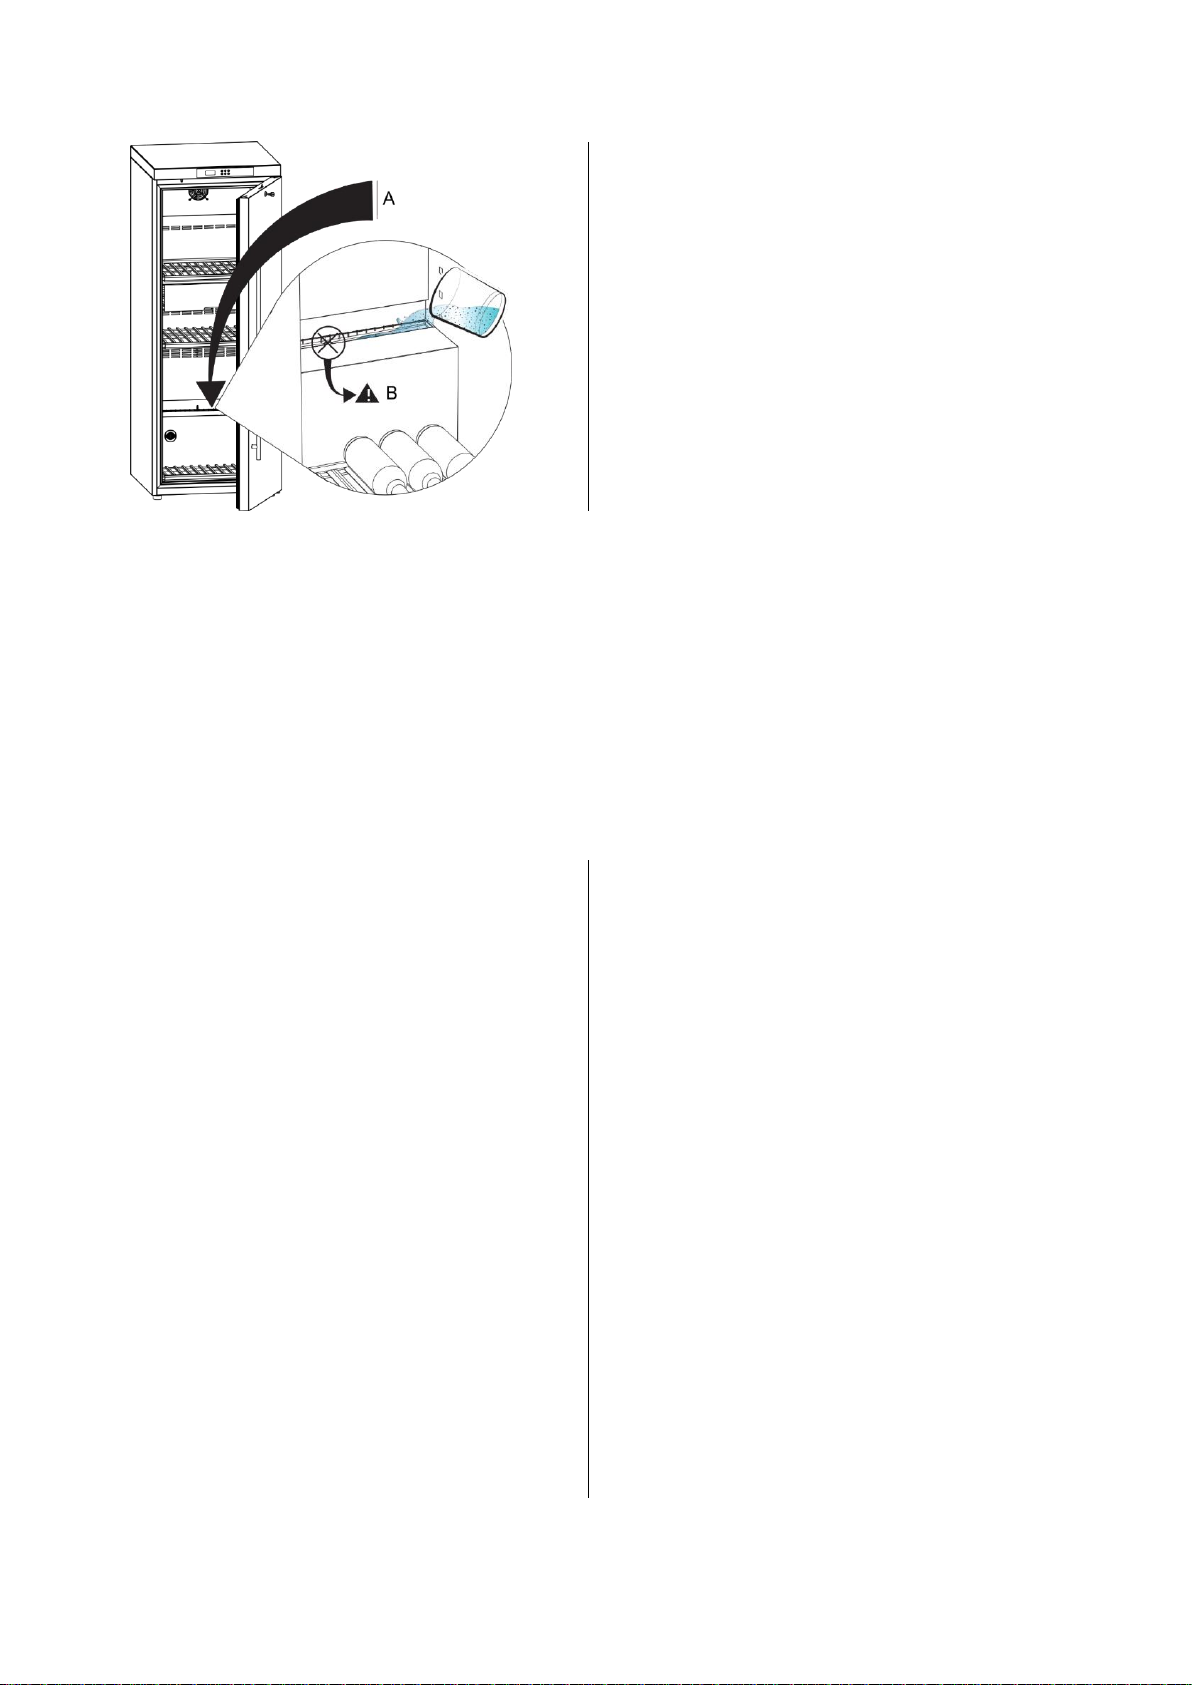
A–Água cerca de 150 ml
B–Não colocar no cano de escoamento de água
Se um novo valor não for introduzido dentro de 30
segundos, o controlador retoma o valor inicial e o
indicador de configuração (5) apaga-se.
Se um novo valor for introduzido, mas não confirmado,
após 30 segundos o controlador assume o novo valor e
retoma ao modo normal.
Nota: exceto quando em modo configuração, os valores apresentados no controlador são a temperatura e a
humidade no interior do aparelho.
Os resultados de novas configurações dependem da carga e das condições ambientes do local. É, portanto,
necessário aguardar que as novas condições internas tenham efeito e estabilizem.
Este aparelho foi desenhado como cave de envelhecimento, podendo, contudo, ser utilizada como cave de
serviço. Para o fazer basta ajustar a temperatura interna de acordo com as necessidades. Como regra geral o
vinho branco tem uma temperatura de serviço entre 6 e 10ºC e os tintos entre 15 e 18ºC.
Considere, contudo, que sendo projetada como cave de envelhecimento, a velocidade de subida e descida da
temperatura é lenta. O tempo necessário para atingir as temperaturas de serviço pode ser longo, dependendo
da carga interna e das condições climáticas.
MANUTENÇÃO DO APARELHO
Antes de fazer qualquer limpeza, desligue o aparelho da
rede elétrica (retirando a ficha ou desligando o interruptor
geral da habitação).
Retire todas as garrafas para fazer a limpeza do interior
ou para movimentar o aparelho.
ATENÇÃO: não danificar o circuito de refrigeração.
Limpeza e manutenção
O interior do aparelho deve ser limpo com regularidade.
Utilize um pano macio e uma solução de água e
detergente suave. Não use para o efeito produtos
abrasivos, acetona diluentes ou produtos à base de álcool.
Após a limpeza do interior enxague bem com água limpa
e seque cuidadosamente Após esta operação pode voltar
a ligar o seu aparelho seguindo as instruções do capítulo
“Como pôr em funcionamento o aparelho”.
Substituição do filtro de carvão (pag.39 / IMG 2)
Para manter uma adequada qualidade do ar o filtro de
cravão (I) deve ser substituído pelo menos uma vez por
ano. Puxe o filtro antigo do suporte e empurre o novo,
tendo o cuidado de o alinhar com os encaixes. Pode
adquirir novos filtros no seu revendedor.
O controlador mostrará a mensagem “FIL” quando for a
altura de substituir o filtro. Confrontando-se com esta
mensagem pressione qualquer tecla para parar o aviso
sonoro, mude o filtro como indicado anteriormente e
depois pressione a tecla do filtro (17) para reiniciar o
contador de dias e desaparecer a mensagem. O período de
utilização do filtro está programado para ser substituído
ao fim de 365 dias. Pode, no entanto, alterar este valor
pressionando o botão do filtro (17) por 3 segundos,
pressionar o botão incrementar (13) ou decrementar (14)
para ajustar a programação e pressione novamente o
botão do filtro (17). A introdução de um valor nulo (zero
dias) anulará a função filtro.

8
Limpeza do condensador
Uma vez por ano é aconselhável limpar a grelha posterior
(condensador). Para o efeito pode utilize um aspirador ou
um pincel macio. Ao faze-lo mantem um baixo consumo
de energia.
Inatividade prolongada do aparelho
Nos casos em que o aparelho não seja utilizado durante
longos períodos, é aconselhável desligá-lo da rede de
alimentação eléctrica e deixar a porta aberta para evitar a
formação de maus cheiros ou mofo. Verifique se o dreno
(H) está limpo. Se necessário elimine a água com uma
esponja e limpe o furo com o escovilhão fornecido.
MOVER OU ADICIONAR PRATELEIRAS
Disposição padrão
No esquema abaixo encontra um exemplo de disposição
de prateleiras que lhe permite, com as prateleiras
fornecidas e garrafas de dimensão normalizada conforme
EN62552:2013, atingir a capacidade de garrafas
declarada.
Disposição alternativa
Também pode adquirir prateleiras adicionais no seu
revendedor e aumentar a flexibilidade do seu aparelho,
aqui tem alguns exemplos.
F- Fixa | T- Gaveta | C- Móvel
Inserir suportes de prateleira fixa
(pag.39 / IMG 4)
Nota: preste atenção ao posicionamento à esquerda ou à
direita dos suportes.
Alinhe os engates do suporte da prateleira com as
desejadas aberturas da parede, pressione a parte posterior
do suporte (A) para baixo para que a patilha engate na
parede. Repita com o engate frontal (B).
Verifique se o suporte ficou completamente encaixado na
parede.
Remover suportes de prateleira fixa
Puxe a frente do suporte (B) para cima até que fique solto
da parede, repita na zona posterior (A).
Colocar prateleiras fixas (pag.39 / IMG 5)
Verifique se os suportes têm os amortecedores de
vibrações instalados (C), coloque a prateleira sobre os
amortecedores e deslize-a para trás de modo a que
encaixe (D) e não se possa mover para a frente.
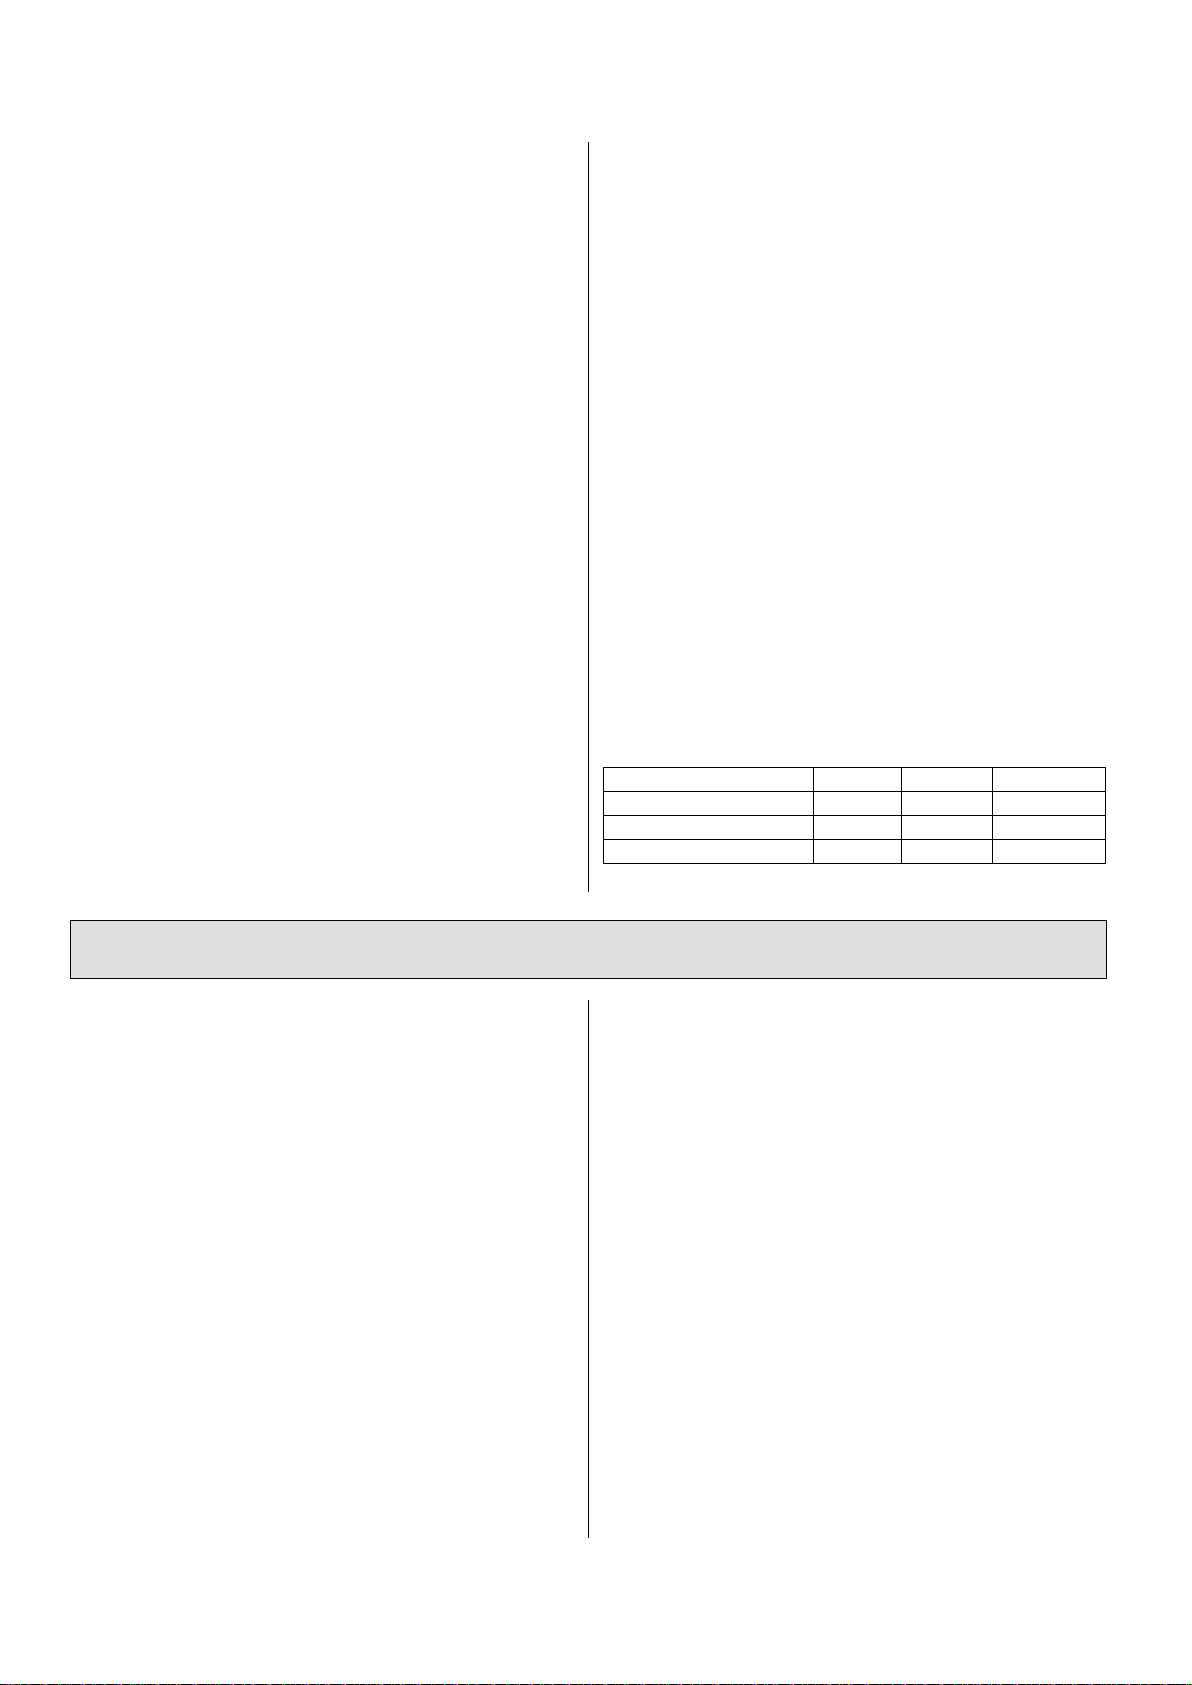
Modelo 150 (A)
Modelo 190 (B)
Modelo 190 Duplo (C)
Capacidade - 138 Garrafas
Capacidade - 237 Garrafas
Capacidade - 237+237 Garrafas
2 Prateleiras fixas
3 Prateleiras fixas
3+3 Prateleiras fixas
1 Prateleira móvel
2 Prateleira móvel
2+2 Prateleira móvel
1 Gaveta Selection
1 Gaveta Selection
1+1 Gaveta Selection
9
Inserir os suportes de prateleira móvel
(pag.39 / IMG 6)
Alinhe o engate traseiro com o encaixe da parede
desejado, empurre o suporte (F) para trás de modo a que
encaixe completamente na parede.
Alinhe o engate frontal com o desejado encaixe da parede
(G) e pressione para baixo de modo a que encaixe
completamente na parede.
Verifique se o suporte ficou completamente encaixado na
parede.
Remover suportes de prateleira móvel
Puxe para cima a zona frontal do suporte de modo a
desencaixar o engate (G)da parede, puxe o suporte na sua
direção de modo a desencaixar o engate traseiro (F) da
parede.
Inserir uma prateleira móvel (pag.39 / IMG 6)
Com a prateleira inclinada (1º) insira-a entre os roletes
dos suportes, deslize a prateleira para trás para que entre
na calha guia (2º).
Inserir um suporte de gaveta “Selection”
(pag.39 / IMG 8)
Nota: preste atenção ao posicionamento à esquerda ou à
direita dos suportes.
Alinhe o engate traseiro com o encaixe da parede
desejado, empurre o suporte (H) para trás de modo a que
encaixe completamente na parede. Alinhe o engate
frontal com o encaixe da parede (I), pressione para baixo
de modo a que encaixe completamente na parede.
Verifique se o suporte ficou completamente encaixado na
parede.
Inserindo uma gaveta “Selection” nas guias
(pag.39 / IMG 9)
Posicione a gaveta acima dos trilhos e empurre-o.
Puxe a gaveta juntamente com as partes deslizantes das
guias e coloque os dois parafusos de fixação (K).
Verifique se os suportes têm os amortecedores de
vibrações instalados, coloque a prateleira (J) sobre os
amortecedores e deslize-a para trás de modo a que
encaixe e não se possa mover para a frente.
Remover uma gaveta “Selection”
Remova todas as garrafas da gaveta e da prateleira
superior (J). Remova a prateleira (J) superior.
Abra completamente a gaveta e remova os dois parafusos
inferiores (K). Puxe a gaveta para desengatá-la dos
trilhos.
Remover um suporte de gaveta “Selection”
Puxe para cima a zona frontal do suporte de modo a
desencaixar o engate (I) da parede, puxe o suporte na sua
direção de modo a desencaixar o engate traseiro (H) da
parede.
Repita esta operação no outro lado.
Peso máximo acima de uma prateleira
A iluminação LED não liga com a porta
aberta
Verifique se:
- A ficha está inserida na tomada elétrica ou
suficientemente inserida.
- Existe corrente no local de instalação.
A cave de vinho não arrefece corretamente
ou o compressor está sempre a trabalhar
Verifique se:
- A porta está corretamente fechada ou o vedante
danificado.
- A porta é aberta com muita frequência.
- São respeitadas as condições de instalação.
O aparelho é muito ruidoso
Verifique se:
- O aparelho está corretamente nivelado.
- O aparelho foi instalado entre móveis que vibram e
fazem ruído.
- São respeitadas as condições de instalação.
- A ventoinha interna está desobstruída e pode rodar
livremente.
- Se o ruido é produzido pelo fluido refrigerante o que
pode ocorrer mesmo quando o compressor não está a
trabalhar (isto não é um defeito).
A parede traseira interna do aparelho está
coberta de gelo ou gotas de água
- Esta situação é normal.
Há água no fundo do aparelho
Verifique se:
- O furo de descarga não está desobstruído.
Uma certa quantidade de água está normalmente
armazenada no dreno de descarga, isto garante um bom
controlo de humidade no aparelho.
Se, apesar de todos os controlos abordados, o aparelho
não funcionar corretamente, contacte o Centro de
Assistência Técnica mais próximo, comunicando as
seguintes informações: tipo de avaria, a sigla do modelo
(Mod.) e o respetivo número série (SN). Estas
informações encontram-se escrito na placa de
características situadas no interior do aparelho.
Prateleiras para
Fixa
Móvel
Gaveta
Modelo 150
86 kg
15 kg
12 kg
Modelo 190
95 kg
30 kg
12 kg
Modelo 190 Dupla
95 kg
30 kg
12 kg
RESOLUÇÃO DE PROBLEMAS
10
Nunca recorrer a técnicos não autorizados e recusar sempre a instalação de peças sobressalentes não originais.
O controlador mostrará uma mensagem de alarme ou um aviso se algo não estiver de acordo com o previsto. Esta
mensagem é exibida alternadamente com a temperatura interna até que as condições de alarme estabilizem.
O aviso sonoro pode ser silenciado pressionando qualquer tecla do controlador.
A seguinte tabela permite relacionar a indicação mostrada com a causa e as ações a tomar para resolver a situação.
MENSAGEM DE ALARME E AVISO
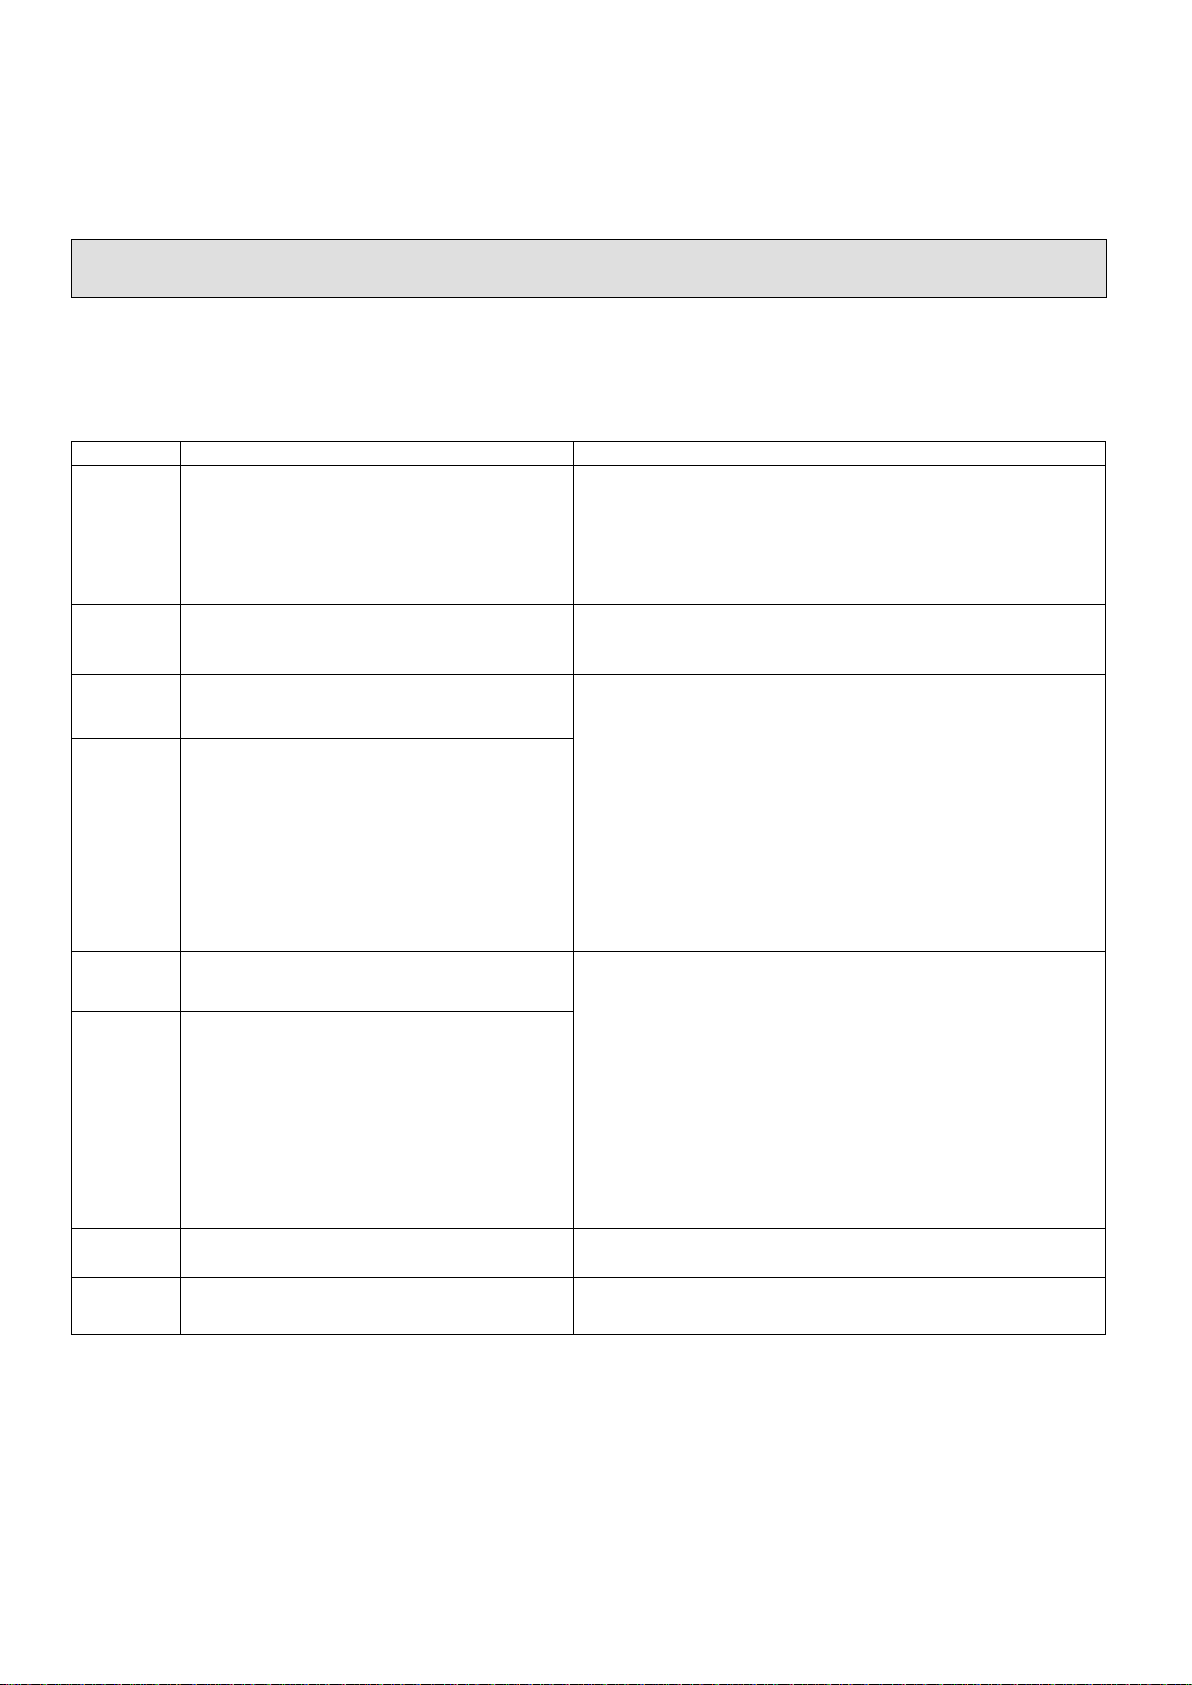
Indicação
Causa
Ações
dA
Alarme de porta aberta
Feche a porta, a menos que precise de mante-la aberta para
operação de carga / descarga. Neste caso, você pode parar o
aviso sonoro pressionando qualquer tecla. Quando terminar,
certifique-se de fechar a porta e a luz LED se desligue.
Até que esta causa seja corrigida, o aparelho irá parar todas as
ações de arrefecimento e aquecimento.
FIL
Mudança filtro carvão
Mude o filtro de carvão e reinicie o contador de dias com a tecla
(17). Veja o capítulo “Manutenção do aparelho” para detalhes.
Mesmo que esta mensagem, o aparelho continuará normal.
HA
Alarme temperatura alta
Esta mensagem aparece se o aparelho não for capaz de atingir a
temperatura configurada ao fim de um certo tempo.
Verifique se o aparelho está instalado corretamente e se as
condições climáticas do local estão de acordo com as
especificações (conforme o capitulo “Instalação”).
Se houve uma mudança da configuração de temperatura,
humidade, uma alteração significativa da carga do aparelho ou
um longo período de porta aberta, silencie o alarme sonoro
pressionando qualquer tecla e aguarde algumas horas para que
a temperatura e/ou humidade no interior estabilize.
Se não for capaz de resolver o problema contacte o seu
distribuidor.
LA
Alarme temperatura baixa
HHA
Alarme humidade alta
Esta mensagem aparece se o aparelho não for capaz de alcançar
atempadamente a humidade para um valor seguro.
Verifique se o aparelho está instalado corretamente e se as
condições climáticas do local estão de acordo com as
especificações (conforme o capitulo “Instalação”).
Se houve uma mudança da configuração de temperatura,
humidade, uma alteração significativa da carga do aparelho ou
um longo período de porta aberta, silencie o alarme sonoro
pressionando qualquer tecla e aguarde algumas horas para que
a temperatura e/ou humidade no interior estabilize.
Se não for capaz de resolver o problema contacte o seu
distribuidor.
HLA
Alarme humidade baixa
P1
Alarme sonda temperatura
Na presença desta indicação o seu aparelho deixa de trabalhar.
Deverá neste caso contactar o seu revendedor.
P3
Alarme sonda humidade
Na presença desta indicação o seu aparelho deixa de trabalhar.
Deverá neste caso contactar o seu revendedor.

11
Congratulations
You have purchased a wine cellar carefully developed for long-term storage of your wine.
You can also use it to bring wine to serving temperature. All you have to do is to change temperature set point.
This appliance is intended to be used exclusively for the storage of wine.
Please read this manual carefully and keep it for future reference.
It contains important information for the installation, use and maintenance of your
appliance.
Maturing Wine
Successful long-term storage of wine is a delicate process. Any sudden temperature change, cork sealing quality
damage due to low humidity, exposure to light (particularly UV radiation) or abnormal vibration can change wine
qualities.
Recommended maturing temperature is in the range of 10 to 14ºC.
Relative humidity should be above 50%, lower than this cork sealing will be at risk.
High humidity will damage your bottle labels.
As you will see later in this manual, the controller is pre-set to 12ºC and 65% relative humidity. However, you will be
able to adjust these conditions according to your needs.
Serving Wine
Recommended serving temperature for white wine is 6 to 10ºC. Red wine is normally served between 15 and 18ºC.
Please consult a good manual or use wine label information in order to set the correct temperature for the specific wine
you want to serve.
Bottle Capacity
The number of bottles you are able to put in your wine cellar has been calculated using the standard number and
layout of shelves and bottle dimension according to EN 62552:2013.
In chapter “Shelves layout”you have an overview of how this loading plan was made and also some other options if
you want to increase the number or change the position of the shelves.
EN

12
ATTENTION: Read this manual
carefully because it contains
instructions which will ensure safe
installation, use and maintenance of
your appliance.
-Your wine cellar has been built according to the
International Safety Standards (2014/35/EU).
It also meets the standards on the prevention and
elimination of radio interference (2014/30/EU).
-The manufacturer reserves the right to modify the
characteristics of the models without prior notice.
Warning: This appliance must be earthed.
-Some models may not have all the accessories
indicated.
1. This appliance has been designed to be used
indoors and under no circumstances should it be
installed outside, even if protected by a roof.
Leaving the appliance exposed to rain and other
weather conditions is extremely dangerous.
2. This appliance can be used by children over 8
years old, individuals with reduced physical,
sensorial or mental capabilities and anyone with lack
of experience or knowledge, as long as they are
given supervision or instruction concerning the safe
use of the appliance and understand the dangers
involved. Children should not play with the
appliance.
3.Do not attempt to operate or handle the wine cellar
when barefoot, or with wet hands or feet.
4. It is highly recommended that you do not operate
this appliance by connecting it to the power supply
with extensions or multiple socket plugs.
If the appliance has been installed between two
cabinets, make sure that the supply cord is not
dangerously crimped or trapped beneath a heavy
object.
5. Never pull the cable or the appliance to remove
the plug from the socket. This is extremely
dangerous.
6. Do not touch the internal cooling elements,
especially if your hands are wet, because you can get
burnt or hurt yourself.
7. Before doing any cleaning, disconnect the
appliance from the electricity (by pulling out the
plug or turning off the general switch in your home).
8.Before disposing of your old appliance, remember
to break or remove the lock as a safety measure to
protect children from locking themselves inside it
when playing. In addition, if the appliance is a new
one with a lock, keep the key out of the reach of
small children.
9. If your appliance is not operating properly, read
the chapter entitled, “Troubleshooting”, which
might help you resolve the problem.
Do not attempt to repair the appliance by tampering
with the internal components.
10. If the power supply cord needs to be replaced,
please note that in some cases, the connections are
made using special terminals and in other cases, a
special tool must be used to access the connections.
This operation should only be performed by an
authorized agent.
11. Do not use electric appliances inside the storage
compartments of your wine cellar, unless they are
recommended by the manufacturer.
Do not use mechanical devices or other means to
accelerate the defrosting process, other than those
recommended by the manufacturer.
12. Do not store explosive substances such as
aerosols containing flammable propellants in this
device.
13. This wine cellar is intended to be used in
household and similar applications such as:
- Kitchen staff areas in shops, offices and other
working environments;
- Farmhouses and by clients in hotels, motels and
other residential type environments;
- Bed and breakfast type environments;
- Catering and similar non-retail applications.
14.At the end of the functional life of your
appliance -containing cyclopentane gas in the
insulation foam and perhaps R600a gas (isobutane)
in the refrigeration circuit - it should be made safe
before being sent to the trash. For this operation,
please contact your dealer or the Local Organisation
in charge of waste disposal in accordance with the
rules in force (WEEE).
15. Do not damage the refrigeration circuit.
16. Keep ventilation openings in the appliance
enclosure, or in the built-in structure clear of
obstruction.
Fuse replacement
If the mains lead of this appliance is fitted with a BS
1363A 13 amp fused plug, to change a fuse in this
SAFETY
13
type of plug use an A.S.T.A. approved fuse to BS
1362 type and proceed as follows:
1. Remove the fuse cover and fuse.
2. Fit replacement 13A fuse into fuse cover.
3. Refit both into plug.
Important: The fuse cover must be refitted when
changing a fuse and if the fuse cover is lost the plug
must not beused until a correct replacement is fitted.
Correct replacement is identified by the colour insert
or the colour embossed in words on the base of the
plug. Replacement fuse covers are available in your
local electrical store.
To ensure that the appliance operates properly and to
reduce energy consumption, it is important that the
appliance is installed correctly.
General conditions
Do not place your appliance in a room liable to flood.
Avoid water splashes in the control panel and in the back
of the appliance.
Ventilation
The compressor and condenser generate heat and need to
be ventilated properly. Rooms with no ventilation are not
suited for the installation of this appliance. Therefore, it
should be installed in a room with an opening (window
or French window) that provides the appropriate amount
of air re-circulation.
For proper ventilation of the appliance, leave a space of
at least 10cm around it and any adjacent cabinets/walls.
Room temperature and humidity
Room temperature should be according to the climate
class of the appliance. Please look at the rating plate
(inside the appliance) to see the climate class of your
wine cellar and compare it with the following ranges:
Symbol
Class
Ambient range
SN
Extended temperate
+10 to +32ºC
N
Temperate
+16 to +32ºC
ST
Subtropical
+16 to +38ºC
T
Tropical
+16 to +43ºC
SN-T
Extended temperate to
tropical
+10 to +43ºC
Despite this standard range, your appliance will work
correctly even in a room with temperature starting from
0ºC.
Room relative humidity should be in the range of 50% to
75%. Outside this range the appliance will do his best to
bring internal humidity to set point but, depending on the
load and temperature set point, this cannot be guaranteed.
Away from heat
Avoid positioning the appliance in a place where it is
directly exposed to sunlight, nor near an oven, cook top
or other similar equipments.
Wall Spacer (pag.39 / IMG 1)
Before putting the appliance in position, you should
install the supplied wall spacer in the top back of the
appliance. Slightly lose the two screws, slide the space
and then tighten completely.
Levelling the appliance
Your appliance should be installed in a flat, stable and
vibration free surface.
Put your wine cellar in position and then adjust the front
feet (screwing or unscrewing them) in order to bring it to
level. The use of a spirit level is recommended.
Cleaning
Before connecting the power cord, clean the
compartments and accessories with water and a mild
detergent solution.
Earth electrical connections
Before proceeding with the electrical connection, make
sure that the voltage indicated on the rating plate, located
inside the appliance, corresponds to the mains voltage in
your home and that the socket is fitted with a standard
earth wire in accordance with safety standards. If the
socket is not fitted with an earth wire, the manufacturer
will not assume liability for any damages and/ or injuries
arising out of the use of the appliance. Do not use
multiple sockets or adapters.
Position the appliance in such a way that you can access
the socket where it is plugged in.
Insufficient Power
The electrical socket must be able to handle the maximum
power load of the appliance, which is indicated on the
rating plate located inside the wine cellar.
INSTALLATION

14
THE APPLIANCE
A -Temperature and Humidity Controller
B -LED Light
C -Internal Fan
D -Door Key (*)
E -Door Handle
F -Bottle Shelves
G -Selection Drawer
H -Drain and Discharge Hole
I -Active Charcoal Filter
J -Adjustable Feet and Wheels
(*) not present in all models
STARTING UP THE APPLIANCE
Before starting the appliance, follow the installation
instructions (see “Safety” and “Installation”).
This appliance should not be turned on right after
transportation
Two hours is the minimum advised time so that the oil
from the motor-compressor gets back to its original
position.
Installing or moving shelves
Remove any packing materials, check if the racks are
completely inserted and if the shelves are well supported.
If you need to move or add new shelves, please read how
to do so in chapter “Moving or adding shelves”.
Checking filter installation (pag.39 / IMG 2)
Check if the charcoal filter is aligned and completely
inserted in its position and remove any packing materials.
Checking discharge hole wiper (pag.39 / IMG
2)
Drain hole is fitted with a cleaning wiper. Please check if
it is in position.
Starting your appliance
Connect the power cord and wait a few seconds for the
controller to start (the display will show a line of scores).
After start-up, it will show actual internal temperature
and humidity or a dot at the bottom, in this case press the
On/Off key (18) to bring it to ON status.
Set the controller to the desired temperature if different
from default set point 12ºC. See “Controller adjustment”.
Loading your bottles
Layout must respect the maximum weight allowable per
shelf. Bottles must not touch the cabinet rear wall nor the
door liner. Weight should be loaded as uniformly as
possible, by spreading the bottles and avoiding
concentration of the load on the top or the bottom of the
appliance.
Sliding shelves should not be loaded with more than two
rows of bottles. Top row should be loaded in such a way
that sliding the shelf forward will not result in bottle
collapse.
Never pull out more than one sliding shelf at a time.
ENERGY SAVING AND ENVIRONMENT
Install the appliance correctly
This means that the appliance should be installed away
from sources of heat or direct sunlight, in a well
ventilated room.
Shut the door
Open your appliance only when strictly necessary. Every
time you open the door, most of the cold air will be lost.
In order to restore the correct temperature, the motor will
have to run and consume energy.
Check the door seal
Keep the seal clean and pliable so that it fits closely
against the door to ensure that no cold air is lost.
Setting temperature and humidity
Observe the recommended ranges, extreme temperature
or humidity set points will increase power consumption.
15
Environment caring
Your appliance does not use any CFC or HCFC. Foaming
agent and refrigerant gas are harmless to the ozone layer
and have zero impact on the greenhouse effect.
Unpacking
Packing material is completely made from recyclable
materials. After unpacking, please take the unnecessary
materials to a recycling point.
Electric and electronic equipment disposal
Electric and electronic equipment must be disposed in a
proper manner. If you need to trash your old appliance,
please contact your dealer or the local organisation in
charge of waste disposal.
CONTROLLER ADJUSTMENT
1 - Internal temperature display
2 - Internal relative humidity display
3 - Temperature units
4 - Humidity units
5 - Setting warning light (temperature / humidity)
6 - Fault Alarm –will show if an alarm is present
7 - Compressor signal light –on if the compressor is
working, blinking if the anti-short cycle delay is enabled
8 - Heater signal light –on if the heater is working
9 - Dehumidifying action in progress
10 - Humidifying action in progress
11 - Fan signal light –on if the fan is working
12 - LED signal light - on if the light is working
13 - Adjustment key to increase
14 - Adjustment key to reduce
15 - Temperature setting key
16 - Humidity setting key
17 - Charcoal filter key
18 - ON / OFF key –press to stop or restart appliance
Temperature setting
Default temperature set point is 12ºC, this is the usual
maturing temperature. However, you can adjust your
cellar between 5 and 20ºC.
Press the temperature setting key (15), actual temperature
set point and signalling light (5) will start blinking.
Adjust to the desired internal temperature using setting
keys UP (13) or DOWN (14), confirm your choice
pressing again the temperature setting key (15).
It is not possible to adjust temperature outside the
appliance working range.
If set point is not changed within 30 seconds, the
controller will return to the default temperature and the
signalling light (5) will switch off.
If the set point is changed but not confirmed, after 30
seconds, the controller will assume the new set point and
return to the display mode.
Humidity setting
Default humidity set point is 65%. In order to keep the
sealing quality of the corks and avoid bottle label
damage, internal level of humidity should be ideally
between 60 and 75%. You can however adjust this set
point between 50% and 75%. The appliance will take the
necessary actions to adjust internal humidity to set point.
Please consider that according to the load and the room
conditions, a tolerance of 10% around set point must be
considered.
Press the humidity setting key (16), actual humidity set
point and signalling light (5) will start blinking.
Adjust to the desired internal humidity using setting keys
UP (13) or DOWN (14). Confirm your choice pressing
again the humidity setting key (16).
It is not possible to adjust relative humidity outside the
working range.
16
A–Water around 150 ml
B–Do not place in the drainpipe
In case, you are facing a low humidity inside the cabinet
(mainly in the initial phase of the installation), adjust it
with small amount of water as shown in the illustration.
Note: The values shown in the display are actual temperature and humidity inside the appliance.
New set point effects will depend on internal load and environmental conditions. It is therefore necessary to
wait until new internal conditions are stable.
This appliance has been designed as a maturing cabinet.
It can also be used as a serving appliance. All you need to do is to adjust internal temperature according to your
needs. As a general rule, white wine should be served between 6 and 10ºC and red wine between 15 and 18ºC.
Please consider that being born as a maturing cabinet, the internal temperature raising and dropping rate is
slow. The time needed to achieve serving temperatures, depending on internal load and climate conditions, can
be large.
MAINTAINING THE APPLIANCE
Before doing anycleaning, disconnect the appliance from
the electricity (by pulling out the plug or turning off the
general switch in your home).
Unload any bottles for internal cleaning or if you need to
move your appliance.
WARNING: Do not damage the refrigeration circuit.
Cleaning and Maintenance
The inside of the appliance should be cleaned on a
periodic basis. Use only a soft cloth, water and a mild
detergent solution to clean the appliance. Do not use
abrasive, acetone, spirit or alcohol based cleaning
products.
After cleaning the inside, rinse it well with clean water
and dry carefully.
Once the appliance is cleaned, turn it on, following the
instructions in Chapter “Starting up the appliance”.
Charcoal filter replacement (pag.39 / IMG 2)
In order to keep adequate air quality, the charcoal filter
(I) must be replaced once a year. Pull the old filter from
its support and push the new one, being careful while
aligning it.
You can purchase original filters at your retailer.
The controller will show a “FIL” message when it is time
to change the filter. In face of that message,just press any
key to stop the buzzer, change the filter and press release
filter key (17) to reset counter and message. Default time
is 365 daysbut you will be able to change it pressingfilter
key for 3 seconds and then increasing or decreasing the
number of days with the UP and DOWN keys (13/14),
press again (17) to exit setting mode.
Imputing zero days will disable the filter function.
Condenser cleaning
Once a year it is advisable to clean the rear grid
(condenser). You can vacuum clean it or use a soft brush.
Doing so will maintain a low energy consumption level.
When not in use
Should the unit not be used for a long period of time,
disconnect the plug from the mains and leave the door
open to avoid the formation of mould and unpleasant
odours.
Check if the drain (H) is clean. If necessary, remove all
water with a sponge and clean the water discharge hole
with the supplied wiper

17
SHELVES LAYOUT
Standard layout
In the following drawings you will find an example of a
rack arrangement that will permit you, with the shelves
supplied and the standard bottle dimension
(EN62552:2013), achieve the declared capacity of your
cellar.
Alternative layout
You can also buy additional shelves from your retailer
and increase the flexibility of your appliance. Here you
have some exemples.
F- Fixed | T- Drawer | C- Sliding
Inserting a rack fixed shelf (pag.39 / IMG 4)
Note: pay attention to positioning to the right or left of
the supports.
Align rack clips with the desired wall fittings, press the
back of the rack (A) down in order to completely fit the
clip in the slot. Repeat in the front clip (B).
Make sure the rack is completely secure to side wall.
Removing fixed racks
Pull up front rack (B) until the clip is loose from the side
wall, repeat on the back of the rack (A).
Installing fixed shelves (pag.39 / IMG 5)
Make sure the racks have the vibration dampers installed
(C), put the shelf above the dampers, slide it back so that
it fits and cannot move forward.
Inserting a sliding shelf rack (pag.39 / IMG 6)
Align the back clip with the desired wall fitting, push
back in order to completely fit the clip in the slot (F).
Align the front clip with the slot pressing it down in order
to completely fit the clip in the slot (G).
Make sure the rack is completely secure to the side wall.
Removing sliding shelf racks
Pull up the front rack until (G) the clip is lose from the
side wall, pull back clip out (F) of the slot in your
direction.
Inserting a sliding shelf (pag.39 / IMG 7)
Insert the sliding shelf above the rack rollers (1º),
allowing it to slide into the guides (2º).
Inserting a “Selection”drawer rack (pag.39 /
IMG 8)
Note: pay attention to positioning to the right or left of
the supports.
Align the back clip with the desired wall fitting, push
back in order to completely fit the clip in the slot (H).
Align the front clip with the slot, pressingit down in order
to completely fit the clip in the slot (I). Make sure thatthe
rack is completely secure to the side wall.
Inserting a drawer in the rails (pag.39 / IMG 9)
Position the drawer above the rails and push it.
Model 150 (A)
Model 190 (B)
Model 190 side by side (C)
Capacity - 138 Bottles
Capacity - 237 Bottles
Capacity - 237+237 Bottles
2 Fixed shelves
3 Fixed shelves
3+3 fFxed shelves
1 Sliding shelf
2 Sliding shelf
2+2 Sliding shelf
1 Selection drawer
1 Selection drawer
1+1 Selection drawer

18
Pull the drawer together with the sliding parts of the rail
and assemble the two fixing screws (K).
Make sure the racks have the vibration dampers installed,
put the fixed shelf (J) above the dampers, slide it back so
that it fits and cannot move forward.
Removing a “Selection” drawer
Remove all the bottles from the drawer and the top shelf
(J).
Remove shelf (J) from the drawer racks.
Completely open the drawer and remove the two bottom
screws (K).
Pull the drawer in order to disengage it from the rails.
Removing a “Selection” drawer rack
Pull up the front rack until the clip is loose from the side
wall (I), pull the back clip out of the slot in your direction
(H).
Repeat this operation on the other side.
Maximum weight above a shelf
The LED light does not turn on when
opening the door
Check if:
- The plug has been installed correctly in the electrical
socket and if the distance is adequate;
- There is no electricity in the house.
The wine cellar does not cool well or the
compressor runs constantly
Check if:
- The door does not close properly or if the seal is
damaged;
- The door is frequently being opened;
- The installation conditions are respected.
The appliance makes too much noise
Check if:
- The appliance is levelled;
- The appliance has been installed between cabinets that
vibrate and make noise;
- The installation conditions are respected;
- The internal fan is not obstructed and free to run;
- It is the noise made by the refrigerant, which occurs
even when the compressor is off (this is not a fault).
The internal back wall of the appliance unit
is covered in frost or droplets of water
- This shows that the appliance is operating normally.
There is water in the internal bottom of the
appliance
- The drain hole is not obstructed.
A certain amount of water is normally present in the
drain. This ensures a good humidity control in the
appliance.
If, after checking the above situations, the wine cellar
does not work or the problem persists, please contact the
nearest Service Centre communicating: the type of
malfunction, the appliance model (Mod) and serial
number (SN). This information can be found on the data
plate located inside the appliance.
Never call unauthorized technicians and always refuse spare parts that are not originals.
Shelf type
Fixed
Sliding
Drawer
Model 150
86 kg
15 kg
12 kg
Model 190
95 kg
30 kg
12 kg
Model 190 side by side
95 kg
30 kg
12 kg
TROUBLESHOOTING

19
The controller will display an alarm or a warning code if something is not according to expectations. This message is
displayed alternating with internal temperature until alarm condition recovers.
The Buzzer can be Silenced by Pressing any Key. Please refer to the following table to understand the meaning and
what should be done to overcome alarm or warning situations.
ALARMS AND WARNING MESSEGES
Code
Cause
Action
dA
Open Door Warning
Close the door unless you need it opened for a loading
/unloading operation. In this case, you can stop the buzzer by
pressing any key. When finished, make sure to close the door,
the LED light should go off.
Until this fault is recovered, the appliance will stop all cooling
and heating actions.
FIL
Charcoal Filter Change
Change the charcoal filter and reset the message pressing the
filter key (17). See chapter “Maintaining the appliance” for
details.Even if this message is present, the appliance will
continue his normal operation.
HA
High Temperature Alarm
This message will appear if the controller is not able to bring
internal temperature to set point threshold.
Check if the appliance is installed correctly and if the climate
conditions of the room are according to specifications (refer to
chapter “Installation”).
If there has been a change in temperature or humidity set point,
a major load change or a long open door status, press any key to
stop the buzzer and wait some hours for the appliance to
stabilise.
If you are not able to sort the problem, contact your retailer.
LA
Low Temperature Alarm
HHA
High Humidity Alarm
This message will appear if the controller is not able to bring
internal humidity to safe range.
Check if the appliance is installed correctly and if the climate
conditions of the room are according to specifications (refer to
chapter “Installation”).
If there has been a change in temperature or humidity set point,
a major load change or a long open door status, press any key to
stop the buzzer and wait a few hours for the appliance to
stabilise.
If you are not able to sort the problem, contact your retailer.
HLA
Low Humidity Alarm
P1
Thermostat Probe Failure
Contact your retailer, with this fault your appliance will stop
working.
P3
Humidity Probe Failure
Contact your retailer, with this fault your appliance will stop
humidity control.

20
Félicitations
Vous avez acheté une cave à vin élaborée avec soin pour conserver et vieillir votre vin pendant une longue période.
Vous pouvez également l'utiliser pour stabiliser la température de votre vin à la température désirée. Pour ce faire,
vous n'aurez qu'à ajuster la température par voie électronique.
Cet appareil est exclusivement destiné au stockage du vin.
Veuillez lire attentivement ce manuel et le conserver pour référence ultérieure.
Contient des informations importantes pour l'installation, l'utilisation et la maintenance de
votre appareil.
Le vieillissement du vin
Le vieillisement des vins avec succès et un processus délicat. La qualification du changement de température, la
variation de la qualité des bouchons de liège due à une humidité insuffisante, l'exposition à la lumière (en particulier
les rayons UV) ou des vibrations anormales peuvent altérer la qualité du vin.
Une température de maturation recommandée pour le vieillissement des vins entre 10ºC et 14ºC. Une unité relative
est supérieure à 50%. O En dessous de ces valeurs, la qualité des bouchons en liège peut être compromise.
D'un autre côté, les étiquettes sur vos bouteilles sont exagérées.
Comme expliqué, mais en avant, le contrôleur est préréglé à 12°C et 65% d'humidité relative. Cependant, il est toujours
possible d'ajuster les conditions convenues en fonction de vos besoins.
Servir le vin
Une température recommandée pour servir le vin blanc est comprise entre 6ºC et 10ºC. Le vin rouge est généralement
servi entre 15°C et 18°C.
Reportez-vous à un manuel de référence ou utilisez les informations d'étiquette de vin pour définir une température
correcte pour un contenu de service de vin spécifique.
Capacité de la bouteille
Le nombre de bouteilles que vous pouvez mettre dans votre cave à vin authentique est calculé en fonction de la
disposition standard des étagères et en fonction de l'appareil et d'une taille de la bouteille standard définie dans la
norme EN 62552: 2013.
Dans le chapitre «Agencement de rayonnage» nous donnons un aperçu de la façon dont cette disposition foi calculée
ainsi que d'autres dispositions pour être en mesure d'augmenter le nombre de bouteilles stockées ou simplement
changer une position des étagères.
FR
This manual suits for next models
2
Table of contents
Languages:
Popular Wine Cooler manuals by other brands

La Sommeliere
La Sommeliere SLS34DZ User instructions

Wine Corner
Wine Corner Winemaster C50 IN Instructions for installation and use

GE
GE Profile PCR06BATSS Owner's manual and installation instructions

Igloo
Igloo FRW080UK instruction manual

Pevino
Pevino PM248D-HHB Instructional manual

Medion
Medion MD 16703 user manual


