Kanga Kare KK1691 User manual

WARNING
AVERTISSEMENT
ADVERTENCIA
Failure to follow these warnings and the installation instructions could result in serious injury or
death.
Read all instructions before installing diaper changing station. Keep these instructions. DO NOT
discard.
Le non respect de ces avertissements et instructions d’installation peut entraîner des blessures
graves ou la mort.
Lisez attentivement toutes les instructions avant d’installer la station à langer.Conservez ces
instructions. NE les jetez PAS.
El no seguir estas advertencias y las instrucciones para la instalación podría causar lesiones graves
o la muerte.
Lea todas las instrucciones antes de instalar la estación para cambiar pañales.Guarde estas
instrucciones. NO las deseche.
•
•
•
•
•
•
KK1691
Horizontal Diaper Changing Station
Installation Instructions
Related Proudcts
SKU : BBL10
Scented liners Biodegradable
for Sanitary Bin
SKU: SB001
Sanitary bin
SKU: 781788W
Baby Change Station
Bed Liners

ADUL T INSTALLA TION REQUIRED.
TOOLS REQUIRED:
Level(A)
Measuring tape(B)
Power drill with 7/32” , 1/8” and 1/2” masonry bits(C)
Power screwdriver with bull nose phillips bit(D)
A .D .A .C o m p lian c e:
READ ALL INSTRUCTIONS BEFORE ASSEMBL Y OF DIAPER CHANGING STATION.
UNPACK CARTON AND IDENTIFY ALL PARTS.
306.3
307.2
308.2
308.3
309.4
902.3
Compliant when properly installed.
Knee Clearance
Maximum Protruding Objects
Forward Reach
Side Reach
Operation
Work Surface
PARTS LIST
•
•
Parts Description Quantity
Hardware for installation:
3” Wood Screws
s
3/4” Finishing Washers
3” Machine Screws
3” Machine Screws
2
3/4 ”Flat Washers
3/4” Flat Washers 3/4” Flat Washers
Toggle
Toggle
Anchors
Anchors
2
1-1/4 ” Caps
1-1/4”Caps
6
Door / Wall Plate 1
For Wood Studs: For Use With Toggle Anchors:
Door / wall plate to be
mounted away from
restroom door.
"
ASSEMBLY INSTRUCTIONS

WARNING
WARNING
INSTALLATION
A stud MUST be located and used for at least one side of the diaper changing station.
The diaper changing station is no stronger than the anchors or walls to which they are attached and, therefore,
MUST be firmly secured in order to support the weight they are intended to support.Contact an architect or
building contractor if any questions.
All 4 of these locations MUST be used for safe installation. The lower holes ensure
installation through the metal brackets.
•
•
•
1. Locate wood stud where left side of changing station will be mounted to the wall.
2. Measure up 42'' (107cm) from the floor and mark the wall.This locates the position
for the top left attachment hole.
NOTE: Mark on wall MUST be in center of wood stud.
3. Align hole in top left corner of changing station with mark on wall and hold in place.
4. Using a level and measuring tape, mark the remaining three (3) holes. After marking holes ,
set changing station down on ground.
5. Use a power drill and appropriate bit to drill four (4) holes in the wall. This may require
2 people.
NOTE1: For wood studs:
-If finished wall surface is tile or masonry over wood studs,use
a 7/32” masonry bit for the pilot hole until you hit the wood
stud, then change to 1/8” bit.
-Use wood screws, finishing washers and flat washers (Fig.a).
NOTE2: For use with toggle anchors:
-If finished wall surface has wood studs that are not 16” on center,
has metal studs, or has an underlying surface of concrete block,
6. Align holes in changing station with drilled holes and secure top left corner of
changing station to wall stud using the appropriate screw and washer. Continue
to secure the three (3) remaining corners using the appropriate screws and washers
as described in Note1 or Note2.
use 1/2” bit.
-Use machine screws and flat washers (Fig.b).
Wood Stud
Wood Stud
Flat
Washer
Flat
Washer
Toggle
Anchor
Machine
Screw
Break-Away
Wood Stud Toggle
Anchor
Fig.d
Finishing
Washer
Wood
Screw
Changing
Station
Changing
Station
Fig.c
-For holes NOT located in a wood stud, toggle anchors MUST be used (Fig.c).
See "Using Toggle Anchors" section.
7. Ensure all four (4) screws are tight and snap caps over screw heads.
Using Toggle Anchors:
1.Insert metal end of toggle anchor into 1/2” hole.
2.Slide zip strip down snugly against wall.
3.Snap off break-away pieces of toggle anchor (Fig.d).
5.Ensure all four (4) screws are tight and snap caps over screw heads.
4.Align holes in changing station with toggle anchors and secure top left corner of changing station to
wall using machine screws and flat washers.Continue to secure the three(3) remaining corners
using machine screws and flat washers.
Fig.b
Fig.a

RECOMMENDED BLOCKING:
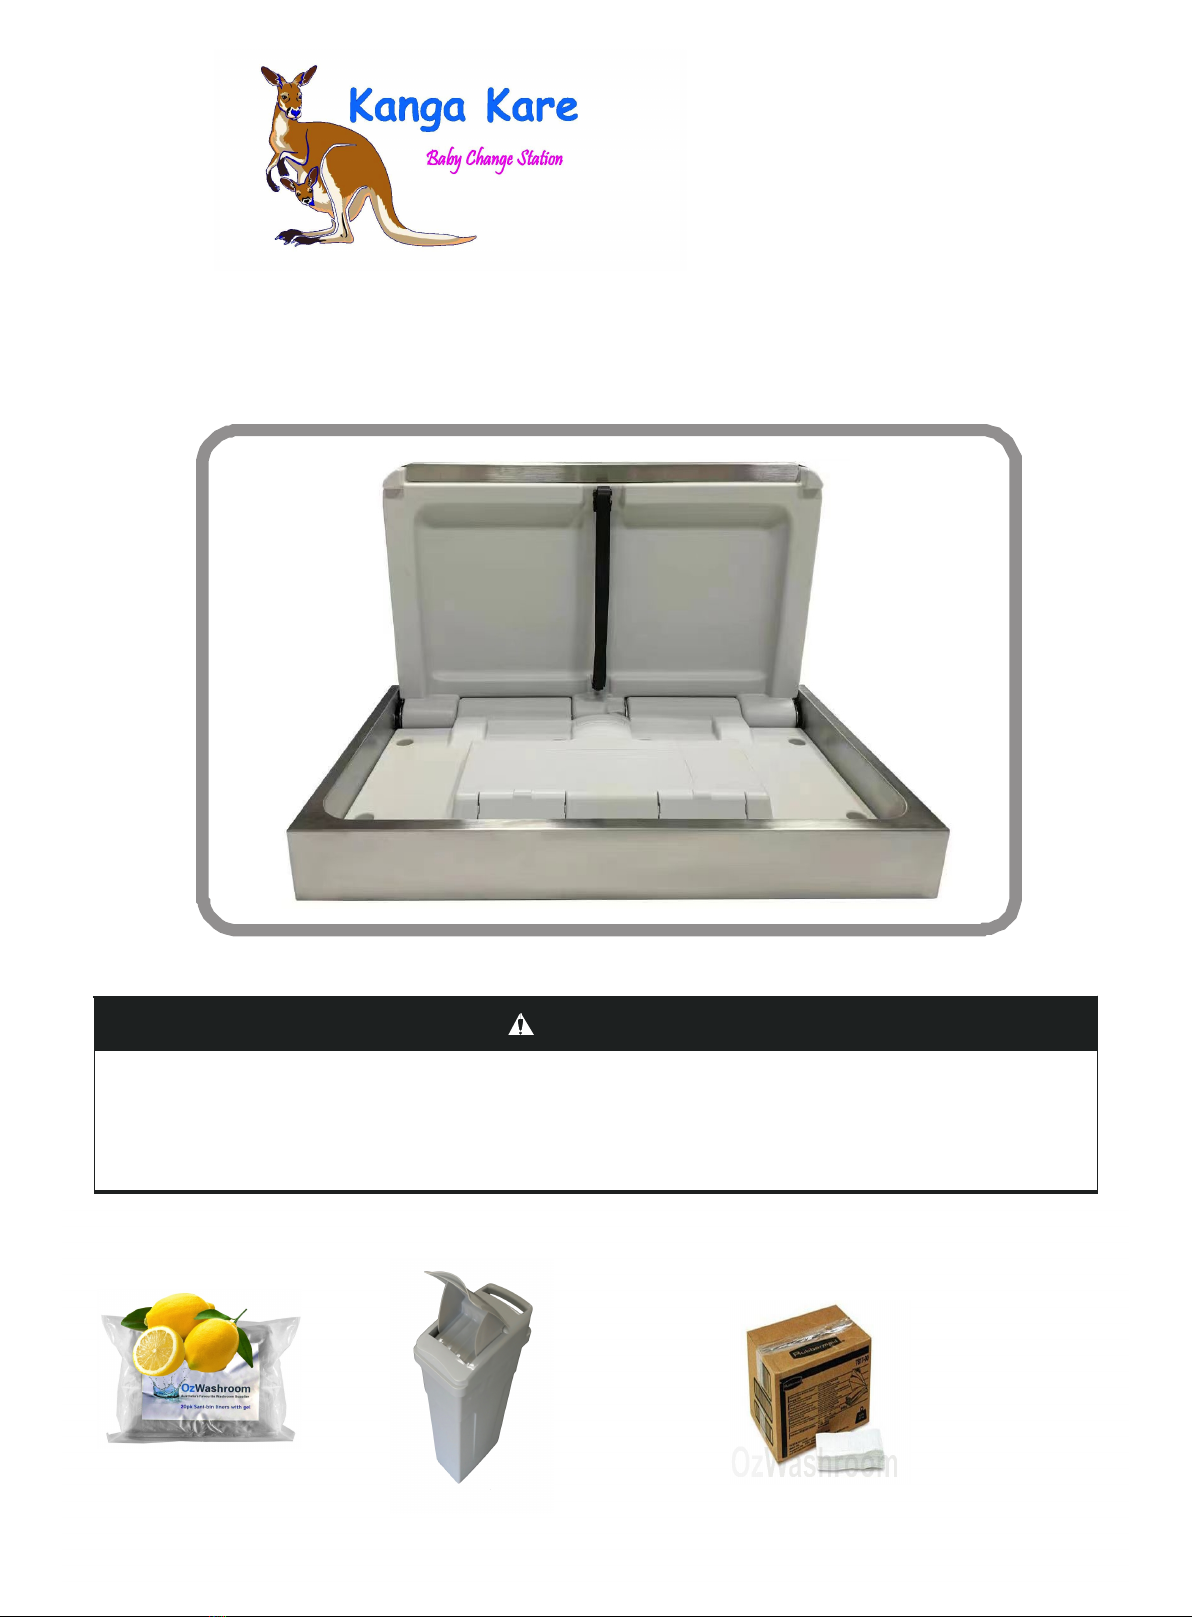
OPERATION:
USE OF RESTRAINT SYSTEM:
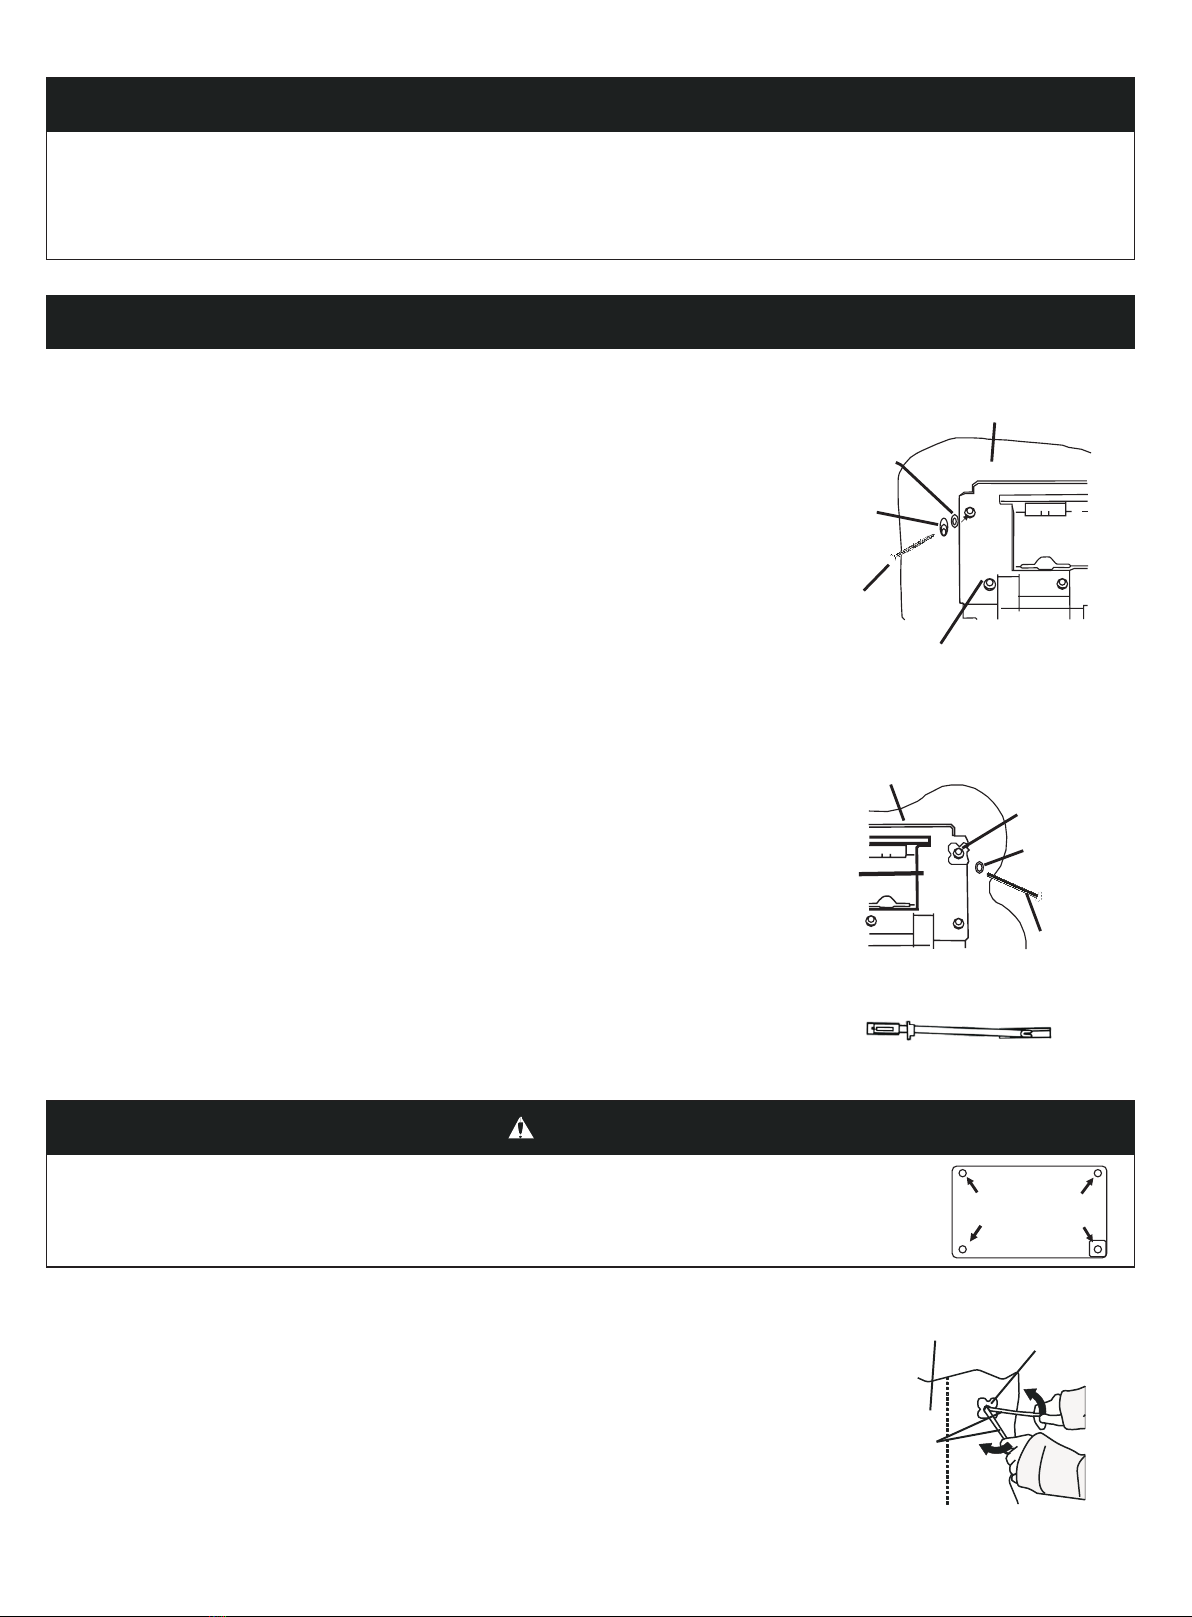
Using Backer Plate Mounting System:
If the walls do not have studs on center, then additional
blocking is necessary (Fig.e).
Contact an architect or building contractor to make sure the
blocking is adequate and complies with building codes.
Rotate base downward. Place infant on top of the changing surface.
Use restraint system as described below. After child has been changed,
remove restraint system and rotate base back up against the wall.
Place child so restraint strap is located at abdomen. Rotate top of buckle upward and insert
strap in buckle. Pull strap through buckle until snug against infant. Rotate top of buckle
downward to lock the strap into place. Slide yellow locking tab over top of buckle (Fig.f).
Reverse steps to loosen strap.
If your changing station was supplied with a backer plate, please follow these instructions. If a backer plate was not supplied and you
would like to order one, see information on page 1.
The backer plate is designed to enhance the attachment method to ensure that at least one wood stud is used to support the changing
station.
MAINTENANCE AND CLEANING:
Check all hardware and components monthly or as required to ensure hardware is
tight and there are no missing or damaged components. Take unit out of service if
any component is missing or damaged and contact customer service to order
replacement parts. Do not substitute parts. For replacement parts, contact customer
service at
Clean by using a damp cloth with mild soap or mild multi-purpose cleaner. Do not use
any strong chemical cleaners or cleaning agents that may be hazardous to children.
1.Locate wood stud where left side of changing station will be mounted to the wall.
2.Measure up 42” (107cm) from the floor and mark the wall.
NOTE: Mark on wall MUST be in center of wood stud.
3.Using two (2) 3” wood screws and a level, mount the backer plate to the center of the wood stud (Fig. g).
NOTE: The lip of the backer plate MUST be facing away from the wall (Fig. h).
Repeat steps to secure backer plate to another stud on the opposite side.
4.Slide recessed area on back of changing station onto lip of backer plate.
5.Return to installation step 5.
Fig.f
Locking
Tab
Top Of
Buckle
WARNING
WARNING
Child should never be left unattended.
Avoid serious injury from falling or sliding out. Always use restraint system.
Adding excessive weight such as parcels, packages, or accessories to the unit or to the bag hooks that exceed the total
weight limit of 50 pounds (22.7 kg) may cause the unit to be unstable or may cause a hazardous unstable condition to
exist.
A stud MUST be located and used for at least one side of the diaper changing station.
The diaper changing station is no stronger than the anchors or walls to which they are attached and, therefore, MUST be
firmly secured in order to support the weight they are intended to support. Contact an architect or building contractor if
any questions.
Use backer plate mounting system with at least four (4) standard mounting screws. The backer plate alone is NOT a
secure attachment method.
•
•
•
•
•
•
(Fig. g).
(Fig. h).
Side view of
Backer Plate
(10 1/4'')
260mm
For A.D.A.
Compliance
43 1/4
(110cm) 31 1/2'')
800 mm
on center
Fig.e
Other Kanga Kare Baby Accessories manuals
Popular Baby Accessories manuals by other brands

CNP Brands
CNP Brands Activity Gym & Play Mat operating instructions

Lascal
Lascal KIDDYBOARD-MAXI owner's manual

Philips AVENT
Philips AVENT SCF146 Specification sheet

Philips
Philips AVENT SCF602/42 Specifications

JANE
JANE Nurse Elephant manual

Summer
Summer DELUXE LEARN-TO-DINE FEEDING SEAT instruction manual