Karl Hagemann cleancool B100 User manual

OPERATION MANUAL
MANUEL D’UTILISATION
HANDLEIDING
B
100
IMPORTANT SAFETY INSTRUCTIONS
BEFORE USING THIS APPLIANCE READ ALL INSTRUCTIONS
AND CAUTIONARY MARKINGS IN THIS MANUAL AND ON THE
APPLIANCE.
www.karlhagemann.com

KARL HAGEMANN™ CUSTOMER CARE
THANK YOU FOR CHOOSING TO BUY A HAGEMANN™ APPLIANCE
After registering your free 2 year guarantee, your Hagemann™ appliance will
be covered for parts and labour (excluding filters) for 2 years from the date of
purchase, subject to the terms of the guarantee. If you have any questions
about your appliance, call the Hagemann™ Helpline with your serial number
and details of where/when you bought the appliance.
SERVICE À LA CLIENTÈLE KARL HAGEMANN™
MERCI D'AVOIR CHOISI D'ACHETER UN APPAREIL HAGEMANN™
Une fois que vous aurez enregistré votre garantie gratuite de 2 ans, votre
appareil Hagemann™ sera couvert pour les pièces et la main-d'œuvre (à
l'exclusion des filtres) pendant 2 ans à compter de la date d'achat, sous
réserve des conditions de la garantie. Pour toute question relative à votre
appareil, appelez la ligne d'assistance Hagemann™ en indiquant votre
numéro de série et les détails concernant le lieu/la date d'achat de l'appareil.
KARL HAGEMANN™ KLANTENSERVICE
HARTELIJK DANK VOOR UW AANKOOP VAN EEN APPARAAT VAN HAGEMANN™
Na het registreren van uw gratis 2-jarige garantie, is uw Hagemann-apparaat
voor 2 jaar gedekt voor onderdelen en arbeidskosten (exclusief filters)
vanaf de datum van aanschaf, onderhevig aan de voorwaarden van
de garantie. Als u vragen hebt over uw Hagemann-apparaat, bel dan de
085 0600467
www.karlhagemann.com

WARNING
These warnings apply to the appliance, to all tools, accessories, chargers or mains
adaptors. To reduce the risk of fire, electric shocks, and/or injuries:
1. This Hagemann machine can be used by children aged from 8 years and
above and persons with reduced physical or reasoning capabilities, or lack
of experience and knowledge can use the appliance under supervision by a
responsible person. Cleaning and maintenance should not be performed by
children.
2. Do not allow the machine to be used as a toy. Close attention is needed
when used by or near children.
3. Please use a separate outlet according to the current / voltage of the fan.
Do not use a multi-purpose socket for simultaneous use with other electri-
cal devices.
4. If the machine does not work due to a damaged power cord, turn off the
power and contact the Hagemann customer care. Use only as described in
this official Karl Hagemann manual. Do not carry out any maintenance
other than that shown in this manual or advised by the Hagemann Helpli-
ne.
5. Do not move the appliance when you pull the plug out of the socket.
6. Do not unplug by pulling on the cable. To unplug, grasp the plug not the
cable. The use of an extension cable is not recommended.
7. Do not operate the fan with a damaged cable or connector. Please contact
customer service to replace or repair the cable if the cable is damaged.
8. Do not stretch or energize the cable. Keep the cable away from any heat
sources.
9. Suitable for dry places only. Keep away from wet surfaces and do not use
outdoors. Do not expose it to water or rain.
10. Do not run the cable under carpets, do not cover it with carpets or similar
covers. Route the cable outside the traffic area to avoid accidents.
11. Turn off all controls before pulling the plug and pull the plug out of the
socket if you are not going to use the device for a long time.
12. Do not place any objects on the air inlet or outlet. Make sure that the
ventilation openings are free of dust, lint, hair and other obstacles that
could reduce the air flow.
13. The fan should be set up dry on a horizontal platform and should not be
near heat sources, corrosive air and moisture. The fan should be kept a
distance of 15 cm around to ensure good air circulation.
14. Always carry the appliance by the base, do not carry it by the loop ampli-
fier.
15. Do not immerse the air cooler, power cord, or plug in water or other liquids
to avoid danger. The use of an extension cord is not recommended.
16. Do not use an air cleaner or similar product right next to the appliance.
Keep essential oils and chemicals away from the appliance.
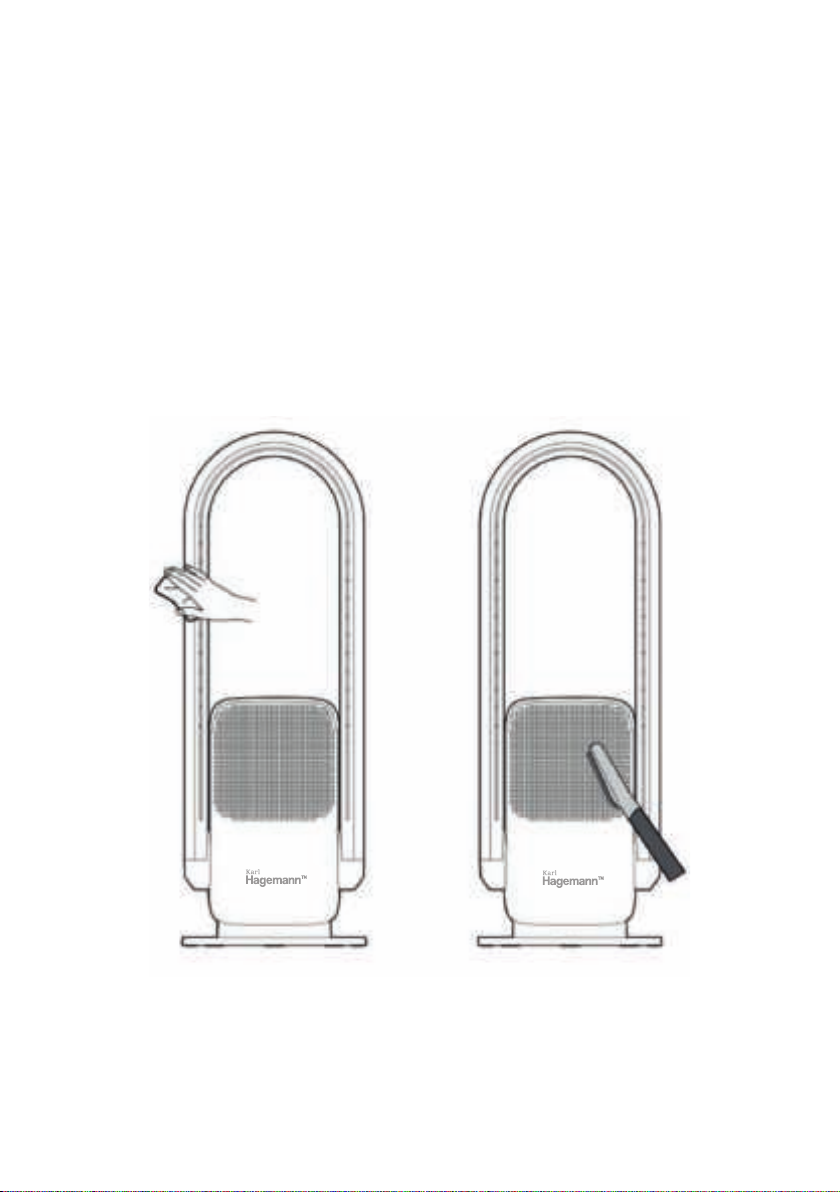
17. Do not use any cleaning agents or lubricants for this fan and pull out the
power plug before cleaning, moving and/or servicing the device.
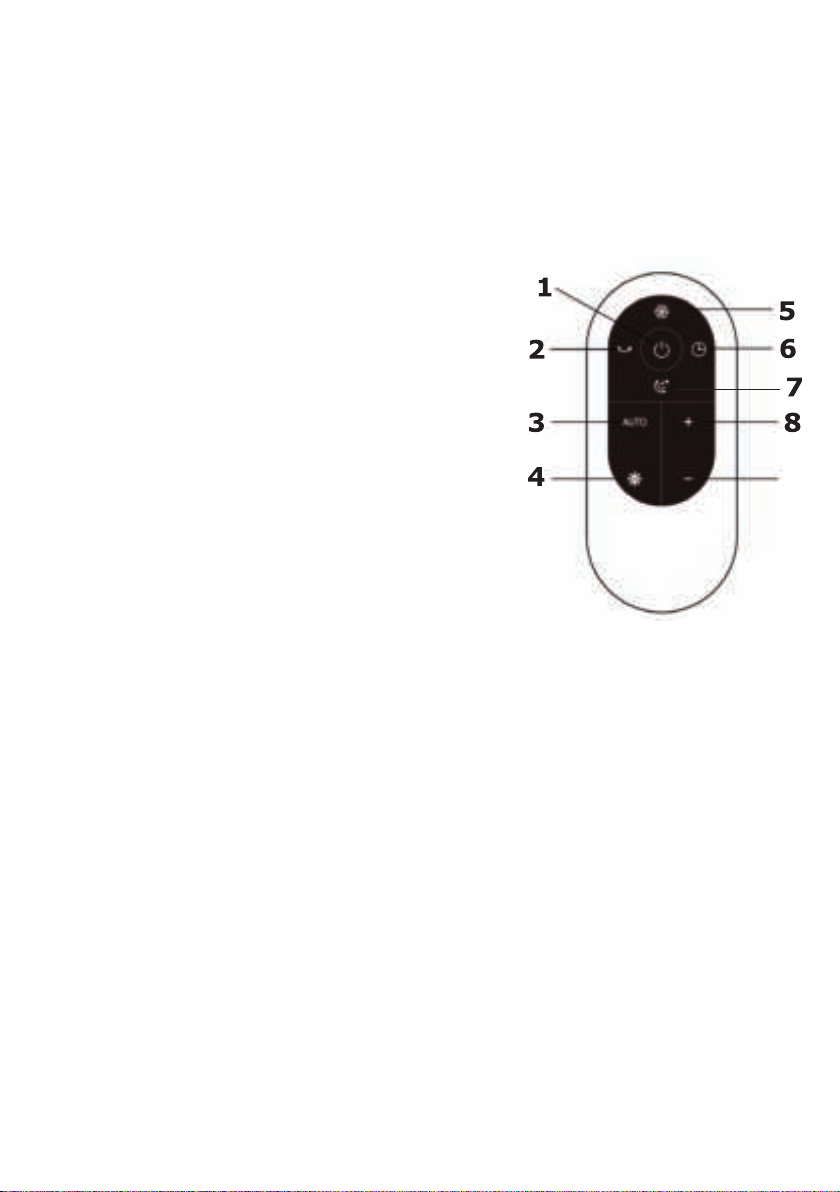
18. Choking hazard – The remote-control unit contains a small battery. Keep
the remote control away from under aged children and do not swallow the
battery. If the battery is swallowed seek medical help immediately.

WARNING
The appliance and the remote control both contain magnets.
1. Pacemakers and defibrillators may be affected by strong magnetic
fields. If you or someone in your household has a pacemaker or
defibrillator, avoid placing the remote control in a pocket or near to the
appliance.
2. Credit cards and electronic storage media may also be affected by
magnets and should be kept away from the remote control and the top of
the appliance.
PRODUCT STRUCTURE
1. Air Duct
2. Air Outlet
3. LED Display
4. Top Cover
5. Air Inlet
6. Base
7. Air Duct
8. Top Cover
9. Air Inlet
10. Body
11. Power adapter
11

1. Please put the appliance on a stable flat
surface. Avoid putting it on an unstable surface
(such as a slanted or soft surface) to prevent it
from falling over. Please do not use it in hot
and humid areas (such as bathroom and
kitchen).
2. Avoid blocking the Air Inlet and Air Outlet
when the appliance is in use. Please keep the
appliance away from curtains, so that they will
not block the Inlet/Outlet and obstruct the
airflow.
3. Do not place objects within 1 meter in front of
the Air Outlet to ensure that the airflow would
not be reduced.
Battery Replacement
1. Please remove the insulation sheet before using the remote control.
2. Battery replacement method: as shown in the picture. Please note the
battery direction.
GETTING STARTED
1. If the remote control will not be used for a prolonged period of time, please
remove the battery.
2. The battery is not rechargeable. Do not try to recharge the battery.
3. The remote control and battery are not toys. Please keep them out of reach
of any children.
4. If the battery is swallowed, please seek medical help immediately.
CAUTION

1. Connect to power source, and the air cooler
will enter into Standby Mode.
2. Press On/Off, the buzzer will beep once,
and product will start to operate.
3. To turn off the appliance, press On/Off for 2
seconds. The buzzer will beep twice, and
the appliance will be turned off. When the
buzzer beeps once the air cooler will stop
operating, but it will not be turned off.
OPERATING INSTRUCTIONS
Air Duct Angle Setting
Before adjusting the air duct angle, please make sure the product is turned off. Hold
the body with one hand and set the air duct 15° forward or backward. Switch ON and
OFF
1. Wi-Fi Indicator Light
2. UV-C Disinfection Indicator Light
3. Filter Replacement Alert
4. Temperature Display / AUTO mode
5. Settings & Humidity Display
6. Turn On/Off
LED Display

LED Display Icons
On/Off Button
• Press to turn product on.
• Press repeatedly to adjust air volume.
• Press 1 second to turn on oscillation on and off.
• Press 2 second to turn off the appliance.
• Long-press 5 seconds to connect product to smartphone App Control.
Filter Replacement Alert Indicator Light
After approx. 720 hours of operation the filter replacement indicator will
light up, indicating the filter needs to be replaced. After the filter has
been replaced, long-press on the Remote Control for 5 seconds, the
indicator will turn off, and product will enter a new 720-hour cycle.
UV-C Disinfection Indicator Light
When UV-C Disinfection Function is turned on via the
remote control, the indicator will light up. UV-C will automatically turn off
after 1 hour.
Wi-Fi Indicator Light
Long-press on the LED Display for 5 seconds, the indicator will flash,
user can then control the product through smartphone App.
When successfully connected to the app, the indicator will light up.
Temperature Display
Cool Air Mode, display will light up in white
Settings & Humidity Display
This indicates the current setting and humidity level.
Attention!
When operating the Hagemann B100 aircooler, the following phenomena may
occur:
1. The appliance may respond to the remote control of other devices.
2. Other products may respond to the received remote control. This is
due to overlapping frequencies of the remote controls. To avoid
interference, keep this remote control away from other electrical
devices during operation.
3. The On/Off button on the Remote Control does not completely
disconnect the power supply to this product. If product will be
unused for a prolonged period of time, please unplug the power cord
from the socket.

Remote Control
1. Turn On/Off
• In Standby Mode, press once to turn on product.
• When the appliance is operating, press once and
the air cooler will turn off and return to standby
mode.
2. Oscillation
• Press once to turn on Oscillation Function,
oscillation angle is 80°±5°.
• Press again to turn off Oscillation Function.
3. AUTO mode
Press this button to start AUTO function. Air speed
will be changed base on different room tempera-
ture.
4. UV sterilization
• Press once to turn on UV-C Steriliza-
tion Function.
• Press again to turn off UV-C Sterili-
zation Function (UV Sterilization Function will
automatically turn off after operating for 1 hour).
5. Turbo Mode
Max mode: the digital display will show “HH” and
the wind speed becomes maximum.
6. Timer Mode
Press this button to set Countdown to turn Off
Time (1-8 hours). When the countdown is finis-
hed, the appliance will automatically stop opera-
ting.
7. Sleep Mode
Press this button to set the airflow to soft.
8. Air volume +
• Press + to increase airflow.
• Fan has 9 levels of airflow.
9. Air volume -
• Press - to decrease airflow.
• Fan has 9 levels of airflow.
NOTE
The remote control should be
pointed directly at the signal
receiver on the appliance’s display
panel to maximize remote control
reception.
9

CLEANING & MAINTENANCE
Unplug the power supply before performing maintenance.
Filter Replacement
Lift out Top Cover. Lift out the old air filter
Reinstall Top Cover, the magnetic-
lid will snap into place automati-
cally.
Install new filter into the main
body of the product.

Product Surface
• When cleaning the appliance, do not wet or splash water on the product, to avoid
water entering and causing malfunctions.
• Do not use banana oil, benzine, alcohol, bleach or metal objects to wipe the
surface of the appliance, which may damage the surface or cause discoloration.
• Please use a soft dry cloth to lightly wipe the surface of the product.
• If the surface is very dirty, use a soft cloth and diluted mild detergent to clean,
then wipe dry with a soft dry cloth.
Air Inlet & Air Outlet
Use a soft brush or vacuum cleaner to regularly clean off any dust accumulated on
the Air Inlet and Outlet. Do not let dust build up as too much dust will reduce the
efficiency of the product.

Product Surface
Remote Control
Gently wipe the surface of the remote control with a soft dry cloth. If the remote
control will not be used for a prolonged period of time, please remove the battery
inside to avoid battery consumption.
Power Plug
Use soft dry cloth to clean the power plug.
Storage
• After cleaning the product, put in plastic bag and store away.
• Avoid storing in a place with vibration, a place heated or cooled by another
appliance.
• Avoid placing it in direct sunlight or in a hot and humid environment.
• Keep this product out of reach of young children.
Technical Specification
Brand Karl Hagemann™
Model B100 CleanCool
Serie B series
Type Aircooler
Rated Power 35W
Rated Voltage DC 24V
Product size Depth 23.5 cm
Length 23.5 cm
Height 81 cm

Operating through Google Home
The Aircooler works with the Google Assistant, allowing you to control your device
by using your Google Home devices, your Android or iPhone, or any other device
with built-in Google Assistant support.
Open Google Home App by tapping the app icon on your device. Tap “Sign
up” and choose one Google account that you already logged in on your
mobile device. Find and tap “Settings” from Home page. And then tap
“More Settings”.
Tap “Assistant”. Tap “Home Control”. Tap “+”. Find “Smart Life” in the list.
In the input window, select your Smart Life account’s region type and
input your account and password. The link tab will be highlighted.
Tap “Link Now”. After linked, select the Room (ex Living Room) where your
Aircooler is located. This helps you identify the device when you want to
cast to it.
After then, your devices will be listed in the Home Control page and now
you can control your Aircooler through Fan Home. And you can now
activate Aircooler ON/OFF via voice instructions to Google Home Device.
Now you can use your Google Home device to control your products using
voice commands, e.g. :
‘’Hey Google, turn on the “device name”’’.
‘’Hey Google, turn off the “device name’’”.
‘’Hey Google, set the “device name” to 9 Speeds’’
‘’Hey Google, increase / decrease the “device name” speed’’.
1
2
3
4
5
SMART APP

Operating through Smart Life
Download and install Smart Life APP.
Use your smart phone to scan the QR code below to download “Smart Life” App.
Run the “Smart Life” App and either register a new account or login with
your existing account and password. You will need to add your Smart
Aircooler to the same WiFi Router as your phone by following the below
instructions.
Open the App and click “Add Device” or “+” to add device, select “Small
Home Appliance” in the list of devices and tap “Aircooler” icon.
Make sure the power is connected to the appliance before using. Plug the
appliance into an AC 240V~50Hz mains outlet. Press and hold the power
button for 5 seconds. Ensure your phone is connected with your local
2.4GHz WIFI.
In OFF mode, press and hold the button for 5 seconds, the display will
show ”F” and until the “F” flashes rapidly. If not, try again. The network
connection is abnormal if the indicator flashes slowly, please check the
router or network configuration.
Click “Confirm light blinks rapidly”. Type in your WiFi password and click
“Confirm” to search device. Once the configuration is completed, the
indicator light will stop blinking rapidly.
Note: If the Aircooler is failed to establish connection, make sure there is no special symbol in
your WiFi name (it should only contain letters and numbers) and password, try again by
repeating step 4 and step 5 to set it up.
Once connected, you can rename your Aircooler and select the Room (e.g.
Living Room) where your Smart Aircooler is located. This helps you
identify the device when you want to cast to it.
You can tap the “Power icon” to turn on/off the cooler. Sliding Press “the
blue circle” to adjust the fan speed, Press “Oscillate” to adjust the Oscilla-
tion Press “Sleep” ,”Boost” or “Fresh” to select your want. Press “Time” ,
to set 1 to 8 hours.
Or search “Smart Life” in either Apple Store or
Google Play to download and install the App.
1
2
3
4
5
6
7

Operating through Amazon Alexa @ Echo dot
The Aircooler works seamlessly with Alexa to give you hands-free voice control.
Run the Alexa App and connect your Echo dot. Go to Home menu. Select
“Skills“ or “Skills & Games“ in Home menu and search “Smart Life“ in the
search window. And then select “Smart Life” and tap “Enable“ to enable
the Smart Life skill.
Select your country code and enter your “Smart Life“ App Login and
Password, then press the “Link Now“ button. Choose “Smart Life“ and tap
“Link Now“ again. And then press “Authorize” button. Wait until Alexa has
been successful linked with Smart Life.
Back to the menu, press the “Smart home“ button and choose “Devices“.
And then press “Discover“ button.
Your device is connected successfully if you find the device in the Devices
list. You can use your echo dot through Alexa to control your Smart
Aircooler by voice now.
Control your intelligent product via Amazon Alexa. When the accounts
have been successfully linked, you can use your smart products via
control the Amazon Alexa device by voice command, e.g .:
“Hi Alexa, turn on the “device name“.
“Hi Alexa, turn off the “device name“.
“Hi Alexa, set the “device name” to 9 speeds“.
“Hi Alexa, increase / decrease the “device name“ speed .
“Hello Alexa, increase / decrease the Speed of the “device name“.
Note: Echo needs to discover your smart devices before it controls
them. You can say “Alexa, discover devices” to Alexa. Alexa will
discover devices in about 20 seconds.
1
2
3
4
5

OPERATION MANUAL
MANUEL D’UTILISATION
HANDLEIDING
B
100
IMPORTANTES CONSIGNES DE SÉCURITÉ
AVANT TOUTE UTILISATION DE CET APPAREIL, VEUILLEZ LIRE
ATTENTIVEMENT TOUTES LES INSTRUCTIONS ET MISES EN
GARDE FIGURANT DANS CE MANUEL ET SUR L'APPAREIL.
www.karlhagemann.com

AVERTISSEMENT
Ces avertissements sont applicables à l'appareil, à tous les outils, accessoires,
chargeurs ou adaptateurs secteur. Afin de réduire les risques d'incendie, de chocs
électriques et/ou de blessures:
1. Cette machine Hagemann convient aux enfants à partir de 8 ans et aux
personnes ayant des capacités physiques ou de raisonnement réduites, ou
manquant d'expérience et de connaissances pouvant utiliser l'appareil sous
la surveillance d'une personne responsable. Le nettoyage et l'entretien ne-
doivent pas être effectués par des enfants.
2. Ne pas laisser l'appareil être utilisé comme un jouet. Une attention particu-
lière est nécessaire lorsqu'il est utilisé par ou à proximité des enfants.
3. Veuillez recourir à une prise de courant séparée en fonction du courant / de
la tension du ventilateur. Ne pas utiliser une prise polyvalente pour l'utilisa-
tion simultanée d'autres appareils électriques.
4. Si l'appareil ne fonctionne pas en raison d'un cordon d'alimentation endom-
magé, coupez l'alimentation et contactez le service clientèle de Hagemann.
Ne pas utiliser la machine autrement que comme décrit dans ce manuel
officiel Karl Hagemann.N'effectuez aucun entretien autre que celui indiqué
dans ce manuel ou conseillé par le service d'assistance téléphonique de
Hagemann.
5. Ne pas déplacer l'appareil lorsque vous retirez la fiche de la prise.
6. Ne pas débrancher en tirant sur le câble. Pour débrancher, saisissez la fiche
et non le câble. L'utilisation d'une rallonge n'est pas recommandée.
7. Ne pas faire fonctionner le ventilateur avec un câble ou un connecteur
endommagé. Veuillez contacter le service client pour remplacer ou réparer
le câble si celui-ci est endommagé.
8. Ne pas tendre ou mettre le câble sous tension. Gardez le câble à l'écart de
toute source de chaleur.
9. Convient uniquement aux endroits secs. Tenir à l'écart des surfaces humi
des et ne pas utiliser à l'extérieur. Ne pas l'exposer à l'eau ou à la pluie.
10. Ne pas faire passer le câble sous les tapis, ne pas le recouvrir de tapis ou
de couvertures similaires. Faites passer le câble en dehors de la zone de
circulation pour éviter les accidents.
11. Éteignez toutes les commandes avant de débrancher la fiche et débranchez
la fiche de la prise si vous ne comptez pas utiliser l'appareil pendant une
longue période.
12. Ne pas placer d'objets sur l'entrée ou la sortie d'air. Assurez-vous que les
ouvertures de ventilation sont exemptes de poussière, de peluches, de
cheveux et d'autres éléments qui pourraient réduire le flux d'air.
13. Le ventilateur ne doit pas être posé sur une plate-forme horizontale et ne
doit pas se trouver à proximité de sources de chaleur, d'air corrosif et
d'humidité. Le ventilateur doit être maintenu à une distance de 15 cm
autour pour assurer une bonne circulation de l'air.
14. Portez toujours l'appareil par le socle, ne le portez pas par l'amplificateur
de boucle.
15. Ne pas plonger le rafraîchisseur d'air, le cordon d'alimentation ou la fiche
dans l'eau ou d'autres liquides pour éviter tout danger. L'utilisation d'une
rallonge n'est pas recommandée
16. Ne pas utiliser un purificateur d'air ou un produit similaire juste à côté de
l'appareil. Gardez les huiles essentielles et les produits chimiques loin de
l'appareil.

AVERTISSEMENT
L'appareil et la télécommande contiennent tous deux des aimants.
1. Les stimulateurs cardiaques et les défibrillateurs peuvent être affectés par
des champs magnétiques puissants. Si vous ou un membre de votre famille
porte un stimulateur cardiaque ou un défibrillateur, évitez de placer la
télécomman de dans une poche ou à proximité de l'appareil.
2. Les cartes de crédit et les supports de stockage électroniques peuvent
également être affectés par les aimants et doivent être tenus à l'écart de la
télécommande et du dessus de l'appareil.
STRUCTURE DU PRODUIT
1. Conduit d'Air
2. Sortie d'Air
3. Affichage LED
4. Couvercle Supérieur
5. Entrée d'Air
6. Socle
7. Conduit d'Air
8. Couvercle Supérieur
9. Entrée d'Air
10. Corps
11. Adaptateur Secteur
17. Ne pas utiliser de produits de nettoyage ou de lubrifiants pour ce ventila
teur et débrancher la fiche d'alimentation avant de nettoyer, déplacer et/ou
entretenir l'appareil.
18. Risque de suffocation - La télécommande contient une petite pile. Gardez la
télécommande hors de portée des enfants en bas âge et n'avalez pas la
pile. En cas d'ingestion de la pile, consultez immédiatement un médecin.
11

1. Veuillez mettre l'appareil sur une surface plane
et stable. Évitez de le poser sur une surface
instable (telle qu'une surface inclinée ou molle)
pour éviter qu'il ne se renverse. Ne pas utiliser
l'appareil dans des endroits chauds et humides
(comme la salle de bain ou la cuisine).
2. Évitez de bloquer l'entrée et la sortie d'air en
cours d'utilisation de l'appareil. Tenez l'appareil
éloigné des rideaux, afin qu'ils ne bloquent pas
l'entrée/sortie d'air et n'entravent pas le flux
d'air.
3. Ne pas placer d'objets à moins d'un mètre
devant la Sortie d'Air pour s'assurer que le flux
d'air ne sera pas réduit.
Remplacement de la Batterie
1. Veuillez retirer la feuille d'isolation avant d'utiliser la télécommande.
2. Méthode de remplacement de la batterie: comme indiqué sur la photo.
Veuillez noter le sens de la batterie.
DÉMARRER
1. Lorsque la télécommande n'est pas utilisée pendant une période prolongée,
veuillez retirer la pile.
2. La batterie n'est pas rechargeable. N'essayez pas de la recharger.
3. La télécommande et la pile ne sont pas des jouets. Veuillez les garder hors
de portée des enfants.
4. En cas d'ingestion de la pile, veuillez consulter immédiatement un médecin.
AVERTISSEMENT

1. Brancher à la source d'alimentation, et le
refroidisseur d'air entrera en mode veille.
2. Appuyez sur la touche On/Off, le buzzer
émet un bip et le produit commence à
fonctionner.
3. Pour éteindre l'appareil, appuyez sur On/Off
pendant 2 secondes. Le buzzer émet deux
bips et l'appareil s'éteint. Lorsque le buzzer
émet un seul bip, le rafraîchisseur d'air
s'arrête de fonctionner, mais il ne s'éteint
pas.
MODE D'EMPLOI
Réglage de l'Angle du Conduit d'Air
Avant de régler l'angle du conduit d'air, veuillez vous assurer que le produit est
éteint. Tenez le corps d'une main et réglez le conduit d'air de 15° en avant ou en
arrière. Allumez et Eteignez
1. Témoin lumineux du Wi-Fi
2. Voyant lumineux de désinfection
par UV-C
3. Alerte de Remplacement du
Filtre
4. Affichage de la Température /
Mode AUTO
5. Affichage des Paramètres et de
l'Humidité
6. Mise en Marche/Arrêt
Affichage LED

Icônes d'Affichage LED
Bouton On/Off
• Appuyez pour allumer le produit.
• Appuyez à plusieurs reprises pour régler le volume d'air.
• Appuyez 1 seconde pour activer et désactiver l'oscillation.
• Appuyez 2 secondes pour éteindre l'appareil.
• Appuyez longuement pendant 5 secondes pour connecter le produit au
système de contrôle de l'application du smartphone.
Témoin Lumineux d'Alerte de Remplacement du Filtre
Après environ 720 heures de fonctionnement, l'indicateur de remplace-
ment du filtre s'allume, indiquant que le filtre doit être remplacé. Après le
remplacement du filtre, appuyez longuement sur la télécommande
pendant 5 secondes, l'indicateur s'éteint et le produit entre dans un
Voyant Lumineux de Désinfection par UV-C
Lorsque la fonction de désinfection par UV-C est activée par la télécom-
mande, l'indicateur s'allume. Les UV-C s'éteignent automatiquement
après une heure.
Témoin Lumineux du Wi-Fi
Appuyez longuement sur l'écran LED pendant 5 secondes, l'indicateur
clignote, l'utilisateur peut alors contrôler le produit via l'application du
smartphone. Lorsque la connexion à l'application est réussie, l'indicateur
s'allume.
Affichage de la Température
Mode Air Frais, l'écran s'allume en blanc.
Réglages et Affichage de l'Humidité
Il indique le réglage et le taux d'humidité actuels.
Attention!
Lors du fonctionnement du refroidisseur d'air Hagemann B100, les phénomè-
nes suivants peuvent se produire:
1. L'appareil peut répondre à la télécommande d'autres appareils.
2. D'autres produits peuvent être sensibles à la télécommande reçue.
Ceci est dû au chevauchement des fréquences des télécommandes.
Pour éviter toute interférence, éloignez cette télécommande d'autres
appareils électriques pendant son fonctionnement.
3. Le bouton On/Off de la télécommande ne permet pas de couper
complètement l'alimentation de ce produit. Si le produit ne sera pas
utilisé pendant une période prolongée, veuillez débrancher le cordon
d'alimentation de la prise.
Table of contents
Languages:
Popular Air Conditioner manuals by other brands

Electrolux
Electrolux U31175 LU4 9QQ user manual

Sharp
Sharp AF-P80CX Installation and operation manual

Tate
Tate SmartAire MZ Basic User's installation guide

COOLFORT
COOLFORT CF-4000 Manual instruction

Mitsubishi Electric
Mitsubishi Electric MUZ-GE71VA operating instructions

Willis
Willis WAM09MH27S Service manual

GE
GE AJES06LSC datasheet

Midea
Midea BREEZELESS+ Series owner's manual

Samsung
Samsung AJ TNL EG Series user manual

Mitsubishi Electric
Mitsubishi Electric PVFY-P18 NAMU-E installation manual

Haier
Haier SYJS-0308 Service manual

Mitsubishi Electric
Mitsubishi Electric CITY MULTI PKFY-P NLMU Series installation manual