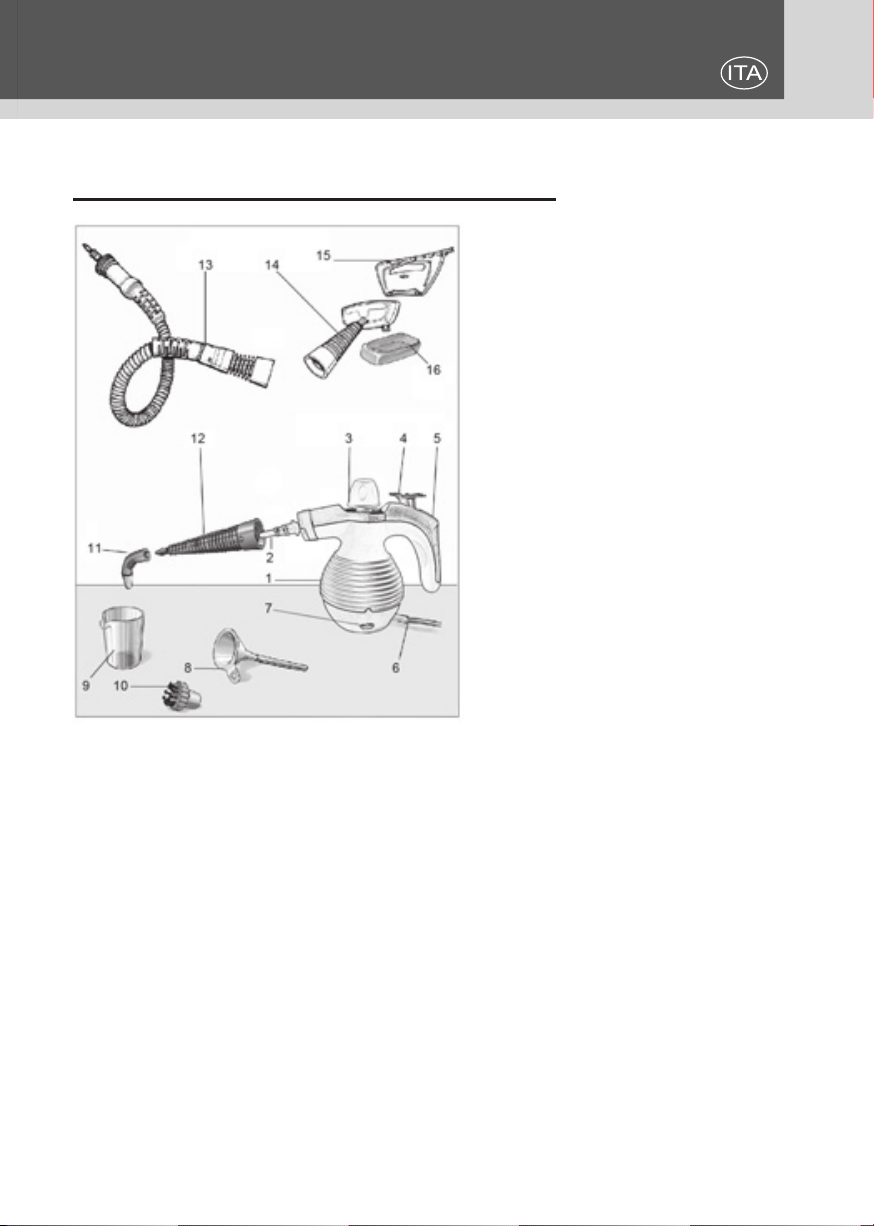
Kasanova BRO000003 User manual

PULITORE A VAPORE
HANDHELD STEAM CLEANER • HANDDAMPFREINIGER •
NETTOYEUR VAPEUR À MAIN • LIMPIADOR A VAPOR
INSTRUCTIONS MANUAL • BEDIENUNGSANLEITUNG •
MANUEL D’INSTRUCTION • MANUAL DE INSTRUCCIONES
MANUALE DI ISTRUZIONI
BRO000003

2PULITORE A VAPORE
Leggere attentamente queste istruzioni prima di utilizzare il pulitore a vapore.
Si prega di conservare questo manuale di istruzioni in un luogo sicuro per un ulteriore
utilizzo.
CARATTERISTICHE DEL PRODOTTO
Innovamento tecnico
Il vapore ad alta temperatura e ad alta pressione viene utilizzato per eliminare le spor-
cizie e le macchie sulle assi del pavimento, porte, nestre e vestiti; il macchinario può
anche essere utilizzato per uccidere i batteri sulle superci e rimuovere polvere, ed è un
prodotto ecologico e igienico.
Controllo automatico del riscaldamento, in grado di generare vapore continuo e pulizia
continua. Usato con vapore acqueo ad alta pressione, non vengono aggiunti agenti chi-
mici, completamente ecologici.
Maggiore sicurezza
Progettato per impedire il riscaldamento della caldaia vuota, dopo che l’acqua nel ser-
batoio della caldaia è stata riscaldata e si è evaporata completamente, il macchinario
scollegherà automaticamente l’alimentazione elettrica e quindi eviterà il riscaldamento
a vuoto. Con termostato ad alta sensibilità, è disponibile un vapore ad alta temperatura
da 140 °C, garantendo la disinfezione e la sterilizzazione. La valvola di sicurezza ha la
funzione di rilascio automatico della pressione. Quando c’è un’alta pressione del vapore
nel serbatoio, la valvola si apre automaticamente e rilascia la pressione.
Cavo di alimentazione prolungato con doppio isolamento, può isolare ecacemente il
cavo dall’acqua e dalla polvere e garantire la sicurezza.
Durevole
L’equipaggiamento è progettato per avere una caldaia pressofusa in lega di alluminio
con parete interna extra-spessa e può resistere all’alta pressione e ha una lunga durata.
Il guscio di plastica completo è realizzato in PP e PA di qualità con anticorrosione e alta
resistenza.
Risparmio energetico
Grazie al design integrato di tubi di riscaldamento e corpo caldaia appositamente realiz-
zati, viene fornito il riscaldamento complessivo, un’elevata ecienza di riscaldamento e
risparmio energetico.
La struttura del guscio a doppio strato può prevenire ecacemente la perdita di calore,
l’ambiente e il risparmio energetico.
Facile da usare
Accendere l’alimentazione e il macchinario inizierà immediatamente il processo di riscal-
damento. Quando si riscalda alla temperatura specicata, premere il pulsante del vapore
e il vapore verrà spruzzato lentamente. Quindi la macchina è facile da usare.
Con gli accessori di pulizia completi e forniti, questo prodotto può essere montato e
smontato facilmente. Può essere usato per pulire porte, nestre, assi del pavimento e

3
PULITORE A VAPORE
vestiti, e quindi è ampiamente applicabile.
DESCRIZIONE DELLE PARTI STRUTTURALI
1. Corpo
2. Ugello a spruzzo corto
3. Tappo di sicurezza
4. Pulsante di vapore
5. Maniglia
6. Cavo di alimentazione
7. Indicatore di alimentazione
8. Imbuto
9. Misurino
10. Ugello a spazzola rotonda in nylon
11. Ugello di spruzzatura piegato
12. Ugello a spruzzo lungo
13. Ugello di spruzzo di connessione esteso
14. Ugello di spruzzo generale
15. Ugello di spruzzo per porta / nestra
16. Manicotto per asciugamano

4PULITORE A VAPORE
MISURE DI SICUREZZA
Quest‘icona signica “Vietato” Quest‘icona signica “Attenzione”
1. Non permettere ai bambini di usare questo macchinario in modo indipendente o
ai bambini piccoli di essere troppo vicini al prodotto quando nessun adulto e presente.
2. Per evitare scosse elettriche, non immergere il cavo di alimentazione o la spina in
acqua o altri liquidi.
3. Il cavo dell’alimentazione e la spina di alimentazione devono essere in buone con-
dizioni e non devono essere danneggiati. Il cavo o spina d’alimentazione che sono dan-
neggiati o difettosi non devono essere utilizzati e devono essere riparati presso il centro
di assistenza autorizzato.
4. Questo prodotto è destinato esclusivamente all’uso domestico e non deve essere
utilizzato per applicazioni industriali.
5. Non accendere l’alimentazione nché il serbatoio non è pieno d’acqua
6. L’alimentazione elettrica utilizzata deve essere conforme ai requisiti del prodotto
del produttore
7. Durante il funzionamento, la bocca del serbatoio deve essere tappata ermeticamen-
te e il cappuccio di sicurezza deve essere serrato in posizione.
8. Utilizzare una presa con cavo di messa a terra speciale.
9. Durante l’uso, il corpo del prodotto non deve essere inclinato di oltre 45 gradi. O
altrimenti l’acqua bollente verrà spruzzata insieme al gruppo.
10. Non dirigere il vapore verso persone, animali o altri prodotti elettrici.
11. Prima di rimettere acqua, assicurarsi di scollegare il cavo d’alimentazione per scol-
legare l’alimentazione. È necessario scollegare il cavo d’alimentazione dopo l’uso del
prodotto, prima che venga pulito e mentre viene riparato.
12. Non aggiungere alcun solvente per la rimozione della ruggine, agenti anti-odore,
alcool e detergenti nel serbatoio, che potrebbero causare danni al serbatoio.
13. Se il cavo di alimentazione è danneggiato, deve essere sostituito dal produttore
o dal suo agente di assistenza o da una persona con qualica simile per evitare un pe-
ricolo.
14. L’apparecchio deve essere scollegato dopo l’uso e prima della pulizia o della ma-
nutenzione dall’utente dell’apparecchio.
15. Non usare in piscine contenenti acqua.
16. Liquido o vapore non devono essere diretti verso apparecchiature contenenti com-
ponenti elettrici, come l’interno dei forni.
17. L’apertura di riempimento non deve essere aperta durante l’uso.
Importante: non riempire mai eccessivamente il serbatoio, altrimenti la generazione di
vapore sarà compromessa o si produrrà una pressione del vapore troppo elevata.

5
PULITORE A VAPORE
ACCESSORI IN DOTAZIONE CON LA MACCHINA
Nome Imbuto Misurino Spazzola
rotonda
Manicotto per
asciugamano
Ugello a
spruzzo
lungo
Q.tà 1 1 1 1 1
Nome
Ugello spruzza-
tore per porta /
nestra
Ugello di
spruzzatura
generale
Ugello a
spruzzo
piegato
Ugello di
spruzzo di
collegamento
esteso
Manuale
utente
Q.tà 1 1 1 1 1
SPECIFICA TECNICA
Valutazione dell’alimentazione elettrica: 220-240 V, 50 Hz
Capacità del serbatoio: 350 ml
Capacità dell’acqua consigliata: 250 ml
Potenza nominale: 900W-1050W
Pressione del vapore: 2,8-3,5 bar
Capacità del vapore iniettato: 28g / min ± 5
Regolatore di temperatura: temperatura di funzionamento: 135 °C
Fusore: temperatura di funzionamento: 169 °C
Dimensione complessiva: 275x125x220 mm
Peso netto: 1,55 kg
FUNZIONI
Disinfezione e sterilizzazione
Installare l’ugello a spruzzo lungo sul corpo principale e puntare l’ugello di spruzzatura
nella posizione che richiede la disinfezione, quindi premere il pulsante di erogazione del
vapore. Il vapore ad alta temperatura può uccidere i batteri.
Pulizia dei vestiti
Installare l’ugello di spruzzatura generale sul corpo principale, quindi coprire il manicotto
per asciugamani. Puntare l’ugello di spruzzatura sugli indumenti appesi, premere il pul-
sante del vapore e spostare l’ugello verso l’alto e verso il basso, nonché verso sinistra e
verso destra allo stesso tempo. Le macchie potranno essere rimosse dai vestiti.
Pulizia di porte e nestre
Installare l’ugello di spruzzatura generale sul corpo principale, quindi installare l’ugello
di spruzzatura per porta / nestra su di esso. Puntare lo spruzzino sulla porta / nestra e
premere verso il basso il pulsante del vapore e spostare l’ugello su e giù, nonché verso
sinistra e verso destra allo stesso tempo. Le macchie potranno essere rimosse dalla

6PULITORE A VAPORE
porta / nestra.
Pulizia delle assi del pavimento
Installare l’ugello di spruzzo di collegamento esteso sul corpo principale, quindi installare
l’ugello di spruzzatura piegato o l’ugello di spruzzo rotondo. Puntare l’ugello di spruzza-
tura sul pannello del pavimento e premere il pulsante del vapore per rimuovere lo sporco
e le macchie negli angoli della parete e sul pavimento.
ISTRUZIONI PER L’USO
Procedure operative
1. Disimballare il prodotto, controllare gli accessori e i documenti in dotazione con il pro-
dotto e accertarsi che il prodotto e gli accessori non siano danneggiati.
2. Prima dell’uso, leggere attentamente il Manuale dell’utente. Il pulitore a vapore è solo
per uso domestico.
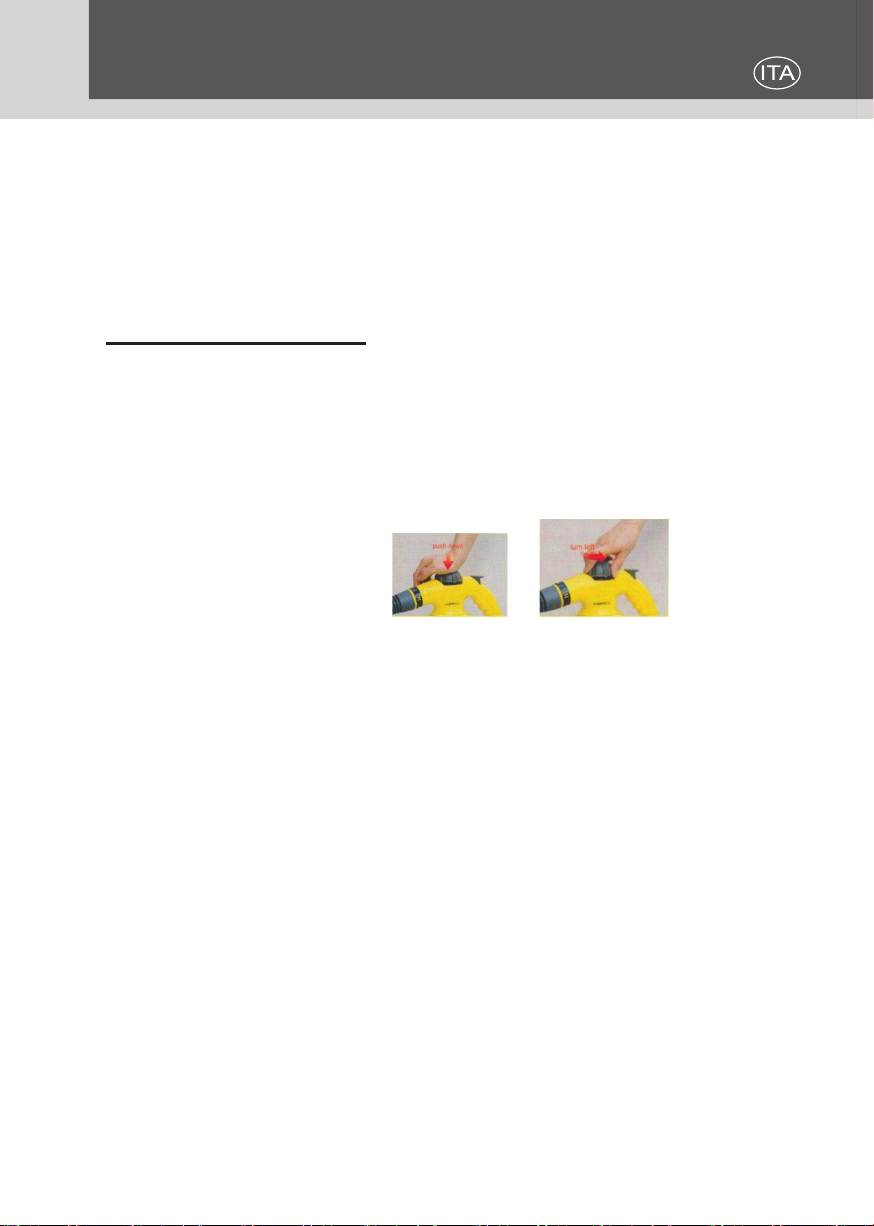
3. Innanzitutto, posizionare il pulitore a vapore su una piattaforma piana, spingere verso
il basso il coperchio di sicurezza, svitare il tappo di sicurezza in senso antiorario, quindi
installare l’imbuto. Come in chat: (I) (II) .
4. Prelevare acqua pulita adatta con il misurino e aggiungerla nel serbatoio (la capacità
massima del serbatoio è di 350 ml quindi non riempire eccessivamente il serbatoio e
lasciare un po’ di spazio nel serbatoio). Reinstallare il cappuccio di sicurezza e serrarlo
in posizione
5. Controllare l’alimentatore e la presa e vericare che siano conformi ai requisiti indicati
nel manuale dell’utente, quindi collegare l’alimentazione.
6. La spia si spegne 3 minuti dopo aver collegato l’alimentazione, signica che il vapore
è pronto. A questo punto, posizionare l’interruttore di sicurezza sul pulsante del vapo-
re, quindi premere leggermente il pulsante del vapore e controllare se il vapore viene
spruzzato dall’ugello. (Non puntare l’ugello di spruzzatura su animali, persone o prodotti
elettrici).
7. Se viene spruzzato del vapore, rilasciare il pulsante del vapore e installare gli acces-
sori adatti in base alle proprie esigenze, quindi posizionare l’interruttore di sicurezza sul
pulsante del vapore, premere il pulsante del vapore, quindi tirare indietro l’interruttore di
sicurezza: il pulsante del vapore è ssato, l’unità emetterà continuamente il vapore per
eseguire le operazioni richieste dall’utente.
8. Quando si nisce il lavoro di pulizia o si ferma il prodotto per fare altre cose, alzare il
pulsante del vapore, quindi l’interruttore di sicurezza richiederà uno sforzo.
Installazione di accessori
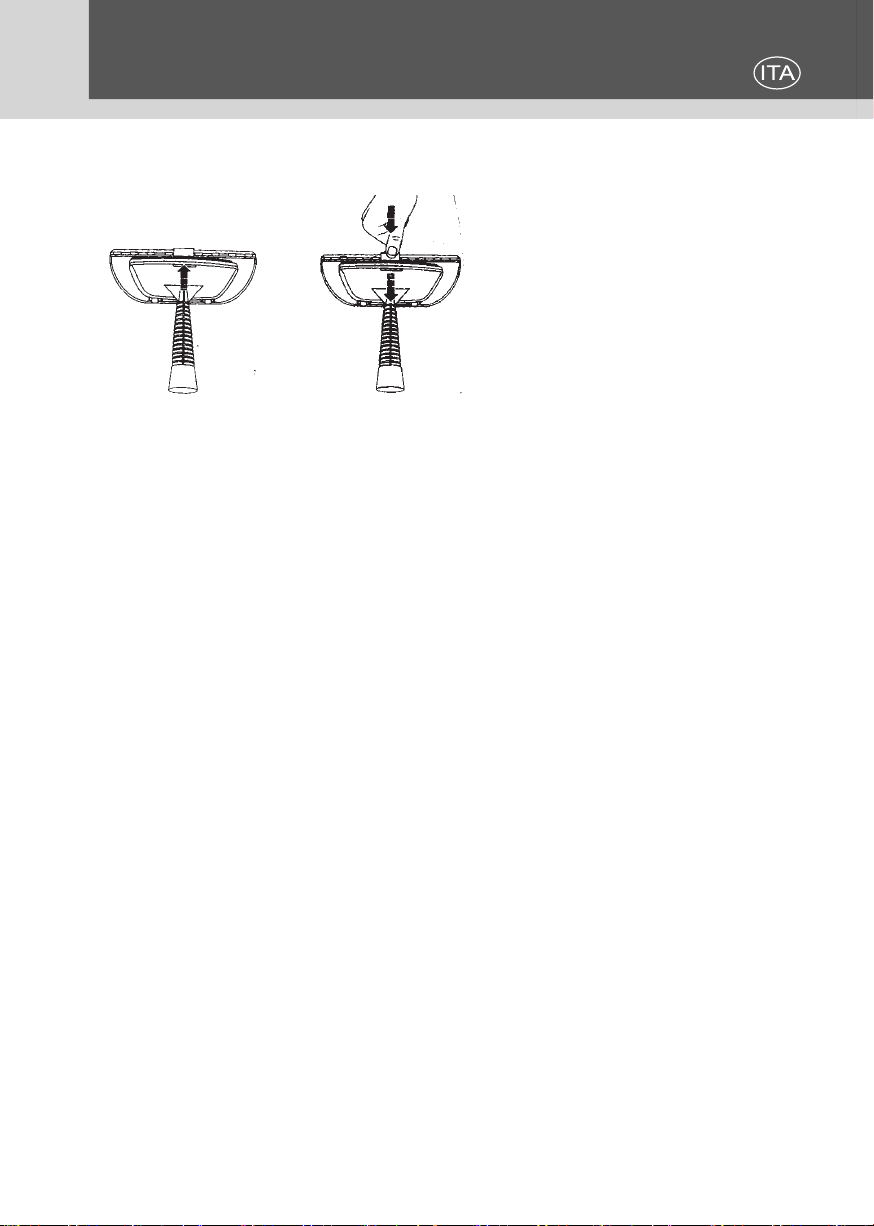
1. Installare la ventosa con la spazzola per capelli
Tenere la sezione del tubo della vaschetta di spruzzatura con la spazzola per capelli in
mano, allineare la freccia sulla vaschetta con il segno della linea singola sull’ugello a

7
PULITORE A VAPORE
spruzzo corto sul corpo del prodotto e inserire la ventosa in posizione. Ruotare la va-
schetta di spruzzatura in senso orario e allineare la freccia sulla vaschetta con il segno
della doppia linea sull’ugello a spruzzo corto sul corpo macchina, come mostrato nella
Figura 1. Fissare la vaschetta di spruzzatura sul corpo della macchina. Per rimuovere la
ventosa con la spazzola per capelli, ruotare inversamente la vaschetta di spruzzatura (in
senso antiorario) come mostrato nella Figura 2 e allineare la freccia sulla vaschetta con
il segno a linea singola sul corpo della macchina. Quindi si può estrarre la vaschetta di
spruzzatura con la spazzola per capelli.
(I) (II)
2. Installare la vaschetta di spruzzatura con una spazzola rotonda o una vaschetta di
spruzzatura piegata.
Per l’installazione diretta su ugelli a spruzzo corti, puntare la vaschetta di spruzzatura
con una spazzola rotonda o una vaschetta di spruzzatura curvata nella parte superiore
dell’ugello di spruzzatura, come mostrato nella Figura 3, e spingere la vaschetta verso
l’alto nché non è in posizione. Poiché l’ugello a spruzzo corto e la vaschetta di spruz-
zatura sono posizionati in sei direzioni, l’angolo e la direzione possono essere regolati
durante l’installazione. Oppure, installare prima la vaschetta lunga e poi la vaschetta di
spruzzatura con la spazzola rotonda o la vaschetta piegata. La vaschetta di spruzzatura
lunga è installata nello stesso modo dell’installazione della vaschetta di spruzzatura con
la spazzola per capelli. L’ugello di spruzzatura con spazzola rotonda o le vaschette di
spruzzatura piegata o lunga possono essere installate nelle stesse procedure dell’instal-
lazione su ugello a spruzzo corto.
(III)
3. Installazione della vaschetta di spruzzatura per porta / nestra
Per prima cosa installare la vaschetta di spruzzatura con la spazzola per capelli sull’u-
gello a spruzzo corto.
Come mostrato nella Figura 4 e nella Figura 5, installare i due piccoli ganci della va-
schetta di spruzzatura per porta / nestra sulle alette di sospensione della vaschetta di

8PULITORE A VAPORE
spruzzatura con la spazzola per capelli, quindi innescare il grosso gancio della vaschetta
di spruzzatura per porta / nestra e spingere la vaschetta per la porta / nestra verso
l’alto e agganciarla sul corpo della ventosa con la spazzola per capelli.
(IV) (V)
Riempire l’acqua durante il funzionamento
1. Scollegare il cavo di alimentazione e scollegare l’alimentazione.
2. Premere il pulsante del vapore per rilasciare la pressione no a quando non viene
iniettato vapore.
3. Svitare lentamente il cappuccio di sicurezza ma non rimuoverlo e il vapore residuo
verrà scaricato lentamente no a quando non ne fuoriesce più. Quindi posizionare la
macchina in un luogo fresco per rareddarla per circa cinque minuti. Inne, rimuovere
completamente il cappuccio di sicurezza.
4. Utilizzare l’imbuto e il misurino per riempire una quantità adeguata di acqua fredda o
calda nel serbatoio.
5. Reinstallare il cappuccio di sicurezza sul corpo della macchina e serrarlo in posizione.
Dopo che la macchina è stata utilizzata
1. Dopo aver utilizzato la macchina per la pulizia, scollegare il cavo di alimentazione e
scollegare l’alimentazione.
2. Premere il pulsante del vapore per rilasciare la pressione no a quando non viene
iniettato vapore, quando il vapore non viene espulso, sollevare il pulsante del vapore,
quindi l’interruttore di sicurezza richiederà uno sforzo.
3. Svitare lentamente il cappuccio di sicurezza ma non rimuoverlo e il vapore residuo
verrà scaricato lentamente no a quando non ne fuoriesce piu. Quindi posizionare la
macchina in un luogo fresco per rareddarla per circa cinque minuti. Inne, rimuovere
completamente il cappuccio di sicurezza.
4. Svuotare l’acqua residua nel serbatoio e pulire la supercie esterna con un panno
asciutto.
5. Inne, reinstallare il cappuccio di sicurezza sul corpo della macchina e serrarlo in
posizione.

9
PULITORE A VAPORE
AVVERTENZE
Pericolo di scottature
Questo apparecchio non è destinato all’uso da parte di persone (compresi i bambini) con
capacità siche, sensoriali o mentali ridotte, o che mancano di esperienza e conoscen-
za, a meno che non siano stati supervisionati o istruiti sull’uso dell’apparecchio da parte
di una persona responsabile della loro sicurezza.
I bambini devono essere sorvegliati per assicurarsi che non giochino con l’apparecchio.
L’apertura di riempimento non deve essere aperta durante l’uso.
NON dirigere il vapore verso persone, animali o altri prodotti elettrici.
TRATTAMENTO DEL DISPOSITIVO ELETTRICO ED
ELETTRONICO A FINE VITA
Informazione agli utenti per il corretto smaltimento del prodotto ai sensi della Direttiva
Europea 2002/96/CE e del D.lgs N. 151/2005
Caro consumatore,
è importante ricordarti che, come buon cittadino, avrai l’obbligo di smaltire questo
prodotto non come riuto urbano, ma di eettuare una raccolta separata. Il simbolo
sopra indicato e riportato sull’apparecchiatura indica che il riuto deve essere
oggetto di “raccolta separata”. I dispositivi elettrici ed elettronici non devono essere
considerati riuti domestici. Pertanto, il prodotto alla ne della sua vita utile, non
deve essere smaltito insieme ai riuti urbani. L’utente dovrà conferire (o far conferire)
il riuto ai centri di raccolta dierenziata predisposti dalle amministrazioni locali,
oppure consegnarlo al rivenditore contro l’acquisto di una nuova apparecchiatura
di tipo equivalente. La raccolta dierenziata del riuto e le successive operazioni di
trattamento, recupero e smaltimento favoriscono la produzione di apparecchiature con
materiali riciclati e limitano gli eetti negativi sull’ambiente e sulla salute eventualmente
causati da una gestione impropria del riuto.
Grazie!

10 HANDHELD STEAM CLEANER
Read these instructions carefully before using your steam cleaner.
Please keep this instruction manual in safe place for further use.
PRODUCT CHARACTERISTICS
Technically leading
High-temperature and high-pressure steam is used for clearing away the dirts and stains
on the oor boards, doors, windows and clothes; The machine also can be used for killing
bacteria on surfaces, and removing dusts and bacteria, and it is an environment-friendly
and sanitary product.
Automatic control of heating, able to generate steam continuously and continuous clea-
ning is easy. With pure high-pressure water steam used, no chemical agents are added,
completely environment-friendly.
Higher Safety
Designed to prevent heating empty boiler, after the water in the boiler tank is heated and
evaporated completely, the machine will automatically disconnect the power supply and
thus prevent empty heating. With high-sensitivity thermostat, 140°C high-temperature
steam is available, ensuring disinfection and sterilization. The safety valve has automatic
pressure release function. When there is high steam pressure in the tank, the valve will
automatically open and release the pressure.
Extended power cord with double insulation, can eectively insulate the cable from water
and dust, and ensure safety.
Durable
The machine is designed to have aluminum alloy die casting boiler body with extra-thick
inner wall, and can resist high pressure and has a long service life.
Complete plastic shell is made from quality PP and PA with anti-corrosion and high
strength.
Energy-saving
With integrated design of specially-made heating tubes and boiler body, overall heating
is provided, high heating eciency and energy-saving.
Double-layer shell structure can eectively prevent heat loss, environment-friendly and
energy-saving.
Easy to use
Switch on power supply, and the machine immediately starts heating process. When it
heats to specied temperature, press the steam button, and steam will be sprayed out
slowly. So the machine is easy to operate.
With complete cleaning accessories supplied, the machine can be assembled and di-
sassembled easily. It can be used to clean the doors, windows, oor boards and clothes,
and thus is applicable widely.

11
HANDHELD STEAM CLEANER
DESCRIPTION OF STRUCTURING PARTS
1. Body
2. Short spray nozzle
3. Safety cap
4. Steam button
5. Handle
6. Power cord
7. Power Indicator
8. Funnel
9. Measuring cup
10. Nylon round brush nozzle
11. Bent spray nozzle
12. Long spray nozzle
13. Extended connecting spray nozzle
14. General spray nozzle
15. Spray nozzle for door/window
16. Towel sleeve

12 HANDHELD STEAM CLEANER
SAFETY PRECAUTIONS
This icon represents “Prohibition” This icon represents “Warning”
1. Do not allow children to use this machine independently or little children to be too
near to this machine when no adults attend to them.
2. To prevent electrical shock, do not immerse power cord or power plug in water or
other liquids.
3. The power cord and power plug should be in good condition and must not be da-
maged. Damaged or defective power cord and power plug must not be used and should
be repaired at appointed service center.
4. This product is for only use in households and must not be used for industrial ap-
plications.
5. Do not turn on power supply until the tank is full of water.
6. Used power supply should comply with the product requirements of the manufactu-
rer.
7. During operation, the tank mouth must be plugged hermetically and safety cap
should be tightened in position.
8. A socket with special earthing wire must be used.
9. In use, the machine body must not be inclined at more than 45 degrees. Or otherwi-
se boiling water will be sprayed out together with team.
10. Do not direct the steam towards persons, animals or other electrical products.
11. Before relling water, ensure to unplug the power cord to disconnect power supply.
It is necessary to unplug the power cord after the machine is used, before it is cleaned
and while it is repaired.
12. Do not add any rust remover, odorcounteracting agent, alcohol and detergent into
the tank, which will possibly cause damage to the tank.
13. If the supply cord is damaged, it must be replaced by the manufacturer or its ser-
vice agent or a similarly qualied person in order to avoid a hazard.
14. The appliance has to be unplugged after use and before cleaning or user mainte-
nance of the appliance.
15. Do not use in swimming pools containing water.
16. Liquid or steam must not be directed towards equipment containing electrical
components, such as the interior of ovens.
17. The lling aperture must not be opened during use.
Important: never overll the tank, or otherwise the steam generation will be aected or
too high steam pressure will be caused.

13
HANDHELD STEAM CLEANER
ACCESSORIES SUPPLIED WITH THE MACHINE
Name Funnel Measuring
cup
Round brush
nozzle Towel sleeve Long spray
nozzle
Qty 1 1 1 1 1
Name
Spray nozzle
for door/
window
General
spray nozzle
Bent spray
nozzle
Extended
connecting
spray nozzle
User ma-
nual
Qty 1 1 1 1 1
TECHNICAL SPECIFICATION
Rating of power supply: 220-240V, 50Hz
Tank capacity: 350ml
Suggest water capacity: 250ml
Rated power: 900W-1050W
Steam pressure: 2.8-3.5Bar
Injected steam capacity: 28g/min±5
Temperature controller: functioning temperature: 135 °C
fuser: functioning temperature:169 °C
Overall dimension: 275x125x220 mm
Net weight: 1.55kg
FUNCTIONS
Disinfection and sterilization
Install the long spray nozzle on the main body and aim the spray nozzle at the position
that needs disinfection, and then press down the steam button. High-temperature steam
can kill bacteria.
Cleaning the clothes
Install the general spray nozzle on the main body, and then cover the towel sleeve on it.
Aim the spray nozzle at the hung clothes, and press down the steam button and move
the nozzle up and down as well as to the left and to the right at the same time. Then
stains can be removed from the clothes.
Cleaning doors and windows
Install the general spray nozzle on the main body, and then install the spray nozzle for
door/window on it. Aim the spray cup at the door/window, and press down the steam but-
ton and move the nozzle up and down as well as to the left and to the right at the same
time. Then stains can be removed from the door/window.

14 HANDHELD STEAM CLEANER
Cleaning the oor boards
Install the extended connecting spray nozzle on the main body, then install bent spray
nozzle or round spray nozzle. Aim the spray nozzle at the oor board, and press down
the steam button to remove the dirt and stains in wall corners and on the oor.
OPERATING INSTRUCTIONS
Operation Procedures
1. Unpack the product, check the accessories and documents supplied with the product
and make sure that the product and accessories are not damaged.
2. Before use, please read the User Manual carefully. The steam cleaner is only for use
in households.
3. First, place the steam cleaner on a level platform, push down the safety cover, un-
screw the safety cap counterclockwise, and then install the funnel. As chatting:
(I) (II) .
4. Take suitable clean water with the measuring cup, and add the water into the tank.
(Max. capacity of the tank is 350ml. Do not overll the tank and some space must be left
in the tank). Re-install the safety cap and tighten it in position
5. Check the power supply and socket, and conrm they comply with the requirements
given in the user manual, then connect the power supply.
6. Indicator lamp will turn o in 3 minutes after connect the power supply, it means steam
is ready. At this time put forward the safety switch on the steam button then lightly press
the steam button and check whether steam is sprayed out of the nozzle. (Do not aim the
spray nozzle at any animal, person or electrical products).
7. If there is steam sprayed out, release steam button and installs suitable accessories
according to your needs, then put forward the safety switch on the steam button, press
down the steam button,then pull back the safety switch, the steam button is xed, the
unit will emit the steam continually in order to carry out the operations required by you.
8. When nish the cleaning job or stop the machine to do some other things, raise the
steam button, then safety switch will takes eort.
Installation of Accessories
1. Install the spray cup with hairbrush
Hold the pipe section of the spray cup with hairbrush in your hand, align the arrow on
the spray cup with the single-line mark on short spray nozzle on the machine body, and
insert the spray cup in position. Rotate the spray cup in clockwise direction, and align the
arrow on the spray cup with the double-line mark on short spray nozzle on the machine
body, as shown in Figure 1. Fix the spray cup on the machine body. To remove the spray
cup with hairbrush, please rotate the spray cup inversely (counterclockwise) as shown in
Figure 2, and align the arrow on the spray cup with the single-line mark on the machine
body. Then the spray cup with hairbrush can be pulled out.

15
HANDHELD STEAM CLEANER
(I) (II)
2. Install spray cup with round brush or bent spray cup
For direct installation on short spray nozzle, aim the spray cup with round brush or bent
spray cup at the top of spray nozzle, as shown in Figure 3, and push the spray cup
upwards until it is in position. As the short spray nozzle and spray cup are positioned in
six directions, the angle and direction can be adjusted during the installation. Or, rst in-
stall long spray cup and then the spray cup with round brush or bent spray cup. The long
spray cup is installed in the same method as the installation of spray cup with hairbrush.
The spray cup with round brush or bent spray cup and long spray cup can be installed in
the same procedures as the installation on short spray nozzle.
(III)
3. Installation of spray cup for door/window
First install the spray cup with hairbrush on short spray nozzle
As shown in Figure 4 and Figure 5, install the two small hooks of the spray cup for door/
window onto suspension lugs of the spray cup with hairbrush, and then trigger the big
hook of the spray cup for door/window, and push the spray cup for door/window up and
clutch it onto the body of the spray cup with hairbrush.
(IV) (V)

16 HANDHELD STEAM CLEANER
Rell water during operation
1. Unplug the power cord and disconnect the power supply
2. Press down the steam button to release the pressure until no steam is injected out.
3. Slowly unscrew the safety cap but do not remove it, and residual steam will be dischar-
ged slowly until no steam comes out. Then place the machine in a cool place to cool it
down for about ve minutes. Finally, completely remove the safety cap.
4. Use the funnel and measuring cup to rell a suitable quantity of cold or hot water into
the tank.
5. Re-install the safety cap onto the machine body and tighten it in position.
After the machine is used
1. After the cleaning machine is used, unplug the power cord and disconnect the power
supply.
2. Press down the steam button to release the pressure until no steam is injected out,
when no steam injected out, raise the steam button, then safety switch will take eort.
3. Slowly unscrew the safety cap but do not remove it, and residual steam will be dischar-
ged slowly until no steam comes out. Then place the machine in a cool place to cool it
down for about ve minutes. Finally, completely remove the safety cap.
4. Empty the residual water in the tank and clean the external surface with a piece of
dry cloth.
5. At last, re-install the safety cap onto the machine body and tighten it in position.
WARNINGS
Danger of scalding
This appliance is not intended for use by persons (including children) with reduced phy-
sical, sensory or mental capabilities, or lack of experience and knowledge, unless they
have been given supervision or instruction concerning use of the appliance by a person
responsible for their safety.
Children should be supervised to ensure that they do not play with the appliance. The
lling aperture must not be opened during use.
DO NOT direct steam towards persons, animals or other electrical products.
INFORMATION FOR USERS OF DOMESTIC APPLIANCES
This marking indicates that this product should not be disposed with other
household wastes throughout the EU. To prevent possible harm to the
environment or human health from uncontrolled waste disposal, recycle it responsibly
to promote the sustainable reuse of material resources. To return your used device,
please use the return and collection systems or contact the retailer where the product
was purchased. They can take this product for environmental safe recycling.

17
HANDHELD STEAM CLEANER
NOTES

18 HANDDAMPFREINIGER
Lesen Sie diese Anweisungen sorgfältig durch, bevor Sie Ihren Dampfreiniger verwen-
den. Bewahren Sie diese Bedienungsanleitung zur weiteren Verwendung an einem si-
cheren Ort auf.
PRODUKTMERKMALE
Technisch führend
Das Gerät nutzt Hochtemperatur- und Hochdruckdampf zum Beseitigen von Schmutz
und Flecken auf den Dielen, Türen, Fenstern und Kleidungsstücken. Die Maschine
kann auch zum Abtöten von Bakterien auf Oberächen sowie zum Entfernen von Staub
verwendet werden. Es ist ein umweltfreundliches und hygienisches Produkt.
Das Produkt hat eine automatische Heizungssteuerung mit kontinuierlicher Dampfer-
zeugung und kann ganz leicht gereinigt werden. Durch die Verwendung von reinem
Wasserdampf, der unter hohem Druck steht, müssen keine chemischen Mittel zugesetzt
werden, was das Produkt sehr umweltfreundlich macht.
Hohe Produktsicherheit
Um das Heizen eines leeren Kessels zu verhindern, wird die Maschine nach dem Erhit-
zen und Verdampfen des Wassers im Kesseltank automatisch von der Stromzufuhr ge-
trennt und somit ein Heizen verhindert. Mit einem hochempndlichen Thermostat steht
140 °C Hochtemperaturdampf zur Verfügung, der Desinfektion und Sterilisation gewährl-
eistet. Das Sicherheitsventil verfügt über eine automatische Druckentlastungsfunktion.
Wenn im Tank ein hoher Dampfdruck herrscht, önet sich das Ventil automatisch und
gibt den Druck frei.
Das verlängerte Netzkabel mit doppelter Isolierung schützt das Kabel eektiv vor Was-
ser und Staub und gewährleistet ein hohes Maß an Sicherheit.
Hohe Haltbarkeit
Die Maschine ist für den Druckguss-Kesselkörper aus Aluminiumlegierung mit extra
starker Innenwand ausgelegt und kann hohen Druck standhalten und hat eine lange
Lebensdauer.
Die komplette Kunststoschale besteht aus hochwertigem PP- und PA-Material mit Kor-
rosionsschutz und hoher Festigkeit.
Stromsparend
Durch die integrierte Konstruktion von speziell angefertigten Heizrohren und Kesselkörp-
er wird eine Gesamtheizung bereitgestellt, eine hohe Heizleistung und Energieeinspa-
rung.
Doppelschicht-Schalenstruktur kann Wärmeverluste wirksam verhindern, umweltfreun-
dlich und energiesparend.
Einfach zu nutzen
Schalten Sie die Stromversorgung ein und die Maschine beginnt sofort mit dem Au-
fheizvorgang. Wenn es sich auf die festgelegte Temperatur erwärmt, drücken Sie die
Dampftaste und der Dampf wird langsam ausgestoßen. So ist die Maschine einfach zu

19
HANDDAMPFREINIGER
bedienen.
Mit dem mitgelieferten Reinigungszubehör kann die Maschine leicht zusammengebaut
und demontiert werden. Es kann zum Reinigen von Türen, Fenstern, Bodenbrettern und
Kleidungsstücken verwendet werden und ist daher weithin anwendbar.
BESCHREIBUNG DER EINZELTEILE
1.Körper
2. Kurze Spritzdüse
3. Schutzkappe
4. Dampftaste
5. Gri
6. Netzkabel
7. Betriebsanzeige
8. Trichter
9. Messbecher
10. Rundbürste aus Nylon
11. Gebogene Spritzdüse
12. Lange Spritzdüse
13. Verlängerte Verbindungsspritzdüse
14. Allgemeine Spritzdüse
15. Spritzdüse für Tür / Fenster
16. Handtuchhülse

20 HANDDAMPFREINIGER
SICHERHEITSVORKEHRUNGEN
Dieses Symbol steht für “Verbot” Dieses Symbol steht für “Warnung”
1. Erlauben Sie Kindern nicht, diese Maschine zu benutzen, oder lassen Sie kleine
Kinder zu nahe an dieser Maschine sein, wenn sich keine Erwachsenen um sie kümm-
ern.
2. Tauchen Sie das Netzkabel oder den Netzstecker nicht in Wasser oder andere
Flüssigkeiten, um einen elektrischen Schlag zu vermeiden.
3. Das Netzkabel und der Netzstecker sollten in gutem Zustand sein und dürfen nicht
beschädigt werden. Beschädigtes oder defektes Netzkabel und Netzstecker dürfen nicht
verwendet werden und sollten in einem autorisierten Servicecenter repariert werden.
4. Dieses Produkt ist nur für den Haushalt bestimmt und darf nicht für industrielle
Anwendungen verwendet werden.
5. Schalten Sie die Stromversorgung erst ein, wenn der Tank voll mit Wasser ist.
6. Das verwendete Netzteil sollte den Produktanforderungen des Herstellers entspre-
chen.
7. Während des Betriebs muss die Tankmündung luftdicht verschlossen sein und der
Sicherheitsverschluss sollte festgezogen werden.
8. Es muss eine Steckdose mit speziellem Erdungskabel verwendet werden.
9. Bei der Benutzung darf der Maschinenkörper nicht mehr als 45 Grad geneigt sein.
Ansonsten wird kochendes Wasser zusammen mit Dampf gesprüht.
10. Richten Sie den Dampf nicht auf Personen, Tiere oder andere elektrische Pro-
dukte.
11. Bevor Sie Wasser nachfüllen, stellen Sie sicher, dass der Netzstecker gezogen ist,
um die Stromversorgung zu trennen. Es ist notwendig, das Netzkabel nach Gebrauch
der Maschine, vor der Reinigung und einer Reparatur abzuziehen.
12. Füllen Sie keinen Rostentferner, geruchsneutralisierenden Mittel, Alkohol und Rei-
nigungsmittel in den Tank. Dies kann zu Schäden am Tank führen.
13. Wenn das Netzkabel beschädigt ist, muss es vom Hersteller oder seinem Kunden-
dienst oder einer ähnlich qualizierten Person ausgetauscht werden, um eine Gefahr zu
vermeiden.
14. Das Gerät muss nach dem Gebrauch und vor der Reinigung oder Wartung des
Geräts vom Stromnetz getrennt werden.
15. Nicht in der Nähe von befüllten Swimming Pools verwenden.
16. Flüssigkeit oder Dampf darf nicht auf Geräte gerichtet werden, die elektrische
Komponenten enthalten, wie z. B. das Innere von Öfen.
17. Die Einfüllönung darf während des Gebrauchs nicht geönet werden.
Wichtig: Überfüllen Sie den Tank niemals, da sonst die Dampferzeugung beeinträchtigt
wird oder ein zu hoher Dampfdruck entsteht.
Table of contents
Languages:
Other Kasanova Steam Cleaner manuals