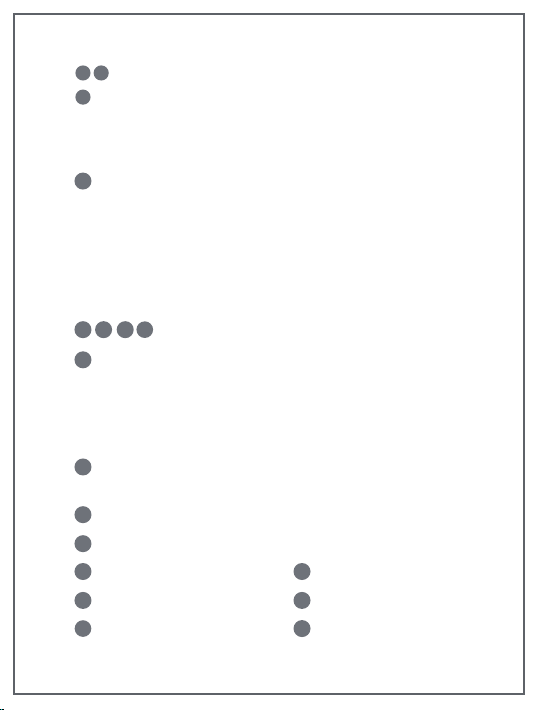
KAWA S6 User manual

HD Video Wireless Baby Monitor
Model:S6
USER MANUAL

Monitor Charging Method
Camera Power Supply Method
Add Camera to the Baby Monitor
Display Mode of Screen
Camera Installation Methods
Certification
Declaration of Conformity
Monitor Menu Settings & Icons Description
Box Contents
Monitor Features
Camera Features
Warning Explain
2
3
4
6
7
7
8
10
11
13
19
19
24
Directory
EN

Baby Monitor
(S6-M)
Monitor
Adapter
(5V 2A)
Camera
Adapter
(5V 1A)
Monitor Micro-USB
Power Cable
(1500+200mm)
Camera Micro-USB
Power Cable
(2600+200mm)
Mounting
Screws Pack
Manual
Baby Camera
(S6-C)
Wall Mount
3
Box Contents
EN

4
Monitor Features
EN
15
17
16
14
10
3
8
7
6
5
4
2
1
9
RESET
11
12
13
18

Volume -/+Keys
Navigation Buttons
Return to previous level of menu/talk button:
1)Short press the【return menu / talk intercom】button in the
menu barand return to the superior menu.
2)Any interface, long press【return to the last menu/ Talk intercom】
button to achieve voice intercom.
Power Button: Long press for 3 seconds to power on / off, short press
to switch on / off the monitor screen
Menu Button:
OK Key:
1) Short press the【Menu】to pop up the menu.
2) Short press the【Menu】to close the menu and return to the
home page.
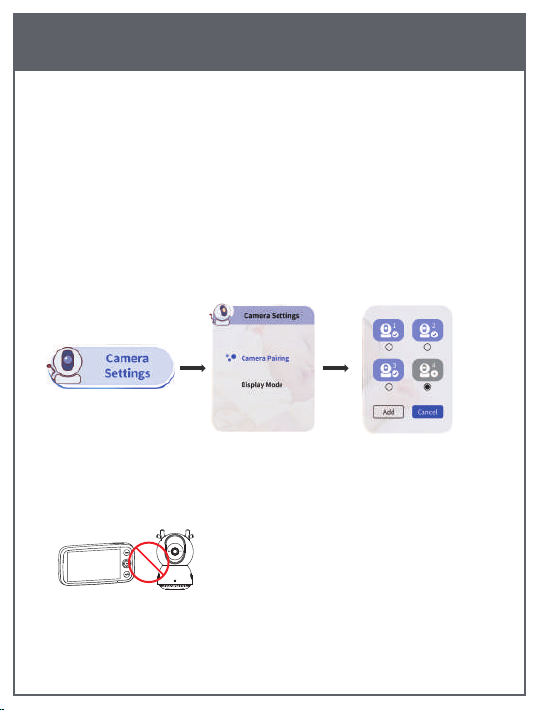
1) Click the 【OK】 button to enter the Camera Setting in the
disconnected interface.
2) For function selection, press the 【OK】 key to confirm
the selection.
3) In multi-screen display, long press the 【OK】 key to
select the monitoring screen.
Switch keys zoom 1.5X、2X and zoom off
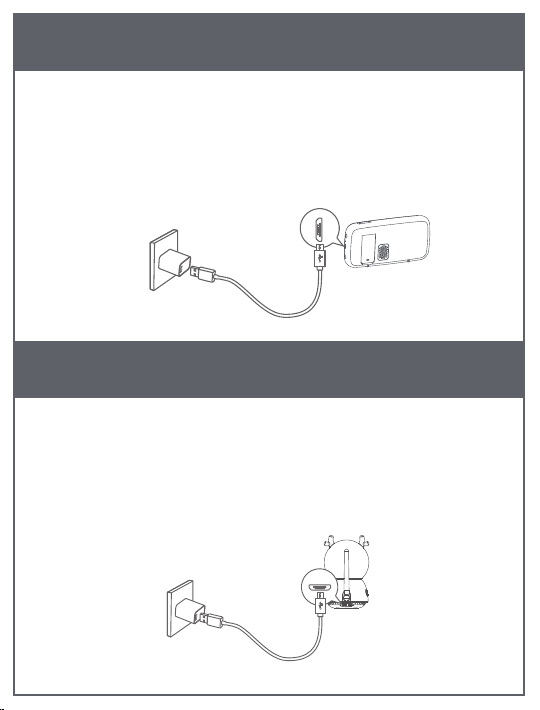
Monitor LED Indicator ( Red: In Charging Green: Full Power )
Monitor Micro USB Port
Microphone
Support Stand
Reset Button
Speaker
Display Screen
12
567 8
9
10
11
12
13 14
16
18
15
17
3
4
5EN

Microphone
Camera Power LED
Status Indicator
Temperature Sensor
Camera Micro USB Port
Wide-Angle Lens
Ambient Light Sensor
Camera Antenna
Speaker
Camera Pairing Button
1 2
3
6
Camera Features
5
7
6
8
9
4
EN
12
3
7
89
4
6
5

Monitor Charging Method
Please fully charge the Monitor before use. Charging method:
1. Connect one end of the Micro USB (1.5m) cable to the Baby Monitor,
and the other end to the power adapter (5 V 2A).
2. Plug the adapter into a power outlet.
Camera Power Supply Method
1) Connect one end of the Micro USB (2.6m) cable to the camera,
and the other end to the power adapter (5 V 1A).
2)Plug the adapter into a power outlet.
After fully charging the Monitor and powering the Camera, you
can enjoy the video baby monitor.
7EN

Install Camera( wall mount & corner mount)
1) Determine the installation position.
2) Put the upper wall bracket on the mounting position and mark
the screw hole with a pencil.
3) Drill the hole Ø6.0 mm on the wall, then insert the expansion nail
into the hole.
4) Screw through the mounting hole of the upper wall bracket
and screw into the expansion nail.
5) Align the Camera on the upper wall bracket, push forward
and hold the Camera.
Note: Please make sure the Camera is properly installed
and secured.
Camera Installation Methods
Installation Method 1 :
8
step 1 step 2
EN

Winding the USB cable
Installation Method 2 :
9
step 1 step 2
step 3
step 3 step 4
Push forward
Adhesive tape
The adhesive tape can be affixed to
the left or right side.
EN

Add Camera to the Baby Monitor
Baby Monitor and Baby Camera are paired out of the box. Please
refer to the following steps when adding additional Baby Cameras
or after resetting a Baby Camera :
Please make sure the Baby Monitor version matches the Baby
Camera version.
1) Press the【MENU】button to open the menu, select Camera
Setting →Camera Pairing, press 【OK】to add Camera.
2) Hold down the pair button on the back of the Camera for
second until you hear the ticking prompt.
Note: If you restore the initial plant settings, press the OK button
in the "Please add a camera" interface to add Camera.
After the Monitor and Camera are
successfully connected, please do not
place the Camera and Monitor too close,
otherwise it may cause howling .
10
EN

Display Mode of Screen
When you add more than two Baby Cameras, you can manually
and automatically switch screen, or you can display multiple
screens at the same time.
1. Manual switching: Long press the 【OK 】button, the screen will be
switched to the next screen. The icon of the camera you select will
display.
2. Automatic switching (Muti-Camera Cycling): select “Camera Setting”
→ “Display Mode”→ “Muti-Camera Cycling / ” option. The screen
cycles through the list of connected Baby Cameras according to
pre-set intervals.
3. Display muti-cameras at the same time: select "camera setting "
→"display mode"→"full screen / ", "two screens / ",
"three screens / ", " four screens / " option, it can display
multiple cameras video at the same time.
11 EN

Multi-screen display
Multi-screen mode allows to view up with 2-screen, 3-screen and
4-screen. And you can operate the camera which its screen around
with blue lines, pan/tilt/zoom and "talk to baby ". The audio you
hear on the monitor comes from this camera. To switch to another
paired Camera, long press the【OK 】button for two seconds.
Full Screen
This mode allows you to see one camera in full-screen view.
12
EN

Press the 【MENU】 button on the Monitor to display the functional
interface, as shown below:
Monitor Menu Settings & Icons Description
VOX Mode When you turn on the VOX mode, the screen will be
turned on automatically if the noise is detected above your pre-set level.
Alert Threshold 1-5 thresholds are optional.
13
1. Menu settings
EN

Sound Alert You can set the Baby Monitor to alert you when
a specific noise level is detected.
Note: Surrounding noise might set off false alarm.
High Temp Alert When the temperature is higher than the
value you set, the monitor will alert.
Note: The high temperature alert you set must be higher than
the low temperature alert you set.
Low Temp Alert When the temperature is lower than the
value you set, the monitor will alert.
Note: The low temperature alert you set must be lower than
the high temperature alert you set.
Alert Duration
Alert Volume 1-3 volume are optional, "2" by default.
Note: When the Monitor paired more Cameras, if you set volume 1
which means all paired cameras are volume 1.
Key Note:The interval duration between each sound alarm is
5 seconds. It will not alert during this interval even there is alert
trigger condition.
14
EN

Camera Lullaby Comfort baby. Select your desired lullaby song.
You can adjust the volume by pressing the "-/+" volume button.
Note: Alert is automatically disabled after enabling the
lullaby function.
Warning: The sound of lullabies may mask the baby's cry.
Off, 1H, 1.5H, 2H, 2.5H, 3H, 3.5H, 4H and custom are optional.
Description:
1. "Off" indicates that the clock reminder is turned off.
2. "1H, 1.5H, 2H, 2.5H, 3H, 3.5H, 4H" means that the monitor will
alarm you after 1, 1.5, 2, 2.5, 3, 3.5, 4 hours. (e.g. When you
choose "Feeding" -> "3H", means that the alarm clock will
remind you to feed after 3 hours)
3. Custom: You can set the clock according to the time you need.
Feeding、Diaper Changing、Other
Monitor white noise Help parent to sleep. Select your desired
white noise. You can adjust the volume by pressing the "-/+"
volume button.)
15 EN

Camera Pairing Add Camera (Note: You can add up to 4
cameras per baby monitor.) Delete Camera
Night Vision Mode Automatic and close are optional. When
set to "Auto", camera automatically switches the screen color
according to the light condition in the room. Note: If the night
vision mode is set to "Close", the Monitor will stick to daylight
screen color and will not change when the surrounding
environment is getting dark.
Time Setting Set the monitor system time.
Brightness Set the screen brightness.
Sleep Mode Sleep Mode: Off, 1min, 3min and 5min are optional.
Enable to automatically turn off the screen after 1min, 3min or
5min. If you select "Off", the screen will not be turned off
automatically.
Display Mode Full screen, two split-screen, three split-screen,
quad split-screen and cycle cameras.
Note: When multiple cameras are connected and set to "cycle
cameras", the monitor will cycle through the list of connected
baby monitors according to the pre-set interval.
16EN

2. Small icon description
Wireless signal
strength
Current battery power
status of monitor
The volume level
of the room where
the camera is located
Temperature Unit ℃ and ℉ are optional.
Select the desired temperature unit.
Anti-Screen Flicker If the baby monitor's screen is flickering,
change to the other Anti-Screen Flicker mode.
Default Settings Reset all options to their default setting.
Version Information Display Monitor version number, Camera
version number, Monitor SN number, Camera SN number.
Language Setting Set the monitor display language.
17 EN

Baby Monitor
is charging
Baby Monitor
has successfully
connected to Camera
It is cycling through the
Cameras screens,
and currently cycling
to Camera3
The temperature of
the room where the
camera is located
Acoustic alarm
is triggered
Currently set time
VOX mode is on
Camera is playing
a single lullaby
The monitor is playing
one kind of white noise
The monitor is
playing all white
noise circularly
Camera is
cycling lullabies
Night Vision
Mode is enabled
18
EN

Certification
This device complies with the radio interference
requirements of the European Community.
Warning Explain
STRANGULATION HAZARD: Cords can strangle children.
Keep cords out of the reach of children (more than
3ft (0.9m) away).
19 EN
Hereby, KAWA ELECTRONICS COMPANY LIMITED declares that the
radio equipment type Baby Monitors S6 is in compliance with
Directive 2014/53/EU.The full text of the EU declaration of
conformity is available at the following internet address:
www.kawa-in.com
The product shall only be connected to a USB interface of version
USB2.0 or higher and that the connection to a power USB is prohibited.

NOTE: This equipment has been tested and found to comply with
the limits for a Class B digital device, pursuant to part 15 of the
FCC Rules. These limits are designed to provide reasonable
protection against harmful interference in a residential installation.
20EN
Caution:
For Adapter: Shall be installed near the equipment and shall be
easily accessible.
For Battery: Risk of explosion battery is replaced by an incorrect type,
dispose of used batteries according to the instructions.
To prevent possible hearing damage, do not listen at high volume
levels for long periods.
Only can use the adapter as below:
S6-M: Rated Input & Output: AC100V-240V, 50/60Hz, 200mA, DC5.0V, 2A.
S6-C: Rated Input & Output: AC100V-240V, 50/60Hz, 200mA, DC5.0V, 1A.
Manufacturer: KAWA ELECTRONICS COMPANY LIMITED
Model Name: Baby Monitor S6
The plug could be disconnected from adapter.
Operating Frequency Range: 2400 ‒ 2483.5MHz
Transmit Output Power: 21 (+1/-2) dBm @ Maximum Power Setting
FCC Statement
Table of contents