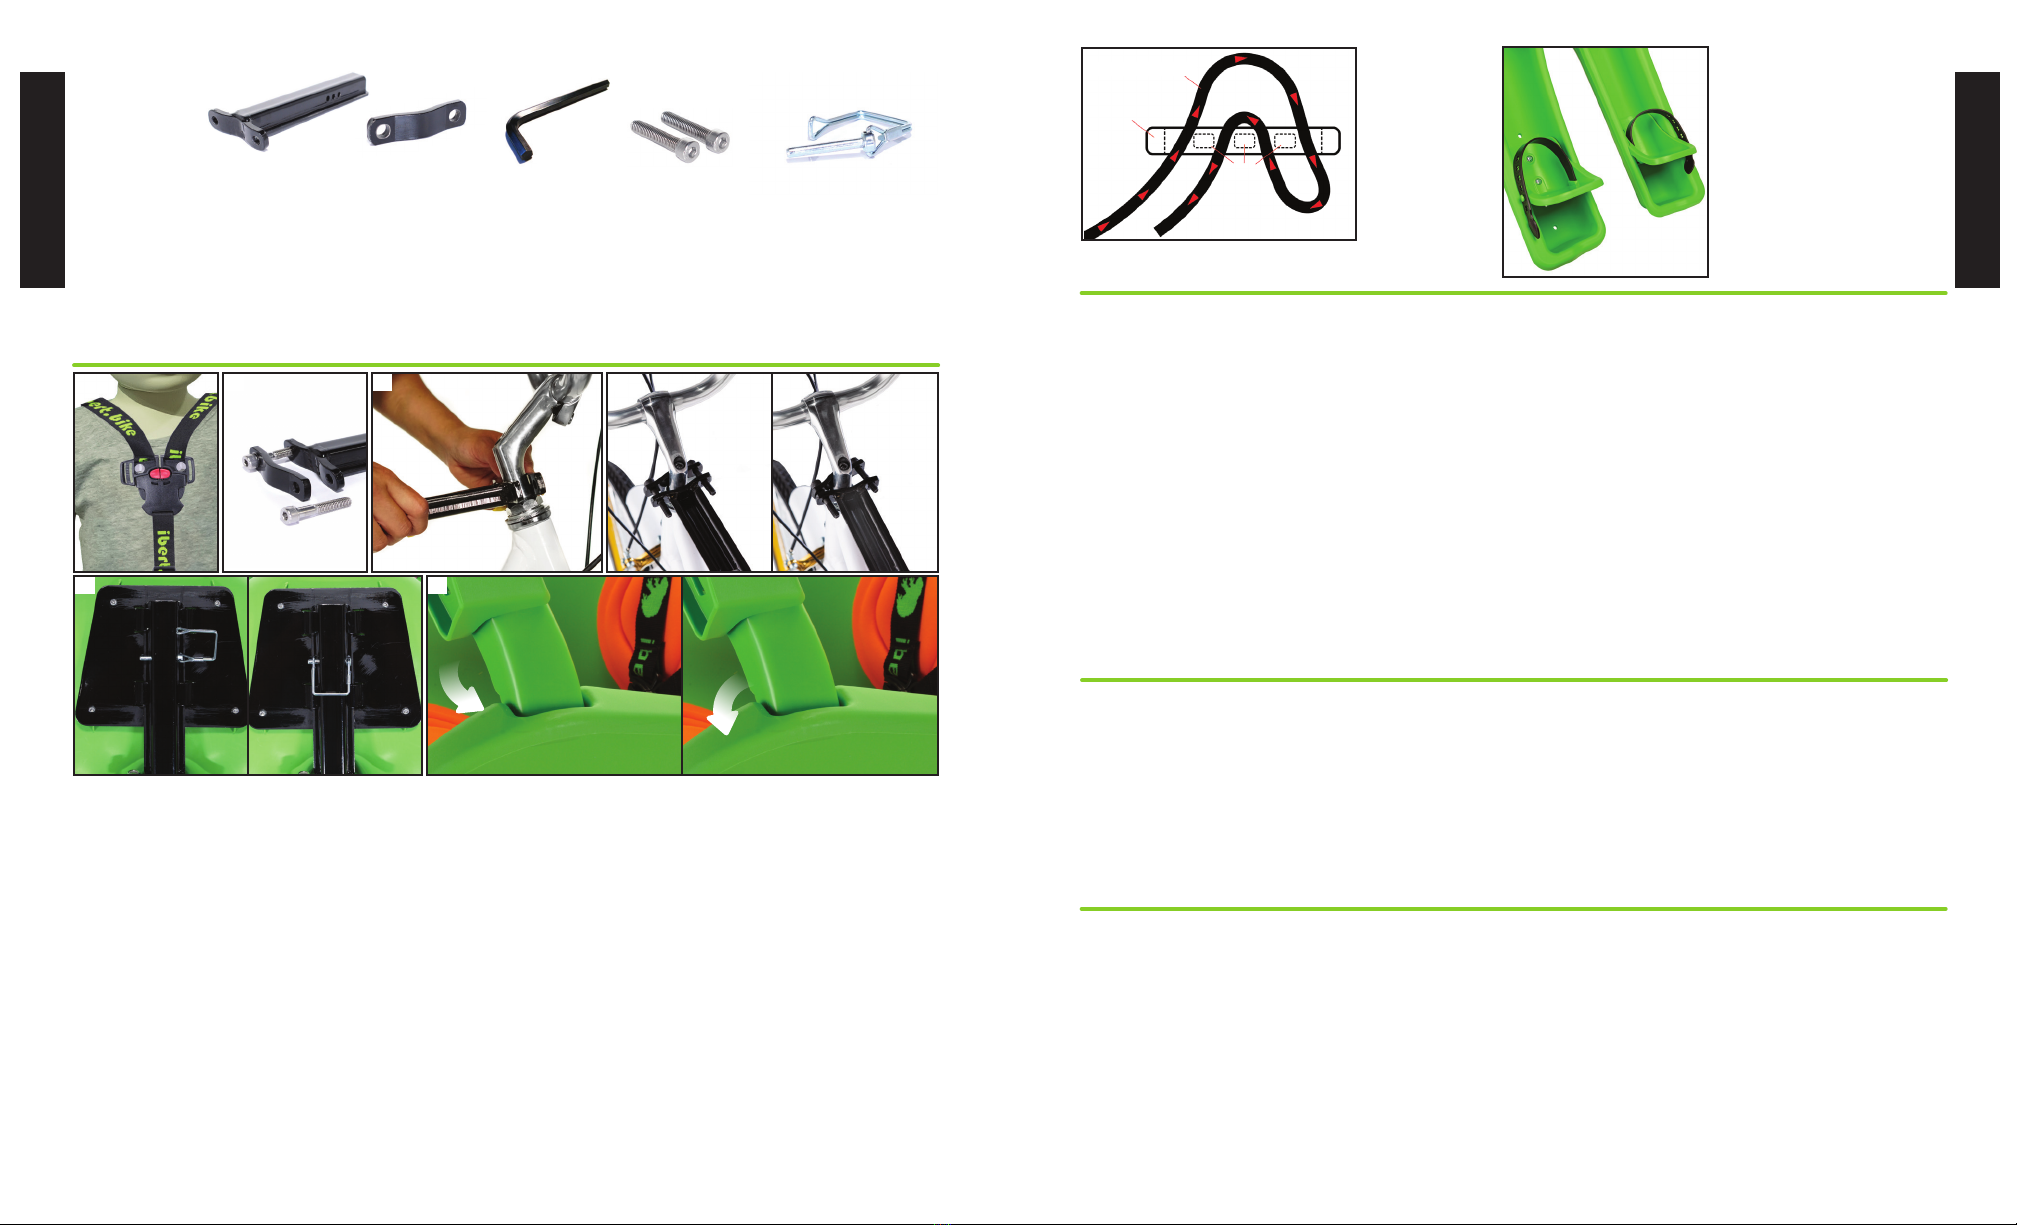
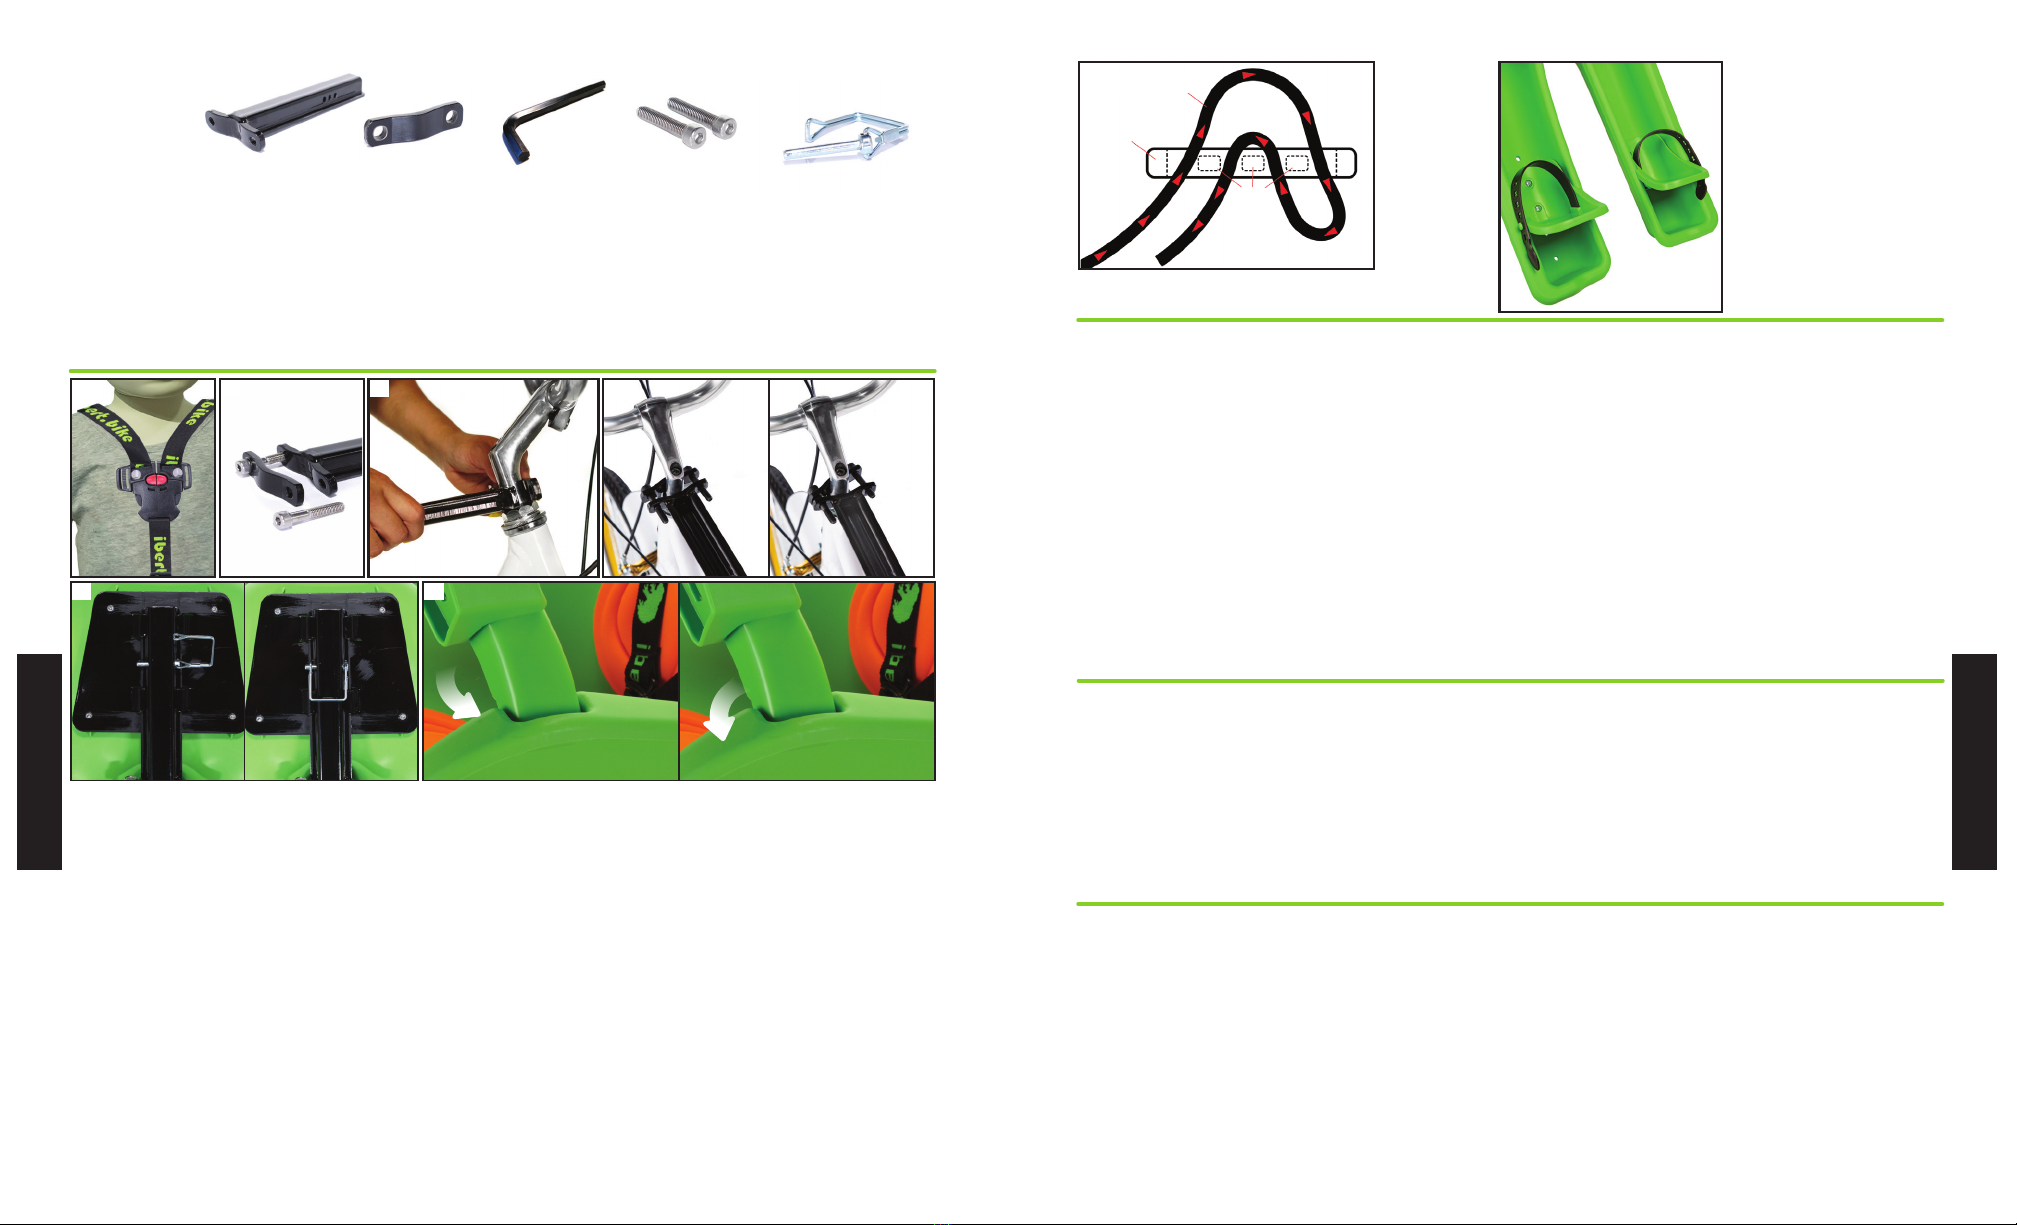
KaZAM iBert User manual

ASSEMBLY INSTRUCTIONS
INSTRUCCIONES DE MONTAJE
INSTRUCTIONS D’ASSEMBLAGE
MONTAGEANLEITUNG F R SICHERHEITSSITZ
ASSEMBLY INSTRUCTIONS
INSTRUCCIONES DE MONTAJE
INSTRUCTIONS D’ASSEMBLAGE
MONTAGEANLEITUNG F R SICHERHEITSSITZ
THIS INSTRUCTION BOOKLET CONTAINS IMPORTANT SAFETY INFORMATION. PLEASE READ AND KEEP FOR FUTURE REFERENCE.
ESTE FOLLETO DE INSTRUCCIONES CONTIENE INFORMACIÓN IMPORTANTE SOBRE SEGURIDAD. POR FAVOR, LEA Y GUÁRDELA PARA REFERNCIA FUTURA.
CE LIVRET D’INSTRUCTIONS CONTIENT DES INFORMATIONS IMPORTANTES SUR LA SÉCURITÉ. VEUILLEZ LIRE ET ENREGISTRER POUR RÉFÉRENCE ULTÉRIEURE.
DIESE GEBRAUCHSANWEISUNG ENTHÄLT WICHTIGE SICHERHEITSINFORMATIONEN, BITTE LESEN UND AUFBEWAHREN.

IBERT BY KAZAM LIMITED WARRANTY
This Limited Warranty is the only warranty for your iBert by Kazam safe-T-seat. There are no other express
warranties. The manufacturer warranties this product to be free of manufacturing defects for a period of two years
from the date of purchase. This Limited Warranty extends only to the original consumer and is not transferable to
anyone else.
This Limited Warranty is limited solely to defects in materials and workmanship and does not cover normal wear and
tear or any damage, failure or loss that is caused by improper assembly, maintenance, adjustment, storage, or use of
the safe-T-seat.
THIS LIMITED WARRANTY WILL BE VOIDED IF THE IBERT BY KAZAM SAFE-T-SEAT IS EVER:
• used in a manner other than for recreation or transportation;
• modified in any way;
• rented;
• used in a manner contrary to the instructions.
THE MANUFACTURER IS NOT LIABLE FOR INCIDENTAL OR CONSEQUENTIAL LOSS OR DAMAGE DUE
DIRECTLY OR INDIRECTLY FROM THE USE OF THIS PRODUCT.
THIS LIMITED WARRANTY GIVES YOU SPECIFIC LEGAL RIGHTS AND YOU MAY HAVE OTHER RIGHTS
WHICH VARY FROM STATE TO STATE.
This item meets or exceeds U.S. Consumer Product Safety Commission Regulations.
Designed for Children 1 year and older.
PROTECT YOUR CHILD - Always use a CPSC approved bike helmet.
THIS INSTRUCTION BOOKLET CONTAINS IMPORTANT SAFETY INFORMATION. PLEASE READ AND KEEP FOR FUTURE REFERENCE.
ASSEMBLY INSTRUCTIONS
SPARE T- BAR ASSEMBLIES and replacement parts are available directly from Kazam LLC.
60 East Halsey Road
Parsippany, NJ 07054
1-800-245-3123
TIPS:
1. Carry extra clothing for your child, such as a windbreaker, sweater, etc. You are active while cycling, the child is
inactive and may feel cooler than you do.
2. Carry an air pump and repair kit, complete with all the necessary tools (including the hex key), to repair a tire or
tighten nuts, bolts, etc.
3. Young children are very sensitive to the UV rays from the sun. You can reduce the damaging effects of the sun’s UV
rays by having the child wear appropriate clothing, applying sunscreen lotions, and wearing UV protective sunglasses.
WARNING: FAILURE TO COMPLY WITH THESE MANUFACTURER’S
INSTRUCTIONS CAN LEAD TO SERIOUS INJURY OF THE
PASSENGER/RIDER!
WARNING: TO AVOID SERIOUS INJURY, Never, never, ever leave your child
unattended in the iBert by Kazam seat. Always maintain positive control of the
bike. Never, ever use the kickstand alone to support the bike or leave the bike
leaning against a support with the child in the seat.
U.S. Patent No. 7,044,541 B1
ENGLISH
ENGLISH
Register Your New iBert by Kazam Safe-T-Seat online @ www.kent.bike/product-registration
IN CASE OF SAFETY ALERTS OR RECALL INFO:

E
Buckle
(Cross Section)
Tabs
Harness Webbing
Red arrows
indicated how webbing
travels through buckle.
ASSEMBLY INSTRUCTIONS:
1. Remove the seat from the box and set it on a carpeted floor. Place your child in the seat and adjust the height of the 3
point buckle so the buckle is 2 inches below the child's chin. Adjust each shoulder strap so that it is snug on the child's
shoulders and lock the shoulder strap into place with the two buckles to hold the child securely in the seat.
2. Take the child out of the seat. Looking at the bottom of the seat, remove the assembled T-bar and bracket from the
seat plate by removing the ring pin and clip. Then remove 1 cap screw and remove from the bracket.
3. Place the partially assembled pieces around the handlebar stem and insert the other screw.
(It may be necessary to raise the handle bar stem to accommodate the T-bar assembly.)
4. Tighten both screws the same length with the hex key so there is even pressure on the bracket. Before tightening the
screws completely, make sure the T-bar is aligned with the tire and frame. DO NOT OVERTIGHTEN!
5. Slide seat onto the T-bar as far forward as possible. Secure the T-bar to the seat plate by sliding the locking pin through
the holes and rotating the clip around and then snapping it over the end of the pin.
6. Snap the right side of the lap bar assembly firmly into the two holes in the seat recess. You can then pivot the lap bar
assembly down and snap it into place.
7. Holding onto the bike, unlock the lap bar and pivot it up. Put the child in the seat and pull each strap over the child’s
shoulders and lock into the buckle. Push down the lap bar until it locks.
8. ENJOY YOUR RIDE!!!
NOTE: If you have difficulty in assembling the seat, have a bike shop finish the assembly for you.
PLEASE READ & FOLLOW THESE INSTRUCTIONS
FOR SAFETY WHEN USING YOUR IBERT BY KAZAM BICYCLE CHILD CARRIER
WARNING:
1. This child carrier is designed to carry children that weigh up to 38 lbs. - 17 kgs. DO NOT carry a child that weighs
more than this weight or a child unable to support itself in the seat.
2. THE RIDER AND THE CHILD BEING CARRIED SHOULD WEAR HELMETS THAT MEET NATIONALLY
RECOGNIZED STANDARDS FOR BICYCLE HELMETS.
3. DO NOT carry a child, who is less than 12 months of age, in this child carrier. To be a passenger, the child must
be able to sit up straight with the head held upright WHILE WEARING A BICYCLE HELMET. A doctor should be
consulted about any child who of questionable development age.
4. DO NOT us this child carrier on rough or off - road conditions.
5. DO NOT make any modifications to this child carrier.
6. DO NOT permit any part of the child’s body or clothing, shoelaces, etc. to come in contact with the moving parts
of the bicycle.
7. DO NOT permit the child to carry refreshments, food or toys while riding in the child carrier. These items may
distract the cyclist and if thrown by the child, they may cause loss of control of the bicycle.
8. ALWAYS attach the security harness snugly around the child.
9. DO NOT leave the child unattended in the iBert by Kazam seat.
10. DO NOT leave the child in the seat when an adult is not present and the bicycle is supported only by the
kickstand.
CAUTION:
1. AVOID riding in inclement weather or hazardous conditions, including temperatures below freezing that could
cause the child to suffer frostbite or other injuries.
2. Additional luggage or accessories should not be attached to the bicycle child carrier. If additional loads are to be
carried on the bicycle, they should be placed only in carriers designed specifically for that purpose.
3. When the child carrier is not in use, buckle the security straps together to prevent the straps from dangling or
presenting a hazard to the bicyclist.
4. Before each ride, ensure that the mounted child carrier does not interfere with the cyclist’s ability to brake, pedal
or steer the bicycle.
NOTE: WHEN RIDING THE BIKE WITHOUT THE SEAT ATTACHED WE
STRONGLY RECOMMEND THAT YOU REMOVE THE T-BAR FROM THE BIKE.
NOTICE:
1. Any load added to a bicycle will lessen the stability of the bicycle and alter its riding characteristics. Do not
attempt to carry a load that is heavier than you can readily control. Match the load to your weight, strength, and
size.
2. Keep these instructions handy for reference when moving the bicycle child carrier to another bicycle or doing
maintenance or making adjustments to the bicycle.
3. The bicycle, to which the child carrier is attached, must be in good working order, of a type appropriate for the
additional load and of a proper size and adjustment for the rider. The cyclist should consult the information
supplied with the bicycle or obtain information from the manufacturer or supplier of the bicycle to determine how
to make the necessary adjustments. A properly sized and adjusted bicycle will improve both the comfort and
safety of the ride.
4. Before each use, check to determine that all fasteners are in place and secure. Check them frequently and ensure
that they have not loosened due to vibration.
5. Always remove the child carrier from the bicycle when the bicycle is being transported on a motor vehicle. This
is necessary because the force of the high wind on the child carrier, may degrade or damage the carrier to the
point where it may not perform reliably. This carrier has been designed for easy and rapid removal from the
bicycle. When reattaching the child carrier, check all fasteners and tighten as required.
It is important to properly thread the seat harness
through the two rear buckles as indicated to
ensure that there is no slippage while riding.
1 2
CORRECT INCORRECT
43
6
PIVOT SNAP
5
ENGLISH
ENGLISH
HARNESS ADJUSTMENT: FOOT CUP ADJUSTMENT:
1. With child removed from
carrier, unscrew both
locking screws from one
leg of the seat.
2. Align foot cup to desired
position.
3.
Reinsert and tighten
screws. Verify foot cups
are stable for passenger.
Do not overtighten.
4. Repeat steps 1-3 with
opposite foot cup.
AB C D
PARTS LIST:
A: T-Bar
B: Bracket
C: Hex Key
D: Cap Screws
E: Locking Pin
WARNING: For safety the iBert by Kazam child carrier must be installed in strict accordance with the instructions
provided. The instructions should be read carefully and each step followed carefully and completely. Check the
product regularly to be certain all fasteners are tightened securely and all components are in working condition and
function as intended. Proper care and maintenance are essential to product safety.
ALL PICTURES SHOWN ARE FOR REFERENCE PURPOSE ONLY. ACTUAL PRODUCT SIZE AND APPEARANCE
MAY VARY. RETAIN TOOLS FOR FUTURE USE TO PROPERLY MAINTAIN THE PRODUCT.

GARANTÍA LIMITADA DE IBERT BY KAZAM
Esta garantía limitada es la única garantía de la silla segura en forma de T de IBert by Kazam. No existen otras
garantías explícitas. El fabricante garantiza que este producto no tendrá defectos de fabricación durante un período
de dos años desde la fecha de la compra. Esta garantía limitada se aplica solo al cliente original y no es transferible a
terceros.
Esta garantía limitada se limita exclusivamente a los defectos de los materiales y la mano de obra y no cubre el
desgaste normal ni ningún daño, fallo o pérdida que se produzca por un montaje, mantenimiento,ajuste,
almacenamiento o uso inadecuado de la silla segura en forma de T.
ESTA GARANTÍA LIMITADA SE ANULARÁ SI LA SILLA SEGURA EN FORMA DE T DE IBERT BY KAZAM:
• Se usa de un modo contrario al de las instrucciones.
• Se alquila.
• Se modifica de algún modo.
• Se utiliza de un modo diferente al de la recreación o el transporte.
EL FABRICANTE NO SE HACE RESPONSABLE POR LA PÉRDIDA O EL DAÑO ACCIDENTAL O INDIRECTO
PROVOCADO POR EL USO DIRECTO O INDIRECTO DEL PRODUCTO.
ESTA GARANTÍA LIMITADA LE OTORGA DERECHOS LEGALES ESPECÍFICOS Y PUEDE CONTAR CON
OTROS DERECHOS QUE PUEDEN VARIAR SEGÚN EL ESTADO.
Este artículo satisface o supera las Normativas Estadounidenses de la Comisión de Seguridad de Productos de
Consumo (U.S. Consumer Product Safety Commission Regulations). Diseño para niños mayores de 1 año.
PROTEJA A SU NIÑO/A - Utilice siempre un casco de bicicleta homologado por la CPSC
ESTE FOLLETO DE INSTRUCCIONES CONTIENE INFORMACIÓN IMPORTANTE SOBRE SEGURIDAD. POR FAVOR, LEA Y GUÁRDELA PARA REFERENCIA FUTURA.
INSTRUCCIONES DE MONTAJE
PIEZAS DE RECAMBIO disponibles de Kazam LLC Los pedidos se pueden realizar a través
60 East Halsey Road
Parsippany, NJ 07054
1-800-245-3123
CONSEJOS:
1. Los niños pequeños son muy sensibles a los rayos UV del sol. Puede reducir los efectos perjudiciales de los rayos UV
del sol poniéndole la ropa adecuada, protectores solares y gafas que protejan contra los UV.
2. Lleve consigo una bomba de aire y un kit de reparación completo con todas las herramientas necesarias (incluso una
llave hexagonal) para arreglar un neumático o apretar tuercas, tornillos, etc.
3. Lleve más ropa para su hijo como una cazadora, un jersey, etc. Usted está activo mientras pedalea pero el niño no y
puede sentir más frío que usted.
ADVERTENCIA: ¡EN EL CASO DE NO CUMPLIR CON LAS INSTRUCCIONES DEL
FABRICANTE PUEDE LASTIMAR GRAVEMENTE AL CICLISTA/ACOMPAÑANTE!
ADVERTENCIA:
PARA EVITAR LESIONES GRAVES, no deje nunca al niño sin
vigilancia en la silla iBert by Kazam. Mantenga siempre un buen control de la
bicicleta. No utilice nunca el caballete solo para aguantar a la bicicleta ni deje la
bicicleta apoyada contra cualquier lugar con el niño en la silla.
U.S. Patent No. 7,044,541 B1
ESPAÑOL
ESPAÑOL
Registre su nuevo iBert by Kazam Safe-T-Seat en línea en www.kent.bike/product-registration
EN CASO DE ALERTAS DE SEGURIDAD O INFORMACIÓN DE RECUPERACIÓN:

ESPAÑOL
ESPAÑOL
Hebilla
(Sección Transversal)
Correas del Arnés
Las flechas rojas
indican cómo deben
pasar las correas por la hebilla.
LEA Y SIGA ESTAS INSTRUCCIONES POR RAZONES DE SEGURIDAD CUANDO
UTILICE LA SILLA PARA NIÑOS DE LA BICICLETA IBERT BY KAZAM
ADVERTENCIA:
1. Esta silla para niños fue diseñada para transportar niños que pesen hasta 38 libras (17 kg). NO monte a un niño que pese más
del peso indicado o a un niño que no sea capaz de mantenerse a sí mismo en la silla.
2. EL CICLISTA Y EL NIÑO QUE TRANSPORTE DEBEN LLEVAR CASCOS QUE CUMPLAN CON LAS NORMAS
RECONOCIDAS NACIONALMENTE ACERCA DE LOS CASCOS PARA BICICLETAS.
3. NO transporte a un niño menor de 12 meses. Para ser un pasajero, el niño debe ser capaz de sentarse derecho con la cabeza
en vertical MIENTRAS LLEVE PUESTO EL CASCO PARA BICICLETAS. Debe consultar con un médico cuando se trate de
un niño con una edad de desarrollo cuestionable.
4. NO utilice esta silla para niños en carreteras irregulares o accidentadas.
5. NO realice modificaciones en la silla para niños.
6. NO permita que ninguna parte del cuerpo o la ropa del niño, cordones del zapato, etc. entre en contacto con las piezas móviles
de la bicicleta.
7. NO permita que el niño lleve refrescos, comida o juguetes mientras monte en la silla para niños. Estos elementos pueden
distraer al ciclista o si el niño los tira puede provocar la pérdida del control de la bicicleta.
8. Sujete SIEMPRE el arnés de seguridad perfectamente alrededor del niño.
9. NO deje al niño sin vigilancia en la silla de iBert by Kazam.
10. NO deje al niño en el asiento cuando no esté presente ningún adulto y la bicicleta esté apoyada solo mediante el soporte.
PRECAUCIÓN:
1. EVITE montar en condiciones peligrosas o con mal tiempo, incluso con temperaturas bajo cero que puedan provocar que el
niño sufra algún tipo de congelación u otras lesiones.
2. El equipaje o los accesorios adicionales no deben sujetarse a la silla para niños de la bicicleta. Si tienen que transportarse
cargas adicionales en la bicicleta, deberían colocarse solo en las sillas diseñadas especialmente para tal propósito.
3. Cuando no utilice la silla para niños, coloque las correas de seguridad juntas para evitar que cuelguen o representen un peligro
para el ciclista.
4. Antes de montar, asegúrese de que la silla para niños montada no interfiera con la capacidad del ciclista para frenar, pedalear
o conducir la bicicleta.
NOTA: CUANDO MONTE LA BICICLETA SIN EL ASIENTO PUESTO, RECOMENDAMOS
ESPECIALMENTE QUE RETIRE LA BARRA EN FORMA DE T DE LA BICICLETA.
AVISO:
1. Cuando monte la bicicleta sin el asiento puesto, recomendamos especialmente que retire la barra en forma de T de la bicicleta.
Cualquier carga añadida a la bicicleta reducirá la estabilidad de la misma y alterará sus características de conducción. No
intente transportar una carga que sea tan pesada que le haga perder el control. Ajuste la carga con su peso, fuerza y tamaño.
2. Tenga a mano estas instrucciones para poder consultarlas cuando quiera cambiar la silla para niños de una bicicleta a otra o
cuando quiera realizar el mantenimiento o ajustes a la misma.
3. La bicicleta, a la que está sujeta la silla para niños, debe estar en buen estado y ser del tipo adecuado para poner una carga
adicional, del tamaño adecuado y que se ajuste al ciclista. El ciclista debe consultar la información proporcionada con la
bicicleta u obtener información del fabricante o del proveedor de la bicicleta para saber cómo se realizan los ajustes
necesarios. Una bicicleta ajustada y con el tamaño adecuado mejorará la comodidad y la seguridad del paseo.
4. Antes de utilizarla, compruebe que todas las sujeciones estén en su lugar y sean seguras. Compruébelas con frecuencia y
asegúrese de que no se aflojen debido a la vibración.
5. Retire siempre la silla para niños de la bicicleta cuando la tenga que transportar en un vehículo con motor. Esto es obligatorio
ya que la fuerza del viento fuerte en la silla para niños puede estropear o dañar la silla hasta el punto de que puede dejar de
ser fiable. Esta silla fue diseñada para poder quitarse fácil y rápidamente de la bicicleta. Cuando vuelva a sujetar la silla para
niños, compruebe todas las sujeciones y apriételas según sea necesario.
Es importante pasar adecuadamente el arnés del
sillín por las dos correas traseras como se indica para
asegurarse de que no se deslice durante el trayecto.
AJUSTE DEL ARNÉS: AJUSTE DE LA SANDALIA:
1. Con el niño quitado del
asiento, destornille los dos
tornillos de fijación de una
pata del asiento.
2. Alinee la sandalia según la
posición deseada.
3. Vuelva a introducir los
tornillos y apriételos.
Verifique que las sandalias
sean estables para
el pasajero. No las apriete
excesivamente.
4. Repita los pasos 1-3 con la
sandalia del lado contrario.
Lengüetas
INSTRUCCIONES DE MONTAJE:
1. Retire la silla de la caja y póngala sobre un suelo alfombrado. Coloque al niño en el asiento y ajuste la altura de la hebilla de
3 puntos de modo que quede 2 pulgadas por debajo de la barbilla del niño. Ajuste las correas de los hombros de modo que
queden tirantes en los hombros del niño y bloquee las correas en su lugar con las dos hebillas para mantener al niño seguro
en la silla.
2. Quite al niño del sillín. Fíjese en la parte inferior del sillín, retire la barra en T montada y el soporte de la placa de asiento
quitando el perno de anillo y el gancho. A continuación, retire la tapa roscada y el perno del soporte.
3. Coloque las partes montadas parcialmente alrededor de la potencia del manillar e introduzca el otro tornillo. (Puede que sea
necesario levantar la potencia del manillar para acomodar la barra en T).
4. Apriete ambos tornillos de la misma longitud con la llave para que haya una presión uniforme en el soporte. Antes de apretar
los tornillos completamente, asegúrese de la que barra en T esté alineada con el neumático y el cuadro. ¡NO APRIETE EN
EXCESO!
5. Deslice la silla en la barra en forma de T lo máximo posible. Asegure la barra en forma de T en la placa de la silla deslizando
el pasador de sujeción a través de los orificios, girando el gancho alrededor y trabándolo al final del pasador.
6. Trabe el lado derecho del conjunto de la barra de retención firmemente en los dos orificios situados en el hueco del asiento.
A continuación, puede girar el conjunto de la barra de retención hacia abajo y dejarla encajada.
7. Al mantener la bicicleta, suelte la barra de retención y gírela. Coloque al niño en la silla y ponga las correas sobre los hombros
del niño y sujételas con la hebilla. Presione sobre la barra de retención hasta que se trabe.
8. ¡DISFRUTE DEL PASEO!
NOTA: Si tiene problemas para montar la silla, vaya a una tienda de bicicletas para que terminen de montarla.
1 2
CORRECTO INCORRECTO
43
6
GIRAR TRABAR
5
LISTA DE PIEZAS:
A: Forma de T
B: Soporte
C: Llave Hexagonal
D: Tornillos Centrales
y tuercas de seguridad (2)
E: Pasador de Sujeción
ADVERTENCIA: Por razones de seguridad, la silla para niños de iBert by Kazam debe colocarse en estricta conformidad
con las instrucciones proporcionadas. Debe leer las instrucciones con detenimiento y seguir los pasos cuidadosa y
completamente. Revise el producto regularmente para asegurarse de que todos los sujetadores estén bien apretados y de
que todos los componentes estén en condiciones de funcionamiento y funcionen según lo previsto. El cuidado y
mantenimiento adecuados son esenciales para la seguridad del producto.
E
AB C D
TODAS LAS IMÁGENES MOSTRADAS SON SÓLO PARA REFERENCIA. EL TAMAÑO Y LA APARIENCIA REAL DEL
PRODUCTO PUEDEN VARIAR. CONSERVAR LAS HERRAMIENTAS PARA SU USO FUTURO A FIN DE MANTENER
ADECUADAMENTE EL PRODUCTO.

GARANTIE LIMITÉE IBERT BY KAZAM
Cette garantie limitée est la seule offerte pour votre siège en T de sécurité iBert by Kazam. Il n'y a aucune autre
garantie expresse. Le fabricant garantit ce produit contre tous les défauts de fabrication pour une période de deux
ans à compter de la date d'achat. Cette garantie limitée concerne uniquement l'acheteur d'origine et n'est
aucunement transférable à qui que ce soit.
Cette garantie est uniquement limitée aux défauts de pièces et de main d'œuvre et ne couvre pas les éléments
suivants : usure ou vieillissement normal, voire tout dommage, panne ou perte occasionné par un assemblage,
entretien, réglage, rangement ou usage incorrect du siège en T de sécurité.
CETTE GARANTIE LIMITÉE EST NULLE ET NON AVENUE SI JAMAIS VOTRE SIÈGE EN T DE SÉCURITÉ
IBERT BY KAZAM EST:
• utilisé en contravention des instructions ;
• loué ;
• modifié de quelconque manière ;
• utilisé d'une manière autre que pour les loisirs ou le transport.
LE FABRICANT DÉCLINE TOUTE RESPONSABILITÉ POUR LES PERTES ET DOMMAGES, INCIDENTS OU
CONSÉQUENTS, IMPUTABLES, DIRECTEMENT OU INDIRECTEMENT, À L'USAGE DE CE PRODUIT. CETTE
GARANTIE LIMITÉE VOUS CONFÈRE DES DROITS JURIDIQUES SPÉCIFIQUES. VOUS POUVEZ
ÉGALEMENT DISPOSER D’AUTRES DROITS, D'UN ÉTAT À L'AUTRE.
Cet article répond ou dépasse le Règlement de la Commission de la sécurité
des produits de consommation des États-Unis. Conçu pour les enfants de 1 an et plus.
PROTÉGER VOTRE ENFANT - Utilisez toujours un casque de vélo approuvé par la CPSC.
CE LIVRET D'INSTRUCTIONS CONTIENT DES INFORMATIONS IMPORTANTES SUR LA SÉCURITÉ. VEUILLEZ LIRE ET ENREGISTRER POUR RÉFÉRENCE ULTÉRIEURE.
INSTRUCTIONS D'ASSEMBLAGE
Les pièces de rechange sont disponibles directement chez iBert Inc.
Les pièces peuvent être commandées via notre site Web: www.kazambikes.com ou par
60 East Halsey Road
Parsippany, NJ 07054
1-800-245-3123
CONSEILS:
1. Les jeunes enfants sont très sensibles aux rayons UV du soleil. Vous pouvez réduire les effets dommageables des
rayons UV solaires en couvrant l'enfant avec des vêtements appropriés, en lui appliquant une crème solaire de
protection et lui faisant porter des lunettes de soleil à protection UV.
2. Emportez une pompe à vélo et un kit de réparation avec tous les outils nécessaires (notamment une clé hex) pour
réparer un pneu ou serrer des écrous, boulons, etc.
3. Emportez des vêtements additionnels pour votre enfant ainsi un coupe-vent, un pull, etc. Vous êtes actif pendant le
pédalage mais l'enfant est inactif et peut sentir davantage le froid que vous.
AVERTISSEMENT: TOUT MANQUEMENT À CES INSTRUCTIONS DU FABRICANT
PEUT ENTRAÎNER DES BLESSURES GRAVES POUR LE CYCLISTE /PASSAGER !
AVERTISSEMENT:
POUR ÉVITER TOUTE BLESSURE GRAVE, ne laissez jamais -
absolument jamais - votre enfant sans surveillance dans le siège iBert by Kazam.
Maintenez toujours un contrôle réel sur le vélo. N'utilisez jamais - absolument
jamais - la béquille pour soutenir le vélo et n'appuyez pas le vélo contre un support
si l'enfant est dans le siège.
U.S. Patent No. 7,044,541 B1
FRANÇAIS
FRANÇAIS
Enregistrez votre nouvel iBert by Kazam Safe-T-Seat en ligne @ www.kent.bike/product-registration
EN CAS D'ALERTES DE SÉCURITÉ OU D'INFORMATIONS DE RAPPEL:

FRANÇAIS
FRANÇAIS
Boucle
(Section en Coupe)
Pattes
Sanglage du
Harnais
Les flèches rouges
indiquent le cheminement
du sanglage dans la boucle.
VEUILLEZ LIRE ET SUIVRE CES INSTRUCTIONS
PAR MESURE DE SÉCURITÉ EN UTILISANT VOTRE SIÈGE ENFANT POUR VÉLO IBERT BY KAZAM
AVERTISSEMENT:
1. Ce siège enfant est conçu pour le transport d'enfants pesant jusqu'à 38 lb - 17 kg. NE TRANSPORTEZ PAS un enfant d'un
poids supérieur ou incapable de se tenir assis tout seul dans le siège.
2. LE CYCLISTE ET L'ENFANT TRANSPORTÉ DOIVENT PORTER UN CASQUE CONFORME AUX NORMES
NATIONALES RECONNUES POUR LES CASQUES DE VÉLO.
3. NE TRANSPORTEZ PAS un enfant de moins de 12 mois dans ce siège enfant. Pour être passager, l'enfant doit pouvoir
s'asseoir à la verticale avec la tête bien droite TOUT EN PORTANT UN CASQUE DE VÉLO. Un médecin devrait être
consulté pour tout enfant dont l'âge de développement est en question.
4. N'UTILISEZ PAS ce siège enfant sur des routes difficiles ou en hors piste.
5. N'APPORTEZ AUCUNE modification à ce siège enfant.
6. NE LAISSEZ AUCUNE partie du corps, des vêtements, des chaussures ou autre de l'enfant entrer en contact avec les
parties mobiles du vélo.
7. NE LAISSEZ PAS l'enfant emporter des rafraîchissements, des aliments ou des jouets en étant assis sur le siège enfant.
8. Ces articles peuvent distraire le cycliste et, si l'enfant les lance, lui faire perdre le contrôle du vélo.
9. Fixez TOUJOURS fermement le harnais de sécurité autour de l'enfant.
10. NE LAISSEZ JAMAIS l'enfant sans surveillance s'il se trouve dans le siège iBert by Kazam.
ATTENTION:
1. ÉVITEZ de rouler sous les intempéries ou si la météo est incertaine, notamment en cas de gel qui pourrait infliger des
gelures à l'enfant ou autrement le blesser.
2. Aucun bagage ou accessoire ne devrait être fixé sur le siège enfant du vélo. Si des charges additionnelles doivent être
transportées sur le vélo, elles devraient être placées dans des supports conçus spécifiquement à cet effet.
3. Si le siège enfant n'est pas utilisé, bouclez les sangles de sécurité ensemble pour éviter qu'elles ne pendent et ne
présentent un risque pour le cycliste.
4. Avant chaque trajet, assurez-vous que le siège enfant installé n'interfère aucunement avec la capacité du cycliste à
freiner, pédaler ou diriger le vélo.
NOTE: LORSQUE VOUS UTILISEZ LE VÉLO SANS LE SIÈGE POUR ENFANT,
NOUS VOUS RECOMMANDONS FORTEMENT D'ENLEVER LA BARRE EN T.
NOTE:
1. En cas de trajet avec le vélo sans le siège fixé, nous recommandons vivement de retirer la barre en T du vélo. Toute charge
ajoutée à un vélo réduit sa stabilité et altère ses caractéristiques roulantes. Ne tentez pas de transporter une charge
supérieure à celle que vous pouvez aisément contrôler. Adaptez la charge à votre poids, votre force et votre taille.
2. Conservez ces instructions à proximité pour référence ultérieure afin de transférer le siège enfant d'un vélo à un autre ou
pour assurer son entretien et ses réglages sur le vélo.
3. Le vélo sur lequel le siège enfant est fixé doit être en bon état de marche, d'un type approprié à la charge additionnelle et
d'un taille et d'un ajustement corrects pour le cycliste. Le cycliste devrait consulter les informations fournies avec le vélo
ou les obtenir auprès du fabricant, voire du revendeur, du vélo, afin de déterminer comment apporter les ajustements
nécessaires. Un vélo de la bonne taille et bien réglé améliore à la fois le confort et la sécurité des trajets.
4. Avant chaque utilisation, vérifiez que toutes les fixations sont présentes et bien serrées. Vérifiez-les fréquemment et
assurez-vous qu'elles ne se sont pas desserrées du fait des vibrations.
5. Retirez toujours le siège enfant du vélo si le vélo est transporté sur un véhicule à moteur. Cela s'avère nécessaire du fait de
la force exercée par le vent sur le siège enfant, susceptible de détériorer ou d'endommager le siège à un point tel qu'il ne
serait plus fiable. Ce siège a été conçu pour une pose et un retrait rapides du vélo. En fixant à nouveau le siège enfant,
vérifiez toutes les fixations et serrez-les selon les besoins.
Il est essentiel d'acheminer correctement le harnais du
siège dans les deux boucles arrière, selon les indications,
pour assurer l'absence de glissement pendant le trajet.
D'AJUSTEMENT DE HARNAIS : RÉGLAGE DE LA COUPE DE PIED:
1. Lorsque l'enfant est retiré du
support, dévissez les
deux vis de blocage de l'une
des jambes de l'assise.
2. Alignez la coupe du pied à la
position désirée.
3. Réinsérer et serrer les vis.
Vérifiez que les gobelets
sont stables pour le passager.
Ne pas trop serrer.
4. Répétez les étapes 1 à 3 pour
la tasse de pied opposée.
INSTRUCTIONS D’ASSEMBLAGE:
1. Retirez le siège de la boîte et posez-le au sol sur un tapis. Placez votre enfant dans le siège et ajustez la hauteur de la boucle 3 points
afin qu'elle se trouve 5 cm sous le menton de l'enfant. Ajustez chaque sangle d'épaule pour qu'elle tienne fermement les épaules de
l'enfant et bloquez la sangle d'épaule en place avec les deux boucles afin de maintenir l'enfant en toute sécurité dans le siège.
2. Sortez l'enfant du siège. En observant le fond du siège, retirez la barre en T et le support assemblés de la plaque de siège en
enlevant la goupille à anneau et le clip. Retirez ensuite 1 vis à tête et l'écrou du support.
3. Placez les pièces partiellement assemblées autour de la potence et insérez l'autre vis. (Il peut être nécessaire de lever la
potence pour accueillir l'ensemble de barre en T)
4. Serrez les deux vis sur la même longueur avec la clé afin d'uniformiser la pression sur le support. Avant de serrer les vis à
fond, assurez-vous que la barre en T est alignée avec le pneu et le cadre. NE SERREZ PAS TROP!
5. Glissez le siège sur la barre en T aussi loin que possible. Serrez la barre en T sur la plaque de siège en glissant la goupille de blocage
dans les orifices et en faisant tourner le clip autour pour l'engager sur le bout de la goupille.
6. Enclenchez fermement le côté droit de l'ensemble de barre de recouvrement dans les deux orifices de la partie évidée du siège.
Vous pouvez alors faire pivoter vers le bas l'ensemble de barre de recouvrement et l'enclencher.
7. En tenant le vélo, débloquez la barre de recouvrement et faites-la pivoter vers le haut. Placez l'enfant dans le siège et passez
chaque sangle par-dessus ses épaules pour enfin bloquer la boucle. Abaissez la barre de recouvrement pour la bloquer.
8. PROFITEZ DE LA RIDE!
NOTE: Si l'assemblage du siège vous suppose une difficulté, confiez sa finalisation à un atelier de
cycles.
1
6
PIVOTER ENCLENCHER
5
LISTE DE PIÈCES:
A: La Barre en T
B: Support
C: Clé Hex
D: Vis à Tête et
Écrous de Blocage(2)
E: Goupille de Blocage
AVERTISSEMENT:
Par mesure de sécurité, le siège enfant iBert by Kazam doit être installé en conformité stricte avec
les instructions fournies. Les instructions devraient être lues avec soin et chaque étape être respectée scrupuleusement
et intégralement. Vérifiez régulièrement le produit pour vous assurer que toutes les fixations sont bien serrées et que
tous les composants sont en bon état de fonctionnement et fonctionnent comme prévu. L'entretien et la maintenance
appropriés sont essentiels à la sécurité du produit.
2
CORRECT INCORRECT
43
E
AB C D
TOUTES LES PHOTOS MONTRÉES LE SONT À TITRE DE RÉFÉRENCE SEULEMENT. LA TAILLE ET L'APPARENCE RÉELLES
DU PRODUIT PEUVENT VARIER. CONSERVER LES OUTILS POUR UNE UTILISATION FUTURE AFIN D'ENTRETENIR
CORRECTEMENT LE PRODUIT.

IBERT BY KAZAM EINGESCHRÄNKTE GARANTIE
Diese eingeschränkte Garantie gilt als ausschließliche Garantie für Ihren iBert by Kazam Sicherheitssitz. Andere
ausdrückliche Garantien werden nicht zugesichert. Der Hersteller garantiert, dass dieses Produkt über einen
Zeitraum von zwei Jahren ab Kaufdatum frei von Fabrikationsfehlern ist. Diese eingeschränkte Garantie gilt lediglich
für den Erstkäufer und kann nicht auf Dritte übertragen werden.
Diese eingeschränkte Garantie bezieht sich ausschließlich auf Material- oder Verarbeitungsfehler und gilt nicht für
normale Abnutzung oder für Schäden, Materialversagen oder Beeinträchtigungen aufgrund von unsachgemäße
Montage, Wartung, Einstellung, Lagerung oder Nutzung des Sicherheitssitzes.
CETTE GARANTIE LIMITÉE EST NULLE ET NON AVENUE SI JAMAIS VOTRE SIÈGE EN T DE SÉCURITÉ
IBERT BY KAZAM EST:
• entgegen den Vorgaben der Herstellerbroschüre verwendet wird;
• im Verleih eingesetzt wird;
• in jedweder Weise verändert wird;
• für andere Zwecke als den Transport oder für den Freizeitgebrauch genutzt wird.
DER HERSTELLER HAFTET NICHT FÜR SICH DIREKT ODER INDIREKT AUS DER PRODUKTNUTZUNG ERGE-
BENDEN NEBEN- ODER FOLGESCHÄDEN BZW. BESCHÄDIGUNGEN.DIESE EINGESCHRÄNKTE GARANTIE
GEHT MIT BESTIMMTEN GESETZLICHEN RECHTEN EINHER, DIE JEDOCH JE NACH LAND VARIIEREN
KÖNNEN.
Dieser Artikel entspricht oder übertrifft die US-amerikanischen Verbraucherschutzkommission.
Entworfen für Kinder 1 Jahr und älter.
SCHÜTZEN SIE IHR KIND - Verwenden Sie immer einen CPSC zugelassenen Fahrradhelm.
ERSATZTEILE und ZUSAMMENBAUEN sind direkt bei iBert Inc. erhältlich.
60 East Halsey Road
Parsippany, NJ 07054
1-800-245-3123
TIPP:
1. Gerade kleine Kinder reagieren bei schönem Wetter besonders empfindlich auf UV-Strahlen. Um Sonnenbrand zu
vermeiden, sollten Sie bei Ihrem Kind auf angemessene Kleidung achten, Sonnenschutzmittel mit entsprechendem
Schutzfaktor auftragen und ggf. eine Sonnenbrille verwenden.
2. Führen Sie stets eine Luftpumpe und ein Reparaturset mit allen für Reifenwechsel oder für das Festziehen von
Schrauben notwendigen Werkzeugen mit.
3. Denken Sie bitte auch an zusätzliche Kleidung für Ihr Kind wie z.B. Windjacke, Strickjacke usw. Sie als Radfahrer sind
immer in Bewegung, aber ihr Kind sitzt nur im Sitz und kühlt daher schneller aus Sie selbst.
VORSICHT: EIN NICHTBEACHTEN DER HERSTELLERANWEISUNGEN KANN
MÖGLICHERWEISE SCHWERE VERLETZUNGEN DES RADFAHRERS/DER
TRANSPORTIERTEN PERSON NACH SICH ZIEHEN!
VORSICHT: SIE KÖNNEN ERSTE VERLETZUNGEN IHRES KINDES VERMEIDEN,
INDEM SIE ES NIEMALS UNBEAUFSICHTIGT IM IBERT BY KAZAM SITZ SITZEN
LASSEN! ACHTEN SIE STETS DARAUF, IHR FAHRRAD GUT IM GRIFF ZU
HABEN. WENN IHR KIND NOCH IM KINDERSITZ SITZT, DÜRFEN SIE DAS RAD
NIEMALS OHNE ES FESTZUHALTEN NUR AUF DEN FAHRRADSTÄNDER
STELLEN ODER DAS RAD GEGEN ETWAS LEHNEN. JAMAIS - LA BÉQUILLE
POUR SOUTENIR LE VÉLO ET N'APPUYEZ PAS LE VÉLO CONTRE UN SUPPORT
SI L'ENFANT EST DANS LE SIÈGE.
U.S. Patent No. 7,044,541 B1
DIESE GEBRAUCHSANWEISUNG ENTHÄLT WICHTIGE SICHERHEITSINFORMATIONEN. BITTE LESEN UND AUFBEWAHREN.
MONTAGEANLEITUNG FÜR SICHERHEITSSITZ
DEUTSCH
DEUTSCH
Registrieren Sie Ihren neuen iBert von Kazam Safe-T-Seat online unter www.kent.bike/product-registration
IM FALL VON SICHERHEITSHINWEISEN ODER RÜCKRUFINFORMATIONEN:

DEUTSCH
DEUTSCH
Schnalle
(Querschnitt)
Laschen
Gurtband
Die roten Pfeile
zeigen, wie sich das Gurt-
band durch die Schnalle bewegt.
LESEN UND BEFOLGEN SIE BITTE DIE BEDIENUNGSANLEITUNG, BEVOR SIE
IHREN IBERT BY KAZAM FAHRRADKINDERSITZ VERWENDEN
VORSICHT:
1. Dieser Fahrradkindersitz ist für Kinder bis zu einem Gewicht von 17 kg geeignet. Kinder, die mehr als 17 kg wiegen oder Kinder, die sich
nicht selbst im Sitz halten können, dürfen NICHT transportiert werden.
2. Der Radfahrer und das im Sitz transportierte Kind sollten stets Fahrradhelme tragen, die den im jeweiligen Land geltenden Normen
entsprechen.
3. Kinder, die jünger als 12 Monate sind, DÜRFEN NICHT in diesem Fahrradkindersitz transportiert werden. Nur Kinder, die aufrecht sitzen
können und den Kopf auch beim Tragen eines Helmes halten können, können im Fahrradkindersitz mitgeführt werden. Fragen. Sie ggf.
ihren Kinderarzt, wenn Sie sich bezüglich des Entwicklungsstandes ihres Kindes nicht sicher sind.
4. Der Fahrradkindersitz ist KEINESFALLS auf unebenen Wegen oder im Gelände abseits von Straßen zu verwenden.
5. Der Fahrradkindersitz darf NICHT umgebaut werden.
6. Achten Sie darauf, dass weder Körperteile des Kindes noch Schuhe, Schnürsenkel oder andere Kleidungsstücke durch die beweglichen
Teile des Fahrrades eingeklemmt werden können.
7. Während der Fahrt im Fahrradkindersitz sollten Sie dem Kind NICHT erlauben, Getränke, Essen oder Spielzeuge mitzuführen. Der
Radfahrer ist leicht abgelenkt, falls diese Dinge vom Kind fallengelassen oder weggeworfen werden und er verliert möglicherweise die
Kontrolle über das Rad.
8. Die Sicherheitsgurte müssen IMMER gut am Kind anliegen.
9. Lassen Sie NIEMALS ein Kind unbeaufsichtigt im iBert By Kazam Kindersitz sitzen.
10. Lassen Sie das Kind NICHT in den Sitz, wenn ein Erwachsener nicht anwesend ist und das Fahrrad nur vom Kickstand unterstützt wird.
ACHTUNG:
1. Fahren Sie MÖGLICHST NICHT bei schlechtem Wetter oder in Gefahrensituationen. Dies gilt auch für Temperaturen unter dem
Gefrierpunkt, da hier die Gefahr von Erfrierungen und anderen Verletzungen besteht.
2. Weiteres Gepäck oder Zubehör sollte nicht am Fahrradkindersitz befestigt werden. Wenn Sie zusätzliche Lasten mit dem Fahrrad
befördern wollen, sollten Sie hierfür speziell für diesen Zweck vorgesehene Vorrichtungen verwenden.
3. Wenn der Fahrradkindersitz am Rad ohne Kind mitgeführt wird, achten Sie darauf, die Gurte stets geschlossen zu halten, damit
diese nicht herabhängen und Sie beim Fahren gefährden.
4. Vor Fahrtantritt prüfen Sie bitte, ob der anmontierte Fahrradkindersitz Sie beim Treten, Bremsen oder Lenken behindert.
HINWEIS: WENN SIE DAS FAHRRAD OHNE DEN KINDERSITZ BENUTZEN,
SOLLTEN SIE UNBEDINGT VORHER DIE T-STREBE ABMONTIEREN.
HINWEIS:
1. Falls Sie ohne Fahrradkindersitz fahren wollen, sollten Sie unbedingt die T-Stange vom Rad abmontieren. Alle am Rad mitgeführten Lasten
verringern die Fahrstabilität und Fahreigenschaften des Rades. Sie sollten also keinesfalls Lasten mit dem Rad transportieren, die Sie
nicht problemlos unter Kontrolle haben. Die Lasten sollten Ihrem Körpergewicht, Ihrer Kraft und Größe angepasst sein.
2. Bewahren Sie diese Anleitung bitte für eine spätere Wartung, für Einstellungen oder für die Montage des Sitzes an anderen Fahrrädern auf.
3. Das Fahrrad, an dem der Fahrradkindersitz befestigt ist, sollte technisch in Ordnung sein, sich für den Transport dieser zusätzlichen Last
eignen und der Größe des Fahrers angemessen sein. Falls der Radfahrer Einstellungen vornehmen muss, sollte er entweder die mit dem
Rad mitgelieferten Anleitungen zu Rate ziehen oder die notwendigen Angaben vom Hersteller oder Händler des Rades anfordern. Ein
korrekt eingestelltes Rad verbessert sowohl den Fahrkomfort als auch die Sicherheit beim Fahren eines Rades.
4. Vor Fahrtantritt sollten Sie stets prüfen, ob alle Befestigungselemente vorhanden und gut angezogen sind. Prüfen Sie dies regelmäßig und
kontrollieren auch, ob sie sich nicht durch Vibrationen gelöst haben.
5. Der Fahrradkindersitz muss vom Rad abmontiert werden, wenn dies auf einem Fahrzeug transportiert wird. Dies ist erforderlich, da die auf
den Fahrradkindersitz einwirkende Windlast diesen möglicherweise so beeinträchtigt oder beschädigt, dass er nicht mehr ordnungsgemäß
eingesetzt werden kann. Dieser Kindersitz kann schnell und einfach vom Rad abmontiert werden. Wenn Sie den Sitz wieder anmontieren,
prüfen Sie bitte, ob alle Befestigungselemente fest angezogen sind.
Es ist wichtig, den Sitzgurt ordnungsgemäß durch die beiden
hinteren Schnallen zu führen (wie dargestellt), um
sicherzustellen, dass während der Fahrt kein Schlupf auftritt.
KABELBAUMEINSTELLUNG:
FUßBECHER EINSTELLUNG:
1. Während der Sitz unbesetzt
ist, schrauben Sie beide
Verriegelungsschrauben von
einem Bein des Sitzes ab.
2. Fußbecher in die gewünschte
Position bringen.
3. Schrauben wieder einsetzen
und festziehen. Überprüfen
Sie, dass die Fußbecher für
den Passagier stabil sind.
Nicht
überdrehen.
4. Wiederholen Sie die Schritte
1-3 mit dem gegenüber-
liegenden Fußbecher.
MONTAGEANLEITUNG FÜR SICHERHEITSSITZ:
1. Nehmen Sie den Sitz aus der Transportbox und legen ihn auf einen Teppich. Setzen Sie nun Ihr Kind in den Sitz und stellen die Höhe
des 3-Punkt-Gurtes so ein, dass die Schnalle 5 cm unter dem Kinn des Kindes aufliegt. Stellen Sie jeden Schultergurt so ein, dass
er eng auf den Schultern des Kindes aufliegt und arretieren den Schultergurt mit beiden Gurtschlössen, damit das Kind sicher auf
seinem Sitz angeschnallt ist.
2. Heben Sie das Kind aus dem Sitz heraus. Nehmen Sie nun die am Sitzboden anmontierte T-Stange mit Halterung aus der Sitzplatte
heraus. Hierzu ziehen Sie den Ringstift und die Klemme ab. Nehmen Sie dann 1 Kopfschraube und die Mutter aus der Halterung.
3. Halten Sie nun die vormontierten Teile an die Lenker-Vorbaueinheit und führen die andere Schraube ein. (Zur Aufnahme der
T-Stange müssen Sie ggf. die Lenker-Vorbaueinheit etwas hochziehen.)
4. Ziehen Sie beide Schrauben mit dem Schraubenschlüssel so an, dass die Halterung gleichmäßig befestigt ist. Vor dem
vollständigen Anziehen der Schraube prüfen Sie noch, ob die T-Stange an den Reifen und dem Rahmen ausgerichtet ist.
SCHRAUBEN NICHT ZU FEST ANZIEHEN!
5. Schieben Sie den Sitz auf der T-stange so weit wie möglich nach vorne. Befestigen Sie die T-stange, indem Sie den Sicherungsstift
in die Bohrung einstecken, die Klemme drehen und über das Stiftende klappen.
6. Lassen Sie die rechte Seite des Schoßbügels vollständig in die beiden Bohrungen in der Sitzvertiefung einrasten. Dann können Sie
die Schoßbügeleinheit nach unten kippen und durch Eindrücken arretieren.
7. Halten Sie das Fahrrad fest, lösen den Schoßbügel und klappen ihn nach oben. Setzen Sie das Kind nun in den Sitz, legen die Gurte
über die Schultern des Kindes und befestigen Sie sie im Schloss. Drücken Sie nun den Schoßbügel bis zum Einrasten nach unten.
8. GENIESSEN SIE IHRE FAHRT !!!
HINWEIS: Falls Sie mit der Sitzmontage Probleme haben, lassen Sie die Montage von einem Fahrradfachmann durchführen.
1
6
DREHEN EINRASTEN
5
LISTE DER TEILE:
A: T-Stange
B: Halterung
C: Innensechskantschlüssel
D: Kopfschraube und
Sicherungsmuttern (2)
E: Sicherungsstift
VORSICHT: Aus sicherheitsgründen ist der fahrradkindersitz ausschließlich wie in der beigefügten anleitung beschrieben
zu installieren. Lesen sie die anleitung sorgfältig und befolgen jeden beschriebenen schritt vollständig und genau. Überprüfen
sie das produkt regelmäßig, um sicherzustellen, dass alle befestigungselemente fest angezogen sind und alle komponenten in
funktionstüchtigem zustand sind und wie vorgesehen funktionieren. Die richtige pflege und wartung ist für die
produktsicherheit unerlässlich.
E
AB C D
2
RICHTIG FALSCH
43
ALLE GEZEIGTEN BILDER DIENEN NUR ALS REFERENZ. DIE TATSÄCHLICHE PRODUKTGRÖßE UND DAS AUSSEHEN
KÖNNEN VARIIEREN. WERKZEUGE FÜR DIE ZUKÜNFTIGE VERWENDUNG ZUR ORDNUNGSGEMÄßEN WARTUNG DES
PRODUKTS AUFZUBEWAHREN.
Other manuals for iBert
1
Table of contents
Languages:
Other KaZAM Bicycle Accessories manuals