KEENCUT Evolution3 FreeHand User manual

Evolution3 FreeHand User Guide
The world’s finest cutting machines
www.keencut.com
+44 (0) 1536 263158
+1 (716) 748 6203
[email protected] (UK HQ)
[email protected] (US sales)
Scan the QR code or
click here to view this document online >
Page 1 of 43

Evolution3 FreeHand User Guide
The world’s finest cutting machines
www.keencut.com
+44 (0) 1536 263158
+1 (716) 748 6203
[email protected] (UK HQ)
[email protected] (US sales)
Scan the QR code or
click here to view this document online >
Page 2 of 43
Contents
1. Introduction 3 .........................................................................................................................................................
1.1 The Evolution3 FreeHand user guide 3 ........................................................................................................................
2. Get to know your cutter 4 .........................................................................................................................................
2.1 Swapping tool heads 4 ...........................................................................................................................................
3. Make your first cut 6 ................................................................................................................................................
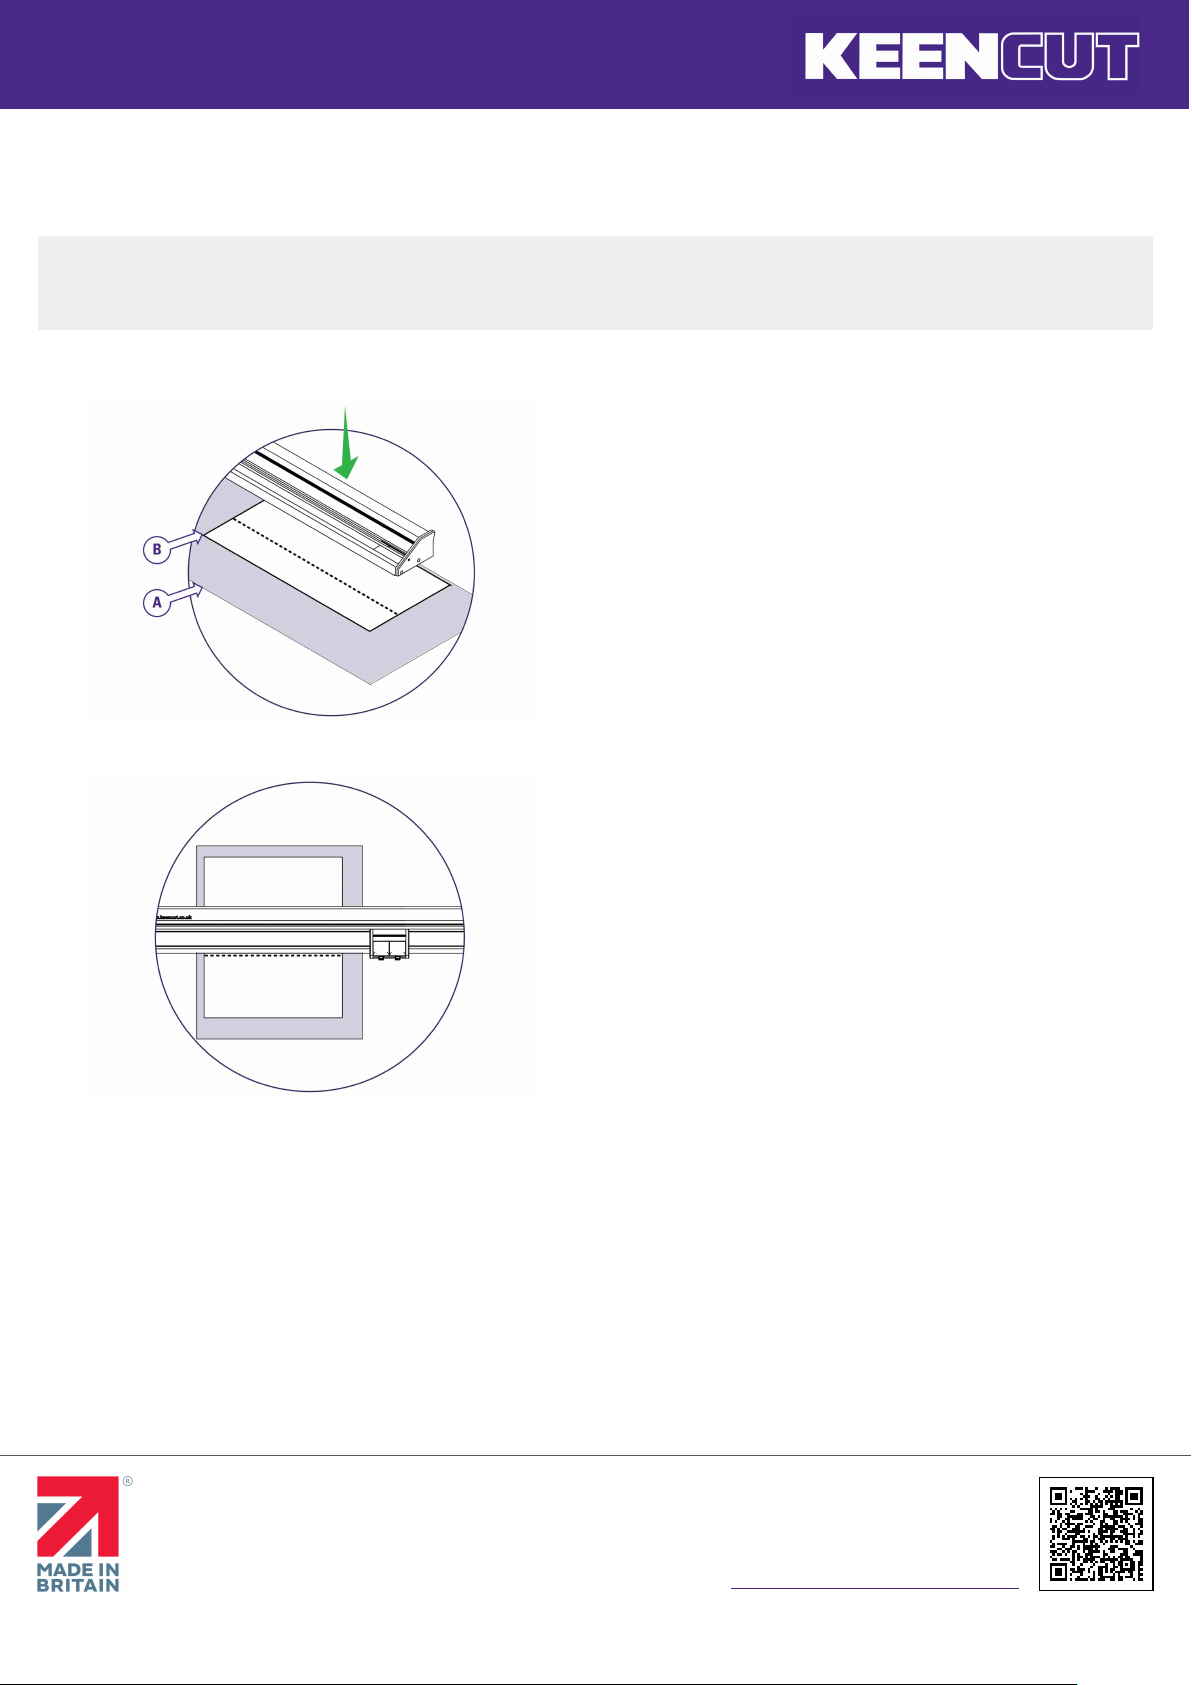
3.1 Align and clamp the material 6 .................................................................................................................................
3.2 Introduction to the Double Graphik tool head 7 .............................................................................................................
3.3 Insert Graphik blades into the Double Graphik tool head 8 ...............................................................................................
3.4 Double Graphik tool head cutting technique 10 .............................................................................................................
3.5 Using a cutting station 12 .......................................................................................................................................
4. Using the Double Graphik tool head 14 .......................................................................................................................
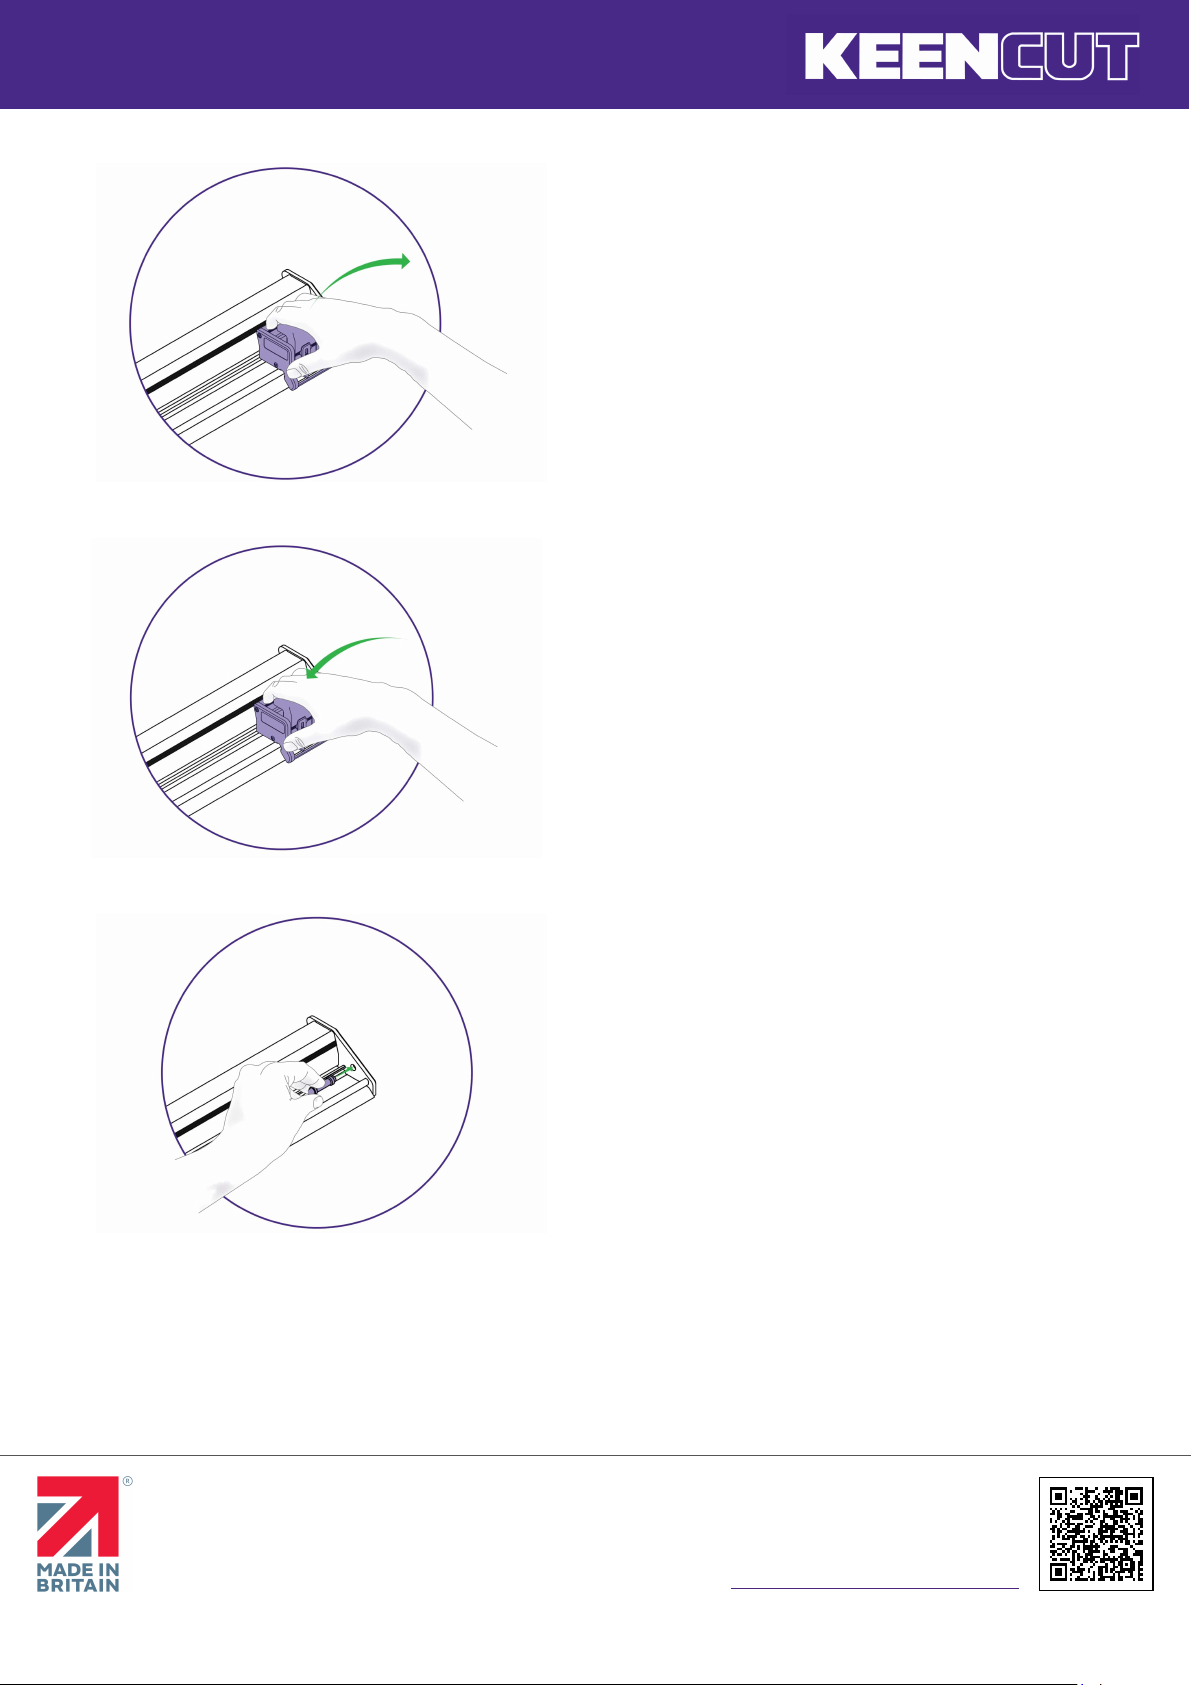
4.1 Change the Graphik blades 14 ..................................................................................................................................
4.2 Adjust the blade depth and direction 16 ......................................................................................................................
4.3 Advanced cutting techniques 18 ...............................................................................................................................
5. Using the Fabric tool head 21 ....................................................................................................................................
5.1 Change the Fabric tool head blade 21 .........................................................................................................................
5.2 Use the Fabric tool head with a cutting mat 23 .............................................................................................................
5.3 Adjust the Fabric tool head blade pressure 24 ...............................................................................................................
5.4 Use the Fabric tool head blade guard 25 ......................................................................................................................
5.5 Fabric tool head cutting technique 26 .........................................................................................................................
6. Using the Creaser tool head 28 ..................................................................................................................................
6.1 Different creasing wheels 28 ...................................................................................................................................
6.2 Change the creasing wheels 29 ................................................................................................................................
6.3 Creasing technique 31 ............................................................................................................................................
7. Using the Rocker tool head 33 ...................................................................................................................................
7.1 The Rocker tool head 33 .........................................................................................................................................
7.2 Fit or change the Rocker tool head blade 34 .................................................................................................................
7.3 Rocker tool head cutting technique 35 ........................................................................................................................
8. Care and maintenance 38 .........................................................................................................................................
8.1 Clean your machine 38 ...........................................................................................................................................
8.2 Maintain the bearing track 39 ..................................................................................................................................
8.3 Change the sightline strip 40 ....................................................................................................................................

Evolution3 FreeHand User Guide
The world’s finest cutting machines
www.keencut.com
+44 (0) 1536 263158
+1 (716) 748 6203
[email protected] (UK HQ)
[email protected] (US sales)
Scan the QR code or
click here to view this document online >
Page 3 of 43
1. Introduction
1.1 The Evolution3 FreeHand user guide
This User Guide for the Evolution3 FreeHand gives advice on
cutting techniques, using the different cutting heads and care
and maintenance of your machine.
Before using your machine make sure that you have installed
and calibrated it correctly. Full details are in the Installation
Manual.
Visit the Evolution3 FreeeHand installation manual >

Evolution3 FreeHand User Guide
The world’s finest cutting machines
www.keencut.com
+44 (0) 1536 263158
+1 (716) 748 6203
[email protected] (UK HQ)
[email protected] (US sales)
Scan the QR code or
click here to view this document online >
Page 4 of 43
2. Get to know your cutter
2.1 Swapping tool heads
See how to swap tool heads in this video >
Pull and remove end stop.
Slide the cutting head to the right.

Evolution3 FreeHand User Guide
The world’s finest cutting machines
www.keencut.com
+44 (0) 1536 263158
+1 (716) 748 6203
[email protected] (UK HQ)
[email protected] (US sales)
Scan the QR code or
click here to view this document online >
Page 5 of 43
Lift up the head to remove it.
Insert the cutting head of your choice, and slide it to the left.
More than one tool can be mounted on the cutter bar if
required.
Always replace the end stop.

Evolution3 FreeHand User Guide
The world’s finest cutting machines
www.keencut.com
+44 (0) 1536 263158
+1 (716) 748 6203
[email protected] (UK HQ)
[email protected] (US sales)
Scan the QR code or
click here to view this document online >
Page 6 of 43
3. Make your first cut
3.1 Align and clamp the material
IMPORTANT: You must use a cutting mat for any cutting, creasing, or scoring process to prevent damage to the work
surface.
See how to align and clamp the material in this video >
Place the cutting mat (A) on the work surface then the material
to be cut (B) making sure the whole length of the cut line is over
the cutting mat. Place the FreeHand on the material near to the
cutline.
Lift and move one end of the cutter so the sightline strip (clear
plastic strip running along cutting edge of the FreeHand) aligns
with the cut line, then repeat at the other end. Look down
vertically and check the sightline strip aligns with the cut line
before making the cut.
Further cutting information is given in the sections under relevant
tool heads.
See Double Graphik cutting techniques >
See the Fabric tool head cutting techniques >
See the Creaser tool head creasing techniques >
See the Rocker tool head cutting techniques >

Evolution3 FreeHand User Guide
The world’s finest cutting machines
www.keencut.com
+44 (0) 1536 263158
+1 (716) 748 6203
[email protected] (UK HQ)
[email protected] (US sales)
Scan the QR code or
click here to view this document online >
Page 7 of 43
3.2 Introduction to the Double Graphik tool head
See how to use the Double Graphik tool head in this video >
QuikSwap Graphik tool head for Evolution3 cutters, with two
individual blade holders for two way cutting. Graphik blades are
stronger and more stable than regular blades. Ideal for vinyl,
banner, cardboard, PVC foamboard up to 13mm (½″), foam-
centred board, corrugated plastic, paper, pop-up and roll-up
materials.
This head is supplied as standard with all Evolution3 cutters.

Evolution3 FreeHand User Guide
The world’s finest cutting machines
www.keencut.com
+44 (0) 1536 263158
+1 (716) 748 6203
[email protected] (UK HQ)
[email protected] (US sales)
Scan the QR code or
click here to view this document online >
Page 8 of 43
3.3 Insert Graphik blades into the Double Graphik tool head
Undo the highlighted knob to remove the magnetic blade
clamping plate.
Pull the magnetic blade clamping plate away from the cutting
head.
Insert a Graphik blade, check it is facing the correct way for your
desired direction of cutting. Place the small pin in the hole at the
top of the blade and align with the edge of the clamping plate.

Evolution3 FreeHand User Guide
The world’s finest cutting machines
www.keencut.com
+44 (0) 1536 263158
+1 (716) 748 6203
[email protected] (UK HQ)
[email protected] (US sales)
Scan the QR code or
click here to view this document online >
Page 9 of 43
Replace the blade clamping plate onto the blade holder but do
not tighten fully until the blade depth has been set (see how to
adjust the blade depth >).
Repeat on the other blade holder if required.

Evolution3 FreeHand User Guide
The world’s finest cutting machines
www.keencut.com
+44 (0) 1536 263158
+1 (716) 748 6203
[email protected] (UK HQ)
[email protected] (US sales)
Scan the QR code or
click here to view this document online >
Page 10 of 43
3.4 Double Graphik tool head cutting technique
IMPORTANT: You must use a cutting mat for any cutting, creasing, or scoring process to prevent damage to the work
surface
Place the cutting mat (A) on the work surface then the material
to be cut (B) making sure the whole length of the cut line is over
the cutting mat. Place the FreeHand on the material near to the
cutline.
Lift and move one end of the cutter so the sightline strip (clear
plastic strip running along cutting edge of the FreeHand) aligns
with the cut line, then repeat at the other end. Look down
vertically and check the sightline strip aligns with the cut line
before making the cut.

Evolution3 FreeHand User Guide
The world’s finest cutting machines
www.keencut.com
+44 (0) 1536 263158
+1 (716) 748 6203
[email protected] (UK HQ)
[email protected] (US sales)
Scan the QR code or
click here to view this document online >
Page 11 of 43
The cutting head can be pulled or pushed to cut the material.
Load and align the material to be cut as described in the
‘clamping material’ section (see how to align and clamp the
material >), press down the chosen blade holder whilst
pushing/pulling the cutting head along the cutter bar.
Tip: Only finger pressure is needed to hold the blade holder
down, if after making the cut the blade holder has risen and the
blade not cut through simply cut again. This could be an
indication the material should be cut in two strokes using
the dual blade depth setting as explained above.

Evolution3 FreeHand User Guide
The world’s finest cutting machines
www.keencut.com
+44 (0) 1536 263158
+1 (716) 748 6203
[email protected] (UK HQ)
[email protected] (US sales)
Scan the QR code or
click here to view this document online >
Page 12 of 43
3.5 Using a cutting station
See how to create a cutting station >
This process assumes a cutting groove has been made or the
work surface has been covered with a cutting mat or other
plastic material to act as a cutting mat.
Lift the FreeHand and place it on the back of the two blocks to
hold it above the work surface.
Slide material to be cut under the FreeHand so that the cut
position on the material is this side of the cutting line/groove on
the work surface.
Lower the FreeHand from the blocks and align the sightline strip
with the cut line.

Evolution3 FreeHand User Guide
The world’s finest cutting machines
www.keencut.com
+44 (0) 1536 263158
+1 (716) 748 6203
[email protected] (UK HQ)
[email protected] (US sales)
Scan the QR code or
click here to view this document online >
Page 13 of 43
Slide the material and the FreeHand back into the cutting
position between the two blocks.
Hold down the cutter bar and make the cut.

Evolution3 FreeHand User Guide
The world’s finest cutting machines
www.keencut.com
+44 (0) 1536 263158
+1 (716) 748 6203
[email protected] (UK HQ)
[email protected] (US sales)
Scan the QR code or
click here to view this document online >
Page 14 of 43
4. Using the Double Graphik tool head
4.1 Change the Graphik blades
Undo the highlighted knob to remove the magnetic blade
clamping plate.
Pull the magnetic blade clamping plate away from the cutting
head.
Lift off the blunt blade (if there is one) and replace with a new
Graphik blade, check it is facing the correct way for your desired
direction of cutting. Place the small pin in the hole at the top of
the blade and align with the edge of the clamping plate.

Evolution3 FreeHand User Guide
The world’s finest cutting machines
www.keencut.com
+44 (0) 1536 263158
+1 (716) 748 6203
[email protected] (UK HQ)
[email protected] (US sales)
Scan the QR code or
click here to view this document online >
Page 15 of 43
Replace the blade clamping plate onto the blade holder but do
not tighten fully until the blade depth has been set. Repeat on
the other blade holder if required.

Evolution3 FreeHand User Guide
The world’s finest cutting machines
www.keencut.com
+44 (0) 1536 263158
+1 (716) 748 6203
[email protected] (UK HQ)
[email protected] (US sales)
Scan the QR code or
click here to view this document online >
Page 16 of 43
4.2 Adjust the blade depth and direction
To adjust the height of the blade, loosen knob ‘A’ by a half to
one full turn. Move knob ‘B’ up or down until the blade is long
enough to just cut through the material.
Place a piece of the material under the cutter bar so it does not
protrude past the edge of the cutter bar and the blade can be
seen against the edge of the material.
Tighten ‘A’ to lock the blade in chosen position.
The design of the Graphik blade allows it to be set in the blade
holder to cut in either direction. The cutting head can be used
with both blades cutting in the same direction or in opposing
direction.

Evolution3 FreeHand User Guide
The world’s finest cutting machines
www.keencut.com
+44 (0) 1536 263158
+1 (716) 748 6203
[email protected] (UK HQ)
[email protected] (US sales)
Scan the QR code or
click here to view this document online >
Page 17 of 43
The blades also have adjustable cutting depth, so if a thick
material is being cut on a long machine such that it is beneficial
to make two cuts, one blade can be set to cut half the thickness
in one direction and the other to cut full depth on the return
journey.

Evolution3 FreeHand User Guide
The world’s finest cutting machines
www.keencut.com
+44 (0) 1536 263158
+1 (716) 748 6203
[email protected] (UK HQ)
[email protected] (US sales)
Scan the QR code or
click here to view this document online >
Page 18 of 43
4.3 Advanced cutting techniques
NOTE: The following is for a right-handed person. For left-handed use cut at the left-hand end of the cutter and reverse the
direction of cut and hand positions. IMPORTANT: You must use a cutting mat for any cutting, creasing, or scoring process
to prevent damage to the work surface
Place the cutting mat (A) on the work surface then the material
to be cut (B) making sure the whole length of the cut line is over
the cutting mat. Place the FreeHand on the material near to the
cutline.
Lift and move one end of the cutter so the sightline strip (clear
plastic strip running along cutting edge of the FreeHand) aligns
with the cut line, then repeat at the other end. Look down
vertically and check the sightline strip aligns with the cut line
before making the cut.

Evolution3 FreeHand User Guide
The world’s finest cutting machines
www.keencut.com
+44 (0) 1536 263158
+1 (716) 748 6203
[email protected] (UK HQ)
[email protected] (US sales)
Scan the QR code or
click here to view this document online >
Page 19 of 43
When cutting thick, tough materials such as PVC foam board and
fluted plastics such as Correx or Coroplast, set the blade depth
so the blade tip protrudes only 1-2mm (1⁄16”) through the
thickness of the board and cuts from left to right.
Position the cutting head to start the cut, turn your body to face
to the right and place the palm of your right hand on the cutting
head.
Take a firm grip on the cutter bar with your left hand.
Depress the blade holder and push the cutting head using the
strength across your shoulders.
Tip: If the material is too thick to reasonably cut in one
stroke the blade can be lowered partially and the board cut in a
number of strokes.

Evolution3 FreeHand User Guide
The world’s finest cutting machines
www.keencut.com
+44 (0) 1536 263158
+1 (716) 748 6203
[email protected] (UK HQ)
[email protected] (US sales)
Scan the QR code or
click here to view this document online >
Page 20 of 43
Cutting Aluminium Composite Panels is not recommended using the Graphik tool head.
See how to cut ACP with the Rocker tool head >
Thin materials such as paper and plastic films are easily cut but
attention should be given to supporting the material at the
beginning of the cut. Pressing down lightly on the edge of
the material with your index finger or thumb will prevent the
material creasing when the blade starts cutting.
Scoring Acrylic and other plastics can be achieved by setting the
blade at minimum depth and running the blade backwards across
the surface whilst applying firm downward pressure on the blade
holder.
Remove the material from the cutter for snapping by hand, some
plastics may benefit from being scored multiple times.
When cutting a small piece of board place it at one end of the
cutter and place a scrap piece at the other end to keep the cutter
bar parallel to the base.
Other manuals for Evolution3 FreeHand
3
Table of contents
Popular Industrial Equipment manuals by other brands

Ammeraal Beltech
Ammeraal Beltech uni chains uni NTB Series Instructions and installation

Clemco
Clemco HS-200P-1 owner's manual

Kval
Kval 990FX Operation manual

Universal
Universal MS-120NI owner's manual

Lumen Dynamics Group
Lumen Dynamics Group OmniCure 2000 Series quick start guide

Draco
Draco K9-1 instruction manual