KeepGuard KW571 User manual

Highly Recommended by Outdoor Explorers
Wildlife Scouting Cam Instruction Book
Applicable models:KW571
1

Congratulations on the purchase of your Trail Cam! The Trail Cam is one of the best scouting
cameras available and is designed for long duration performance in the harshest outdoor
environment. It is equipped with built-in infrared LEDs for incredible night vision images and
can be triggered by movement 24 hours a day. The Trail Cam takes high quality full color
daytime images or video with audio or covert infrared black and white nighttime images or
video with audio. Please refer to the notes below and instructions in this manual to ensure
that you are using this product as designed.
2
Notes Before Use
1. When setting camera parameters, please put camera in Setup mode.
2. Do not set the camera directly from ON to Setup.
3. To replace the battery, SD card, firstly turn camera to OFF mode.

4. The color changing of the Indicator
① When camera is updating, indicator light flashes green.
② The indicator light flashes red when it is turned on or ready for operation.
③ When battery is lower, the indicator light turns blue.
④ When being set to long standby time, the indicator flashes purple.
5. Batteries need to be used dry batteries, can not use rechargeable batteries.
6. When the SD card is inserted into camera, make sure that the SD card is not in the
protected position.
7. When using an external power supply, make sure that voltage is correct.
3
Notes Before Use

8. Please take out the battery for long time unused, so as to avoid leakage of the
battery.
9. Camera can not be directly immersed in water, can not be placed in the
environment of strong acid and alkali.
10. Finger can not press the Fresnel lens.
11. Keep the lens and battery compartment clean.
12. Do not use sharp or hard objects to attack or scratch the screen and other damage
things.
4
Notes Before Use

5
1. Move the latches and open the front cover
2. Load 8 lithium AA(non rechargeable) or alkaline AA batteries
3. Insert the SD card and format
4. Switch to the SETUP Mode
5. Press MENU key
6. Press UP key to select Photo or Video Mode
7. Put it in the right position you would like
8. Switch to the ON Mode and the camera has started working
Quick Starts

Camera Overview
6
[ PIR]
[LED Indicator]
[Loock Catch]
[LDR]
[LENS]
[IR LED]
[Dispiay Screen]
[Battery Case]
[ON-OFF Key]
[Operation part]

Standard Accessories
7
1×Belt 1×USB
1×Manual 1×Gift Box

SD Card
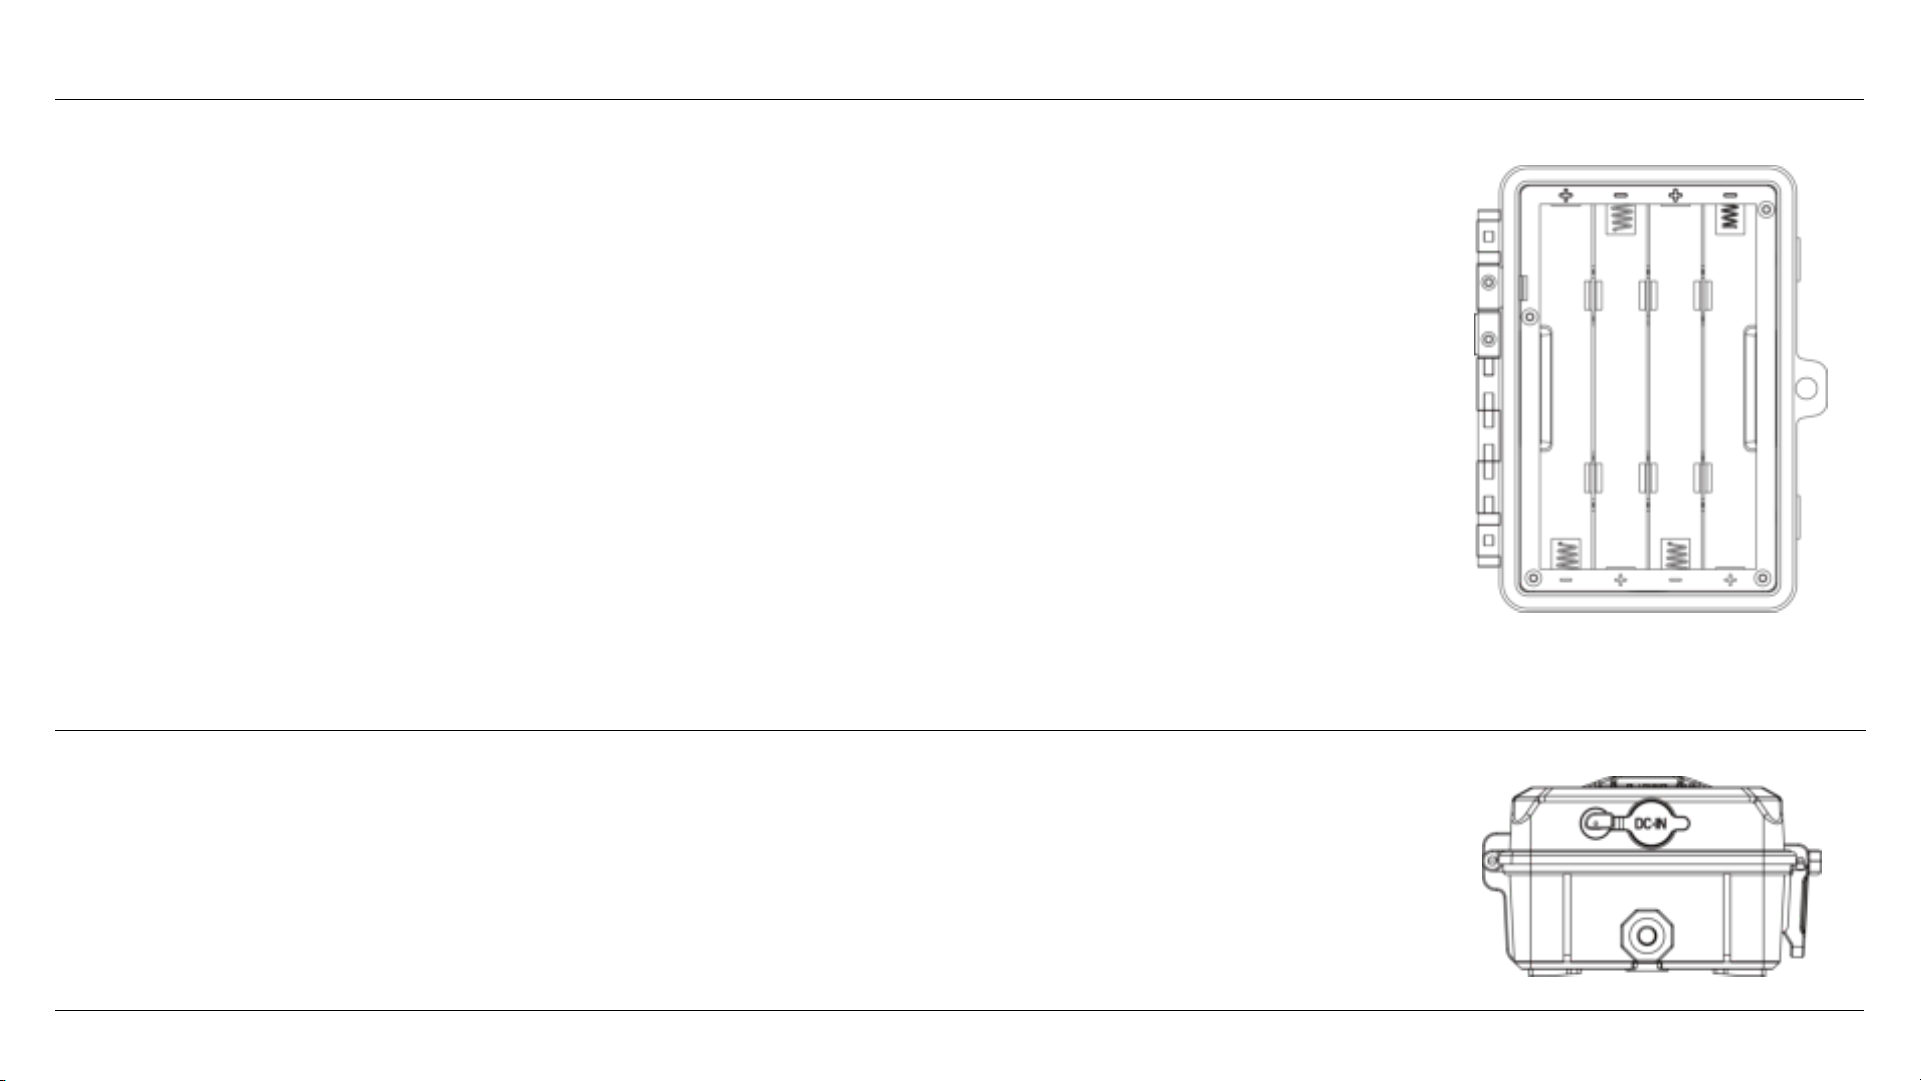
After opening the latch on the right side of the camera, you will see
that it has 8 battery slots. For maximum battery life, we recommend
using 8 lithium AA(non-rechargeable)or alkaline AA batteries.
Please be sure to insert each battery with correct polarity (negative
or“flat”end against the long spring of each battery slot).
Insert the SD card ( OFF mode ) before beginning to operate the
camera. We strongly recommend that you format the SD card at the
first time. SD card is supported up to maximum 256GB capacity.
Power Supply
8

We recommend mounting cam on a sturdy tree with a diameter of about 6 in. (15cm). To get
the optimal picture quality, the tree should be about 16-17 ft(5 meters) away from the place
to be monitored, with the camera placed at a height of 5-6.5 ft. (1.5~2 m). Also, keep in mind
that you will get the best results at night when the subject is within the ideal flash range, no
farther than 60' (19m) and no closer than 10'(3m) from the camera.
There are two ways to mount cam: using the provided adjustable strap or the tripod socket.
1. Using the adjustable strap: Push one end of the strap through the two brackets on the
back of cam. Thread the end of the strap through the buckle. Fasten the strap securely
around the tree trunk by pulling the end of the strap firmly so there is no slack left.
2. Using the tripod socket: The camera is equipped with a socket at the bottom end.
MOUNTING
9

To test whether cam can effectively monitor the area you choose, this test is recommended to
check the sensing angle and monitoring distance of cam. To perform the test:
1. Switch cam to SETUP mode.
2. Make movements in front of the camera at several positions within the area where you
expect game or subjects to be. Try different distances and angles from camera.
3. If emotion indicator LED light blinks, it indicates that position can be sensed.
The results of your testing will help you find the best place where mounting and aiming the
cam. The height from the ground for placing the device should vary with animal size
appropriately. In general,3 to 6 feet is preferred. You can avoid potential false triggers due to
temperature and motion disturbances in front of the camera by not aiming it at a heat source
or nearby tree branches or brush (especially on windy days).
Sensing Angle and Distance Test
10

The cam has three basic operational modes: 「OFF」, 「ON」 and 「SETUP」
●「OFF 」Mode
When cam in OFF mode, you can do the following:
• replacing the SD card or batteries
• connecting cam with other device by USB port
It will occur a little of power consumption under OFF mode. If you won't use it for a long
time, please take batteries off.
●「ON」Mode
Once in ON mode no manual controls are needed or possible (the control keys have no
effect). The cam will take photos or videos automatically (according to its current parameter
settings) when it is triggered by the PIR sensor′s detection of activity in the area it covers.
Operational Modes
11

●「SETUP」Mode
In the SETUP mode you can check and change the settings of the cam with the help of built-
in LCD. Moving the power switch to the SETUP position will turn on the LCD display and you
will see an information screen as below.
Operational Modes
TT
3
M
0000/0888
Camera Mode
Time Stamp ON
Time Scan ON
SD Card
Battery Level
Video Mode
Image Resolution Photos Taken Audio Rec ON
Video Resolution
Available Video
Recording Time
12

13
Clock
Mode
Image Size
Set Exit
Set Clock
OK
Set
MENU
Press OK and use UP/DOWN keys ( to change the setting )
and LEFT/RIGHT keys ( to move to the next field ) to set the
hour ( 24-hr format only, “00”=midnight,“12”=noon)
and minute, then move to the next row to set the year,
month and date accordingly. Once all settings are made,
press OK to save.
Set Exit
Mode
OK
Video
MENU
Dual
Camera Select photos or video mode when the camera is triggered.
Camera means Photo mode,“Dual”=Camera+Video
Set Exit
Image Size
OK
16M
MENU
30M
3M Select image resolution among 3M, 16M and 30M. Higher
resolution produces better quality images but creates larger
files that will occupy more space of the SD card.
Settings

14
Settings
Capture Number
Image Quality
lmage Format
Selects how many photos are taken in sequence per trigger
in Camera mode. This setting affects photos taken in Field
Scan mode as well.
Set Exit
Capture Number
OK
1
MENU
Set Exit
Image Quality
OK
Fine
MENU
Super Fine
Normal
Image Format
4:3
Set Exit
OK MENU
16:9
Selects image resolution (in pixels per frame).Higher
resolution produces better quality, but creates larger files
that take up more of the SD card capacity (fills up faster).

15
Settings
Video Size
Video Length
Selects video resolution (in pixels per frame). Higher
resolution produces better quality videos, but creates larger
files that will occupy more space of the SD card.
Sets length per captured video clip. Settings begin with 10
second default when parameter is first selected. After
stepping down to 5s, video length settings starts over from
60s.
Video Length
10s
Set Exit
OK MENU
Set Exit
Video Size
OK
1280*720
MENU
640*480
1920*1080
Camera Name
Set Exit
Camera Name
OK
Input
MENU
Allows the user to set a customized name for the camera.
Very useful for identification purpose when multiple cameras
are used at the same time since each camera will imprint its
name on all photos (but not videos) it captures.

16
Settings
Interval
Coordinate Input
Selects the length of time that the camera will “wait”until
it responds to any additional triggers from the PIR after an
animal is first detected and remains within the sensor‘s
range. During this mode user sets“ignore triggers”interval,
the camera will not capture photos/videos. This prevents the
card from filling up with too many redundant images.
Set Exit
Coordinate Input
OK
OFF
MENU
ON Using the Setup Menu Input Screens"Allows user to input
latitude and longitude coordinates for camera's location.This
data will be embedded in files saved on camera’s SD card.
Set Exit
Interval
OK MENU
10s
Time Period
Press OK and use UP/DOWN keys ( to change the setting ) and
LEFT/RIGHT keys ( to move to the next field ) to set time. Once
all settings are made, press OK to save.
Set Exit
Time Period
OK MENU
OFF
ON

17
Settings
Timed Scan
Time Scan (Time Lapse) recording mode on/off. When activated,
Time Scan forces the camera to take photos or videos even
when it is not triggered by an nearby live animal,useful for
constant monitoring of an area that might be far away from
the camera. The user can set start and stop times for up to two
in dependent “blocks”of Time Scan recording,as well as the
interval time between each photo/video
Set Exit
Timed Scan
OK MENU
OFF
ON
Sensor Level
Set Exit
Sensor Level
OK
Auto
MENU
Four Ievels:Auto,Low,Meduim,High
Language
Set Exit
Language
OK
English
MENU
Selects user's preferred language from defined other languages.
Note: two time blocks can not appear in overlap section, or you
will not set it successfully.
For example: A 8:00-12:00 B 13:00-23:00, this is OK for set.

18
Settings
Password Press “On”and enter into password set, 4 numbers
shows “****”,you can reset pasword by yourself.
Set Exit
Password
OK MENU
OFF
ON
lmage Recycle When SD card is full, the last pics will be removed.
Time Stamp
Set Exit
lmage Recycle
OK MENU
OFF
ON
Time Stamp
Set Exit
OK MENU
OFF
ON

19
Settings
Video Sound
Set Exit
Video Sound
OK MENU
OFF
ON
Format
Default
Set Exit
Format
OK
Execute
MENU
Select“Execute”and press OK to restore all parameters to the
original factory default settings.
Deletes (erases) all files stored on a card to prepare it for reuse.
Always format a card that has been previously used in other
devices. Caution! Make sure you have downloaded and backed
up all files you want to preserve first! Press OK to execute, press
MENU (or select NO then press OK) to exit without formatting.
Set Exit
Default
OK MENU
Execute

20
Settings
Version
Set Exit
Version
OK MENU
571NC2Dx19XXX
Here it shows the updated Firmware version being currently
used in this camera. Make sure you download and use the
most updated firmware.
Table of contents
Other KeepGuard Scouting Camera manuals