KEEWAY 125-2G User manual

125-2G/150-2G/200-2G
2015FEB02
!Details described or illustrated in this booklet may differ from the vehicle's actual specification
as purchased, the accessories fitted or the national-market specification. No claims will be
asserted as a result of such discrepancies.
Dimensions, weights, fuel consumption and performance data are quoted to the customary
tolerances.
The right to modify designs, equipment and accessories is reserved. Errors and omissions
excepted.

WARNING
!
TIP
WARNING
!
Please read this manual carefully and completely
before operating this vehicle.
This is the safety alert symbol. It is used to alert you
to potential personal injury hazards. Obey all safety
messages that follow this symbol to avoid possible
injury or death.
indicates a hazardous situa-
tion which, if not avoided,
could result in death or seri-
ous injury.
indicates special precautions
that must be taken to avoid
damage to the vehicle or other
property.
provides key information to
make procedures easier or
clearer.
1 - 2
Welcome to the world of motorcycling!
As the owner, you are benefiting from the vast experi-
ence and newest technology regarding the design
and manufacture of high-quality products, which have
earned us a reputation for dependability.
Please take the time to read this manual thoroughly,
so as to enjoy all advantages of your vehicle. The
Owner’s Manual does not only instruct you in how to
operate, inspect and maintain your vehicle, but also in
how to safeguard yourself and others from trouble
and injury.
In addition, the many tips given in this manual will
help keep your vehicle in the best possible condition.
If you have any further questions, do not hesitate to
contact our dealer.
Our team wishes you many safe and pleasant rides.
So, remember to put safety first!
Our company continually seeks advance in product
design and quality. Therefore, while this manual
contains the most current product information
available at the time of printing, there may be minor
discrepancies between your vehicle and this manual.
If there is any question concerning this manual,
please consult our dealer.
INTRODUCTION
IMPORTANT MANUAL
INFORMATION
NOTICE
INTRODUCTION
Safety information
● Safe-riding
● Further safe-riding points
DESCRIPTION
● Left view
● Right view
● Controls and instruments
CONSUMER INFORMATION
● VIN and engine serial number
INSTRUMENT AND CONTROL
FUNCTIONS
● Main switch/steering lock
● Meter & Indicator
● Handlebar
● Fuel tank switch & fuel tank
● Rear shock absorber
● Rear brake pedal
● Shift pedal
● Kick starting lever
PRE-OPERATION CHECKS
OPERATION AND IMPORTANT
RIDING POINTS
● Starting the engine
● Acceleration and deceleration
● Braking
1
3
3
5
6
6
6
7
7
7
7
7
8
9
10
11
12
12
12
13
14
14
15
15
● Engine break-in
● Parking
PERIODIC MAINTENANCE AND
ADJUSTMENT
● Periodic maintenance chart
● Checking the spark plug
● Engine oil
● Idle speed
● Valve clearance
● Air filter
● Checking the throttle cable free play
● Checking the clutch free play
● Checking the front brake lever and
rear brake pedal free play
● Checking the drum limit
● Checking the brake pads
● Checking the battery
● Brake fluid
● Replacing the fuses and bulbs
TIRE
STORAGE
● Storage
SPECIFICATIONS
● Specification
15
16
16
17
19
19
21
21
21
22
22
22
23
23
24
24
25
25
26
27

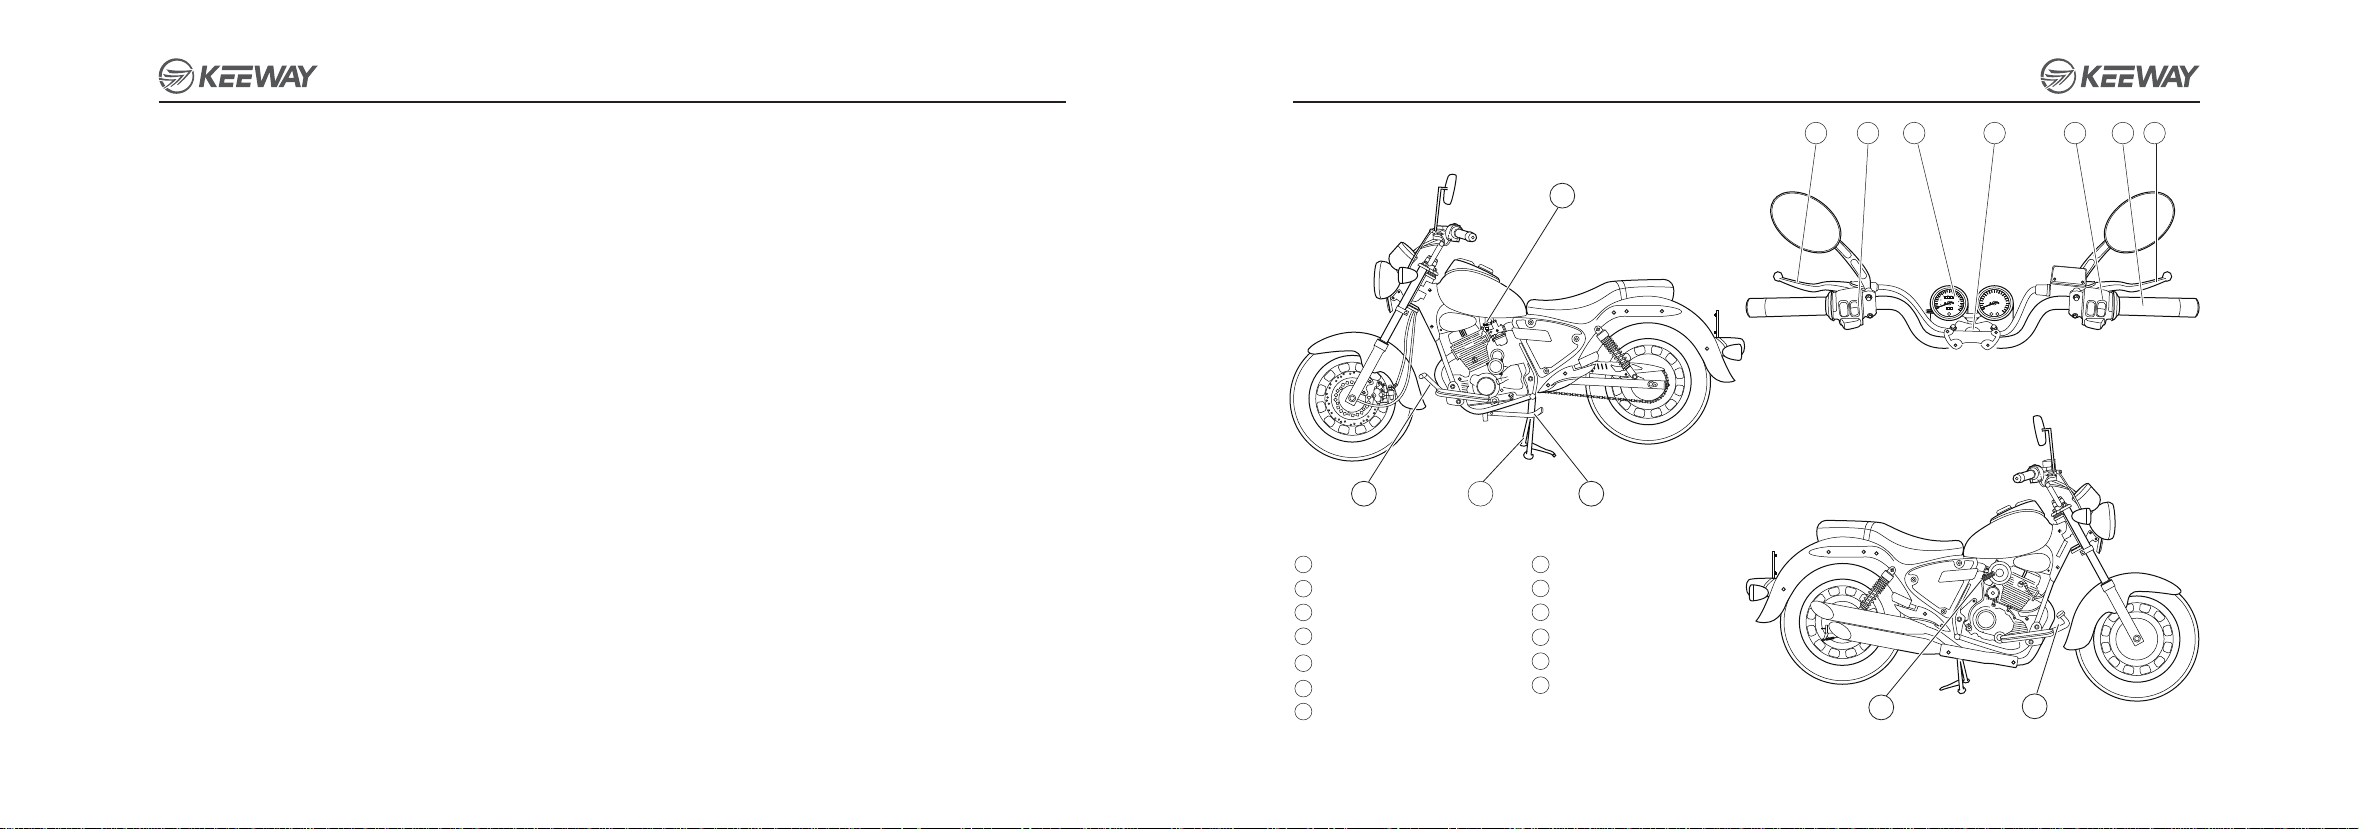
Be a Responsible Owner
As the vehicle's owner, you are responsible for the
safe and proper operation of your vehicle.
The safe use and operation are dependent upon the
use of proper riding techniques as well as the exper-
tise of the operator. Every operator should know the
following requirements before riding this vehicle.
He or she should:
● Obtain thorough instructions from a competent
source on all aspects of vehicle operation.
● Observe the warnings and maintenance require-
ments in this Owner’s Manual.
● Obtain qualified training in safe and proper riding
techniques.
● Obtain professional technical service as indicated
in this Owner´s Manual and/or when made neces-
sary by mechanical conditions.
Safe Riding
Perform the pre-operation checks each time you
use the vehicle to make sure it is in safe operating
condition. Failure to inspect or maintain the vehicle
properly increases the possibility of an accident or
equipment damage. See the page for a list of pre-op-
eration checks.
SAFETY INFORMATION
3 - 4
● This vehicle is designed to carry the operator and
a passenger.
● The failure of motorists to detect and recognize
vehicles in traffic is the predominating cause of
automobile/vehicle accidents. Many accidents have
been caused by an automobile driver who did not
see the vehicle. Making yourself prominent appears
to be very effective in reducing the chance of this
type of accident. Therefore:
• Wear a brightly colored jacket.
• Use extra caution when you are approaching
and passing through intersections, since intersec-
tions are the most likely places for vehicle accidents
to occur.
• Ride where other motorists can see you. Avoid
riding in another motorist’s blind spot
● Many accidents involve inexperienced operators.
In fact, many operators who have been involved in
accidents do not even have a current driver´s
license.
• Make sure that you are qualified and that you only
lend your vehicle to other qualified operators.
• Know your skills and limits.
Staying within your limits may help you to avoid an
accident.
• We recommend that you practice riding your vehi-
cle where there is no traffic until you have become
thoroughly familiar with the vehicle and all of its con-
trols.
● Many accidents have been caused by error of the
vehicle operator. A typical error made by the operator
is veering wide on a turn due to excessive speed or
under- cornering (insufficient lean angle for the
speed).
• Always obey the speed limit and never travel faster
than legal speed limit.
• Always signal before turning or changing lanes.
Make sure that other motorists can see you.
● The posture of the operator and passenger is
important for proper control.
• The operator should keep both hands on the han-
dlebar and both feet on the operator footrests during
operation to maintain control of the vehicle.
• The passenger should always hold onto the opera-
tor, the seat strap or grab bar, if equipped, with both
hands and keep both feet on the passenger foot-
rests. Never carry a passenger unless he or she can
firmly place both feet on the passenger footrests.
● Never ride under the influence of alcohol or other
drugs.
● This vehicle is designed for on-road use only. It is
not suitable for off-road use.
Protective apparel
The majority of fatalities from vehicle accidents are
the result of head injuries. The use of a safety helmet
is the most critical factor in the prevention or reduc-
tion of head injuries.
● Always wear an approved helmet.
● Wear a face shield or goggles.
Wind in your unprotected eyes could contribute to an
impairment of vision that could delay seeing a
hazard.
● The use of a jacket, substantial shoes, trousers,
gloves, etc., is effective in preventing or reducing
abrasions or lacerations.
● Never wear loose-fitting clothes, otherwise they
could catch on the control levers or wheels and
cause injury or an accident.
● Always wear protective clothing that covers your
legs, ankles, and feet. The engine or exhaust sys-
tem become very hot during or after operation and
can cause burns.
● A passenger should also observe the above pre-
cautions.
Avoid Carbon Monoxide Poisoning.
All engine exhaust contains carbonmonoxide, a
deadly gas. Breathing carbon monoxide can cause
headaches, dizziness, drowsiness, nausea confu-
sion, and eventually death.
Carbon Monoxide is a colorless, odorless, tasteless
gas which may be present even if you do not see

5 - 6
or smell any engine exhaust. Deadly levels of carbon
monoxide can collect rapidly and you can quickly be
overcome and unable to save yourself. Also, deadly
levels of carbon monoxide can linger for hours or
days in enclosed or poorly ventilated areas. If you
experience any symptoms of carbon monoxide poi-
soning, leave the area immediately, get fresh air, and
seek medical treatment.
● Do not run engine indoors. Even if you try to venti-
late engine exhaust with fans or open windows and
doors, carbon monoxide can rapidly reach danger-
ous levels.
● Do not run engine in poorly ventlated or partially
enclosed areas such as barns, garages.
● Do not run engine outdoors where engine exhaust
can be drawn into a building through openings
such as windows and doors.
Further safe-riding points
● Be sure to signal clearly when making turns.
● Braking can be extremely difficult on a wet road.
Avoid hard braking, because the vehicle could slide.
Apply the brakes slowly when stopping on a wet sur-
face.
● Slow down as you approach a corner or turn. Once
you have completed a turn, accelerate slowly.
● Be careful when passing parked cars. A driver
might not see you and open a door in your path.
● Railroad crossings, streetcar rails, iron plates on
road construction sites,and manhole covers become
extremely slippery when wet. Slow down and cross
them with caution. Keep the vehicle upright, other-
wise it could slide out .
● The brake pads could get wet when you wash the
vehicle. After washing the vehicle, check the brakes
before riding.
● Always wear a helmet, gloves, trousers (tapered
around the cuff and ankle so they do not flap), and a
bright colored jacket.
● Do not carry too much luggage on the vehicle. An
overloaded vehicle is unstable. Use a strong cord to
secure any luggage to the carrier (if equipped). A
loose load will affect the stability of the vehicle and
could divert your attention from the road.
DESCRIPTION Left view
Right view
12 13
10
11
1 Clutch lever
2 Left handle switch
3 Meter
4 Key switch
8 Kick start lever
9 Rear brake pedal
10 Fuel tank switch
11 Shift pedal
12 Main stand
13 Side stand
5 Right handle switch
7 Front brake lever
6 Throttle grip
1 6 752 43
89

00
1
2
3
45678
9
10
11
12
20
40
60 80
100
120
140
10
20
30 50 60
70
80
40
mph
km/h x1000r/min
0 00 0
000 0
0
4
3
7 - 8
TIP
CONSUMER INFORMATION
The vehicle identifi-
cation number or
the engine serial
number are used to
register the vehi-
cle,they are also to
assist your dealer in
terms of ordering
parts or referring to
special service
information
Meter & Indicator
engine serial number
●The vehicle identifi-
cation number ① is
stamped on the right
side steering head
tube.
● The engine serial
number ② is stamped
on the lower left of the
crankcase.
Vehicle identification number
( VIN )
1
VIN No.
ENGINE No.
QJ157FMI
*41067014*
1 2
4 6 7 85
3
1. Speedometer
Speedometer shows the running speed, kilome-
ters/hours.
2. Odometer
Odometer records the total mileage driven.
3. Tachometer
Tachometer indicates the revolution per minute of
engine.
4. Reset Knob
The mileages on trip meter can be reset by turning
the knob.
5. Trip meter
Trip meter records the mileage driven, can be reset
by user when necessary.
6. High Beam Indicator
When the high beam lamp of the headlamp turns on,
the high beam indicator lamp would be on.
7. Neutral Indicator
When the transmission is in the neutral, the indicator
lamp would be on.
8. Turning Indicator
The indicators would flash with the turning signals.
9. Fuel Level Indicator:
It indicates the fuel level in the fuel tank.
EF
9
INSTRUMENT AND CONTROL
FUNCTIONS
“ ”(Off)position:
All the circuits are off.
“ ”(On) position:
The circuits are on.
“ ”(Parking): (IF EQUIPPED)
The taillight, license plate light and auxiliary lights
are on. The hazard lights and turn signal lights can
be turned on, but all other electrical systems are off.
The key can be removed.
“ ” (The steering lock) (IF EQUIPPED)
Turn the steering handle to left, press the key to “ ”
position, the steering lock is locked. When it needs
to open, insert the key and turn to “ ” position, the
steering lock is released;
P
P
U
S
H
Do not turn your key to lock the vehicle while
driving which is not necessary and is also apt to
cause accident.
Press the key in a proper force.
NOTICE
*LBBXEHAD9EBB26219*
2

WARNING
!
Turn on the direction signal lamps in time when
changing the driveway or turning a direction
and turn off the lamps.
Under normal conditions, this switch shall be on
"Operate" ( ) position. Use this switch under
emergency situation, for example accident or
key switch problems.
NOTICE
9 - 10
Turn the switch to " " position, the high beam of
headlamp turn on and the indicator lamp on the
meter would also turn on; turn the switch to " "
position, the low beam of headlamp turn on.
Direction indicator lamp switch
Turn the switch to " " position, the left direction
signal lamp flashes; turn the switch to " " position,
the right direction signal lamp flashes. And the indi-
cator lamps would turn on accordingly.
Dimmer switch
Press down on the button, to activate the horn.
Horn button
When the switch is on " " position and the power
is on, the engine runs.
When the switch is on " " position and the power
is off.
Engine stop switch (IF EQUIPPED)
Throttle grip is to control the speed of engine. Twist
the grip towards yourself when revving up or turn it in
opposite way to slow down.
Throttle grip
When starting the engine or shifting, pull the clutch
lever to cut off driving on the rear wheel.
Clutch lever (IF EQUIPPED)
Turn switch to position of " " to light up the front
lamp; Turn to " " to light up meter lamp, city light
and tail lamp; turn to "●" for daytime driving.
Light switch (IF EQUIPPED)
When passing other vehicles, press this button so
the high beams of the headlamp would flash to
alarm the vehicles in front of you.
Passing switch (IF EQUIPPED)
Pull the clutch lever or put in Neutral gear and press
the button to run the electric motor and start the
engine.
Adjust choke handle to set choke of carburetor to
fully closed or fully open positions.
Electric starter button
Choke switch (IF EQUIPPED)
Pull the brake lever properly to use the front brake.
Front brake lever
FUEL TANK SWITCH & FUEL TANK
Fuel switch is under the left side of the fuel tank.
●(Off) position
When fuel switch is on the position of " ●", fuel can't
flow to carburetor from fuel tank. Please keep the fuel
switch on "Off" position when you do not drive the
vehicle.
(On) position
When fuel switch is on the position of " ", fuel will
flow into carburetor from main fuel system until it
reaches reserve level.
(Reserve) position
When the fuel switch is on " " (Reserve) position,
fuel would supply from reserve level.
HANDLEBAR
2. Dimmer switch “ / ”
1. Horn switch “ ”
3. Left turn direction indicator lamp switch “ ”
3. Right turn direction indicator lamp switch “ ”
2. Light switch “ ”
1. Electric starter button “ ”
2
1
3
LEFT HANDLE
RIGHT HANDLE
1
2
3

After starting the engine, check on the lever and
make sure it is back to its normal position to
drive safely.
NOTICE
11 - 12
REAR SHOCK ABSORBER
Step the rear brake pedal to brake the rear wheel.
Brake light will turn on while rear brake is in use.
REAR BRAKE PEDAL
Kick starting lever is on the right side of engine.
KICK STARTING LEVER
Slow down the vehicle
when turning to the low
gear. Revving up the
engine slightly to shift
gears in more smooth
way to avoid damaging
gears.
SHIFT PEDAL
Fuel switch is under the left side of the fuel tank.
●(Off) position
When fuel switch is on the position of " ●", fuel can't
flow to carburetor from fuel tank. Please keep the fuel
switch on "Off" position when you do not drive the
vehicle.
(On) position
When fuel switch is on the position of " ", fuel will
flow into carburetor from main fuel system until it
reaches reserve level.
(Reserve) position
When the fuel switch is on " " (Reserve) position,
fuel would supply from reserve level.
To open fuel tank cap, please insert the key and turn
it clockwise and open the cover.
To close the fuel tank, please recap and then press it.
Take away the key when you hear the sound of lock-
ing.
Fuel offFuel onReserve
WARNING
!
Please refuel when the fuel switch is on " "
position and turn the switch back to " " position
after refueling.
WARNING
!
Do not over fill the fuel tank. Do not make fuel
splashes on hot engine.
Please stop the engine and turn the ignition key
to " " (Off) position when you need to refuel.
Do not forget to lock the fuel tank cover after
adding the fuel in case of evaporation to the air,
which is a waste of energy and would pollute
the environment.
Recommended fuel:
REGULAR UNLEADED
GASOLINE ONLY
Fuel tank capacity:
15 L
1
3
N 5
2 4
Rear Brake Pedal
Kick Starting Lever
Each shock absorber is equipped with a spring pre-
load adjusting ring the spring of the rear wheel can
be adjusted in compliance with the driver's weight
and loading condition, driving method and road con-
SOFTER
STIFFER
ditions. Adjust when vehicle it is stable on the main
stand or side stand, turn the preload ring to the place
required.
TORQUE VALUE
Upper fixing bolt: 37-44N.m
Lower fixing bolt: 22-29N.m
5 stages, adjustable

PRE-OPERATION CHECKS
Inspect your vehicle each time you use it to make
sure the vehicle is in safe operating condition.
Always follow the inspection and maintenance pro-
cedures and schedules described in the Owner's
Manual.
Before using this vehicle, check the following points:
STARTING THE ENGINE
1. Check whether the fuel switch handle is on " "
2. Turn the key to “ON”.
3. Put in neutral gear, or pull the clutch lever.
4. Start the engine by pushing the start switch.
When the engine is cold
Use the choke to start the engine.
Read the Owner’s Manual carefully to become famil-
iar with all controls. If there is a control or function
you do not understand, ask your dealer.
OPERATION AND IMPORTANT
RIDING POINTS
WARNING
!
Failure to inspect or maintain the vehicle prop-
erly increases the possibility of an accident or
equipment damage. Do not operate the vehicle if
you find any problem. If a problem cannot be
corrected by the procedures provided in this
manual, have the vehicle inspected by a dealer.
WARNING
!
Failure to familiarize yourself with the controls
can lead to loss of control, which could cause an
accident or injury.
WARNING
!
Do not start the engine indoor with bad ventila-
tion or without ventilation. Do not leave a start-
ing vehicle when no one else is around.
Do not run the engine in high speed when you
do not drive the vehicle, or it will become over-
heating and damage its inner parts.
NOTICE
13 - 14
ITEM CHECKS
Fuel • Check fuel level in fuel tank.
• Refuel if necessary.
• Check fuel line for leakage
Engine oil • Check oil level in engine.
• If necessary, add recommended oil
to specified level.
• Check vehicle for oil leakage.
ITEM CHECKS
Disc brake
( If equipped )
• Check operation.
• If soft or spongy, have dealer bleed
hydraulic system.
• Check brake pads for wear. Replace
if necessary.
• Check fluid level in reservoir. If
necessary, add recommended brake
fluid to specified level.
• Check hydraulic system for leakage.
ITEM CHECKS
Wheels and tires • Check for damage.
• Check tire condition and tread depth.
• Check air pressure.
Brake levers • Make sure that operation is smooth.
Brake pedal • Lubricate pivots if necessary.
Sidestand,
Mainstand
( If equipped )
• Lubricate pivots if necessary.
Instruments,
lights, signals
and switches
• Check operation.
Drum brake
( If equipped )
• Check operation.
• Check brake shoes for wear. Replace
if necessary.
Throttle grip • Make sure that operation is smooth.
• Check cable free play.
• If necessary, have a dealer adjust
cable free play and lubricate cable
and grip housing.
Clutch lever • Make sure that operation is smooth.
• Check cable free play.
• If necessary, have a dealer adjust
cable free play and lubricate cable.

The speed can be adjusted by opening and closing
the throttle. To increase the speed, turn the throttle
grip in direction (a). To reduce the speed, turn the
throttle grip in direction (b).
WARNING
!
It is dangerous only to use either the front brake
or rear brake which may cause skid or lose
control. Be careful and use brakes properly when
you drive on wet road or curved road.
WARNING
!
Failure to properly maintain the vehicle or
performing maintenance activities incorrectly
may increase your risk of injury or death during
service or while using the vehicle. If you are not
familiar with vehicle service, have a dealer
perform service.
● The annual checks must be performed every
year, except if a kilometer-based maintenance,
is performed instead.
● The vehicle may have different accessory for
different market and some parts may not exist
for common chart.
NOTICE
15 - 16
ACCELERATION AND DECELERATION
There is never a more important period in the life
of your engine than the period between 0 and 1000
km. For this reason, you should read the following
material carefully. Since the engine is brand new, do
not put an excessive load on it for the first 1000 km.
The various parts in the engine wear and fit to the
correct operating clearances. During this period, pro-
longed full-throttle operation or any condition that
might result in engine overheating. The engine
should not be over revved and all the gears shall not
be over 80% of red zone engine rpm; don't operate
the throttle under a fully open position; change the
gears in time to keep the engine rpm in reasonable
1. The vehicle should be parked on firm and flat
road.
2. Turn the power key to the position " " to stop
the engine.
3. Remove ignition key from the switch after locking
for security reason.
ENGINE BREAK-IN
PARKING
Periodic inspection, adjustment, and lubrication will
keep your vehicle in the safest and most efficient
condition possible. Safety is an obligation of the
PERIODIC MAINTENANCE AND
ADJUSTMENT
1. Close the throttle completely.
2. Apply both front and rear brakes simultaneously
for safety concern.
BRAKING
a
b
vehicle owner/operator. The most important points of
vehicle inspection, adjustment, and lubrication are
explained on the following pages. The intervals given
in the periodic maintenance and lubrication chart
should be simply considered as a general guide
under normal riding conditions. However, depend-
ing on the weather, terrain, geographical
location, and individual use, the maintenance inter-
vals may need to be shortened.
range. It is strongly suggested to use the vehicle
very carefully during its running in period; also the
rider has to be familiar to the performance.

15 - 16
17 - 18
PERIODIC MAINTENANCE CHART
ITEM
●●●●●●
●●●●●●
●●●●●●
●●●●●●
●●●●●
●●●
●
●●●
●●
●
●●●●
●
●
●
●
●
●
●●●●●●
●●●●●●
●●●●●●
●●●●●●
●●
Rear brake lever
pivot shaft • Lubricate with silicone grease.
Side stand
Main stand
• Check operation.
• Lubricate.
Front fork • Check operation and oil leakage.
Shock absorber • Check operation and shock absorbers for oil leakage.
Engine oil • Change.
• Check oil level and vehicle for oil leakage.
Engine oil strainer • Clean.
Front and rear brake
switches • Check operation.
Moving parts and
cables • Lubricate.
Throttle grip
Housing and cable
• Check operation and free play.
• Adjust the throttle cable free play if necessary.
Lights, signals
and switches
• Check operation.
• Adjust headlight beam.
CHECKS ODOMETER READING
1000Km 4000Km 7000Km 10000Km 13000Km 16000Km
ITEM
Fuel line ●●
●●
●
●●●
●●●
●●●●●●
●●●●●●
●●●●●●
●●●●●●
●●●
●●●
●●●●●●
●●
●
●●
●●
• Check fuel hoses for cracks or crack
Spark plug • Check condition. Clean and regap.
• Replace
Valves • Check/adjust valve clearance.
Air filter element • Inspect/cleaning/replace
Carburetor • Check/adjust idle speed.
Disc brake • Check operation, fluid level and vehicle for fluid leakage.
• Inspect/replace brake pads.
Drum brake • Inspect/replace brake shoes.
Tires
• Check tread depth and damage.
• Replace if necessary.
• Check air pressure.
Wheels • Check runout and damage.
Chassis fasteners • Make sure that all nuts, bolts and screws are
properly tightened
●●●
Front brake lever
pivot shaft • Lubricate with silicone grease.
CHECKS ODOMETER READING
1000Km 4000Km 7000Km 10000Km 13000Km 16000Km
New 3 months 6 months 9 months 15 months1 year New 3 months 6 months 9 months 15 months1 year

The engine oil should be between the minimum
and maximum level marks.
NOTICE
19 - 20
The spark plug is an important engine component,
which should be checked periodically, preferably by
a dealer. Since heat and deposits will cause any
spark plug to slowly erode, it should be removed and
checked in accordance with the periodic mainte-
nance. In addition, the condition of the spark plug
can reveal the condition of the engine.
The porcelain insulator around the center electrode
of the spark plug should be a medium-to-light tan
(the ideal color when the vehicle is ridden normally).
If the spark plug shows a distinctly different color, the
engine could be operating improperly. Do not attempt
to diagnose such problems yourself. Instead, have a
dealer check the vehicle.
If the spark plug shows signs of electrode erosion
and excessive carbon or other deposits, it should be
replaced.
Before installing a spark plug, the spark plug gap
should be measured with thickness gauge and, if
necessary, adjusted to specification.
Clean the surface of the spark plug gasket and its
mating surface, and then wipe off any grime from
the spark plug threads.
CHECKING THE SPARK PLUG
The engine oil level should be checked before each
ride. In addition, the oil must be changed at the inter-
vals specified in the periodic maintenance and lubri-
cation chart.
ENGINE OIL
1. Place the vehicle on the main stand. A slight tilt to
the side can result in a false reading.
TO CHECK THE ENGINE OIL LEVEL
1. Start the engine, warm it up for several minutes,
and then turn it off.
2. Place an oil pan under the engine to collect the
used oil.
3. Remove the engine oil filler cap and the engine
oil drain bolt to drain the oil from the crankcase.
4. Install the washer and the engine oil drain bolt,
and then tighten the drain bolt to the specified
torque.
5. Refill with the specified amount of the recom-
mended engine oil, and then install and tighten the
oil filler cap.
TO CHANGE THE ENGINE OIL
GAP
Type
Gap
NGK DPR7EA
or
TORCH D7RTC
0.6 - 0.7mm
2. Start the engine, warm it up for several minutes,
and then turn it off.
3. Wait a few minutes until the oil settles, remove
the oil filler cap,wipe the dipstick clean, insert it back
into the oil filler hole (without screwing it in), and
then remove it again to check the oil level.
4. If the engine oil is below the minimum level mark,
add sufficient oil of the recommended type to refill it
to the correct level.
5. Insert the dipstick into the oil filler hole, and then
tighten the oil filler cap. (IF EQUIPPED)
Max
Min
Type
Capacity
API SH, SAE10W40, JASO MA
125cc: 1.2L ± 0.1L
150cc: 1.2L ± 0.1L
200cc: 1.3L ± 0.1L

21 - 22
The air filter element should be replaced and should
be cleaned at the intervals specified in the periodic
maintenance and lubrication chart.
1. Place the vehicle on the main stand.
2. Remove the air filter case cover by removing the
screws.
3. Pull the air filter element out.
4. Insert a new air filter element into the air filter
case.
5. Install the air filter case cover by installing the
screws.
AIR FILTER
REPLACING THE AIR FILTER ELEMENT
The throttle cable free play should measure 3.0–5.0
mm at the throttle grip. Periodically check the
throttle cable free play and, if necessary, have a
dealer adjust it.
CHECKING THE THROTTLE CABLE
FREE PLAY
3.0–5.0 mm
The free play of clutch is measured from the free
status of the lever,
Adjust in following methods, if anything abnormal.
(1) Loose the locknut.
(2) Screw in or out adjusting bolt and adjusting
screw to make required free stroke.
(3) Tighten locknut.
CHECKING THE CLUTCH FREE PLAY
10 – 20 mm
The brake lever free play should measure 10-20 mm
as shown. The brake pedal free play should measure
20-30 mm as shown. Periodically check the brake
lever free play and, if necessary, have a dealer
check the brake system.
CHECKING THE FRONT BRAKE LEVER AND
REAR BRAKE PEDAL FREE PLAY
20-30 mm
Good carburetion is the key of engine performance.
Keep the original condition of the carburetor, as set
in the factory. Pay attention to these two items for
adjustment: throttle cable clearance and idling.
IDLE SPEED
1. Keep the vehicle on flat surface.
2.Start the engine and warm up the engine for sever-
al minutes.
3. Clip the digital Tachometer to the spark plug cable.
4. Adjust the idle screw and keep the revolution of
engine stable.
IDLING ADJUSTMENT
The valve clearance changes with use, resulting in
improper air-fuel mixture and/or engine noise. To
prevent this from occurring, the valve clearance must
be adjusted by a dealer at the intervals specified in
the periodic maintenance and lubrication chart.
The engine is required to be in normal operating
temperature for accurate idling adjustment.
VALVE CLEARANCE
Idle speed: 1,400±100r/min
IN: 0.05 ~ 0.07mm EX: 0.05 ~ 0.07mm
Valve clearance( Cold engine )
Air Filter
Disk Brake: No spongy
Drum Brake: 10-20mm

23 - 24
CHECK THE DRUM LIMIT CHECKING THE BATTERY
Adjustment Nut
Wear Of Brake Shoes
To decrease
free play
To decrease
free play
To increase
free play
To increase
free play
Adjustment nut
Adjustment nut
● Turn the adjustment nut on brake arm of rear
wheels to adjust the free play of rear brake .
● Set down the rear brake pedal after adjusting
until there is effective brake feeling.
The extension line is
within the range
The extension line is
beyond the range
On the rear wheel brake, there
sets a wear limit index mark.
Check wear of brake shoes in
the following method:
1. Check if braking system is properly adjusted.
2. Check if braking function is normal, and if the
limit index extension line is within the allowable
range, as shown in Figure A.
3. If the limit index extension line is beyond the
allowable range, as shown in Figure B, please go to
your local distributor for replacement of components
in the brake to ensure driving safety.
A
B
12V6Ah
Lead-acid battery
The front and rear brake pads must be checked for
wear at the intervals specified in the periodic mainte-
nance and lubrication chart.
Each brake pad is provided with wear indicator
grooves, which allow you to check the brake pad
wear without having to disassemble the brake. To
check the brake pad wear, check the wear indicator
grooves. If a brake pad has worn to the point that the
wear indicator grooves were mostly disappeared,
have a dealer replace the brake pads as a set.
CHECKING THE BRAKE PADS (IF EQUIPPED)
Indicator
Brake system is tuned before delivery. Contact
dealer if any problem.
Don't forget to check the amount level in the brake
fluid reservoir. Add appropriate brake fluid if neces-
sary.
BRAKE FLUID (IF EQUIPPED)
Recommended brake fluid
DOT 4
WARNING
!
In case of drinking the brake fluid by mistake or
contacting with eye or skin, wash with a large
amount of water, and seek medical advice
immediately if in a serious condition.
Minimum level mark
LOWER
Ask the dealer to add electrolyte for normal battery.
Have a dealer charge the battery as soon as pos-
sible if it seems to have discharged. Keep in mind
that the battery tends to discharge more quickly if the
vehicle is equipped with optional electrical accesso-
ries.

25 - 26
STORAGE
Always store your vehicle in a cool, dry place and, if
necessary, protect it against dust with a porous
cover.
Short-term
Long-term
Before storing your vehicle for several months:
1. Change engine oil.
Inflation pressure and tire tread should be regularly
checked. In order to ensure maximum safety and
longer service life, inflation pressure requires more
frequent routine check.
Tire Pressure
Insufficient tire pressure will not only accelerate
wearing, but also have bad impact on driving stability
such as making turning difficult. However, too high
pressure will reduce the contact area between tire
and ground, thus causing slipping or even getting out
of control. Tire pressure should be kept in the stan-
TIRE
dard range. Adjust the tire pressure under a "cold"
condition.
TIRE INFORMATION
COLD TIRE PRESSURE
[FRONT] 230kpa(2.30kgf/cm
2
) [REAR] 225kpa(2.25kgf/cm
2
)
REPLACING THE FUSES AND BULBS
If a fuse or bulb for the individual circuits is blown,
replace it as follows.
1. Turn the key to “OFF” and turn off the electrical
circuit in question.
2. Remove the blown fuse or bulb, and then install a
new fuse of the specified specification.
WARNING
!
Do not use a fuse or bulb of a higher amperage
rating than recommended to avoid causing
extensive damage to the electrical system and
possibly a fire or problems.
12V 35W/35W
12V 2W
12V 3A
12V 10W
12V 5W
12V 21W/5W
Turn light
Headlight bulb
Horn
Meter Light
Taillight bulb
City light
REMOVE
INSTALLATION
FUSE(7A)
XOX
2. Lubricate drive chain.
3. Drain fuel in fuel tank and carburetor out.
Install the fuel tank cover again.
4. Detach the spark plug and add one teaspoon of
(15~20cm3) clean engine oil to cylinder. Kick the
starting lever for several times to distribute oil in the
cylinder, and install the spark plug again.
5. Remove the battery. Keep the battery in proper
place which can avoid freezing and the direct sun-
light. Charge the battery or examine the electrolyte
level(if equipped with lead-acid battery).
6. Clean and dry the vehicle. Wax the surface of the
paint.
7. Inflate tire to the required pressure. Put the vehi-
cle on a block to make two tires off the ground.
8. Cover the vehicle (no plastic or coating material)
and keep it in the place consistent temperature and
low humidity. Do not keep your vehicle under direct
sunlight.
Use the vehicle after storage
1. Take off the cover and clean the vehicle. Change
engine oil if you keep your vehicle for more than four
months.
2. Examine the electrolyte level and charging as
needed. Install the battery.
3. Wash away the anti-rust agent in fuel tank, and
add new petrol into fuel tank.

SPECIFICATION 125 / 150 / 200
Size and Weight
Length
Width
Height
Wheelbase
Dry Weight
Engine
Type
Model
Bore × Stroke
Displacement
Ignition System Type
Compression Ratio
Maximum Power
..............................................................................
..................................................................................
..............................................................................
.........................................................................
...........................................................................
............................
...............................................
...........
.....................................................
....................................................................
....................................................
............................................
Tire
2260mm
800mm
1110mm
1440mm
134kg
Single-cylinder, Four-stroke,Air-cooled
157FMI / 162FMJ / 164FML
ø56.5×49.5 /ø62×49.5/ø63.5×62.2mm
124/149.4/197ml
C.D.I
9:1/9.2:1/8.3:1
7.8KW/9000r/min
Front tire
Rear tire
Fuel Tank (include reserve tank)
Fuel Type
Front Brake Type
Rear Brake Type
110/90-16
130/90-15
15L
Regular unleaded gasoline only
Disk Brake
Drum Brake
......................................................................
.......................................................................
..........................................
............................
.......................................................
...................................................
Fuel
Brake
Maximum Torque 8.9N.m/7500 r/min
11.0N.m/6000 r/min
13.9N.m/6000 r/min
........................................
8.8KW/8500r/min
9.6KW/7500r/min
This manual suits for next models
2
Table of contents
Other KEEWAY Motorcycle manuals

KEEWAY
KEEWAY FACT 50 4T User manual

KEEWAY
KEEWAY F-ACT EVO Instructions for use

KEEWAY
KEEWAY K-LIGHT 125 Guide

KEEWAY
KEEWAY RK V125 C User manual

KEEWAY
KEEWAY Rkv200g User manual

KEEWAY
KEEWAY Supershadow User manual

KEEWAY
KEEWAY Speed 125 User manual

KEEWAY
KEEWAY 2015 RKS 125-26 User manual

KEEWAY
KEEWAY RKV125 Instructions for use

KEEWAY
KEEWAY Cruiser 250 User manual