KeLi XK3118K9 Use and care manual

XK3118K9 Weighing Indicator Calibration Manual
I. Main Technical Parameters:
Load cell excitation: DC +5V, can connect 1~12 pieces of 350 ohm strain gauge type load cells
Minimum input voltage of each calibration division value: ≥1.5uV/e
Error Distribution coefficient: pi =0.5
Load cell connection mode: 6 wires (long wire auto compensation), compensation distance ≤50 meter
Power supply: AC 110-220V, 50-60Hz,
DC 6V/10Ah free maintenance lead-acid battery, can be charged by the indicator
II. Analog Load Cell Connection:
Specification
Pins
Name
Code
1
Excitation -
E-
2
Feedback -
F-
6
Excitation +
E+
7
Feedback +
F+
8
Signal -
S-
9
Signal +
S+
5
Shield
SHIELD
E+ with F+, E- with F- must be short connected if you use 4 wire shield cable.
III. Calibration
Indicator enters weighing status after self-check. When calibration is needed, open the cover of calibration case on the
back side of indicator, press the calibration touch switch. Then the beep sounds and calibration lamp lights up, which
indicates that the calibration mode can be entered. Then press the calibration button on the front panel. Then the
calibration lamp goes out and enters calibration mode. Detailed calibration steps are as below:
Step
Operation
Display
Remarks
1
Press【Calibration】
【d *】
After calibration is finished or interrupted, if need to calibrate again,
the calibration switch should be pressed one more time.
2
Press【1】【 0】Press
【Input】
【d 10】
Input division, 1/2/5/10/20/50/100 optional, (factory default setting:
10)
If need compensation calibration, press 【0】press【Input】enters
to step 7, indicator displays 【AdloAd1】, input weight value of
weights loaded, press 【Input】to confirm
3
Press【0 】Press
【Input】
【dC 0 】
Input decimal bits ( 0~4 ), default setting: no decimal 0
4
Press【1】【 2】【 2】【 4】
Press【Input】
【Pn 01224】
〖0 1 2 2 4
Corresponding
VWXYZ 〗
Input system parameter (details reference to the table below) (factory
default setting: 01224)
V: application (0: non-business scale 1: business scale)
W: stability range
X: zero tracing range
Y:manual zero-setting range
Z:power on zero-setting range
5
Press【3】【 0】【 0】【 0】
【0】
Press【Input】
【F 30000】
Input full capacity value (factory default setting:3000)
If need calibration, input F value,then press 【Input】;if press【input】
directly then it enters to step 8;if press【weight】,return back to
weighing status.
(note:full capacity value add 9 division value equals to system preset
overload alarming value.)
6
Press【Input】
【noLoAd】
Zero position confirmation,no object on the scale, press 【Input】after
stability symbol light becomes bright
★★★!!! When indicator displays 【noLoAd】, press 【Weigh】button, skip zero calibration, enters to
compensation calibration directly
7
Press【2】【 0】【 0】【 0】
【0】
Press【Input】
【AdloAd1】
【20000】
Add weights, not less than 50% of full capacity, more accurate when it
is near full capacity.
e.g.:20000

Press【Input】to confirm after the stability symbol light becomes bright
8
Press【1】Press
【Input】
【Adr 01】
Communication address ( 01~26 ) (factory default setting: 1)
9
Press【1】Press
【Input】
【bt 1】
Serial communication baud rate ( 0~4 ), respectively corresponds to
baud rate: 600/1200/2400/4800/9600 bps (factory default setting: 1)
10
Press【0】Press
【Input】
【tF 0】
Serial communication mode: 0—continuous sending, 1—command
response (factory default setting: 0)
11
Press【2】Press
【Input】
【Flt 2】
Filter strength (0~6): 0: weakest, 6: strongest (factory default
setting: 2)
12
Press【0】【0】【 1】【 1】
【Y XYZ】
【Y 011】
Special parameter setting (factory default setting: 0011)
X: 0 Power saving mode OFF 1 Power saving mode ON
X: 0 weight unit is kg; 1 weight unit is ton
Y: 0 data record not use cargo number; 1 data record use cargo
number
Z: 0 data record not use vehicle number; 1 data record use vehicle
number
13
Press【Input】
【L 0】
Three section division displays lower limit, the division value will
switch downwards to next part when the gross weight is less than this
value, if calibration division value is 1, it will not switch (factory
default setting: 0)
14
Press【Input】
【H030090】
Three section division displays upper limit, the division value will
switch upwards to the next part when the gross weight is more than this
value, if calibration division value is 100, it will not switch (factory
default setting: division value switch not valid)
15
【20000 】
Calibration finishes, return back to weighing status
Note 1: in step 6 and step 7, if press 【Weigh】, it means this step does not work, it enters to the next step directly
Note 2: in the calibration process, press 【Weigh】in other steps, it will return back to weighing status
Note 3: Pn parameter setting ways
IV. Operation of Parameters Calibrated
V. Timing shut-down and random unlock
Press【PRINT SET】under weighing status. Input password【88】. Then press【INPUT】. The indicator displays
【SECU 0】, which means that enters timing shut-down setting menu (the password and date of timing shut-down can
be changed). The password of timing shut-down should be kept carefully. The factory setting password is
Input value
0
1
2
3
4
5
6
7
8
9
Unit
W: Stability range
0.5
1.0
1.5
2.0
2.5
3.0
3.5
4.0
4.5
5.0
uV
X: zero tracing range
0
0.5
1.0
1.5
2.0
2.5
3.0
3.5
4.0
4.5
E
Y: manual zero-setting
range
0
2%
4%
10%
20%
No
limit
——
——
——
——
F.S
Z: Start-up zero-setting
range
0
2%
4%
10%
20%
No
limit
——
——
——
——
F.S
No.
Function
Operation
1
Inquire the recent
date of calibration
Press【SET PRINT】, input【9】【 0】→Press【Input】to display“d**.**.**”(Date)→Press
【Input】to display “t**.**.**”(Time)→Press【Input】to return to weighing status.
2
Backup the
calibration
parameters
Press the touch button (the beep sounds and calibration lamp fashes) →Press 【SET
PRINT】and input【9】【 1】→Press【Input】to display “blbc 0”→ Input【1】(any number
except zero)→ Press【Input】to backup the calbiration parameters, and return to weighing
status.
3
Recover the
calibration
parameters
Press touch calibration switch (the beep sounds and calibration lamp fashes)→Press【SET
PRINT】and enter【9】【 2】→Press【Input】to display“blHF 0”→Enter【1】( any number
except zero )→Press【Input】to recover the calibration parameters, and return to weighing
status. The recovery of the calibration parameters is deemed as one complete calibration.
4
Inquire the date to
backup the
calibration
parameters
Press 【SET PRINT 】and input 【9】【 3】→Press 【Input 】to
display“d**.**.**”(Date)→Press【Input】to display “t**.**.**”(Time)→Press【Input】
to return to weighing status.

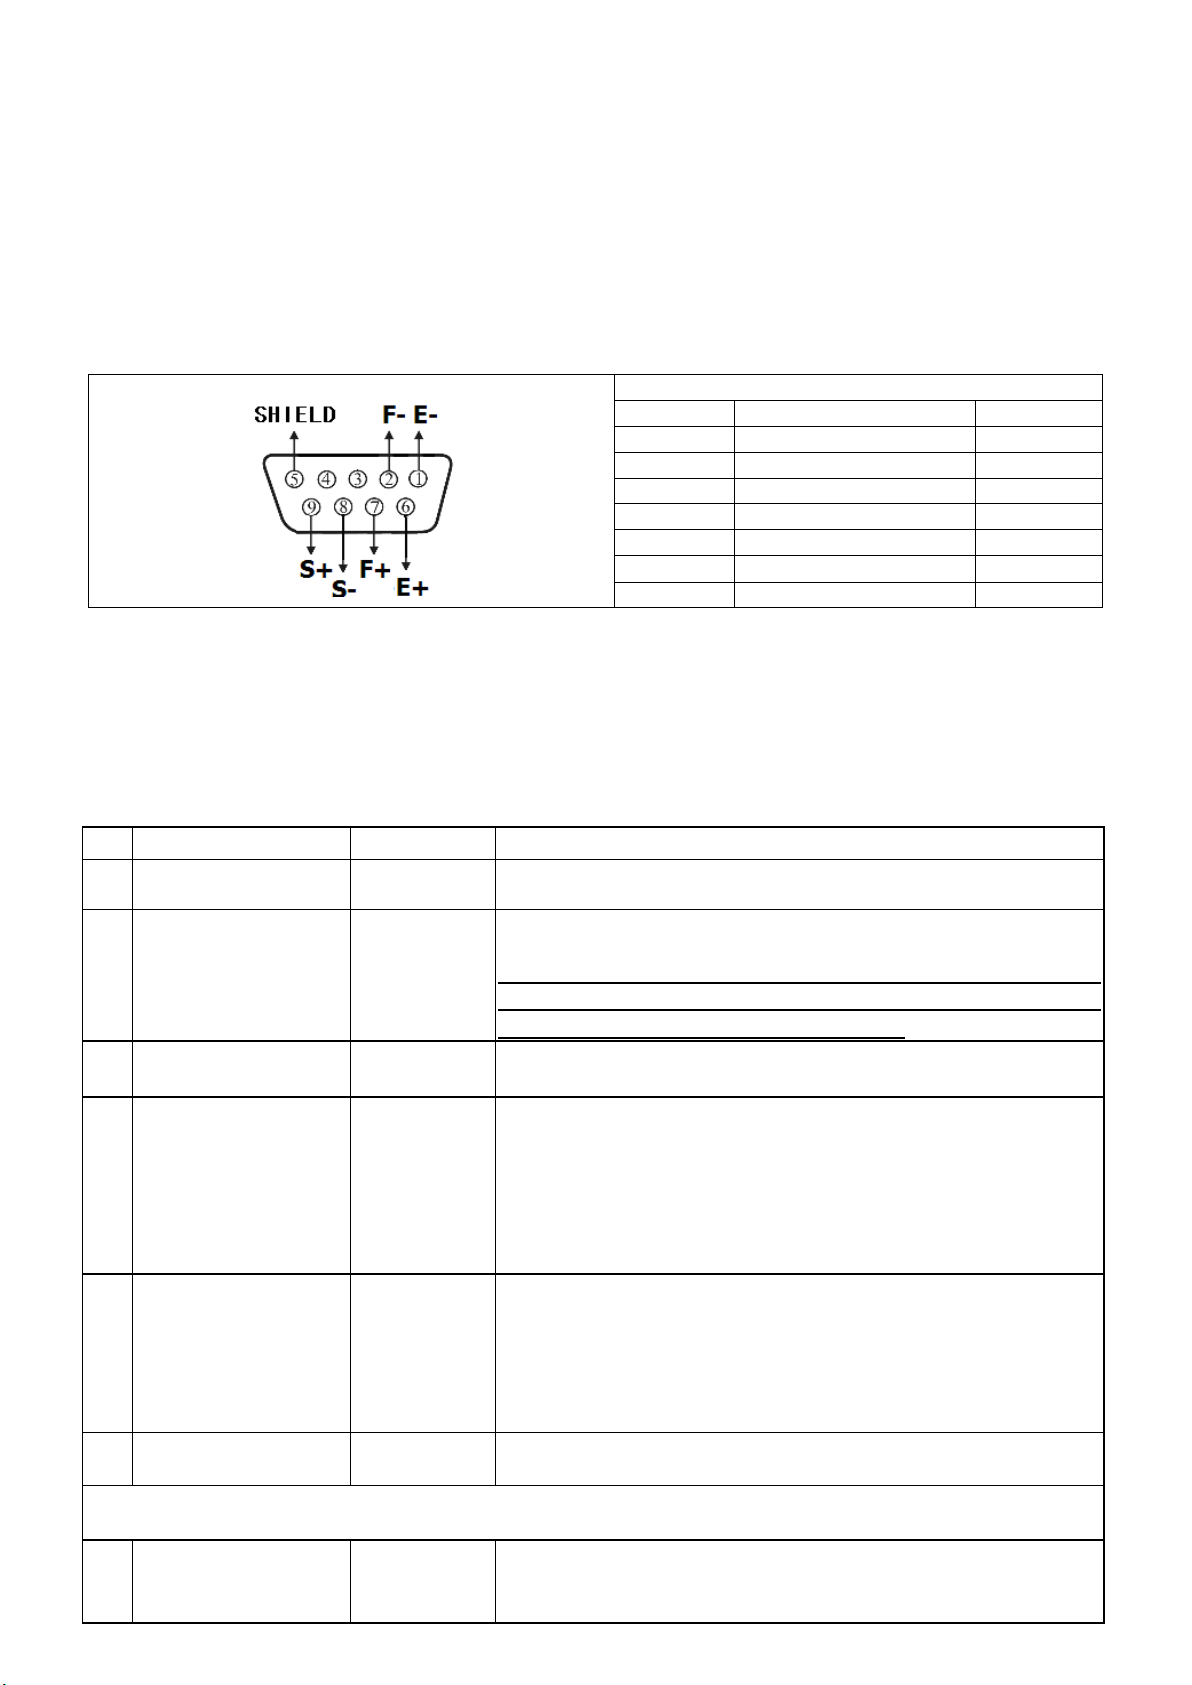
“888888”. If the due period of use is expired and password is lost. The indicator can be unlocked by random
password. Detailed operation is as below.
Note 1: The default setting of date of shut-down is “99.99.99”, which means the timing shut-down is not activated.
Note 2:After the date of timing shut-down is setted. The user can not revise the date and time again.
Note 3: To protect the authority of original user who setted the password, the random password unlocking can only
unlock the indicator for the period agreed, and won’t change the original password! The random password will be
created again. If the indicator is locked, then the random password can only be inquird again.
VI. Overloading Record and Operation
1. Creation of overloading record: When the weight on the platform equals or is over the overloading alarm value, a
set of overloading record is created (incluidng date, time, atual weight). The actual weight value in overloading
record is the maximum overloading weight. After one time of overloading, only when the weight on the platform
is less than 50% of the full capacity, the next overloading will be recorded as the second overloading. When
number of the recoreds is over 20 times, and a new overloading is recorded, then the lightest overloading record
will be deleted automatically and save the new overloading in the record.
2. Delete of overloading record: Overloading records can only be delted after a sucessful re-calibration.
3. Check the overloading record: Press【PRINT SET】and input 【66】→Press【INPUT】to display【no 01】
(the first set of overloading record)→Press【INPUT】to display【d **.**.**】(Date of overloading)→Press
【INPUT】to display【t **.**.**】( Time of overloading)→Press【INPUT】to display【0 *****】(The
actual overloading weight)→……(Press【INPUT】to display the second, third…until the last set of overloading
record. Then press【WEIHGT】to return to weighing status)→Press【INPUT】to display【End】and 【******】
(Return to weighing status autamatically).
4. Print the overloading record
Press【PRINT SET】and input password “67” to print the overloading record out.
VII. Error Information Indicate
No.
Function
Operation
1
Set password of
timing shut-down
Input【1】to display【SECU 1】→Press【Input】to display【P000000】→Input【888888】
→Press【INPUT】to display 【N888888】→ Input【123456】(Example: 123456. If don’t
need to revise password, press 【INPUT】) to display【N123456】→
Press【INPUT】to return to weighing status. Password of timing shut-down is finished
setting.
2
Set date of timing
shut-down
Input【2】to display【SECU 2】→Press【INPUT】to display【t000000】→Input password
【888888】to display【t888888】→Press【INPUT】to display【L99.99.99】→Input【10.10.10】
(Input the date of shut-down. Example: 10.10.10) to display【L10.10.10】→Press【INPUT】
to return to weighing status. Then the revision of date of timing shut-down is finished.
3
Unlock with
random password
Press【PRINT SET】→Input【3】【 2】→Press【INPUT】to display【r******】( “******”is
the random password of the indicator. Write it down)→Press【INPUT】to diplay【U------】
(Indicates to input corresponding unlocking password. Now please contact with our
compnay to get the unlocking password. Input the unlocking password. Do the following
steps and the indicator can be unlocked)→Press【INPUT】to return to weighing status.
Display
Remarks
Err 14
Division value setting is wrong, please make correction
Err 15
Decimal setting is wrong, please make correction
Err 36
Usage period is over
Ctnn 0
In calibration step 6 and step 7, if indicator can not collect stable data it considers within 15 seconds,
it will display Ctnn 0. At this time, the user can input 0 or 1 or 2, the functions are: 0: return back to
weighing status; 1: use these unstable data for calibration; 2: skip this step, and enters to next step
19
Table of contents
Other KeLi Measuring Instrument manuals
Popular Measuring Instrument manuals by other brands

Bosch
Bosch GAM 220 Professional Original instructions

Hach
Hach Polymetron 9523sc pH Basic user manual

Extech Instruments
Extech Instruments 433201A user guide

Agilent Technologies
Agilent Technologies 4339B Operation manual

Emerson
Emerson Rosemount 1195 Installation and operation manual

Keithley
Keithley 192 instruction manual