Kelsec TgForce3D User manual

TgForce3D Sensor User Guide
Release 2.2
Copyright 2019 - Kelsec Systems Inc.

Version 2.2 TgForce3D Sensor User Guide P a g e | 2Page 2

Version 2.2 TgForce3D Sensor User Guide P a g e | 3Page 3
Contents
Product Overview ......................................................................................................................................... 5
Getting Started.............................................................................................................................................. 5
What's included ........................................................................................................................................ 5
Apple iOS Requirements ....................................................................................................................... 5
Downloading the TgForce3D App ......................................................................................................... 5
Charging and activating the sensor........................................................................................................... 6
Charging ................................................................................................................................................ 6
Activating the sensor ............................................................................................................................ 6
Pairing the TgForce3D Sensor................................................................................................................... 6
Attaching the TgForce3D Sensor............................................................................................................... 7
Start Running ............................................................................................................................................ 8
Getting to know the TgForce3D App ............................................................................................................ 9
The main Session view .............................................................................................................................. 9
Peak (PPA) ............................................................................................................................................ 9
Average ................................................................................................................................................. 9
Cadence................................................................................................................................................. 9
gMax Red threshold line ....................................................................................................................... 9
Start/Stop.............................................................................................................................................. 9
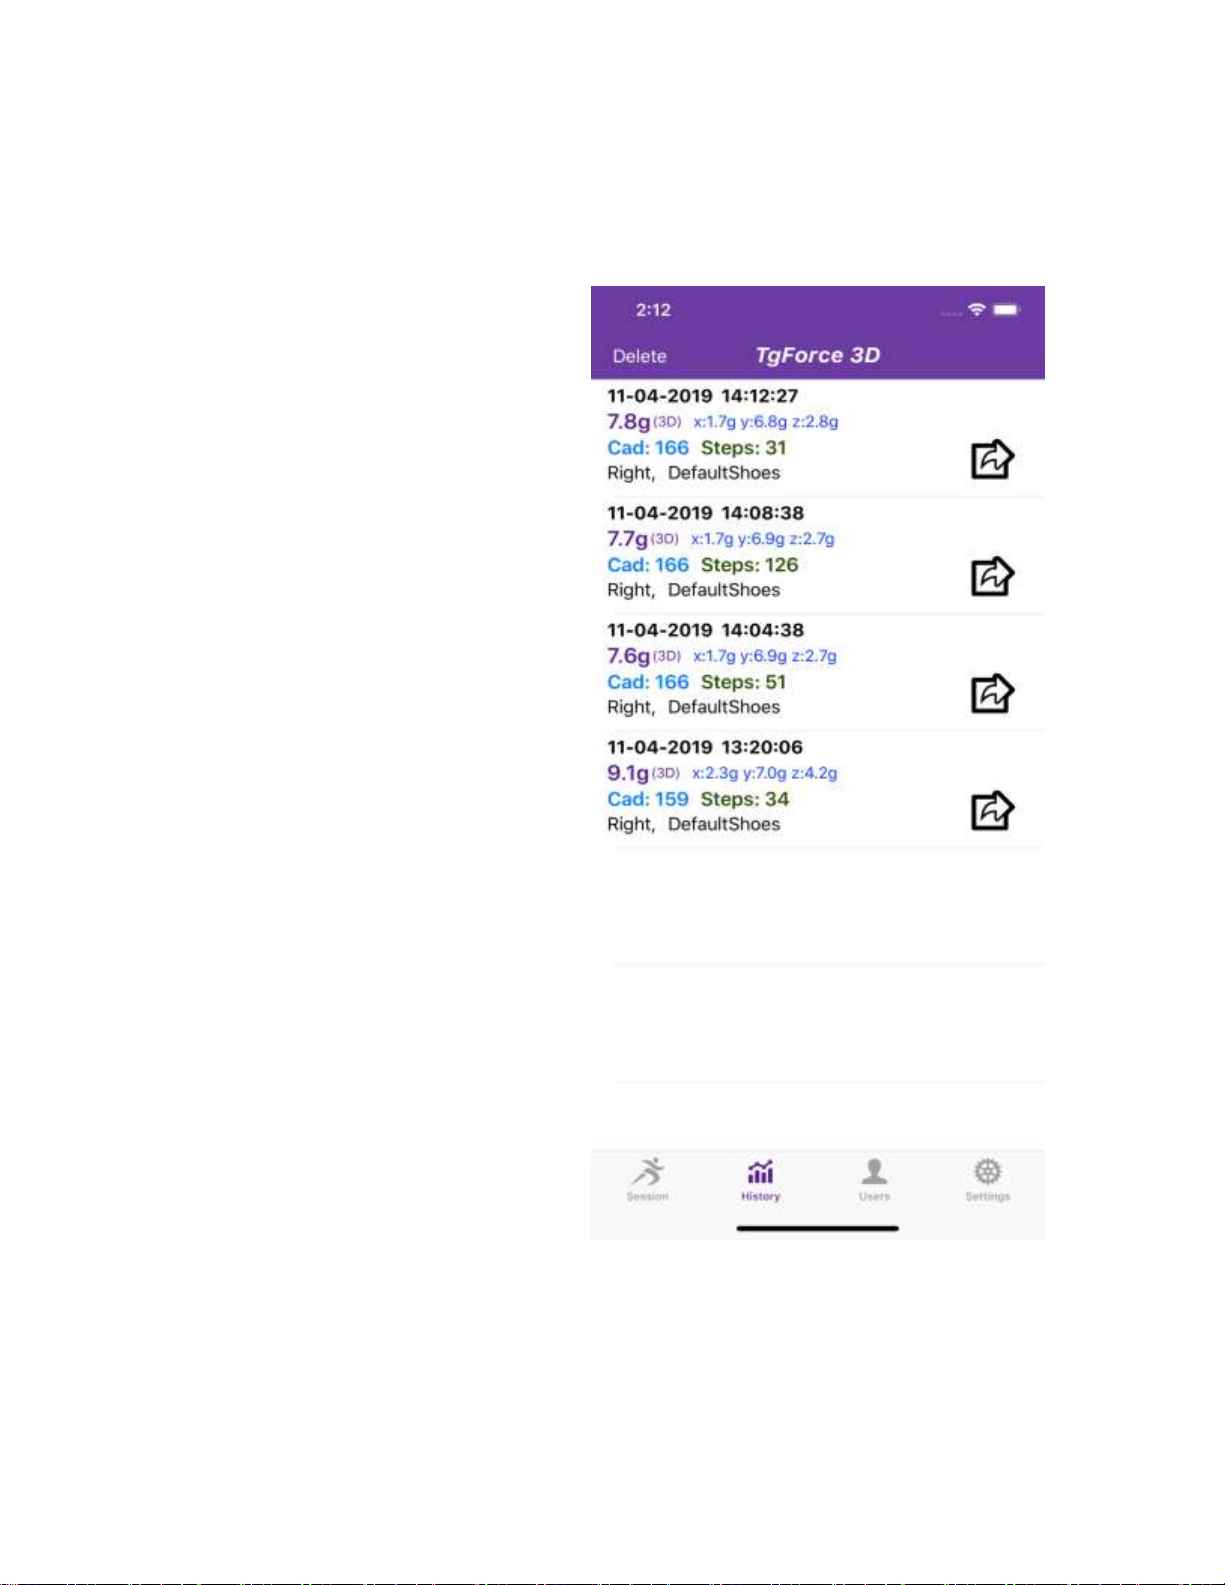
The History view ..................................................................................................................................... 10
The Review chart.....................................................................................................................................11
The Settings view .................................................................................................................................... 12
Find/Connect New Sensor ..................................................................................................................12
Impact Monitoring Section ..................................................................................................................... 12
gMax Warning & Adjustment .............................................................................................................12
Audio Feedback................................................................................................................................... 12
Display................................................................................................................................................. 12
Retrieve Data Section.............................................................................................................................. 12

Version 2.2 TgForce3D Sensor User Guide P a g e | 4Page 4
Check and Download data ..................................................................................................................12
Advanced Settings............................................................................................................................... 13
The User view..........................................................................................................................................13
Understanding Axis definition for the TgForce3D sensor........................................................................... 14
Understanding Peak Positive Acceleration (PPA) Value ............................................................................ 15
Treadmill & Pavement Running ..................................................................................................................15
Sensor Calibration....................................................................................................................................... 16
General Information ................................................................................................................................... 17
Battery life, Charging and Power ............................................................................................................ 17
LED Indicator Light .................................................................................................................................. 17
App Updates............................................................................................................................................17
Cleaning & using the TgForce sensor in wet condition........................................................................... 17
Return Policy and Warranty.................................................................................................................... 17
Specifications ..........................................................................................................................................18
Regulatory and Safety Notices................................................................................................................ 18
Medical advice ....................................................................................................................................18
Canada Regulatory Conformity........................................................................................................... 19

Version 2.2 TgForce3D Sensor User Guide P a g e | 5Page 5
Product Overview
Thank you for choosing the TgForce3D Impact Running Sensor. The sensor and its associated iOS App
provide real time tibial shock feedback and additional features. This document provides instructions on
installing and operating the sensor. It also provides mandatory regulatory information. Please check
tgforce web site at http://tgforce.com for the latest information.
We recommend following the guidelines in this instruction manual before using the TgForce3D Sensor.
Getting Started
What's included
Tgforce3D Sensor
Velcro Band
USB Charging cable
+TgForce3D Mobile App on the Appstore
Apple iOS Requirements
●iPhone 5S+, iPad 2nd Generation+, iPod Touch 6th Generation
●iOS Operating System 11.0 or later
Downloading the TgForce3D App
You will need to download the free TgForce3D App to use your sensor.
1. Click on the App Store on your iOS device.
2. In the search toolbox, enter TgForce3D.
3. Locate the App and Install it (no charge). Do not download th TgForce App (Blue), it is for an
earlier version of the TgForce hardware.
4. Once the download is complete you can find TgForce3D App on your device.

Version 2.2 TgForce3D Sensor User Guide P a g e | 6Page 6
Charging and activating the sensor
Charging
Before first use, it is recommended to fully charge the TgForce3D sensor. Plug the provided USB
charging cable into any USB port. Charging your sensor will take approximately 1-2 hours. When
charging is complete, the orange LED indicator light will turn off.
Activating the sensor
Slightly shaking the sensor will activate it. If the sensor was in sleep mode, LED indicator light will flash
red 5 times (or red and blue if an iOS device with TgForce App is active nearby). Note that the sensor
does not have an On/Off Switch. If the sensor has been unused for more than 5 minutes, it will enter
sleep mode to preserve battery charge. It will also enter sleep mode if the sensor is not paired within 5
minutes.
Pairing the TgForce3D Sensor
Make sure Bluetooth in enabled in the iOS device settings. The TgForce App will automatically look for a
nearby TgForce sensor and establish pairing. You can confirm pairing has been successful by looking at
the Bluetooth icon in the upper left corner of the TgForce App. When successful pairing is established,
the sensor LED indicator will flash blue 5 times.
Alternatively, you can pair the sensor manually by selecting the Settings Tab and ‘Find/Connect New
Sensor'.
Pairing has been successfully established.
There is no pairing with the TgForce3D sensor. Try shaking the sensor until pairing
occur. The sensor may be discharged or you may need to restart pairing using the
Settings/ ‘Find/Connect New Sensor' option.

Version 2.2 TgForce3D Sensor User Guide P a g e | 7Page 7
Attaching the TgForce3D Sensor
For accurate measurement, the sensor
must be attached to the anteromedial
aspect of the distal tibia
(in front and toward the middle of the
lower extremity). Use the provided
Velcro band. The Sensor must be
attached in way that is tight enough so it
does not slide on the skin.
It is very important to have the sensor
visual LED indicator on top; the charging
hole must be downward.
Note: The sensor can also be attached
using Adhesive tape such as the 3M
Nexcare Water Resistant Adhesive Tape.
If the sensor cannot be attached firmly
with the Velcro band, use this method.

Version 2.2 TgForce3D Sensor User Guide P a g e | 8Page 8
Start Running
Push the Start button on the app. Once
you start running, you should see Impact
data being received and displayed.
Each time an impact is detected by the
sensor, the light will flash (blue if paired,
red if not paired)
If Audio feedback is activated (in the
Settings menu), you will be notified in
your earphone if the impact level is
above the gMax threshold.
You can adjust the gMax threshold in the
Settings menu.

Version 2.2 TgForce3D Sensor User Guide P a g e | 9Page 9
Getting to know the TgForce3D App
The main Session view
Peak (PPA)
The Peak PPA (Peak Positive Acceleration) of the Tibia while
running is displayed in real time in g unit (1 g = 9.81 m/s2). It
is the maximum acceleration that occurs during the impact
phase of running. Since the sensor contains a triaxial
accelerometer, you can select any of the axis (X, Y ,Z) or the
magnitude of the three-dimensional vector (3D). By default
the App display the 3D Vector magnitude.
Average
This is the average PPA for the session (for the selected axis).
Calculated over the displayed number of steps.
Cadence
Number of steps per minute - counting both feet.
gMax Red threshold line
The gMax threshold can be adjusted in the Settings menu.
The top PPA value will switch from blue to red every time
the impact value is higher than the gMax threshold value. If
Audio Feedback is enabled, an audible sound (selectable in
the settings menu) will also be generated.
Start/Stop
After a session has been started with the Start Button, only
the Session screen is available. The Settings, History and
Users screens are available after stopping a session.
Stopping the session will provide 3 options: Saving the data
in history, Discard the session data and Resume the session.

Version 2.2 TgForce3D Sensor User Guide P a g e | 10 Page 10
The History view
Each session can be recorded for later review
and analysis. Selecting the History Tab provides
a table with all the sessions recorded. You can
review the latest 1000 steps of each session on
a chart or export the data to an iCloud folder
for analysis in a 3rd party software (csv
format).
For each session, the following information is
displayed:
●Start Date-Time of the session
●Average PPA (Peak Positive
Acceleration) during the session for
each axes and 3D vector.
●Average Cadence of the session
●Total number of steps during the
session.
●Left or right leg (as defined in the user
view)
●Shoe description for the session
Exporting data: , select the arrow - You can
use this feature to export the raw data from
the session. You need to have the iCloud
feature of your iOS device adequately
configured for using this function. The format
is CSV (comma separated value). You can
retrieve the data in the TgForce Folder of
iCloud.
Review Chart: Select the session, a detailed
chart will be displayed.

Version 2.2 TgForce3D Sensor User Guide P a g e | 11 Page 11
The Review chart
The latest 1000 steps can be analyzed using the Review chart. The chart provides impact and cadence
data for the selected session. The chart is scrollable and zoomable for reviewing running data with a
high level of precision. Also available on the review screen is the PPA and Cadence Average for the last
1000 steps. The Review screen can be displayed in the portrait or landscape mode.
Use the Axis Button to toggle between axis (X, Y, Z and 3D)
Use the scale button to adjust the scale for the g force on the active axis. The scale is
initially set for 3D axis view.

Version 2.2 TgForce3D Sensor User Guide P a g e | 12 Page 12
The Settings view
Find/Connect New Sensor
If more than one TgForce sensor is active nearby,
you can select one using this function. You also use
this function to pair with a new sensor. Each
sensor has a specific ID number to differentiate
them from other sensors. Use this function if you
encounter issues with automatic pairing of the
sensor.
Impact Monitoring Section
gMax Warning & Adjustment
This is where you can adjust the impact threshold
for receiving and displaying warnings. The red line
in the Session view chart will be set at this value.
Audio Feedback
If activated, the iOS device will generate either a
'Beep' or a 'Drum' sound when the impact level is
above the gMax threshold
Display
For selecting 3D vector or an individual axe (X, Y, Z)
in the session view and the History/Graph view.
Retrieve Data Section
Check and Download data
The TgForce3D sensor records all steps in internal
memory during a running session. Therefore, you can run without the iOS device nearby and recover the
running data at a later time. Please review carefully how the sensor manage the recorded data.
When 'check and Download data' is selected, the sensor will look for the most recent session
with at least 20 steps. All steps will be downloaded for that session.
A new session is restarted if the sensor has not been used for at least 5 minutes. For example, if
you plan to record multiples sessions, you must wait at least 5 minutes (until the sensor goes
into sleep mode) between each running session.
If you do not wait at least 5 minutes, all steps will be recorded in the same session.

Version 2.2 TgForce3D Sensor User Guide P a g e | 13 Page 13
Advanced Settings
You can fine tune the sensor performance using the sensor threshold.
Sensor Threshold (Z-Axis)
This is the minimal impact level required (in g units) for activating the sensor PPA detection algorithm
on the Z axis. If the sensor is missing steps and display a low cadence value, decrease the threshold
value. If the sensor is recording superfluous steps with abnormal high cadence number, increase the
threshold value. The default value is 3.3g on the Z axis.
The User view
If the sensor and the iOS TgForce3D App are to be
used by multiple runners, you can configure
multiple users in the this view. The active user
name is displayed in the session view (upper left
corner).

Version 2.2 TgForce3D Sensor User Guide P a g e | 14 Page 14
Understanding Axis definition for the TgForce3D sensor
The TgForce3D sensor is equipped with a triaxial accelerometer. All axis (X,Y,Z) are sampled at 1600Hz
for impact detection. After an impact has been detected, the peak value for each axis is recorded into
memory and transmitted by Bluetooth to the IOS device. The 3D resulting vector is also calculated.
It is important to install and position the sensor correctly for accurate measurement.

Version 2.2 TgForce3D Sensor User Guide P a g e | 15 Page 15
Understanding Peak Positive Acceleration (PPA) Value
The sensor and the internal algorithm have been designed for measuring the Peak Positive Acceleration
(PPA) of the tibia. This value is obtained during the initial foot contact. The Z Axis is used for triggering
the detection but all axes are used in the calculation.
Treadmill & Pavement Running
Depending on the type of treadmill used, there may be an important variation in impact level between
treadmill and pavement running. In many cases, the treadmill running surface will absorb a significant
portion of the impact. The TgForce 3D sensor is initially set for normal pavement running. If the
recorded cadence is sometimes incorrect, you should adjust the sensor threshold (g) level (see
calibration section).

Version 2.2 TgForce3D Sensor User Guide P a g e | 16 Page 16
Sensor Calibration
For best performance, you should make sure the sensor is
adequately calibrated. Do a short run with the sensor and
make sure that the number of steps indicated on the main
session view correspond exactly to the number of steps you
did in the session (step count for the leg with the sensor).
If the cadence is sometimes very low or the step count
displayed is lower than the actual number of steps.
●Reduce the sensor impact threshold value (Settings
view, Advanced Settings, Sensor Threshold). Try
reducing the threshold 1 step at a time.
If the cadence is sometimes very high or the step count
displayed is higher than the actual number of steps:
●Increase the sensor impact threshold value (Settings
view, Advanced Settings, Sensor Threshold). Try
increasing the threshold 1 step at a time.

Version 2.2 TgForce3D Sensor User Guide P a g e | 17 Page 17
General Information
Battery life, Charging and Power
The battery will last up to 4 hours with continuous running. Charging your sensor will take
approximately 1-2 hours. When charging is complete, the orange LED indicator light will turn off.
To save battery, the sensor will enter Sleep Mode if it does not detect any impact for 5 minutes. Simply
shaking the sensor will reactivate it.
If the sensor has not been used for more than 3 weeks, you may have to recharge it before using it
again.
Note:If the sensor has never been paired with an iOS device, it will scan for a nearby device for 5
minutes after being shaken. If no pairing has occurred, it will go back into sleep mode.
LED Indicator Light
The indicator light on the sensor communicates the current status and let you know it is powered.
●Orange: Battery currently charging - Will turn off when fully charged.
●Red: If the indicator light flash red when the sensor detects an impact, it means the sensor is
active but not paired to an iOS device.
●Blue: The indicator light will flash blue when paired and actively transmitting data to an iOS
device.
App Updates
TgForce team will periodically add new features, updates, and improvement to the TgForce3D App. It is
recommended that you keep your TgForce3D App updated to the latest version.
Cleaning & using the TgForce sensor in wet condition
The TgForce sensor is sweat-proof and rain-proof. Wipe clean but do not immerse the unit in water.
Return Policy and Warranty
Kelsec Systems provides a one-year limited warranty. Under conditions of the warranty agreement
provided with your TgForce3D sensor, purchasers will be entitled to repair or replacement for defective
TgForce units. This warranty begins from the date of initial purchase. Kelsec Systems may also choose to
refund the purchase price of the unit to the purchaser. Warranty information and the TgForce online
web store return policy can be found in the TgForce Support Center online at
https://www.tgforce.com/support .

Version 2.2 TgForce3D Sensor User Guide P a g e | 18 Page 18
Specifications
Input Voltage (USB Recharging)
4.0 to 6.0 V
Connectivity
Bluetooth 4.2, 2.4GHz ISM Band
Internal Battery
Lithium Polymer
Dimension, weight
5cm X 2cm X 1.1cm, 9.5gr
Impact range (g)
1g to 23.9g
Impact detection
Mems triaxial accelerometer, sampling rate: 1600Hz
Regulatory and Safety Notices
Medical advice
The use of the TgForce3D sensor is not a substitute for individualized gait analysis and therapy by a
trained professional. You should always consult your healthcare provider before beginning any fitness
program.
Recycling
The symbol on the product or its packaging signifies that this product has to be disposed separately from
ordinary household wastes at its end of life. Please kindly be aware that this is your responsibility to
dispose electronic equipment at recycling centers so as to help conserve natural resources. Each country
in the European Union should have its collection centers for electrical and electronic equipment
recycling. For information about your recycling drop off point, please contact your local electrical and
electronic equipment waste management authority or the retailer where you bought the product.
•Do not dispose of the TgForce sensor with household waste.
•Batteries are not to be disposed of in municipal waste stream and require separate
collection.
•Disposal of the packaging and your TgForce sensor should be done in accordance with local
regulations.

Version 2.2 TgForce3D Sensor User Guide P a g e | 19 Page 19
FCC Compliance Statement
This device complies with part 15 of the FCC Rules. Operation is subject to the following two conditions:
1. This device may not cause harmful interference, and
2. This device must accept any interference received, including interference that may cause undesired operation.
This equipment has been tested and found to comply with the limits for a Class B digital device, pursuant to Part
15 of the FCC Rules. These limits are designed to provide reasonable protection against harmful interference in a
residential installation. This equipment generates, uses and can radiate radio frequency energy and, if not
installed and used in accordance with the instructions, may cause harmful interference to radio communications.
However, there is no guarantee that interference will not occur in a particular installation. If this equipment does
cause harmful interference to radio or television reception, which can be determined by turning the equipment
off and on, the user is encouraged to try to correct the interference by one or more of the following measures:
• Reorient or relocate the receiving antenna.
• Increase the separation between the equipment and the receiver.
• Connect the equipment into an outlet different from that to which the receiver is connected
FCC Statement: TgForce3D Sensor contains FCC ID WAP2005
Canada Regulatory Conformity
This digital apparatus does not exceed the Class B limits for radio noise emissions from digital apparatus as set out
in the Radio Interference Regulation of the Canadian Department of Communications.
“Le présent appareil numérique n’émet pas de bruits radioélectriques dépassant les limites applicables aux
appareils numériques de la class B prescrites dans le Règlement sur le brouillage radioélectrique édicté par le
ministère des Communications du Canada."
Contains IC 7922A-2005

Version 2.2 TgForce3D Sensor User Guide P a g e | 20 Page 20
10816 Berri
Montreal, Quebec H3L 2H4
Canada
www.tgforce.com
© 2019 Kelsec Systems Inc.
All Rights Reserved
Printed in Canada
Table of contents
Popular Accessories manuals by other brands

Heath Zenith
Heath Zenith Lighted Wireless Push Button Accessory owner's manual

M-Elec
M-Elec ML-SENSOR quick start guide

Heath Zenith
Heath Zenith 29 manual

MD SPORTS
MD SPORTS Menards AWH042_028M Assembly instructions

wattstopper
wattstopper UT-305 installation instructions

Silvercrest
Silvercrest SPBS 5000 B2 operating instructions