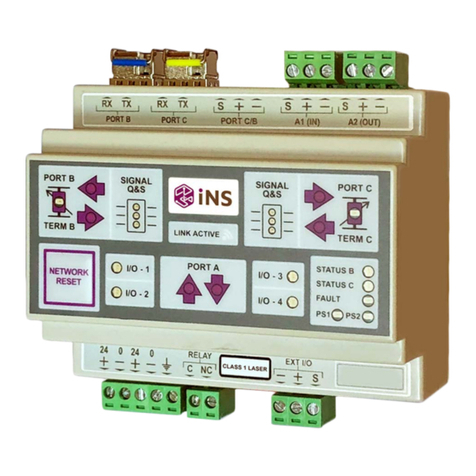
Kentec Electronics DNX-A-2R-K User manual

Man-1491Rev.02
Intelligent Network Solutions
DNX-A-2R-K
RS485 Intelligent Network Analyser
*Man-1491*
User Manual

Legal information
The contents of this document are provided “as is”, except as required by applicable law, no
warranties of any kind, either express or implied, including, but not limited to, the implied
warranties of merchantability and fitness for a particular purpose, are made in relation to the
accuracy and reliability or contents of this document. Kentec reserves the right to revise this
document or withdraw it at any time without prior notice.
Under no circumstances shall Kentec be responsible for any loss of data or income or any
special, incidental, and consequential or indirect damages howsoever caused.
More information about Kentec can be found at the following Internet address:
http://www.kentec.co.uk
Man-1491
DNX-A-2R-K User Manual

Safety
Prior to installation:
Read this manual completely and gather all information on the unit.
Ensure that your application does not exceed the safe operating specifications for this
unit.
This unit should only be installed by qualified personnel.
This unit should be built into an apparatus cabinet, or similar, where access is
restricted to service personnel only.
The power supply wiring must be sufficiently fused, and if necessary, it must be
possible to disconnect manually from the power supply. Ensure compliance to national
installation regulations.
This unit uses convection cooling. Avoid obstructing the airflow around the unit.
Before mounting, using or removing this unit:
Prevent access to hazardous voltages by disconnecting the unit from the power supply.
Warning! Do not open a connected unit. Hazardous voltages may occur within this unit
when connected to a power supply.
Care recommendations
Follow the care recommendations below to maintain full operation of the unit and to
fulfil the warranty obligations.
This unit must not be operated with the cover removed.
Do not attempt to disassemble the unit. There are no user serviceable parts inside.
Do not drop, knock or shake the unit. Rough handling beyond the specification may
cause damage to internal circuit boards.
Do not use harsh chemicals, cleaning solvents or strong detergents to clean the unit.
Do not paint the unit. Paint can clog the unit and prevent proper operation.
Do not expose the unit to any kind of liquids (rain, beverages, etc). The unit is not
waterproof. Keep the unit within the specified humidity levels.
Do not use or store the unit in dusty, dirty areas. Connectors as well as other
mechanical parts may be damaged.
If the unit is not working properly, contact the place of purchase, nearest Kentec
distributor office, or Kentec Tech support.
Maintenance
No maintenance is required, as long as the unit is used as intended within the specified
conditions.
Man-1491
DNX-A-2R-K User Manual

Agency approvals and standards compliance
Type
Approval / Compliance
EMC
EN 61000-6-2, Immunity Standard (Industrial Environments)
EN 61000-6-4, Emission Standard (Industrial Environments)
Safety
EN 60950, IT Equipment
Table 1
Ratings
Power
18 to 36V (24V DC nominal); 250mA (at 24V)
Temperature (Operating)
-10 to 70°C
Temperature (Storage)
-40 to 70°C
Ingress protection (IP)
IP20
Table 2
Man-1491
DNX-A-2R-K User Manual

Safety Control Drawing
Position
Description
Input / Output values
1
Screen/Shield RS-485 - PORT B
Umax = ± 5Vpk
Imax = ± 60 mA
Data rate:
4.8 to 115.2 kbit/s
2
In / Out / + line RS-485 - PORT B
3
In / Out / - line RS-485 - PORT B
4
Screen/Shield RS-485 - PORT C
5
In / Out / + line RS-485 - PORT C
6
In / Out / - line RS-485 - PORT C
7
Screen/Shield RS-485 - PORT A1 (Panel IN Port)
8
In / Out / + line RS-485 - PORT A1 (Panel IN Port)
9
In / Out / - line RS-485 - PORT A1 (Panel IN Port)
10
Screen/Shield RS-485 - PORT A2 (Panel OUT Port)
11
In / Out / + line RS-485 - PORT A2 (Panel OUT Port)
12
In / Out / - line RS-485 - PORT A2 (Panel OUT Port)
Table 3
Figure 1
Table 4
Position
Description
Input / Output values
1
In / +Voltage A
Uin = (18 –36): 24 VDC Nominal
Iin = 250 mA Rated at 24 VDC
2
In / Common
3
In / +Voltage B
4
In / Common
5
Earth connection
6
In & out / Relay contact (C - Common)
Uin = 30 VDC max
Iin = 2000 mA max
Pin = 60 W max
7
In & out / Relay contact (NC - Normally Closed)
8
In & out / Relay contact (NO - Normally Open)
9
In / Out / - line RS-485 –IO Interface
Umax = ± 5Vpk
Imax = ± 60 mA
Data rate:
4.8 to 115.2 kbit/s
10
In / Out / + line RS-485 –IO Interface
11
Screen/Shield RS-485 –IO Interface
Man-1491
DNX-A-2R-K User Manual

Functional description
The DNX-A-2R-K is an RS-485 network node that offers an intelligent performance
optimised RS-485 network bus with 2.5 kV isolation between each of the RS-485 ports
A1(IN), A2(OUT), B and C.
Figure 2: Design structure diagram
The DNX-A-2R-K can function in one of two modes:
1) Mode 1 as a PASSIVE dual port RS-485 signal conditioning repeater.
2) Mode 2 as an ACTIVE network node in either a class A or class B monitored
network. (ACTIVE mode is required for use as a network analysis tool)
The mode can be selected through Set 5 switch 1 in Figure 5c and Table 11.
Note* The DNX-A-2R-K will operate in a basic mode unless upgraded to unlock
the additional features offered by the firmware upgrade (DNX-R-2R-K-UG).
Refer to Table 9a for the features included in the DNX-A-2R-K and DNX-R-2R-K-
UG products.
The DNX-A-2R-K may be purchased and later upgraded with the DNX-R-2R-K-
UG features by purchasing a license key that allows the IVIEW application tool
to unlock the additional functionality. The DNX-A-2R-K will operate in BOTH
PASSIVE and ACTIVE Modes, with the DNX-R-2R-K-UG increasing the features
set.
Man-1491
DNX-A-2R-K User Manual

The additional features offered with the DNX-R-2R-K-UG license are accessed by
using the IVIEW application.
The four RS-485 ports (A1-IN, A2-OUT, B & C) are connected as per Figure 3.
The RS-485 cabling supports installation with and without the installation of a shield.
Figure 3: RS-485 port connections
The module supports 2-wire half duplex applications (RS-485).
It can automatically control the state of the data bus based just on the data it receives.
This allows the unit to be used with equipment that has no handshaking signal. The
maximum standard transmission rate possible is 115.2 kbit/s.
The module also supports non-standard data rates. The non-standard data rates
supported by the product are provided in a separate datasheet provided by Kentec on
request.
Connecting cable shield.
When using the shield on all of the cables between ports B and C, it is
recommended that the shield connection to port C of the DNX-A-2R-K be left
disconnected. This is done so that each link between nodes is only grounded at
one end to avoid ground loops in the network.
Refer to the “Tech Note: DNX-A-2R-K Earth Point Connection Best Practice”
document for
additional information.
Man-1491
DNX-A-2R-K User Manual

Figure 4: DNX-A-2R-K, DNX-R-2F/FC-K-2F/FC Port A1 and A2 Connections
Man-1491
DNX-A-2R-K User Manual

Interface specifications
Power
Rated voltage
18 to 36 VDC
Operating voltage
17 to 42 VDC
Rated current
250 mA @ 24 VDC
Rated frequency
DC
Polarity
Reverse polarity protection
Connection
Detachable screw terminal
Connection size
0.2 –2.5 mm2 (AWG 24-12)
Table 5
RS485 Port A1 (IN) & A2 (OUT)
Electrical specification
RS-485
Data rate
4.8 kbit/s –115 kbit/s (as per selection in table)
Data format
7 or 8 Data bits; Odd, Even or None parity; 1 or 2 Stop bits
Connection
Detachable screw terminal
Connector size
0.2 –2.5 mm2 (AWG 24-12)
Transmission range
In accordance with EIA RS-485
≤ 1200 m, depending on data rate and cable type
RS-485 Termination settings
IN/OUT Switchable termination (Manual via DIP switch 2)
RS-485 Failsafe setting
Failsafe biasing 820 Ω
Protection
Installation Fault Tolerant (up to ± 44 V)
Table 6
RS485 Port B & C
Electrical specification
RS-485
Data rate
4.8 kbit/s –115 kbit/s (as per selection in table)
Data format
7 or 8 Data bits; Odd, Even or None parity; 1 or 2 Stop bits
Connection
Detachable screw terminal
Connector size
0.2 –2.5 mm2 (AWG 24-12)
Transmission range
In accordance with EIA RS-485
≤ 1200 m, depending on data rate and cable type
RS-485 Termination settings
Selectable termination (Auto or Manual): Range 58Ω to 558Ω
RS-485 Failsafe setting
Failsafe biasing 820 Ω
Protection
Installation Fault Tolerant (up to ± 44 V)
Table 7
USB
Electrical specification
USB version 2.0
Data rate
Full speed device mode as per USB 2.0 specification
Data format
As per USB specification
Connector type
USB micro B (device) - cable type micro B required
Implementation mode
Slave
Protection
Transient voltage protection
Table 8
Man-1491
DNX-A-2R-K User Manual

Locations of Interface ports, LEDs and DIP-switches
LED Indicators
LED
Status
Colour
Description
Q &S LED C1/
Q &S LED B1
(Q&S Debug
disabled)
ON
Amber
Signal amplitude and quality LED 1 indicates that the signal quality
is greater than 20%
Signal amplitude and quality is POOR.
OFF
The signal quality is less than 20%
Q &S LED C2/
Q &S LED B2
(Q&S Debug
disabled)
ON
Green
Signal amplitude and quality LED 2 indicates that the signal quality
is greater than 50%
Signal amplitude and quality is ACCEPTABLE.
OFF
The signal quality is less than 50%
Q &S LED C3/
Q &S LED B3
(Q&S Debug
disabled)
ON
Green
Signal amplitude and quality LED 3 indicates that the signal quality
is greater than 90%
Signal amplitude and quality is GOOD.
OFF
The signal quality is less than 90%
Port B TX
ON
Green
A good data packet has been transmitted out of port B
OFF
No valid data has been transmitted out of port B
Port B RX
ON
Green
A good data packet has been received on port B
OFF
No valid data has been received on port B
Termination B
TERM B
Port B side of
Link established
ON
Green
The termination on port B has been successfully set.
If Dynamic Impedance Matching is ENABLED, then the link on port
B has been optimised and a termination value has been set.
OFF
No termination has been set for port B or
If Dynamic Impedance Matching is ENABLED, then the link on port
B has FAILED to optimise and a termination value has NOT been
set.
This will default the termination setting to 120 Ohm for port B.
FLASH
Green
The Port B and C connections between Nodes are crossed over
Port C TX
ON
Green
A good data packet has been transmitted out of port C
OFF
No valid data has been transmitted out of port C
Port C RX
ON
Green
A good data packet has been received on port C
OFF
No valid data has been received on port C
Termination C
TERM C
Port C side of
Link established
ON
Green
The termination on port C has been successfully set.
If Dynamic Impedance Matching is ENABLED, then the link on port
C has been optimised and a termination value has been set.
OFF
No termination has been set for port C or
If Dynamic Impedance Matching is ENABLED, then the link on port
C has FAILED to optimise and a termination value has NOT been
set.
This will default the termination setting to 120 Ohm for port C.
FLASH
Green
The Port B and C connections between Nodes are crossed over
Port A TX
ON
Green
A good data packet has been transmitted out of port A
OFF
No valid data has been transmitted out of port A
Port A RX
ON
Green
A good data packet has been received on port A
OFF
No valid data has been received on port A
Man-1491
DNX-A-2R-K User Manual

Status port B
ON
Green
The link connected to port B is HEALTHY with data activity.
Amber
There is a FAULT present on the link connected to port B.
OFF
There is NO fault on port B, but INSUFFICIENT DATA activity.
FLASH
Amber
There is a signal QUALITY FAULT present on the link connected to
port B.
Green
Port B termination is in a state of BALANCING
Status port C
ON
Green
The link connected to port C is HEALTHY with data activity.
Amber
There is a FAULT present on the link connected to port C.
OFF
There is NO fault on port C, but INSUFFICIENT DATA activity.
FLASH
Amber
There is a signal QUALITY FAULT present on the link connected to
port C.
Green
Port C termination is in a state of BALANCING
Fault Indication
ON
Amber
FAULT identified
OFF
NO FAULT identified
FLASH
PSU Fault
Power supply 1
ON
Green
Power supply 1 is HEALTHY
OFF
CPLD has failed [OR] if Fault LED is Flashing PSU1 has failed
FLASH
CPLD Heartbeat
Power supply 2
ON
Green
Power supply 2 is HEALTHY
OFF
CPU has failed [OR] if Fault LED is Flashing PSU2 has failed
FLASH
CPU Heartbeat
IO PORT LED 1
ON
Amber
Unused
OFF
Unused
FLASH
Unused
ON
Green
ADC Active
OFF
ADC disabled
FLASH
Unused
IO PORT LED 2
ON
Amber
Port A has been internally disconnected - signal OVERDRIVE
OFF
Signal levels good on port A
FLASH
Unused
ON
Green
Internal use only
OFF
Internal use only
FLASH
Internal use only
IO PORT LED 3
ON
Amber
Unused
OFF
Unused
FLASH
Unused
ON
Green
Unused
OFF
Unused
FLASH
Recovery Mode Initiated –fast flash only
IO PORT LED 4
ON
Amber
Port A has been internally disconnected –corrupt data received
OFF
No corrupt data on port A
FLASH
Unused
ON
Green
Configured as Master Node
OFF
Configured as Slave Node
FLASH
Unused
Table 9
Man-1491
DNX-A-2R-K User Manual

Figure 4a: Node fascia
Note –if ALL of the IO PORT LEDs are OFF, then the DNX-A-2R-K is in PASSIVE
mode.
Features included in DNX-A-2R-K (module) and DNX-R-2R-K-UG (upgrade)
Feature
DNX-A-2R-K + upgrade
Passive mode of operation
✓
✓
Active mode of operation (basic mode)
✓
✓
Full RS-485 analysis with report generation in IVIEW
✓
✓
Analysis of signals entering the class A network bus
✓
Signal interference profiling
✓
Power supply monitoring
✓
Third party Data flow monitoring across the network
✓
Table 9a: Supported Feature set
Man-1491
DNX-A-2R-K User Manual

DIP-switch settings
Before accessing the internal DIP-switch settings: (DIP SWITCH SET 2)
Prevent damage to internal electronics from electrostatic discharges (ESD) by
discharging your body to a grounding point (e.g. use of a wrist strap). For internal DIP
SWITCH setting information, refer to the DNX-A-2R-K Advanced User Manual.
The configuration setting for use with Kentec fire alarm panels has been simplified so
that you only need to set external switches. DIP Switch Set 1 (ref Figure 5a) and DIP
Switch Set 5, (ref Figure 5c) both of which are externally accessible. The User should
therefore not need to open the product enclosure. The settings as presented in Tables
10, 11 and 12.
After changing any DIP switch setting, it is essential that the power be turned
OFF and ON again for the setting changes to be recognized.
Figure 5a (Set 1) Figure 5b (Set 2) Figure 5c (Set 5)
ON - OFF
1 2
OFF
ON
OFF
ON
Man-1491
DNX-A-2R-K User Manual

Description
Set 1 - Switch 1,2 & 4
Master selection
Slave selection
Commissioning Mode Enabled
Commissioning Mode Disabled
DNX-A-2R-K node in class A configuration (redundant ring)
DNX-A-2R-K node in class B configuration (radial)
Table 10
Description
Set 5 - Switch 1
Active Mode selection
Passive Mode selection
Table 11
Man-1491
DNX-A-2R-K User Manual

DIP Switch set 5 settings for Fire Alarm Panel Selection
Switch set 5 switch 2 is used to select the Fire panel with which the product will
be used. The switch located on the DNX-A-2R-K as shown in Figure 6, has the
respective setting association as presented in Table 12.
Figure 6: FAP Selection switch
Description
Set 5 - Switch 1
Kentec Syncro Fire Alarm Panel Communication setting selection
Kentec Taktis Fire Alarm Panel Communication setting selection (Default)
Table 12
FAP selector switch
Man-1491
DNX-A-2R-K User Manual

USB connection
The USB micro (B) connector is located on the DNX-A-2R-K as indicated in
Figure 7.
Figure 7: USB micro (B) connector
The USB is supplied with a driver that will need to be installed prior to using the USB
connection. When using the USB connection, it is installed as a virtual serial
communication port, with the specific com port address confirmed using the Windows
Control Panel. The serial communication port settings will however not need adjusting,
since these are determined by the USB driver. Refer to the User Manual for the Kentec
Software application tool for installation details.
Bluetooth interface
The Bluetooth interface is available as an “add-on” interface supplied as a separate
product. (Ref: WIM100B)
WIM100B
Wifi interface
The Wifi interface is available as an “add-on” interface supplied as a separate product.
(Ref: WIM100W)
WIM100W
Man-1491
DNX-A-2R-K User Manual

Unit specific description
The DNX-A-2R-K module is designedto enhance the performance of an RS-485
network by optimising and monitoring the performance of the physical transmission
layer. Each of the RS-485 inter-node links (links between the DNX-A-2R-K nodes) are
managed independently from each other. This allows for each link to have a different
cable type and characteristics. Each link is performance optimised to provide the best
possible Quality of Signal (QoS).
The data rate for the signal transmitted will vary according to the type and length of
cable used. Although each link in the transmission path will be optimised for
performance, the maximum data rate will be limited to the poorest performing link in
the network. Figure 8 illustrates the independent links in a typical class A DNX-A-2R-K
application.
Figure 8: Independent links in a typical class A DNX-A-2R-K application
Man-1491
DNX-A-2R-K User Manual

Dynamic and manual termination adjustments
The dynamic impedance matching is accomplished through a procedure which
optimisesports B and C on either side of an RS-485 link between neighbouring DNX-
A-2R-K modules. The optimisation procedure will not be supported without enabling
the auto-termination of the DNX-A-2R-K port node located on the respective side of the
RS-485 link.
If third party equipment is installed in any of the transmission path links between the
DNX-A-2R-K modules (e.g. example in Figure 9), the auto-termination feature will allow
the DNX-A-2R-K modules to optimise the link performance by adjusting the termination
on the DNX-A-2R-K for the best signal performance.
If the DNX-A-2R-K fails to terminate correctly, a standard 120 Ohm termination will be
selected.
An example with termination through third party OVP equipment.
Figure 9: Termination through third party OVP equipment
Man-1491
DNX-A-2R-K User Manual

Signal propagation delay and jitter
Many CIE (e.g. Fire panel) only offer tight timing requirements for supporting a class A
redundant ring application. With the introduction of third-party equipment into an OEM
redundant transmission path, additional signal delays and jitter are often introduced
with the original CIEs no longer able to function as required. The DNX-A-2R-K
modules are designed to support extended signal delays and jitter. When used with
the installed CIEs, these modules can provide a functional class A redundant solution
that is tolerant of most delays and jitter.
The DNX-A-2R-K monitors the Analog signal levels and profiles to control the
requirement for re-optimisation of the transmission path parameters. This is an
automated process and does not require any human intervention. The module can
also be configured for manual management whereby any configuration changes are
applied manually to the modules using the visual indicators as guides to optimisation.
The LED indicators show the status of the data signals. The fail-safe terminations on
the RS-485 bus ensure that the signal level at the receiver is maintained in the ‘mark
state’ (differential>0.2 Volts) when there is no data on the RS-485 bus. These analog
levels are also monitored and recorded to track transmission path performance drift.
This information is retained for system degradation monitoring in support of life-safety
preventative maintenance programs.
Man-1491
DNX-A-2R-K User Manual

Configuration and installation
The DNX-A-2R-K modules can be used in both the “Passive” and “Active” modes
of operation. The installation of the modules should be executed in order of
presentation.
Configuration steps:
1) Configure the local communication settings for each DNX-A-2R-K.
The communication settings are configured for the respective fire alarm panel by
setting the Rotary switch 2 in Table 12.
2) Configure the Module as Master or Slave (ONLY required for ACTIVE
Mode)
When using the DNX-A-2R-K modules, a master is required for commissioning
the network and managing the fault recovery procedure.
It is important that there is only a single (ONE) DNX-A-2R-K master per class A
ring or class B radial.
Adjust the Master/Slave selection on the device by setting or re-setting DIP
SWITCH 1 of Set 1 as per selection in Table10.
Master Mode
Slave Mode
3) Selecting ACTIVE or PASSIVE Mode of operation local to a module
3.1) The user can set the Mode of operation of the device by setting or re-
setting DIP SWITCH 1 of set 5 as per selection in Table11.
ACTIVE Mode
PASSIVE Mode
Set 5
Set 5
4) Link optimisation procedure in ACTIVE Mode
Once ACTIVE Mode has been selected, the DNX-A-2R-K modules will
automatically manage the communication on either side of the RS-485 link
when the modules have been powered up.
Man-1491
DNX-A-2R-K User Manual
Table of contents
Other Kentec Electronics Measuring Instrument manuals