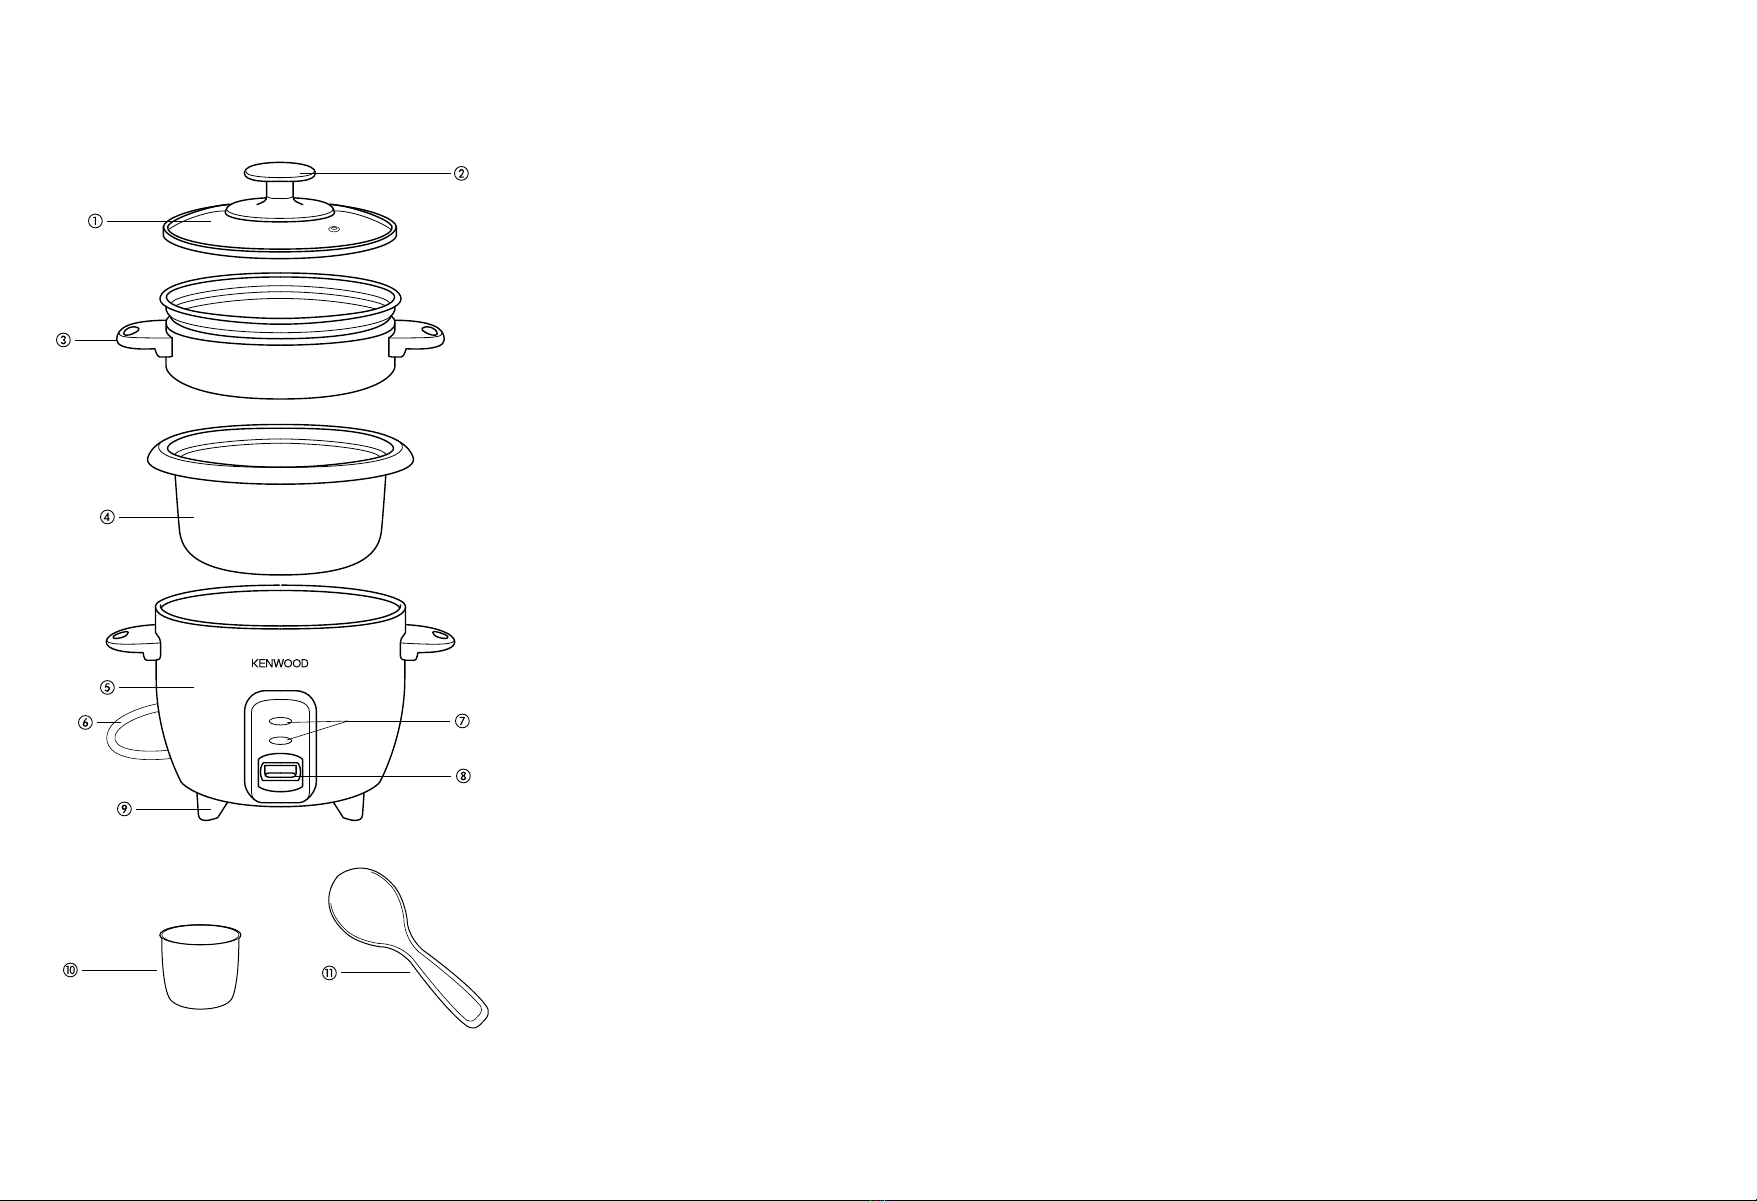
Kenwood RC240 series User manual

122019/1
RC240 series
cocinar
calentar
English 2 - 6
Español 7 - 12
instructions
instrucciones
PASE LA PÁGINA
UNFOLD

English
2
know your rice cooker
Your Kenwood rice cooker is suitable for cooking rice and keeping it warm. Follow
these instructions carefully to ensure safe and enjoyable use of your Kenwood rice
cooker.
IMPORTANT SAFEGUARDS
When using electrical appliances, basic safety
precautions should always be followed to reduce
the risk of fire, electrical shock and/or personal
injury including the following:
•READ ALL INSTRUCTIONS.
•Do not immerse appliance, cord or plug in water or other
liquid.
• Do not use the appliance if it is damaged.
• Do not use the appliance outdoors.
• Do not touch hot surfaces.
• Do not use the appliance on a heat sensitive surface.
• Do not let the cord hang over the edge of the table,
counter or touch hot surfaces.
• Do not place in or near a hot gas or electric burner or
in a heated oven.
•Do not use the appliance for other than its intended use.
• The use of attachments not recommended by the
appliance manufacturer may cause injury.
•Young children should be supervised to ensure that they
do not play with the appliance.
•This appliance is not intended for use by persons
(including children) with reduced physical, sensory
or mental capabilities, or lack of experience and
knowledge, unless they have been given
supervision or instruction concerning the use of
the appliance by a person responsible for their
safety.
•Unplug from outlet when not in use and before cleaning.
Allow to cool before putting on or taking off parts, and
before cleaning the appliance.
cocinar
calentar
made in China
hecho en China

3
•Extreme caution must be used when moving an appliance
containing hot liquids.
•To reduce the risk of shock, cook only in the inner bowl
whilst fitted to the rice cooker.
before plugging in
Make sure your electricity supply is the same as the one
shown on the underside of the appliance.
SAVE THESE INSTRUCTIONS
For Household use only

4
key
Lid Indicator light
Handle Control lever
Steaming basket Feet
Inner bowl Measuring cup
Body Spatula
Cord
using your kenwood rice
cooker
1. Use the measuring cup provided to
measure the desired quantity of rice.
As a guide one cup of rice is sufficient
for one person, but this will vary
according to individual tastes.
Fill the cup with rice levelling the top.
2. Thoroughly wash the rice in several
changes of clean water and drain.
Failure to do so may cause poor
results and /or a build up of steam
within the appliance. Do not wash
the rice in the inner bowl as you may
damage it. Some types of rice may
need to be soaked before cooking.
Follow instructions on the rice packet.
3. Transfer the rice to the inner bowl and
level the surface of the rice. Add
sufficient cold water to the
corresponding level marked on the
bowl e.g. to cook 6 cups of rice, place
the washed rice into the inner bowl
and then fill with water up to the 6
cup level.
Minimum capacity is 2 cups.
You may find that for your own
personal taste you need to slightly
adjust the amount of water added.
For a softer rice add a little more
water, and for a firmer rice little less
water.
4. Transfer the inner bowl to the rice
cooker ensuring that there is no rice
or any moisture on the outside of the
bowl.
5. Cover with the lid, ensuring that the
vent hole in the lid is situated away
from the operator.
6. Plug in he appliance and switch on
at the power supply. Depress the
control lever to the "concinar" (cook)
position and the cook light will glow.
7. Once the rice is cooked, The
appliance will automatically switch to
the "calentar" (keep warm) position
and the keep warm light will glow.
Leave the appliance on this setting
for at least 15 minutes without lifting
the lid.
8. Remove the lid and use the spatula
provided to fluff up the rice which is
then ready to eat. Replace the lid as
quickly as possible. Consume the
stirred rice within 1 hour. Small
quantities i.e. 2 to 4 cups of rice
should be consumed immediately
after stirring.
9. If the rice is to be kept for a longer
period of time, then it should be left
and only stirred prior to consumption.
THE KEEP WARM PERIOD SHOULD
NOT EXCEED 2 HOURS. During this
time the lid should not be lifted.
10.Should the inner bowl be lifted whilst
the cooker is in operation, the
appliance will automatically switch to
warm. To re-commence cooking,
replace the bowl and reset the control
button to cook.
11.After use, switch off at the power
point and remove the plug from the
power supply.
to cook vegetables
1. Pour the required quantity of water
into the inner bowl. The amount of
water affects the length of steaming
time and you should refer to the list
for guidance.
2. Place the food to be steamed in the
steaming basket and place the
steaming basket in the top of the
inner bowl. Vegetables should be
thoroughly cleaned and peeled as
required.
3. Cover with the lid and switch on the
appliance, as directed for cooking
rice.
4. Once all the water has steamed away,
the appliance will automatically switch
to warm and the light will glow.

guide to steam times
The amount of water poured into the
inner bowl determines the steaming time.
As an approximate guide, 150ml (1 cup)
of water provides 15 minutes steaming,
300ml (2 cups) provides 30 minutes
steaming etc.
Personal tastes will affect the cooking
time of vegetables. The following times
provide a guideline, please adjust to suit
your tastes.
VEGETABLES
Asparagus Spears 1/2 lb (225g) 8-10 mins
Beans (Green) cut 1/2 lb (225g) 10-15 mins
whole 1/2 lb (225g) 15-18 mins
Brussel Sprouts 1/4 lb (110g) 15-18 mins
Cabbage 3 medium wedges 20-25 mins
Carrots
(peeled and thickly sliced)
1/2 lb (225g) 10-15 mins
Corn on the Cob *2 small ears 15-20 mins
Mushrooms - whole 1/2 lb (225g) 4-8 mins
Peas (shelled) 1/4 lb (110g) 7-11 mins
(sugar snap) 1/4 lb (110g) 7-11 mins
FISH AND SEAFOOD
Clams 1/2 lb (225g) 6-8 mins Steam until open
Fish Fillets 1/4 lb (110g) 8-10 mins Cook until fish flakes
Steaks 1/2 lb (225g) 10-12 mins easily with fork
Oysters (in shells) 3/4 lb (340g) 10-15 mins Steam until open
Prawns (medium) 1/4 lb (110g) 8-10 mins Steam util pink and firm
* ears may need to be cut in half
5
5. When removing the steaming basket,
hold the handles using heat resistant
gloves.
6. It is possible to cook rice and to steam
foods simultaneously. You will need
to experiment to establish appropriate
amounts of water and cooking time
for various combinations.

hints
•Cooking times are approximate and
are affected by size and temperature
of food and the degree of cooking
desired. Water amounts may
adjusted.
•If the steaming stops before the food
is sufficiently cooked, add cold water
to the inner bowl, replace food and
cover. Restart the cooking until food
is adequately cooked.
•Accumulated steam allows foods to
continue cooking even after the
appliance has switched off. Remove
food prompty to avoid over-cooking.
•Small items cooking faster than larger
ones. Food of uniform size will cook
more evenly.
•Altitude affects the temperature at
which water boils and thus the
cooking time. At high altitude longer
cooking times are needed.
important
•Small quantities of rice (4 or less cups)
should be consumed immediately
after stirring.
•Do not keep rice warm for longer than
two hours.
•Do not interfere with the automatic
switch mechanism by preventing it
from switching to the warm cycle. Do
not immediately depress the switch
to cook once it has begun the warm
cycle.
•Ensure that the area between the rice
cooker and inner bowl is always clean
and free from any rice particles etc.
This is important to ensure proper
contact between the two.
•Always use heat resistant gloves to
remove the inner bowl from the
appliance.
•The rice must be thoroughly washed
before using.
•During cooking, certain varieties of
rice may cause a build up of steam
within the appliance resulting in some
spitting from under the lid. If this
happens carefully lift the lid to allow
excess steam to escape and then
replace.
•On removing the rice from the inner
bowl, a small amount of golden
coloured rice may be noted on the
base of the bowl. this is normal, allow
the bowl to cool, fill with warm soapy
water and allow to soak which will
loosen the rice and make cleaning
easier.
•Do not reheat cooked rice in the rice
cooker.
•Do not lift the lid during the keep
warm period.
•If ingredients are to be added to
cooked rice, they must be thoroughly
cooked as appropriate, and the rice
should be consumed immediately.
•We do not recommend the use of
the rice cooker for cooking packet
type savoury rice.
•The use of sharp implements inside
the bowl may damage the non-stick
coating.
cleaning
Disconnect the appliance from the power
supply. Wipe the outside of the appliance
with a damp cloth then polish with a dry
one.
Wash the inner bowl and lid in hot soapy
water. A soft bristled brush may be used
to remove any rice stuck to the bowl.
Dry the bowl thoroughly. Some staining
of the inner bowl may occur with use.
service and customer
care
•If the cord is damaged it must, for
safety reasons, be replaced by
KENWOOD or an authorised
KENWOOD repairer.
If you need help with:
• using your rice cooker or
•servicing or repairs (in or out of
guarantee)
contact the Kenwood distributor or
your authorised Kenwood repairer.
Have your model number ready - it's
on the underside of the rice cooker.
6

Español
7
Conozca su olla arrocera
Su olla arrocera Kenwood es apta para cocinar arroz y mantenerlo caliente. Siga
estas instrucciones cuidadosamente para garantizar el uso seguro y agradable de
su olla arrocera Kenwood.
RECOMENDACIONES DE SEGURIDAD
Cuando utilice aparatos eléctricos, siempre deben
seguirse las precauciones básicas de seguridad para
reducir el riesgo de incendio, choque eléctrico y/o
lesiones a su persona, incluyendo lo siguiente:
•LEA TODAS LAS INSTRUCCIONES.
•No sumerja el aparato, el cable o el enchufe en agua
u otro líquido.
•No utilice el aparato si está dañado.
•No utilice el aparato en exteriores.
•No toque las superficies calientes.
•No utilice el aparato sobre una superficie sensible al
calor.
•No permita que el cable cuelgue sobre el borde de la
mesa, del mostrador, ni que toque superficies calientes.
•No lo coloque sobre o cerca de una hornilla de gas o
eléctrica, ni en un horno caliente.
•No utilice el aparato para una función distinta de la que
está prevista.
•El uso de accesorios no recomendados por el fabricante
del aparato puede causar lesiones.
•Los niños pequeños deben ser supervisados para
asegurar que no jueguen con el aparato.
•Este aparato no está destinado para ser utilizado
por personas (incluyendo niños) con capacidades
físicas, sensoriales o mentales reducidas, o con
falta de experiencia y conocimiento, a menos que
hayan recibido supervisión o instrucción acerca
del aparato por una persona responsable de su
seguridad.
•Desenchufe del tomacorriente cuando no esté en uso
y antes de limpiarlo. Deje que se enfríe antes de montar
o desmontar partes, y antes de limpiar el aparato.
Antes de leer, por favor despliegue la portada que muestra
las ilustraciones

8
•Debe tener mucha precaución cuando mueva un aparato
que contenga líquidos calientes.
• Para reducir el riesgo de descargas eléctricas, cocine
únicamente en el tazón interno montado montado dentro
de la olla arrocera.
Antes de enchufar
Asegúrese que el suministro eléctrico es el mismo que el
que se indica en la parte inferior del aparato.
GUARDE ESTAS INSTRUCCIONES
Para uso doméstico solamente

9
clave
Tapa Luz indicadora
Asa Botón de
Canastilla de control
vapor Patas
Tazón interno Taza medidora
Cuerpo Espátula
Cable
usando su olla arrocers
Kenwood
1. Use la taza medidora proporcionada
para medir la cantidad deseada de
arroz. Como guía, una taza de arroz
es suficiente para una persona, pero
esto varía de acuerdo con los gustos
individuales.
Llene de arroz la taza medidora al ras.
2. Lave bien el arroz en agua potable
varias veces y escúrralo. No hacerlo
puede dar lugar a pobres resultados
y/o acumulación de vapor dentro del
aparato. No lave el arroz en el tazón
interior para no dañarlo. Algunos tipos
de arroz pueden necesitar remojo
antes de cocinarlos. Siga las
instrucciones del paquete de arroz.
3. Ponga el arroz en el tazón interno y
nivele la superficie de arroz
distribuyéndolo uniformemente. Añada
suficiente agua fría al nivel
correspondiente marcado en el tazón,
por ejemplo, para cocinar 6 tazas de
arroz, coloque el arroz lavado en el
tazón interior y luego rellene con agua
hasta el nivel de 6 tazas. La capacidad
mínima es de 2 tazas. Usted puede
encontrar que para su gusto personal
tiene que ajustar un poco la cantidad
de agua agregada. Para un arroz más
suave agregue un poco más de agua,
y para un arroz más firme agregue
menos agua.
4. Ponga el tazón interno en la arrocera,
asegurándose que no haya arroz o
cualquier humedad en el exterior del
tazón.
5. Cubra con la tapa, asegurándose
que el orificio de ventilación de la
tapa esté situado lejos del operador.
6. Enchufe el aparato y conecte la fuente
de alimentación. Presione el botón
de control a la posición de “cocinar”
y la luz indicadora se encenderá.
7. Una vez que el arroz esté cocinado,
el aparato cambia automáticamente
a la posición “calentar” y la luz
indicadora de mantener caliente se
iluminará. Deje el aparato en esta
configuración al menos 15 minutos
sin levantar la tapa.
8. Retire la tapa y use la espátula
proporcionada para esponjar el arroz
que estará listo para comer. Coloque
la tapa lo más rápido posible.
Consuma el arroz esponjado en un
plazo no mayor de una hora.
Pequeñas cantidades, por ejemplo,
2 a 4 tazas de arroz, deben
consumirse inmediatamente después
de esponjar.
9. Si el arroz se debe mantener durante
un periodo más largo de tiempo,
entonces debe dejarse y solo
esponjarlo antes de su consumo. EL
TIEMPO DE MANTENER CALIENTE
NO DEBE EXCEDER LAS 2 HORAS.
Durante este tiempo la tapa no debe
levantarse.
10. Si el tazón interior se levanta mientras
l a arrocera está en funcionamiento,
el aparato cambia automáticamente
a “calentar”. Para volver a cocinar,
vuelva a colocar el tazón y restablezca
el botón de control a “cocinar”.
11. Después de usar, apague y retire el
enchufe de la fuente de alimentación.
para cocinar vegetales
1. Ponga la cantidad requerida de agua
en el tazón interior. La cantidad de
agua afecta el tiempo cocción al vapor,
y usted debe referirse a la lista para
orientación.
2. Coloque los alimentos a ser cocidos
al vapor en la canastilla de vapor y
colóquela en la parte superior del
tazón interno.
3. Cubra con la tapa y encienda el
aparato, siguiendo las instrucciones
para cocinar el arroz.

guía de tiempos de
cocción al vapor
La cantidad de agua agregada en el
tazón interior determina el tiempo de
cocción. Como guía aproximada, 150
ml (1 taza) de agua proporciona 15
minutos de vapor, 300 ml (2 tazas)
proporciona 30 minutos de vapor, etc.
Los gustos personales afectarán el
tiempo de cocción de los vegetales. Los
siguientes tiempos proporcionan una
referencia, por favor ajústelos de acuerdo
a sus gustos.
VEGETALES
Espárragos 1/2 lb (225g) 8-10 mins
Ejotes cortados 1/2 lb (225g) 10-15 mins
enteros 1/2 lb (225g) 15-18 mins
Coles de bruselas 1/4 lb (110g) 15-18 mins
Col
3 gajos medianos
20-25 mins
Zanahorias 1/2 lb (225g) 10-15 mins
(peladas y rebanadas gruesas)
Mazorca de maíz *2 pequeñas 15-20 mins
Champiñones - enteros 1/2 lb (225g) 4-8 mins
Petit pois (sin vaina) 1/4 lb (110g) 7-11 mins
(en vaina) 1/4 lb (110g) 7-11 mins
PESCADOS Y MARISCOS
Almejas 1/2 lb (225g) 6-8 mins hasta que se abran
Pescado Filetes 1/4 lb (110g) 8-10 mins hasta que se desmenuce
Lonja 1/2 lb (225g) 10-12 mins con tenedor
Ostras (en su concha) 3/4 lb (340g) 10-15 mins hasta que se abran
Camarones (medianos) 1/4 lb (110g) 8-10 mins hasta que estén rosados
y firmes
* Las mazorcas pueden nesesitar ser cortadas por la mitad
10
4. Una vez que toda el agua se ha
evaporado, el aparato cambia
automáticamente a calentar y la luz
se encenderá.
5. Al retirar la canastilla de vapor,
sostenga las asas usando guantes
resistentes al calor.
6. Es posible cocinar arroz y alimentos
al vapor simultáneamente. Usted
tendrá que experimentar para
establecer las cantidades apropiadas
de agua y tiempo de cocción para
diversas combinaciones.

sugerencias
• Los tiempos de cocción son
aproximados y se ven afectados por
el tamaño y la temperatura de los
alimentos y el grado de cocción desea
da. Las cantidades de agua pueden
ajustarse.
• Si el vapor se detiene antes de que
elalimento esté suficientemente
cocido, agregue agua fría al tazón
interno, vuelva a colocar el alimento
y la tapa. Reinicie la cocción hasta
que los alimentos estén
adecuadamente cocinados.
• El vapor acumulado permite que los
alimentos continúen cocinándose
incluso después de que el aparato se
haya apagado. Quite los alimentos
rápidamente para evitar el exceso de
cocción.
Los pedazos pequeños de alimentos
se cocinan más rápido que los
pedazos más grandes. Los de tamaño
uniforme se cocinarán de forma más
pareja.
• La altitud afecta la temperatura a la
que hierve el agua y por lo tanto el
tiempo de cocción. A una mayor altitud
se necesitará más tiempo para cocinar.
importante
• Pequeñas cantidades de arroz (4 tazas
o menos) deben ser consumidas
inmediatamente después de
esponjarlo.
• No mantenga el arroz caliente por
más de dos horas.
• No interfiera con el mecanismo
automático al impedir el cambio al
ciclo de calentar. No presione
inmediatamente el botón a cocinar
una vez que haya comenzado el ciclo
de calentar.
• Asegúrese de que el área entre la
arrocera y el tazón interno esté limpia
y libre de partículas de arroz, etc. Esto
es importante para asegurar el
contacto adecuado entre las dos
partes.
• Siempre use guantes resistentes al
calor para quitar el tazón interno del
aparato.
• El arroz debe ser lavado
cuidadosamente antes de ser usado.
•Durante la cocción, ciertas variedades
de arroz pueden provocar una
acumulación de vapor dentro del
aparato, dando como resultado algo
de salpicadura por debajo de la tapa.
Si esto sucede, levante la tapa con
cuidado, permita que escape algo de
vapor y coloque de nuevo la tapa.
•Después de quitar el arroz del tazó'97n
interno, puede notar una pequeña
cantidad de arroz de color dorado en
la base del tazón. Esto es normal,
deje enfriar el tazón, llénelo con agua
jabonosa caliente, déjelo en remojo
para que se afloje el arroz y se facilite
la limpieza.
• No recaliente arroz cocido en la olla
arrocera.
•No levante la tapa durante el periodo
de calentar.
• Si va a agregar ingredientes al arroz
cocido, éstos deben cocinarse
completamente como sea apropiado,
y el arroz debe consumirse
inmediatamente.
• No se recomienda el uso de la olla
arrocera para cocinar arroz
instantáneo de cajita.
• El uso de utensilios afilados en el
interior del tazón puede dañar el
recubrimiento antiadherente.
limpieza
Desconecte el aparato de la fuente de
alimentación. Limpie el exterior del
aparato con un paño húmedo y luego
pula con un paño seco.
Lave el tazón interno y la tapa con agua
jabonosa caliente. Se puede usar un
cepillo suave para eliminar cualquier arroz
pegado al tazón. Seque el tazón
completamente. Se pueden producir
11

servicio y atención al
cliente
• Si el cable se daña, por razones de
seguridad debe ser sustituido por
Kenwood o un reparador autorizado
por Kenwood.
Si usted necesita ayuda con:
• El uso de su olla arrocera, o
•El mantenimiento y reparación (dentro
y fuera de garantía)
contacte al distribuidor autorizado de
Kenwood o el reparador autorizado
por Kenwood. Tenga a la mano su
número de modelo, está en la parte
inferior de la olla arrocera.
12
Table of contents
Languages:
Other Kenwood Rice Cooker manuals