Kenwood RC410 User manual

English 2 - 6
Nederlands 7 - 12
Français 13 - 19
Deutsch 20 - 25
Italiano 26 - 32
Português 33 - 38
Es añol 39 - 45
Dansk 46 - 51
Svenska 52 - 56
Norsk 57 - 61
Suomi 62 - 67
Türkçe 68 - 73
Ïesky 74 - 79
Magyar 80 - 85
Polski 86 - 92
Ekkgmij 93 - 99
Slovenčina 100 - 105
Українська 106 - 112
´¸∂w
811 - 221
≠U¸ßv
113 - 117
RC410, RC417
in truction
57948/3
HEAD OFFICE: Kenwood Limited, 1-3 Kenwood Bu ine Park, New Lane, Havant, Hamp hire PO9 2NH

2
햲
햳
햴
햵
햶
햷
햸
햹
햺
햷
햻
햿
햽
햾
afety
lRead the e in truction carefully and retain
for future reference.
lRemove all packaging and any label .
lNever put the body of the appliance in
water or let the cord or plug get wet – you
could get an electric hock. And never put
liquid in the body of the appliance.
lNever u e a damaged appliance. Get it
checked or repaired: ee ‘ ervice’.
lKeep children away from the appliance.
And never let the cord hang down where a
child could grab it.
lDon’t get burnt by hot part , boiling water
or team from the appliance. U e oven
glove when removing the inner bowl and
lid.
lDo not keep rice warm for longer than one
hour and do not reheat cooked rice in the
rice cooker.
lDon’t let the cord touch hot part .
lUnplug when not in u e and never leave
the appliance on unattended.
lDon’t place on or near a hot ga or
electric burner or in a heated oven.
lDon’t leave the appliance on a heat
en itive urface.
lOnly u e the rice cooker with the inner
bowl upplied.
lDon’t u e the appliance outdoor .
lMi u e of your appliance can re ult in
injury.

3
before plugging in
lMake sure your electricity supply is
the same as the one shown on the
underside of your rice cooker.
lWARNING: THIS APPLIANCE
MUST BE EARTHED.
lThis appliance conforms to EC
directive 2004/108/EC on
Electromagnetic Compatibility and
EC regulation no. 1935/2004 of
27/10/2004 on materials intended
for contact with food.
before using for the first
time
lWash the parts see ‘cleaning’.
key
vent
lid
steamer basket
inner bowl
spatula
handles
body
storage clip
feet
control lever
indicator lights
detachable cord
measuring cup
lChildren from 8 years and above can use,
clean and perform user maintenance on
this appliance in accordance with the User
Instructions provided they are supervised
by a person responsible for their safety
and have been given instruction
concerning the use of the appliance and
are aware of the hazards.
lPersons with reduced physical, sensory or
mental capabilities or lack of knowledge
using this appliance must have been given
supervision or instruction on its safe use
and are aware of the hazards.
lChildren must not play with the appliance
and both appliance and cord must be out
of reach of children less than 8 years.
lOnly use the appliance for its intended
domestic use. Kenwood will not accept
any liability if the appliance is subject to
improper use, or failure to comply with
these instructions.

4
using your rice cooker
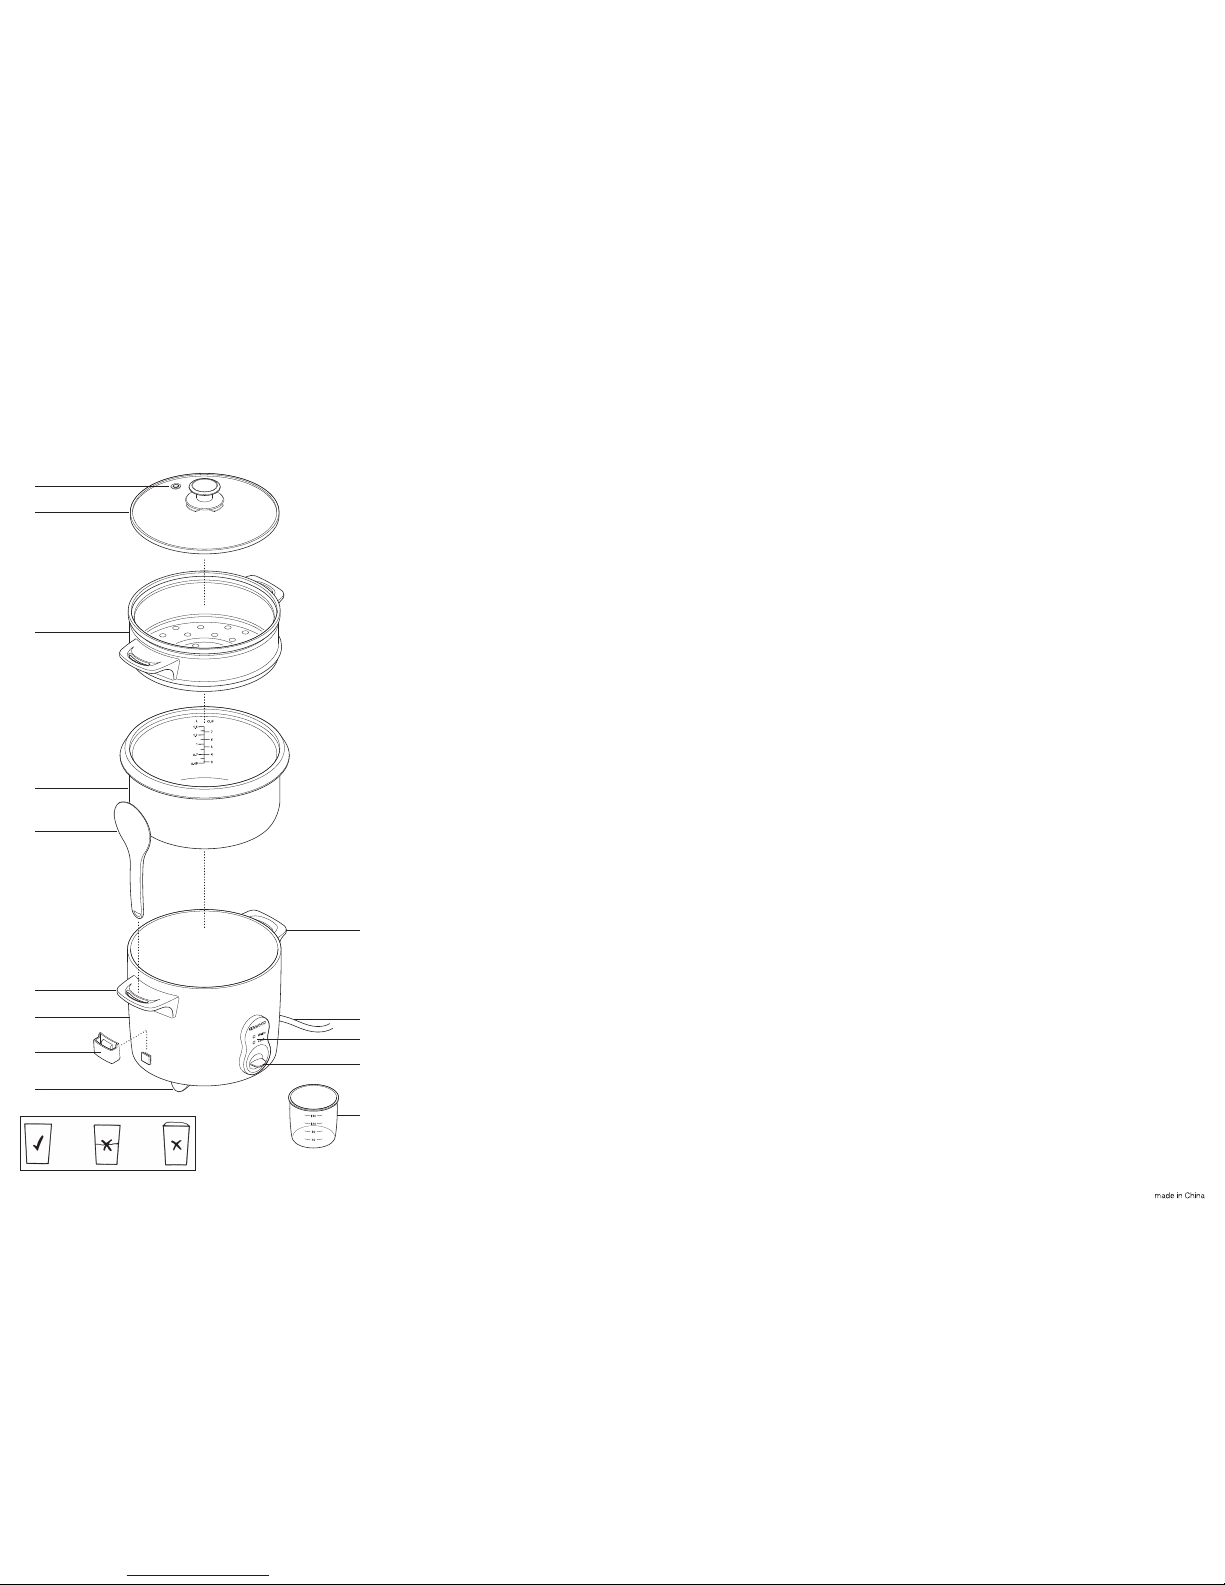
1Use the measuring cup provided to
measure the desired quantity of
rice. As a guide one cup of rice is
sufficient for one person, but this
will vary according to individual
tastes.
Fill the cup with rice levelling the
top .
2 Thoroughly wash the rice in several
changes of clean water and drain.
Failure to do so may cause poor
results and/or a build up of steam
within the appliance. Do not wash
the rice in the inner bowl as you
may damage it.
3 Transfer the rice to the inner bowl
and level the surface of the rice.
Add sufficient cold water to the
corresponding level marked on the
bowl e.g. to cook 3 cups of rice,
place the washed rice into the
inner bowl and then fill with water
up to the 3 cup level.
You may find that for your own
personal taste you need to slightly
adjust the amount of water added.
For a softer rice add a little more
water, and for a firmer rice a little
less water.
4 Transfer the inner bowl to the rice
cooker ensuring that there is no
rice or any moisture on the outside
of the bowl.
5 Cover with the lid, ensuring that
the vent hole in the lid is situated
away from the operator.
6 Fit the detachable cord to the rice
cooker and then connect the
appliance to the power supply.
Depress the control lever to the
COOK position and the cook light
will glow.
7Once the rice is cooked, the
appliance will automatically switch
to the WARM position and the
keep warm light will glow. Leave
the appliance on this setting for at
least 15 minutes without lifting the
lid.
8 Carefully lift the lid and allow any
condensation to drip into the rice
cooker. Use the spatula provided
to fluff up the rice which is then
ready to eat. Replace the lid as
quickly as possible. Consume the
stirred rice within 1 hour.
9 Should the inner bowl be lifted
whilst the cooker is in operation,
the appliance will automatically
switch to WARM. To re-commence
cooking, replace the bowl and
reset the control button to COOK.
10After use, switch off and remove
the plug from the power supply.
to cook vegetables
1 Pour the required quantity of water
into the inner bowl. The amount of
water affects the length of
steaming time and you should refer
to the list for guidance.
2 Place the food to be steamed in
the steaming basket and place the
steaming basket on the top of the
inner bowl. Vegetables should be
thoroughly cleaned and peeled as
required.
3 Cover with the lid and switch on
the appliance, as directed for
cooking rice.
4. Once all the water has steamed
away, the appliance will
automatically switch to warm and
the light will glow.
5 When removing the steaming
basket, hold the handles using
heat resistant gloves.
6 It is possible to cook rice and to
steam foods simultaneously. You
will need to experiment to establish
appropriate amounts of water and
cooking time for various
combinations.
models min max
capacity capacity
RC410/417 3 cups 10 cups

5
guide to steam times
The amount of water poured into the inner bowl determines the steaming time.
As an approximate guide, 150 ml (1 cup) of water provides 15 minutes
steaming,
300 ml (2 cups) provides 30 minutes steaming etc.
VEGETABLES
Asparagus Spears 1 lb (450g) 17 mins
Beans (Green) cut 1 lb (450g) 20 mins
whole 1 lb (450g) 25 mins
Brussel Sprouts 3⁄4 lb (340g) 25 mins
Cabbage Medium (in 6 pieces) 35 mins
Carrots (skinned) 1lb (450g) 20 mins
Corn on the Cob 2 ears 30 mins
Mushrooms - whole 1lb (450g) 10 mins
Peas (shelled) 3⁄4 lb (340g) 17 mins
FISH AND SEAFOOD
Clams 1 lb (450g) 10 mins Steam until open
Fish Fillets 3⁄4 lb (340g) 15 mins}Cook until fish
Steaks 1.lb (450g) 20 mins flakes easily with
fork
Oysters (in shells) 11⁄2 lb (680g) 25 mins Steam until open
Prawns (medium) 3⁄4 lb (340g) 12 mins Steam until pink
hints
lCooking times are approximate
and are affected by size and
temperature of food and the
degree of cooking desired. Water
amounts may be adjusted.
lIf the steaming stops before the
food is sufficiently cooked, add
cold water to the inner bowl,
replace food and cover. Restart the
cooking until the food is
adequately cooked.
lAccumulated steam allows foods
to continue cooking even after the
appliance has switched off.
Remove food promptly to avoid
over-cooking.
lSmall items cook faster than larger
ones. Food of uniform size will
cook more evenly.
lAltitude affects the temperature at
which water boils and thus the
cooking time. At high altitude
longer cooking times are needed.
important
lDo not keep rice warm for longer
than 1 hour. Small quantities are
best eaten straight away.
lDo not reheat cooked rice in the
rice cooker.
lDo not lift the lid during the keep
warm period.
lWe do not recommend the use of
the rice cooker for cooking packet
type savoury rice.
lAlways use heat resistant gloves to
remove the inner bowl, steamer
basket and lid from the appliance.
lIf ingredients are to be added to
cooked rice, they must be
thoroughly cooked as appropriate,
and the rice should be consumed
immediately.
lCooking always takes place in the
inner bowl. Never place food
directly in the body of the rice
cooker.

lDuring cooking, certain varieties of
rice may cause a build up of steam
within the appliance resulting in
some spitting from the vent and
under the lid.
lOn removing the rice from the
inner bowl, a small amount of
golden coloured rice may be noted
on the base of the bowl. This is
normal, allow the bowl to cool, fill
with warm soapy water and allow
to soak which will loosen the rice
and make cleaning easier.
lThe rice must be thoroughly
washed before cooking.
lEnsure that the area between the
rice cooker and inner bowl is
always clean and free from any rice
particles etc. This is important to
ensure proper contact between the
two.
lDo not interfere with the automatic
switch mechanism by preventing it
from switching to the warm cycle.
Do not depress the switch to cook
once it has begun the warm cycle.
lThe use of sharp implements
inside the bowl may damage the
non-stick coating.
cleaning
1 Before cleaning, unplug and let
everything cool down.
2 Never immerse the body of the rice
cooker in water.
3 Don’t wash parts in the
dishwasher.
bowl, lid, measuring cup,
spatula, steaming basket
Wash, then dry thoroughly.
After use, clip the spatula storage
device over the protrusion on the
body of the rice cooker, then fit the
spatula into position as shown .
service
lIf the cord is damaged it must, for
safety reasons, be replaced by
KENWOOD or an authorised
KENWOOD repairer.
If you need help with:
lusing your rice cooker or
lservicing or repairs
lContact the shop where you
bought your rice cooker.
lMade in China.
IMPORTANT INFORMATION
FOR CORRECT DISPOSAL OF
THE PRODUCT IN
ACCORDANCE WITH EC
DIRECTIVE 2002/96/EC.
At the end of its working life, the
product must not be disposed of as
urban waste.
It must be taken to a special local
authority differentiated waste collection
centre or to a dealer providing this
service.
Disposing of a household appliance
separately avoids possible negative
consequences for the environment
and health deriving from inappropriate
disposal and enables the constituent
materials to be recovered to obtain
significant savings in energy and
resources. As a reminder of the need
to dispose of household appliances
separately, the product is marked
with a crossed-out wheeled dustbin.
6

Nederlands
7
Vouw de voorpagina a.u.b. uit voordat u begint te lezen. Op deze
manier zijn de afbeeldingen zichtbaar
veiligheid
lLees deze instructies zorgvuldig door en
bewaar ze voor toekomstig gebruik.
lVerwijder alle verpakking en labels.
lHet apparaat nooit in water plaatsen of het
snoer of de stekker nat laten worden; u
kunt hierdoor een elektrische schok
oplopen. Laat nooit water in het binnenste
van het apparaat lopen.
lGebruik nooit een beschadigd apparaat.
Laat het nakijken of repareren: zie service.
lHoud kinderen uit de buurt van het
apparaat. Laat het snoer nooit naar
beneden hangen waar een kind erbij kan.
lVerbrandt u niet aan hete delen, kokend
water of stoom van het apparaat. Gebruik
ovenwanten om de binnenpan en het
deksel te verwijderen.
lHoud rijdt niet langer dan een uur warm
en warm gekookte rijst niet op in de
rijstkoker.
lLaat het snoer niet in aanraking komen
met hete onderdelen.
lAls u het apparaat niet gebruikt, haalt u de
stekker uit het stopcontact; laat het
apparaat nooit onbeheerd.
lPlaats het apparaat niet op of in de buurt
van een hete gas- of elektrische brander of
in een hete oven.
lLaat het apparaat niet op een
hittegevoelige ondergrond staan.
lDe rijstkoker uitsluitend gebruiken met de
bijgeleverde binnenpan.

lGebruik het apparaat niet buiten.
lMisbruik van uw apparaat kan tot letsel
leiden.
lKinderen van 8 jaar en ouder mogen dit
apparaat reinigen en gebruikersonderhoud
uitvoeren in overeenstemming met de
gebruikersinstructies, mits ze onder
toezicht staan van iemand die
verantwoordelijk is voor hun veiligheid en
instructies hebben gekregen over het
gebruik van het apparaat en zich bewust
zijn van de gevaren.
lPersonen met verminderde lichamelijke,
sensorische of geestelijke capaciteiten of
gebrek aan kennis die dit apparaat
gebruiken, moeten onder toezicht staan of
instructie hebben gekregen over het veilig
gebruik van het apparaat en de betrokken
zich bewust zijn van de gevaren.
lKinderen mogen niet met het apparaat
spelen, en het apparaat en snoer moeten
buiten het bereik van kinderen worden
gehouden die jonger zijn dan 8 jaar.
lGebruik het apparaat alleen voor het
huishoudelijke gebruik waarvoor het is
bedoeld. Kenwood kan niet aansprakelijk
worden gesteld in het geval dat het
apparaat niet correct is gebruikt, of waar
deze instructies niet worden opgevolgd.
8
voor u de stekker in het
stopcontact steekt
lZorg dat u hetzelfde voltage
gebruikt als op de onderzijde van
uw rijstkoker staat aangegeven.
lWAARSCHUWING: DIT
APPARAAT MOET GEAARD
ZIJN.
lDit apparaat voldoet aan de EC-
richtlijn 2004/108/EC betreffende
de elektromagnetische
compatibiliteit en EC-bepaling
1935/2004 van 27/10/2004
betreffende materialen die
bestemd zijn voor contact met
voedsel.

9
voor het eerste gebruik
lDe onderdelen afwassen, zie
Reiniging.
legenda
luchtopening
deksel
stoommandje
binnenpan
spatel
handvaten
buitenpan
opbergclip
voetjes
regelknop
indicatielampjes
verwijderbaar snoer
maatbeker
gebruik van uw
Kenwood
1 Pas de gewenste hoeveelheid rijst
af met het bijbehorende
maatbekertje. Als richtlijn kunt u
aanhouden dat èèn bekertje rijst
voldoende is voor èèn persoon,
maar het spreekt vanzelf dat dit
ook zal afhangen van uw eigen
smaak en inzicht. Vul het bekertje
met rijst en strijk de bovenkant af
.
2 Was de rijst in voldoende schoon
water en laat hierna de korrels
uitlekken in een vergiet. Doet u dit
niet, dan kan het eindresultaat
tegenvallen en/of kan zich tijdens
het koken stoom gaan vormen in
de pan. Was de rijst echter niet in
de binnenpan, aangezien deze
hierdoor beschadigd kan raken.
3 Schud de rijst nu in de binnenpan
en voeg voldoende koud water
toe. Richt u zich hierbij op de
corresponderende niveau-
aanduiding van de pan. Wilt u
bijvoorbeeld 3 bekertjes rijst koken,
schud dan de gewassen rijst in de
binnenpan en vul deze met water
tot aan het niveau voor 3 bekertjes.
Afhankelijk van uw persoonlijke
smaak kan het zijn, dat u zult
willen afwijken van de aanbevolen
hoeveelheid water. Heeft u een
voorkeur voor wat zachtere rijst,
dan moet u iets meer water
toevoegen. Wilt u echter dat de
rijst na het koken nog stevig blijft,
dan moet u iets minder water in de
pan schenken.
4 Zet hierna de binnenpan in de
buitenpan en zorg ervoor, dat de
buitenkant van de binnenpan
droog is en dat er geen rijstkorrels
tegenaan kleven.
5 Zet het deksel op de pan, en wel
zodanig dat de ventilatie-opening
in het deksel van u af gekeerd is.
6 Bevestig het snoer aan de
rijstkoker en sluit het apparaat aan
op het netsnoer. Druk de
regelknop omlaag in de
COOK(KOOK)-stand; het
kooklampje gaat branden.
7 Wanneer de rijst gekookt is, zal de
pan automatisch overschakelen op
de WARM-stand; dit kunt u zien
aan het indicatielampje. Laat de
pan minimaal 15 minuten op deze
stand staan zonder het deksel op
te lichten.
8 Til de deksel voorzichtig op en laat
eventuele condensatie in de
rijstkoker druppelen. Gebruik de
spatel om de rijst om te scheppen;
de rijst kan nu gegeten worden.
Zet de deksel zo vlug mogelijk
weer op de pan. Eet de
omgeschepte rijst binnen een uur.
9 Als de binnenpan tijdens het koken
opgetild wordt, schakelt het
apparaat automatisch over op de
WARM (WARM)-stand. Om verder
te gaan met koken, zet u de
binnenpan weer terug in de
buitenpanen stelt u de regelknop
weer in op COOK (KOOK).
10Na gebruik schakelt u het apparaat
uit en haalt u de stekker uit het
stopcontact.
modellen min max
capaciteit capaciteit
RC410/417 3 kopjes 10 kopjes

gaarstomen van
groenten
1 Schenk de gewenste hoeveelheid
water in de binnenpan. De
hoeveelheid water is van invloed
op de stoomtijd. Zie daarom de
onderstaande tabel, die als richtlijn
dient voor het optimaal bereiden
van uw groenten.
2 Leg de groenten in het
stoommandje en hang dit bovenin
de binnenpan. Maak de groenten
vooraf altijd goed schoon of schil
deze, indien nodig.
3Plaats het deksel op de pan,
schakel het apparaat in en ga op
dezelfde wijze te werk als bij het
koken van rijst.
4Wanneer al het water in de pan
verbruikt is, schakelt deze
automatisch over naar de WARM-
stand. U ziet dit aan het oplichten
van het indicatielampje.
5 Neem het stoommandje bij de
handgrepen uit de pan met behulp
van ovenwanten.
6 Het is mogelijk om tegelijkertijd rijst
te koken en groenten te stomen.
Door gewoon een aantal keren te
experimenteren krijgt u al snel een
goed idee van de gewenste
hoeveelheid water bij diverse
rijst/groenten-combinaties.
10
GROENTEN
Asperges 450g 17 min.
Sperziebonen gesneden 450g 20 min.
heel 450g 25 min.
Spruitjes 340g 25 min.
Sluitkool Medium (in 6 stukjes) 35 min.
Wortels (met schil) 450g 20 min.
Maïskolven 2 stuks 30 min.
Hele champignons 450g 10 min.
Doperwtjes 340g 17 min.
VIS EN ZEEVRUCHTEN
Mosselen 450g 10 min. Stomen tot ze
opengaan
Vis filets 340g 15 min.}Stomen tot vis
Steaks 450g 20 min. makkelijk met vork
uiteen gehaald
kan worden
Oesters (in schelp) 680g 25 min. Stomen tot ze
opengaan
Garnalen (middelgroot) 340g 12 min. Stomen tot ze roze
worden
richtlijnen voor stomen
De hoeveelheid water die u in de binnenpan giet is bepalend voor de
uiteindelijke stoomtijd. Normaal gesproken zorgt 150 ml. water (1 kopje) voor
15 minuten stoomtijd, en 300 ml. water (2 kopjes) voor 30 minuten stoomtijd,
etc.

handige tips
lDe genoemde bereidingstijden
dienen als richtlijn en zijn mede
afhankelijk van de omvang en
temperatuur van het voedsel, en
van uw persoonlijke voorkeur en
smaak. De hoeveelheid water kunt
u naar wens aanpassen.
lWanneer het stoomproces stopt,
voordat het voedsel voldoende
gaar is, giet dan wat extra water in
de binnenpan, leg het voedsel
weer op zijn plaats, breng het
deksel aan en ga verder met het
bereidingsproces.
lDoor het aanwezige stoom in de
pan zal het voedsel na
uitschakeling van het apparaat nog
even nagaren. Om te voorkomen
dat het te gaar wordt, moet u het
daarom meteen uit de pan halen.
lKleine stukken voedsel zijn eerder
gaar dan grote stukken. Voor een
gelijkmatig resultaat kunt u daarom
beter zoveel mogelijk voedsel van
gelijke omvang in de pan leggen.
lDe hoogte waarop u zich bevindt
is van invloed op het kookpunt,
dus op de bereidingstijd. Naarmate
u hoger zit, zult u langere
bereidingstijden in acht moeten
nemen.
belangrijk
lHoud de rijst niet langer dan 1 uur
warm. Kleine hoeveelheden
kunnen het best onmiddellijk
gegeten worden.
lDeze pan is niet geschikt voor het
opwarmen van reeds gekookte
rijst.
lLaat het deksel tijdens de
warmhoudtijd op de pan zitten.
lU kunt in deze pan beter geen
rijstbuiltjes koken.
lGebruik altijd hittebestendige
handschoenen om de binnenpan,
het stoommandje en de deksel van
het apparaat te verwijderen.
lIndien aan de gekookte rijst nog
wat ingrediënten worden
toegevoegd, dan moet u de rijst
niet meer laten staan, maar
meteen opdienen.
lDe rijst wordt altijd in de binnenpan
gekookt. Plaats nooit voedsel
rechtstreeks in de buitenpan van
de rijstkoker.
lBepaalde rijstsoorten kunnen
tijdens het koken stoom in het
apparaat ontwikkelen, waarvan een
deel via de luchtopening en de
deksel ontsnapt.
lWanneer u de rijst na het koken uit
de binnenpan wilt scheppen, kan
het voorkomen dat zich wat korrels
hebben vastgezet op de bodem
van de pan en goudbruin van kleur
zijn geworden. Dit is echter geen
probleem. Laat de pan in zo’n
geval afkoelen, vul hem met warm
water en wat afwasmiddel, laat de
vastgekoekte rijstkorrels losweken
en maak de pan daarna gewoon
schoon.
lDe rijst moet voor het koken
zorgvuldig gewassen worden.
lZorg ervoor dat de ruimte tussen
het stoommandje en de binnenpan
altijd schoon en vrij van
voedselresten blijft. Dit is belangrijk
voor een optimale werkwijze van
de pan.
lVerstoor het automatisch
schakelmechanisme niet en
probeer niet te verhinderen dat het
op de warmhoudcyclus
overschakelt. Druk de schakelaar
niet in de kookstand nadat de
warmhoudcyclus gestart is.
lHet gebruik van scherpe
voorwerpen kan de anti-kleeflaag
van de binnenpan beschadigen.
reiniging
1 Haal voor de reiniging de stekker
uit het stopcontact en laat het
apparaat afkoelen.
2 Dompel de buitenpan van de
rijstkoker nooit onder in water.
3 Was de onderdelen niet in de
afwasmachine.
11

binnenpan, deksel,
maatbeker, spatel,
stoommandje
Wassen en vervolgens grondig
afdrogen.
Klem de opbergclip na gebruik
over het uitsteeksel op de
buitenpan van de rijstkoker en berg
de spatel op zoals afgebeeld .
service
lAls het snoer beschadigd is, moet
het om veiligheidsredenen door
KENWOOD of een door
KENWOOD geautoriseerd
reparatiebedrijf vervangen worden.
Als u hulp nodig hebt met:
lhet gebruik van uw rijstkoker of
londerhoud en reparatie
lkunt u contact opnemen met de
winkel waar u uw rijstkoker
gekocht hebt.
lVervaardigd in China.
BELANGRIJKE INFORMATIE
VOOR DE CORRECTE
VERWERKING VAN HET
PRODUCT IN
OVEREENSTEMMING MET DE
EUROPESE RICHTLIJN
2002/96/EC
Aan het einde van de levensduur van
het product mag het niet samen met
het gewone huishoudelijke afval
worden verwerkt. Het moet naar een
speciaal centrum voor gescheiden
afvalinzameling van de gemeente
worden gebracht, of naar een
verkooppunt dat deze service
verschaft. Het apart verwerken van
een huishoudelijk apparaat voorkomt
mogelijke gevolgen voor het milieu en
de gezondheid die door een
ongeschikte verwerking ontstaan en
zorgt ervoor dat de materialen
waaruit het apparaat bestaat,
teruggewonnen kunnen worden om
een aanmerkelijke besparing van
energie en grondstoffen te verkrijgen.
Om op de verplichting tot gescheiden
verwerking van elektrische
huishoudelijke apparatuur te wijzen, is
op het product het symbool van een
doorgekruiste vuilnisbak aangebracht.
12

Français
13
Avant de lire, veuillez déplier la première page contenant les
illustrations
sécurité
lLisez et conservez soigneusement ces
instructions pour pouvoir vous y référer
ultérieurement.
lRetirez tous les éléments d’emballage et
les étiquettes.
lN’immergez jamais le corps de l’appareil
dans l’eau et ne laissez pas le cordon ou
la prise d’alimentation électrique se
mouiller – vous risqueriez un choc
électrique. N’introduisez jamais de liquide
dans le corps de l’appareil.
lN’utilisez jamais un appareil endommagé.
Faites-le vérifier ou réparer : Voir « Service
après vente ».
lNe laissez pas les enfants s’approcher de
l’appareil. Ne laissez jamais le cordon
pendre de telle façon qu’un enfant puisse
s’en saisir.
lFaites attention à ne pas vous brûler avec
les éléments chauds, l’eau bouillante ou la
vapeur de l’appareil. Utilisez des maniques
lorsque vous retirez la cuve intérieure et le
couvercle.
lNe maintenez pas le riz au chaud pendant
plus d’une heure et ne le réchauffez pas
dans le cuiseur de riz.
lNe laissez pas le cordon en contact avec
des surfaces chaudes.
lDébranchez l’appareil en dehors des
périodes d’utilisation et ne le laissez jamais
sans surveillance.

lNe placez pas l’appareil sur un feu à gaz
ou une plaque électrique ou à proximité,
en encore dans un four chaud.
lNe laissez pas l’appareil sur une surface
sensible à la chaleur.
lUtilisez le cuiseur de riz exclusivement
avec la cuve intérieure fournie.
lN’utilisez pas l’appareil en extérieur.
lToute mauvaise utilisation de votre appareil
peut être source de blessures.
lLes enfants âgés de 8 ans et plus peuvent
utiliser, nettoyer et effectuer la maintenance
utilisateur de cet appareil conformément au
Mode d'emploi Utilisateur, à condition
qu'ils se trouvent sous la surveillance d'une
personne responsable de leur sécurité et
qu'ils aient reçu les instructions relatives à
l'utilisation de l'appareil, et eu
connaissance des risques potentiels.
lLes personnes dont les capacités
physiques, sensorielles ou mentales sont
diminuées, ou qui ne disposent pas de
connaissances quant à l'utilisation de cet
appareil, doivent avoir été formées ou
encadrées pour son utilisation en toute
sécurité et avoir connaissance des risques
potentiels.
lLes enfants ne doivent pas jouer avec cet
appareil ; le cordon et l'appareil doivent
être tous deux tenus hors de portée des
enfants de moins de 8 ans.
lN’employez l’appareil qu’à la fin
domestique prévue. Kenwood décline
toute responsabilité dans les cas où
l’appareil est utilisé incorrectement ou que
les présentes instructions ne sont pas
respectées.
14

15
avant de brancher l’appareil
lAssurez-vous que votre
alimentation électrique correspond
à celle qui est indiquée sur la partie
inférieure de votre cuiseur de riz.
lCet appareil est conforme à la
directive 2004/ 08/CE de la CE
sur la compatibilité
électromagnétique, et au règlement
935/2004 de la CE du
27/ 0/2004 sur les matériaux
destinés au contact alimentaire.
avant la première utilisation
lNettoyez les éléments, voir «
nettoyage ».
légende
orifice de sortie de la vapeur
couvercle
panier de cuisson à la vapeur
cuve intérieure
spatule
poignée
corps
clip de rangement
pieds
levier de commande
témoins lumineux
cordon détachable
verre mesureur
mode d’emploi du
cuiseur de riz Kenwood
1 Utilisez le verre mesureur fourni
pour mesurer la quantité de riz
souhaitée.
A titre d’indication, un verre de riz
est suffisant pour une personne,
mais cela varie selon les
personnes.
Remplissez le verre de riz à
ras-bord .
2 Lavez soigneusement le riz
plusieurs fois dans de l’eau et
égouttez-le.
Si vous omettez de laver le riz,
vous aurez une cuisson médiocre
et/ou de la condensation dans
l’appareil. Ne lavez pas le riz dans
la cuve intérieure car vous pourriez
l’endommager.
3Versez le riz lavé dans la cuve
intérieure et aplanissez la surface.
Ajoutez le volume d’eau
correspondant la graduation
indiquée sur la cuve: par exemple,
pour cuire 3 verres de riz, mettez le
riz lavé dans la cuve intérieure et
remplissez-la d’eau jusqu’à la
graduation 3.
Il se peut que vous ayez besoin de
varier légèrement le volume d’eau
pour une cuisson à votre goût.
Pour un riz plus ferme, diminuez
l’eau, et pour un riz plus tendre,
augmentez l’eau.
4Transférez la cuve intérieure dans
le cuiseur de riz en vérifiant qu’il
n’y a ni riz, ni trace d’eau sur la
paroi extérieure.
5Placez le couvercle et assurez-
vous que le petit évent situé sur le
couvercle est éloigné de vous.
6Raccordez le cordon détachable
au cuiseur de riz puis branchez
l’appareil sur l’alimentation
électrique. Appuyez sur le levier de
commande en position COOK
(CUISSON) et le voyant lumineux
s’allume.
7Lorsque la cuisson est terminée,
l’appareil se met automatiquement
en position ‘WARM’ et le voyant
lumineux de maintien au chaud
s’allume. Attendez au moins 15
minutes avant de soulever le
couvercle.
8Soulevez le couvercle avec
précaution et laissez la
condensation s’égoutter dans le
cuiseur de riz. Utilisez la spatule
fournie pour aérer le riz qui est
maintenant prêt à être consommé.
Replacez le couvercle aussi
rapidement que possible.
Consommez dans l’heure le riz
remué.
modèles capacité capacité
minimale maximale
RC410/417 3 verres 10 verres

16
9Si la cuve intérieure est soulevée
pendant que le cuiseur est en
marche, l’appareil se mettra
automatiquement en position
WARM (MAINTIEN AU CHAUD).
Pour reprendre la cuisson, replacez
la cuve et remettez le levier de
commande en position COOK
(CUISSON).
10Après l’utilisation, éteignez
l’appareil et débranchez-le de
l’alimentation électrique.
cuisson des légumes
1 Versez la quantité d’eau voulue
dans la cuve intérieure. Le volume
d’eau détermine la longueur de la
cuisson à la vapeur; consultez la
liste fournie pour vous guider.
2 Placez votre aliment dans le panier
de cuisson à la vapeur et placez
celui-ci au-dessus de la cuve
intérieure. Les légumes doivent
être préalablement lavés et
épluchés.
3 Mettez le couvercle en place et
branchez l’appareil, comme
indiqué pour la cuisson du riz.
4 Une fois que l’eau se sera
évaporée, l’appareil se mettra
automatiquement en position
‘warm’ et le voyant lumineux
s’allumera.
5 Lorsque vous soulevez le panier de
cuisson à la vapeur, utilisez des
gants thermo-isolants pour tenir les
poignées.
6 Il est possible de cuire des
aliments à la vapeur en même
temps que le riz. Il faudra
expérimenter pour déterminer les
quantités d’eau et les temps de
cuisson pour les différentes
permutations.

17
LEGUMES
Asperges (pointes)450g17 mns
Haricots verts coupés 450g20 mns
entiers 450g25 mns
Choux de Bruxelles 340g25 mns
Chou de taille moyenne35 mns
(en 6 morceaux)
Carottes (épluchées)450g20 mns
Maïs (épi)230 mns
Champignons entiers 450g10 mns
Petits pois (écossés) 340g17 mns
POISSONS ET CRUSTACÉS
Palourdes 450g10 mns Cuire jusqu’à leur
ouverture
Poissons en filets 340g15 mns}Cuire jusqu’à ce
que le poisson
en tranches 450g20 mns s’émiette facilement
à la fourchette
Huîtres (en coquilles)680g25 mns Cuire jusqu’à
leur ouverture
Crevettes (moyennes)340g12 mns Cuire jusqu’
à ce qu’elles
soient roses
astuces
lLes temps de cuisson sont
approximatifs et dépendent de la
taille et de la température des
aliments et du degré de cuisson
souhaité. Il faut ajuster la quantité
d’eau en conséquence.
lSi la cuisson à la vapeur s’arrête
avant que les aliments soient
suffisamment cuits, ajoutez de
l’eau froide dans la cuve intérieure,
replacez les aliments et couvrez.
Reprenez la cuisson jusqu’à ce
que les aliments soient cuits
correctement.
lLa condensation d’eau prolonge la
cuisson des aliments même si
l’appareil est éteint. Retirez vos
aliments rapidement pour éviter
des aliments trop cuits.
lLes aliments de petite taille cuisent
plus rapidement que les grands.
Cuisez ensemble des aliments de
la même taille pour obtenir une
cuisson uniforme.
lL’altitude affecte la température
d’ébullition de l’eau et donc le
temps de cuisson. A haute
altitude, la cuisson est plus
longue.
important
lNe gardez pas le riz au chaud
pendant plus d’une heure. Il est
préférable de consommer les
petites quantités immédiatement.
lNe réchauffez pas le riz dans le
cuiseur de riz.
lNe soulevez pas le couvercle
pendant la période d’attente au
chaud.
temps de cuisson à la vapeur
Le volume d’eau versé dans la cuve intérieure détermine les temps de cuisson
à la vapeur. A titre d’indication, pour 150ml (1 verre) d’eau, le temps de cuisson
sera 15 minutes environ, pour 300ml (2 verres), il sera 30 minutes etc.

lIl est déconseillé d’utiliser le
cuiseur de riz pour cuire des
préparations de riz en sachet.
lUtilisez toujours des gants thermo-
isolants pour retirer la cuve
intérieure, le panier de cuisson à la
vapeur et le couvercle de l’appareil.
lSi vous devez ajouter des
ingrédients au riz cuit, ceux-ci
doivent être cuits complètement, et
le riz doit être consommé
immédiatement.
lLa cuisson se produit toujours
dans la cuve intérieure. Ne placez
jamais d’aliments directement dans
le corps du cuiseur de riz.
lDurant la cuisson, certains types
de riz peuvent causer une
accumulation de vapeur à
l’intérieur de l’appareil entraînant
des projections par l’évent et en
dessous du couvercle
lEn retirant le riz de la cuve
intérieure, vous pourrez remarquer
une petite quantité de riz doré au
fond: c’est normal. Laissez la cuve
refroidir, remplissez-la d’eau
savonneuse et laissez tremper
pour que le riz se détache et
faciliter le nettoyage.
lLavez soigneusement le riz avant
de le faire cuire.
lVérifiez toujours que l’espace entre
le cuiseur de riz et la cuve
intérieure est toujours propre et
sans trace de riz etc… Ceci est
très important pour qu’il y ait un
contact parfait entre les deux
éléments.
lN’interférez pas avec le
mécanisme de basculement
automatique en l’empêchant de
basculer en mode de maintien au
chaud. N’appuyez pas sur le levier
cuisson une fois que le cycle de
maintien au chaud a commencé.
lL’utilisation d’ustensiles tranchants
peut endommager la surface
antiadhésive.
nettoyage
1Avant le nettoyage, débranchez
l’appareil et laissez tous les
éléments refroidir.
2N’immergez jamais le corps du
cuiseur de riz dans l’eau.
3 Ne lavez pas les éléments au lave-
vaisselle.
cuve, couvercle, verre
mesureur, spatule, panier de
cuisson à la vapeur
Lavez, puis séchez
soigneusement.
Après utilisation, attachez le
dispositif de rangement de la
spatule sur la pièce saillante du
corps du cuiseur de riz, puis
installez la spatule comme illustré
.
service après-vente
lSi le cordon est endommagé, il
doit être remplacé pour des
raisons de sécurité par KENWOOD
ou par un réparateur agréé de
KENWOOD.
Si vous avez besoin d’assistance
pour :
lutiliser votre cuiseur de riz ou
lentretenir ou faire réparer votre
appareil
lContactez le revendeur chez qui
vous avez acheté votre appareil.
lFabriqué en Chine.
18

AVERTISSEMENTS POUR
L'ÉLIMINATION CORRECTE DU
PRODUIT AUX TERMES DE LA
DIRECTIVE EUROPÉENNE
2002/96/EC.
Au terme de son utilisation, le produit
ne doit pas être éliminé avec les
déchets urbains.
Le produit doit être remis à l'un des
centres de collecte sélective prévus
par l'administration communale ou
auprès des revendeurs assurant ce
service.
Éliminer séparément un appareil
électroménager permet d'éviter les
retombées négatives pour
l'environnement et la santé dérivant
d'une élimination incorrecte, et
permet de récupérer les matériaux
qui le composent dans le but d'une
économie importante en termes
d'énergie et de ressources.Pour
rappeler l'obligation d'éliminer
séparément les appareils
électroménagers, le produit porte le
symbole d'un caisson à ordures
barré.
19

Deutsch
20
Vor dem Lesen bitte die Titelseite mit den Illustrationen
auseinanderfalten
Sicherheit
lLesen Sie diese Anleitung sorgfältig durch
und bewahren Sie diese zur späteren
Benutzung auf.
lEntfernen Sie jegliches
Verpackungsmaterial und alle Aufkleber.
lDas Gehäuse des Gerätes niemals in
Wasser tauchen und darauf achten, dass
Kabel und Stecker immer trocken sind -
Sie könnten sonst einen Stromschlag
bekommen. Geben Sie niemals Flüssigkeit
in das Gehäuse des Gerätes.
lEin beschädigtes Gerät niemals
verwenden. Überprüfen oder reparieren
lassen: siehe ‘Kundendienst’.
lKinder vom Gerät fernhalten. Darauf
achten, dass alle Kabel außer Reichweite
eines Kindes sind.
lAchten Sie darauf, dass Sie sich nicht an
heißen Teilen am Gerät, kochendem
Wasser oder Dampf, das aus dem Gerät
entweicht, verbrennen. Verwenden Sie
Topfhandschuhe zum Entfernen des
inneren Behälters und beim Abnehmen
des Deckels.
lReis sollten Sie nicht länger als eine
Stunde warm halten und bereits
gekochten Reis auch nicht im Reiskocher
aufwärmen.
lDas Kabel darf nicht in Berührung mit
heißen Teilen kommen.
This manual suits for next models
1
Table of contents
Other Kenwood Rice Cooker manuals
Popular Rice Cooker manuals by other brands

Sanyo
Sanyo ECJ-S35K - 3-1 Micro-Computerized Rice Cooker... instruction manual

Elite Gourmet
Elite Gourmet ERC-150 instruction manual

Winco
Winco RC-S301 operating instructions

Sur la table
Sur la table SLT-5801 owner's manual

Aroma
Aroma ARC-743G instruction manual

Kasanova
Kasanova GIR000066NOC instruction manual