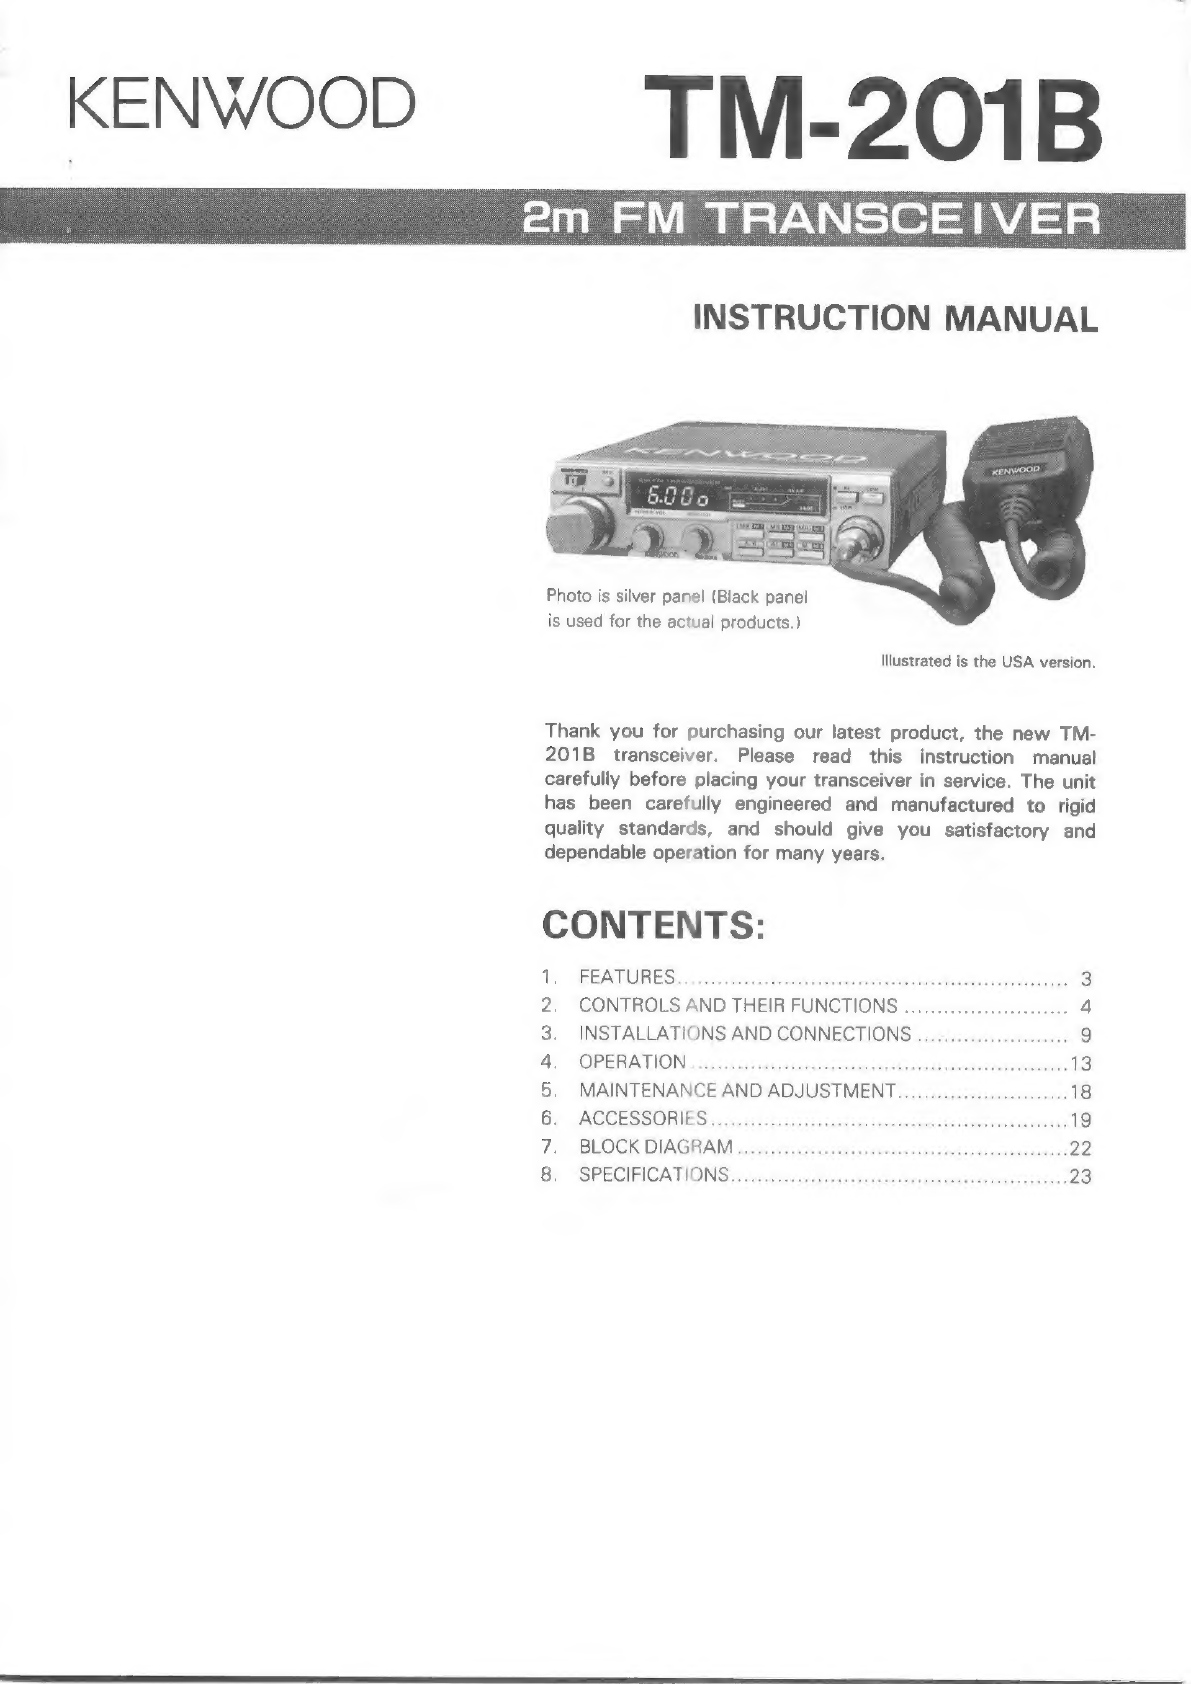
manuals.online logo
Brands
  1. Home
  2. •
  3. Brands
  4. •
  5. Kenwood
  6. •
  7. Transceiver
  8. •
  9. Kenwood TM-201B User manual

Kenwood TM-201B User manual

KENWOOD
TM-201B
INSTRUCTION
MANUAL
Photo
is
silver
panel
(Black
panel
is
used
for
the
actual
products.)
Illustrated
is
the
USA
version.
Thank
you
for
purchasing
our
latest
product,
the
new
TM-
201B
transceiver.
Please
read
this
instruction
manual
carefully
before
placing
your
transceiver
in
service.
The
unit
has
been
carefully
engineered
and
manufactured
to
rigid
quality
standards,
and
should
give
you
satisfactory
and
dependable
operation
for
many
years.
CONTENTS:
PAE
i
csienitincnmsivaniniciryas
debjeuten
tet
CONTROLS
AND
THEIR
FUNCTIONS
........c
cc
ceeeeeeeeeeees
4
9
‘Sigs
OF
S
@
SS
@
ACCESSORIES
@
Carefully
unpack
your
TM-201B
and
confirm
that
it
is
supplied
with
the
follow-
ing
accessories:
a
@
Microphone
a
Dynamic
microphone
................0c0cccccceeeeeeseeee
(T91-0331-05)....1
pe.
b
Electret
condenser
microphone
with
touch-tone...(T91-0332-15)....1
pe.
@
Communications
speaker
(with
2.5
m
lead)
.........
(T19-0101-05)....1
pe.
@
Speaker
mounting
kit
BRBOK
GT
icsivwancoenstancnuiien
tons
sbanat
maa
oaacaamime
ei
(J21-2799-13).....1
pe.
GANG
HTTOIA
(AR)
ei
sien
vnc
wares
iva
Sahmtninas
esi
(G13-0680-04)
...1
pe.
TAPPING
SCLEW
(D4
X'S)...
nny
sane
ssacncnnaicevatewaietees
(N87-4008-41)
..4
pes.
Flat
head
tapping
screw
(#4
x
8)
.
(N88-4008-41)
..2
pcs.
Round
head
screw
($4
x
10).....
..
(N30-4010-41)
..2
pes.
For
versions
other
than
USA.
Hex.
head
nut
(4).......
ee
eT
eee
..
(N10-2040-41)
..2
pcs.
b
Mobile
mounting
kit
Mounting
bracket.........00....00.0008
(A13-0640-12)
...1
pe.
Boss
(Two
of
6
pes.
are
spare
parts.)
..
(J32-0775-14)
..6
pes.
Flat
washer
for
boss
($3)
.............
...
(N19-0631-05)
..4
pes.
Flat
screw
for
boss
(@3
x
14)
.....
...
(N32-3014-41)..4
pes.
Round
head
screw
(¢6
x
20).....
...
(NO9-0008-04)
..4
pes.
Flat
washer
(6)
...........0..00cceeeees
...
(N15-1060-46)
..4
pes
Spring
washer
(6)
......
...
(N16-0060-46)
..4
pcs.
Flange
nut
(#6)
.........
ate
..(N14-0510-04)
..4
pes.
“KENWOOD
Tapping
screw
(P5
X12)
0...
cccccencceeeneeeeeee
eee
es
(NO9-0632-05)
..4
pcs.
Flat
washer
(@5)
..........cccccscrssuceveneeeeueensneeeenes
(N15-1050-46)
..4
pcs.
For
USA:
version:
Cushion
(B)
seguas
.,..(G13-0683-04)
...1
pc.
...
(G13-0686-04)
..2
pcs.
(E30-2022-15)....1
pe.
....
(FO5-1031-05)....1
pe.
7)
[ASHUCTION
MANUAL
,..:ncrccarsrscnorensincunsomensinmnneneva
(B50-4059-00)
..1
copy
Q@@@-20053-x%--s0aGM-+0
aocm
F
hesae
ppppk
neeee
/
f
®
jA7A
PF
OP
BeE_H
Mm
eo
25
coco
4
6)
Pp
@
AFTER
UNPACKING
Shipping
container:
Save
the
boxes
and
packing
in
the
event
your
unit
needs
to
be
transported
for
remote
operation,
maintenance,
or
service.
The
following
explicit
definitions
apply
in
this
manual:
Note:
If
disregarded,
inconvenience
only,
no
risk
of
equipment
damage
or
personal
injury.
Caution:
Equipment
damage
may
occur,
but
not
personal
injury.
1.
FEATURES
®
Compact,
slim
transceiver
for
easy
mobility
Microcomputer
provides
multi-frequency
control
functions
©
Dual
function
keyboard
facilitates
memory
recall
(MR)
¢
High
reliability
by
using
PC
boards
for
each
unit;
high
sensitivity
(12
dB
SINAD
0.22
V)
front-end
using
GaAs
FETs
©
Quality
sound
for
transmission
and
reception
©
HI/LOW
switch
controls
output
power
¢
Repeater
operation
e
Extended
frequency
range*
OnkWN—
2:
3,
.
Coaxial
connector
with
cable
greatly
reduces
effective
depth
when
connec-
ting
an
antenna
cable.
.
External
speaker
system
allows
installation
in
any
place.
.
Remote
frequency
control
unit
(FC-10)
extends
your
operation
a
flexibility.
.
Five
channel
memories
plus
COM
channel.
.
ALERT
function
monitors
memory
channel
1
(M1).
.
Memory
scan
operation
(MS)
from
memory
channels
1
through
5.
.
Programmable
scan
within
the
selected
frequency
range.
.
1
MHz
step-up
function
(MHz).
.
VFO
A
in
5
kHz
(25
kHz;
for
European
and
British
versions)
steps;
VFO
B
in
5
kHz
steps.
.
Beeper
indicates
each
of
7
modes.
“Lue
k,
blebs
.
External
communications
speaker,
77
mm
in
dia.,
supplied.
.
Maximum
3%
modulation
distortion
ensures
good
quality
transmit
signal.
.
COM
system
facilitates
access
to
repeaters
with
the
TU-3
or
TU-3A
tone
unit*
(option)
installed.
The
TU-3
or
TU-3A
2nd
tone
frequency
(one
of
37
frequencies
selectable)
interconnected
with
the
TX
OFFSET
system
enables
access
to
a
repeater.
The
REV
switch
monitors
direct
signal.
Covers
142.0
~
148.995
MHz
in
5
kHz
steps.
(Specifications
guaranteed
for
the
144
~
148
MHz
Amateur
band
only)
2.
CONTROLS
AND
THEIR
FUNCTIONS
©
19) C8)
eo
@
POWER/VOL
SQUELCH
Photo
is
silver
panel
@
FRONT
PANEL
=
=
@
Tuning
control
(VFO)
Used
to
select
the
transmit
and
receive
frequency.
During
memory
recall
operation,
turning
this
control
restores
the
operation
to
VFO
control.
Note:
One
click
rotation
shifts
the
displayed
frequency
one
step
up
or
down.
However,
occasionally
the
frequency
step
may
chang
due
to
microprocessor
transients.
@
VOL/POWER
Power
ON-OFF
switch
and
volume
control.
Turning
the
control
fully
counter-
clockwise
will
turn
the
power
OFF.
Clockwise
rotation
will
increases
the
C)
volume.
OF
©
SQUELCH
The
squelch
control
is
used
to
eliminate
noise
during
no-signal
periods.
Nor-
mally,
this
control
is
adjusted
clockwise
until
the
noise
just
disappears
(squelch
©
threshold).
For
scan
operation,
this
control
must
be
set
to
the
threshold
point.
©
Keyboard
(a)
MR/M1
(memory
recall)
Used
to
recall
memory
channel
information.
key
When
first
depressed,
memory
channel
1
is
recalled.
The
MR
indicator
lights
to
show
memory
recall
has
been
selected.
To
recall
one
of
the
other
memory
(M2
~
M5),
depress
the
MR/M11
key
then
|
the
corresponding
key
M2
~
M5.
(6)
MS/M2
(memory
scan)
Used
to
initiate
memory
channels
scan.
key
During
memory
recall
operation,
depressing
this
key
recalls
memory
CH2.
Cus
During
memory
scan,
depressing
this
key
recalls
the
next
memory
channels.
ae
xe)
MHz/M3
(1
MHz
up)
key
MHz
d)
M/M4
(memory
input)
key
me
v4
—|
e
AL/M5
(alert)
key
je
M5
|
=|
f)
A/B
(VFO
A/B
selection,
scan
stop)
key
A/B
|
©
MIC
connector
(8
pin)
@
COM
(common
channel)
key
COM
-
When
depressed,
the
displayed
frequency
shifts
up
1
MHz.
During
memory
recall
operation,
depressing
this
key
recalls
memory
CH3.
Used
to
store
the
desired
frequency
in
memory.
For
memory
input,
refer
to
page
15.
During
memory
recall
operation,
depressing
this
key
recalls
memory
CH4.
In
memory
CH4,
transmit
and
receive
frequencies
are
stored
independently
for
odd
split
operation.
When
depressed,
the
ALERT
indicator
lights
to
show
alert
operation
is
in
pro-
gress,
Depressing
this
key
again
releases
this
operation.
For
more
details,
refer
to
page
17.
During
memory
recall
operation,
depressing
this
key
recalls
memory
CH5.
Memory
channel
5
is
used
for
odd
split
operation
as
is
memory
channel
4.
The
frequencies
(transmit
and
receive)
stored
in
CH5
designate
frequency
range
limits
for
programmable
scan
operation.
For
more
details,
refer
to
page
15.
As
shown
in
the
table,
this
key
provides
three
types
of
operation.
Mode
A/B
key
functions
VFO
Each
time
the
key
is
depressed,
VFO
A
and
B
are
selected
alternately.
MR
When
depressed,
the
VFO
frequency
that
was
selected
before
memory
recall,
is
restored.
SCAN
When
depressed,
scan
is
released.
Microphone
audio
input.
Frequency
UP/DWN
control
and
PTT
lines
are
includ-
ed.
Pin
assignments
of
the
MIC
connector
are
shown
below.
(5)
8C(
+
8V)
—
(4)
UP
(10
mA
Load)
(3
DWN
(6)
NC
OUSTEvIETT
Note:
Do
not
apply
voltage
to
7)
GND
(MIC)
Dimic
pint
2,
3,
and
@.
—
(8)
GND
Pin
(5)
should
not
be
shorted
or
have
any
FRONT
VIEW
voltage
applied.
When
the
key
is
depressed
initially,
the
common
channel
can
be
recalled
regardless
for
mode.
This
channel
can
be
programmed
to
any
desired
frequen-
cy.
For
common
channel
programming,
refer
to
page
15.
To
release
common
channel
operation,
depress
this
key
again.
No
other
key
will
release
the
opera-
tion.
When
the
optional
TU-3
or
TU-3A
tone
unit
is
installed,
the
1st
tone
frequency
is
emitted
when
operating
the
COM
channel.
@
HI/LOW
switch
m
Hi
|_—=
|
om
LOW
©
Display
@)
S
Frequency
display
Scan
indicator
VFO
B
indicator
MR
indicator
ALERT
indicator
ON
AIR
indicator
BUSY
indicator
S
&
RF
meter
Photo
is
silver
panel
HI
setting:
This
setting
causes
the
transmitter
to
transmit
at
approx.
45
watts.
LOW
setting:
This
setting
causes
the
transmitter
to
transmit
approx.
5
watts.
(a)
d
@)
f
2m
FM
TRANSCEIVER
Mo
7
fm
is
a
ia
MR
ALERT
ON
AIR
a
4
toll
wus
(ge
h
During
VFO
A
or
B,
frequency,
for
example,
145.02
is
displayed
in
four
digits
as
‘'
5.020
''.
5.028
During
MR
(M1
—
M5)
operation,
frequencies,
such
as,
145.24
are
displayed
in
4
digits
as
‘5.240"'.
S.24u
During
COM*
operation,
frequency
is
displayed
in
four
digits.
At
this
time,
zero
at
the
last
digit
is
half
size.
“
European
and
British
versions
excluded.
During
scan
operation,
this
dot
flashes.
In
operations
other
than
scan,
this
dot
lights
to
show
MHz.
Lights
when
VFO
B
is
in
operation.
Lights
during
memory
recall
operation
(M1
—
M5,
MS).
Lights
during
alert
operation.
Lights
when
transmitting.
Lights
during
reception
with
squelch
opened.
This
can
be
used
to
see
if
the
channel
is
busy
or
not.
Indicates
the
incoming
signal
strength
by
LEDs
during
reception.
During
transmission,
LEDs
light
to
show
the
RF
output
level
strength.
With
the
HI/LOW
switch
HI,
al!
LEDs
light.
With
the
HI/LOW
switch
LOW,
two
to
four
LEDs
light.
©
REV
switch
Used
to
reverse
the
repeater
shift
(+600
kHz)
to
monitor
the
repeater
input.
REV
Setting
this
switch
to
ON
in
simplex
operation
locks
the
displayed
frequency
O
regardless
of
VFO,
keyboard,
and
COM.CH
operations.
@
TX
OFFSET
switch
Used
to
select
the
transmit
frequency
offset
(+600
kHz)
for
repeater
use.
For
other
than
of
a
repeater
operation,
place
this
switch
to
the
‘’S’’
position.
This
equalizes
the
transmit
and
the
receive
frequency.
"+"
setting
shifts
+600
kHz;
‘’—"’
setting
shifts
—600
kHz
from
the
receive
frequency
when
transmitting.
This
operation
is
only
effective
in
VFO
and
MR
(M1~M3)
operations.
If
an
offset
frequency
were
to
go
beyond
the
operating
frequency
range
when
depressing
the
PTT
switch
to
transmit,
a
beep
will
sound
three
times
to
indicate
an
error,
and
the
radio
will
transmit
simplex.
*With
the
optional
TU-3
or
TU-3A
tone
unit
installed,
either
‘’+''
or
''—"'
set-
ting
of
the
TX
OFFSET
switch
connects
the
TU-3
or
TU-3A
2nd
tone
frequency
setting.
@
REAR
PANEL
@
ANT
connector
lead
Connect
a
50-ohm
antenna
to
this
terminal.
@
DC
Power
Lead
DC
power
input
lead.
Connect
the
supplied
power
cord
with
plug.
Input
voltage
is
13.8
V
DC.
Observe
plus
(+)
and
minus
(—)
polarity!
@®
SP
Terminal
Connect
the
supplied
8
ohm
speaker
to
this
jack.
@
RIGHT
SIDE
PANEL
®
Remote
jack
Used
to
connect
the
optional
FC-10
unit,
controlling
the
operation
frequency.
Hi
MICROPHONE
(For
U.S.A.
version)
@®
UP/DWN
switches
®
PTT
Switch
@
16
Touch-Tone
Keys
(Auto-
patch
operation)
@
MICROPHONE
(For
versions
other
than
U.S.A.)
@
UP/DWN
switches
®
PTT
switch
1)
2)
3)
Mic-hook
button
KENWOOD
Microphone
Touch-tofe
encoder
Depressing
the
UP
or
DWN
key
momentarily,
shifts
the
displayed
frequen-
cy
one
step
up
or
down.
Holding
the
key
depressed,
continuously
shifts
the
frequency
up
or
down.
Holding
the
UP
or
DWN
key
depressed
for
about
one
second
initiates
scan
operation.
The
scan
direction
depends
on
the
UP
or
DWN
key
operated.
Depressing
the
UP
or
DWN
key
during
MR
operation
will
change
the
opera-
tion
from
MR
to
VFO.
Press-to-talk
switch
is
used
for
transmission.
This
will
also
releases
scan
opera-
tion.
When
releasing
the
SCAN
operation,
transmission
is
inhibited.
Used
to
activate
the
touch-tone
encoder.
ith
2)
3}
Depressing
the
UP
or
DWN
key
momentarily
shifts
the
displayed
frequency
one
step
up
or
down.
Holding
the
key
depressed
continuously
shifts
the
frequency
up
or
down.
Holding
the
UP
or
DWN
key
depressed
for
about
one
second
initiates
scan
operation.
The
scan
direction
depends
on
the
UP
or
DWN
key
operated.
Depressing
the
UP
or
DWN
key
during
MR
operation
will
change
the
opera-
tion
from
MR
to
VFO.
Press-to-talk
switch
used
for
transmission.
This
will
also
release
scan
opera-
tion.
When
releasing
the
scan
operation,
transmission
is
inhibited.
3.
INSTALLATIONS
AND
CONNECTIONS
@
ANTENNA
@
MOBILE
INSTALLATION
¢
Interconnection
®
Installation
location
The
performance
of
the
transceiver
depends
to
a
great
extent
upon
the
type
of
antenna
to
be
used.
To
ensure
the
maximum
performance
of
the
TM-201B,
select
a
suitable
antenna and
adjust
it
for
low
VSWR.
The
TM-201B
is
equipped
with
an
external
speaker.
HTT
MI
J
UUUUUU
To
antenna
Lh
+>
Red
+
Red
Using
the
supplied
mounting
bracket,
install
the
transceiver
under
the
dashboard
or
on
the
side
of
the
console
in
your
car
as
shown.
If
your
car
is
equipped
with
an
electronic
fuel
injector,
the
transceiver
should
be
mounted
as
far
from
the
contro!
equipment
as
possible.
Under
driver's
seat
Side
of
—
console
Speaker
Cushion
(A)
~~
Example
2-3
|
cur
The
transceiver
should
be
located
away
from
your
knees.
Under
the
dashboard
SPEAKER
INSTALLATION
Note:
For
safetys
sake,
do
not
install
the
speaker
on
the
ceiling.
Tapping
screw
($4
x
8)
Example
1-2
//
Mounting
bracket
Example
2-2
Example
2-1
Nut
(to
$4)
Me
ry)
eer
A
rae
roll
\
Fe
:
\,
Mounting
Mounting
(
surface
surface
\
4
(>
pana
©
©
©
0}
Tapping
screw
Round
head
scre\
ath
98x)
pene)
(ax
10)
Bracket
~
Mounting
surface
Speaker
a
Exai
2-1
Cushion
(A)
note
258
Example
2-4
Cushion
(A)
Cushion
(A)
Bracket
©
Installation
procedure
Fig.
a
Boss
securing
oumm—{))
)—4}
Flat
head
-
Boss
Flat
screw
washer
Be
sure
to
use
flat
washers.
However,
when
stack
installation
with
the
TM-401B
is
at-
tempted,
do
not
use
these
washers
since
the
stack
plates
are
used.
Fig.
c
Mounting
bracket
installation
Mounting
surface
Flange
nut
Flat
washer
Spring
washer
Hex.
head
bolt
Mounting
bracket
these
parts
as
shown.
10
Mounting
surface
Mounting
bracket
To
install
the
bracket
on
a
bent
mounting
surface,
bend
Example
2-7
—
Bracket
8
Sy
US
Speaker
1)
Secure
the
bosses
on
each
side
with
4
flat
head
screws.
(Fig.
a)
2)
Affix
the
cushion
(c)
on
each
side
of
the
mounting
bracket.
(Fig.
b)
3)
Secure
the
mounting
bracket
to
the
chassis
as
shown
in
Fig.
c.
When
installing
the
bracket,
be
sure
the
front
part
of
the
bracket
faces
you.
4)
Insert
the
transceiver
as
shown
in
Fig.
d
so
the
bosses
on the
transceiver
slide
into
the
grooves
of
the
mounting
bracket.
5)
To
stack
with
the
TM-401B
(70
cm),
first
secure
the
supplied
stack
plate
to
the
TM-201B
with
bosses
then
stack
the
TM-401B,
second
insert
the
stacked
transceivers
as
shown
in
Fig.
d
so
the
bosses
on
the
upper
transceiver
slide
into
the
grooves
of
the
mounting
bracket.
Fig.
b
Cushion
attachment
Affix
the
cushion
(C)
on
each
side.
Fig.
d
Transceiver
installation
Transceiver
installation
Ensure
the
front/rear
of
the
bracket
when
mounting.
Bosses
iS
Flat
washer
Tapping
screw
Mounting
surface
TM-201B
Rear
part
of
the
bracket.
Flat
screw
Stacking
plate
TM-401B
e
Antenna
Installation
a
a
—
a
ai
eae
Roof-top
system
Roof
side
system
aE
CEN,
LO"
&
JO)
Front
fender
Trunk
lid
system
Installation
for
mobile
operation.
Be
sure
to
use
a
duplex
mobile
antenna.
Coax.
cable
routing
©
Power
supply
©
Ignition
noise
Various
types
of
antennas
for
VHF
mobile
operation
are
available.
Note:
For
gutter-mount
installation,
the
antenna
bracket
must
be
grounded
to
the
car
body
as
shown
below.
Affix
the
antenna
securely,
referring
to
the
antenna
provided
with
your
instructions.
Antenna
installation
Antenna
bracket
Remove
the
paint
to
in-
sure
grounding
to
the
car
body.
Pass
through
the
rear
window.
fa)
Pass
through
the
door
fit-
ting.
The
cable
can
be
in-
serted
easily
if
the
door
cushion
is
soft.
Note
that
rain
water
may
enter
along
the
cable.
Lift
the
trim
plate
and
install
the
cable.
Connect
the
supplied
power
cable,
with
fuse,
directly
to
the
battery
terminals.
Connecting
to
the
cigarette
lighter
socket
can
cause
a
poor
connection,
and
excessive
voltage
drop.
insert
through
the
firewall
Battery
To
battery
Rubber
grommet
mf
y
Connect
directly
to
the
battery
terminals.
The
transceiver
is
designed
to
suppress
ignition
noise;
however,
if
excessive
noise
is
present,
it
may
be
necessary
to
use
suppressor
spark
plugs
(with
resistors).
The
PG-3A
is
available,
should
you
requied
additional
filtering.
11
@
FIXED
STATION
¢
Power
supply
e
Antenna
Yagi
antennas
(ARRAY)
Antenna
Array
Rotor
Control
cable
12
INSTALLATION
[general]
A
regulated
DC
power
supply
(13.8
V
DC,
9.5
A
or
more)
is
required.
It
is
recommended
that
the
PS-430
be
used
for
a
power
supply.
Use
of
the
PS-430
NOTE:
Preferably,
voltage
should
be
adjusted
to
13.8
V
DC.
Current
capacity
is
more
than
9.5
A.
The
regulated
supply
should
be
equipped
with
a
built-in
Ground
plane
antenna
protection
circuit
for
both
overcurrent
and
over-
voltage.
CAUTION
A
battery
charging
power
supply
cannot
be
used.
TM-201B
~7s
~~
di
}
Various
types
of
fixed
station
antennas
are
commercially
available,
select
your
desired
antenna
according
to
your
installation
space
and
application.
Note
that
the
SWR
of
your
antenna
should
be
less
than
1.5.
A
high
SWR
will
cause
the
TM-201B
protective
circuit
to
operate,
reducing
the
transmit
output
power.
Transceiver
performance
depends
largely
on
the
type
of
antenna
used.
For
fixed
station
operation
there
are
ground
plane
antennas
(omni-
directional)
and
Yagi
antennas
(uni-
directional).
The
Yagi
antenna
is
suitable
for
long
distance
operation
(OX)
or
communication
with
a
specific
party.
(having
excellent
directivity
and
antenna
is
generally
used
for
local
operation.)
Tower
4.
OPERATION
@
RECEPTION
©
SQUELCH
control
OF
When
power
and
antenna
connections
are
complete,
set
the
controls
and
swit-
ches
as
follows:
Me
om
ALERT
ON
AR
2m
FM
TRANSCEIVER
POWER
VOL
SouELen
Connect
microphone
After
verifing
the
initial
setup
of
controls
and
switches,
proceed
as
follows:
(1)
Turn
the
POWER/VOL
control
clockwise
to
turn
on
power.
The
indicators
on
the
display
light
to
show
the
transceiver
is
operating.
(2)
As
the
POWER/VOL
control
is
turned
clockwise,
either
noise
or
a
QSO
is
heard.
(3)
To
eliminate
the
no-signal
noise,
use
the
SQUELCH
control.
For
SQUELCH
control
operation,
refer
to
next
explanation.
(4)
Tune
to
the
desired
frequency
using
the
MAIN
DIAL.
To
eliminate
receiver
noise
during
no-signal
periods,
slowly
adjust
the
squelch
clockwise
until
the
noise
just
disappears,
and
the
BUSY
indicator
goes
off
(threshold
point).
When
a
signal
is
received,
the
squelch
will
open,
the
BUSY
indicator
will
light
and
the
speaker
will
operate.
The
SQUELCH
control
is
also
used
for
scan
operation
control.
If
the
signal
is
weak
or
fades
during
mobile
operation,
readjust
the
squelch
for
constant
reception.
l@
TRANSMISSION
¢
Transmitter
precautions
¢
HI/LOW
power
switch
ma
Hi
=
LOW
To
transmit,
first
select
the
desired
frequency
to
be
used
and
see
whether
it
is
busy
or
not.
If
it
is
not
busy,
simply
depress
the
mic
PTT
switch
for
transmis-
sion.
The
ON
AIR
indicator
lights
1)
The
TM-201B
antenna
impedance
is
50
ohms.
Be
sure
to
use
only
an
antenna
of
50
ohms
impedance.
2)
Check
the
intended
transmit
frequency
before
operating
to
prevent
in-
terference
with
other
stations
3)
Pressing
the
microphone
PTT
switch
places
the
transceiver
in
transmit
mode;
the
ON
AIR
indicator
will
light
and
the
LED
bar
meter
shows
transmitter
power.
Recommended
talk
distance
to
the
microphone
is
ap-
proximately
5
cm.
In
local
QSO's
can
be
enjoyed
with
less
interference
to
others
and
with
less
power
consumption
by
reducing
the
RF
output
power.
This
is
accomplished
by
depressing
the
HI/LOW
switch,
which
reduces
power
from
45
W
to
approx.
5
W.
The
power
indication
will
drop
to
approximately
‘'2~4"'
on
the
meter.
13
oe
@
16
key
AUTO
PATCH
OPERATION
@
VERIFICATION
BEEP
TONE
14
To
operate,
hold
the
mic
PTT
switch
depressed
until
after
the
first
key
has
been
depressed.
Note:
1.
After
PTT
operation
is
initiated,
the
transceiver
will
remain
in
transmit
mode
even
with
the
PTT
switch
released.
2.
More
than
0.8
seconds
keying
interval
between
digit
entry
will
return
the
radio
to
receive
mode.
3.
The
touch-tone
encoder
level
can
be
readjusted
according
to
your
re-
quirement.
When
readjusting,
set
the
deviation
to
3
kHz
by
using
the
built-in
VR
(in
the
mic.)
with both
the
3
and
6
keys
of
the
encoder
held
depressed.
Next,
hold
both
the
2
and
3
keys
depressed
to
verify
the
deviation
which
is
within
1.2
kHz+0.3
kHz.
When
operating,
several
beep
sounds
are
provided
to
indicate
operation.
Beep
level
can
be
adjusted
by
the
potentiometer
inside.
(page
18)
Beep
When
beep
will
sound
Once
When
a
key
is
operated
correctly.
Twice
When
CH1
is
busy
during
alert
operation.
When
ordering
memory
scan
with
all
memory
channels
Three
times
empty.
When
an
offset
frequency
is
out
of
operating
frequency
range.
Four
times
When
transmit
frequency
for
odd
split
is
not
stored,
the
repeatedly
beep
will
sound
until
the
frequency
is
stored.
Five
times
During
REVerse
operation
Eight
times
When
memory
is
ready
to
be
stored.
Once
for
approx.
F
1.5
sec.
When
memory
is
stored.
@
MEMORY
INPUT
IN
(REPEATER
COM
CHANNEL
AND*)
MEMORY
CHANNEL
(1)
In
memory
channels
1
—
3
Procedure
Operation
(Simplex
channels)
Set
frequency
to
be
stored
using
the
tuning
control
or
mic
UP
or
DWN
switch.
2
|
Memory
standby
|
Depress
the
M/M4
key.
The
beep
will
sound
eight
times.
Depress
M1,
M2
or
M3
key
while
the
beep
is
sounding.
The
1.5
second
beep
sounds
to
verify
the
memory
input.
1
|
Freq.
setting
3
|
Memory
input
(2)
In
memory
channels
4,
5
Procedure
Operation
and
COM*
(split
channel)
1
Receive
freq.
Set
receive
frequency
to
be
stored
using
the
tuning
con-
setting
rol
or
mic
UP
or
DWN
switch.
2
|
Memory
standby
|
Depress
the
M/M4
key.
The
beep
will
sound
eight
times.
Depress
M4,
M5
or
COM*
key
while
the
beep
sound
is
sounding
3
|
Memory
input
The
1.5
second
beep
sounds
when
the
memory
is
input.
Then
the
beep
sounds,
4
times
repeatedly
to
require
a
transmit
frequency
input.
4
Transmit
freq.
Set
transmit
frequency
to
be
stored
using
the
tuning
con-
setting
trol,
mic
UP
or
DWN
switch,
or
MHz
key.
5
Memory
input
Depress
the
same
key
used
in
step
3.
(transmit)
The
1.5
second
beep
sounds
when
the
memory
is
input.
@
SCAN
OPERATION
(1)
Memory
scan
(Memory
channels
1
—
5
are
scanned.)
Before
operating
scan,
adjust
the
SQUELCH
control
to
the
threshold
point.
Procedure
Operation
Indication
Depressing
the
MS
key
initiates
scan
from
memory
channel
1
to
5
as
shown.
1
|
Scan
start
1
ed
>
M5
C
:
J
.
Empty
channels
are
skipped.
Flashes
2
Scan
will
stop
at
busy
station,
Depressing
the
MS
key
recalls
the
next
memory
channel.
Depressing
the
A/B
key
or
the
mic
PTT
switch
stops
the
scan.
°
The
displayed
memory
channel
is
restored
to)
Lights
memory
recall
mode.
3
|
Quick
scan
4
|
Scan
release
To
perform
MS
operation
again,
depress
the
A/B
key
to
release
MR
operation.
15
(2)
Programmable
scan
16
144.5
8
During
VFO
A
or
B
operation,
depressing
and
holding
the
mic
UP
or
DWN
switch
for
1
second
will
initiates
scan
programmed
within
the
range
set
bet-
ween
receive
and
transmit
frequencies
designated
in
memory
channel
5.
144.0
Upper
limit
Lower
Up
scan
limit
Down
scan
ii)
When
VFO
is
at
point
B,
scan
starts
as
shown.
T
Up
scan
Down
scan
As
shown
in
the
figure,
R
denotes
the
receive
frequency
in
CH
5;
T
denotes
the
transmit
frequency
in
CH
5.
i)
When
VFO
is
at
point
A,
scan
starts
as
shown.
iii)
When
R
and
T
are
equal,
scan
operates
through
the
whole
frequency
range.
Procedure
Operation
Indication
1
|
Scan
range
setting
Store
lower
and
upper
limit
frequencies
in
memory
channel
5
by
operating
the
M,
M5,
tuning
control
UP,
DWN
or
MHz
switch.
2
|
Scan
start
Hold
the
mic
UP
or
DWN
switch
depressed
for
more
than
one
second.
The
scan
starts.
The
megahertz
dot
starts
flashing
°
Flashes
3
|
Scan
will
stop
at
a
busy
station
and
resume
in
6
seconds.
4
|
Scan
resume
Scan
resumes
regardless
of
signal
when
operating
the
tuning
control
or
UP/DWN
switch
5
|
Rapid
scan
Holding
the
UP/DWN
switch
depressed
allows
rapid
up
or
down
scan.
Holding
the
MHz
key
depressed
allows
rapid
scan
in
1
MHz
steps.
6
|
Scan
direction
During
up
scan,
depressing
the
DWN
key
or
turning
the
tuning
control
one
click
to
the
left
reverses
the
direction.
During
down
scan,
reversing
the
above
pro-
cedure
reverses
the
direction.
7
Other
scan
range
operation
Holding
the
UP/DWN
key
depressed
allows
the
scan
to
go
beyond
the
upper
or
lower
frequency
limit
Example:
During
up
scan
from
R
to
T,
hold
the
UP
key
depressed
and
allow
the
scan
to
go
beyond
T.
The
scan
goes
from
T
to
R.
(Outside
the
programm-
ed
limits)
8
|
Scan
release
Depressing
the
A/B
key
or
mic
PTT
switch
releases
the
scan.
The
flashing
dot
will
stop.
°
Lights
(3)
Releasing
memory
scan
or
Programmable
scan
@
ALERT
OPERATION
To
release
scan
operation,
normally
depress
the
A/B
key
or
the
mic
PTT
switch
once.
During
scan,
the
mic
PTT
switch
operation
will
release
the
scan
but
not
transmit.
During.scan
operation,
the
following
operations
will
release
the
scan.
¢
Depressing
the
COM*,
MR
key.
®
Turning
off
the
POWER
switch.
¢
Depressing
the
UP
and
DWN
keys
simultaneously
during
programmable
scan.
Used
to
monitor
the
frequency
stored
in
memory
channel
1,
whether
or
not
it
is
busy,
during
any
mode
operation.
When
memory
channel
1
is
busy,
two
beeps
sound.
6
seconds
Current
receive
frequency,
Example
145.32.......cccccccsessseseseeee
Frequency
stored
in
CH1,
Example
145.50
.....cccccscssessseseeseseces
crseaseavenre
LU LU
L
0.3
seconds
When
the
ALERT
operation
is
in
use,
memory
channel
1
is
monitored
once
every
6
seconds.
During
this
period,
voice
is
silenced.
During
the
3
seconds
requieed
to
scan
the
priority
channel
key
operation
to
inhibited.
17
5.
MAINTENANCE
AND
ADJUSTMENT
M@
COVER
REMOVAL
1
Loosen
5
screws
($2.65
mm)
of
the
side
@
BEEPER
ADJUSTMENT
@
LITHIUM
BATTERY
7
@
MICROCOMPUTER
RESET
18
panels.
2
To
remove
the
top
cover,
remove
2
screws
j
(62.6
x5
mm).
i
Ss
emma
3
To
remove
the
bottom
cover,
remove
5
Loosen
screws
(@2.6X
5
mm).
Adjust
VR1
on
unit
B
(X53-1340-11/61)
to
the
desired
level.
Reset
opening
A
lithium
battery
is
contained
in
the
transceiver
to
retain
memory.
Therefore,
turning
off
the
POWER
switch,
disconnecting
the
power
cable,
or
a
power
failure
will
not
clear
the
memory.
The
battery
will
last
approximately
five
years.
When
the
battery
discharges
an
erroneous
display
may
appear
on
the
LCD.
Lithium
battery
replacement
should
be
performed
by
an
authorized
TRIO-
KENWOOD
service
facility
either
your
TRIO-KENWOOD
dealer,
or
the
factory.
Note:
When
the
lithium
battery
is
replaced,
the
microprocessor
must
be
reset.
Note:
Removing
the
battery
does
not
require
reprogramming
the
operating
system,
only
your
memory
channel
information
etc.
Depress
the
reset
switch
with
a
nonconductive
rod,
through
the
reset
opening
of
the
bottom
cover
as
shown
6.
ACCESSORIES
M@
USE
OF
THE
REMOTE
FREQUENCY
CONTROL
(OPTION)
Connecting
the
remote
frequency
control
(FC-10)
allows
you
to
operate
the
transceiver
more
handily.
Note:
When
connecting
or
disconnecting
the
FC-10
from
the
transceiver,
the
POWER
switch
of
the
transceiver
should
be
set
to
OFF,
or
the
FC-10
may
be
damaged.
1)
Display
(The
following
numbers
correspond
to
those
in
the
figure
above.)
©®
©©
©
©
2)
Keyboard
i)
ee
@
PS-430
POWER
SUPPLY
@
PG-3A
LINE
FILTER
REQUENCY
|
S.
Hi
Hi
Pri
ad
—
(Comiceaicrm
Frequency
display:
Indicates
in
four
digits.
Example:
Indication
5
MHz
denotes
145.0
MHz.
ALERT
display:
During
ALERT
operation,
the
(%)
lights.
VFO
A/B:
(#1)
denotes
VFO
A;
(4)
denotes
VFO
B.
&)
denotes
COM"
operation;
(1
—
5)
denotes
memory
channel
1
—
5.
Scan
display:
Flashes
during
scan
operation.
In
memory
scan,
memory
address
is
displayed
at
@).
In
programmable
scan,
()
or
(%)
is
displayed
at
@).
MHz
key:
When
used,
the
VFO
displayed
frequency
is
shifted
up
in
1
MHz
steps.
MR
key:
This
key
has
two
functions:
Memory
recall;
and
COM"
recall.
cial
*M1-M2-
+s
reser
ee
The
VFO
frequency
is
not
memorized
during
[A/B]
—
[MR]
—
[A7B
key
Operation.
After
[A/B]
key
is
pushed
twice,
push
[MR
key
so
that
the
VFO
frequency
can
be
recalled.
.
UP/DWN
key:
These
keys
function
the
same
as
those
of
the
microphone.
A/B
key:
This
switch
functions
the
same
as
that
of
the
transceiver
With
this
switch,
COM*
operation
can
be
released.
@
SW-100A/100B
SWR
METER
li
SW-200A/200B
SWR
METER
@
MC-55
(8P)
MOBILE
MICROPHONE
@
SWT-1/SWT-2
ANTENNA
TUNER
lH
MC-60A/80/85
DESK
TOP
MICROPHONE
i
PG-2K
DC
CABLE
@
MA-4000
MOBILE
ANTENNA
@
TU-3/TU-3A
(TWO-TONE
UNIT:
OPTION)
°
Accessories
©
Tone
Frequency
Setting
[ZAVER
IVER
=)
O©OOO@O
To
set
subtone,
cut
diode(s)
according
to
the
table.
Diode
Matrix
(D9)
Setting
©
Tone
unit
Installation
Mount
D9
as
shown.
Peel
waxed
sheet.
RIVER
<
RIVER
<
S——
Cushion
Attachment
Affix
this
adhesive
cushion
to
the
TU-3.
_
Peel
waxed
sheet
20
TU-3
Unit
Installation
BWN
=
.
Diode
Matrix
(D9)
..............
.
Adhesive
Cushion.............
.
Tone
Frequency
Name
Plate
.
Instruction
Manual.............
.
Select
the
desired
first
tone
frequency
by
cutting
selected
diodes
from
diode
array
DQ,
referring
to
the
table.
Example:
To
set
to
94.8
Hz,
cut
D9
diodes
as
shown.
To
install
D9,
use
a
45-W
(or
less)
soldering
pencil
and
solder
carefully,
heating
the
connections
only
long
enough
to
insure
a
good
solder
joint.
Do
not
over
heat.
.
Select
the
desired
second
tone
frequency
by
setting
the
6-bit
dip
switch,
referring
to
the
table.
Example:
To
set
to
100.0
Hz,
set
the
dip
switch
as
shown.
.
Install
the
supplied
diode
array
D9
(frequency
preset)
in
the
TU-3
unit
as
shown,
.
Loosen
five
screws
on
both
sides
of
the
transceiver.
.
Remove
two
screws
from
the
top
cover.
Lift
the
rear
part
of
the
cover
and
remove
it.
.
Peel
the
waxed
sheet
off
the
cushion
and
affix
the
cushion
to
the
TU-3
PC
board.
.
Peel
the
waxed
sheet
off
the
cushion
affixed
to
the
TU-3
unit.
Affix
the
TU-3
unit
to
the
mounting
space
of
the
transceiver.
.
Plug
the
5-pin
connector
into
its
mating
jack
on
the
TU-3
unit.
.
Replace
the
transceiver
top
cover
and
secure
with
two
screws.
.
Tighten
five
screws
on
both
side
of
the
transceiver.
.
Affix
the
supplied
tone
frequency
name
plate
on the
transceiver
bottom
cover,
EIA
Specification
Group
EIA
Program
Lines
EIA
Program
Lines
#
|
Specification
(ON:+:1,
OFF+--0)
|
#
|
Specification
(ON:++1,
OFF++-0)
Group
Hz
{
23
4°S
&
Group
Hz
|
23
4
5 6
I|A
67.0
L £
A
1);
2tya
141.3);1
0
OO
8
@
2/8
Fi
1 £
do
1}
22)
B
146.2
I
of
oD
s@r
3]
°C
74.4
rot?
@
1
bapa
1540;
2
TP
TW
«OO
4|A
Th,
lL sf
2
oh
©
24|B
156.7/0
1
100
1
5]
C
79
1
1
1
1/25)
A
162.2;0
1 1
}
0
DO
6|B
8:
1
vy
1
©
1}
26/8
1679]
0
F
OL
iO
a
Rc
85
!
7
)
1]
27]
A
173.8)0
1
0
1
0
0
Bi
A
88.5.
1 1
4
0
0}
28)B
1799.9/0
1000
1
g/cc
91:5
10
©
2B
ft
Ly
2na
186.2/0
100
0
0
10)
8B
94.8
1
bi
tO
1)
300)
8
1922.8;0
0
1
1
0
1
Il]
A
0
1 1
0
1
0
OF
31]
A
205.5
)0°
0
1
1
0
@
12;
B
5/1
1
0
0
0
1)32/B
210.7;09
0
100
1
IZ}
A
21
10
OF
0
O/
3k)
4
a2i3.1/0
@
1
0
@
Oo
14/8
9)71
0
1 1
0
1/34/86
225.7"
||
O'
0
Oo
TO
|
I5|A
8/1
0
1
1
0
O1
35/4
233.6);0
0010
0
16]
B
811
0
1
@
1]
36/B
241.8)/0
0000
1
WW]
A
Oj/1
@
rt
dO
G/s7
A
260.3;0
00000
18|B
“2
11
O
O
1
0
fT
I9|}A
@/1
0010
0
20|B
6
|1
0
@ o
1

Other manuals for TM-201B

3

Other Kenwood Transceiver manuals

Kenwood NX-3220E2 User manual

Kenwood

Kenwood NX-3220E2 User manual

Kenwood TK-6110 User manual

Kenwood

Kenwood TK-6110 User manual

Kenwood TS-660 User manual

Kenwood

Kenwood TS-660 User manual

Kenwood TH-K4AT User manual

Kenwood

Kenwood TH-K4AT User manual

Kenwood TK-3360 User manual

Kenwood

Kenwood TK-3360 User manual

Kenwood ProTalk NX-P1200AV User manual

Kenwood

Kenwood ProTalk NX-P1200AV User manual

Kenwood TR-9000 User manual

Kenwood

Kenwood TR-9000 User manual

Kenwood UBZ-LF14 User manual

Kenwood

Kenwood UBZ-LF14 User manual

Kenwood TS-930S User manual

Kenwood

Kenwood TS-930S User manual

Kenwood PKT-03 User manual

Kenwood

Kenwood PKT-03 User manual

Kenwood TK-2212 User manual

Kenwood

Kenwood TK-2212 User manual

Kenwood TM-271A User manual

Kenwood

Kenwood TM-271A User manual

Kenwood ProTalk TK-2100 User manual

Kenwood

Kenwood ProTalk TK-2100 User manual

Kenwood TK-90 User manual

Kenwood

Kenwood TK-90 User manual

Kenwood TK-880 series User manual

Kenwood

Kenwood TK-880 series User manual

Kenwood TH-G71A User manual

Kenwood

Kenwood TH-G71A User manual

Kenwood FleetSync TK-690 User manual

Kenwood

Kenwood FleetSync TK-690 User manual

Kenwood TK-3212 User manual

Kenwood

Kenwood TK-3212 User manual

Kenwood TM-261A User manual

Kenwood

Kenwood TM-261A User manual

Kenwood TK-3160 User manual

Kenwood

Kenwood TK-3160 User manual

Kenwood TK-5820 User manual

Kenwood

Kenwood TK-5820 User manual

Kenwood NEXEDGE NX-700 series User manual

Kenwood

Kenwood NEXEDGE NX-700 series User manual

Kenwood TK-P721 User manual

Kenwood

Kenwood TK-P721 User manual

Kenwood TS-820S User manual

Kenwood

Kenwood TS-820S User manual

Popular Transceiver manuals by other brands

Miranda FXE-1501 Guide to installation and operation

Miranda

Miranda FXE-1501 Guide to installation and operation

Parrot FC6100 ASPEN datasheet

Parrot

Parrot FC6100 ASPEN datasheet

Expert Electronics SunSDR2 DX user manual

Expert Electronics

Expert Electronics SunSDR2 DX user manual

Transition Networks E-FRL-MC03 user guide

Transition Networks

Transition Networks E-FRL-MC03 user guide

Delta Electronics Optical Transceiver Modules LC-155Axxxxx Specification sheet

Delta Electronics

Delta Electronics Optical Transceiver Modules LC-155Axxxxx Specification sheet

Yaesu FT-900 Technical manual

Yaesu

Yaesu FT-900 Technical manual

K.W. Electronics KW Atlanta instruction manual

K.W. Electronics

K.W. Electronics KW Atlanta instruction manual

Simrad WBAT Setting up

Simrad

Simrad WBAT Setting up

REnex Technology ZcoRE3-2400 series user manual

REnex Technology

REnex Technology ZcoRE3-2400 series user manual

Satel slr6 user guide

Satel

Satel slr6 user guide

Alinco DJ-MD5 user manual

Alinco

Alinco DJ-MD5 user manual

Wouxun KG-619 Service manual

Wouxun

Wouxun KG-619 Service manual

Technisonic Industries Limited TDFM-600 Maintenance manual

Technisonic Industries Limited

Technisonic Industries Limited TDFM-600 Maintenance manual

Keysight Technologies S9101A Startup guide

Keysight Technologies

Keysight Technologies S9101A Startup guide

General Radiotelephone Company Super MC-IIA Operation guide

General Radiotelephone Company

General Radiotelephone Company Super MC-IIA Operation guide

Braun SE 280 user manual

Braun

Braun SE 280 user manual

Yellobrik OBD 1410 quick reference

Yellobrik

Yellobrik OBD 1410 quick reference

Spotwave SpotCell 167 Quick installation guide

Spotwave

Spotwave SpotCell 167 Quick installation guide

manuals.online logo
manuals.online logoBrands
  • About & Mission
  • Contact us
  • Privacy Policy
  • Terms and Conditions

Copyright 2025 Manuals.Online. All Rights Reserved.