KEYBOARDPARTNER HX3.6 User manual

User Manual
Hammond XB2 with HX3.6
(As of firmware version 6.010, May 2023)
keyboardpartner.com

2 XB2 Kit
Please read this manual carefully before using the HX3/XB2.
Designed for indoor use only. Do not use in moist places. Do not spill
liquids or solvents into unit.
No user-serviceable parts inside. Refer to qualified technician or service
representative if problems occur.
Only clean with damp soft cloth. Using detergents or solvents may
deteriorate finish and lettering.
Keep packaging in case of service shipment.
EU conformity declaration
The producer/distributor
KEYBOARDPARTNER UG
Entwicklung elektronischer Musikinstrumente
Carsten Meyer
Ithweg 37, D-30851 Langenhagen
info@keyboardpartner.de
hereby declares, that the product
HX3 XB2 Retrofit Kit
has been designed, produced and examined in compliance with the DIN VDE 0580 standard and in
accordance with the EU Low Voltage Directive.
Following directives, standards and guidelines have been used:
EMV-Richtlinie 2014/30/EU
Niederspannungsrichtlinie 2014/35 EU
RoHS-Richtlinie 2011/65/EU
Langenhagen, May 2023
____________________________
Carsten Meyer / Geschäftsführer

XB2 Kit 3
Inhalt
HX3.6 Retrofit Kit for Hammond XB2...............................................................................................4
Features.......................................................................................................................................4
HX3 Apps and Tools........................................................................................................................5
HX3.6 Manager............................................................................................................................5
TouchOSC for HX3 ......................................................................................................................5
Connectors and pots at the rear side...............................................................................................6
Button functions...............................................................................................................................7
Potentiometers.................................................................................................................................9
Volume/Expression Control..........................................................................................................9
Menu Panel....................................................................................................................................10
Saving settings .......................................................................................................................10
Menu Overview ..........................................................................................................................11
Start menu..............................................................................................................................12
Upper Voice............................................................................................................................13
Lower Voice............................................................................................................................13
Pedal Voice.............................................................................................................................13
Audio Setup............................................................................................................................14
Reverb Levels.........................................................................................................................15
Rotary Setup...........................................................................................................................15
Percussion Setup....................................................................................................................16
Vibrato Setup..........................................................................................................................16
Organ Setup ...........................................................................................................................16
Keyboard/MIDI........................................................................................................................18
Updates..........................................................................................................................................20
DSP Files ...................................................................................................................................20
MIDI Control...................................................................................................................................22
Panic button ...............................................................................................................................22
How To …?....................................................................................................................................23
Serial numbers and licenses..........................................................................................................24

4 XB2 Kit
HX3.6 Retrofit Kit for Hammond XB2
With the HX3.6 Retrofit Kit, the Hammond XB2 finally sounds like the real thing. If MUSE or DRB
chip have died, HX3 revives your XB2 with a new soul.
HX3 is a tonewheel emulator with all the features of a classic electromagnetic organ. The HX3
sound engine offers unlimited polyphony and 100 presets, 3 x 15 drawbar presets and CaM rotor
simulation with rotary speaker, scanner vibrato and amp 122. General MIDI sounds like piano and
strings are also available.
Optionally (with Extended License) the HX3 RealOrgan sound generator is capable of recreating
all electromagnetic organs, including the famous H100, plus combo organs and concert organs of
the 70s and 80s like Böhm Orchestra and Wersi Helios.
This manual covers the rebuilt Hammond XB2 with basic retrofit kit consisting of HX3.6 mainboard
and two interface boards, which allow to continue using all existing controls of the Hammond XB2,
as well as the optional additions HX3.5 extension board, menu control unit and WiFi interface.
Features
Authentic reproduction of the tone generator. Key contacts, percussion, rotary effect, scanner
vibrato and TubeAmp realized using physical modeling in pure hardware.
Extremely low internal latency of 50 microseconds Key-to-Audio.
Natural key click due to 9 (B3 mode) or 12 (H100 mode) virtual contacts closing separately
Authentic ‘CaM Rotor’ simulation with 122 amp
General MIDI (GM) Synth, 54x polyphonic
Transposable in semitone steps, tunable in range of A = 433 through 447 Hz
Effects DSP providing 3 reverb programs, level adjustable
MIDI IN for separate keyboard or bass pedal, 2x MIDI OUT with selectable CC sets
Swell (expression) pedal and footswitch jacks
Connector for 11-pin Leslie® Speakers
Wirelessly operable via TouchOSC (iOS, Android) if the optional WiFi interface is installed
Made in Germany
Trademarks Hammond®, B3® and Leslie® belong to Hammond Suzuki Corporation (Japan). Trademark NI B4
belongs to Native Instruments GmbH, Germany. Product and company names used in this document apply for
illustration and example purposes only. Keyboardpartner is not related to these trade marks in any way.

XB2 Kit 5
HX3 Apps and Tools
If the optional control unit is installed, you can control the HX3/XB2 completely via the menu panel
(see section Menu Panel). However, there are other, more convenient options: Use the Panel in
the HX3 Manager for operation via PC or notebook. Use TouchOSC for operation via tablet or
smartphone.
HX3.6 Manager
The HX3.6 Manager supports the use of your HX3 device
with a variety of functions:
The Panel contains switches and drawbars for your HX3
device. In the panel window you can adjust sounds and
effects, create, name and save presets. When the panel is
open, you can recall presets live using the function keys on
your PC keyboard.
The Preset Mover makes it easy to manage presets. It lets
you try out, move, and rename presets. You can transfer
presets from a file to the HX3 device or save them to a file.
The Editor lets you set up the HX3 for all conceivable
hardware configurations, gives you access to all available
parameters, and lets you fine-tune sounds and effects.
With the CC Set Editor you can edit the MIDI CC Sets of the
HX3, create CC Sets or load them from a file from your PC.
This allows you to get the most out of your keyboard
controller, even if none of the included CC Sets fit right
away.
The Updater updates the operating software of your HX3
device completely in an automatic process or individual
selected parts. Use the Updater also to activate an Extended
License or to change the username.
TouchOSC for HX3
Control your HX3 device via tablet or smartphone with the TouchOSC mk1 app from Hexler, which
you can get for a few euros in the Apple App Store or Google Play. For wireless connection of iOS
or Android mobile devices we offer a WLAN interface. iOS devices can also communicate with
TouchOSC via MIDI over USB.

6 XB2 Kit
Connectors and pots at the rear side
Left to right:
LESLIE Standard 11-pin Leslie® speaker connector for newer Hammond Suzuki loudspeaker
cabinets. Not suitable for 9-pin Leslie® speakers with passive adaptor due to different polarity of
switching voltages. We recommend using a Leslie® preamp for 6-pin and 9-pin Leslie® speakers.
Of course, this output only works if the optional HX3.5 Extension Board is installed.
USB USB B-type connector for MIDI over USB, for updates and configuration by HX3 Manager
application.
Headphone ¼” stereo jack. Headphone amplifier output.
Audio L ¼” mono jack. Audio output left channel (line level).
Audio R ¼” mono jack. Audio output right channel (line level).
Swell ¼” stereo jack. Expression pedal input is compatible with Yamaha FC-7 and similar
expression pedals (direct connection preferred for speed/accuracy, but may also be remote
controlled by MIDI control change, controller 11). Plug connection: Sleeve = ground /
potentiometer start, ring = potentiometer tap, tip = potentiometer end.
Footswitch ¼” stereo jack. Single or double foot switch controls simulated rotary speed as well as
external rotary cabinet speed: SLOW/FAST on plug tip, RUN/STOP on plug ring. Please use
latching foot switches; momentary (button type) switches are not supported. If single foot switch is
used, Rotary is always on RUN (no plug ring, input grounded by plug sleeve). The switch affects
both the internal simulation and an externally connected Leslie®.
Potentiometers Bass, Treble Equalizer settings Equalizer (can be assigned other functions with
the HX3.6 Manager/Editor).
FOOT SWITCH socket is not used.
WiFi antenna (optional).
MIDI OUT1, MIDI OUT2 MIDI outputs for connecting external devices or DAW. The HX3/XB2
generates MIDI signals with a velocity component, which can also be used to control piano
expanders, for example.
MIDI IN Input for MIDI signals from any MIDI-capable keyboard or pedal.
The CC Sets for MIDI input and outputs are selectable and can be edited with the CC Set Editor.

XB2 Kit 7
Button functions
Almost all buttons are double assigned. After
switching on, the organ is in standard mode. The
buttons are assigned to the functions marked in white
letters.
Press the Edit button on the front panel to access the
other functions, which are printed in cyan.
The display shows the accessed HX3 functions -
useful especially for the unlit buttons.
The HX3 sound engine is designed for a fully equipped organ with upper manual, lower manual
and bass pedal. You can connect another manual or pedal via MIDI (see chapter MIDI control).
You can split the XB2 manual and play either the lower manual or bass with the left hand.
Split functions: In Edit mode, press the Keyb Split button to split the keyboard into two zones.
There are the following options:
oLower to Upper: Press a single key on upper manual while switching SPLIT on to map lower
to upper manual up to this key.
oPedal to Upper: Press two keys simultaneously on upper manual while switching SPLIT on to
map pedal to upper manual up to highest of both keys pressed (useful for playing pedal bass
lines on single manual keyboards without bass pedal).
oLower to Upper +1: Press three keys simultaneously on upper manual while switching SPLIT
on to map lower to upper manual up to highest of all keys pressed. Lower notes range is
transposed one octave up (useful for left-hand 8’ accompaniment chords on single manual
keyboards).
oLower to Upper +2: Press four keys simultaneously on upper manual while switching SPLIT
on to map lower to upper manual up to highest of all keys pressed. Lower notes range is
transposed two octaves up (useful for left-hand 16’ accompaniment chords on single manual
keyboards).
With the Drawbars U | L | P button you assign the drawbars cyclically to the manuals or the pedal.
Press the button once, the LED lights steadily, drawbars now affect the lower manual. Press
again, the LED flashes, drawbars now act on the pedal. Press next time, LED turns off, drawbars
act on upper manual again. When switching to pedal, the first two drawbars are assigned to 16'
and 8' harmonics, with the third you can set the pedal decay ("sustain"). The other drawbars have
no function.
Drawbar settings only become effective when the drawbars are actuated.

8 XB2 Kit
Percussion Second or Third switch the percussion effect of the upper manual on or off at the 4'
or 2 2/3' foot position respectively. When percussion is on, the 1' drawbar is turned off, as with the
real thing (optional, can be changed in the editor). The percussion does not sound every time a
key is pressed, but only if all keys have been released beforehand. The level can be set in the
Percussion Setup submenu or in the Editor.
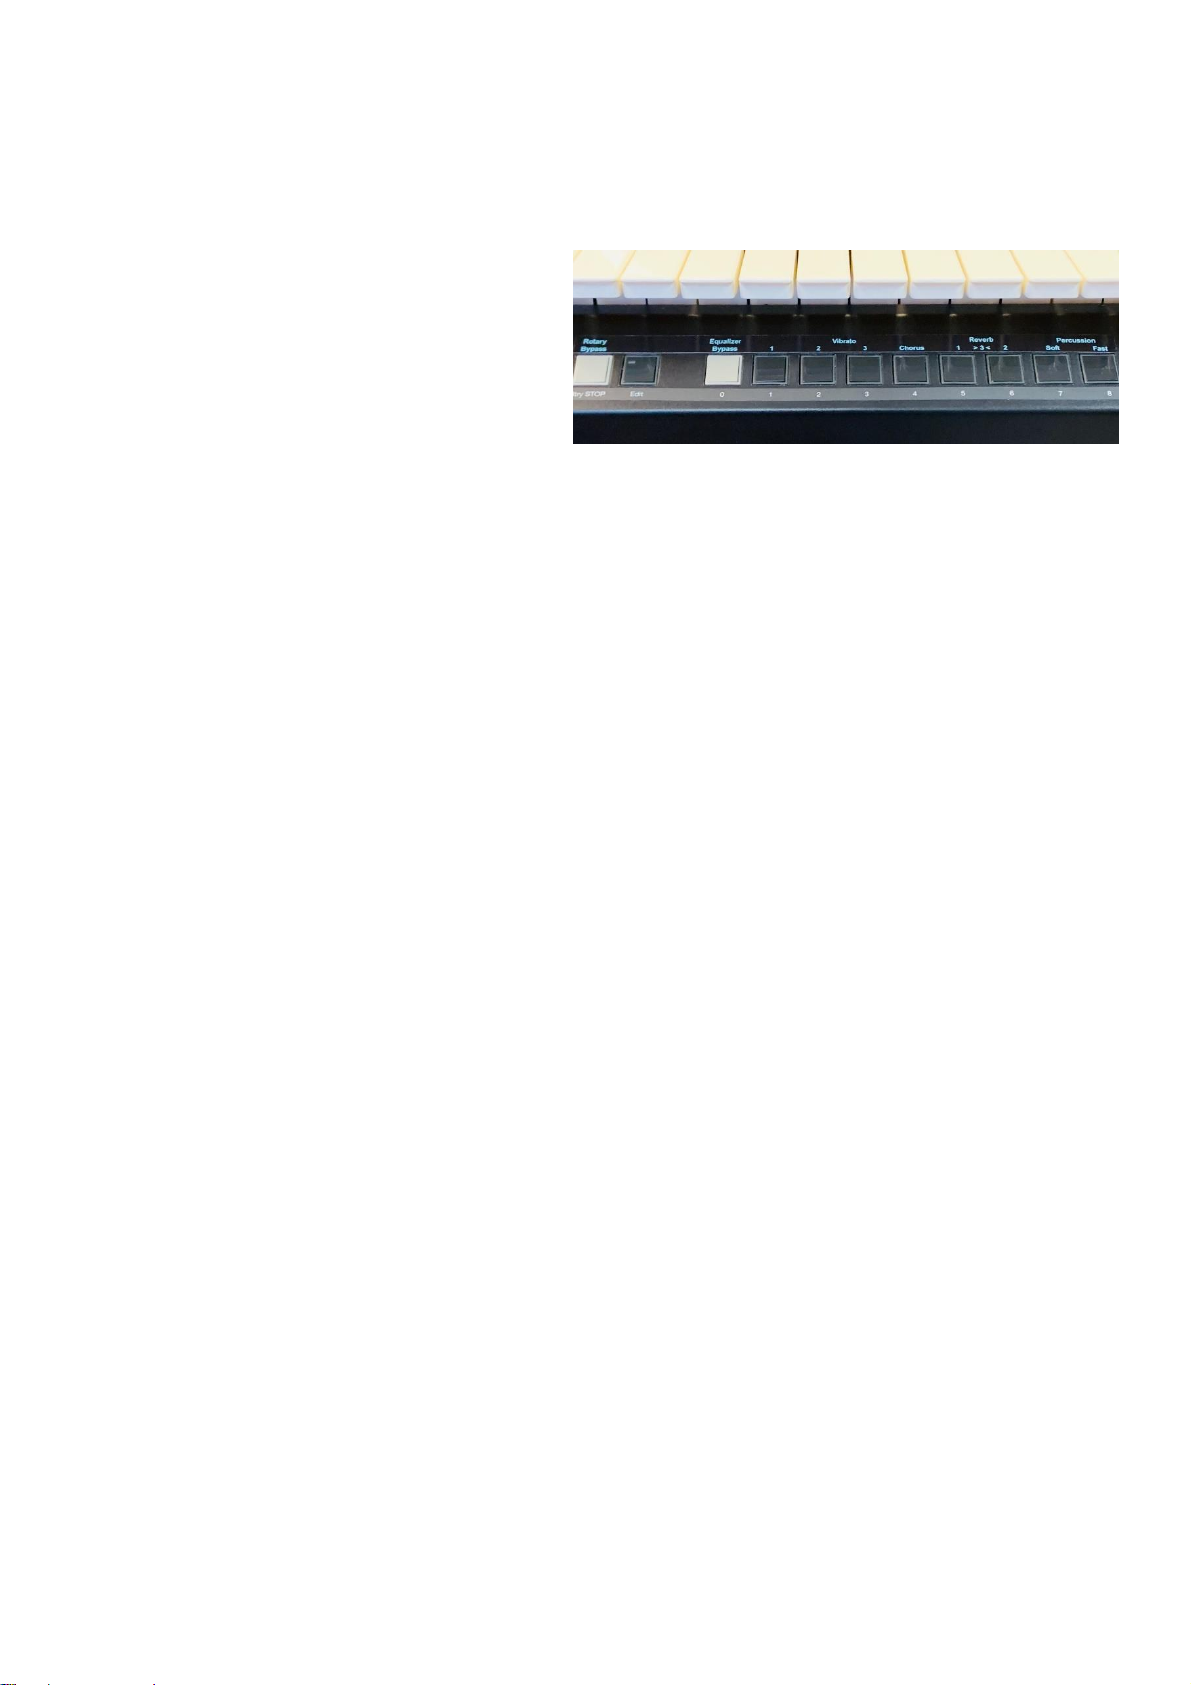
The Soft and Fast percussion settings are
located on the rightmost buttons on the front
panel in Edit mode. Drawbar volume is
damped in the normal position to emphasize
the percussion. Soft decreases the damping
and thus the strength of the percussion
effect. Fast shortens the decay time of the
effect from about one second to 0.2 seconds.
Vibrato ON switches vibrato on/off. Synchronously with the drawbar assignment, vibrato is
switched to the lower manual when the LED in the Drawbars U | L | P button is lit.
In Edit mode, use the Vibrato button group on the front panel to select the vibrato intensity from 1
to 3 and toggle the Chorus effect on/off.
Rotary FAST switches the rotary speed between SLOW and FAST. The built-in LED flashes with
the frequency of the rotor rotation. The Rtry STOP function is on the first button on the left of the
front panel. Even with the motors stopped, the amp and speaker modeling is maintained; so this is
not a bypass function. Press the button in Edit mode for Rotary Bypass.
Pitch-Wheel and Mod-Wheel can optionally be used for rotary control as well. With the Mod-
Wheel you switch the simulated motors on and off, with the Pitch-Wheel you switch between
SLOW and FAST.
Transpose: In Edit mode, press the -1 button or the +1 button to decrease or increase the pitch in
semitone steps, respectively. Press both buttons at the same time > 0 < to cancel transposition.
If you press PedRtryByp in Edit mode, the pedal sound will bypass the rotary simulation.
Equalizer Bypass in Edit mode switches off the equalizer. In the default setting, the EQ emulates
a typical Leslie frequency response. If the organ is used with a Leslie, a linear frequency response
is preferable. When operating with a tube Leslie, Tube Amp Bypass and Rotary Bypass may also
be advisable.
The Reverb button group selects one of the reverb programs 1, 2, or 3 (1+2) in Edit mode.
The buttons marked with the white numbers 0to 8are used to quickly access presets. Preset 0 is
the live preset, which takes over the current drawbar settings.
The assignment of the buttons in edit mode can be changed in the editor of the HX3 manager by
means of the Switch Remap parameters as desired.

XB2 Kit 9
Potentiometers
The knob formerly labeled REVERB has been
assigned Gain (overdrive). The Volume knob adjusts
the volume of the audio outputs and the headphone
output.
The two pots on the back next to the footswitch jack
retain their functions as level controls for bass and
treble. They thus override the EQ settings in the HX3
menu, which can be made with the optional control unit.
The assignment of the pots can be changed as desired in the editor of the HX3.6 Manager using
the Analog Remap parameters. For example, you can assign the Reverb Level and Percussion
Level functions to them.
Volume/Expression Control
Output level of all output channels is controlled by Volume rotary knob or MIDI CC #7 “Volume”,
whichever occurs last.
Organ's expression pedal position is controlled by a pedal or MIDI CC #11 “Expression”,
whichever occurs last. The loudness curve is similar to the swell pedal of a classic tonewheel
organ, so expression volume will not reach zero. We recommend connecting an expression pedal
Yamaha FC-7 or similar (1/4" jack, 10k to 47k total resistance). Swell control is faster and more
accurate when connected directly than via MIDI.
MIDI CC #11 and #7 may be altered via menu to any valid MIDI CC Number.

10 XB2 Kit
Menu Panel
The menu actions described in this chapter can only be performed with the optional control unit.
But even without the control unit, the display is fully functional and provides information about the
states of the non-illuminated buttons.
With the HX3/XB2 in factory setting, some of the menu items listed below are omitted since
physical controls exist. These menu items can be added to the menu by means of the editor with
the parameters of the Menu Enables group.
On power on, the Preset/Drawbar menu is present. Pressing the
rotary knob twice briefly will let you return to the home position from
any other menu position.
Turn the rotary knob to scroll through the menu. A hatched arrow indicates the menu position.
Press the rotary knob once to edit a parameter value. A white arrow indicates the selected
entry that may be altered. Turn the rotary knob to change that value. Press the rotary know once
again to continue scrolling through the menu.
In the preset/drawbar menu the rotary knob selects the Presets 0 …99. Presets consist of
drawbar settings and optionally tab switch settings (percussion, vibrato etc., including rotary
Run/Fast/Slow), volume and 122 tube amp gain as well as all other effects. Use the Panel in the
HX3 Manager, Presets page, to select which parameters are to be recalled with the presets.
Scroll downwards (= turn the rotary knob clockwise) to the drawbar
presets (Voices) for Upper manual, Lower manual, and Pedal. The
top display line shows the drawbar positions as numbers from 0 –8.
Saving settings
Parameter values tagged by the letter Care part of a single preset. Values tagged by Dapply to
all presets and are stored as defaults. The assignment can be changed in the editor of the HX3
Manager with parameter #1498 or on the Presets page of the Manager’s Panel.
Values tagged by U, L, or Pare part of the current voice for upper, lower, or pedal. These are
saved as Voice (Drawbar settings only) if you save them while one of these markers is displayed.
O marks settings of the selected organ model, Rmarks settings of the selected rotary model.
An asterisk appears at the bottom right of the display when a value has been changed. To save
the setting, keep the rotary knob pressed until a confirmation message appears on the display, for
example:
"Saved to Defaults OK" for default values.
"Save Preset to #XX" for presets ("XX" stands for the number of the currently active preset).
Change the number as desired and press the knob again.
"Save UpperDbV to #XX", "Save LowerDbV to #XX" or "Save PedalDbV to #XX" for drawbar
settings ("XX" stands for the number of the currently active Voice). Change the number as desired
and press the knob again.

XB2 Kit 11
Menu Overview
From the HX3 menu you can access all control functions, such as rotary speed, percussion,
chorus/vibrato. You can select organ models and rotary models. You can adjust many sound-
defining parameters. You can create and recall Common Presets and Voice Presets (drawbar
settings only). You can perform updates of the operating software, optionally even without the
HX3.6 Manager.
Important to know:
The HX3 menu is arranged in function groups and has two levels: The main menu, shown in
green, contains the operating functions that are frequently used. In the submenu of the respective
function group, shown in blue, you will find parameters that are used less frequently, usually the
pre-settings.
Press the lower button to switch from a main menu to a submenu. An "S" symbol then appears at
the bottom right of the display. Press the upper button to return to the main menu.
Turn the rotary knob to navigate through the menu. Press the rotary knob briefly to change a
setting. Briefly press the rotary knob again to navigate further.
The menus are arranged in a ring. The last menu item in the list is therefore followed by the first
again when you scroll down further, and the same applies vice versa.
As of firmware version 5.637, the menu is shorter and therefore clearer than in previous versions.
Rarely used parameters have been removed from the menu, but are still adjustable with
TouchOSC, with the Panel or with the Editor of the HX3 Manager. Please use this method for the
manifold settings in EG mode.
The editor can be used to remove other unwanted menu items from the menu or added to the
menu.

12 XB2 Kit
Start menu
HX3 Preset: Selection of Common Presets 00 ... 99.
Common Presets include Drawbar settings and optionally Tab Switch settings (Percussion,
Vibrato etc.), Rotary Run/Fast/Slow, TubeAmpGain, and other effect settings. In the Editor or
Panel of the HX3 Manager you can define which parameters are saved in presets. Preset 0
determines the settings when the device is switched on.
Edit Name: The name of the preset can be edited in this submenu. Press the rotary knob
once. Turn the knob to select the desired letter and press the knob again to save the change.
Turn the knob to edit the next letter. Turn the rotary knob past the last digit or turn the rotary
knob from the first letter to the left to navigate to the other submenu items.
LED Dimmer: Brightness of the LEDs on connected control panels and on the menu panel of
the HX3 MIDI Expander.
Save Defaults: Saves all settings as default values that apply at power-up.
SD File Exec: Selection of a script file on the SD card when the SD card adapter is connected.
Bootld Update: Press the rotary knob for two seconds to launch the bootloader for operating
software updates. HX3.6 performs a system reset and puts itself into a special communication
mode for "Device Firmware Upgrades" (DFU mode). This interrupts the connection with the
HX3.6 Manager.
oDFU upload ... Fast and secure transfer of firmware via DFU (see chapter Updates).
DFU packages can be transferred to the device using the DreamDFU app or
DreamDFU_kbp for macOS. Under Windows, this is also possible with the updater of the
HX3.6 Manager.
oFPGA recover from FAILSAFE Restore the FPGA configuration from the backup copy
stored in the device.
oFW recover from FAILSAFE Restore the microcontroller firmware from the backup
copy stored in the device.
oExit update, start HX3.6 Exit the DFU mode with a reset, Connect of the HX3.6 manager
via MIDI over USB is then possible again.
WiFi Init Def: Reset WLAN interface to factory default.
Preset Init: Sets the live preset 0 to a basic B3 organ sound.

XB2 Kit 13
Upper Voice
U00 ... U15: Selection of the drawbar presets (voices). The upper line shows the drawbar settings
as numbers from 0 ... 8.
UpperDB 16 ... UpperDB 1: Settings of the standard drawbars for the upper manual.
In addition to the organ sounds, General MIDI (GM) instruments are available that can sound as
layers simultaneously. To activate a GM instrument, set its level as desired. To deactivate the
organ, set all drawbars to 0
UpperGM Prg 1: Selection of GM instrument by program number
UpperGM Lvl 1: Level setting of GM voice
UpperGM Hrm 1: Harmonic transposition of GM voice
Lower Voice
L00 ... L15: Selection of the drawbar presets (voices). The upper line shows the drawbar settings
as numbers from 0 ... 8.
LowerDB 16 ... LowerDB 1: Drawbar settings for the lower manual.
LowerGM Prg 1: Selection of the GM instrument by program number.
LowerGM Lvl 1: Level setting of the GM Voice
LowerGM Hrm 1: Harmonic transposition of the GM voice
Pedal Voice
P00 …P15: Selection of the drawbar presets (voices). The upper line shows the drawbar settings
as numbers from 0 ... 8.
PedalDB 16, PedalDB 8: Drawbar settings for the pedal.
PedalDB 16H, PedalDB 8H: Drawbar settings for the pedal, smoother sound.
Pedal Release: Changes decay time of pedal sound (often called string bass "sustain" on
other organs).
PedalGM Prg 1: Selection of the GM instrument by program number.
PedalGM Lvl 1: Level setting of the GM Voice
PedalGM Hrm 1: Harmonic transposition of the GM voice

14 XB2 Kit
Audio Setup
Master Volume: Sets the volume for all outputs. Higher values result in a better signal to noise
ratio.
TubeAmp Gain: Sets the level of the simulated tube amplifier. The amplifier enters saturation and
distorts at high values and higher swell pedal values. So the distortion level is controlled with the
swell pedal as well. If Gain Vol Compensation is set in parameter 1501 of the editor, Gain works
almost volume-neutral.
TubeAmpBypass: When ON, the rotary tube amplifier is bypassed.
The Audio Setup menu items have a common submenu:
Equ Bypass: When ON, the equalizer is bypassed.
Bass Equal: Bass level adjustment
Bass Equ Frq: Bass filter frequency, invalid if Parameter B/T is set to OFF.
Bass Equ Q: Bass filter Q (bandwidth), invalid if Parameter B/T is set to OFF
Mid Equal: Mids level adjustment
Mid Equ Frq: Mids filter frequency
Mid Equ Q: Mids filter Q (bandwidth)
Treble Equal: Treble level adjustment
Treb Equ Frq: Treble filter frequency, invalid if Parameter B/T is set to OFF.
Treb Equ Q: Treble filter Q (bandwidth), invalid if Parameter B/T is set to OFF.
Parametr B/T: Parametric equalizer also for bass/treble. If Parameter B/T is set to OFF, the
equalizers for bass and treble act as shelving filters.
Upper Lvl Adj: Allows separate upper manual default level setting.
Lower Lvl Adj: Allows separate lower manual default level setting.
Pedal Lvl Adj: Allows separate pedal default level setting.
Perc Lvl Adj: Allows percussion level setting.
PedalRotBypas: Routes the pedal signal to bypass the CaM Rotor, optionally only to the
separate pedal output, if No Pedal on Main is set in parameter #1501, Bit 3 of the editor.
AO28 Tone Pot: Tone potentiometer setting on preamp.
AO28 Gain Cap: Overall gain of AO28 preamp.
AO28 MinSwell: Minimum volume of swell pedal in heel position.
AO28 Tube Age: Age of the preamp tubes. The older (the higher the value), the more clearly
the triode distortion becomes audible.

XB2 Kit 15
Reverb Levels
Reverb Prgm: Reverb program selection (OFF, 1, 2, 3).
Reverb 1 Lvl: Reverb portion in position REV 1.
Reverb 2 Lvl: Reverb portion in position REV 2.
Reverb 3 Lvl: Reverb portion in position REV 3.
Rotary Setup
Rotary Motor: RUN/STOP switch of the rotary simulation.
Rotary Fast: SLOW/FAST switch of the rotary simulation.
Rotary Bypass: Switching off the rotary simulation.
Rotary Model: HX3 contains predefined rotary models that are editable. With the Standard
license you can choose from 6 models, with the Extended License from 16.
o122 Std SmR (Model 122 Standard, small room)
o122 Std LgR (Model 122 Standard, large room)
o122 Old SmR (Model 122 alt, small room)
o122 Old LgR (Model 122 alt, large room)
o147 New SmR (Model 147, small room)
o147 New LgR (Model 147, large room)
The Rotary Setup menu items have a common submenu:
HornSlowSpeed: Rotation speed of the horn in SLOW position.
RotrSlowSpeed: Rotation speed of the rotor in SLOW position.
HornFastSpeed: Rotation speed of the horn in FAST position.
RotrFastSpeed: Rotation speed of the rotor in FAST position.
HornRampUp: Horn ramp up time.
RotorRampUp: Rotor ramp up time.
HornRampDown: Horn runout time
RotorRampDown: Rotor runout time.
Rotary Throb: Microphone placement.
Rotary Spread: Stereo width.
Rotary Balnce: Level balance between rotor and horn.
Tube Select A: Age of power stage tube A, adjustable from 0 (very old) to 7 (new).
Tube Select B: Age of power stage tube B, adjustable from 0 (very old) to 7 (new). If A and B
are set differently, the proportion of the 2nd harmonic increases.

16 XB2 Kit
Percussion Setup
Percussion: Percussion selection stepwise in all possible combinations of NORM/SOFT,
FAST/SLOW, 2nd/3rd (not for H100) and OFF.
PercNormLvl: Level in position NORMAL.
PerSoftLvl: Level in position SOFT.
PercLongTm: Decay time in position LONG.
PercShortTm: Decay time in position SHORT.
Vibrato Setup
UPR: Scanner vibrato upper manual OFF/ON.
LWR: Scanner vibrato lower manual OFF/ON.
Vibr: Vibrato knob with the six positions V1 ... C3.
The Vibrato Setup menu items have a common submenu:
Scanner Gear: Vibrato frequency.
Ch ScannerLvl: Scanner portion in chorus positions C1 ... C3.
Ch Bypass Lvl: Dry portion in chorus positions C1 ... C3.
V1/C1 FM Mod: Modulation depth at positions V1, C1.
V2/C2 FM Mod: Modulation depth at positions V2, C2.
V3/C3 FM Mod: Modulation depth at positions V3, C3.
Organ Setup
Organ Model: HX3 contains predefined organ models that are editable. With the Standard license
4 models are available, with the Extended License 16.
oB3 Standard (B3 with nine drawbars per manual).
oB3 Old (1955 B3, Flutter and Leakage increased).
oB3 Recapped (B3 with new capacitors).
oM100/M3
TG Tuning: Allows organ generator tuning in range from A = 433 through 447 Hz.

XB2 Kit 17
The organ setup menu items have a common submenu:
Gating Mode:
oB3/9 Drb: The HX3 default setting (B3 mode) implies mechanical key contacts, 2 2/3’ or 4’
percussion, and 9 drawbars per manual. The remaining menu items require an Extended
License.
oH100/12 Drb switches to the H100 organ model including 3 additional mixtures. This
activates the respective drawbars. B3 percussion is de-activated in this mode, instead the
H-Perc 16‘ …H-Perc Mixt3 in submenu Voice Upper settings are effective if Perc ON is
selected. By means of this mask you may assign percussion individually to each available
harmonic. Percussion always sounds without vibrato and phasing rotor. This mode may be
combined with all generator models.
oEnvelopeGen (EG) substitutes “mechanical” keying, which generates a key click, by “soft”
electronic keying. This is the way to model the entirely electronic organs of the 80s. In this
mode three additional mixtures are available; the respective drawbars are active. An ADSR
envelope is applied to the harmonics selected by means of the EnvEna 16‘ …EnvEna
Mixt3 settings on the Panel or with TouchOSC.
oEG +PercDrb works like EnvelopeGen (EG), but instead of the ADSR envelope a
percussion envelope is active on the harmonics selected by the EnvEna 16‘ …EnvEna
Mixt3 settings in submenu Voice Upper. The percussion effect amount can be adjusted with
the Envelope Generator Drawbars (EGenvDB 16‘ …Mixt3) on the Panel or with TouchOSC.
oEG +TimeDrb as well works like EnvelopeGen (EG), but in this mode the Envelope
Generator Drawbars (EGenvDB 16‘ …Mixt3) affect the decay and release times of the
ADSR envelope on harmonics selected by the EnvEna 16‘ …EnvEna Mixt3 settings in
submenu Voice Upper. Thus you can create interesting transient and decay effects similar
to a Fourier synthesizer by using time settings depending on the respective harmonics.
TG WaveSet: Determines the content of harmonics in the generated sound. Automatically set
for the selected generator, but can be overridden in this menu:
oB3 25%...38% k2 –B3, clean to rich harmonics (new to old organ)
oSine 2% k2 –clean LSI/transistor sine generator
oSawt Fltrd –Sawtooth-like tone
oSine LC Gen –sine wave generator with moderate k2 content
oSine TOSGen –square wave generator with sine wave filtering, sounds slighty hollow
TG Flutter: Adjusts tone generator "sloppyness" (spring clutch tension, bearing precision, and
resulting slow phase shifts and pitch changes).
TG Leakage: Sets tone generator leakage (crosstalk noise of adjacent notes, “growl”).
ContSpringFlx: Adjusts key contact spring flex, thereby affecting click frequency.
ContSpringDmp: Adjusts key contact spring damping, thereby affecting click length.

18 XB2 Kit
ContEarlyActn: Fatar keyboards only: Sound triggering on upper key contact. If OFF, the
organ sound is triggered with the lower key contact. MIDI NOTE ON on the other hand is
always sent with velocity and thus after closing the lower contact.
NoDB1@Perc: With the original, the 1' foot position is switched off during percussion when
PERC is ON. This behavior can be switched off here.
Keyboard/MIDI
MIDI Transpose: Allows transposition of sound generation by up to +24/-24 half note steps. Note:
Like the original, tonewheel generator includes 5 octaves. Notes outside this range do not sound.
MIDI CHANNEL: Sets the MIDI basic receive channel from 1 to 10 (upper manual, lower
manual +1 , pedal + 2).
MIDI OPTION: Sets the MIDI Routing to
oLocal Tx –own MIDI Events are sent to MIDI OUT
oInp 1 Thru –MIDI IN1 is routed as THRU to MIDI OUT
oInp 2 Thru –do not use
oUSB InThru –USB MIDI IN is routed as THRU to MIDI OUT
MIDI CC Set: Sets the HX3 accepted MIDI CC set to
oNI B4 d3c: Native Instrument B 4, Döpfer d3c controller (default), NI B4D
oHammond XK
oHammond SK (Note: Hammond changed MIDI CC set between XK and SK series, so try
out which fits)
oVersatile MIDI CC Set
oNord C1/C2 MIDI CC Set
oVoce Drawb –Voce MIDI drawbars
oKeyB/Duo
oHamichord (or „Mojo“, same hardware)
oHX3.5/KBP MIDI CC Set
oMIDI Custom CC Set
oMIDI Custom CC Set B
MIDI Swell CC: CC number for swell pedal (default 11, expression pedal).
MIDI VolumeCC: CC number for Master Volume (default 7, volume pedal).
MIDI PresetCC: CC number for presets (default #32 bank select LSB)

XB2 Kit 19
TransposeOffs: Transposition of directly connected Fatar keybed can be shifted for special
purposes. Affects MIDI OUT only.
Local On/Off: Interrupts the connection from a directly connected keyboard to the tone
generator. Notes are only sent via MIDI.
Split Keyb: When ON, the keyboard is split into two zones at the set split point.
Split Point: Sets split point (when split is ON) as key number (24 is second „C“ on manual).
Split Mode: Default split setting on power-up, engaged when split set to ON.
o'PedalToLower', map pedal to lower manual up to split point.
o'LowerToUpper', map lower to upper manual up to split point.
o'PedalToUpper', map pedal to upper manual up to split point.
o'Lower+1 ToU', map lower to upper manual up to split point, transpose lower +1 octave.
o'Lower+2 ToU' map lower to upper manual up to split point, transpose lower +2 octave.
o‘LwrAddPedal’, links the pedal to the lower manual up to the split point.
Split point and split mode may also be changed by one of the following procedures:
oPedal to Lower: Press a single key on lower manual key while switching SPLIT on to obtain a
custom split point.
oLower Add Pedal: Press a two keys on lower manual key while switching SPLIT to link the
pedal to lower manual up to the split point.
oLower to Upper: Press a single key on upper manual while switching SPLIT on to map lower
to upper manual up to this key.
oPedal to Upper: Press two keys simultaneously on upper manual while switching SPLIT on to
map pedal to upper manual up to highest of both keys pressed (useful for playing pedal bass
lines on single manual keyboards without bass pedal).
oLower +1 to Upper: Press three keys simultaneously on upper manual while switching SPLIT
on to map lower to upper manual up to highest of all keys pressed. Lower notes range is
transposed one octave up (useful for left-hand 8’ accompaniment chords on single manual
keyboards).
oLower +2 to Upper: Press four keys simultaneously on upper manual while switching SPLIT
on to map lower to upper manual up to highest of all keys pressed. Lower notes range is
transposed two octaves up (useful for left-hand 16’ accompaniment chords on single manual
keyboards).

20 XB2 Kit
Updates
Updates of the operating software are
provided as DFU files and can be
transferred to the device under Windows
with HX3.6 Manager or with the
DreamDFU app included in the update
directory.
A macOS version of the app named
DreamDFU_kbp is available for download
on the update server. Before you start
using the app, please read the important
note in the attached README file.
Put the HX3.6 device into DFU mode as
described in the Start menu section, or by
holding down the rotary knob when
switching on. Then start DreamDFU. A file
selection dialog opens where you can select the update package for your device. For a regular
complete update select the file hx36_upd.dfu from the updates subdirectory. Wait until the
unpacking is complete (displayed on the menu panel). Wait until the unpacking is complete
(displayed on the menu panel). Exit the DFU mode by restarting after the unpacking has been
completed.
DSP Files
While sound generation for the organs takes place completely in hardware in an FPGA, HX3.6
uses a digital signal processor (DSP) for reverb effects (EFX) and General MIDI (GM) instruments.
128 GM sounds are installed as a so-called soundbank.
The DSP firmware and the DSP soundbank are normally included in the update package, but can
also be updated separately via DFU. This comes into consideration if you want to do without the
factory installed GM sounds and use other reverb programs. Please note: The USB-B socket on
our old HX3 Extension Board mk4 has no direct connection to the DSP chip and therefore cannot
be used for DSP updates.
In the update directory you will find the following files:
DSP Firmware (file dsp_fw.dfu) with reverb and GM synthesizer sound generation),
DSP Firmware (file dsp_fw_nogm.dfu) with reverb and more reverb programs, but without GM
synthesizer sound generation),
DSP default soundbank (file dm_bank.dfu), default soundbank for the DSP-GM synthesizer,
contains the sounds specified by the GM2 standard),
Optional soundbank (file ext_bank.dfu) with higher quality piano sounds for the DSP-GM
synthesizer.
Other manuals for HX3.6
1
Table of contents
Other KEYBOARDPARTNER Accessories For Musical Instruments manuals