Kia CEED 2018 User manual

>> OWNER’S MANUAL
QUICK REFERENCE GUIDE

2
Interior Overview
* if equipped
[#] Number in brackets indicates chapter in Owner‘s Manual.
The illustrations in this guide may vary from the actual vehicle.
a Inside door handle [4]
b Outside rearview mirror
control switch [4]
c Outside rearview mirror
folding switch* [4]
d Power window switches [4]
e Power window lock
button [4]
f Driver position memory
button* [3]
g Steering wheel [4]
h Tilt and telescopic steering
column control lever [4]
i Headlight leveling
control* [4]
j Instrument panel
illumination control [4]
k LKA ON/OFF button [6]
l BCW ON/OFF button* [6]
m ESC ON/OFF button [6]
n Bonnet release lever [4]
o Interior fuse box [8]
p Seat [3]
1
2
3
4
5
6
8
9ab
c
d
e
f
g
7

3
Instrument Panel Overview
a Instrument cluster [4]
b Horn [4]
c Driver’s front air bag [3]
d Turn signal/Headlamp
control lever [4]
e Wiper and washer control
lever [4]
f Ignition switch or ENGINE
START/STOP button* [6]
g Cruise control/Smart cruise
control buttons* [6]
h AVN (Audio/Video/
Navigation*) [5]
i Hazard warning light [7]
j Central door lock switch [4]
k Climate control system [4]
l Air ventilation seat* [4]
m Seat warmer button* [4]
n Heated steering wheel
button* [4]
o Shift lever [6]
p SPORT button* [6]
q Idle Stop and Go (ISG) OFF
button* [6]
r Parking distance warning
ON/OFF button* [4]
s Parking assist system ON/
OFF button* [4]
t Electronic parking brake
switch* [6]
u Auto Hold button* [6]
v Center console storage
box [4]
w Glove box [4]
x Passenger’s front air bag [3]
1
2
3
45
6
67
8
9a
b
cc
d
de
f
g
h
j
k
l
m
n
o
p

4
Instrument Cluster / Engine Compartment
a Tachometer
b Speedometer
c Engine coolant temperature
gauge
d Fuel gauge
e Warning and indicator lights
f LCD information screen
a Engine coolant reservoir [8]
b Engine oil filler cap [8]
c Brake/clutch* fluid
reservoir [8]
d Air cleaner [8]
e Engine room fuse box [8]
f Negative battery
terminal [8]
g Positive battery terminal [8]
h Engine oil dipstick [8]
i Radiator cap [8]
j Windscreen washer fluid
reservoir [8]
Instrument cluster [4]
Engine compartment [2]
12
34
5
5
6
1
2
3
4
5
67
89
a

5
Climate Control System
a Fan speed control
b Temperature control
c Air conditioning*
d Rear window defroster
e Air intake control
f Mode selection
a Driver’s temperature
control
b AUTO (automatic control)
c Front windscreen defroster
d Rear window defroster
e Air conditioning
f Air intake control
g Blower OFF
h Fan speed control
i Mode selection
j Passenger’s temperature
control
k SYNC
Manual climate control system* [4]
Automatic climate control system* [4]
12
34 5 5
6 6 66
1
2
34
5
678 8
999
a
b

6
Door Locks / Tailgate / Fuel Filler Lid / Bonnet
Closing the bonnet
> Before closing the bonnet,
check if all filler caps are
correctly installed and any
other combustible material
must be removed from the
engine compartment.
> Lower the bonnet until it is
about 30 cm above the closed
position and let it drop to
securely lock in place.
Opening the tailgate [4] Closing the tailgate [4] Emergency tailgate safety
release [4]
a Push the mechanical key to
the right
Opening the bonnet [4]
Pull the release lever to unlatch
the bonnet.
a Lift the bonnet slightly
b Push the secondary latch
inside and lift the bonnet
Opening the fuel filler lid [4]
With car un-locked press the 3
o’clock position edge of the fuel
filler lid.
a Fully open the lid
b Turn cap counterclockwise
to open
Closing the fuel filler
> Turn the cap clockwise until it
“clicks” to ensure it is securely
closed.
> Close the lid and press the
edge until it is securely
locked.
Operating door locks
manually [4]
a Press the lever
b Push out the cover
Central door lock switch [4] Child-protector rear door
lock [4]
1
2
1
2
1
2

7
Windows / Wipers and Washers
Wipers and Washers [4]
a Driver’s door power window
switch
b Front passenger’s door
power window switch
c Rear door (left) power
window switch
d Rear door (right) power
window switch
e Window opening and closing
f Automatic power window
up*/down*
g Power window lock button*
Note: In cold and wet climates,
power windows may not
work properly due to freezing
conditions.
A: Front wiper speed control
2 High wiper speed
1 Low wiper speed
--- Intermittent wipe
AUTO* Automatic control wipe
O Off
Single wipe
B: Intermittent wipe time adjustment
C: Wash with brief wipes (front)*
D: Rear wiper/washer control
2Continuous wipe
1 Intermittent wipe*
O Off
E: Wash with brief wipes (rear)
Windows [4]
1
22
3
3
4
4
55
5
5
6
6
7
Front
Rear

8
Seat / Air Bag / Child Restraint System
Front seat
a Driver position memory
system*
b Forward and backward
c Seatback angle
d Seat cushion height
e Lumbar support*
f Headrest
Front passenger’s seat
g Forward and backward
h Seatback angle
i Seat cushion height
j Lumbar support*
k Headrest
Rear seat
l Armrest*
m Headrest
Passenger’s front air bag ON/
OFF switch* [3]
Rearward-facing child restraint
system [3]
Securing with “Tether
Anchorage” system [3]
Securing with “ISOFIX” system
and “Tether Anchorage”
system [3]
a ISOFIX (i-Size) Anchor
Position Indicator
b ISOFIX (i-Size) Anchor
Installing a child restraint
system by lap/shoulder belt [3]
Seats [3]
1
2
3
3
44
4
5
5
6
7
8
9a
b
c
d d d
12

9
Lighting Control / Steering Wheel / Cruise Control System
Lighting control [4]
a OFF
b Auto light
c Position light
d Headlight
Tilt & telescopic steering [4]
Steering wheel adjustment:
a Pull down the lock release
lever
b Adjust the steering wheel to
the desired angle
c Height adjustment
Lock the steering wheel by
pulling up the lock release lever.
Heated steering wheel* [4]
When the ignition switch or
ENGINE START/STOP button
is in the ON position, press
the button shown to switch
on the heated steering wheel.
The indicator on the button
will illuminate. To turn off the
heating function, press the
button once again.
Cruise control system [6]
ON-OFF button ( ) to
activate cruise control system
Set cruise control speed by
moving the lever down to SET -
To increase cruise control set
speed
To decrease cruise control set
speed
Cancel cruise control set
speed by pressing the cancel
button (O)
Resume cruising speed by
moving the lever up to RES +
1
2
3
4
1
2
3
2 3
5 6
1
4

10
Towing / Spare Tyre, Jack And Tools / Tyre Mobility Kit
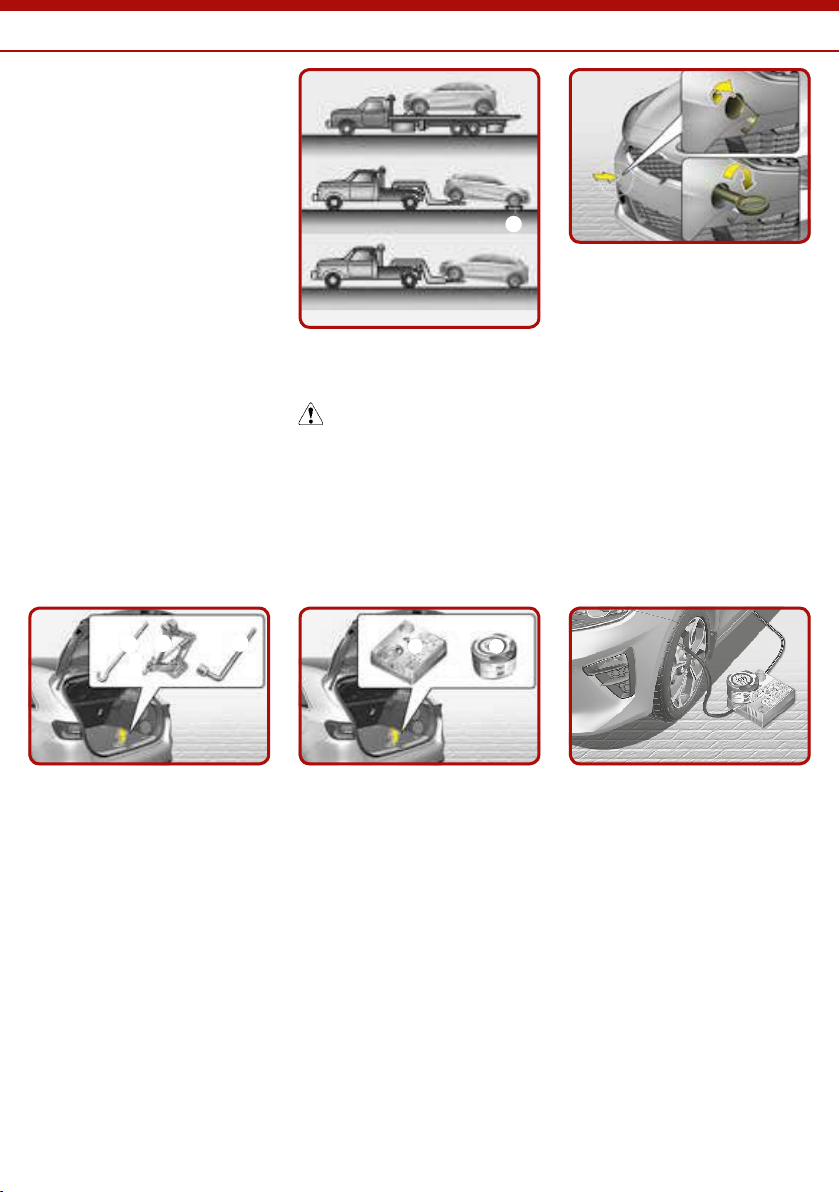
Spare tyre, jack and tools* [7]
The shown tools are stored in
the luggage compartment.
Pull up the luggage box cover to
reach this equipment.
a Jack handle
b Jack
c Wheel lug nut wrench
Tyre Mobility Kit* [7]
Please read the instructions
before using the Tyre Mobility
Kit.
a Compressor
b Sealant bottle
With the Tyre Mobility Kit
you stay mobile even after
experiencing a tyre puncture.
After you ensure that the tyre
is properly sealed you can drive
cautiously on the tyre (up to
200 km (120 miles)) at a max.
speed of 80 km/h (50 mph)
in order to reach a vehicle or
tyre dealer to have the tyre
replaced.
Towing [7]
When towing the vehicle in
an emergency without wheel
dollies, tow with the front
wheels off the ground and:
1. Set the ignition switch in the
ACC position.
2. Place the transaxle shift
lever in N (Neutral).
3. Release the parking brake.
Emergency towing
If towing is necessary, it is
recommended to have it done
by an authorised Kia dealer or a
commercial tow truck service.
Removable towing hook [7]
1. Open the tailgate and
remove the towing hook
from the tool case.
2. Remove the hole cover by
pressing the lower part of
the cover on the bumper.
3. Install the towing hook by
turning it clockwise until it is
fully secured.
4. Remove the towing hook and
install the cover after use.
123
1 2
a Wheel dollies
CAUTION
Failure to place the transaxle
shift lever in N (Neutral) may
cause internal damage to the
transaxle.
1

11
Engine Oil / Washer Fluid / Selective Catalytic Reduction
Checking the engine oil level [8]
Pull the dipstick out and check
the level. The level should be
between F and L.
Refilling engine oil [8]
Use only the specified engine oil
[9] and avoid spillage.
Checking the washer fluid
level [8]
Note: 1.6 CRDi derivatives of the CEED require a urea solution (also known as DEF (Diesel Exhaust Fluid))
for emission control that is added to a separate tank. The filler for the urea tank is located behind the
fuel flap next to the diesel fuel filler.
If the Urea level is not regularly checked and topped up this may cause the vehicle not to start.
Urea solution level gauge* [8]
Low urea solution warning
message* [8]
When “Refill Urea tank or
vehicle will not start” message
is displayed with SCR warning
lamp ( ), the vehicle can’t be
restarted once the engine is
turned off. For the above cases,
full replenishment is always
recommended.
Adding the urea solution* [8]
Idle Stop & Go (ISG)
When enabled, ISG
automatically stops the
car’s engine to reduce fuel
consumption and emissions.
The ISG function may not
work if the car’s battery
charge status, ambient
temperature and/or engine
temperature is too low. Air
conditioning/heater control
settings may also affect ISG
function.
Parking brake (handbrake)
When engaging the parking
brake, apply the footbrake
first and keep it depressed.
Then apply the parking
brake.
We strongly recommend
to leave the car in first or
reverse gear or in the ‘P’
(Park) position on automatics
when leaving the car.
Bluetooth®
Many of our cars have
Bluetooth® connectivity to
enable the driver to safely
enjoy the convenience of the
mobile phone. For Bluetooth®
compatibility please visit
the owners section on our
website.
Additional Info*

For full details and instructions on any item contained in this quick reference guide, please read the owner’s manual.
The Kia 7 year warranty 7-year/100,000 mile new car warranty.
Valid in all EU member states (plus Norway, Switzerland, Iceland and Gibraltar),
subject to local terms and conditions.
YEAR WARRANTY
Copyright © 2018 Kia Motors Europe GmbH, all rights reserved.
18.000317 - QRG CD - ENG-UK RHD
Additional Info*
Kia Service App Kia Service App
Kia Service App
The Kia Service App – now available for
free on iPhone/iPad and Android With the
Kia Service App, you have (almost) all Kia
dealers in Europe within reach*. Looking
for a showroom or just a service, the app
displays all dealers around your current
location on the map. With one click you
can call a dealer, visit their website or get
directions to the showroom.
(*) In selected markets only
Table of contents
Other Kia Automobile manuals

Kia
Kia Cerato 2021 User manual

Kia
Kia SELTOS User manual

Kia
Kia stinger 2021 Parts list manual

Kia
Kia Telluride 2023 User manual

Kia
Kia SPORTAGE 2022 Parts list manual

Kia
Kia Carens 2009 User manual

Kia
Kia amanti 2004 User manual

Kia
Kia Rio 2018 User manual

Kia
Kia Forte 2015 User manual

Kia
Kia SOUL EV User manual