KIBI EVO User manual

IMPORTANT! READ CAREFULLY AND KEEP
FOR FUTURE REFERENCE
SOFT STRUCTURED
BABY CARRIER KiBi®

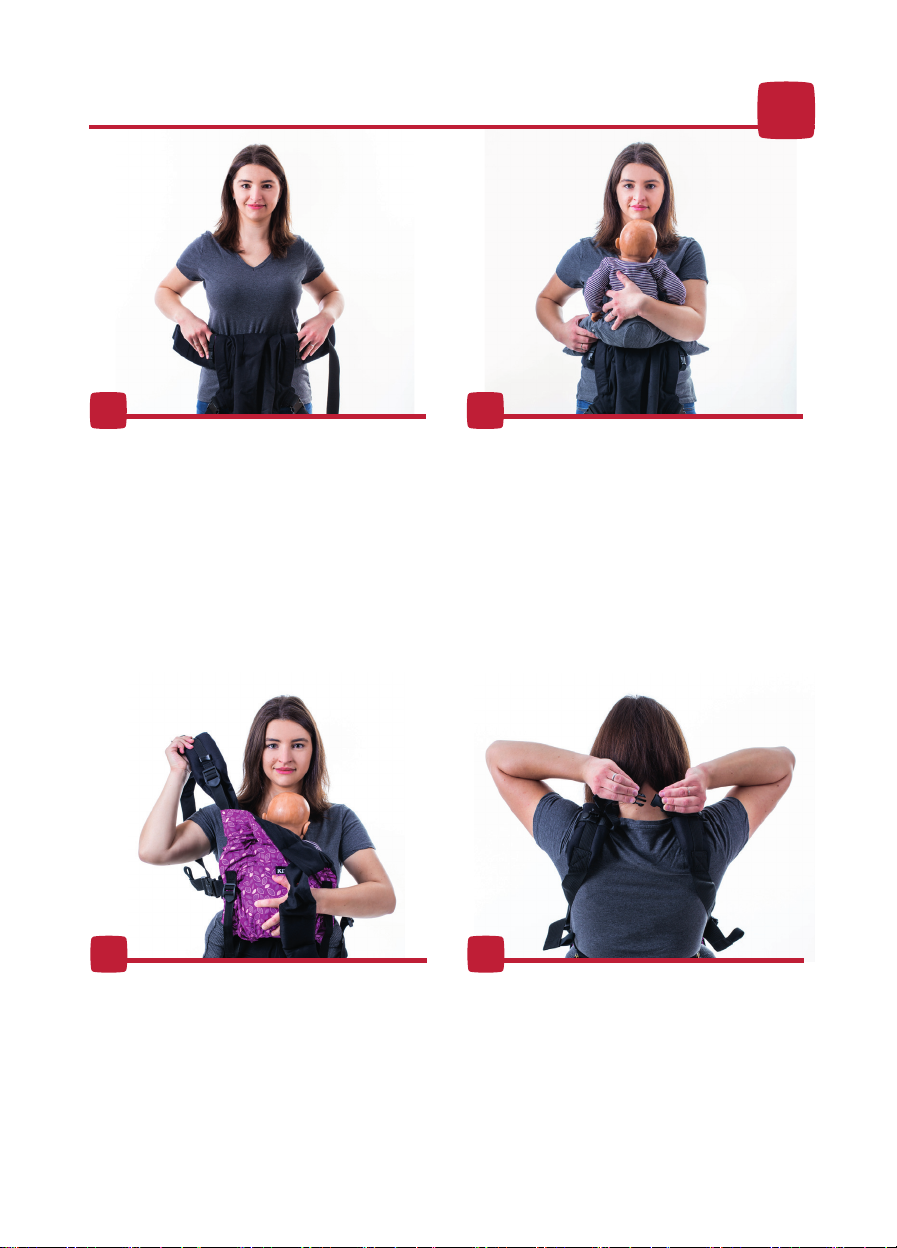
A baby is born with a rounded back, and the muscles along the spine are not fully
developed yet. To wear the baby as gently as possible, you need to place them in the
carrier curled up with their knees bent and always higher than their bottom. The baby’s
back will be slightly rounded and supported along its whole length by the fabric backrest
of the carrier. Therefore, it is necessary that the fabric supports the whole length of their
thighs and is always wide enough under the bottom. The baby’s legs should not be
hanging down. Such a position leads to the baby arching their back backwards, which
is not only uncomfortable but also unhealthy for the baby’s spine and hips.
The carrier should also be high enough to provide support for the baby’s back
above the shoulders as well. Babies can be carried with their hands out of the carrier
only when they can sit alone without support.
The baby can rest their head on your chest, and until they are able to hold it up
themselves it is protected against sudden backward movement by the upper rim of the
backrest. When the child is older you can use an additional fabric ap for further head
support.
KiBi is designed to grow with your child, giving them support at every age.
Dear parents,
you’ve purchased the KiBi ergonomic baby carrier, hand-sewn in the Czech Repub-
lic from as many Czech materials as possible. Some of our collections feature a topmost
layer of fabric made outside the CR and the EU, such as the design collection which uses
American prints (for more details, check the description of the baby carrier/collection on the
manufacturer’s website).
The baby carrier was designed to facilitate a healthy seating position of babies and
toddlers and to grow with them, serving them perfectly whether they’re small or all grown up.
Please read these instructions carefully before rst use. We hope that they will help
you make the most of your baby carrier. We wish you many wonderful experiences with your
child!
THE ERGONOMICS OF CARRYING CHILDREN
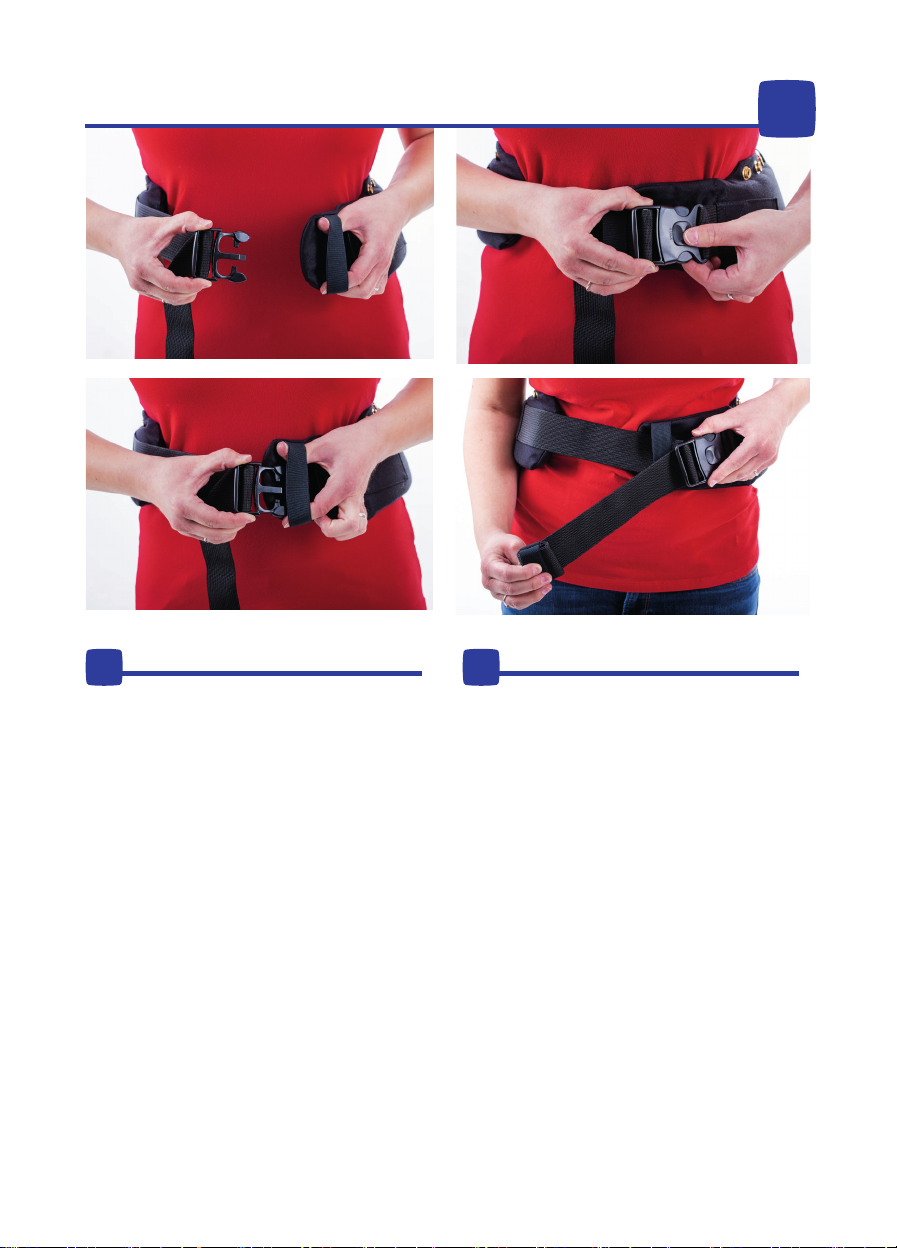
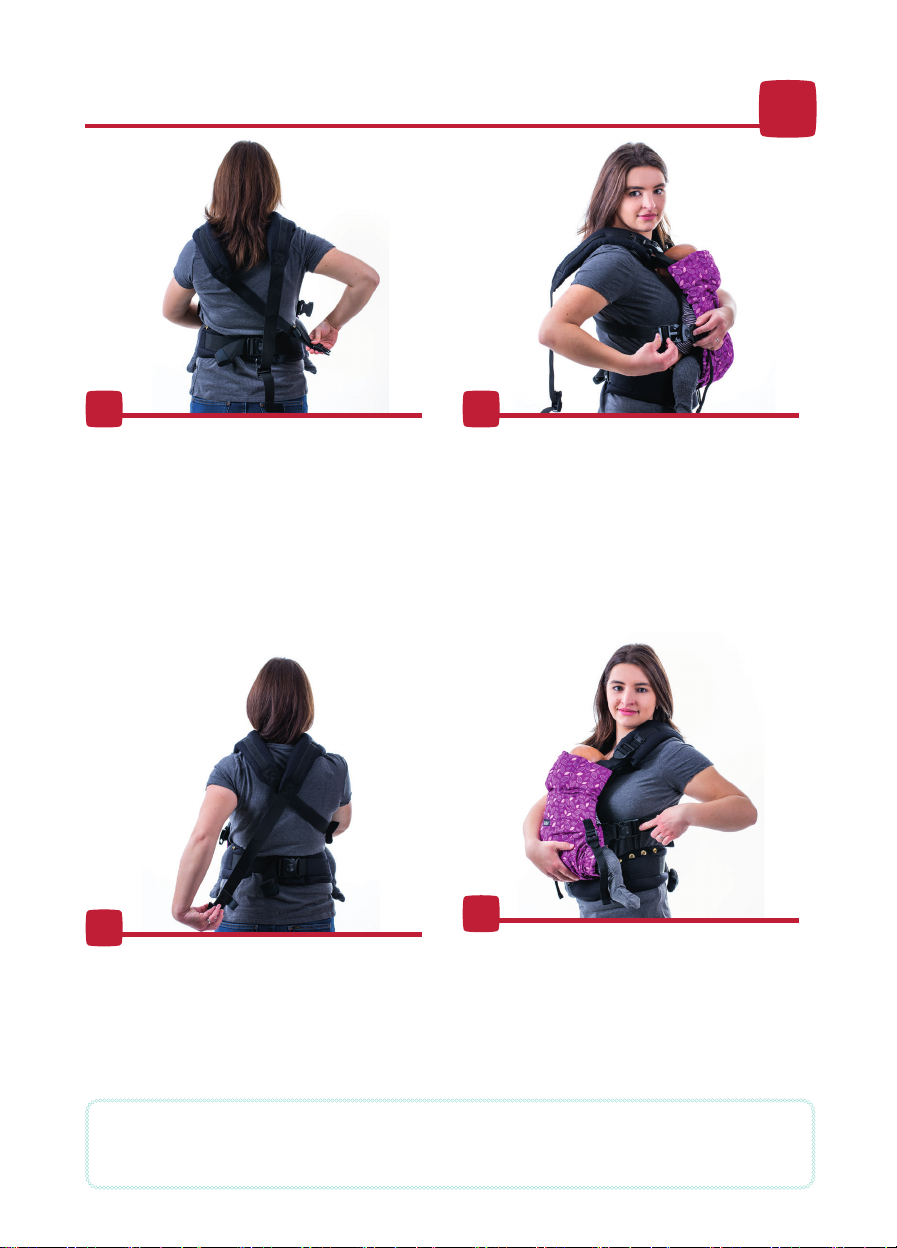
KIBI IS ADJUSTABLE TO THE SIZE OF THE
PERSON USING THE CARRIER
INTRODUCTION
The hip belt can be tightened around your waist with the buckle to ensure it
sits snugly. If there is any excess length left, you can roll it up and clasp with the
rubber band sewn in for this purpose.
Depending on your height, you will probably need to adjust the length of the
shoulder straps to ensure that the padding is on your shoulders and the carrier is
comfortable to wear. To shorten the shoulder straps, use the buckle at the begi-
nning of the padded section. To improve the child’s comfort, the black strap is cove-
red with fabric; all you need to do is to pull it out as needed, tighten with the buckle
and return it to the pocket in the backrest panel. You only need to set the length of
the shoulder straps once before rst use; after that, it only has to be adjusted if the
carrier will be worn by another person of a physical structure.

The upper part of the backrest is loosely
threaded on the shoulder straps so that the fab-
ric can be pulled up or down according to your
need. Inside the internal pouches for both straps
you will nd snap-hooks, which make it possi-
ble to attach the top of the backrest, at the de-
sired height, to the narrow strip sewed onto the
shoulder straps. Babies who are not able to sit
by themselves should always have the backrest
above the level of their shoulders with their arms tucked inside. Once
they learn to sit on their own the fabric only needs to reach as far as
their shoulder blades, and their arms can be left free. When you carry
a baby in front of your body, the top of the backrest can also be used
as head support. When the baby falls asleep, you can pull the fabric
high over the head. For the duration of the sleep you can secure the
backrest in the desired position with the snap-hooks, but it is usually
not necessary when carrying your child in front of you.
The baby is comfortable when the backrest supports the whole length
of their thighs. With the smallest babies you should adjust the width to the
narrowest position. Undo the studs on both sides of the black belt around
the waist and move them to the center as far as possible. Then only do up
the studs on the edge of the backrest and push out the excess fabric to the
outside of the carrier so that it does not cause discomfort to the baby. Fasten
the excess fabric with the cord located in the middle of the carrier.
SETTING THE WIDTH OF THE BACKREST
SETTING THE HEIGHT OF THE BACKREST

Before you start wearing the
carrier, it’s important to shorten
the straps on the sides of the
backrest. These straps are not
easy to tighten; this prevents
them from loosening over time
which would cause the baby or
toddler’s legs to gradually drop
lower. Because of this, however,
we recommend tightening them
before you position the baby in the carrier. Slowly pull the straps out
of the fabric and tighten with the buckle (this is more eective than
just pulling the strap). After that, you can just slightly tighten or loosen
them as needed.
PULLING UP THE LEGS
3
To verify that the baby is in
the right position in the carrier,
check that her bottom pushes the
hip belt towards your stomach/
back without bending the hip belt.
The child should be sitting in a
„pocket“ formed by the backrest.
The fabric of the backrest should stretch from one knee to ano-
ther and the knees should be above the baby’s bottom. In the world
of ergonomic baby carrying, this is called the “M position”.
CORRECT POSITION

Before fastening the buckle, rst
run the entire strap with the buckle
under the safety rubber band. Only
then fasten the buckle – you should
hear a distinctive click.
The buckles on a KiBi baby ca-
rrier have a special lock which you
activate by sliding the button on top to
the „lock“ position.
Then pull out the loose part of
the strap and place it over the safety
rubber band. This will improve safety
if the buckle unexpectedly snaps
open. You can roll up the remaining
length of the strap and secure with a
rubber band sewn in at the end.
1 2
SAFETY 4

SAFETY
It is very important that the waist belt buckle is securely locked so that it
cannot come undone while wearing your baby. Never unlock your waist
belt while the baby is still in the carrier! When you want to nish wearing
your baby, rst remove the baby from the carrier and only after that take
o the carrier itself.
Always watch your baby when using a soft carrier!
Using the carrier is very simple but if you are not sure during your rst few
attempts, check yourself in the mirror or ask another adult to help you.
When rst moving the child to the back, we recommend trying it over a
soft surface (for example the bed) or asking another adult for help. Initia
lly, putting your child on your back might appear dicult and parents may
feel intimidated. Don’t worry. After several attempts it will become routine.
Minimize the risk of falling - beware of slippery surfaces! We recommend
safe shoes without high heels. In winter conditions on snow and ice wear
special anti-slip overshoes over your boots.
It’s not recommended to do any sports while wearing a baby carrier!
Just like you protected your baby during pregnancy, you should protect it
in your carrier.
Be aware of the risks at home, such as heat sources or spilling of hot
drinks. If you’re wearing in front, do not iron clothes and avoid hot pots
and steam while cooking. Remember that a child on your back has a
very long reach! You take up more space when you’re carrying a child –
be careful when walking through doors etc.
Please consult healthcare professionals before using the carrier for
babies of low birth weight and/or babies suering from health problems.
Do not use the carrier if any parts are missing or damaged.
If you’re not using the carrier, keep it out of the reach of children.
i
5

Fasten the hip belt around your
waist and secure the buckle with the
rubber band. The buckle should give
an audible click when fastened. Slide
the safety lock on the buckle to prevent
accidental opening, pull out the loose
strap under the rubber band (see Safe-
ty) and tighten the hip belt around your
waist or hips.
Place the baby on your chest; the
baby’s bottom should be on the level of
the upper edge of the hip belt or slightly
below. Bend the baby’s legs and spread
them around your waist.
Raise the backrest (which should
have been hanging down until this po-
int) and pull it high up over the baby‘s
back. Put on one shoulder strap rst,
followed by the second one. Hold the
baby with one hand all the time.
Lean back slightly, reach behind
your neck and do up the buckle on the
chest strap. If you cannot reach it from
the top, you can place the buckle lower
down and do it up as you would do up
a bra.
1
3
2
4
CARRYING IN FRONT 6

Pull the black straps at the side
clasps backwards to tighten the shoul-
der straps. The buckles must be locked.
The child should be positioned correctly
(see Correct Position) and pressed tight
against you. This will ensure that your
centre of gravity is as close to your body
as possible so you won’t have to lean
back and wearing will be more comfor-
table.
When using the carrier for the
rst time, it is recommended to tighten
the strap located on the sides of the
backrest. This will pull the baby’s knees
higher. It’s recommended to do this
before seating the baby. The strap is
deliberately dicult to tighten – this
ensures it won’t loosen by itself and
will keep the baby’s legs in the right
position without the need for constant
adjustments. You will probably have to
readjust the strap once the baby grows
and you have to widen the backrest
under the legs.
That’s it: you can start carrying
now.
5
7
6
When wearing the smallest babies the
waist belt is usually worn high on the
waist so that the baby is placed su-
ciently high on your chest. However,
you can experiment and put the waist belt
into dierent positions.
If you are starting to wear a little baby you will
be gradually training your muscles to bear the
load and becoming more t. If you are starting
to wear a heavier child, we recommend that
you rst wear them for shorter periods of time
so that you can try dierent positions for the
waist belt and dierent tightnesses of the
shoulder straps.
i
7

Open the safety locks on the side
buckles and unfasten the shoulder straps
so they hang freely. Place the baby on
your chest, pull the backrest over the
baby and put the shoulder straps on your
shoulders. Keep holding the baby with
one hand and reach behind with the other
to grab the loose strap from the other
shoulder.
Lead the strap across your back
and side to the other part of the buckle
located on the side of the baby carrier.
The buckle must make an audible click;
make sure it’s secured properly and
locked.
Change hands. The other hand
should be holding the baby now. Reach
to the back for the second free strap
with a buckle at the end.
Fasten also this part of the buckle
and lock it into its counterpart on the
side of the carrier. Then tighten the
houlder straps so the baby is snugly
sitting right next to your body and the
carrier is comfortable to wear.
8
10
9
11
CROSSING THE SHOULDER STRAPS
It is generally recommended to have the baby high enough to be able to kiss them on the
head.
As your child grows, you can gradually put the waist belt lower. For some people it is more
comfortable to put the belt around the hips instead.
i
8

Lay down the unfolded carrier with the
studs positioned upwards towards you;
the strap for tightening the three-pronged
buckle in the middle will also be facing you.
Removing the chest strap:
1. Unfasten the large buckles with the lock
at the end of the shoulder straps.
2. There are studs on both sides of the
chest strap – open them.
3. Gently pull the chest strap down from the
shoulder straps.
REMOVABLE CHEST STRAP
9
Replacing the chest strap:
1. Unfasten the large buckles with the lock at the end of the shoulder straps.
2. Run the loose end of the shoulder strap with the three-pronged buckle through the
eyelet/sleeve on the side of the chest strap. Pull the chest strap higher all the way to
the padding. Repeat on the other side for
the other shoulder belt.
3. There’s one more small strap with a stud at the end inside the eyelets/sleeves on
the chest strap. Run this strap between the padding of the shoulder strap and the
vertical black strap that goes from top to bottom along its surface; fasten the stud.
This locks down the chest strap on the shoulder strap and prevents it from coming
loose o the padded section.
4. Click in and lock the big buckles on the shoulder straps.
All done!
HEADREST

When carrying small babies in front, it’s easiest to use the upper part of the backrest as a headrest.
When the baby falls asleep, pull the backrest over her head; as soon as she wakes up, pull it down
again. ATTENTION! There must always be free space in front of your baby’s face with enough fresh
air to breathe. Never cover the baby’s face with the headrest or any clothing!
If the headrest is too loose around the baby’s head, fold the additional headrest for older children
and insert it in the space between the two layers of fabric. This will reinforce the upper edge of the
backrest.
In the corners of the head restraint
ap there are small black straps with
clasps. Pull the ap over the baby‘s head.
Reach for the second part of the small
clip that is attached to the shoulder strap
and lock it. Do the same with the clip on the
other shoulder strap. Pull on the head supp-
ort straps to tighten the ap as needed in
order for your child‘s head to not recline.
When you’re not using the addi-
tional headrest and don’t want to let it
hang freely, you can roll it up and store
in the pocket located in the upper part
of the backrest. This also helps support
the neck of small babies.
2
1
4
HEADREST 10
i
If the chest strap is on your back in
the lower position and it’s dicult to reach
the other end of the buckle, or if you’re
wearing with crossed shoulder straps wi-
thout the chest strap, you can snap the
headrest straps in the buckle located on
the shoulder straps.
3

Fasten the hip belt around your
waist, listening for the distinctive click of
the buckle, and slide the lock. The buckle
should always be secured by the safety
rubber band (see Safety). Move the hip
belt to your side and pull tight around your
body.
Unfasten the buckles on the shoul-
der straps and let the ends hang freely.
Place the baby on your side,
always holding their back with one
hand. Grasp the shoulder strap in front
of you and put it over your shoulder.
Change hands and hold the baby
with your other hand. Reach to the back
for the free end of the strap. Pull the
strap across your back and do up the
side buckle under your arm.
Fasten the loose part of the buck-
le into the corresponding counterpart
on the side of the backrest. The buckle
must make an audible click. Then slide
the safety lock.
1
3
2
4
CARRYING ON THE SIDE
Babies are not often worn on the side because one hand is less mobile and the weight is
only on one side and thus long periods of wearing on the side may not be as comfortable as
front wearing or back wearing is.
i
11

Change hands again. Take the
shoulder strap that is free.
Pull it horizontally under your
arm and across your back to the
buckle on the other side of the ca-
rrier.
Fasten the loose part of the buckle
at the end of the shoulder strap into its
counterpart on the side of the backrest.
The buckle must again make an audible
click. Slide the safety lock.
Tighten the shoulder straps more
comfortably and away you go!
5
7
6
8
Even so, wearing your baby on the side is quite suitable for children because it puts their
hips into the best position for proper hip development and the child has a better view of their
surroundings.
i
12

Fasten the hip belt around your
waist, listening for the distinctive click
of the buckle, and slide the lock. The
buckle should always be secured by the
safety rubber band (see Safety). Move
the hip belt to your side. Pick up the
baby and position it on your side.
Pull the backrest over the baby.
Gradually begin to bend forward.
With one hand hold the child and pull
them onto your back. The second hand
can help move the waist belt around
your waist.
Once the child is on your back stay
bent and keep one hand on him at all
times.
1
3
2
4
CARRYING ON THE BACK
From a physiological point of view there is no reason why even the smallest babies cannot
be worn on the back. Mothers in many tribal societies wear babies almost exclusively on their
back. However, when wearing the baby on the back we have less information about the child‘s
comfort, and we cannot reach for the pacier or the hat ... Mostly we start wearing babies on
the back when they can already sit by themselves and are a little more self-sucient.
i
13

First put on one shoulder strap
and then the other. Hold the child with
one hand at all times.
You can straighten up slightly.
First tighten one shoulder strap tightly
on your shoulder and then do the same
with the other. The buckles on the side
must be securely locked.
Fasten the chest strap buckle and
tighten the strap if needed to ensure the
shoulder straps don’t slip o your shoul-
ders. You can adjust the height of the
chest strap to where it’s most comforta-
ble. Tighten the hip belt as needed.
Until you’re experienced enough,
it’s recommended to check the baby-
’s position in a mirror. And now you’re
carrying!
5
7
6
8
During the rst attempts to put the child on your back, ask another person to help. It also helps
on your rst attempt to place the child on your back to do so above a soft surface (a bed, etc.).
Try setting the waist belt at various heights. Some people like wearing babies on their hips,
some prefer to wear them higher, almost above the waist.
i
14

Unfasten the rubber bands on the
outer part of the hip belt and lead the
upper rubber band between the hip
belt studs to the inner side of the baby
carrier. If it’s too dicult, unfasten one
stud.
Put the shoulder straps in the
middle of the backrest and then roll the
backrest up towards the waist belt.
Wrap the elastic band around the
rolled-up backrest and lock the clip into
its second half which is attached to the
bottom of the waist belt. Do the same
on the other side of the carrier with the
second elastic band.
This makes the carrier very porta-
ble and unobtrusive. If you loosen the
waist belt, you can wear the carrier over
your shoulder like a handbag.
1
3
2
4
FOLDING THE BABY CARRIER
If your toddler is walking by himself, you can fold the empty carrier and carry it as a „fanny
pack“. It is not necessary to put the carrier in a special bag or backpack or let it hang down
in an ugly-looking way.
15
i

How long can my baby spend in the carrier?
Wear your baby according to your intuition and signals that your child gives you. In everyday life
the baby is worn at home when it fusses or when asleep. Outside, on trips, it is often necessa-
ry to carry him in the carrier for a long time, but even then the wearing is interrupted by breaks for
nappy changing or feeding. We recommend giving the child enough time to stretch and exercise his
muscles.
Can I wear my baby facing forward?
No. KiBi is designed to conform with modern-day paediatric knowledge and is designed so that
the baby is facing the carrying person. Small babies who cannot sit on their own and cannot walk do
not have sufciently developed muscles along the spine to fully support their own body weight. They
like to be in a slightly crouched position. Bending backwards is irritating and uncomfortable for them.
If you place your baby into the carrier facing forward with the fabric crunched between their legs, their
body will bend backwards and their head will not be supported at all, a position which is not healthy
for the baby. Wearing is not comfortable for them, since all their weight rests on the crotch. And when
your baby needs to rest, he cannot snuggle up to you.
Won’t the child be cold in winter?
Not necessarily. It is easiest to dress small babies into a normal set of clothes for home tem-
perature, put them into the carrier and then dress yourself in a larger jacket or a special babywearing
jacket with an expansion for the baby in the carrier, even special babywearing covers are in offer. It
is necessary to keep the child’s legs warm because they are sticking out of the carrier - use woolen
socks, warm slippers or shoes. Balaclava hoods are excellent to keep the head warm in winter - they
not only protect the head, but also the whole neck.
In summer we sweat terribly. Can babies be worn in the heat?
When wearing your child on the body you will always be more sweaty and hot. It may help to
use high-tech synthetic or woollen clothes and a cotton cloth as an absorption layer between you, or
other types of functional clothes made of wool and other natural bres. Wool is much more absorbent
than cotton, can accumulate more sweat and does not get cold when wet. Another simple solution is
an umbrella or a parasol and a canvas hat with a wide brim for the child that protects their eyes from
the sun and shields their head and neck. In the heat we recommend that you be extra careful and
make sure that the child is drinking enough liquids.
The baby is crying when I put him in the carrier. Are his legs spread too
far apart?
If the fabric reaches from one knee to the other and no farther, the baby should not be uncom-
fortable. When the baby is outside the carrier, try exercising his legs - you will see that they can han-
dle this position easily. Children who have hip development problems are commonly given aids that
should keep their legs at exactly the same angle as when carried in a carrier. There are babies who
need to get used to the carrier. It bothers them when they need to be put into the carrier and buckled
up even though it takes only a minute. Once you go out, and the baby can have fun watching the
world around them and is lulled by the swinging movement of walking, they usually calm down quite
quickly. Some children fuss and cry before falling asleep. Follow your intuition. If the child refuses to
be worn, try the carrier again in 2 weeks. The child can change his mind even in such a short period
of time :)
FREQUENTLY ASKED QUESTIONS 16

chest strap
shoulder strap
head
suppport
backrest
waist belt
CARRIER MODEL
17
The recommended minimum baby´s age is 4-6 months.
Maximum child´s weight is 20 kg.
Material:
shell: 100% cotton
linning: 100% cotton

waist belt
GETTING STARTED WITH THE BABY CARRIER
– CHECKLIST
Main points for carrier adjustment
Narrowing the backrest
(see page 2 of the instructions)
Lowering the backrest
(see page 2 of the instructions)
Raising the feet and pads
(see page 3 of the instructions)
You have just received the KiBi adjustable and ergonomic baby carrier, which is set
to the largest size, i.e. for a child around the age of three. It is therefore necessary
to adjust it before wearing the carrier for the first time based on the size of the child
you plan to carry. Here we go!
Unfasten the clips, slide the strap to the middle section and fasten in the required
width. If you are carrying a small baby, narrow the headrest as far as possible and
pull out drawstring for contracting the loose material.
The backrest is loosely strung on the shoulder straps. Lower it to the required height
and secure with the attached snap hooks.
Tighten the straps in the buckles on the sides of the backrest. The child should be
sitting with their bottom set in the backrest pocket; their bottom should hang over
the lumbar belt around your tummy ... Check in the mirror, from the front and side,
to make sure their feet are in an “M” position.
Please note: This is only a check of the main points of the carrier adjustment.
For additional important information, refer to the instructions!
ax
CHECKLIST 18

Soft structured baby carrier
KiBi EVO
WARNING:
- your balance may be adversely aected by your movement and that of your
child;
- take care when bending or leaning forward or sideways;
- this carrier is not suitable for use during sporting activities.
Complies to European norm
EN 13209-2:2015 since 1. 6. 2016.
Manufacturer:
Adporto s.r.o.
Syrovátka 156
503 27 Syrovátka
Czech Republic
CARE:
Can be machine washed at 30°C on a gentle cycle. Fasten all buckles before
washing. It’s recommended to set up the baby carrier to its largest size.
Wash using a gentle detergent for coloured laundry, spin at 400 RPM (or as
low as possible).
Remove from the washing machine as soon as possible and let drip dry by
hanging the carrier vertically in the shade. It’s recommended to hang the
carrier by the hip belt.
Can be ironed with heat set to low.
VAT ID: CZ03416780
info@kibibabycarrier.eu
www.kibibabycarrier.eu
Table of contents
Other KIBI Baby Carrier manuals