Kids First Coding & Robotics User manual

CODING
& ROBOTICS
Franckh-Kosmos Verlags-GmbH & Co. KG, Pfizerstr. 5-7, 70184 Stuttgart, Germany | +49 (0) 711 2191-0 | www.kosmos.de
Thames & Kosmos, 301 Friendship St., Providence, RI, 02903, USA | 1-800-587-2872 | www.thamesandkosmos.com
Thames & Kosmos UK LP, 20 Stone Street, Cranbrook, Kent, TN17 3HE, UK | 01580 713000 | www.thamesandkosmos.co.uk
Lesson Plan and Experiment Manual
EXPERIMENT MANUAL

IMPORTANT INFORMATION ASSEMBLY TIPS
ANCHOR PINS AND CONNECTORS
Take a careful look at the different assembly
components. Blue anchor pins, pink shaft
plugs, blue joint pins, and gray long joint pins
all look pretty similar at first glance. When you
assemble the models, it’s important to use the
right ones.
CONNECTING
FRAMES AND RODS
Use the anchor pins to
connect frames and rods.
AXLES
The building system contains
axles (also called shafts)
of various lengths. When
assembling the model, always
be sure that you’re using the
right one.
PART SEPARATOR TOOL
If any of the building pieces are stuck together
and too hard to separate with your bare hands,
use the part separator tool like a crowbar
to pry them apart. Use the narrow end
of the lever to remove the anchor
pins. You can use the
wide end to
pry out shaft
plugs.
PULLEYS AND GEARS
If pulleys or gears are mounted too tightly
against other components, they can be hard
to turn. If you leave a gap of about 1 mm
between the gear or pulley and an adjacent
component, it will turn easily.
Safety Information
Warning! Not suitable for children
under 3 years. Choking hazard —
small parts and small ball may be
swallowed or inhaled.
Keep the packaging and instructions
as they contain important
information.
Warning. Do not discharge an object
other than the projectile provided
with this toy.
This product requires the Kids First
Coding & Robotics base kit. Refer
to the safety information on the
packaging and in the instructions for
that kit.
Store the experiment material and
assembled models out of the reach
of small children.
WARNING:
CHOKING HAZARD — Small
parts. Toy contains a small ball. Not
for children under 3 yrs.

567013-02-030419
Dear Parents,Teachers,
and Other Supervising
Adults,
This kit offers additional parts for
models and coding challenges for
the Kids First Coding & Robotics
Kit, which is required to build all
the models and perform the coding
activities.
Together with the base kit, this kit is
designed to teach children the basic
principles of programming in a fun,
interactive, and experimental way.
This kit picks up where the base kit
leaves off, offering more challenging
builds with more technical features.
The coding lessons are presented
as challenges that the child must
attempt to solve before the answers
are given.
We recommend you use this kit after
your child has mastered the lessons
in the base kit, or for children who are
ready for a more difcult challenge.
With your help, children will build
robots and program them to
complete a specic challenge.
Children will likely need help from
a parent or adult while using this
product. They may need your help
interpreting terms that are new to
them. They may need your help
assembling difcult models or
programs. And they may need your
help explaining what the robot is
doing and why.
Safety Info ........Inside front cover
Introduction...................... 1
Kit Contents...................... 2
Challenges
Forklift ....................... 3
Claw.......................... 5
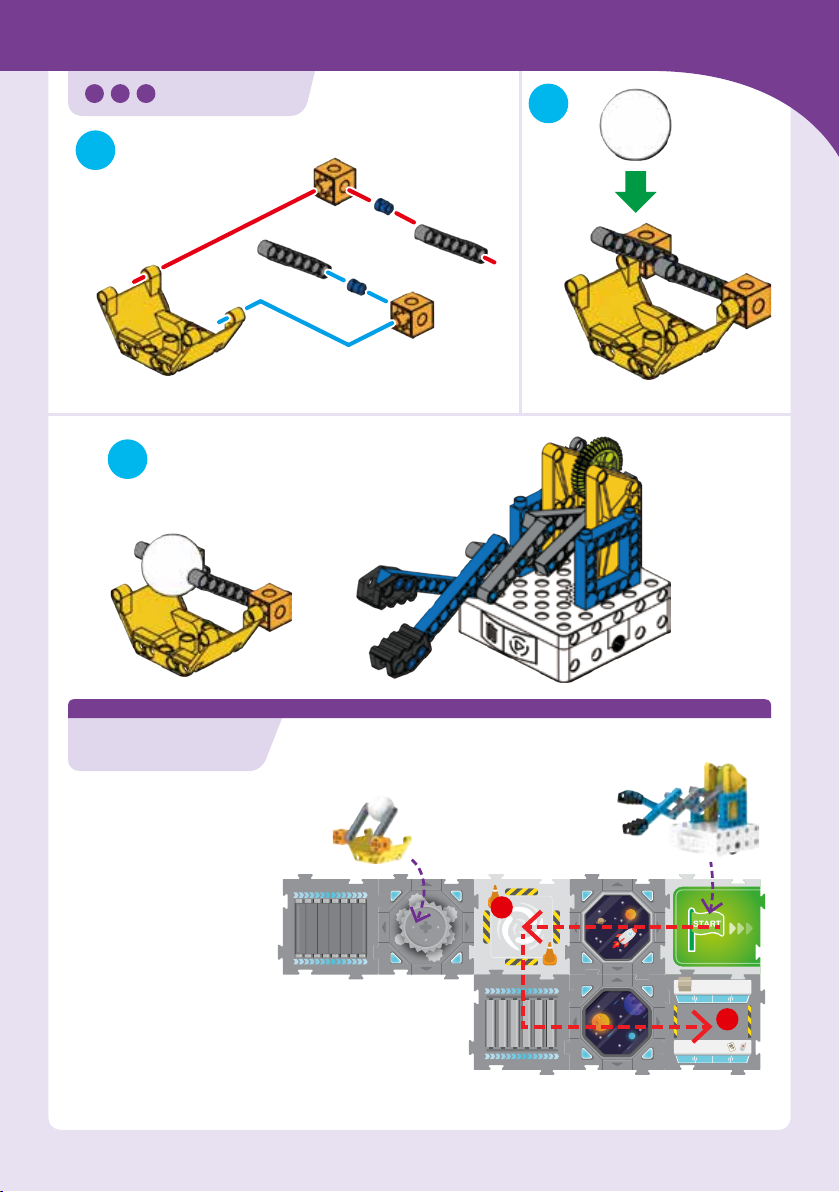
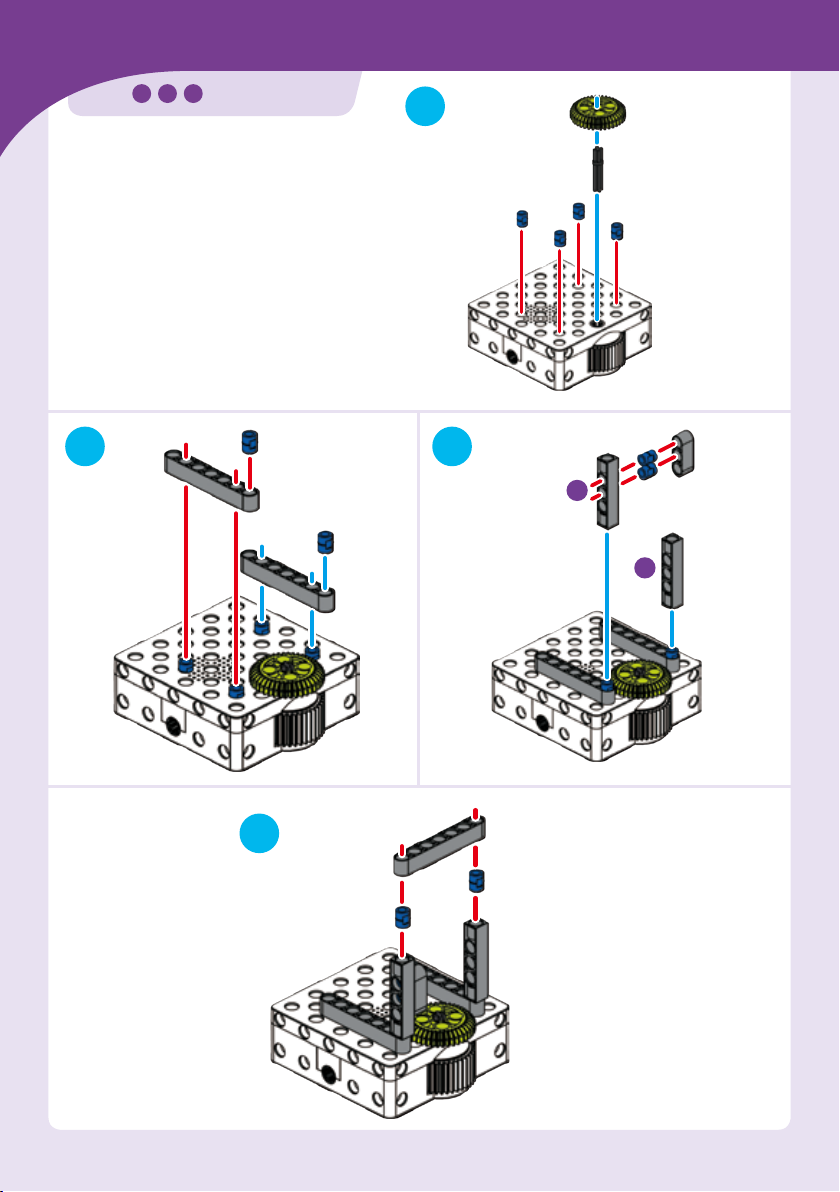
Catapult ...................... 8
Walker ........................11
Bulldozer .....................13
Scissor Lift ....................15
Hammer.......................17
Plow..........................19
Possible Solutions to the
Challenges ..... Inside back cover
Coding & Robotics: Challenge Pack 1
INTRODUCTION TABLE OF CONTENTS

No. Description Qty. Item No.
1 Short anchor pin 20 7344-W10-C2B
2Shaft plug 6 7026-W10-H1K
3Joint pin 12 7413-W10-T1B
4Long joint pin 27413-W10-U1S
590-degree converter X 2 7061-W10 -X1S2
6 3-hole cross rod 1 7026-W10-X1S2
73-hole wide rounded rod 4 7404-W10-C1S
87-hole wide rounded rod 4 7404-W10-C2S
9 7-hole flat rounded rod 4 7404-W10-C3S
10 5-hole rod 2 7413 -W10-K2S1
11 5-hole cross rod 2 7413-W10-R1S1
12 9-hole rod 2 7407-W10-C1S
13 11-hole ro d 2 7413-W10-P1B1
14 Square frame 2 7413-W10-Q1B
15 Trapezoidal plate 2 74 0 8 -W10-A1Y
16 Trapezoidal cover 1 7408 -W10-B1Y
17 Motor axle 2 7026-W10-L1S1
No. Description Qty. Item No.
18 Axle, 35 mm 2 7413-W10-O1D
19 Axle, 70 mm 2 7061-W10-Q1D
20 Small gear 6 7026-W10-D2K
21 Medium gear 4 7408 -W10-D2YG
22 Worm (for worm drive) 1 7344-W10-A1S1
23 Cube block, orange 2 880-W10-A1O3
24 Convex block, orange 1 880-W10-R1O3
25 Polystyrene ball 1 K30#7366-2
26 Gripper 2 7411-W10- G1D
27 Part separator tool 1 7061-W10 -B1Y
28 Map cards, set of 6 1 K16#7442-A-1
What’s inside your experiment kit:
Checklist: Find, Inspect, Check off
1 2 3 7 854 6 9 10
11 12 13 14 15
23
16
17 18 2419 2520
26 27
21
28
22
Missing Parts?
If you are missing any parts, please contact
Thames & Kosmos customer service.
US: tec[email protected]
UK: tec[email protected]
KIT CONTENTS

1
2
345
678
CONTINUED ...
Coding & Robotics: Challenge Pack 1
FORKLIFT
PREPARATION
Build this model and then
complete the coding challenge
on the next page.
STEP 1
STEP 2
70 mm
STEP 3
10
10
STEP 4
70 mm
STEP 5
x2
STEP 6
11
STEP 7
STEP 8
Use the robotic base unit
from the base kit.

10
11
9
DONE
A
B
MAP
FORKLIFT
Set up the map cards as
shown. Place a piece of
paper on the card as shown,
with a small stand under
it that will allow the forks
to slide under the piece of
paper to lift it up.
Create a program with the
code cards to move the
forklift robot from the Start
card to the event map card A,
where it will lift up the piece
of paper. With the paper
lifted, program the robot to
move to map card B.
CHALLENGE 1 LIFT THE CARGO
STEP 9
STEP 10
STEP OK
Use the Start
and event
map cards and
code cards
from the base
kit. Disregard
the arrows on
the Start map
card for this
challenge.
Start with
the forks
down
(not up as
shown).
Place the stand on
the map card and
put the paper on
the stand.
You will also need a piece of
paper raised up on a small stand.
Forks

1
2
3 4
5 6
Coding & Robotics: Challenge Pack 1
CLAW
PREPARATION
Build this model and then complete the
coding challenge on page 7.
35 mm
35 mm
27 mm
Use the
robotic base
unit from the
base kit.

78
910
11
CLAW
x2
x2

12
13
14
DONE
Set up the map cards as
shown. Place the ball in
the ball holder on the card
as shown.
Create a program with the
code cards to move the
claw robot from the Start
card to the event map card
A, where it will extend
its grabber claw and try
to grab the ball. With the
ball gripped in its claws
(if possible), program the
robot to move to map
card B.
A
B
Coding & Robotics: Challenge Pack 1
CLAW
CHALLENGE 2 GRAB THE BALL
MAP
Use the Start and event map cards and code cards from the base kit.
Disregard the arrows on the Start map card for this challenge.
Place the
ball in the
ball holder.
Start with the
grabber arm
pulled in (not
extended as
shown).
Ball holder

1
2 3
4
CATAPULT
PREPARATION
Build this model and then complete the
coding challenge on page 10.
1
35 mm
11
11
Use the
robotic base
unit from the
base kit.

5
7
6
8 9
Coding & Robotics: Challenge Pack 1
CATAPULT
10
70 mm

DONE
10
11
12
Set up the map cards
as shown. Place the
basket on the card as
shown.
Create a program
with the code cards
to move the catapult
robot from the Start
card to event map
card A, where it will
shoot the ball into
the basket. After that,
program the robot to
move to map card B.
A
B
MAP
Use the Start and event
map cards and code
cards from the base kit.
Start with the
catapult arm
down (not
up as shown)
and with the
ball in the
holder.
Align the
opening of
the basket so
that the ball
can be shot
into it.
CATAPULT
CHALLENGE 3 SHOOT THE BALL
Target basket

x2
35 mm
11
x2
10
x2
27 mm
x2
2
1
5
4
3
6
Coding & Robotics: Challenge Pack 1
WALKER
PREPARATION
Build this model and then complete the
coding challenge on the next page.
Use the
robotic base
unit from the
base kit.

27 mm
DONE
7
8
910
Set up the map cards
as shown. Place any
object as an obstacle on
the card as shown.
Create a program with
the code cards to move
the walker robot from
the Start card to the
event map card A,
where it will light up
and play a sound. Then,
program the robot
to move around the
obstacle to map card B.
A
B
MAP
Use the Start and event
map cards and code
cards from the base kit.
Place an object as
an obstacle in the
path on the map
card here.
WALKER
CHALLENGE 4 WALK AROUND THE OBSTACLE

70 mm
10
70 mm
1
6
2
7
3
45
Use the
robotic base
unit from the
base kit.
Coding & Robotics: Challenge Pack 1
BULLDOZER
PREPARATION
Build this model and then complete the
coding challenge on the next page.

x2
x2
DONE
8
9
10
11 12
Set up the map cards as
shown. Place some small
objects to be pushed by
the bulldozer on the map
card as shown.
Create a program with
the code cards to move
the bulldozer robot from
the Start card to the event
map card A, pushing the
load with its blade in the
process. At the event
card, it should raise its
blade and move to map
card B.
Blade
A
B
MAP
Use the Start and event
map cards and code
cards from the base kit.
Place some small
objects in the path
of the bulldozer on
the map card here.
Start with the blade of the bulldozer
in the down position.
BULLDOZER
CHALLENGE 5 PUSH THE LOAD

10
35 mm
10
70 mm
x2
x2
70 mm
DONE
12
3 4 5
6 7
8 9
10 11
Use the
robotic
base unit
from the
base kit.
Coding & Robotics: Challenge Pack 1
SCISSOR LIFT
PREPARATION
Build this model and then complete the
coding challenge on the next page.

x2
11
12
13
14 15
DONE
Set up the map cards
as shown.
Create a program with
the code cards to move
the scissor lift robot
from the Start card to
the event map card A,
where it will raise its
platform up into the air,
lower it, and raise it up
again. With the platform
raised, program the
robot to move to map
card B.
A
B
MAP
Use the Start and event
map cards and code
cards from the base kit.
Start with
the scissor
lift platform
lowered, not
raised.
SCISSOR LIFT
CHALLENGE 6 RAISE THE PLATFORM

27 mm
35 mm
Aach first
Aach second
DONE
1
2
3 4
5 6
Use the
robotic base
unit from the
base kit.
Coding & Robotics: Challenge Pack 1
HAMMER
PREPARATION
Build this model and then complete the
coding challenge on the next page.

10
70 mm
DONE
7
8
9
Set up the map cards
as shown. Place a small
object for the hammer
robot to hammer on the
map card as shown.
Create a program with
the code cards to move
the hammer robot
from the Start card to
the event map card A,
where it will hammer
the object a few times
(or pretend to). Then,
program the robot to
move to map card B.
A
B
MAP
Use the Start and event
map cards and code
cards from the base kit.
Place a small
object for the
hammer robot to
hammer on the
map card here.
HAMMER
CHALLENGE 7 HAMMER THE OBJECT
Table of contents
Other Kids First Toy manuals
Popular Toy manuals by other brands

Harbor Freight Tools
Harbor Freight Tools 91311 Assembly & operating instructions

Twister
Twister 400 SPORT V2 instruction manual

Pichler
Pichler MINI DOMINO C9795 instruction manual

Mattel
Mattel ALIXA DOLL 27494-0920 G3 instructions

TP Toys
TP Toys Junior Chef Mud Kitchen Instructions for assembly, maintenance and safe use

Beyblade
Beyblade Wing Defenser instructions