QUESTION AND COMMENTS
We treasure you as a customer and your satisfaction with this product is important to us. In case you have any comments or questions, or
you find any parts of this kit missing or defective, please do not hesitate to contact our distributor in your country, whose address is
printed
on
the
package.
You
are
also
welcome
to
contact
our
marketing
support
team
at
Email:
[email protected],
Fax
(852)
25911566, Tel (852) 28936241, Web site: WWW.4M-IND.COM
A. SAFETY MESSAGES
1. Please read through all the instructions and keep them since they contain important information.2. Adult assistance and supervision
are required.3. This kit is intended for children 5 years or older.4. This kit and its finished product contain small parts which may cause
choking if misused. Keep away from children under 3 years old.5. To prevent possible short circuits, never touch the contacts inside the
battery case with any metal.6. Only install batteries after the kit is assembled. Adult supervision is required.
B. USE OF BATTERIES:
1. Requires two 1.5V AAA batteries (not included). 2. For best results, always use fresh batteries.3. Make sure you insert the batteries
with the correct polarities.4. Remove the batteries from the kit when not in use. 5. Replace exhausted batteries straight away to avoid
possible damage to the kit. 6. Rechargeable batteries must be removed from the kit before recharging. 7. Rechargeable batteries must be
recharged under adult supervision. 8. Make sure that the supply terminals in the battery case are not short circuited. 9. Do not attempt to
recharge non-rechargeable batteries. 10. Do not mix old and new batteries. 11. Do not mix alkaline, standard (carbon-zinc), or
rechargeable batteries.
C. CONTENTS
13. Now press the LOWER button and the barrier should extend to block the entrance.
14. The barrier will only open with the keycard in place. Slide the keycard into the card holder. Now press the UPPER button to make the
barrier fold.
15. Now install the barrier gate on the door of your room. Apply the double-sided adhesive foam tape (P) to the back of the body, press it
onto the wall or door frame to make it stick in place. (You can also ask your parent to fix a nail or screw on the wall next to the door or to
the door frame for the main body to hang onto). Press the LOWER button, the barrier gate will extend to block the door entrance.
16. Add the sticker (W9) to the hexagonal plate (S) and push the plate into the barrier. You can also add different signs to the barrier.
Detach the signs (I) from the package box flaps and slot it into place. You can only enter your room if you have the card. Slot the card into
the card holder and press UPPER button. The gate will collapse and rotate up to open the door entrance.
E. TROUBLESHOOTING
If the barrier does not open or close:
• Check that you are using fresh batteries.
• Check that you have connected the wires correctly (step 3).
• Check that the metal ends of the wires are touching the terminals and are held in place by the terminal caps.
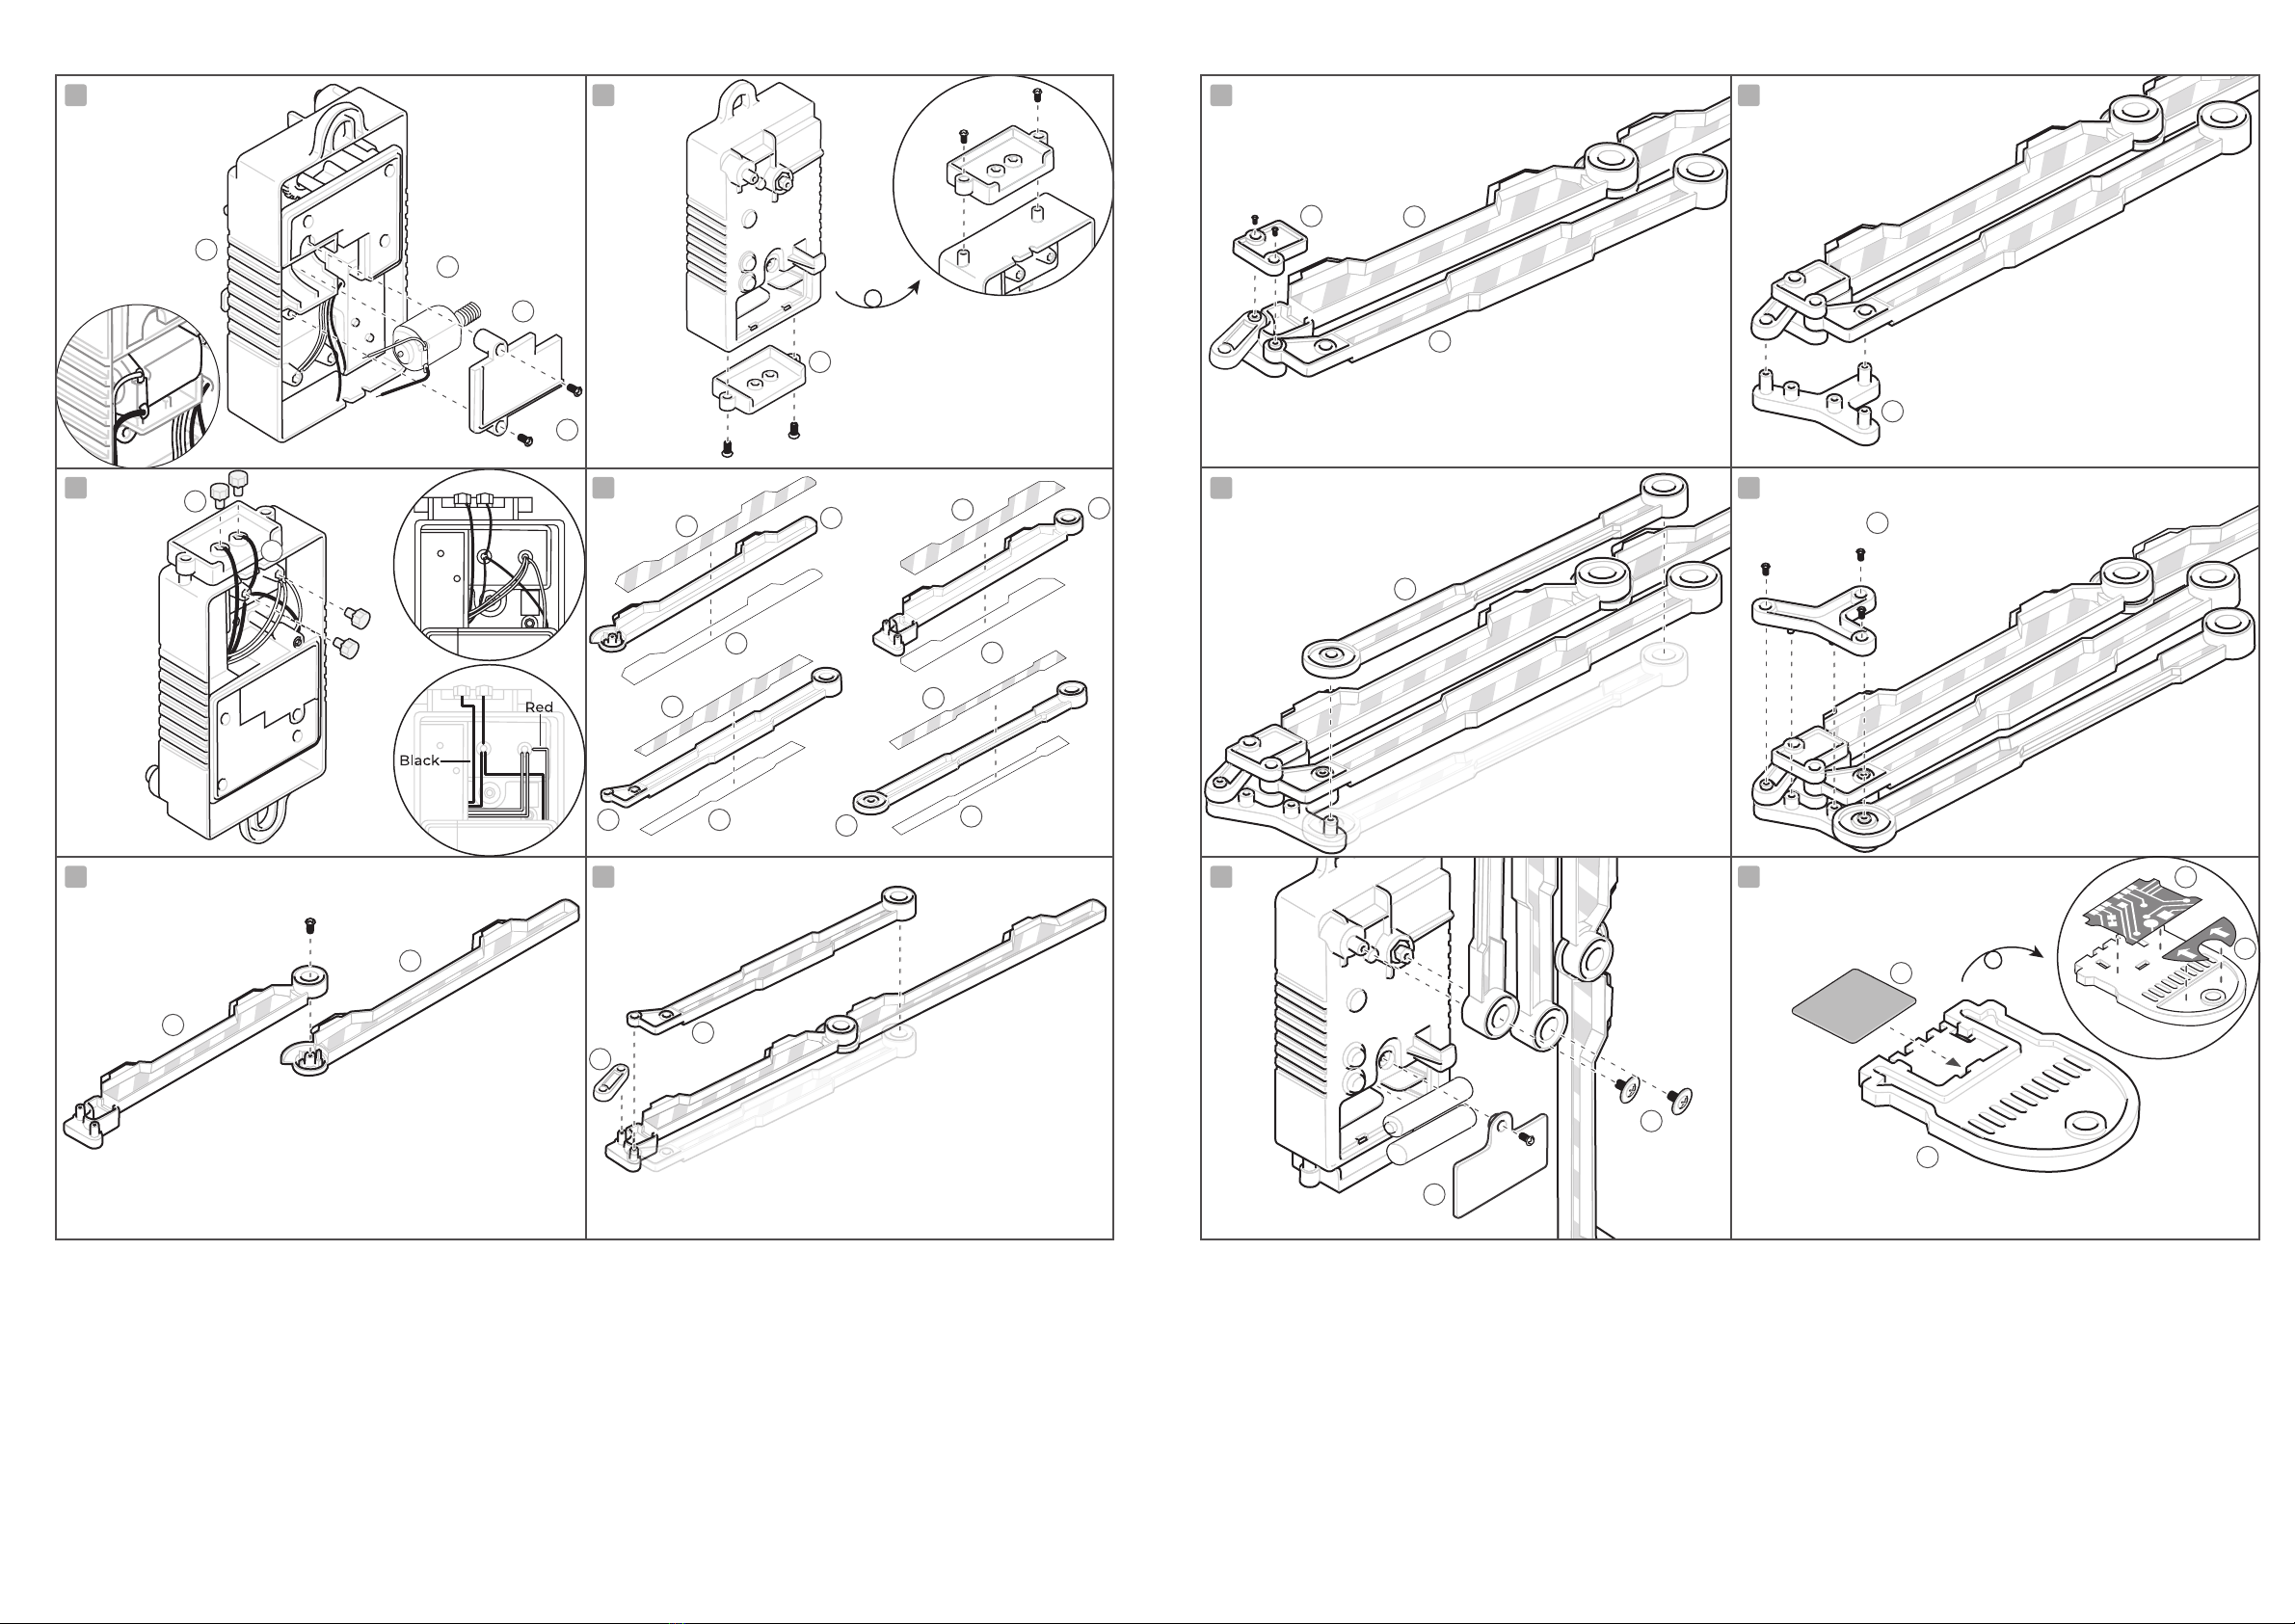
F. HOW IT WORKS
The motor has a worm gear that turns a shaft that raises or lowers arms Aand B. The metal on the card completes a circuit that allows
the motor to run when you press the UPPER button. The joint mechanism raises the outer end of the barrier when the inner end lowers,
and lowers the outer end of the barrier when the inner end rises.
G. FUN FACTS
•Security barriers like this are used at stadiums and train stations to allow people with tickets to gain access. The barriers only open
when a valid ticket is inserted.• Access cards are used to open security doors in many buildings, including hotels.• Lifting barriers are
used in car parks and railway crossings. In car parks the barrier only opens when a ticket is inserted into the machine.• Many security
barriers have light sensors that detect when a person or vehicle has passed through. The sensors trigger the barrier to close again.•
Barriers can also be operated by clever sensors such as number-plate recognition cameras.• Barriers have safety systems that prevent
them from lowering when a person or vehicle in underneath.
CHOKING HAZARD - Small parts.
Not for children under 3 years.
TO PARENTS: PLEASE READ THROUGH THESE
INSTRUCTIONS BEFORE PROVIDING GUIDANCE
TO YOUR CHILDREN.
PLEASE SCAN THE QR CODE TO VIEW MULTI-LANGUAGE INSTRUCTIONS
Part A: Arm A, Part B: Arm B, Part C: Arm C, Part D: Arm D, Part E: Main body, Part F: Motor cover, Part G: Card holder, Part H:
keycard, Part I: Card template (from box flaps), Part J: Joint base, Part K: Joint cover, Part L: Motor, Part M: Battery cover, Part N: Joint
link, Part O: Metal plate, Part P: Double-sided adhesive foam tape, Part Q: Terminal caps, Part R: Small joint cover, Part S: Hexagonal
plate, Part T: Black wire, Part U: Washer screws, Part V: Screws and Part W: Stickers. Also required but not included in the kit: 2x1.5-
volt AAA batteries, a small crosshead screwdriver.
©2021 4M INDUSTRIAL DEVELOPMENT LIMITED. ALL RIGHTS RESERVED.
2x2R
Content
A E
B
C
D
F
J
N
R
K
O
S
L
P
T
M
G H
Q
V
I
U
W1
W2
W3
W4
W5
W5
W6
W7
W8
W9
©2021 4M Industrial Development Limited. All rights reserved.
41-03447/2 20210527
13
15
14
16
S
P
W9
I
2x2R
Content
A E
B
C
D
F
J
N
R
K
O
S
L
P
T
M W
G H
Q
V
I
U
W1
W2
W3
W4
W5
W5
W6
W7
W8
W9
©2021 4M Industrial Development Limited. All rights reserved.
41-03447/2 20210527
13
15
14
16
S
P
W9
I