manuals.online logo
Brands
  1. Home
  2. •
  3. Brands
  4. •
  5. KidzLabs
  6. •
  7. Toy
  8. •
  9. KidzLabs MAGNETIC INTRUDER ALARM User manual

KidzLabs MAGNETIC INTRUDER ALARM User manual

MAGNETIC
INTRUDER
ALARM
QUESTION AND COMMENTS
We treasure you as a customer and your satisfaction with this product is important to us. In case you have any comments or questions,
or you find any parts of this kit missing or defective, please do not hesitate to contact our distributor in your country, whose address is
printed on the package. You are also welcome to contact our marketing support team at Email: [email protected], Fax (852)
25911566, Tel (852) 28936241, Web site: WWW.4M-IND.COM
A. SAFETY MESSAGES
1. Adult supervision and assistance are required at all times.
2. This kit is intended for children 5 years or older.
3. This kit and its finished product contain small parts which may cause choking if misused. Keep away from children under 3 years old.
4. To prevent possible short circuits, never touch the contacts inside the battery case with any metal.
5. Only install batteries after the kit is assembled. Adult supervision is required.
6. Please read through all the instructions and keep them since they contain important information.
B. USE OF BATTERIES:
1. Requires two 1.5V AAA batteries (not included).
2. For best results, always use fresh batteries.
3. Make sure you insert the batteries with the correct polarities.
4. Remove the batteries from the kit when not in use.
5. Replace exhausted batteries straight away to avoid possible damage to the kit.
6. Rechargeable batteries must be removed from the kit before recharging.
7. Rechargeable batteries must be recharged under adult supervision.
8. Make sure that the supply terminals in the battery case are not short circuited.
9. Do not attempt to recharge non-rechargeable batteries.
10. Do not mix old and new batteries.
11. Do not mix alkaline, standard (carbon-zinc), or rechargeable batteries.
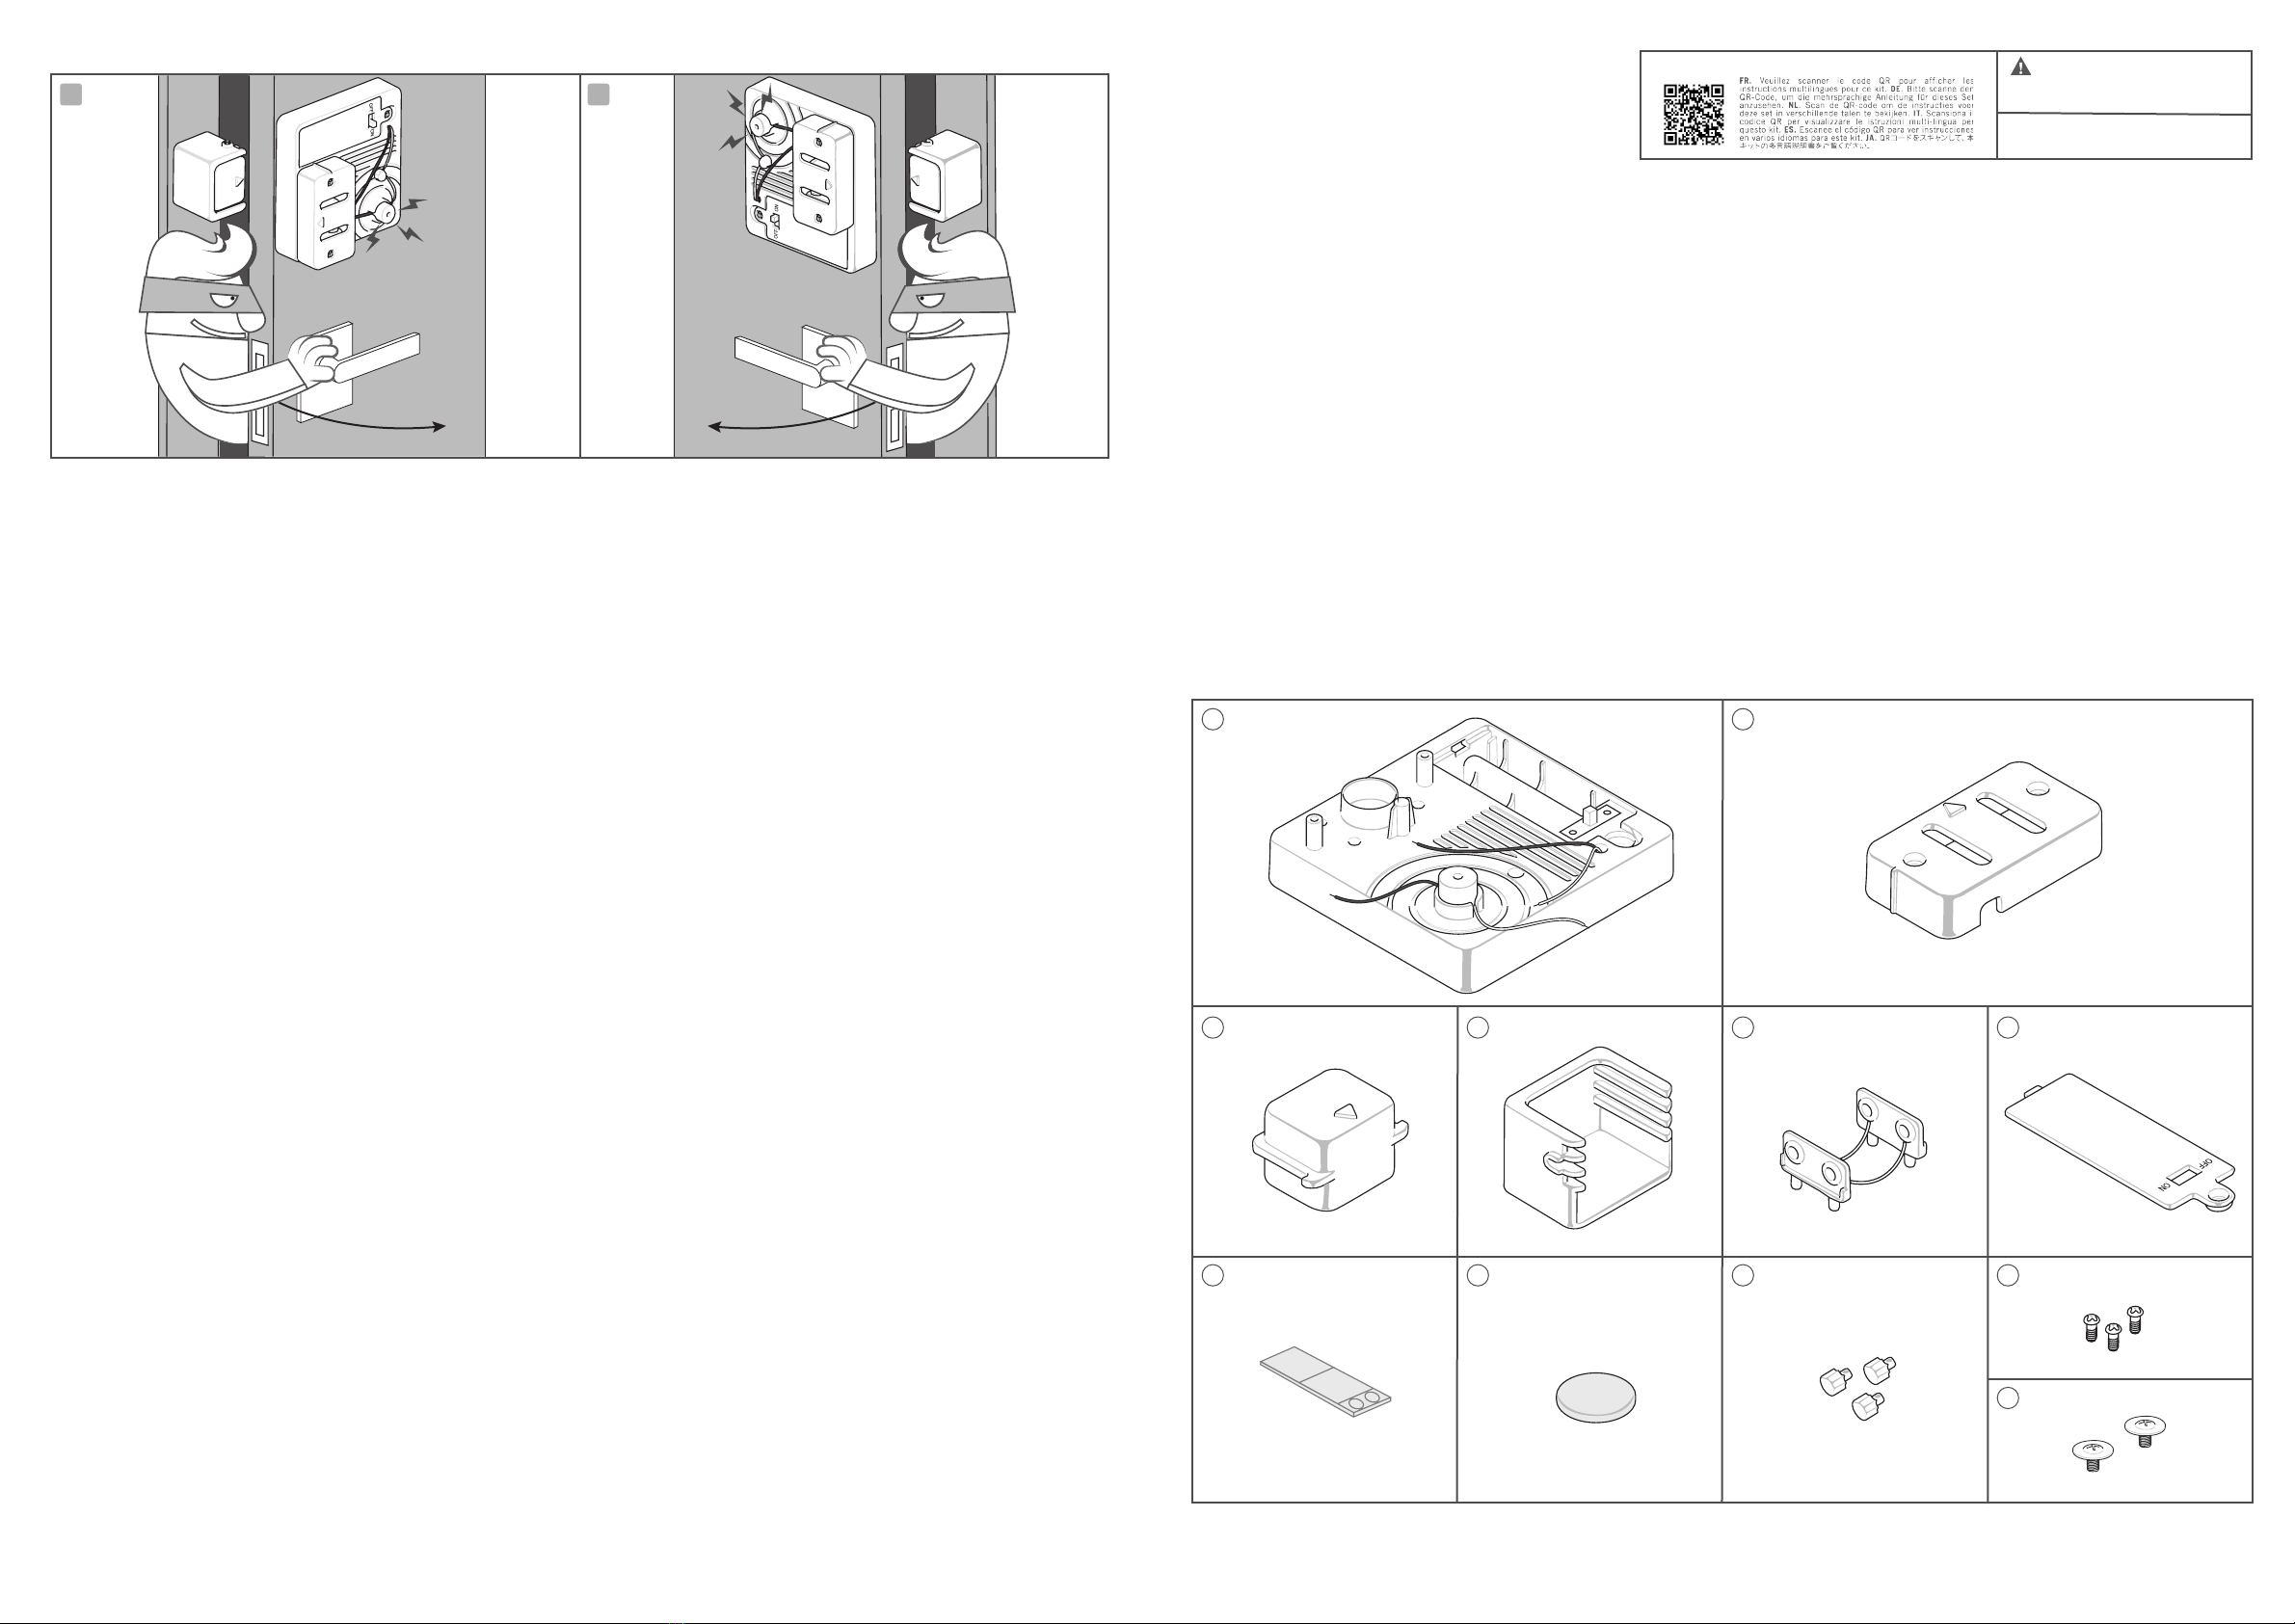
C. CONTENTS
41-03440/QR 201124
WARNING:
CHOKING HAZARD - Small parts.
Not for children under 3 years.
TO PARENTS: PLEASE READ THROUGH THESE
INSTRUCTIONS BEFORE PROVIDING GUIDANCE
TO YOUR CHILDREN.
PLEASE SCAN THE QR CODE TO VIEW MULTI-LANGUAGE INSTRUCTIONS
Part A: Base x 1, Part B: Cover x 1, Part C: Magnet x 1, Part D: Magnet holder x 1, Part E: Eyelet plate set x 1, Part F: Battery cover x 1,
Part G: Adhesive tape, Part H: Metal disc x 1, Part I, Terminal caps x 3, Part J: Screws x 3, Part K: Washer screws x 2.
Also required but not included in the kit: 2 x 1.5-volt AAA batteries, a small crosshead screwdriver.
©2020 4M INDUSTRIAL DEVELOPMENT LIMITED. ALL RIGHTS RESERVED.
10. Your Magnetic Intruder Alarm is ready for action! Turn on the alarm and close the door. Now if anyone opens the door even a tiny bit
the alarm will be triggered. Close the door again or switch off the alarm to silence the buzzer.
11. If your door handle is at the right-hand side of the door, stick the system onto the door upside down – it will still work.
F. TROUBLESHOOTING
If the alarm fails to sound in the tests in steps 5 or 6 above:
• Make sure you are using fresh batteries.
• Make sure your batteries are inserted in the holder with the correct polarities.
• Make sure the bare metal of the wires is in contact with the metal of the terminals.
• If the alarm fails to sound when the door is opened, repeat step 9 until it works.
G. HOW IT WORKS
The disc is made of steel, a magnetic metal which is attracted by the magnet. When the door is closed and the triangles on the magnetic
holder and base are aligned, the disc is pulled to one side of the eyelet area by the magnet. When the door is opened, the magnet
moves away from the base and the pull from the magnet is no longer strong enough to hold the disc. The disc rolls down into the bottom
of the eyelet area and rests across the two terminals. This acts as a switch, completing the circuit and allowing current to flow through
the buzzer.
H. Fun facts
• Many real house alarms use magnetic sensors like this to detect when doors or windows are opened and closed. Asignal from the
switch goes to the alarm’s control box.
• Magnetic switches are used in many machines to detect when parts of machine are in or out of position. For example, they detect when
dishwasher and washing machine doors are closed so that water does not leak from the machine.
• Many magnetic switches are called reed switches. Inside a reed switch is a thin metal strip (the reed) that bends when a magnet is
close by. The bent reed closes a circuit to allow current to flow.
•Other switches use moving parts in a similar way. Tilt switches detect when a machine or part of a machine is tipped over to one side.
Inside is a ball bearing that rolls over two contacts in the same way as the disc in the Magnetic Alarm to complete a circuit.
• Tilt switches are on pinball machines to stop players from tilting the table to cheat!
E. OPERATION
2x2R
Content
Assembly
A
10 11
B
C ED F
G IH J
K
2x2R
Content
Assembly
A
10 11
B
C ED F
G IH J
K
7. Peel the backing from one side of the pieces of adhesive tape (part G) and stick them onto the back of the alarm and the magnet
holder as shown.
8. Peel the backing from the other side of the tape. Stick the magnet holder onto the door frame and the alarm base onto the door.
Ensure the two arrows on the alarm and magnet are aligned as shown.
9. If the magnet is too far from the base because of the shape of your door frame, the alarm will sound continuously when switched on.
You will need to adjust the position of the magnet in its holder. Loosen the two screws first. You can adjust the magnet's position by
moving it to a different slot in the holder and by sliding it sideways in its slot. The aim is to make the magnet and metal disc as closely as
you can. After making adjustment, retighten the two screws.
1. Insert the two eyelet plates (part E) onto the base (part A) as shown.
2. Put the bare metal end of the black wire from buzzer into the left terminal on the eyelet plate as shown. Secure the wire in place with
the terminal cap (part I). Repeat this step with the black wire from battery compartment to the right terminal. Put the bare metal ends of
the two red wires in the terminal next to the buzzer and secure them with the terminal cap.
3. Place the metal disc (part H) into the area between the eyelets. Place the cover (part B) over the eyelet area and secure it with two
screws (part J).
4. Insert two 1.5-volt AAA batteries into the battery compartment. Make sure the negative, flat ends of the batteries are against the
springs in the battery case. Add the battery cover (part F) and secure it with a screw. Test the alarm by sliding the switch. The buzzer
should sound when the alarm is placed upright (with the battery compartment at the top). Switch off the alarm after your test.
5. Slide the magnet (part C) into the magnet holder (part D). Screw the two washer screws (part K) into the holder and adjust them so
that each one is just touching the magnet case. Do not over tighten the screws to avoid deforming the holder.
6. Switch on the alarm. With the alarm upright, place the magnet next to the base with the two arrows aligned. If you move the magnet
towards the alarm, the buzzer's sound will be stopped. Switch off the alarm again after this test.
D. ASSEMBLY
AAA 1.5 V
AAA 1.5 V
A
1 2
3 4
5 6
7 8
9
B
C
E
D
F
G
G
I
I
H
J
K
AAA 1.5 V
AAA 1.5 V
A
1 2
3 4
5 6
7 8
9
B
C
E
D
F
G
G
I
I
H
J
K

This manual suits for next models

1

Other KidzLabs Toy manuals

KidzLabs MOTORISED BARRIER GATE User manual

KidzLabs

KidzLabs MOTORISED BARRIER GATE User manual

KidzLabs Wind Powered Racer User manual

KidzLabs

KidzLabs Wind Powered Racer User manual

Popular Toy manuals by other brands

Freewing F-35 Lightning II Joint Strike Fighter manual

Freewing

Freewing F-35 Lightning II Joint Strike Fighter manual

BABY born MOMMY, Look I Can Swim! quick start guide

BABY born

BABY born MOMMY, Look I Can Swim! quick start guide

Model Airways CURTISS JN-4D JENNY instruction manual

Model Airways

Model Airways CURTISS JN-4D JENNY instruction manual

Global Hobby Wattage Turbo Hawk EDF Instructions for final assembly

Global Hobby

Global Hobby Wattage Turbo Hawk EDF Instructions for final assembly

Eduard ASLAV-25 RV Assembly instructions

Eduard

Eduard ASLAV-25 RV Assembly instructions

LEGO City 60046 Building instructions

LEGO

LEGO City 60046 Building instructions

Educational Insights EI-8475 Digitz Instructions for use

Educational Insights

Educational Insights EI-8475 Digitz Instructions for use

Kenner The Claw Vehicle Operation instructions

Kenner

Kenner The Claw Vehicle Operation instructions

Wild Planet Flipper Frenzy! manual

Wild Planet

Wild Planet Flipper Frenzy! manual

bloco dumel Discovery Creative Cat Assembly instructions

bloco

bloco dumel Discovery Creative Cat Assembly instructions

Fisher-Price POWER WHEELS LIL' QUAD N8379 Owner's manual with assembly instructions

Fisher-Price

Fisher-Price POWER WHEELS LIL' QUAD N8379 Owner's manual with assembly instructions

Smoby MAJO GARAGE MOTOR CITY manual

Smoby

Smoby MAJO GARAGE MOTOR CITY manual

Ripmax Mini Xcalibur E Jet instructions

Ripmax

Ripmax Mini Xcalibur E Jet instructions

PARKZONE VisionAire AS3X instruction manual

PARKZONE

PARKZONE VisionAire AS3X instruction manual

Radio Shack Lightning Owenrs manual

Radio Shack

Radio Shack Lightning Owenrs manual

dji WooKong HELI user manual

dji

dji WooKong HELI user manual

Faller 242301/3 manual

Faller

Faller 242301/3 manual

Hasbro Sip 'N Slurp Baby Alive manual

Hasbro

Hasbro Sip 'N Slurp Baby Alive manual

manuals.online logo
manuals.online logoBrands
  • About & Mission
  • Contact us
  • Privacy Policy
  • Terms and Conditions

Copyright 2025 Manuals.Online. All Rights Reserved.