Kinco FV20 Series User manual

39
Directory
Chapter 1 Safety ................................................................................................................................................... 40
Chapter 2 Product introduction ............................................................................................................................. 41
2.1 Nameplate Information ............................................................................................................................... 41
2.2 VFD Model Rule ......................................................................................................................................... 41
2.3 External dimension and weight .................................................................................................................. 42
2.3.1 External dimension and weight ....................................................................................................... 42
2.3.2 Operation panel and installation box size ....................................................................................... 44
Chapter 3 Wiring Guide of VFD ............................................................................................................................ 45
3.1 Wiring and Configuration of Main circuit terminal ...................................................................................... 45
............................................................................. 45
3.1.2 Wiring of VFD for Basic Operation .................................................................................................. 46
3.2 Wiring and configuration of control circuit .................................................................................................. 46
Chapter 4 Operation Instructions of Kinco VFD .................................................................................................... 49
4.1 Using Operation Panel ............................................................................................................................... 49
.......................................................... 49
4.1.2 Display status of operation panel .................................................................................................... 51
4.1.3 Panel Operation............................................................................................................................... 51
Chapter 5 Troubleshooting ................................................................................................................................... 52
Chapter 6 List of Parameters ................................................................................................................................ 53

Chapter 1 Safety
40
Chapter 1 Safety
Danger Attention
Only qualified personnel shall wire the drive, or it
may cause electric shock.
Perform the maintenance job after confirming that
the charg
ing LED is off or the DC Bus voltage is
below 36V, or it may cause electric shock.
Never wire the drive unless the input AC supply is
totally disconnected, or it may cause electric shock.
It is prohibited from changing internal parts or
circuit.
nstall the drive in places where water pipes
may leak onto it.
Don't allow screws, washers and other metal foreign
matters to fall inside the drive, otherwise there is a
danger of fire or damage;
Don't install the drive under direct sunshine,
otherwise it may be damaged;
-
), otherwise there
is a danger offire or the drive may be damaged.
control terminals except terminals Ra, Rb and Rc.
PB and + are used to connect th
e brake resistor, do
not shortcut them, or the brake unit may be damaged.
!

Chapter 2 Product introduction
41
Chapter 2 Product introduction
In this chapter we introduce the basic product information of specifications, model, and structure and so on.
2.1 Nameplate Information
2.2 VFD Model Rule
FV20 4T 0075G/0110L A 037
Power
Input Voltage/Current/freque
Output Voltage/Current/freque
Serial Number
Model name
CE certification
0 Standard model
Others
The second generation
Power supply
2 220V
4 380V
Software custom code
Hardware custom code
0075G 7.5KW constant torque
0110L 11KW constant power
VFD Code
FV FV Series
S Signal phase
T Three-phase

Chapter 2 Product introduction
42
2.3 External dimension and weight
2.3.1 External dimension and weight
Fig 2-1FV20-4T-0185G/0220L and lower power VFD
Fig 2-2FV20-4T-0220G/0300L FV20-4T-8000G
Fig 2-5 FV20-4T-1000G

Chapter 2 Product introduction
43
Table 2-1 Mechanical parameters
VFD model
(G.Constant torque load;
L.Draught fan and water
pump load)
External dimension and (mm)
Weight
(kg)
W H D W1 H1 D1 Installation
hole(d)
FV20-4T-0007G/0015L
120 186 167 115 175 74.5 4.7 2
FV20-4T-0015G/0022L
FV20-4T-0022G/0037L
FV20-4T-0037G/0055L
FV20-4T-0055G/0075L 140 256 181 131 243 91 5.8 6
FV20-4T-0075G/0110L
FV20-4T-0110G/0150L
160 320 207 151 303 115 5.8 8
FV20-4T-0150G/0185L
FV20-4T-0185G/0220L
FV20-4T-0220G/0300L 206 471 201 166 453 94 7 18
FV20-4T-0300G/0370L
FV20-4T-0370G/0450L 320 535 224 220 512 88.5 10 31
FV20-4T-0450G/0550L
FV20-4T-0550G/0750L 373 649 262 240 628 102.5 10 42
FV20-4T-0750G/0900L
FV20-4T-0900G/1100L 440 758 285 340 737 102 11 73
FV20-4T-1100G/1320L 430 780 330 280 755 168 11 76
FV20-4T-1320G/1600L
FV20-4T-1600G/1850L
530 940 380 340 910 206 14 114 FV20-4T-1850G/2000L
FV20-4T-2000G/2200L
FV20-4T-2200G/2500L
690 1006 380 500 974 207 14 156 FV20-4T-2500G/2800L
FV20-4T-2800G/3150L
FV20-4T-3150G/3550L
810 1228 400 520 1196 209 14 225 FV20-4T-3550G/4000L
FV20-4T-4000G/4500L
FV20-4T-6000G 810 1328 400 520 1296 / 14 450
FV20-4T-8000G
FV20-4T-10000G 1480 1807 600 Pedestal installation
W1*H1=1040*440 d=14 460

Chapter 2 Product introduction
44
2.3.2 Operation panel and installation box size
Fig 2-3 Installation box dimension
Note
When the operation panel is mounted, the opening size of the tray is 65*130mm.

Chapter 3 Wiring Guide of VFD
45
Chapter 3 Wiring Guide of VFD
3.1 Wiring and Configuration of Main circuit terminal
3
Table 3-1 Description of main loop terminal
Terminal name Function description
L N Single phase 220VAC input terminal
R S T 3-phase 380V AC input terminal
DC bus positive and negative terminal
PB Braking resistor terminal
U V W 3-phase AC output terminal
PE Shield PE terminal

Chapter 3 Wiring Guide of VFD
46
3.1.2 Wiring of VFD for Basic Operation
Fig.3-1 Basic wiring chart
3.2 Wiring and configuration of control circuit
3.2.1 Wiring of control circuit terminal.
Wire the terminals correctly before using the Drive. Refer to the table 3-2 for control circuit terminal function
Table 3-2 Control circuit terminal function
Sequence No.
Function
1 Analog input and output terminal, RS232 and RSRS485 communication port
Note:
It is recommended to use cables bigger than 1mm2 to connect to the terminals.
Arrangement of control circuit terminals is as follows.
Ra Rb Rc
X1 X2 X3 X4 X5 COM 10V GND AI1 AI2
Y1 COM X6 24V PLC AO1 AO2 GND
485+
485-
Fig.3-2 Arrangement of control terminals
J601 J602 J603 J604
I I I I
V V V V
AI1 AI2 AO1 AO2

Chapter 3 Wiring Guide of VFD
47
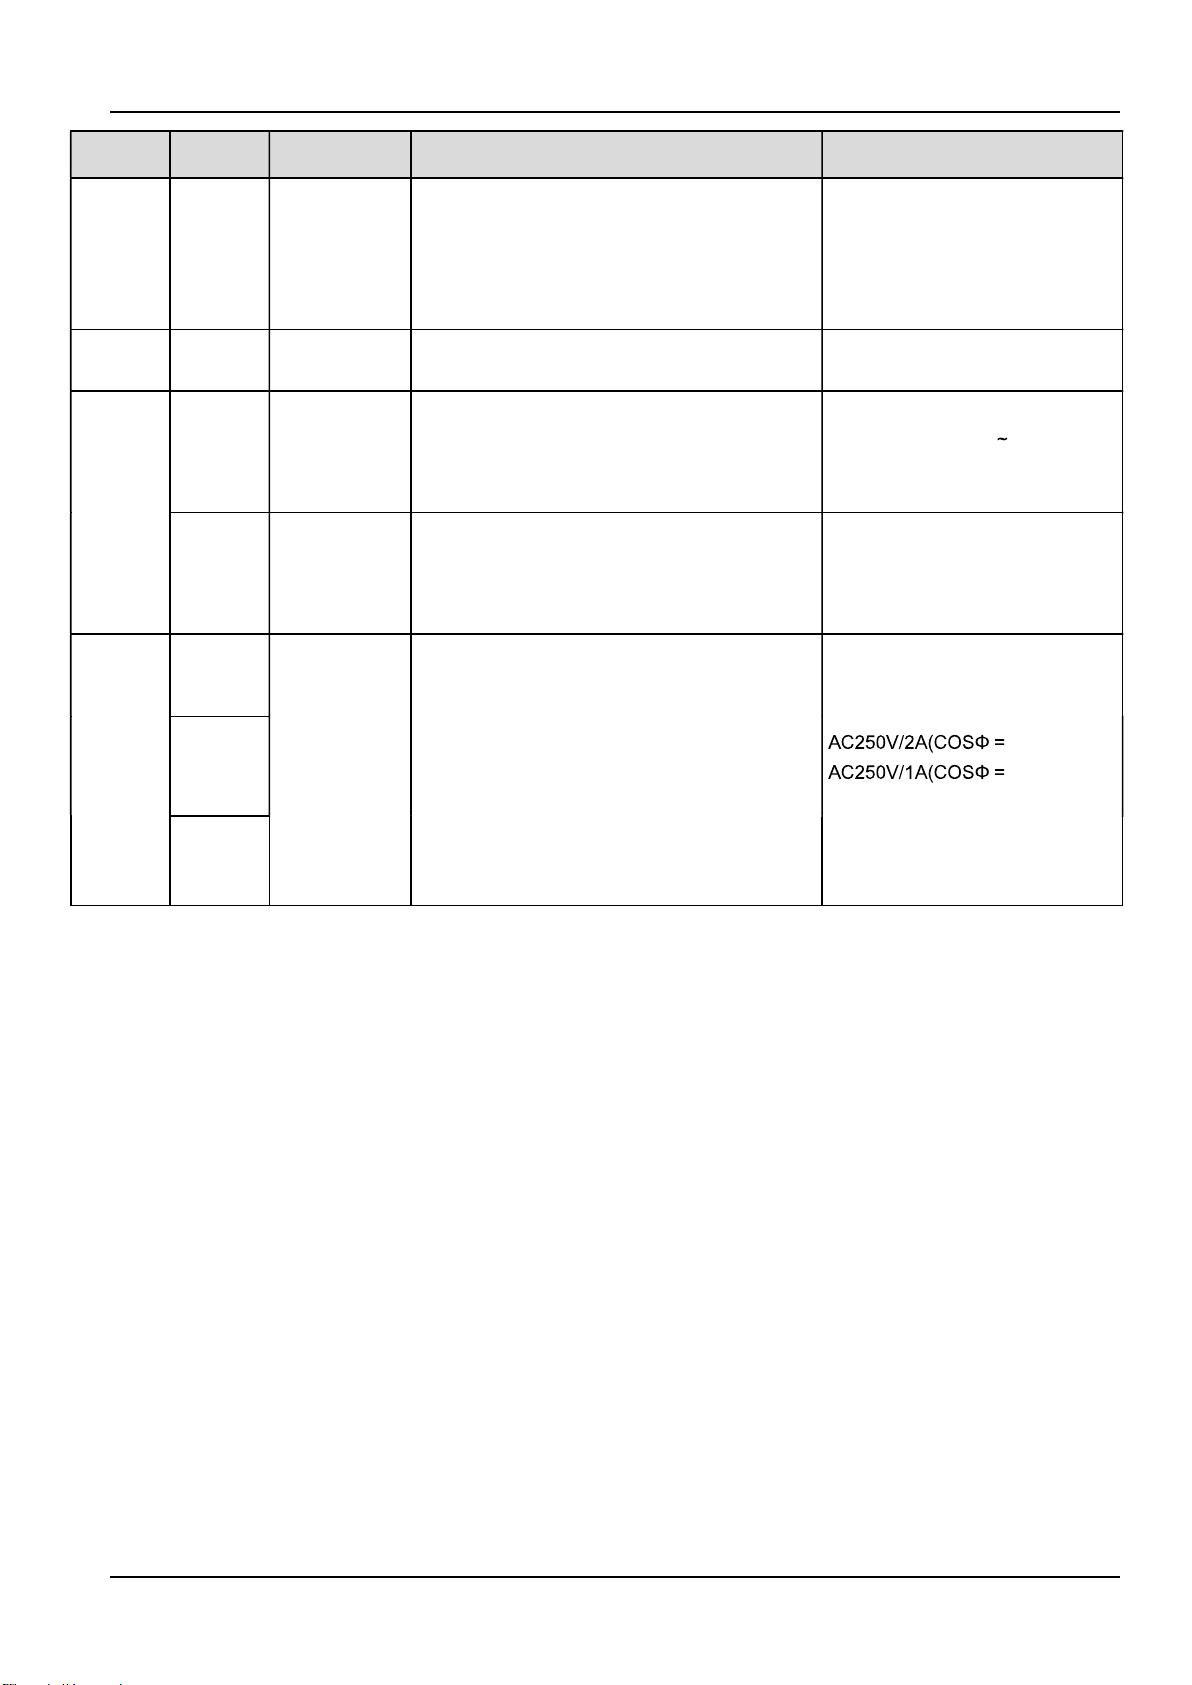
Refer to table 3-3 for description of each terminal
Table 3-3 function list of each list
Category
Terminals
Name Function description Specification
Shield Shielded PE
PE terminal connected to shielding layer. 485
communication cable, Analog signal cable,
motor power cable shield can be connected to
this terminal here
Connected to PE terminal of main
loop inside
Power
supply
+10 +10V Power
supply Provide +10V power supply Maximum current output is5mA
GND +10V GND of
Power supply GND for analog signal and 10V power supply Isolated from COM and CME
inside
Analog
input
AI1 Signal-
ended
input AI1
Can accept analog voltage or current input,
jumper AI1 can select voltage or current input
mode.(Reference ground. GND)
Input voltage range.-10V
10V(Input impedance
Input current range.0mA 20
mA,Resolution.1/2000(Need
jumper)
AI2 Signal-
ended
input AI2
Can accept analog voltage or current input,
jumper AI2 can select voltage or current input
mode.(Reference ground. GND)
Analog
output
AO1 Analog
output 1
Providing analog voltage or current output, they
are selected by the jumper AO1. The default
setting is output voltage, refer to the function
code A6.28 for detail.(Reference ground. GND)
Voltage output range.0V 10V
Current output range.0/4 20mA
AO2 Analog
output 2
Providing analog voltage or current output, they
are selected by the jumper AO2. The default
setting is output voltage, refer to the function
code A6.29 for detail.(Reference ground.GND)
Voltage output range.0V
10VCurrent output range.0/4
20mA
Communi
-cation
RS485+ RS485
communication
port
485+ StandardRS-485communication
port, please use twisted-
pair cable
or shielded cable.
RS485- 485-
Multi-
function
input
terminal
X1 Multi-function
input terminal 1
Can be defined as multi-
function digital input
terminal.
(Refer to the A6 group, form A6.00 to A6.06)
Optocoupler isolation input
Maximum frequency input of
X1 X5.200Hz
Maximum input frequency of
X6.100kHz
Input voltage range.2 30v
X2 Multi-function
input terminal 2
X3 Multi-function
input terminal 3
X4 Multi-function
input terminal 4
X5 Multi-function
input terminal 5
X6 Multi-function
input terminal 6
+24V
X1
X7
PL
C
+3.3
V
CO
M
24
V
R

Chapter 3 Wiring Guide of VFD
48
Category
Terminals
Name Function description Specification
Multi-
function
output
terminal
Y1
Open collector
output terminal
(High-speed
pulse) output
terminal
When defined as Open collector output
terminal,refer to the A6.14 for detail,When
defined as High-speed pulse output
terminal,refer to A6.27 for detail.Maximum
frequency could up to 100KHz
Optocoupler isolation output
Maximum working voltage.30v
Maximum output current.50mA
Power
supply +24V +24V power
supply Providing +24V power for others Maximumoutputcurrent.200mA
Common-
port
PLC
Common port
of
multi-function
input
Common port of Multi-function input
(Short cut with 24V in default)
Common port of X1 X6, PLC is
isolated from 24V internally
COM
Common port
of
24V power
supply
Three common ports in all, cooperate with other
terminals
COM is isolated from CME and
GND inside the drive
Relay
output
terminal 1
Ra
Relay output Can be defined as multi-function relay
output terminal(Refer to the A6.16 for detail)
Ra-Rb.Normally closed
Ra-Rc.normally open
Contact capacity .
1)
0.4)
DC30V/1A
Input voltage for over-voltage
class of relay output terminal is
over-voltage class II
Rb
Rc

Chapter 4 Operation Instructions of Kinco VFD
49
Forward / Reverse indicator
ON: Local control LOC
OFF: Remote control REMOTE
ON: Reverse
OFF: Forward
ON: Local contro
Flashing: Self-learning status
OFF: Remote control
Chapter 4 Operation Instructions of Kinco VFD
4.1 Using Operation Panel
4.1.1
Operation panel is used to setup the drive and display parameters, it is LED display. As shown in Fig.4-1
Function indicator:
RUN/TUNE: When the light is on, it indicates that the inverter is in running state. When the light is flashing, it
indicates that the inverter is in the self-learning state. When the light is off, the inverter is in the
stop state.
LOC/REMOTE: Panel operation, terminal operation and communication control indicator.
LOCAL/REMOT Light off Run/Stop in panel control
LOCAL/REMOT Light on Run/Stop in terminal control
LOCAL/REMOT Light blink Run/Stop in communication control
ON: Current limit
OFF: No limit
ON: Fault alarm
OFF: Normal
R
U
N
k
e
y
S
H
I
F
T
k
e
y
ENTER ke
y
Multi-function key
STOP / RESET ke
y
Forward / Reverse
Potentiometer
U
n
i
t
i
n
d
i
c
a
t
o
r
Current limit indicato
r
Running indicator
Command source indicator
MENU key
A
d
d
/
S
u
b
k
e
y
F
a
u
l
t
i
n
d
i
c
a
t
o
r

Chapter 4 Operation Instructions of Kinco VFD
50
FWD/REV: Light is on, VFD runs forward; Light is off, VFD runs reversely.
NORM/LMT Light is on, VFD is in current limit state; Light is off, VFD is not in current limit state and can run
normally.
FLT/ALM Fault alarm indicator
LOCAL/REMOT Light off VFD in normal running status
LOCAL/REMOT Light on VFD in fault status & display fault code
LOCAL/REMOT Light blink VFD in alarm status & do not display fault code
HZ A V
RPM %
Unit indicator, used to show unit of current data.
There are some unit below Light OFF Light ON
HZ A V
RPM %
HZ Frequency unit
HZ A V
RPM %
A Current unit
HZ A V
RPM %
V Voltage unit
HZ A V
RPM %
RPM Speed unit
HZ A V
RPM
%
% Percentage
There are 8 keys on the operation panel and functions of each key are shown in Table 4-1.
Table 4-1 Function list of operation panel
Key Name Function
MENU Program/exit key Enter or exit programming status
ENTER Function/data key Enter next level menu or confirm data
Increase key Increase data or parameter
Decrease key Decrease data or parameter
SHIFT Shift key
In editing status, press this key to select the Bit to be modified. In other status,
this key is used to switch the parameters to display.
M Multi-function key Use the b4.01 to configure the function of this key
RUN Run key In panel control mode, press this key to run the drive.
STOP/RST Stop/reset key Press this key to stop or reset the drive.

Chapter 4 Operation Instructions of Kinco VFD
51
4.1.2 Display status of operation panel
FV20 operation panel can display the parameters in
stopping, operating, editing and function code..
1. Parameters displayed in stopping status
When the drive is in stop status, the operation panel
displays the stop status parameter. Pressing the
SHIFT key can display different stop status
parameters in cycle (Defined by function code b4.05)
2. Parameters displayed in operation status
When the drive receives operating command, it
starts running and its panel will display the operation
status parameters, the RUN indicator turns on. The
status of FWD indicator depends on the operation
direction. The unit indicator display the unit of the
parameter, by pressing the SHIFT key can display
different operation parameters in cycle (Defined by
function code b4.05)
3. Parameters displayed in error status
When the drive detects a fault signal, the panel will
display the flashing fault code..
Press the SHIFT key to display the stop status
parameters and error code in cycle. By pressing the
STOP/RST, control terminal or communication
command to reset the error. If the error exists still,
then the panel keeps displaying the error code.
4. Parameter edit status
When the drive is in stop, operation or error state,
press MENU/ESC can enter edit status(If password
needed, please refer to description of A0.00),. Edit
state displays in 2-level menu, they arefunction code
group or function cod
parameter value. You can press ENTER to enter
parameter displayed status. In function parameter
displayed status, press ENTER to save the settings,
and press MENU to exit the menu.
4.1.3 Panel Operation
Various operations can be completed on the
operation panel; the following are 5 common
examples. Refer to function code list in chapter 9 for
detail function code description.
Example 1.Set parameters
Example.Change the value in A0.03 from 50.00Hz to
30Hz
1. In the stop parameter displaying state, press
MENU to enter the first level A0.00;
2. Press to change A0.00 to A0.03;
3. Press ENTER to enter the second level menu
4. Press the SHIFT to change the marker to the
highest bit
5. Press the to change the 50.00 to 30.00
6. Press the ENTER to confirm above change and
back to the fist level menu. Then the parameter is
changed successfully.
The above operations are shown in following picture.
Fig 4-2 Example of setting parameter
In function parameter displaying status, if there is no
bit flashing. It means that this function code can not
be changed, the possible reason are.
1. This function code is unchangeable parameter.
Like actual detected parameter, operation log
parameter and so on
2. This parameter can not be changed when running;
you need stop the VFD to edit the parameter
3. The parameters are protected. When the b4.02 is 1,
function code can not be changed. It is to protect the
VFD from wrong operation. If you want to edit this
parameter, you need set function code b4.02 to 0.

Chapter 5 Troubleshooting
52
Chapter 5 Troubleshooting
Table 5-1 lists the possible faults of FV20, error code E001 E099. When VFD reports error, users could check
this list and record the detailed fault phenomena before seeking service from supplier.
Table 5-1 Faults
Error code Error category
E001 Hardware over current during acceleration
E002 Hardware over current during deceleration.
E003 Hardware over current during running in constant speed.
E004 Hardware over voltage during acceleration.
E005 Hardware over voltage during deceleration.
E006 Hardware over voltage during running in constant speed.
E007 Software detected over-voltage
E008 Input phase loss
E009 Output phase loss
E010 22kw above models.IGBT module is detected voltage drop too large.
E011
E012
E013 Running current is larger than VFD rated current for long time.
E014 Running current is larger than motor rated current for long time.
E015 External device fault.
E016 EEPROM W/R fault.
E017 VFD can not get communication with host.
E018 Power board/drive board/contactor damage causes contactor abnormal.
E019 Hall/drive board abnormal causes current detective circuit fault.
E020 E022 Reserved
E023 Keyboard parameter copy error
E024 Auto tunning fault in vector control.
E025 Encoder signal fault in lose-loop control
E026 VFD running current is detected smaller than set value of load lost.
E027 Braking unit fault.
E028 E030 Reserved
E031 Current limiting fault
E032 Reserved
E033 VFD output is short circuit to earth
E034 VFD running speed and encoder detected speed deviation exceeds allowed value.
E035 E039 Reserved
E040 Extension card and control board SPI communication fault
E041 Software detected over-current during acceleration
E042 Software detected over-current during deceleration
E043 Software detected over-current at constant speed
E091 E092 Internal data processing is abnormalseek help from manufacturer
(MCU communication failed,replace the control board)
Note:
VFD braking resistor short circuit may lead to VFD braking unit damage.

Chapter 6 List of Parameters
53
Chapter 6 List of Parameters
FV20 identified by
The parameter descriptions are listed in the tables below.
Table 6-1 Descriptions of Function Code Parameter Structure Table
No. Name Description
1 Function code The number of function code
2 Name The name of function code
3 Setting range The setting range of parameters.
4 Unit The minimum unit of the setting value of parameters.
5 Factory setting The setting value of parameters after the product is delivered
6 Modification
modified.
O Denotes the parameters can be modified during operation or at STOP state;
Denotes the parameters cannot be modified during operating;
Denotes the parameters are actually detected and cannot be revised;
Denotes the parameters are defaulted by factory and cannot be modified ;
(When you try to modify some parameters, the system will check their modification property
automatically to avoid mis-modification.)
Note:
1 Parameter settings are expressed in decimal (DEC) and hexadecimal (HEX). If the parameter is expresse
d in
hexadecimal, the bits are independent to each other.The value of the bits can be 0 F.
2
the factory settings. But the actual detected or recorded parameters cannot be initialized;
It is defaulted that no parameters except A0.03 are allowed changing. If you need change them,please
first
set b4.02(parameter write-in protection) from 1 to 0.
Table 6-2 List of Parameters
Function
code Name Descriptions Unit Factory
setting Modif
.
Setting
range
Group A0.Basic operating parameters
A0.00 User password 0: No password protection.
Others: Password protection.
1 0 O 0 FFFF
A0.01 Control mode LED Unit s place: Motor 1 control mode
0: Vector c ontrol without PG
1: Vector control with PG
2: V/F control without PG
3: V/F control with PG
1 2 X 0 2

Chapter 6 List of Parameters
54
Function
code Name Descriptions Unit Factory
setting Modif
.
Setting
range
LED Ten s place: Motor 1 type
0: asynchronous motor
1: synchronous motor
LED Hundred s place: Motor 2 control
mode
0: Vector control without PG
1: Vector control with PG
2: V/F control without PG
3: V/F control with PG
LED Thousand s place: Motor 2 type
0: asynchronous motor
1: synchronous motor
A0.02 Main reference
frequency selector
0: Digital setting
Keyboard UP/DN or terminal UP/DN
1: AI1
2: AI2
3: Keyboard potentiometer
4: Set via DI terminal(PULSE)
5: Reserved
1 0 O 0 5
A0.03 Set the operating
frequency indigital mode
A0.11 A0.10 0.01Hz 50.00 O 0 30000
A0.04 Methods of inputting
operating commands
0: Panel control
1: Terminal control
2: Communication control
1 1 O 0 2
A0.05 Set running direction 0: Forward
1: Reverse
1 0 O 0 1
A0.06 Acc time 1 0.0 6000.0 0.1s 2kw or below :
6.0s
30kw 45kw
:
20.0s
45kw or above
:
30.0s
O 0 60000
A0.07 Dec time 1 0.0 6000.0 0.1s 2kw or below
:
6.0s
30kw 45kw
:
20.0s
45kw or above
:
30.0s
O 0 60000
A0.08 Max. output frequency upper limit of frequency
A0.11 300.00Hz
0.01Hz 50.00 X 0 30000
A0.09 Max. output Voltage 0 480V 1V ted
values
X 0 60000
A0.10 Upper limit offrequency A0.11 A0.08 0.01Hz 50.00 O 0 30000
A0.11 Lower limit offrequency 0.00 A0.10 0.01Hz 0.00 O 0 30000
A0.12 Basic frequency 0.00 300.00Hz 0.01Hz 50.00 O 0 30000
A0.13 Torque boost 0.0%(Auto) 0.1% 30.0% 0.1% 0.0% O 0 300

Chapter 6 List of Parameters
55
Function
code Name Descriptions Unit Factory
setting Modif
.
Setting
range
Group A1.Start and stop parameters
A1.00 Starting mode 0: Start from the starting frequency
1: Brake first and then start
2: Start on the fly(including direction
judgement), start at starting frequency
3: Current search type speed tracking
starting (only valid in V/F control)
1 0 X 0 2
A1.01 Starting frequency 0.00 60.00Hz 0.01Hz 0.00Hz O 0 6000
A1.02 Holding time of starting
frequency
0.00 10.00s 0.01s 0.00s O 0 1000
A1.03 DC injection braking
current at start
0.0% current 0.1% 0.0% O 0 1000
A1.04 DC injection braking time
at start
0.00(No action)
0.01 30.00s
0.01s 0.00s O 0 3000
A1.05 Stopping mode 0: Dec-to-stop
1: Coast-to-stop
2: Dec-to-stop+DC injection braking
1 0 X 0 2
A1.06
DC injection braking initial
frequency at stop
0.00 60.00Hz 0.01Hz 0.00Hz O 0 6000
A1.07 Injection braking
waiting time at stop
0.00 10.00s 0.01s 0.00s O 0 1000
A1.08 DC injection braking
current at stop
0.0% 0.1% 0.0% O 0 1000
A1.09 DC injection braking time
at stop
0.0(No action)
0.01 30.00s
0.01s 0.00s O 0 3000
A1.10 Restart after power failure
0: Disable
1: Enable
1 0 X 0 1
A1.11
Delay time for restart after
power
0.0 10.0s 0.1s 0.0s O 0 100
A1.12 Anti-reverse running
function
0: Disabled
1: Enabled
(It will operate at zero frequency when
input a reverse command)
1 0 X 0 1
A1.13 Delay time of run
reverse/forward
0.00 360.00s 0.01s 0.00s O 0 36000
A1.14 Switch mode of run reverse
/ forward(Reserved)
0: Switch when pass 0Hz
1: Switch when pass starting frequency
1 0 X 0 1
A1.15 Stopping speed 0.00 150.00Hz 0.01Hz 0.10Hz X 0 15000
A1.16 Action voltage of braking
unit
650 750V 1 720 X 650 750
A1.17 Dynamic braking 0: Disable
1: Enable
1 0 X 0 1
A1.18 Ratio of working time of
total
working time
0.0 100.0% 0.1% 80.0% O 0 1000

Chapter 6 List of Parameters
56
Function
code Name Descriptions Unit Factory
setting Modif
.
Setting
range
A1.19
Selection of power outage
restarting mode
0: Current finding mode
(Only valid in V/F control; Otherwise set
to 0, starting with vector tracking)
1: Vector tracking mode
2: Depend on the parameter A1.00
1 0 X 0 2
Group A2.Frequency setting
A2.00 Auxiliary reference
frequency selector
0: No auxiliary reference frequency
1: AI1
2: AI2
3: Keyboard potentiometer
4: Set by DI (PULSE)terminal
5: output by PID process
1 0 O 0 5
A2.01 Main and auxiliary
reference frequency
calculation
0: +
1: -
2: MAX
(Main reference, Auxiliary reference)
3: MIN
(Main reference, Auxiliary reference)
1 0 O 0 3
A2.02 UP/DN rate 0.01 99.99Hz/s 0.01 1.00 O 1 9999
A2.03 UP/DN regulating control :
0: Save reference frequency upon
power outage
1: Not save reference frequency
upon power outage.
:
0: Hold reference frequency at stop
1: Clear reference frequency at stop
:
0: UP/DN integral time valid
1: UP/DN speed value
1 000 O 0 111H
A2.04 Jog operatingfrequency 0.10 50.00Hz 0.01Hz 5.00 O 10 5000
A2.05 Interval of Jog operation 0.0 100.0s 0.1s 0.0 O 0 1000
A2.06 Skip frequency 1 0.00 300.00Hz 0.01Hz 0.00 X 0 30000
A2.07 Range of skip frequency1 0.00 30.00Hz 0.01Hz 0.00 X 0 3000
A2.08 Skip frequency 2 0.00 300.00Hz 0.01Hz 0.00 X 0 30000
A2.09 Range of skip frequency 0.00 30.00Hz 0.01Hz 0.00 X 0 3000
A2.10 Skip frequency 3 0.00 300.00Hz 0.01Hz 0.00 X 0 30000
A2.11 Range of skip frequency3 0.00 30.00Hz 0.01Hz 0.00 X 0 3000
Group A3.Setting curve
A3.00 Reference frequency
curve selection
0: Curve 1
1: Curve 2
2: Curve 3
3: Curve 4
1 0000 O 0 3333H

Chapter 6 List of Parameters
57
Function
code Name Descriptions Unit Factory
setting Modif
.
Setting
range
0: Curve 1
1: Curve 2
2: Curve 3
3: Curve 4
.Keyboard
potentiometer curve selection
0: Curve 1
1: Curve 2
2: Curve 3
3: Curve 4
curve selection
0: Curve 1
1: Curve 2
2: Curve 3
3: Curve 4
A3.01 Max reference of curve 1 A3.03 110.00% 0.01% 100.00% O 0 11000
A3.02 Actual value
corresponding to the Max
reference of curve 1
Reference frequency:
0.0 100.00%Fmax
Torque.0.0 300.00%Te
0.01% 100.00% O 0 10000
A3.03 Min reference of curve 1 0.0% A3.01 0.01% 0.00% O 0 11000
A3.04 Actual value
corresponding to the Min
reference of curve 1
The same as A3.02 0.01% 0.00% O 0 10000
A3.05 Max reference of curve 2 A3.07 110.00% 0.01% 100.00% O 0 11000
A3.06 Actual value
corresponding to the Max
reference of curve 2
The same as A3.02 0.01% 100.00% O 0 10000
A3.07 Min reference of curve 2 0.0% A3.05 0.01% 0.00% O 0 11000
A3.08 Actual value
corresponding to the Min
reference of curve 2
The same as A3.02 0.01% 0.00% O 0 10000
A3.09 Max reference of curve 3 A3.11 110.00% 0.01% 100.00% O 0 11000
A3.10 Actual value
corresponding to the Max
reference of curve 3
The same as A3.02 0.01% 100.00% O 0 10000
A3.11 Min reference of curve 3 0.0% A3.09 0.01% 0.00% O 0 11000
A3.12 Actual value
corresponding to the Min
reference of curve 3
The same as A3.02 0.01% 0.00% O 0 10000
A3.13 Max reference of curve 4 A3.15 110.00% 0.01% 100.00% O 0 11000
A3.14 Actual value
corresponding to the Max
reference of curve 4
The same as A3.02 0.01% 100.00% O 0 10000

Chapter 6 List of Parameters
58
Function
code Name Descriptions Unit Factory
setting Modif
.
Setting
range
A3.15 Reference of inflection
point 2 of curve 4
A3.17 A3.13 0.01% 100.00% O 0 11000
A3.16 Actual value
corresponding to the Min
reference of inflection
point 2 of curve 4
The same as A3.02 0.01% 100.00% O 0 10000
A3.17 Reference of Inflection
point 1 of curve 4
A3.19 A3.15 0.01% 0.00% O 0 11000
A3.18 Actual value
corresponding to the Min
reference of inflection
point 1 of curve 4
The same as A3.02 0.01% 0.00% O 0 10000
A3.19 Min reference of curve 4 0.0% A3.17 0.01% 0.00% O 0 11000
A3.20 Actual value
Corresponding to the Min
reference of curve 4
The same as A3.02 0.01% 0.00% O 0 10000
A3.21 Characteristic selection of
curve
: Characteristic choice
of curve 1
0: set 0 Hz when frequency < 0 Hz
1: symmetrical about origin
2: absolute value
: Characteristic choice
of curve 2
0: set 0 Hz when frequency < 0 Hz
1: symmetrical about origin
2: absolute value
: Characteristic
choice of curve 3
0: set 0 Hz when frequency < 0 Hz
1: symmetrical about origin
2: absolute value
: Characteristic
choice of curve 4
0: set 0 Hz when frequency < 0 Hz
1: symmetrical about origin
2: absolute value
1 0000 O 0000
2222H
0000
Group A4.Acc/Dec parameters
A4.00 Acc/Dec mode 0: Linear Acc/Dec
1: S curve
1 0 X 0 1
A4.01 Acc time 2 0.0 6000.0 0.1s 20.0s O 0 60000
A4.02 Dec time 2 0.0 6000.0 0.1s 20.0s O 0 60000
A4.03 Acc time 3 0.0 6000.0 0.1s 20.0s O 0 60000
A4.04 Dec time 3 0.0 6000.0 0.1s 20.0s O 0 60000
A4.05 Acc time 4 0.0 6000.0 0.1s 20.0s O 0 60000
A4.06 Dec time 4 0.0 6000.0 0.1s 20.0s O 0 60000
Other manuals for FV20 Series
1
This manual suits for next models
30
Table of contents
Other Kinco DC Drive manuals
Popular DC Drive manuals by other brands

YASKAWA
YASKAWA A1000 Series installation guide

ANSMANN
ANSMANN FM4.0 Original operating instructions

Danfoss
Danfoss VLT Midi Drive FC 280 operating instructions

Grundfos
Grundfos CUE Safety instructions and other important information

Pentair
Pentair Pentek Intellidrive quick start guide

Aerotech
Aerotech Automation1 iXC2e Hardware manual