Kinderwagon METRO User manual

www.kinderwagon.com
(800) 531-7130
metro instruction manual
The safety of Kinderwagon products and the materials
used for their production are guaranteed and certified in
laboratory tests according to ASTM F833 standards.
Metro
Please read this instruction manual carefully and
keep it in a safe place for future reference!
It contains important information, instructions and
recommendations for the stroller and its safe usage.
METRO

WARNINGS & SAFETY INFORMATION
TABLE OF CONTENTS
Assembly Instructions ...................................................... 5
Main Parts ........................................................................ 5
Unfolding The Stroller ....................................................... 6
Installing and Removing the Front Wheels ....................... 6
Installing and Removing the Rear Wheels ........................ 7
Installing and Removing the Seat to the Frame ................ 8
Front Bumper ................................................................... 8
Attaching and Removing Canopy ..................................... 9
Parking Device ................................................................. 9
Leg Rest ......................................................................... 10
Adjusting Backrest .......................................................... 10
Changing Handle Height ................................................. 10
Fitting and Adjusting the Harness .................................... 11
Folding the Stroller .......................................................... 12
Installing and Removing Car Seat .................................... 16
Care and Maintenance .....................................................17
THANK YOU FOR BUYING OUR STROLLER!
To ensure that your stroller is used in accordance with these instructions please read
them fully. This stroller conforms to ASTM F833 and is guaranteed for 1 year from the
date of purchase against manufacturing defects. This limited warranty extends only to
the original retail purchaser and is only valid when supplied with proof of purchase.
uAvoid serious injury from falling or sliding out. ALWAYS use
restraint system.
uNEVER leave child unattended, even when sleeping.
uAdjust the restraint system snugly around child.
uAVOID PINCH INJURY. Keep fingers clear of hinged joints
when folding and unfolding stroller.
uMake sure the stroller is LOCKED in the use position before
placing child in stroller.
uWhen making adjustments, always ensure child’s body parts
are clear of any moving parts.
uDO NOT allow child to climb on stroller or stand in seat.
uDO NOT lift stroller by front bumper bar.
uALWAYS apply breaks when parking the stroller.
uParcels or accessory items, or both, place on the unit may
cause the unit to become unstable.
uDO NOT hang items from the handles as this may affect
the strollers stability. Use the basket provided: max. weight 5 lbs.
Excessive weight may cause a hazardous unstable condition to exist.
uDO NOT place hot liquids in cup holder. Max. weight 1 pound.
Read all instructions BEFORE use of product.
KEEP INSTRUCTIONS FOR FUTURE USE.
Maximum weight: 50 lbs. per seat.
Suitable from: 3+ months.
WARNINGS
!

STROLLER ASSEMBLY STROLLER ASSEMBLY
ASSEMBLY INSTRUCTIONS
3
UNFOLDING THE STROLLER
INSTALLING AND REMOVIING FRONT WHEELS
4
MAIN PARTS
This stroller is supplied partially assembled. In order to complete the assembly, you
don’t need any tools. Follow exactly the instructions given and check the pictures.
Please, note that in most cases after the completion of an operation you will hear
a clicking sound.
IMPORTANT! After each operation, make sure that you have followed the instruc-
tions correctly and the fixing is stable.
WARNING! Do not allow children younger than 3 years near the stroller during the
assembly or disassembly, in order to prevent the risk of injury.
Keep your hands from finger entrapment, especially during folding or unfolding the
stroller. WARNING! Keep your hands from entrapment while doing each opera-
tion, especially when folding and unfolding!
1. Canopy
2. Front bumper
3. Safety harness buckle
4. Button for adjusting the footrest
5. Foot rest
6. Wheel locking button
7. Wheel release button
8. Front wheels
9. Button for adjusting the
handle height
10. Folding mechanism
11. Front bumper release button
12. Seat release button
13. Parking device
14. Frame lock
15. Back rest position adjuster
16. Rear wheels
17. Storage basket
Place the frame on an even surface and release the frame lock (part. 14, fig. 1),
which holds the frame folded. (fig. 2-1 and 2). With one hand grab the stroller
handle and pull up, while with the other hand hold the support tube to unfold the
frame (fig. 2-3). You must hear a click indicating that the stroller is locked unfolded.
WARNING! Check if the stroller is locked in unfolded position!
Install with pressure each front wheel in the front
tubes of the frame until you hear a click (fig. 3). Check
whether the wheel is well fixed by pulling it down.
To detach the wheels from the frame, press the
release button on the front wheels (fig. 3) and pull the
wheel out.
WARNING! Make sure that the front wheels are well
installed and fixed to the stroller frame by moving and
turning them with your hand.
The front wheels have 2 modes - straight-
forward and swivel (360°).
Straightforward mode of the front wheels
(fig. 4-1)
The front wheels will move only straight
when you press down the straightforward
mode button on the front wheels. You will
hear a click when the straightforward mode
is engaged.

STROLLER ASSEMBLY STROLLER ASSEMBLY
5
FRONT BUMPER
6
INSTALLING AND REMOVING THE SEAT
TO THE STROLLER FRAME
INSTALLING AND REMOVING REAR WHEELS
Swivel mode of the front wheels (fig. 4-2)
The front wheels will swivel when you press the swivel button on the front wheels
(pos. 7, fig. 1).
WARNING! The good working order of the buttons is crucial to the locking of the
front wheels and the safe use of the stroller.
WARNING! When you use the stroller on uneven surfaces, fix the front wheel. For
even surfaces, please use the swivel function. These two functions assure better
moving of the stroller and so you will prevent the wheels from wearing out.
INSTALLING THE REAR WHEELS
Place the axis of each rear wheel in the respective opening in the frame as shown
in fig.5. Install with pressure until you hear a click and the wheels are fixed.
WARNING! Make sure that the rear wheels are installed and fixed to the stroller
frame by moving and turning them with your hand.
REMOVING THE REAR WHEELS
To remove the rear wheels press with one hand the rear wheel release button (fig.
5-1), while with the other hand pull the wheel out.
INSTALLING THE SEAT
The seat can be installed in two directions - forward
facing or facing the parent.
Choose the desired direction and place the adap-
tors onto the respective openings on both sides of
the frame. Install with pressure until you hear a click
and the seat is fixed (fig. 6).
Before using the stroller make sure that the seat is
correctly fixed to the frame by trying to pull it up.
REMOVING THE SEAT
To remove the seat from the frame press simultaneously the release buttons on
both sides of the seat (fig. 6) and pull it away from the frame.
INSTALLING THE FRONT BUMPER
To install the front bumper (pos. 2, fig. 1), align
its ends to the respective openings in the frame
(fig. 7). Install by pressing until the pins are visible
through the respective openings in the frame and
you hear a click. Make sure the front bumper is
well fixed to the frame.
REMOVING THE FRONT BUMPER
Press the front bumper release button (pos. 11,
fig. 1) on one side and pull the bumper out (fig. 7).
In this way it will be easier to put the child in or take out of the stroller.
Press simultaneously both front bumper release buttons. Pull the bumper out to
remove it from the seat.
WARNING! Always use the front bumper with the safety harnesses when the
child is in the stroller!

78
PARKING DEVICE
LEG REST
The stroller is equipped with a parking device (pos.
13, fig. 1), which block simultaneously both rear
wheels and the movement of the stroller.
Press the pedal on the right wheel with your foot (fig.
9) to block the movement of the stroller. Make sure
the parking device is engaged. The stroller should
not move at a light push.
Lift the pedal up with your foot to release the parking
device.
ATTENTION! When the stroller is not in motion,
always use the parking device.
ATTENTION! Always engage the parking device when putting in or taking your
child out of the stroller, as well as when you make adjustments, and when folding
or unfolding the stroller!
The leg rest (pos. 5, fig. 1) can be positioned in
three levels.
To adjust the leg rest, press down both buttons on
both sides of leg rest and move it up or down until
you hear a click (fig. 10).
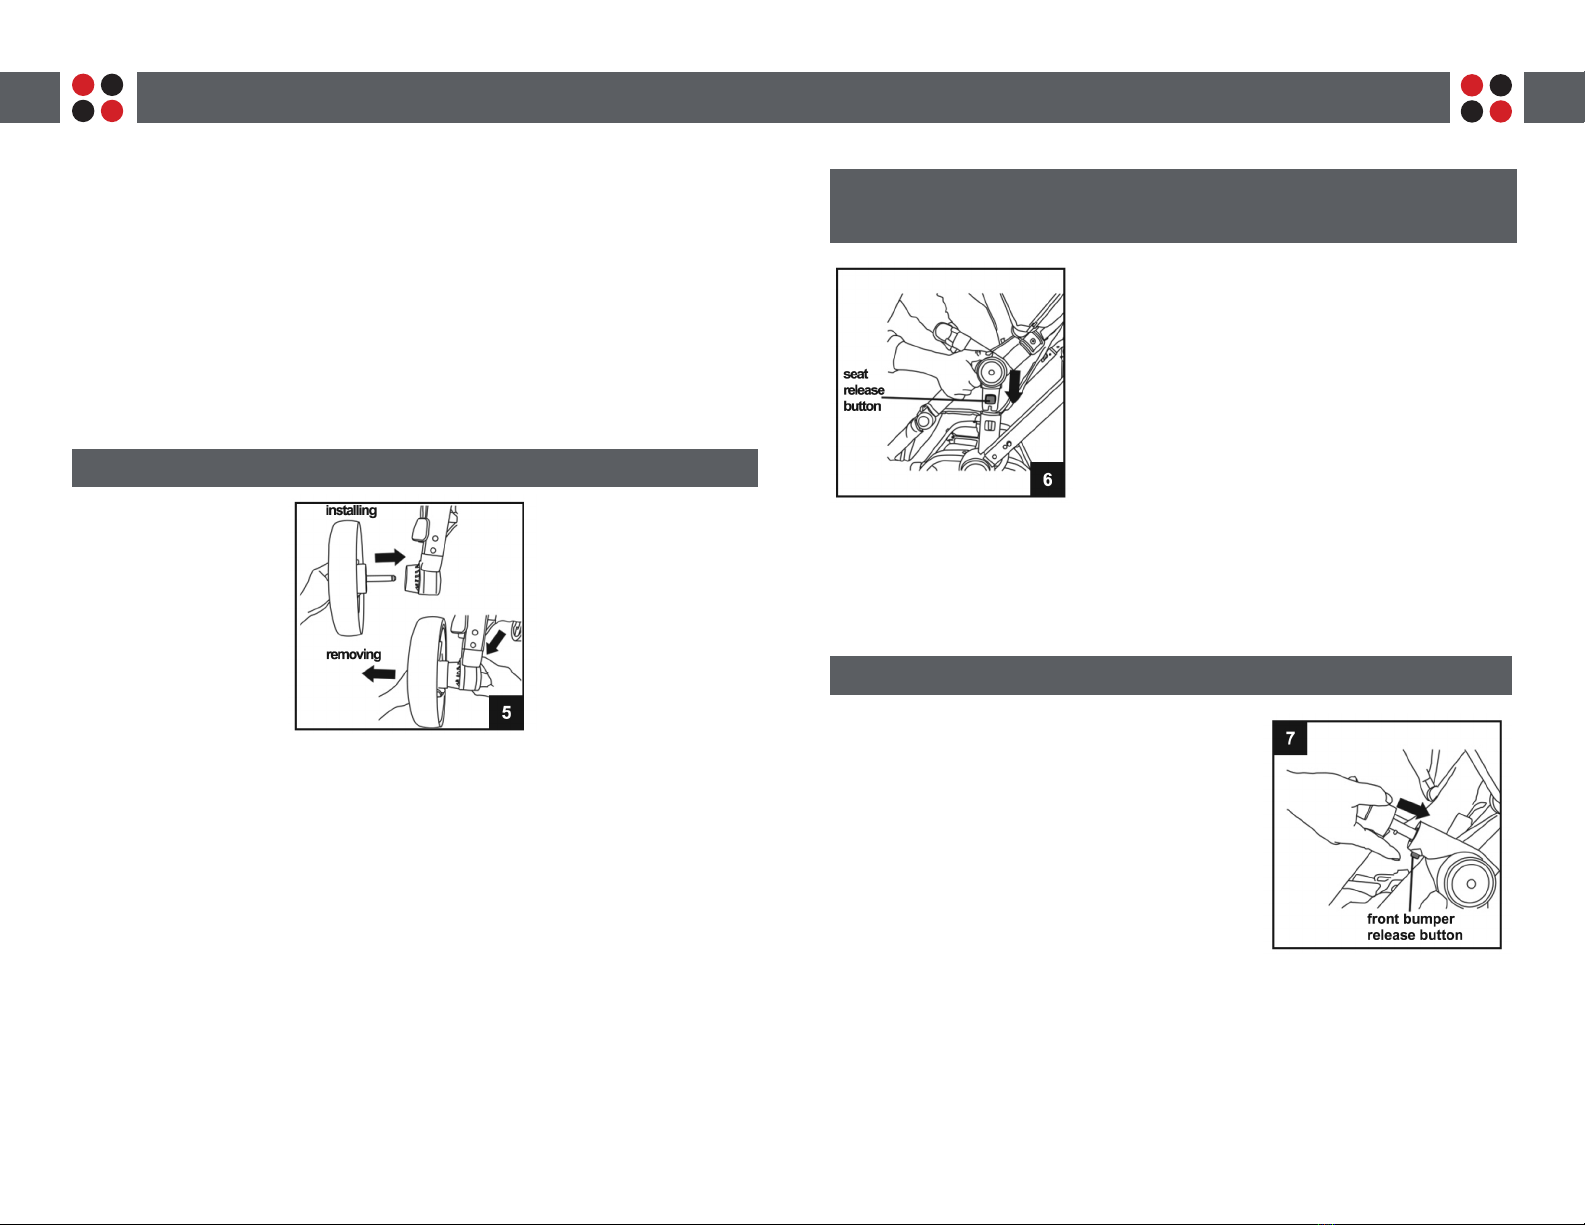
ADJUSTING THE BACKREST
CHANGING HANDLE HEIGHT
The backrest can be adjusted in 3 positions.
To take the backrest one position down or to set
it in lying position, pull the lever (pas. 15, fig. 1) in
the upper part of the seat (fig. 12-1). At the same
time press the seat back. Release the lever to fix
the position.
To set the seat in a higher position lift the lever up
(fig. 12-2). At the same time press the seat up to the
desired position. Release the lever to fix the chosen position. You must hear a click.
You can adjust the handle of the stroller at 3 posi-
tions. Press the button in the center of the handle
(pas. 9, fig. 1), and set the handle in the desired
position (fig. 13) by moving up or down.
When the position is fixed, the pins of the handle
must be located in the respective openings in the
frame.
Fixing of handle positions is always accompanied
by a click.
ATTACHING AND REMOVING CANOPY
Place the brackets on both sides of the canopy
(pos 1, fig. 1) on to the handle tubes so that the
pins match the openings in the canopy brackets.
Install with pressure until you hear a click and the
pins show through the openings in the brackets (fig.
8). Cover the backrest with the canopy and fix the
canopy with the Velcro straps.
Open the zipper in the rear side of the canopy to
enlarge it. To open or close the canopy you must
pull it out or push it back until the desired position is reached.
To remove the canopy pull the two brackets out, open the Velcro straps and
remove the canopy.

910
FITTING AND ADJUSTING THE HARNESS
The stroller is equipped with a 5-point harness.
The shoulder straps have 3 height positions, according to child’s height. Always
check if the belts are at the correct height. They must pass through the openings
in the stroller fabric at the level of the child’s shoulders or through the closest open-
ings above the child’s shoulders.
Join the loose ends of the shoulder and waist straps. Insert them in the central
buckle (pas. 3, fig. 1)until you hear a click. Adjust the length of the belts accord-
ing to the baby’s growth (fig.14). Periodi cally check to ensure that the seat belt is
securely attached to the stroller frame as well as securely fastened. The seat belt
straps must not be damaged, worn out or twisted!
In order to unfasten the harness, press the central buckle button and pull out the
belts.
Always use the safety harnesses to avoid injury or slipping off the stroller. After you
close the harnesses, set their lengths according to your child’s height to secure its
safety. Use the shoulder harnesses together with the waist straps.
WARNING! Always use the safety belts and keep them fastened even if the child
is in the stroller for a short period of time.
FOLDING THE STROLLER
WARNING! BEFORE FOLDING THE STROLLER, INSTALL THE SEAT
IN FORWARD FACING POSITION (WITH THE CHILD’S BACK TO THE
ADULT).
WARNING! Make sure that the child is at a safe distance when unfolding or fold-
ing the stroller.
To complete folding follow the below sequence of actions (fig. 15):
1) Engage the parking device;
2) Remove any luggage from the storage basket;
3) Set the backrest in sitting position;
4) Close the canopy;
5) Set the front wheels in straightforward mode;
6) Stand at the side of the stroller handle;
7) Set the handle in lowest position;
8) Simultaneously pull the locking mechanisms on both sides of the handle;
9) At the same time press the handle down in the direction of the rear wheels
and fold the stroller.

ATTENTION! ALWAYS INSTALL THE CAR SEAT IN FACE-TO-FACE MODE.
To install the car seat on the stroller frame, follow the below sequence of actions:
1) Engage the parking device.
2) Unfold the adaptor into the locked open position.
3) Mak sure the tall side of the adaptor is at the front of the stroller.
4) Push adaptor down onto the frame hubs until the buttons click into position. Pull
up on the adaptor to ensure it is securely attached.
5) Set the car seat in a position so that it faces the parent.
6) Use the restraint strap to secure the car seat.
7) Pull straps through vehicle belt hooks on each side of the infant car seat.
8) To secure the infant car seat in position, connect the clip and pull the
loose end of the strap.
11 12
INSTALLING THE INFANT CAR SEAT ADAPTER
CHECK THAT THE
INFANT CAR SEAT
IS SECURELY ATTACHED
BY PULLING UP.
CARE AND MAINTENANCE
This stroller requires regular maintenance by the user.
• For cleaning use only mild detergent and warm water.
•DO NOT USE BLEACH.
• From time to time check your stroller for loose screws, worn parts, torn
materials or loose stitching. Replace or adjust parts as needed.
• We advise that your stroller is not stored or left outside at anytime.
At Kinderwagon, providing you, our customer, the best service and best
products possible are two of our top priorities. In the event we have
product related information we need the ability to contact you.
Please visit www.Kinderwagon.com to register your product.
Be assured, your contact information will be handled confidentially
and only used for the purpose described above.
Please have the following information available:
Model Number ______________________________
Manufacture Date ___________________________
REGISTER YOUR PRODUCT
4
5

13 14
Table of contents
Other Kinderwagon Stroller manuals