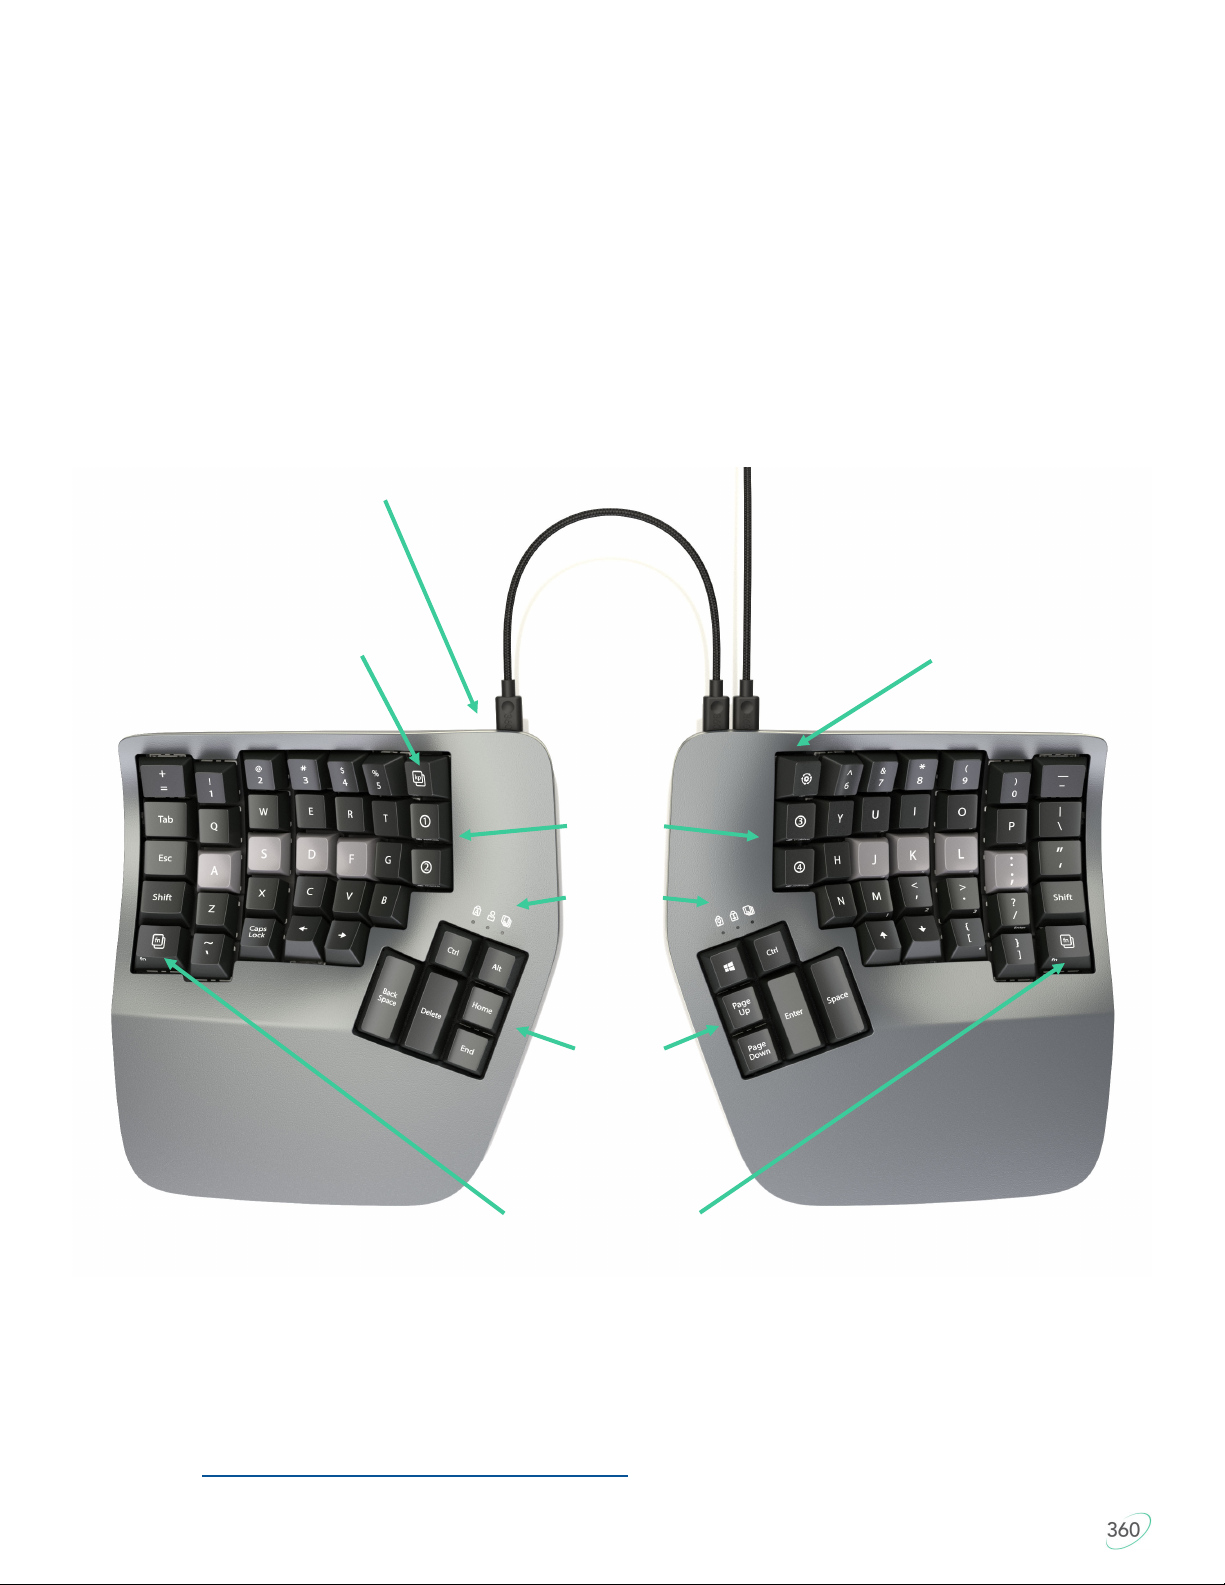
Kinesis Advantage 360 KB360 User manual

Proudly designed and hand-assembled in the USA since 1992
USER’S MANUAL
SmartSet Programming Engine
KB360

2
This page intentionally left blank

3
Kinesis® Advantage360™ Keyboard with the SmartSet™ Programming Engine
Keyboard models covered by this manual include all KB360 series keyboards (KB360-xxx). Some
features may require a firmware upgrade. Not all features supported on all models. This manual does not
cover setup and features for the Advantage360 Professional keyboard which features the ZMK
programming engine.
February 15, 2021 Edition
This manual covers features included up through the firmware version 1.0.0.
If you have an earlier version of firmware, not all features described in this manual may be supported. To
download the latest firmware here:
kinesis.com/support/kb360/#firmware-updates
© 2022 by Kinesis Corporation, all rights reserved. KINESIS is a registered trademark of Kinesis Corporation.
ADVANTAGE360, CONTOURED KEYBOARD, SMARTSET, and v-DRIVE are trademarks of Kinesis
Corporation. WINDOWS, MAC, MACOS, LINUX, ZMK and ANDROID are property of their respective
owners..
Information in this document is subject to change without notice. No part of this document may be reproduced
or transmitted in any form or by any means, electronic or mechanical, for any commercial purpose, without
the express written permission of Kinesis Corporation.
KINESIS CORPORATION
22030 20th Avenue SE, Suite 102
Bothell, Washington 98021 USA
www.kinesis.com

4
FCC Radio Frequency Interference Statement
Note
This equipment has been tested and found to comply with the limits for a Class B digital device, pursuant to
Part 15 of the FCC Rules. These limits are designed to provide reasonable protection against harmful
interference when the equipment is operated in a residential installation. This equipment generates, uses, and
can radiate radio frequency energy and, if not installed and used in accordance with the instructions, may
cause harmful interference to radio communications. However, there is no guarantee that interference will not
occur in a particular installation. If this equipment does cause harmful interference to radio or television
reception, which can be determined by turning the equipment off and on, the user is encouraged to try to
correct the interference by one or more of the following measures:
• Reorient or relocate the receiving antenna
• Increase the separation between the equipment and receiver
• Connect the equipment into an outlet on a circuit different from that to which the receiver is connected
• Consult the dealer or an experienced radio/TV technician for help
Warning
To assure continued FCC compliance, the user must use only shielded interfacing cables when connecting to
computer or peripheral. Also, any unauthorized changes or modifications to this equipment would void the
user’s authority to operate.
INDUSTRY CANADA COMPLIANCE STATEMENT
This Class B digital apparatus meets all requirements of the Canadian Interface-causing Equipment
Regulations.
Cet Appareil numerique de la classe B respecte toutes les exiginces du Reglement sur le material broilleur du
Canada.

5
7.0 Firmware Update
7.1 Firmware Update Process………………………………………………………………….. 20
7.2 Firmware Rescue…………………...…………………………………………………………… 20
8.0 TroubleshooƟng, Support, Warranty, and Care
8.1 Troubleshoong………………………………………………………………………………….. 21
8.2 Contacng Tech Support……………………………………………………………………… 21
8.3 Warranty……………………………………………………………………………………………… 21
8.4 Returns and Repairs……………………………………………………………………………. 21
8.5 Ejecng the v-Drive…………………………………………………………………………….. 21
8.6 Cleaning………………………………………………………………………………………………. 21
8.7 Moving Keycaps…………………………………………………………………………………… 21
1.0 Read Me First
1.1 Health and Safety Warning………………………………………………………………….. 6
1.2 Preserving your warranty rights…………………………………………………………... 6
1.3 Quick Start Guide………………………………………………………………………………... 6
1.4 Read this User's Manual………………………………………………………………………. 6
2.0 Overview
2.1 Geometry and Key Groupings………………………………………………………………. 7
2.2 Keyboard Diagram………………………………………………………………………………. 7
2.2 Ergonomic Design and Features…………………………………………………………... 7
2.4 Full Programmability…...………...…………………………………………………………… 9
2.5 Genuine Kinesis Accessories……………………………………………………………….. 9
3.0 InstallaƟon and setup
3.1 In the Box…………………………………………………………………………………………….. 10
3.2 Compability……………………………………………………………………………………….. 10
3.3 Connecng Your Keyboard for the First Time………………………………………. 10
4.0 Geƫng Started
4.1 Posioning and Work Area Setup………………………………………………………... 11
4.2 Adapon Guidelines…………………………………………………………………………….. 11
4.3 If You Are Injured………………………………………………………………………………... 11
5.0 Basic Keyboard Use
5.1 Profile 0……………………...………………………………………………………………….…… 13
5.2 Mul-Layer Layouts………………….. ………………………………………………………. 13
5.3 Funcon Keys (F1-F12) ………………………………………………………………………. 13
5.4 Numeric 10 Key……………………………………………………………………………………. 13
5.5 New Hotkeys……………………………………………………………………………………….. 13
6.0 Customizing your Keyboard
6.1 Onboard Remapping…………………………………………………………………………… 15
6.2 Onboard Macro Recording………………………………………………………………….. 15
6.3 Accessing the v-Drive…………………………………………………………………………… 17
6.4 Refreshing…………………………………………………………………………………………… 18
6.5 Loading Profiles…………………………………………………………………………………… 18
6.6 Program Lock………………………………………………………………………………………. 18
6.7 Status Report………………………………………………………………………………………. 18
6.8 SoReset……………………………………………………………………………………………. 18
6.9 Hard Reset…………………………………………………………………………………………… 18
6.10 The SmartSet App……………………………………………………………………………….. 18
6.11 Direct Programming……………………………………………………………………………. 19
6.12 Media Keys, Mouse Clicks etc……………………………………………………..………. 19
6.13 Tap and Hold……………………………………………………………………………………….. 19
6.14 Mul-Modifiers…………………………………………………………………………………… 19
6.15 Customizing the Indicator LED ……………………………………………………………. 19
5.6 Default Layout Map……………………………………………………………………………… 14
Table of Contents

6
1.0 Read Me First
1.1 Health and Safety Warning
Continuous use of any keyboard may cause aches, pains, or more serious cumulative trauma disorders such
as tendinitis and carpal tunnel syndrome, or other repetitive strain disorders.
• Exercise good judgement in placing reasonable limits on your keyboarding time every day.
• Follow established guidelines for computer and workstation setup (see Appendix 13.3).
• Maintain a relaxed keying posture and use a light touch to press the keys.
Keyboard is not a medical treatment
This keyboard is not a substitute for appropriate medical treatment! If any information in this guide appears to
contradict your health care professional’s advice, please follow your health care professional’s advice.
Establish realistic expectations
• Ensure that you take reasonable rest breaks from keyboarding during the course of the day.
• At the first sign of stress-related injury from keyboard use (aching, numbness, or tingling of the arms,
wrists, or hands), consult your health care professional.
No warranty of injury prevention or cure
Kinesis Corporation bases its product designs on research, proven features, and user evaluations. However,
because of the complex set of factors believed to contribute to computer-related injuries, the company can
make no warranty that its products will prevent or cure any ailment. Your risk of injury may be affected by
workstation design, posture, time without breaks, type of work, non-work activities and individual physiology.
If you currently have an injury to your hands or arms, or have had such an injury in the past, it is important
that you have realistic expectations of your keyboard. You should not expect an immediate improvement in
your physical condition simply because you are using a new keyboard. Your physical trauma has built up over
months or years, and it may take weeks before you notice a difference. It is normal to feel some new fatigue
or discomfort as you adapt to your Kinesis keyboard.
1.2 Preserving Your Warranty Rights
Kinesis does not require any product registration to obtain warranty benefits, but you will need your purchase
receipt in the event you need a warranty repair.
1.3 Quick Start Guide
If you are eager to get started, please consult the included Quick Start Guide. The Quick Start Guide can also
be downloaded from the Advantage360 Resources Page. Consult this full manual for advanced features.
1.4 Read This User’s Manual
Even if you don’t normally read manuals or you are a long-time user of Kinesis Contoured keyboards, Kinesis
strongly encourages you to review this entire manual. The Advantage360 is a fully-programmable keyboard
with powerful tools and features, many of which are brand new. If you unknowingly execute a programming
shortcut or key combination, you could inadvertently alter the layout of your keyboard, which could have
unintended consequences for your work and might necessitate a hard reset of the keyboard.

7
2.0 Overview
2.1 Geometry and Key Groupings
If you are new to a Kinesis Contoured keyboard, the first thing you will notice about the Advantage360™
keyboard is its sculpted shape, designed to conform to the natural postures and shapes of your hands—
which reduces the physical demands of keyboarding. Many have imitated this striking design but there is no
substitute for its unique three-dimensional shape. While the Advantage360 looks very different from other
keyboards, you’ll find that making the transition is actually quite easy because of its intuitive form factor,
thoughtful key layout, and its unparalleled electronic configurability. The Advantage360 keyboard features
distinctive key groupings not found on traditional or “natural style” keyboards.
2.1 Keyboard Diagram
2.2 Ergonomic Design and Features
The design of the Advantage360 keyboard traces its roots to the very first ContouredTM keyboard introduced
by Kinesis in 1992. The original objective was to develop a design informed by generally accepted ergonomic
design principles to maximize comfort and productivity, and minimize the major health risk-factors associated
with typing. Every aspect of the form factor was thoroughly researched and tested.
Learn More: kinesis.com/solutions/keyboard-risk-factors/
SmartSet Key
Thumb
Clusters
Fn Layer Keys
Hotkeys
Keypad Layer Key
LED
Indicator
Lights
Main CableLink CableFoot Pedal Port

8
Fully split design
Separating the keyboard into two independent modules allows you to position the keyboard so you can type
with straight wrists which reduces abduction and ulnar deviation which are harmful postures that can lead to
repetitive strain injuries such as carpal tunnel syndrome and tendonitis. Straight wrists can be achieved by a
mixture of sliding the modules apart to approximately shoulder-width and/or rotating the modules outward.
Experiment with different positions to find what is most comfortable for you body type. We recommend
starting with the modules close together and gradually moving them apart. If you need more separation than
the included link cable provides, you can purchase your own USB-C to USB-C cable as a substitute. Most 3rd
party cables should be compatible.
Bridge Connector
If you aren’t ready to go to full separation, attach the included Bridge Connector to recreate the classic
separation of the one-piece contoured keyboard. Note: The Bridge Connector is NOT designed to bear the
weight of the keyboard, it’s a simple spacer for desktop use. So do not pick the keyboard up by one module
with the Bridge Connector attached.
Integrated palm supports
Unlike most keyboards, the Advantage360 features integrated palm supports and an optimal cushioned palm
pads, now magnetic and washable (sold separately). Together these enhance comfort and reduce stressful
extension and pressure on the wrist. The palm supports provide a place to rest the hands while they are not
actively keying, though many users prefer to rest while typing to take weight off the neck and shoulders. You
should not expect to be able to reach all the keys without rocking your hands forward at times.
Separate thumb clusters
The left and right thumb clusters feature commonly used keys such as Enter, Space, Backspace, and Delete.
Modifier keys such as Control, Alt, Windows/Command. By moving these commonly used keys to the thumbs,
the Advantage360 redistributes the workload from your relatively weaker and overused little fingers, to your
stronger thumbs.
Vertical (orthogonal) key layout
Keys are arranged in vertical columns, unlike conventional “staggered” keyboards, to reflect the optimal range
of motion of your fingers. This shortens reaches and reduces strain, and can also make it easier to learn
touch typing for new typists.
Concave keywells
The keywells are concave to reduce hand and finger extension. Hands rest in a natural, relaxed position, with
the fingers curled down to the keys. Keycap heights are varied to match the different lengths of your fingers.
Conventional flat keyboards cause longer fingers to arch up over the keys and results in extension of the
muscles and tendons in your hands, which causes rapid fatigue.
Low-force mechanical key switches
The keyboard features full-travel mechanical switches known for their reliability and durability. The standard
brown stem switches features “tactile feedback” which is a slightly elevated force around the midpoint of the
stroke of the key which lets you know the switch is about to be activated. A tactile response is preferred by
many ergonomists, because it cues your fingers that activation is about to occur and is thought to reduce the
incidence of “bottoming out” the switch with a hard impact.
If you are coming from a laptop keyboard or a membrane-style keyboard, the additional depth of travel (and
noise) may take some getting used to, but the benefits are huge.
Adjustable Tenting
The contour design of the Advantage360 naturally positions your hands so that your thumbs are
approximately twenty degrees higher than pinky fingers when the keyboard is in its lowest position. This

9
“tented” design helps to minimize stresses associated with pronation and static muscle tension, while
enabling maximum keying productivity. Using the buttons on the underside of the keyboard you can quickly
and easily choose between three available heights to find the settings that feels most natural for your body.
We recommend starting on the lowest setting and working your way up until you find the sweet spot.
LED Indicator Lights
There are 3 RGB light emitting diodes (LEDs) above each thumb cluster. The LEDs are used to indicate the
status of the keyboard. These LEDs can be custom programmed for both Color and Function via the
SmartSet App. Factory default functions are listed below.
Default Layers: Base: Off, Kp: Blue, Fn1: White, Fn2: Green, Fn2: Red
Default Profiles: 0: Off, 1: White, 2: Cyan, 3: Green. 4: Red. 5: Blue, 6: Yellow, 7:Orange, 8: Green-Blue, 9:
Pink
2.4 Full Programmability
Kinesis Contoured keyboards have long featured a fully-programmable architecture that allowed users to
record macros, remap keys, and create custom layouts and settings. The Advantage360 utilizes the latest
version of Kinesis’ revolutionary SmartSet™ Programming Engine, which makes the Advantage360 even
more powerful and versatile than its predecessors.
The SmartSet Engine
SmartSet Kinesis’s driverless programming engine that allows users to store custom keyboard layouts and
settings on an onboard flash memory drive (aka the “v-Drive) and reprogram the keyboard quickly and easily
using “onboard programming shortcuts”. Keyboard configuration files are saved as “simple text” files which
allow them to be edited from virtually any operating system.
Onboard Programming Shortcuts
Customizing the keyboard is accomplished quickly and easily using a variety of onboard programming
shortcuts. Shortcuts are triggered with the dedicated SmartSet Key (Gear icon) used in conjunction with other
keys pressed in a special combination to perform the desired customization. Programming can be disabled
with the new Program Lock command to eliminate the risk of “inadvertent programming.”
Built-in Bootloader
The bootloader allows you to update the firmware on your Advantage360 in seconds using a firmware file
downloaded from our website and special key combination. Now you can always be up-to-date with the latest
releases from Kinesis and can ensure compatibility with the newest operating system versions.
2.5 Genuine Kinesis Accessories
Kinesis offers a number of accessories designed to work with your Advantage360 to increase your comfort
and productivity, or let you customize the keyboard for a unique look. Please visit the Kinesis Store, Amazon,
or one of authorized resellers to learn more.
Right Key Module
Le= Num Lock (On/Off)
Middle = Scroll Lock (On/Off)
Right = Layer (Base, Kp, Fn1, Fn2, Fn3)
LeŌKey Module
Le= Caps Lock (On/Off)
Middle = Profile (0-9)
Right = Layer (Base, Kp, Fn1, Fn2, Fn3)

10
3.0 Installation and Setup
3.1 In the Box
• Quick Start Guide
• Link Cable (USB-C to USB-C)
• Main Cable (USB-C to USB-A)
• Additional keycaps for customization
• Keycap removal tool
• Bridge Connector
3.2 Compatibility
The Advantage360 keyboard is a multimedia USB keyboard that uses generic drivers provided by the
operating system, so no special drivers or software is required. Therefore it is “plug-and-play” with all
operating systems that support full-featured USB keyboards.
Known compatibility issues
The Advantage360 is designed to be connected directly to your PC. Connecting the keyboard to certain
intermediary devices such KVM (keyboard-video-mouse) switches, IP telephony devices, and USB hubs can
cause diminished functionality.
If you currently use keyboard customization software (e.g., Autohotkey, Karabiner, etc.), that software may
create unpredictable behavior and diminished performance when interacting with the SmartSet Engine.
3.3 Connecting Your Keyboard for the First Time
1). Connect the two key modules using the Link Cable. The Link Cable must be connected to the left
modules right port and the right modules left port.
2). Then connect the right module to the PC using the Main Cable
3). The keyboard will automatically install itself. When the auto-installation is completed, you should see
a “device is ready to use” notice on your screen. Note: Mac Users may be prompted with the Keyboard
Setup Assistant. Follow the on-screen prompts to complete the Setup.
4). You can now attach the magnetic palm pads or foot pedal (sold separately)

11
4.0 Getting Started
4.1 Positioning and Work Area Setup
Thanks to its separate key modules, unique thumb clusters, and built in tenting, the Advantage360 forces you
to adopt an optimal typing position when you place your fingers over the home row. The Advantage360 uses
the conventional home row keys (ASDF / JKL;). The home row keys feature special, cupped keycaps
designed let you quickly find the home row without taking your eyes off of the screen. Despite the unique
architecture of the Advantage360, the finger you use to press each alphanumeric key is the same finger you
would use on a traditional keyboard.
Position your fingers on the color-contrasted home row and relax your right thumb over the Space Key and
your left thumb over Backspace. Raise your palms slightly above the palm rests while typing. This position
provides the necessary mobility for your hands so that you can comfortably reach all the keys. Note: Some
users may need to move their arms slightly while typing to reach some distant keys.
Workstation configuration
Since the Advantage360 keyboard is taller than a traditional keyboard and features integrated palm
supports, it may be necessary to adjust your workstation to achieve a proper typing posture with the
Advantage360. Kinesis recommends the use of an adjustable keyboard tray for optimal placement.
Learn More: kinesis.com/solutions/ergonomic-resources/
4.2 Adaptation Guidelines
Many experienced typists overestimate the amount of time it will take them to adapt to the key layout. By
following these guidelines you can make adaption fast and easy, regardless of your age or experience.
Adapting your “kinesthetic sense”
If you are already a touch typist, adapting to the Kinesis Contoured keyboard does not require “re-learning” to
type in the traditional sense. You just need to adapt your existing muscle memory or kinesthetic sense.
Typing with long fingernails
Typists with long fingernails (i.e., greater than 1/4”) may have difficulty with the curvature of the keywells.
Typical adaptation period
You will need a little time to adjust to the new shape of the Advantage360 keyboard. Laboratory studies and
real-world testing show that most new users are productive (i.e., 80% of full speed) within the first few hours
of starting to use an Advantage360 keyboard. Full speed is typically achieved gradually within 3-5 days but
can take up to 2-4 weeks with some users for a few keys. We recommend not switching back to a traditional
keyboard during this initial adaptation period as that can slow your adaptation.
Initial awkwardness, fatigue, and even discomfort is possible
Some users report awkwardness when first using a Contoured keyboard. Mild fatigue and discomfort may
occur while you adjust to new typing and resting postures. If you experience severe pain, or symptoms persist
for more than a few days, stop using the keyboard and see Section 4.3.
After Adaptation
Once you have adapted to the Advantage360, you should have no problem switching back to a traditional
keyboard, though you may feel slow. Many users report an increase in typing speed because of the
efficiencies inherent in the contoured design and the fact that it encourages you to use proper typing form.
4.3 If You Are Injured
The Advantage360 keyboard is designed to reduce the physical stress that all keyboard users experience–
whether or not they are injured. Ergonomic keyboards are not medical treatments, and no keyboard can be

12
guaranteed to cure injuries or prevent the occurrence of injuries. Always consult your health care professional
if you notice discomfort or other physical problems when you use your computer.
Have you been diagnosed with RSI or CTD?
Have you ever been diagnosed with tendinitis, carpal tunnel syndromes, or some other form of repetitive
strain injury (“RSI”), or cumulative trauma disorder (“CTD”)? If so, you should use special care when using a
computer, regardless of your keyboard. Even if you simply experience modest discomfort when using a
traditional keyboard you should use reasonable care when typing. To achieve the maximum ergonomic
benefits when using the Advantage360 keyboard, it is important that you arrange your workstation in
accordance with generally accepted ergonomic standards and take frequent “micro” breaks. For individuals
with existing RSI conditions it may be advisable work with your health care provider to develop an adaptation
schedule.
Establish realistic expectations
If you currently have an injury to your hands or arms, or have had such an injury in the past, it is important
that you have realistic expectations. You should not expect an immediate improvement in your physical
condition simply by switching to the Advantage360, or any ergonomic keyboard for that matter. Your physical
trauma has built up over months or years, and it may take a number of weeks before you notice a difference.
At first, you may feel some new fatigue or discomfort as you adapt to the Advantage360.
A keyboard is not a medical treatment!
The Advantage360 is not a medical treatment nor a substitute for appropriate medical treatment. If any
information in this Manual contradicts the advice you have received from a health care professional, please
follow your health care professional’s instructions.
When to begin using your new keyboard
Consider beginning to use your Advantage360 keyboard after you have a taken a break from traditional
keyboarding– perhaps after a weekend or a vacation, or at the very least first thing in the morning. This gives
your body a chance to rest and make a fresh start. Trying to learn a new keyboard layout can be frustrating,
and if you are working long hours or under a deadline that can make matters worse. Do not overtax yourself
early on, and if you have not been using a keyboard regularly, build up slowly. Even if you are symptom free,
you are still susceptible to injury. Do not dramatically increase your keyboard usage without first consulting
your health care professional.
If your thumbs are sensitive
The Advantage360 keyboard is designed for increased thumb usage compared to a traditional keyboard
which places more strain on the little fingers. Some new Kinesis contoured keyboard users initially experience
fatigue or discomfort as their thumbs adapt to the increased workload. If you have a preexisting thumb injury,
be especially careful to move your hands and arms when reaching for thumb keys and consider customizing
your layout to reduce thumb workload.
Guidelines for using your thumbs
Avoid stretching your thumbs to reach the furthest keys in the thumb clusters. Instead move your hands and
arms slightly, being careful to stay relaxed, and keep your wrists straight. If your thumbs are especially
sensitive, consider using your index fingers instead of your thumbs to activate these keys. You may want to
speak with your health care professional about these options. If pain persists for more than several days, stop
using the Advantage360 keyboard and contact your health care professional for advice.

13
5.0 Basic Keyboard Use
The default layout is a great place to start to learn the Advantage360. The keyboard comes pre-configured for
QWERTY typing on a Windows PC but it can be reconfigured for alternate layouts and operating systems
very easily using the SmartSet App and by rearranging any number of keycaps.
5.1 Profile 0 Base Layout
The Advantage360 has ten available Profiles, numbered 0-9. Profiles 1-9 are fully programmable, but “Profile
0” was built to be non-programmable to prevent novice users from inadvertently reconfiguring the keyboard.
The Advantage360 ships from the factory with Profile 0 loaded. If you are happy with the keyboard’s “base”
layout and don’t plan to make any changes, then Profile 0 is perfect for you. If you would like to custom
program your keyboard you’ll need to load one of the other 9 Profiles using the onboard shortcut or the
SmartSet App.
5.2 Multi-Layer Layouts
The Advantage360 is a multi-layer keyboard which means that each physical key on the keyboard can
perform multiple actions. The default layout in each Profile features 3 easily accessible layers: The primary
“Base Layer”, and two secondary layers (“Fn” and “Keypad”) which offer auxiliary key actions. The user can
use the 3 dedicated layer keys in the default layout to move between the layers as needed. Most keys
perform the same action in all 3 layers by default, but keys that have unique actions in the auxiliary layers
have additional legends on the front of the keycap. Navigating layers can be intimidating at first but with
practice it can actually boost your productivity and improve your comfort by keeping your fingers on the home
row.
Note: The 9 programmable Profiles (1-9) feature 2 additional layers (the Fn2 Layer and the Fn3 Layer) which
can be configured via the SmartSet App for power users..
Note: The location and behavior of the layer access keys can be customized in the SmartSet App.
5.3 Function Keys (F1-F12) reside in the new Fn Layer
Long time users of our contoured keyboard will note that we have eliminated the18 half-size function keys
resulting in a more compact layout. The Function Key actions now reside in the new “Fn Layer” as secondary
actions for the traditional number row. The Fn Layer can be accessed by pressing either of the two new
“pinky” keys labeled with “fn”. By default these two Fn Layer Keys momentarily shift the keyboard to the Fn
Layer. So to output F1, you simply press and hold either of the Fn Layer Keys and then tap the “equals” keys.
When you release the Fn Layer Key you return to the Base Layer and the primary key actions.
By default the Fn layer features 12 unique key actions (F1-F12) which are legended on the front left edge of
the keycaps.
5.4 Numeric 10 Key resides in the Keypad Layer
The new full-size Keypad Layer Key toggles the keyboard into the Keypad Layer where the standard numeric
10-key actions are found on the right module. Unlike the Fn Layer Keys, the Keypad toggles layers so you tap
it once to move in the Keypad Layer, and tap it again to move back to the Base Layer.
By default the Keypad layer features 18 unique key actions on the right module (traditional 10 key) which are
legended on the front right edge of the keycaps.
5.5 Four new Hotkeys
The Advantage360 features 4 keys in the middle of the keyboard labeled 1-4 inside of a circle. By default
these keys are blank so don’t be disappointed if they don’t produce any action at first. These four keys can be
programmed to perform any single key action, mouse click, macro and more. And a different action can be
assigned in each layer. Use them in whatever way you see fit, or simply ignore them.

14
5.6 Default Layout Map

15
6.0 Customizing your Keyboard
The SmartSet Programming Engine provides a number of easy-to-use productivity tools. Even those who
have never used a programmable keyboard can easily learn and benefit from these. There are 3 ways to
customize your keyboard:
1. Onboard Programming using shortcuts
2. The SmartSet App GUI (for Windows and Mac)
3. Direct Programming of .txt files on the v-Drive (for Power Users only, download the separate guide)
View the list of support actions: kinesis.com/support/kb360/#manuals
Onboard Programming
All onboard programming begins with the dedicated SmartSet Key (Gear Icon, right module). Shortcuts are
triggered using the SmartSet Key and one or more other keys. The four most commonly-used onboard
shortcuts reside on the Hotkeys and are legended with the gear icon on the front face of the key. To activate
these shortcuts, press and hold the SmartSet Key and then tap the corresponding Hotkey. The LED
indicators will flash in response to a successful onboard shortcut.
Note: Remap and Macro changes are applied only to the Active Profile. To mirror changes across multiple
Profiles its best to use the Save As function in the SmartSet App.
Caution: There are variety of additional, unlabeled shortcuts. Please read this manual and be mindful
whenever using the SmartSet Key to avoid inadvertent programming.
6.1 Onboard Remapping (SmartSet + Hotkey 1)
The Advantage360 lets you customize the key layout in each of the 9 programmable Profiles by moving (aka
“remapping”) key actions from one location to another. You can remap one or two critical keys to a more
convenient location, or remap dozens of keys to suit your particular workflow. Every key except for the
SmartSet key can be reprogrammed in each of the 5 layers although the layers keys can not be
reprogrammed using the onboard shortcut.
Note: If you wish to move a lot of keys we recommend using the SmartSet App.
Remap Process
To remap a key, open the application in which the macro will play correctly, then follow the steps below.
1. Hold SmartSet briefly while tapping Hotkey 1 to enter “Remap Mode”. The LEDs will flash rapidly.
2. Tap the “Source Key” (i.e., the action you want to duplicate). The LEDs will flash slowly.
3. Tap the “Destination Key” (i.e., the physical key you want to perform the previously selected action)
Notes: Remapping moves only one key action at a time. To swap two keys you must use the shortcut to re-
enter Remap mode and perform the inverse operation. While in Remap Mode the keyboard will revert to the
factory default layout so that you never lose a key.
Remapping between layers
Each of the 5 layers are separately programmable. When a key is remapped, it is only remapped in the active
layer. You can navigate between the layers during onboard remapping using the Layer Access Keys to move
a key to a different layer.
6.2 Onboard Macro recording (SmartSet + Hotkey 2)
A macro is any string of characters or sequence of key actions that are trigged by a single key press. Macros
are powerful productivity tools that allow users to save time and eliminate repetitive key strokes or awkward
key combinations. The Advantage360 can be programmed to playback macros by tapping either a single
trigger key, or key combo using a primary trigger key in combination with one or more modifier keys (e.g.,

16
Shift, Ctrl, Alt, and Windows/Command).
Notes: Left and right modifier keys are treated separately in triggering macros. The default layer shifting keys
cannot trigger a macro via onboard programming, but can trigger a macro via the SmartSet App.
The key action is the trigger
Unlike on previous Advantage keyboards, the macro trigger key is represented by the trigger action, not the
physical position key to give users more flexibility in assignment and playback. For example, if you record a
macro to be triggered by the “Z” key, that macro will fire anytime you tap a key that has the Z action assigned.
Size limits on macros
Individual macros typically can comprise up ~300 individual keystrokes and dozens of macros can be saved
each Profile. Once you reach the macro size limit, the keyboard will stop recording.
Recording a Macro
To program a macro, open the application in which the macro will play correctly, then follow the steps below.
1. Hold SmartSet briefly while tapping Hotkey 2 to enter “Macro Mode.” The LEDs will flash rapidly.
2. Tap the “macro trigger” key or key combination. If you use a combination, hold the modifier(s) first, then
press the trigger key, then release all keys. The LEDs will now flash slowly.
3. Type your macro contents.
4. When you are finished recording your macro, tap SmartSet to exit Program Macro Mode.
Note: When recording a macro any remapping you have done will be active, but you cannot “daisy chain” or
embed one macro within another.
Every keystroke is recorded
As you record a macro, the Advantage360 records the exact keystrokes you type. If you a make mistake
while recording a macro, you can use corrective keystrokes, but this will slow playback slightly and for long
macros, it may also reduce the maximum macro size to below 300 characters. So if you make lots of
mistakes while recording a macro, consider re-starting the recording process. Alternatively, you can edit a
“sloppy” macro in the SmartSet App.
Playback speed and performance
Macro recording only logs the key strokes not timing. By default, the macro will play back at an “average”
speed with no delays between keystrokes, but the playback speed can be customized in the SmartSet. All
computers respond differently to macros so complex macros may require some fine tuning.
Erasing a macro
To erase a macro simply enter Macro Mode in the corresponding Profile, press the corresponding trigger key
(s) for the macro you wish to erase, and then tap the SmartSet Key again to clear the macro from that Profile.
Other keystrokes are not blocked during macro playback
While a macro is being played back the keyboard can still send key strokes that will interrupt playback. If you
are using especially long macros or want to execute a macro in rapid succession with other keystrokes, we
recommend increasing your macro playback speed.
Using Windows as co-trigger
Because of the special way in which the “Windows Key” is treated by the Windows operating system and
differences between processor speed and Windows versions, experimenting with playback speed may be
needed if you use lwin or rwin as the only modifier to help trigger a macro in combination with a non-modifier
key. There should be no problem if Win plus another modifier are combined with a macro trigger key.
Macros take priority
If macro is assigned to a single trigger, macro playback will take priority over the underlying key action.

17
6.3 Accessing the v-Drive (SmartSet + Hotkey 3)
The Advantage360 contains a virtual flash drive named “Adv360” where the all keyboard’s configuration files
are stored. The “v-Drive” is normally hidden from your computer and can be ignored access for basic
keyboard usage or any of the onboard programming shortcuts.
There are four reasons to access the v-Drive: 1) to use the SmartSet App for Windows or Mac, 2) to Direct
Program your keyboard, 3) to perform a firmware update, or 4) troubleshooting. The v-Drive should be closed
except when performing the above operations.
Onboard shortcut to open (aka “mount”) the v-Drive:
Hold the SmartSet Key and tap Hotkey 3. The Indicator LEDs will flash 4 times to signal the v-Drive is
opening. Note: It may take up to twelve seconds for the v-Drive to appear.
Finding the v-Drive on your computer
The v-Drive is always named “Adv360” but its location will vary depending on your operating system. Here
are some tips:
• Windows: The v-Drive will usually “pop-up” automatically in FILE EXPLORER under “This PC”
• Mac: Look at the DESKTOP or in FINDER under “Devices”
• Android: Look in COMPUTER SETTINGS
• Chrome: Look in FILES
• Linux: Look in MY COMPUTER
Programming disabled while v-Drive is open
All non-essential onboard shortcuts are disabled while the v-Drive is open to prevent potential drive
corruption.
Contents of the v-Drive
• Firmware Folder: Contains the “rescue.upd” firmware file for a rescue reset and any firmware update files
you may place there
• Layout Folder: Contains the 9 “layout_.txt” files (key actions and macros) corresponding to each of the 9
programmable Profiles
• Lighting Folder; Contains the 9 “led_.txt” (Indicator LED function and color) corresponding to each of the
9 programmable Profiles
• Settings Folder: Contains the current global keyboard settings file called “settings.txt”
Simple text configuration files
All of the files (other than firmware files) found on the v-Drive use the .txt format which can be opened with
any text editing program (e.g., Notepad, Microsoft Word, etc.).
Closing the v-Drive
Before closing the v-Drive, be sure to save any .txt files that have been edited if you would like those changes
to be implemented. Always “Eject” the v-Drive from you Operating System (right-click the mouse in
Windows) before closing the v-Drive using the onboard shortcut (SmartSet + Hotkey 3). The Indicator
LEDs will flash 2 times to signal the v-Drive is closing.
The new SmartSet App for Windows is designed to eject the v-Drive for you provided you follow the on-
screen prompts.
If you get a message from your operating system that the device is busy and cannot eject, be sure all v-Drive
files are closed and click on the top level of the v-Drive, then try again. You can also unplug the keyboard to
close the v-Drive instead of using the shortcut.
Note: macOS will frequently produce an error after disconnecting the v-Drive but this can be safely ignored.

18
6.4 Refresh Shortcut (SmartSet + Hotkey 4)
Changes made to the via the SmartSet App and/or Direct Programming do not go into effect automatically. To
“push” your changes to the keyboard (after saving changes in the App and following the proper eject protocol)
you can either close the v-Drive or you can use the Refresh Shortcut by holding the SmartSet Key and then
tapping Hotkey 4. Refresh allows use to keep the v-Drive open and make further changes.
6.5 Load one of the 10 Profiles (SmartSet + 0-9)
Use the SmartSet Key in conjunction with the corresponding number in the number row to directly load any of
the 10 Profiles on-the-fly.
6.6 Program Lock/Unlock (SmartSet + Right Ctrl+ L)
If you are worried about accidentally reprogramming your keyboard, we recommend using the above shortcut
to “lock” your keyboard which will disable all onboard programming shortcuts. Use the same shortcut to
unlock the keyboard if you wish to do any onboard programming.
6.7 Status Report (SmartSet + Right Ctrl + Right Shift + /)
The Status Report is a handy feature which allows Advantage360 users to quickly see the current keyboard
settings. This section briefly explains how to interpret the Status Report. For a detailed explanation of the
features referenced below, please read Sections 7 and 8 of this Manual.
Important Note: Before running a Status Report, open a text editing program so that the keyboard can
“print” the Status Report to the screen.
Model: Indicates the model name of the keyboard.
Profile: Indicates which of the 10 Profiles is active
Remaps: Indicates the number of custom key remaps that have been saved to the active Profile
Macros: Indicates the number of macros that have been saved to the active Profile
NKRO: Indicates whether N-key rollover mode is active
Firmware: Indicates which versions of firmware are running on each key module
6.8 Soft Reset (SmartSet + Right Ctrl + Ent)
Soft Reset erases all macros and remaps from the currently active Profile.
6.9 Hard Reset (SmartSet + Right Ctrl + Enter while plugging in keyboard)
A Hard Reset erases all of the remaps and macros saved to all 9 Profiles and restores all keyboard settings
to their factory defaults. To initiate a Hard Reset, hold the SmartSet Key, Right Ctrl and Enter while plugging
the keyboard. Once Indicator LEDs start to flash you can release the keys.
6.10 The SmartSet App for Windows and Mac
The Advantage360 features a host of
customization options that cannot be accessed
through onboard programming. Users can
download the SmartSet App from the link below
and run it from their desktop after opening the v-
Drive.
kinesis.com/support/kb360/#smartset

19
6.11 Direct Programming
For power users who would prefer to customize their keyboard layouts directly via the .txt configuration files,
please download the Direct Programming Guide at the link below for a full list of tokens, syntax rules, and
examples.
kinesis.com/support/kb360/#manuals
6.12 Media Keys, Mouse Clicks/ Movements and More (SmartSet App and Direct Programming only)
The Advantage360 supports a wide array of keyboard actions. If there is a key action that is not present in the
default layout, you can likely find it in the SmartSet App and assign it to any key in any layer you choose, or
program it directly using the Kinesis token.
6.13 Tap and Hold (SmartSet App and Direct Programming only)
The Advantage360 supports a new feature that allows you to assign two distinct actions to a single key where
the output depends on how long you hold the key. Assign one action for quick taps, and another action for
longer holds. You can even set the timing delay yourself.
Note: Tap and Hold may not be suitable for all desired applications because of the inherent timing delays
(e.g., alphanumeric keys are not recommended).
6.14 Multi-modifiers (SmartSet App and Direct Programming only)
The Advantage360 supports the ability to have one single key act as a compound modifier key to make multi-
key shortcuts even easier. Select one or more modifiers from Shift, Windows/Command, Alt, and Ctrl.
6.15 Indicator LED Programming
Each of the Indicator LEDs is fully programmable. You can customize the color and function of each LED to
make it easy to know which Profile and Layer you are in, create a custom color scheme based on your
personal preferences, or just disable LEDs that aren’t useful for you.
6.16 NKRO Mode
By default a standard USB keyboard can only send 6 simultaneous key-strokes to the PC. For certain users
and applications it may be desirable to send more simultaneous keystrokes than that (i.e., chording). Those
users can activate/deactivate N-Key Rollover Mode (aka NKRO) to support unlimited simultaneous key
presses using the onboard shortcut SmartSet + Ctrl + N. Note: NKRO mode is automatically deactivate each
time the v-Drive is open.

20
7.0 Firmware Update
The SmartSet technology in your Advantage360 allows you to update the keyboard’s firmware to stay up-to-
date with the latest releases from Kinesis. Your Advantage360 keyboard comes from the factory with the
most up to date fully-vetted version of the firmware as of its build date but Kinesis may at times release new
versions of firmware to improve performance and/or compatibility.
To determine which version of firmware is currently installed on your keyboard launch the SmartSet App
and click the “Check for Updates” button. You can also open a text editing screen and run a Status
Report (SmartSet + Right Shift + Right Ctrl + /) and compare it to the version listed on our website at the
link below.
kinesis.com/support/kb360/#firmware-updates
7.1 Firmware Update Process
1. Obtain the appropriate Advantage360 firmware update (“.upd” file) from Kinesis tech support or website
2. Open the v-Drive (SmartSet + Hotkey 3)
3. Copy and paste the firmware update file into the “firmware” folder
4. Eject via right-click and close the v-Drive (SmartSet + Hotkey 3)
5. Initiate Firmware Update with the shortcut SmartSet + Right Ctrl + U until you see the Indicator LEDs start
to flash. The update normally takes 10-12 seconds per side, during which time the keyboard will be
inactive and LEDs will flash in sequence on first the right module, and then the left module. IMPORANT
NOTE: DO NOT unplug or type on keyboard until done.
6. If it is successful, the indicator LEDs will flash green on both sides indicating the keyboard is now ready to
use. you can tap the Keypad key to test the keyboard.
7. Run a Status Report or launch the SmartSet App to confirm the new version of firmware was successfully
installed.
7.2 Firmware Rescue (SmartSet + Hotkey 4 while plugging in)
In some instances it may be necessary or desirable to install a “rescue” firmware file to restore the keyboard
to its factory default state. Provided the rescue file has not been deleted from the “firmware” folder on v-Drive
you can press and hold SmartSet + Refresh while plugging in the keyboard to trigger.
Continue to hold the keys until you see the Indicator LEDs start to flash. The rescue normally takes 10-12
seconds per side, during which time the keyboard will be inactive and LEDs will flash in sequence on first the
right module, and then the left module. IMPORANT NOTE: DO NOT unplug or type on keyboard until done. If
it is successful, the indicator LEDs will flash green on both sides indicating the keyboard is now ready to use.
you can tap the Keypad key to test the keyboard. Run a Status Report or launch the SmartSet App to confirm
the new version of firmware was successfully installed.
Other manuals for Advantage 360 KB360
2
Table of contents
Other Kinesis Computer Accessories manuals
Popular Computer Accessories manuals by other brands

Lauterbach
Lauterbach MMDSP Processor Architecture Manual

Targus
Targus Wireless Keypad and Mouse Combo user guide

Heckler Design
Heckler Design WindFall KIOSK Assembly & installation

Rentokil
Rentokil Connect AutoGate instruction manual

Dynex
Dynex DX-WDCMBO - Keyboard And Optical Mouse Wired Setup guide

Rebel
Rebel KOM-1004 user manual