kinetic GymAware User manual

gymaware.com
January 2019
USER GUIDE

Welcome
Congratulations on your purchase of a GymAware PowerTool.
You have now joined the community of GymAware users who are all benetting from using the best velocity and power monitoring
equipment available.
We value your feedback on our products and hope that you will contact us with any questions or comments you may have.
This user guide is designed to get you up and running; there are some great GymAware set up tutorials available on YouTube:
search for “GymAware Setup”.
For further on-line help and tutorials check out our support at gymaware.zendesk.com
The GymAware PowerTool is backed with a 12 month warranty - see gymaware.com for further details.

What’s in the Box?
The GymAware PowerTool LE
1
Each GymAware kit contains:
• GymAware PowerTool LE device
• Wall charger with mini USB charger cable
• First Aid kit
• Quick start guide
• User guide
VELCRO STRAP
TETHER
LED INDICATORS SERIAL #
ZERO
POSITION
CHARGING
INDICATOR
MINI USB
CHARGE
PORT RESET BUTTON
GymAware Cloud license and accessories
are available from the online shop at
GymAware.com/shop:
• Cloud license - 1, 3 or 5yrs
• Hard travel case
• Ceiling mount bracket
• Replacement velcro straps
• iPad cases
• GymGrips - magnetic iPad holder

Get Connected - GymAware PowerTool LE
2
Download the GymAware App from the iTunes Apps store
Search for GymAware in “iPad only Apps”
Note: GymAware PowerTool LE will only work with App v2.3 and above.
For the best experience make sure your iPad is running the latest version of iOS.
Get Started:
Ensure the iPad App is downloaded and the GymAware PowerTool
placed on a at surface on its magnetic feet.
1. Open the GymAware App - On initial opening only, the App
guide will appear as a set of slides - read these then close by
clicking the “X” at the top of the window.*
2. Slowly pull the tether twice to wake up your PowerTool - or
press the reset switch located on the side of the PowerTool
3. The connection window will pop up (bottom left of the screen)
4. Ensure the tether is fully retracted
5. Tap the I’m at Zero button**
You are now connected and ready to collect data!
*The help slides can be accessed at any time by tapping the yellow “?” located under the iPad time at the top of the screen.
** Zeroing the device only needs to be done once per session

Download the GymAware App from the iTunes Apps store
Welcome
Launching the in-App Help 3
The very rst time you open the App, you will see a series of introduction slides. Help is available throughout the App by tapping
the yellow “?” Once HELP mode is on, tap on an element to learn more and then tap the “X” when you are nished learning to
return to the active state of the App.
Tap the ABOUT button to
replay the introduction slides.
Once HELP mode is
activated, tap each element
to reveal the information.
You may need to scroll the
yellow box to reveal all the
information.
Tap the “X” button to exit
help mode.

Basic App Guide
Using the Dial Interface
4
With any of the input elds you
can rotate the dial to update
values or use the double tap
to bring up the key pad.

Basic App Guide
Using the Dial Interface
Basic App Guide
4
1. Free Run mode (DEFAULT)
The default mode is Free Run when not logged into the Cloud.
FREE RUN mode is always in a data collection state. Select exercise,
parameter, bar weight and body mass.
A target and range can be set if desired by tapping the central dial.
The RESET button becomes available when you have performed at
least one rep. Tapping this button allows users the ability to clear the
dashboard and graph at any time.
To change modes, tap the arrow top left of the screen to reveal
the Squad List tab. Select GymAware Lite.
Three demo athletes will be revealed. Up to 10 demo athletes
can be registered and all data and videos can be exported as
a csv via email.
2. GymAware Lite
One App - Three levels of use.

App Basic Guide
4
2. GymAware Lite continued. 3. GymAware Cloud
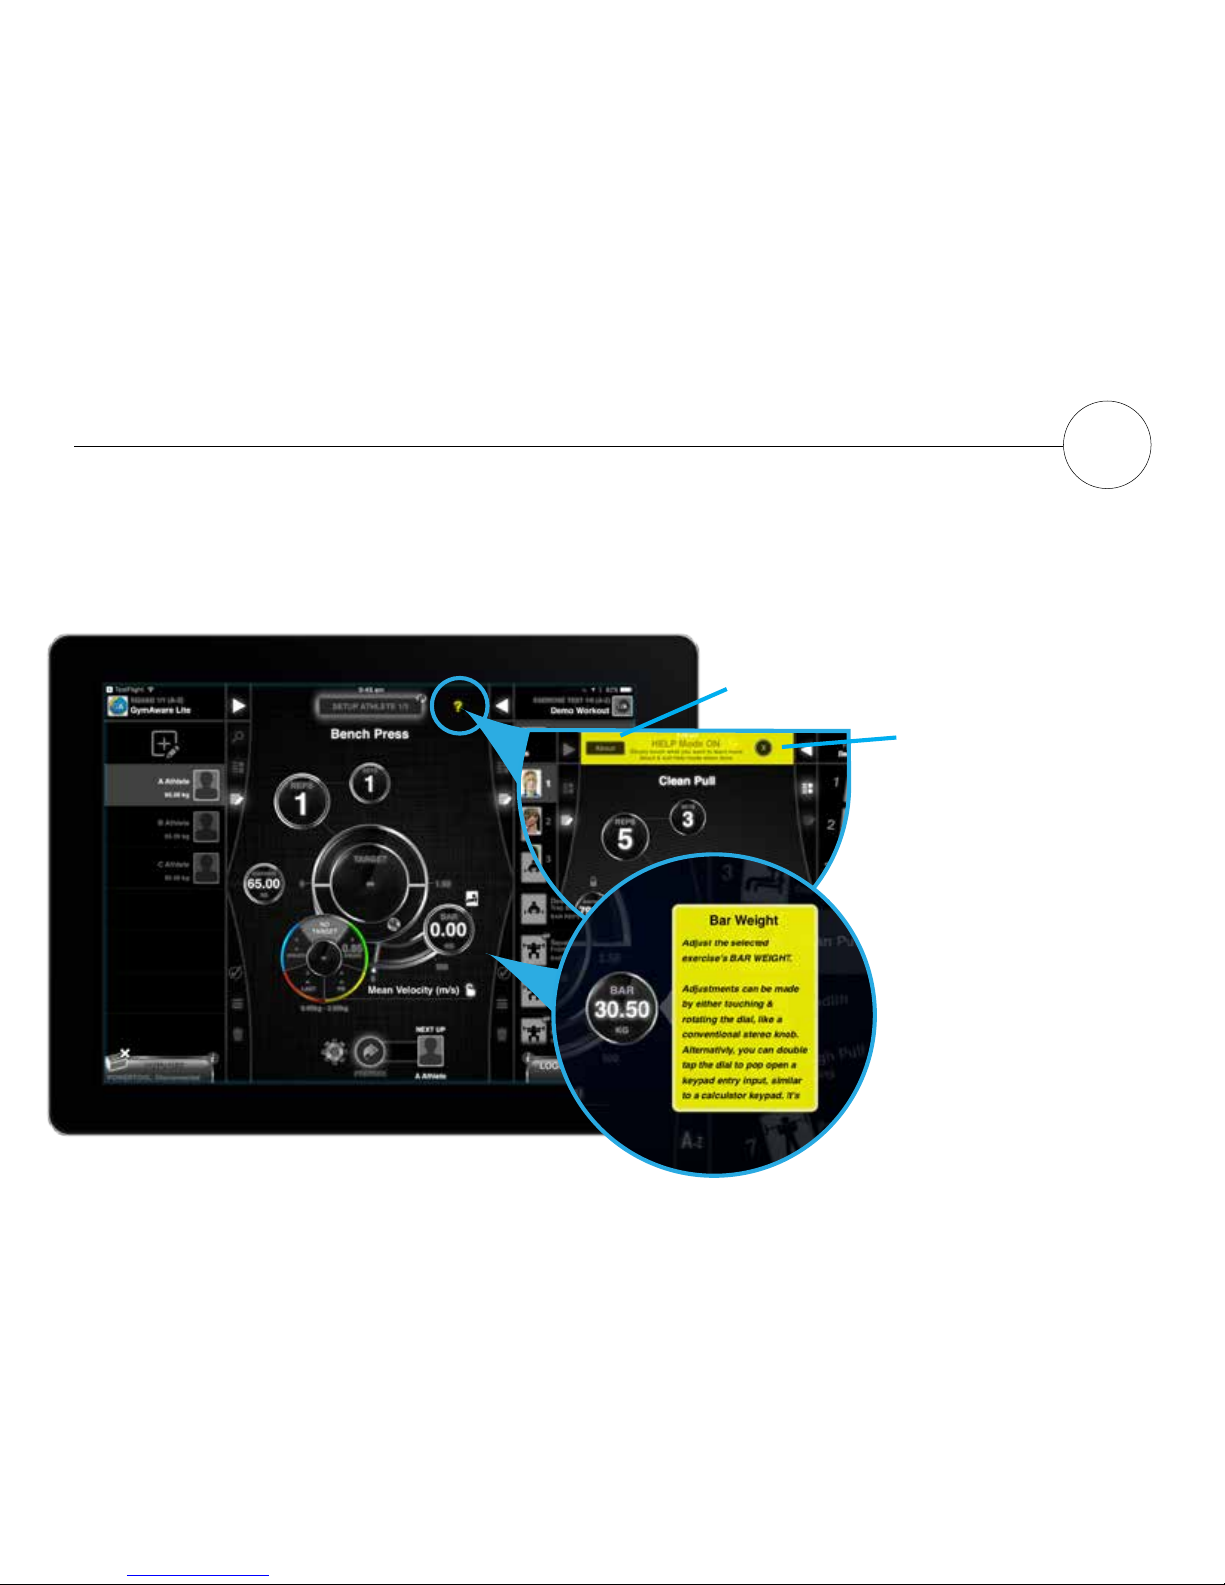
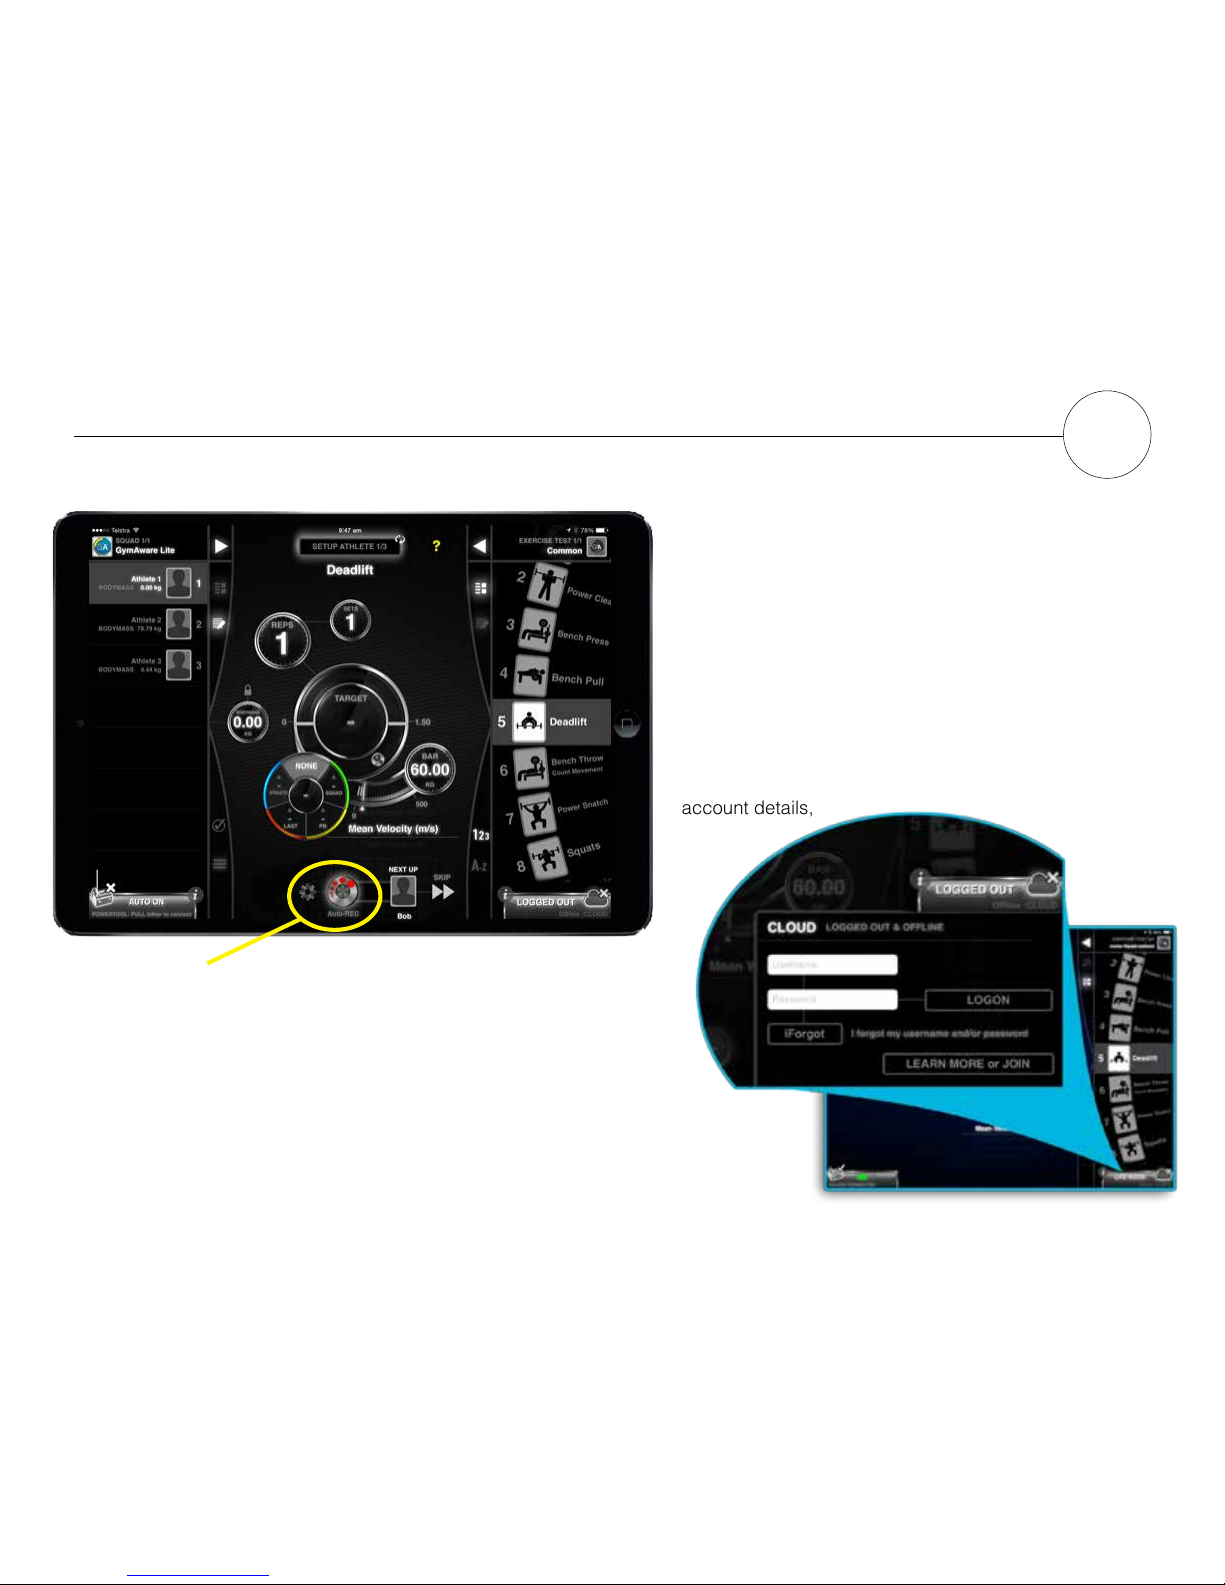
The MAIN CONTROL displays options depending on what mode the
system is currently in. By default this is Auto Record. Tap the cog icon
to reveal the other recording modes.
From the SETUP screen you can select your athlete, exercise, set the
bar weight, any targets, ranges, reps/sets and body mass.
Once you have selected and congured your athlete and exercise tap
the main control “RECORD” button to switch to the PREPARE screen.
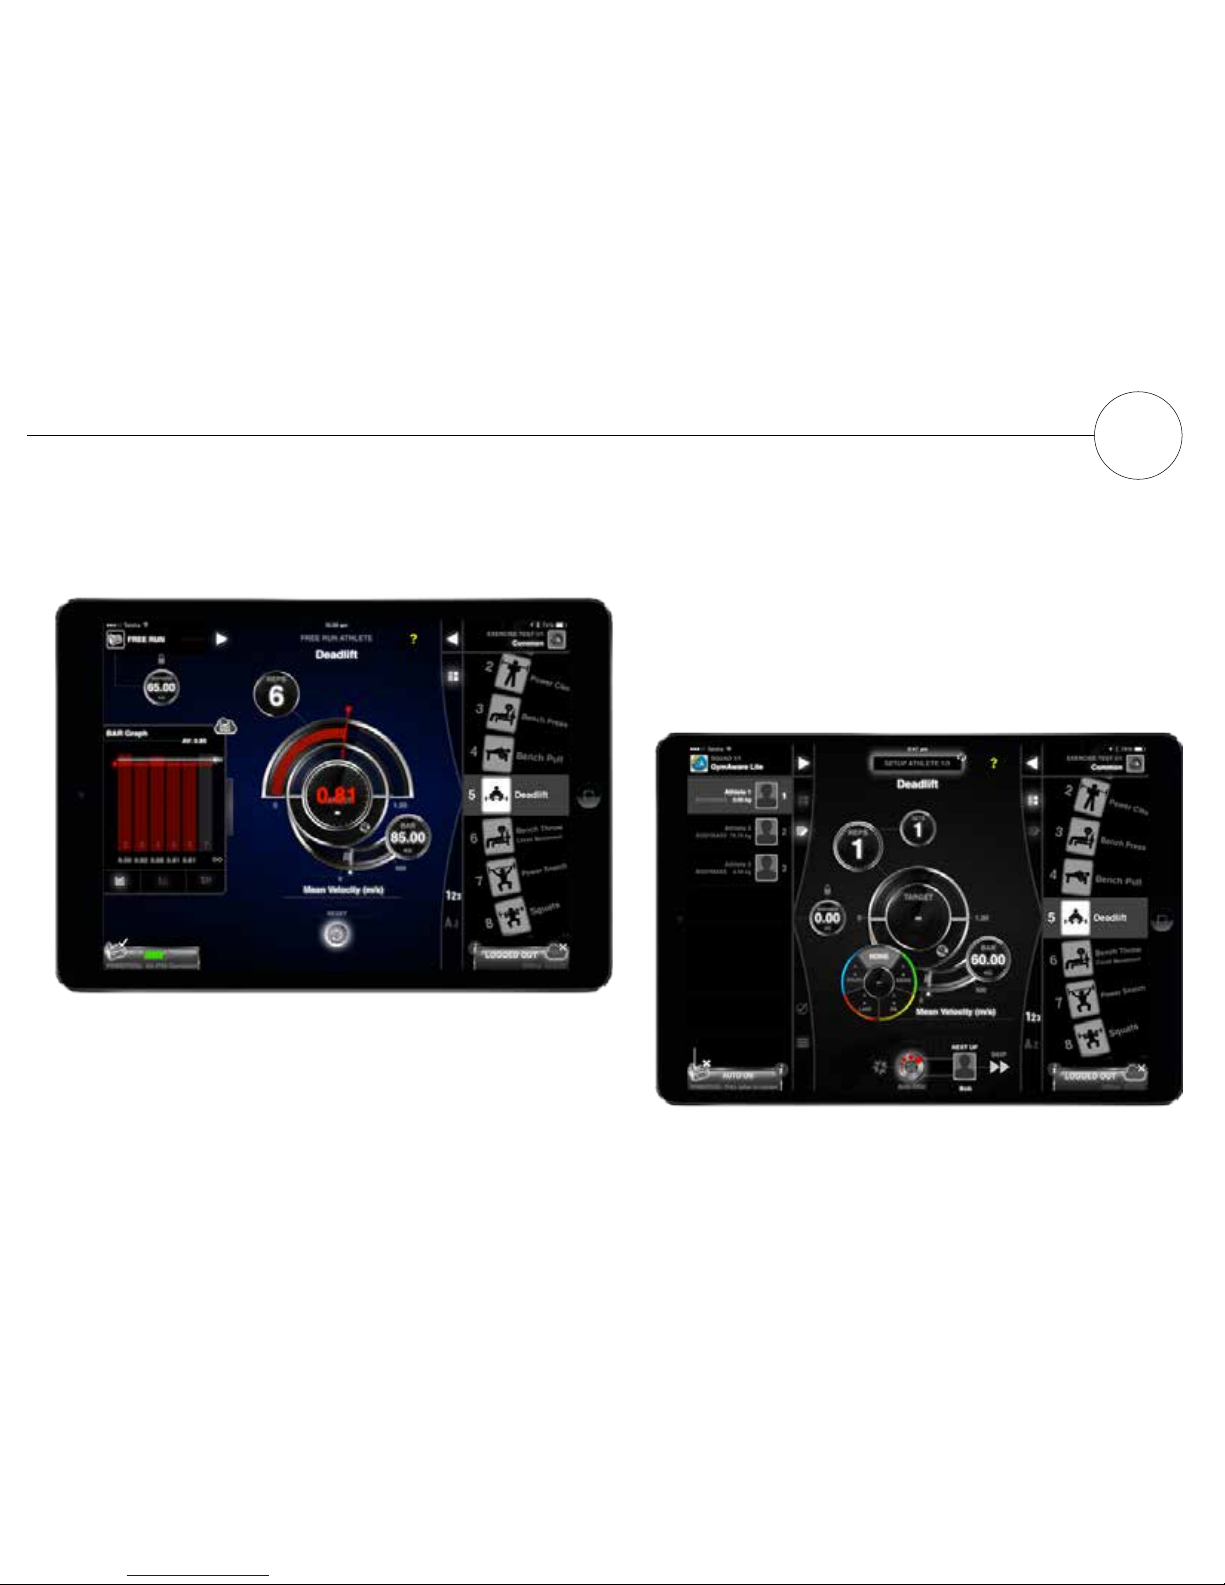
The GymAware Cloud license is a paid account. Make sure
that you are connected to 3G/4G or WiFi is enabled and active.
Use your details as supplied in the Getting Started email to
login. If you do not have a Cloud account you can tap the “i”
icon to nd more information about this service.
A free 30-day trial is available via the link within the App.
Once logged into the Cloud, your squad and exercise list will
automatically populate.
Tap the Cloud tab to reveal the log-in area and enter your
account details,

App Basic Guide
Basic App Guide
General App Settings
4
Access the General, Audio/Speach and Camera settings from one main area at the Prepare or Setup screen.
Settings are accessed by tapping the cog icon:
Options include -
• Audio and speech options: Customisable target sounds
• Video camera settings
• General settings including kg/lbs etc. (non global weight metric)

Recording Modes
By default, Auto-Rec mode is enabled.
Access the recording modes from either the PREPARE or SETUP
screens. The icon is the COG shaped icon next to the PREPARE or
RECORD button (depending on which screen you are in).
To enter the recording mode settings, tap the COG icon.
SET timeout can be adjusted from this screen. The set timeout
refers to how many seconds after no bar movement will the set
automatically stop recording.
This can be adjusted up to 60 seconds.
Basic App Guide
4

Basic App Guide
Basic App Guide
4
SQUAD selector
Tap on the Squad tab or arrow at
the top of the screen to reveal the
squad list.
After selecting the squad the
athletes are displayed. Tap on an
athlete to select them.
Both squads and exercise lists can
be congured via gymaware.com
To switch between “Set Up” and
“Review” tap the Box at the top of
the screen.
Press the “Record” button to
proceed to the “Prepare” screen
where you can make any nal
adjustments.
SETUP screen (GymAware Lite/Cloud)
EXERCISE selector
Tap the “Exercise tests
label” to reveal the list
of pre-programmed
exercise tests
When you have setup
the athletes, tap the
REC button to move to
the prepare screen.

To return to the setup screen
press the BACK button located at
the bottom of the screen.
Use this screen as a nal check
of parameters and position
athlete.
In this view the LEADERBOARD
tab is hidden.The BAR GRAPH
tab has been swiped open to
display the results in this form.
Tap the line graph option and
change the parameter to bar path
to view real time position of the
bar.
PREPARE Screen
Basic App Guide
4

Basic App Guide
4
REVIEW Screen
By tapping the REVIEW ATHLETE
button you can switch between setup
and review modes.
Only athletes and exercises which
have collected data sets will be
displayed.
PARAMETER
LOCK
In REVIEW mode, all sets collected
for each exercise are able to be
reviewed. By default the lock icon is
‘open’.
This means that each set will display
the measurment parameter which it
was collected under.
You can make a global change
across all sets by changing the and
then ‘closing’ the lock icon.

Basic App Guide
Targets and Ranges
4
The targets module appears when you use GymAware Lite
or GymAware Cloud. The dial colour will change depending
on which target is selected.
Squad Target (Green Zone)
Applicable to all athletes within the squad. Changing the
Squad Target will automatically update across any iPad
logged into the Cloud with a WiFi connection.
Coaches select a squad target for each exercise and
congure the desired training zone. Any athlete, on any
station performing the same exercise who are connected
to the same Cloud account will then see the target zone.
Athlete (Blue Zone)
Coaches can individualise any target zone or load per
athlete without effecting the squad.
Last Target (Orange Zone)
This value is the result from the exercise the LAST time it
was performed. That can be today or from previous week
or month.
Personal Best Target (Yellow Zone)
This value is an athletes Personal Best (PB) or PR
(Personal Record). It could be from the last set or a result
they posted previously. PB’s are automatically tracked via
the GymAware Cloud and are based on weight.
Double tap the bell icon to reveal PB set information.

On the Floor
PowerTool Setup
5
Positioning of the PowerTool for optimal performance.
Note: The magnetic feet of the PowerTool hold it in position.
Aim to position the PowerTool so that it is vertically
under the path of the lift.
The PowerTool should be
positioned adjacent and away
from the athletes feet.
On the gym oor place the
PowerTool on a small weight
to help keep it in place.
Basic App Guide
NOTE: The PowerTool is positioned parallel to the bar with
the big arrow facing away from the athlete.

PowerTool Setup
Pin-loaded weights machine 5
The PowerTool can be attached to any pin-loaded weights machine.
Place PowerTool on a small
weight close to the weight
stack.
You are now set and ready to
collect data.
Thread the pin through the
Velcro strap.
Return the pin to the weight
stack.

PowerTool Setup
Ceiling Mount 5
The GymAware PowerTool can be mounted above the lifting platform. You need to purchase a ceiling
bracket and mount it using the additional mounting screws provided.
Ceiling mount in use attached
to a weights cage - this needs
to be attached with the ceiling
mount and screws for safety. During the exercise, position
the Velcro strap in the centre of
the bar.
Screw the PowerTool to the
ceiling bracket for security.
Maximum mounting height: 3m*
*An extension tether is available.
Attach the bracket to the
ceiling.
The ceiling mount brackets
are available from the Kinetic
shop.

Trouble Shooting 6
PowerTool connects to the iOS device, then omits one long beep
and switches off.
The PowerTool has a problem and cannot continue
communicating with the iOS device.
Restart the iOS device.
iOS and PowerTool Communication
Hold the Sleep/Wake button for 5 seconds then swipe the on-
screen slide to power off.
Next, turn the iOS device back on by pressing the power button.
There are occasions where you may nd your PowerTool
is not behaving as it should. It may not be responding
or disconnect from the App. Listed below are some key
trouble shooting steps you can implement to try to resolve
the issue:
1. Make sure BlueTooth is on
Yes, a rookie mistake, but it happens especially after
traveling or when iPads are left out in the weights room.
2. Perform a Full Reset of the PowerTool
Nothing like a good re-boot to wake everything up. Press
the reset button located on the side.
3. Leave the PowerTool on charge overnight
Plug it in - a good 10hr charge can make the difference.
4. Forget and re-pair the PowerTool with your iPad
With a lot of BlueTooth connections in the air, sometimes
your PowerTool will connect to another iPad in range, or
just get scrambled.
5. Bad State
Try the battery disconnect - search for help at
gymaware.zendesk.com
Restart the iOS
Online Help - GymAware.zendesk.com

Trouble Shooting 6
PowerTool won’t turn on
GymAware is smart.
By default, the type of battery inside the unit disconnects
after a period of non-use in order to protect itself. If your
GymAware won’t turn on (ie. LEDs light up) when the tether
is pulled we recommend:
• Pull the tether slowly a few times (4-5) at least 30cm-60cm.
• Perform a full reset by pressing the reset button on the
side of the unit
• Place the unit on charge overnight - this may make the unit
start to beep consistently, but this is the low battery warning
and needs to be ignored as it will shut off after a low charge
is reached.
• Battery jumpstart - this involves taking the end cover off,
doisconnecting the battery and reconnecting.
Further information/tutorials are available -
gymaware.zendesk.com
NOTE: If problems persist visit gymaware.zendesk.com or contact Kinetic on (+61 2) 6162 1770 of[email protected]
Tether care
The GymAware tether is a braided cord with a 65kg breaking strain
(thats a big big sh); however, there are some simple concepts to
keep in mind to make sure it functions as it should.
Issue and Prevention:
Slack tether - Blocked angle sensor - Clean the angle sensor
regularly. The weights room can be a sweaty place and the angle
sensor can become clogged with chalk and grime. Use the angle
cleaning tool in the GymAware First Aid kit for a seasonal service.
Be controlled when dumping the bar - instructing the athletes
to be mindful of violent releases. It is the sudden shock of the
reversing tether direction which can damage the spring inside the
spool mechanism.
Adjust the tether tension - this involves using tools. Find someone
who is good at changing lightbulbs and follow the instructions at
gymaware.zendesk.com - We have even made a video which we
recommend watching.

Trouble Shooting
PowerTool Hardware - What do the indicator LED’s mean? 6
or rmware upgrade
Other manuals for GymAware
2
Table of contents
Other kinetic Fitness Electronic manuals