Kinetix CMOS User manual

Kinetix Pre-Arrival Guide
Thank you for your interest in the Kinetix CMOS, the next generation in scientific CMOS.
This is a guide to help you prepare for the arrival of the Kinetix, ensuring that the hardware and
software of both your computer and microscope are capable of making the most of the power
of the Kinetix and delivering your desired data. Alongside this, we also include detailed steps
on setting up the Kinetix upon arrival, making the most of your preparations. The sections are
as follows:
1. Pre-Arrival
2. What’s In The Box?
3. Setup
4. Troubleshooting

Pre-Arrival
There are four important questions to ask during pre-arrival:
1. Is my PC running Windows 10?
2. Does my PC have a free x8 or x16 Gen 3 PCIe slot?
3. Does my PC have sufficient specifications to optimally run the Kinetix?
4. Does my microscope have the correct camera mount adapter?
Let’s answer these questions!
1.
Is my PC running Windows 10?
The Kinetix family will
only
run on Windows 10, earlier versions of Windows such as XP, 7, 8,
and 8.1
will not
be able to run the Kinetix.
To find out if you are running Windows 10, go to
Start > Settings > System > About
and you
should see ‘Windows specifications’:

2.
If I want to use the PCIe interface, does my PC have a free x8 or higher
Gen 3 PCIe slot?
The Kinetix features both USB and
PCI Express (PCIe)
ports, and in order to achieve the
maximum speeds of the Kinetix the PCIe interface should be used. Not all computers come
with PCIe interfaces, so we supply a
PCIe interface card
in the Kinetix box, which attaches to
a
PCIe slot
on your computer motherboard and allows you to use PCIe cables with the Kinetix
and achieve maximum speeds.
However, the PCIe card
only fits into size x8 or x16
PCIe slots. If you don’t have an available
slot or only have smaller slots (x1 or x4), then you won’t be able to install the PCIe card, and
won’t be able to use this interface with Kinetix.
As long as you have an
x8 or x16 PCIe slot
and
at least 8 CPU-connected PCIe lanes
available, you can reliably use the included PCIe card. Please check your computer
motherboard for slots in order to use the included PCIe card and maximum Kinetix speeds.
The figure below details the PCIe process for Kinetix (in blue) and some potential pitfalls (in
orange).
If you don’t need to operate the Kinetix at high speed, the alternative is USB. Again, we supply
USB cables and USB interface cards, so please check for PCIe slots if your computer doesn’t
have high speed USB 3.1 Gen 2 slots (10 Gbps data rate).

3.
Does my PC have sufficient processing power (CPU, RAM) and storage
(SSD) to optimally run the Kinetix?
The Kinetix has a
10 megapixel sensor
that can run at up to
500 fps full frame
, meaning it
can put out
5 gigabytes per second
. This is a high data rate and it is important to use the
Kinetix with a sufficiently powerful computer in order to get optimal performance, especially
if looking to do lengthy high speed imaging experiments and rapidly stream data to disk.
We have put together a list of
recommended PC specifications
. If your PC does not match
these, be warned you may
not
be able to operate the Kinetix as intended.
•
OS:
Windows 10 64-bit
only
•
CPU:
3.0 GHz or faster, for example Intel Xeon or Core i5 with 4 or more cores
•
RAM:
32 GB DDR4 or more (2666 MHz 4-channel or 3200 MHz 2- or 4-channel)
•
Storage:
256 GB or larger SATA SSD for OS as a boot drive
oAdditional PCIe/NVMe data storage SSD, e.g. Samsung 960/970 Pro series
oIf streaming to disk, we recommend PCIe RAID controller such as HighPoint
SSD7101A-1 with 4x NVMe SSD in RAID-0 configuration
•
GPU:
1 GB or more, either dedicated PCIe GPU or integrated graphics
•
Motherboard:
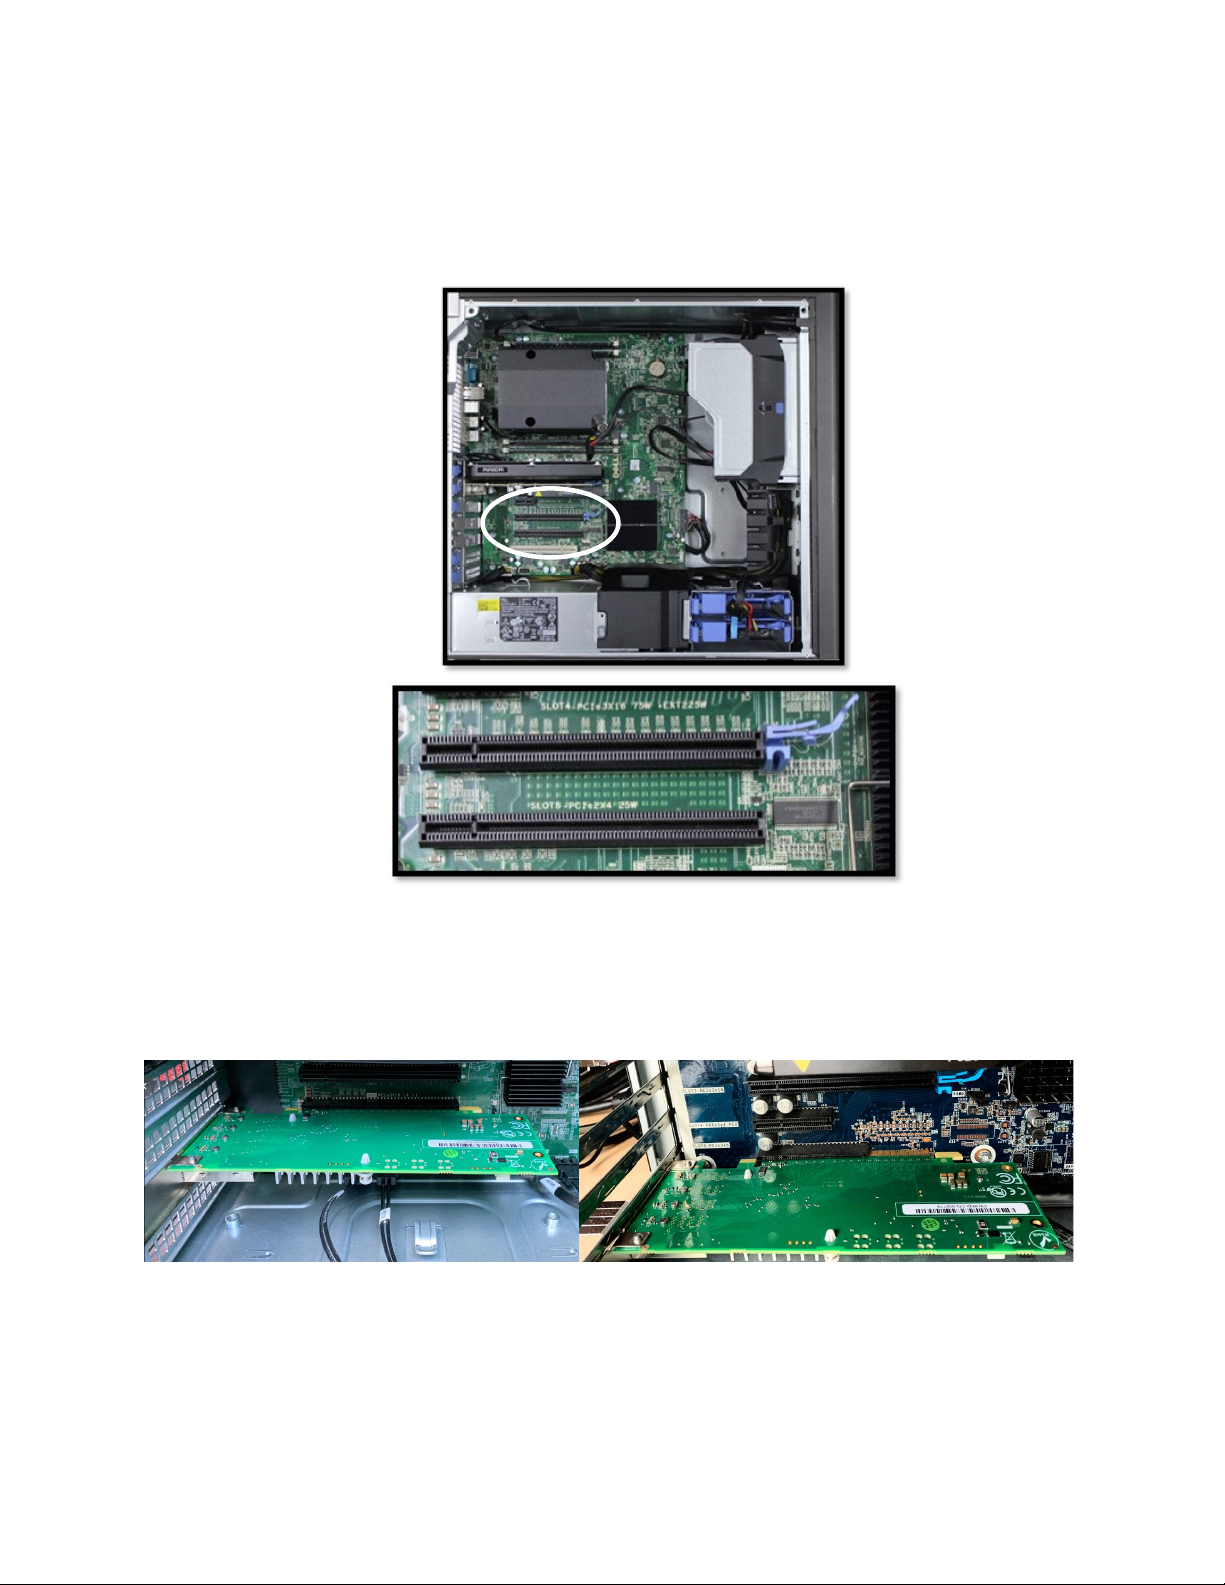
Containing enough slots for both the PCIe interface card and the RAM,
with extra slots for future upgrades optional but useful
•
I/O:
The Kinetix comes with USB 3.2 and PCIe interface cards that will add these I/O
ports. While PCs can feature existing USB and PCIe ports, these may not necessarily
work well with the Kinetix and we recommend the use of the included interface cards
If your PC does
not
meet these specifications it may not be able to operate the Kinetix
optimally. We also recommend several pre-built PC systems which we use for in-house
testing, including the
Dell Precision Tower 5820
and the
HP Z4 G4 Workstation
.
For more information on recommended PC specs, please see our dedicated webpage:
https://www.photometrics.com/support/recommended-pc-specifications

4.
Does my microscope/imaging system have the adapter for the mount I want
to use, either C, F or T?
The
mount
is the interface between the camera and the microscope/imaging system. The
Kinetix supports
C-, F-
and
T-mounts
, thanks to an interchangeable faceplate, but be warned
your microscope will need to have an imaging port with a
suitable adaptor
to mount the
Kinetix. If you have a particular brand of microscope and want to use an F-mount with the
Kinetix, you will need the relevant F-mount adapter.
The mount affects the Kinetix
field of view
, with a C-mount limiting to ~22 mm, while an
F-mount or T-mount can make use of the whole 29 mm Kinetix sensor, depending on the
output of the microscope or imaging system used.
What is the maximum field of view your
microscope can use?
If it is 22 mm or below, we recommend a C-mount or the
Kinetix22
.
For up to 29 mm, use the F- or T-mount with Kinetix.

What’s In The Box?
The box you will receive should contain the following components:
•Kinetix CMOS (with F-mount front plate installed)
•PCIe interface card
•PCIe data cable, 3 m (x2)
•USB 3.2 interface card
•USB 3.2 A to C cable, 90 cm
•USB 3.2 C to C cable, 3 m
•Power supply (12V/10A DC) with international power cord set
•BNC trigger cable
•C-mount front plate
•T-mount front plate
•USB stick containing PVCAM drivers and software
•Quick Installation Guide
Providing the
pre-arrival
steps were completed, the box contains all you need to get imaging!
While unlikely, if items are missing, please contact Teledyne Photometrics Customer Service.

Please note that, as stated in
pre-arrival
, you need to check if the PCIe interface card is
compatible with your computer motherboard, and you also need to check if you have the
correct adapters for the mount type you wish to use with your microscope. Finally, the
computer you wish to use with the Kinetix
must
be running Windows 10.
Here are some additional details about the box contents:
•The Kinetix typically comes with the F-mount attached, while T- and C-mounts are
separate. Swap over to your mount of choice using the faceplate screw threads,
ensuring you have the correct adapter for your microscope or imaging setup.
•The PCIe interface card slots into your motherboard (x8 or x16 PCIe slot
only
), and
comes with four ports (1-4 top to bottom). The two PCIe cables are
both
needed to
operate the Kinetix at maximum speeds, typically plugged into ports 1 and 2.

•The USB 3.2 interface card allows you to use high speed USB ports with your computer,
and we recommend only using the supplied USB interface card, rather than existing
USB ports on your computer. Please bear in mind
only
the PCIe interface can operate
the Kinetix at maximum speeds.
oTwo USB cables are included, a 90 cm A-C cable and a 3 m C-C cable. The
Kinetix has a USB C port, so we give you the choice of USB A or C at the PC end.
oThe USB C-C cable is uni-directional, and only works when the blue end (host)
is plugged into the PC and the red end (sink) is plugged into the Kinetix.
•The BNC cable is used for
advanced hardware triggering
, it plugs into the back of the
Kinetix and comes with eight different cables for input and output hardware triggering,
typically used to synchronise your light source and camera

Setup
Now that you’ve performed your pre-arrival steps and got the box, it’s time to get imaging!
Setup comes in two main sections,
hardware
and
software
, and details everything you need
to get the Kinetix up and running for your imaging experiments.
Software Setup
Teledyne Photometrics cameras use a driver known as
PVCAM
(Programmable Virtual Camera
Access Method) to communicate with the computer. PVCAM
must
be installed on the host
computer before the Kinetix can be used. The USB stick that comes in the box contains the
latest version of PVCAM, or you can download it from our website:
https://www.photometrics.com/support/download/pvcam.
In addition to the camera driver, PVCAM also contains two advanced imaging applications,
PVCamTest
and
VersionInformation
, the former allowing you to test the camera connection
and take live images, and the latter reads firmware information, useful for technical support.
Please note that PVCamTest is
not
software for acquiring images, and should be used for
testing purposes only.
Start by installing PVCAM on your PC, either from the included USB stick or our website:
https://www.photometrics.com/support/download/pvcam

Hardware Setup (when using a PCIe connector)
1. Shut down and unplug your PC.
2. Open your PC case to access motherboard and PCIe slots (circled in white on image).
3. Locate an available
x16 or x8
PCIe slot and install the PCIe interface card, it should slide
into place with minimal resistance, you will hear a click when fully inserted. The below
image shows the PCIe card in a x16 slot (left) and a x8 slot (right, has overlapping pins).
4. Close your PC case and locate the newly available PCIe ports on the card.

5. Insert the two PCIe cables into the
top two ports (1 and 2)
of the PCIe card. The cable
in port 1 should then plug into the
top port (1)
of the Kinetix, and the cable in port 2
should plug into the
bottom port (2)
of the Kinetix.
a. A marker or tape is useful to differentiate the cables in case they are unplugged
in the future. The below image shows an example setup, with the Kinetix on the
left (tape on port 2) and the computer on the right (tape on port 2).
6. Plug the power cable into the Kinetix and a suitable socket, then power on the Kinetix.
The
initialising light
will flash orange, once the flashing stops the Kinetix is ready.
7. Plug in and power on the PC.
8. If the link between PC and Kinetix is successful, there will be
two green LED lights
on
the PCIe card. If one or both lights are
orange
, make sure the cables are connected to
the correct ports and are undamaged.
9. The link can also be confirmed using
PVCamTest
, try to acquire some live images. You
can also check your
Device Manager
and see if your PC has identified a PVCAM device.

If wanting to use a USB connection, install the included USB 3.2 interface card in the same
manner to installing the included PCIe card. The Kinetix only requires one USB cable for
operation, but will not operate at maximum speed.
Imaging In Software
The Kinetix is supported by a range of third party imaging software provided by external
organizations and companies, including
MATLAB
,
Micro-Manager
,
LabVIEW
,
Open CV
,
Python
, and more to come!
Micro-Manager
MicroManager (
µManager
) is open source software for control and automation of imaging
hardware. µManager 2.0 is fully compatible with the Kinetix CMOS camera and can be
downloaded at the following address:
https://micro-manager.org/Download_Micro-Manager_Latest_Release
µManager uses a
configuration file
to control the Kinetix, here’s how to get set up:
1. Make sure the Kinetix and any additional imaging hardware is plugged in, turned on,
and successfully connected to the PC.
2. Open
µManager
, when prompted for a
Hardware Configuration File
, select ‘(none)’.

3. Under the ‘
Devices’
dropdown
menu, choose ‘
Hardware Configuration Wizard
’ and
create a new configuration.
4. You’ll see a list of available devices, go to PVCAM, select ‘
Camera-1
’, and click ‘
Add’
,
then name the device.

5. Add in any additional hardware such as motorized stages, light sources, etc. if needed.
6. Click through ‘
Next’
to add and change additional hardware settings, please note that,
PVCAM devices need no additional settings changing at this stage.
7. Name and save your Hardware Configuration File and put it in an easy to access
location, as you’ll need to select this
.config
file every time you open µManager.
8. The Kinetix is now set up in µManager and you can use the basic functions, such as
changing the exposure and starting an acquisition (in the red square below).
9. For Kinetix specific settings, it is necessary to add ‘
Groups’
for each desired setting.
10. Click the plus symbol next to Group (green square) to see a list of all available
hardware settings for the Kinetix.

11. We recommend first adding ‘
Ports’
as this allows access to the
four modes
of the
Kinetix, namely Speed, Sensitivity, Dynamic Range and Sub-Electron.
12. Select the ‘
Use in Group’
tick box, name the Group, click OK, this adds the Group to
the µManager window.
13. Add any other relevant Groups for settings you wish to control, such as fan speed,
scan direction, triggering, and more.
14. You will also need to add Groups to control aspects of your other imaging hardware
(if included in the config file), such as channels for your light source, etc.
15. By saving the config file, all your Groups will be preserved for the next time you open
µManager.
16. See our full guide on what you can do with µManager here:
https://www.photometrics.com/wp-content/uploads/2020/11/How-to-use-Micro-
Manager-Rev-A2-03112020.pdf

Troubleshooting
•
Why isn’t my Kinetix running at maximum speed in Speed Mode?
In order to get the full 500 fps across the full frame in 8-bit Speed Mode, you will need to use
the PCIe connection (with two cables) with a sufficiently powerful PC. The PC can be a limiting
factor with the Kinetix, so it is vital to have enough RAM and a modern CPU. It is also vital to
consider software limitations and updating to the latest drivers.
Using USB and/or a PC with older parts will limit the data rate of the Kinetix, meaning full speed
will not be achievable. In addition, if you don’t have enough RAM, even opening other
applications can limit the bandwidth available for the Kinetix, and in turn limit the maximum
achievable speed.
If you are using PCIe with a modern PC and still not getting the full speeds, check your imaging
settings and exposure time. The 8-bit Speed Mode is needed for the maximum speeds, and in
order to achieve >1000 fps (>1 kHz) it is necessary to use an exposure time of 1 ms or less.
•
I have orange lights on my PCIe card
When successfully connecting the Kinetix and your host PC, the PCIe card will display two
green LED lights. If these lights are orange it means there is an issue with the connection.
Ensure that the PCIe cables are fully inserted on both the PCIe card and the Kinetix. If removing
the cables to reattach, remember to pull on the green tab, not the wire itself.
Check that the cables are plugged into the top two ports (1+2) on the PCIe card, and each
cable corresponds to the same ports (1+2) on the Kinetix. If lights are still orange, try ports 3+4
on the card (with 3 going to 1 on Kinetix and 4 going to 2). Once you find an orientation that
works, mark the cables. Finally, ensure that the camera was turned on and fully initialised
before the PC was turned on.
Table of contents