King Quest PRO VQ4800 User manual

VQ4800 Owner’s Manual
For DIRECTV®
This manual contains detailed information on your KING Quest Pro.
To start using your KING Quest Pro right away,
see the Quick Reference Guide.


Page 1
Bell TV is an ofcial trademark of Bell Canada.
DIRECTV is a registered trademark of AT&T Intellectual Property.
DISH is a registered trademark of DISH Network L.L.C.
KING is a registered trademark of Electronic Controlled Systems, Inc. which is afliated with neither Bell nor DIRECTV.
KING Quest Pro and Simply better, by design. are trademarks of Electronic Controlled Systems, Inc. which is afliated with neither Bell nor DIRECTV.
TABLE OF CONTENTS
Section Contents Page
1. INTRODUCTION ........................................................2
2. APPLY RUBBER FEET TO ANTENNA UNIT ...................................3
3. SET UP TV AND RECEIVER ...............................................3
4. OPERATION.......................................................... 4-5
5. USING A SECOND RECEIVER .............................................5
6. SWM-ONLY RECEIVER CONNECTIONS .....................................6
7. ROOF INSTALLATION ..................................................8-11
8. TROUBLESHOOTING ...................................................12
9. SECURITY FEATURE ...................................................12
10. ACCESSORIES . . . . . . . . . . . . . . . . . . . . . . . . . . . . . . . . . . . . . . . . . . . . . . . . . . . . . 12-13
11. MAINTENANCE AND SAFETY INFORMATION ...............................14
12. LIMITED WARRANTY ...................................................15
PRODUCT REGISTRATION
To provide ongoing technical support and to better
facilitate warranty processing, please register your product at
kingconnect.com/products/product-registration.
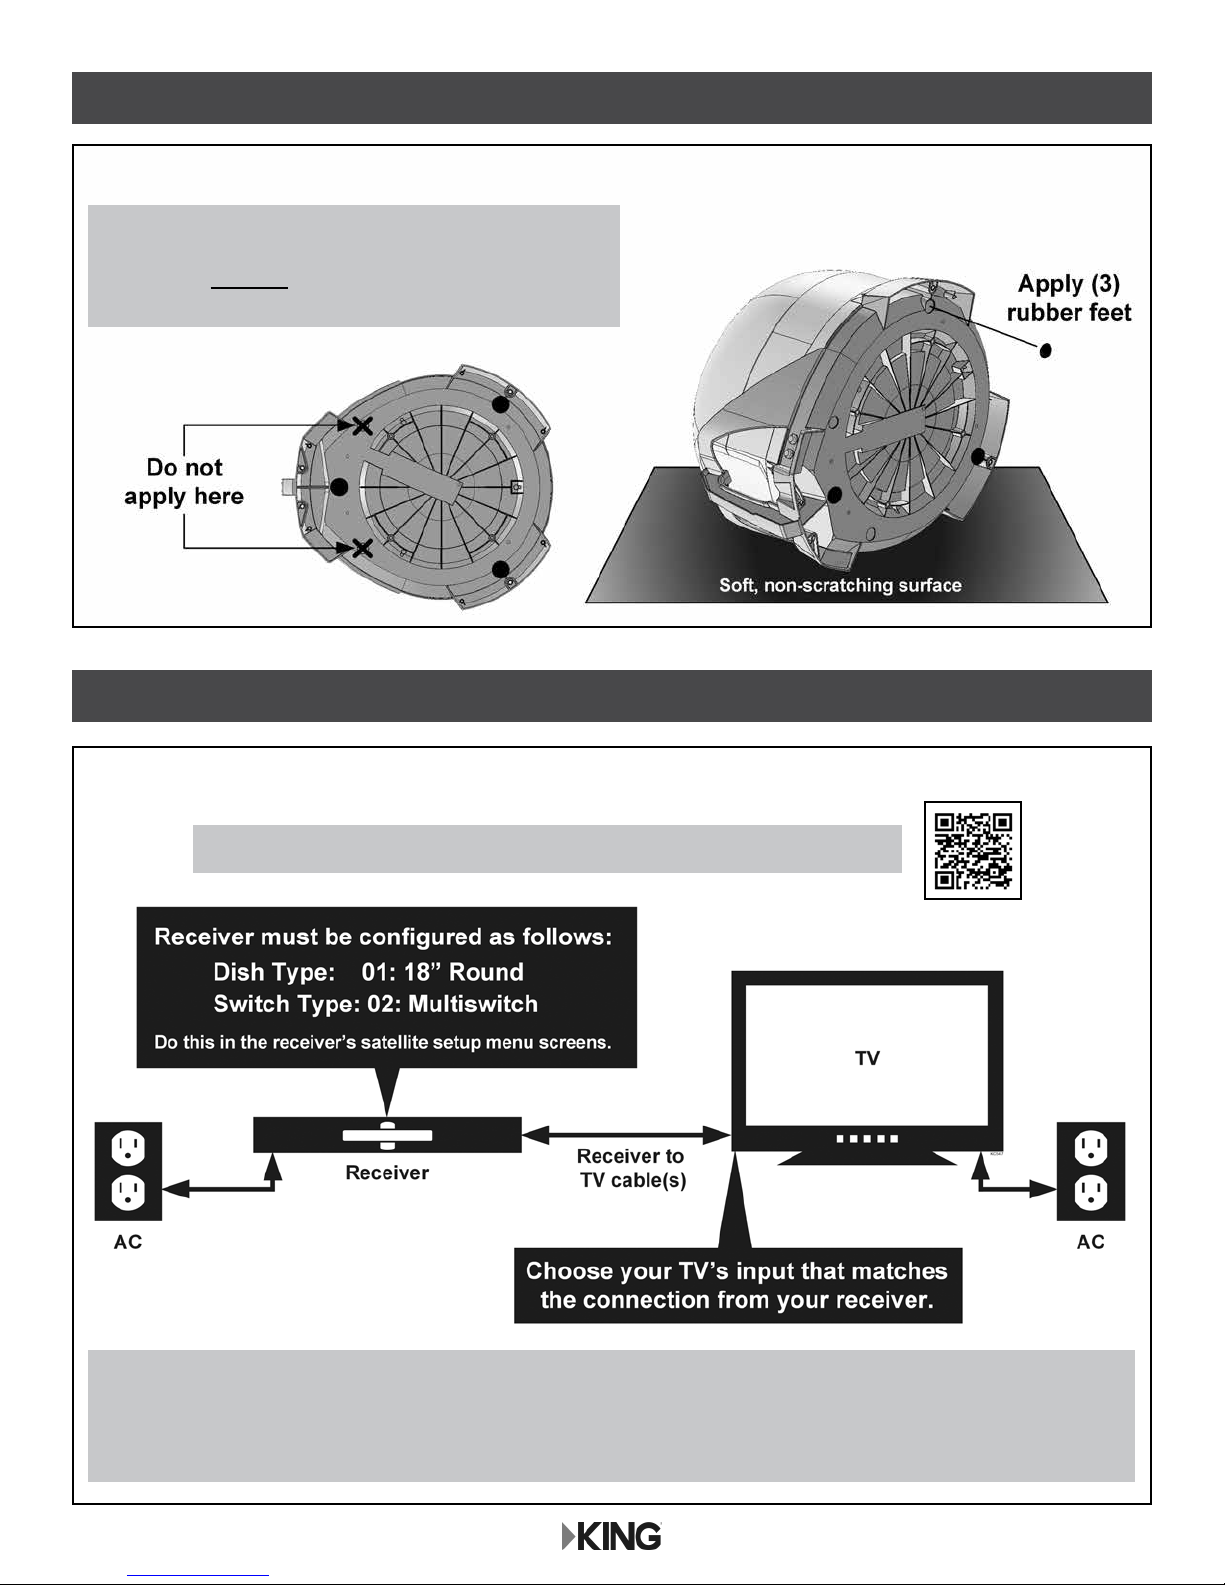
IMPORTANT!
The KING Quest Pro is specically designed to work with the DIRECTV 101 satellite to receive your favorite SD
programming from DIRECTV.
The KING Quest Pro will work with non-SWM receivers, and select SWM-only receivers (see page 2). The use
of SWM-only receivers requires SWM hardware (sold separately - see page 6).
The KING Quest Pro will not receive channels broadcast from DIRECTV’s Ka band satellites at 99° and 103°.
The satellite TV market is expanding and changing. The information in this manual was accurate at the time of
printing. If your KING Quest Pro does not operate as outlined in this manual, please call KING®at
(952) 922-6889 or visit our website at kingconnect.com. KING is not responsible for changes outside of its
control.
Please read this Owner’s Manual thoroughly before using the KING Quest Pro. For additional maintenance
and safety information see section 11.

Page 2
1 INTRODUCTION
Thank you for purchasing a KING antenna!
The KING Quest Pro is specically designed to work with the DIRECTV 101 satellite for SD
programming and nationwide distant network local channels found on the 101 satellite. Other local
area channels are broadcast from either the 101 or 119 satellites via spot beam transponders and
have limited availability outside your immediate local area. If your local channels are broadcast from
the 119 satellite, an optional universal controller KING #UC1000 (sold separately - see page 13)
is required which allows the antenna to automatically switch between the 101 and 119 satellites to
receive those channels.
LEGACY RECEIVERS
The KING Quest Pro is compatible with a variety of DIRECTV legacy receivers including Models D10,
D11, D12, H20, H21, H22, H23, H24, HR20, HR21, HR22, HR23 and HR24.
The connection diagram on page 4 shows how to use your KING Quest Pro with the included Power
Inserter to receive programming from satellite 101.
To nd out more about the KING UC1000 controller which allows you to receive programming from
satellite 119 as well as the 101, contact KING or your local dealer.
SWM-ONLY RECEIVERS
SWM-only receivers such as H25 and higher models are only compatible with the 101 satellite and
require additional SWM hardware which is sold separately (see page 6).
Unbox your KING Quest Pro and verify all components are present.
NOTE: The KING Quest Pro may be used as a portable satellite antenna or as a roof-mounted antenna (see section 7
for roof installation instructions).

Page 3
2 APPLY RUBBER FEET TO ANTENNA UNIT
Lay the antenna unit on a soft, non-scratching surface, and apply the (3) rubber feet.
3 SET UP TV AND RECEIVER
All components
sold separately.
You must congure the receiver as shown above. Once completed, the receiver will default to these settings
unless they are changed.
You must have a DIRECTV programming subscription.
NOTE: For a list of compatible receivers, see kingconnect.com/dtv-receivers.
Set up your TV and receiver.
IMPORTANT!
If you are going to roof mount the antenna unit,
DO NOT apply the rubber feet.
See the roof installation section later in this manual.

Page 4
4 OPERATION
IMPORTANT!
Plug in power supply last.
Do not move antenna unit after
plugging in power supply as the
antenna has begun scanning.
PLEASE BE PATIENT!
The antenna unit may lock onto the satellite in as little as 2 minutes,
but may occasionally take up to 10-15 minutes.
IMPORTANT!
Place power inserter in
an accessible location.
IMPORTANT!
Any tall objects can block
the signal from reaching
the antenna.
Do not overtighten the coax connections.
Do not route the coax cable where it can be tripped on or run over by a vehicle.
Do not put sharp bends or kinks in the coax cable.
Place the antenna unit in a position with a clear view of
the southern sky to scan for the DIRECTV 101 satellite.
Make connections 1-3 in the order shown.
Place the KING Quest Pro on a stable and reasonably level surface with a clear view of the southern
sky. When placing the KING Quest Pro in position, be sure surface is dry and free of loose dirt or sand.
When all connections are made, the antenna will scan for the DIRECTV 101 satellite.
When the satellite is found, your programming will appear. Enjoy!
The KING Quest Pro is not programmed to lock onto the 119 satellite, so you will not receive your local channels
if they are broadcast from the 119. If you wish to receive programming from the 119 as well as the 101, you can
replace the power inserter with the KING UC1000 Controller (sold separately - see your dealer or our website
kingconnect.com for details.)

Page 5
You can connect a second receiver and TV to the AUX port on the antenna unit.
5 USING A SECOND RECEIVER
Second receiver must be congured the same as
the main receiver (see section 3, page 3).
Second receiver must not be a SWM-only receiver.
If your main receiver has a second “satellite in” port and built-in DVR, you can connect this input to the AUX
port to record programs on a different channel than the one you are watching.
All components sold
separately.
If you wish to start a new scan (for example, the unit gets moved and you lose reception):
Pressing the power inserter’s RESET button is the preferred method to start a new scan, but there are two
alternate methods as well:
• Disconnect and reconnect the coax from the MAIN port on the antenna unit.
• Press the RESET button on the receiver (this option works for select receivers only, such as
models D12, H24 and HR24).

Page 6
6 SWM-ONLY RECEIVER CONNECTIONS

Page 7
This page intentionally left blank.

Page 8
7 ROOF INSTALLATION
1. Make sure you have the following tools and materials before starting.
ANTENNA UNIT LOCATION (See Illustration on next page)
2. Select an area on the roof for the antenna unit and the location where the wiring will enter the
vehicle through the roof to the satellite receiver inside using the following criteria:
• A shorter distance between the antenna unit and the satellite receiver is most desirable.
• Make sure you have enough room to mount the antenna unit.
• The antenna unit should be mounted on the center line of the vehicle, and not tilted more
than 2 degrees in any direction.
• There must be no “line of sight” obstructions. Air conditioning units, other antennas, and
storage areas that are too close to the antenna unit may prevent the satellite signal from
reaching the antenna unit.
• Mount the antenna unit with the handle to rear of the vehicle.
NOTE: Many RVs are prewired with RG-6 coax cable for satellite antennas. Contact the manufacturer of your RV or
your local RV dealer to verify where this cable is located.
If prewired, run the existing coax cable from the prewire location in the roof to the antenna unit. When
choosing the antenna unit location, make sure the prewiring will reach the antenna unit.
If you wish to semipermanently mount the antenna unit (allowing you to remove it for use as a portable) you can mount
it with the MB600 removable feet or the MB700 Quick Release Roof-Mount Kit (see page 13).

Page 9
HEIGHT OF
OBSTRUCTION
APPROXIMATE MINIMUM DISTANCE
TO EDGE OF ANTENNA UNIT
10” 8”
11” 10”
12” 12”
13” 14”
14” 16”
15” 18”
16” 20”
ANTENNA UNIT LOCATION

Page 10
3. If the rubber feet have been installed,
remove them from the bottom of the unit.
DO NOT INSTALL UNIT ON ROOF
WITH RUBBER FEET IN PLACE.
4. Apply roof-compatible sealant to roof around
entire area where fasteners will penetrate
the roof. Mount the antenna unit using the
(4) mounting holes. After mounting unit, seal
fastener heads with roof-compatible sealant.
5. Connect one end of 50 foot coax cable to the MAIN port and tighten connection (see below).
DO NOT OVERTIGHTEN.
If using a second receiver, connect end of second coax (sold separately) to the AUX port.
Tighten connection. DO NOT OVERTIGHTEN.
The installer is responsible for determining the most appropriate fasteners to secure the antenna unit to the roof.
Depending on the roof material, fasteners such as lag screws, well nuts, sheet metal screws, toggle bolts and
T anchors may be used, and should always be used in combination with a roof-compatible sealant.
IMPORTANT! The installer is responsible for weatherproong all holes (except drain holes) with sealant.
IMPORTANT!
Coax connections should be snug.
DO NOT OVERTIGHTEN!
There are two coax ports on the back of the antenna unit. The one labeled “MAIN” MUST be connected to the main
receiver in vehicle. The one labeled “AUX” can be used for an additional receiver if desired.

Page 11
6. Run coax from the antenna unit to the roof edge, then along edge to location where coax will
be fed into the vehicle. If installing an optional second receiver, run second coax to location
where it will enter the vehicle. Secure (both) coax to roof every 12-18 inches (see below).
7. Drill 3/4” hole through the roof and into the cabinet where receiver is stored. Feed coax down
through hole. Seal opening with roof compatible sealant so that it is completely waterproof
(inside and outside of the 3/4” hole). Repeat for second coax if present.
8. Inside vehicle, make connections 1-3 in order shown below.
You can cut the coax to length but you must
terminate the coax with Snap-n-Seal Connectors.
IMPORTANT!
Plug in power supply last.
Antenna begins scanning when
power supply is connected.
IMPORTANT!
Place power inserter in a convenient
and accessible location.
AUX coax connects directly to second receiver (see page 5).
Do not overtighten the coax connections.
Do not put sharp bends or kinks in the coax cable.
IMPORTANT!
Roof hole(s) for wiring must be sealed
so they are completely waterproof.
Sealant must be roof-compatible.
The CE2000 Cable Entry Cover provides a
watertight seal where cables
penetrate the roof.
See the satellite antenna
accessories page at
kingconnect.com.

Page 12
The KING Quest Pro can be secured to an object
by looping a cable thru the handle.
Cable sold separately.
8 TROUBLESHOOTING
9 SECURITY FEATURE
SYMPTOM POSSIBLE CAUSE COURSE OF ACTION
Antenna unit does not scan for
satellites.
No power to antenna unit.
Antenna unit needs to be reset.
Make sure antenna unit is connected to power inserter.
Make sure power inserter is powered (LED will be lit).
Press RESET on power inserter.
Antenna unit scans but no picture
on TV.
Improper connections made. Make sure antenna unit is connected to power inserter, and
power inserter is plugged in.
Make sure powered receiver is connected to power inserter
and TV.
Antenna unit scans but does not
nd satellite.
Line of sight obstruction. Move antenna unit to have a clear view of the southern sky.
Press RESET on power inserter to start a new scan.
Picture on TV goes in and out. Temporary obstruction of signal. Heavy rain or snow may cause loss of signal. Reception
will improve as weather clears.
Make sure nothing is temporarily blocking view to the
southern sky (like tree branches blowing in the wind).
10 ACCESSORIES (Sold separately - see kingconnect.com/products/accessories)
NOTE:
The optional KING Controller can be used as
an alarm to deter theft as well (see next page).
Allows you to position
your KING Quest
Pro almost anywhere
for best line of sight
to satellite. Keeps
antenna off the
ground away from
moisture.
KING Quest Pro
ts securely inside.
Features include
zippered cover, foam
padding, carry handles
and pockets for
cables, receiver and
remote.
TR1000
Tripod Mount
CB1000
Carry Bag
KING Quest Pro not included. KING Quest Pro not included.

Page 13
10 ACCESSORIES (Sold separately - see kingconnect.com/products/accessories)
UC1000
Multiservice Controller and Alarm
Allows hanging of antenna unit on vehicle
window or included hanger bracket.
For stationary use only.
Vehicle must not be in motion while antenna
unit is on window or hanger bracket.
MB500
Mounting Bracket
KING Quest Pro not included.
The KING Quest Pro is not compatible
with the MB100 Mounting Bracket.
Use of the MB100 will void warranty.
The use of any unauthorized
mounting bracket will void warranty.
MB160
Mounting Bracket
KING Quest Pro not included.
Allows you to easily use
your KING Quest Pro as
either a roof-mounted or
portable antenna.
The MB600 removable mounting feet allow semipermanent
mounting of your KING Quest Pro on your vehicle roof.
MB600
Removable
Mounting Feet
MB700
Quick Release
Roof-Mount Kit
KING Quest Pro not included.
Enables the antenna unit to work with DIRECTV satellite 119
as well as the 101, and with DISH® or Bell TV™ services
(with paid programming subscription).
Sounds an alarm if the coax is disconnected from the
antenna unit (antenna unit must be on or in sleep mode).
CAUTION! Do not use with the power inserter. If power
inserter is present, remove before adding the controller.

Page 14
SAFETY INFORMATION
1. Keep this Owner’s Manual and the included Quick Reference Guide in a safe place for future
reference.
2. Follow all instructions and warnings. Set up and operate the KING Quest Pro in accordance
with the instructions.
3. Always handle the KING Quest Pro product carefully. Do not drop the KING Quest Pro. Avoid
excessive shock or vibration to the KING Quest Pro.
4. Use caution when carrying the KING Quest Pro. Always carry the KING Quest Pro by the
handle.
5. Do not operate near any indoor or outdoor heat source such as radiators, heat registers,
stoves, barbecues, campres, or other items that produce heat.
6. Do not stack the KING Quest Pro on top of or below other electronic devices as this can cause
heat buildup or block the satellite signal from reaching the KING Quest Pro.
7. Keep the enclosure clean from dirt, bugs, and other debris by hand washing with mild soap
and water.
8. Do not power wash the KING Quest Pro. Do not submerge the KING Quest Pro or place in
standing water.
9. To avoid risk of electrical shock, unplug the power inserter before connecting the KING Quest
Pro in damp or wet conditions.
10. Do not remove the cover of the KING Quest Pro without prior authorization. Doing so will void
the Limited Warranty.
11. Do not coat or paint the KING Quest Pro with any substance.
12. Tighten all of the coax cable connections only by hand. If you use a wrench, you may over
tighten the connections and damage your equipment.
13. Servicing may be required if the unit has been dropped or damaged in any way or if the unit
does not operate normally. Call KING Customer Service at (952) 345-8147.
The KING Quest Pro has been designed to be maintenance and trouble free. If not using the KING
Quest Pro for long periods of time, it is recommended that you set up the system on a quarterly basis
(every three months) to keep all moving parts of the KING Quest Pro in good working order.
If you have any comments or questions, please contact KING Customer Service at (952) 345-8147,
or by email at [email protected].
11 MAINTENANCE AND SAFETY INFORMATION

Page 15
12 LIMITED WARRANTY
KING Quest Pro Satellite Antennas are thoroughly inspected and tested before leaving the factory, and are covered by the following
limited warranty from the date of original purchase:
• Two-year parts warranty: The customer is not responsible for the cost of replacement parts if the original part is determined to be
defective under the terms of the warranty. The customer is responsible for the cost of replacement parts after two years.
• One-year labor warranty: The customer is not responsible for labor costs to repair unit if labor is performed within the labor
warranty period. The customer is responsible for all labor costs after one year.
Only KING and certied dealers may perform warranty evaluations and repairs. Depending upon the problem, KING may authorize a
dealer to perform the necessary repairs. Any warranty labor outside of that performed at the factory is not covered unless 1) the product
has been installed by an authorized dealer/installer or OEM manufacturer and 2) the dealer/installer receives prior authorization to
perform the repair.
A certied dealer must not perform any repair without rst contacting KING for a Service Order Number. KING will advise the dealer on
how to proceed with any repairs.
Should any trouble develop during the warranty period, contact KING at (952) 922-6889. You must contact KING before the warranty
period expires. The customer must supply proof of purchase (such as a dated sales receipt) when requesting warranty service. If the
customer cannot supply proof of purchase, warranty period shall start 30 days after date of manufacture.
If it is determined that the unit needs to be returned to KING, customer must return COMPLETE product, freight prepaid, to:
KING, 11200 Hampshire Avenue South, Bloomington, MN 55438-2453.
If inspection shows the trouble is caused by defective workmanship or material, KING will repair (or at its option, replace) without
charge.
When returning product, KING will supply an RMA number (Return Merchandise Authorization). This number must be clearly written
on the box. Failure to clearly write RMA number on box may result in delays in processing claim. Along with product, customer should
include in the box: his/her name, address, daytime phone number, proof of purchase and description of the problem.
This warranty does not cover installation and external wiring, or remanufactured units. This warranty does not cover damage caused
by the use of an accessory other than a KING accessory designed for the product. This warranty is not transferable from the original
owner.
Due to the expanding and changing TV market, KING cannot be held responsible for changes made to satellite services. Software
updates to address such issues are not covered under warranty.
This warranty also does not apply where:
• The product has been abused, misused, improperly installed or improperly maintained.
• The product has been used with an accessory other than a KING accessory designed for the product.
• Repairs have been made or attempted by others that are not certied by KING to do such repairs.
• Repairs are required because of normal wear and tear.
• Alterations have been made to the product.
• The product or any associated component has been opened without authorization or disassembled to any degree.
• Damage has been caused by power washing.
• Circumstances beyond the control of KING cause the product to no longer operate correctly.
• Customer is not the original owner.
In no event shall KING be liable for any indirect, incidental, or consequential damages from the sale or use of the product. This
disclaimer applies both during and after the term of the warranty.
KING disclaims liability for any implied warranties, including implied warranties of “merchantability” and “tness for a specic purpose,”
after the term of the warranty.
This warranty gives you specic legal rights, and you may also have other rights, which vary from state to state. Some states do not
allow the exclusion or limitation of incidental or consequential damages, so the above limitation or exclusion may not apply to you.
Some states do not allow limitations on how long an implied warranty lasts, so the above limitation may not apply to you.

Page 16
NOTES:


11200 Hampshire Avenue South, Bloomington, MN 55438
PH 952.922.6889 || FAX 952.922.8424 || kingconnect.com
© 2017 KING
22977 Rev A
Simply better, by design.
™
Table of contents
Other King Quest Antenna manuals
Popular Antenna manuals by other brands

Hy-Gain
Hy-Gain 28 FM instruction manual

Bricon
Bricon GSM interface user guide

Philips
Philips SDV9201K Specifications

Philips
Philips MANT901 user manual

Texas Instruments
Texas Instruments Tag-it RI-K01-320A reference guide

Directive Systems & Engineering
Directive Systems & Engineering DSE3319LYAK quick start guide