Kinova Gripper adapter KR11703-01 User manual

5 | kinovarobotics.com
Installation Guide
KINOVA®Gripper
adapter kit

Contents
About this document......................................................................................................................................................4
Symbols and definitions................................................................................................................................................5
Acronyms and Abbreviations......................................................................................................................................6
Safety and warnings.......................................................................................................................................................7
Warranty............................................................................................................................................................................. 8
Disclaimer............................................................................................................................................................................9
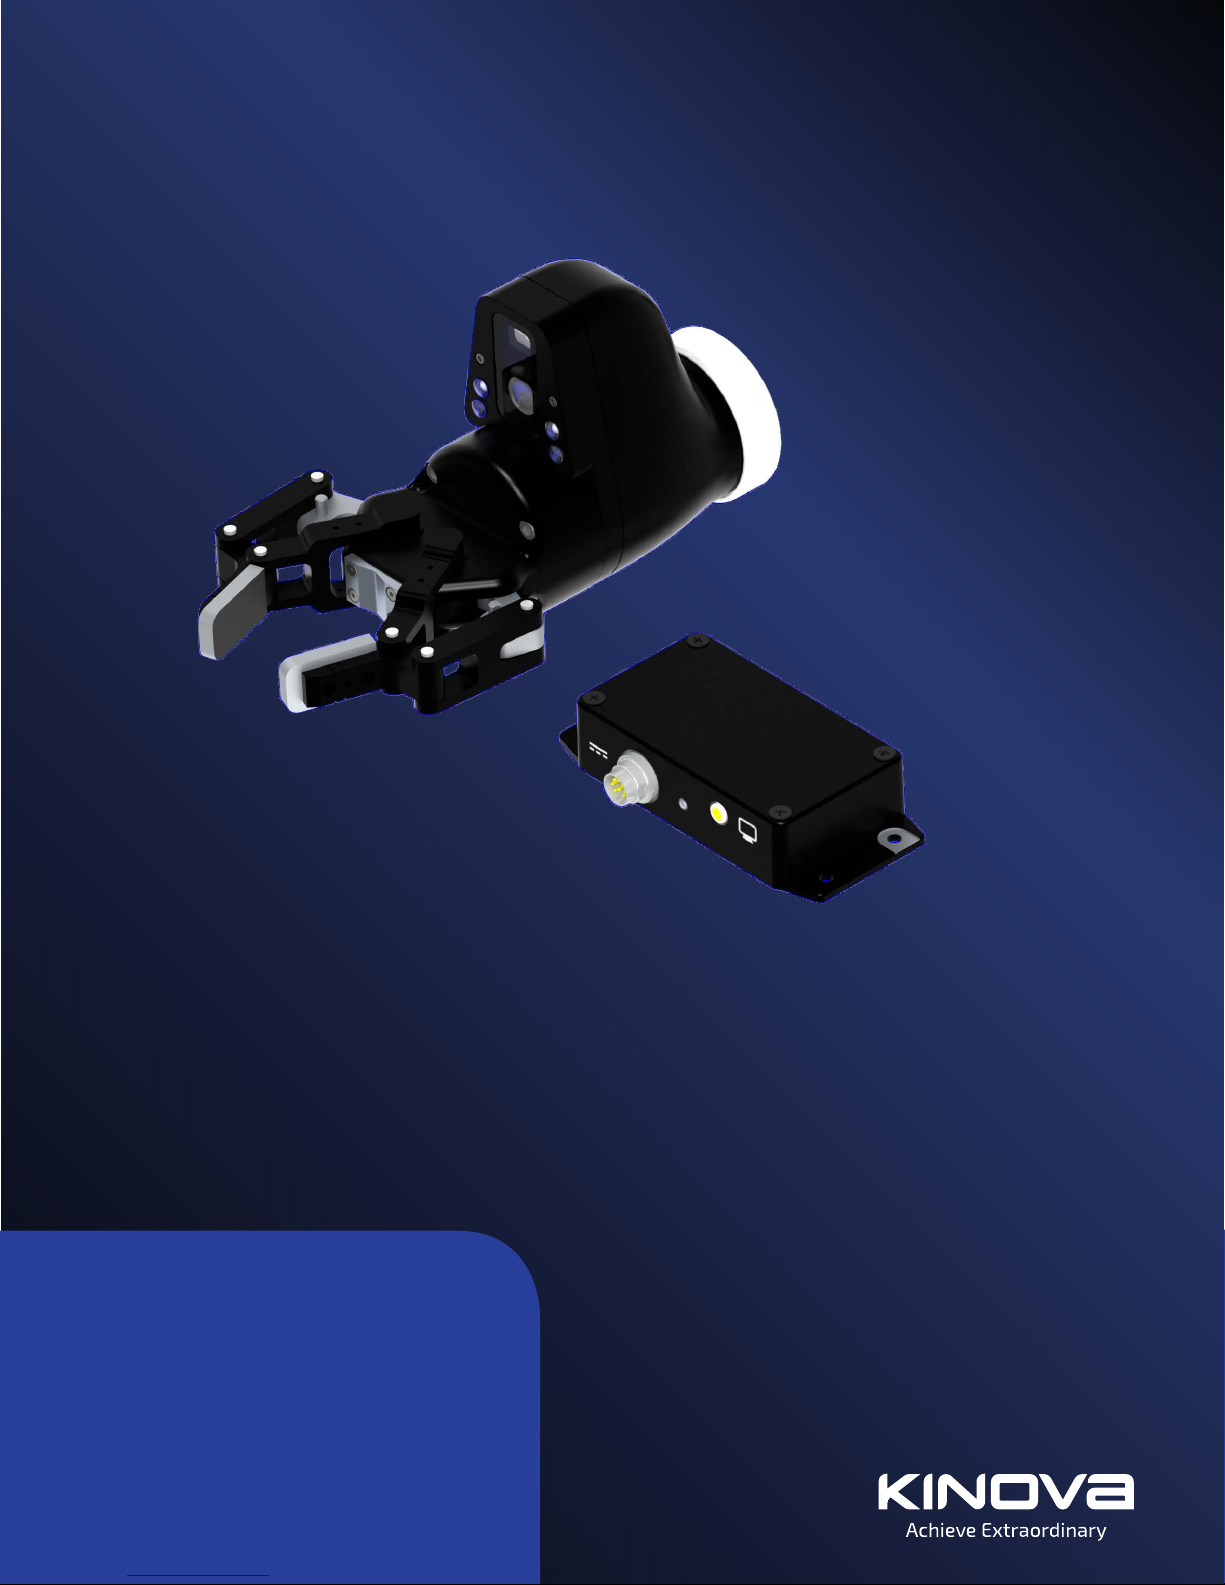
What's in the box?.........................................................................................................................................................10
Gripper adapter kit overview......................................................................................................................................11
Gripper adapter module...........................................................................................................................................................11
Camera module overview...........................................................................................................................................12
Laser overview................................................................................................................................................................... 12
Light sources overview.................................................................................................................................................13
Video adapter................................................................................................................................................................................. 13
Robot to video adapter cable...................................................................................................................................13
Connecting video adapter and Kinova joystick using splitter cable (Optional)......................... 14
Robotiq gripper................................................................................................................................................................16
Installation.........................................................................................................................................................................17
Kinova gripper removal........................................................................................................................................................... 17
Installing the gripper adapter..............................................................................................................................................17
Install a Robotiq gripper on the gripper adapter................................................................................................... 18
Installing the video adapter................................................................................................................................................ 20
Viewing the video adapter output.................................................................................................................................. 20
Adjusting the laser angle....................................................................................................................................................... 21
Controlling gripper and gripper adapter.............................................................................................................. 23
Controlling the gripper and gripper adapter with KINOVA® Communication system
gamepad (Optional)............................................................................................................................................................ 23
Controlling the gripper and gripper adapter using Xbox gamepad................................................23
Controlling the Robotiq gripper with the Kinova joystick.................................................................................27
Controlling the Robotiq gripper and gripper adapter using the Kinova robot C++ API................. 28
Normal use definition..................................................................................................................................................29
Markings and labels.....................................................................................................................................................30

Electromagnetic interference from RF sources..................................................................................................31
Disposal considerations...............................................................................................................................................32
Contacting support........................................................................................................................................................33

KINOVA® Gripper adapter kit Installation Guide 4
About this document
This document contains information on the installation and operation of the KINOVA®
Gripper adapter.
Read all instructions before using this product.
Read all warnings on the product and in this guide.
Follow all instructions.
Keep these instructions for future reference.
This document contains information regarding product setup and operation. It is intended for:
• Kinova product end users
• Field service, customer support and sales employees of authorized Kinova distributors

KINOVA® Gripper adapter kit Installation Guide 5
Symbols and definitions
Important information regarding product safety.
Direct current.
Compliance with WEEE2 directive.
Compliance with ROHS3 directive.

KINOVA® Gripper adapter kit Installation Guide 6
Acronyms and Abbreviations
fps
frames per second
IR
Infrared
LED
Light-emitting diode
NTSC
National Television System Committee
PAL
Phase Alternating Line
ROHS3
Restriction of Hazardous Substances Directive 2015/863/EU
WEEE2
Waste Electrical & Electronic Equipment Directive 2012/19/EU

KINOVA® Gripper adapter kit Installation Guide 7
Safety and warnings
Do not open the chassis of the video adapter. The adapter is only to be opened by Kinova
trained and certified service professionals.
To avoid the possibility of serious damage to eyesight, do not look directly at the gripper
adapter laser beam.
Read the documentation from Robotiq for the gripper and observe all recommended safety
precautions listed therein.
Ensure that the ground connector of the video adapter is connected to ground.

KINOVA® Gripper adapter kit Installation Guide 8
Warranty
This section describes the Kinova warranty terms.
Subject to the terms of this clause, Kinova warrants to End User that the Products are free of
defects in materials and workmanship that materially affect their performance for a period of
two (2) years from the date Kinova ships the Products to the End User ("Delivery Date").
Kinova agrees to repair or replace (at Kinova's option) all Products which fail to conform to the
relevant warranty provided that:
1. notification of the defect is received by Kinova within the warranty period specified above;
2. allegedly defective Products are returned to Kinova, (at the End User’s expense, with
Kinova's prior authorization) within thirty (30) days of the defect becoming apparent;
3. the Products have not been altered, modified or subject to misuse, incorrect installation,
maintenance, neglect, accident or damage caused by excessive current or used with
incompatible parts;
4. the End User is not in default under any of its obligations under this Agreement;
5. replacement Products must have the benefit of the applicable warranty for the remainder of
the applicable warranty period.
If Kinova diligently repairs or replaces the Products in accordance with this section, it will be
deemed to have no further liability for a breach of the relevant warranty.
Allegedly defective Products returned to Kinova in accordance with this contract will, if found
by Kinova on examination not to be defective, be returned to the End User. Kinova may charge a
fee for examination and testing.
The warranty cannot be assigned or transferred and is to the sole benefit of the End User.
Where the Products have been manufactured and supplied to Kinova by a third party, any
warranty granted to Kinova in respect of the Products may be passed on to the End User.
Kinova is entitled in its absolute discretion to refund the price of the defective Products in the
event that such price has already been paid.

KINOVA® Gripper adapter kit Installation Guide 9
Disclaimer
KINOVA® and Kinova’s logo are trademarks of Kinova inc., herein referred to as Kinova. All
other brand and product names are trademarks or registered trademarks of their respective
owners.
The mention of a product name does not necessarily imply an endorsement by Kinova. This
manual is furnished under a lease agreement and may only be copied or used in accordance with
the terms of such lease agreement. Except as permitted by the lease agreement, no part of this
publication may be reproduced, stored in any retrieval system, or transmitted, in any form or
by any means, electronic, mechanical, recording, or otherwise, without prior written consent of
Kinova.
The content of this manual is furnished for informational use only and is subject to change
without notice. It should not be construed as a commitment by Kinova. Kinova assumes no
responsibility or liability for any errors or inaccuracies that may appear in this document.
Changes are periodically made to the information herein and will be incorporated into new
editions of this publication. Kinova may make improvements and/or changes to the products
and/or software programs described in this publication at any time.
Any questions or comments concerning this document, the information it contains or the
product it describes may be sent to Kinova via the support page of the Kinova website:
www.kinovarobotics.com/support
Kinova would like to thank you for your contribution, while retaining the right to use or
distribute whatever information you supply in any way it believes appropriate (without
incurring any obligations to you).

KINOVA® Gripper adapter kit Installation Guide 10
What's in the box?
This section describes the contents of the KINOVA® Gripper adapter kit.
The KINOVA® Gripper adapter kit ships with the following items:
• gripper adapter module
º p/n KR11703-01 (PAL) or
º p/n KR11703-02 (NTSC)
• video adapter (p/n KR11716)
• monitor RCA-RCA video cable (p/n 008177)
• robot to video adapter cable (p/n EH 01M8 0006)

KINOVA® Gripper adapter kit Installation Guide 11
Gripper adapter kit overview
This section describes the Gripper adapter kit.
The KINOVA® Gripper adapter module is a peripheral designed for use as an integated part of
the KINOVA® Remote roboc manipulaon system. The system allows remote manipulation of
objects using an adapted robot arm (KINOVA® Gen2 Ultra lightweight robot) and gripper with a
gamepad controller over an intervening communication network and aided by a built-in camera
and other components in the gripper adapter.
The gripper adapter is offered for existing Kinova robot customers as part of this standalone
installation kit to expand the capabilities of the Gen2 Ultra lightweight robot.
This gripper adapter kit augments the robot with the ability to integrate a 2-finger 85 mm
Robotiq Gripper (sold separately - p/n KR ROB 0085) as end effector. The gripper adapter also
incorporates an integrated video camera, LED lights and positioning laser. When combined with
a communication network (KINOVA® Communicaon system, sold separately) and an optional
user-supplied video transmission system, users can perform video-guided remote manipulation
of objects.
Gripper adapter module
This section describes the gripper adapter module.
The gripper adapter module enables the integration of a 2-finger 85 mm Robotiq gripper onto a
Gen2 Ultra lightweight robot. The gripper adapter is located between the end of the robot and
the gripper.
Figure 1: Gripper adapter kit components

KINOVA® Gripper adapter kit Installation Guide 12
Figure 2: Gripper adapter module
The gripper adapter module includes the following integrated devices:
• video camera
• positioning laser
• four illumination LEDs (two white-light, two infrared)
The gripper adapter and its devices receive power and control signals from the robot. The
gripper adapter also transmits power and control signals to the attached gripper.
Camera module overview
This section outlines the features of the camera module.
The camera module has the following features:
• PAL or NTSC composite video output (using video adapter)
• wide field of view > 100°
Laser overview
This section explains the features of the integrated tilting laser.
The pupose of the laser is to provide positioning guidance for any gripper-held tool. The tilting
laser improves user depth perception and targeting, improving overall gripper manipulation. Its
range extends from the tip of the gripper to 50 cm in front of it. At the tool tip, the laser beam
diameter is less than 2.5 mm.

KINOVA® Gripper adapter kit Installation Guide 13
The laser angle can be adjusted mechanically on the back of the gripper adapter module
using a 2.5 mm hex key, and ranges from horizontal (with respect to the gripper fingers) to
approximately 30° below the horizontal.
The laser can be switched on using the KINOVA® Communicaon system gamepad.
Light sources overview
This section describes the light sources used for illumination.
The gripper adapter module includes four LED light sources for illumination purposes. At night
or in other low-light situations, they make it easier to visualize objects when using the video
camera.
There are four sources of illumination:
• two visible-spectrum LEDs (cool white light, 9000 K color temperature)
• two IR LEDs (infrared spectrum, 860 nm wavelength)
The light sources can be controlled using the gamepad in the KINOVA® Communicaon system.
Using the gamepad, the IR LEDs and white light LED intensities can be adjusted in steps from off
up to full intensity.
Video adapter
This section describes the features of the video adapter.
The video adapter converts the camera's differential video signals into a single-ended PAL or
NTSC composite video signal which is output on the RCA connector on the side of the video
adapter. It is mounted close to the arm support and is powered via a second cable connected to
the expansion port of the robot base.
Figure 3: Video adapter
Robot to video adapter cable
This section describes the robot to video adapter cable.
The robot to video adapter cable conveys the differential video signal and the power to the
video adapter.

KINOVA® Gripper adapter kit Installation Guide 14
The cable connects the joystick / expansion connector of the robot to the power connector of
the video adapter, and provides the differential video signal as well as the power to the video
adapter.
The video stream is accessible from the video adapter via the RCA composite video output.
Figure 4: Robot to video adapter connection
Connecting video adapter and Kinova joystick using splitter cable (Optional)
This section describes how to connect the video adapter and a Kinova joystick to the robot
using an optional splitter cable.
The video adapter connects to the robot via the joystick / expansion connector on the arm.
This connector can also used for connecting the Kinova joystick controller that comes with
the KINOVA® Gen2 Ultra lightweight robot. If you want to control the robot using the Kinova
joystick while the video adapter is connected, this is possible using an optional splitter cable
(Sold separately from the robot, P/N EH 0M15 0001 R1.2).
One end of the splitter cable connects to the robot joystick / expansion connector via a Lumberg
0331 08-1 (8-pin male) connector. At the other end the cable branches to give two Lumberg
0321 09-1 (8-contact female) connectors. This provides connection points for the Kinova
joystick cable and the robot to video adapter cable to connect just as they would with the robot
base joystick / expansion port.

KINOVA® Gripper adapter kit Installation Guide 15
Figure 5: Use of splitter cable
Note: Using the Kinova joystick, it will only be possible to control the movement of the robot
and the opening and closing of the Robotiq gripper. The positioning laser, and light sources will
NOT be controllable using the Kinova joystick alone.
Note: The separate KINOVA® Communicaon system allows the arm, gripper, and gripper
adapter devices to be controlled using an Xbox One gamepad and communication adapter. This
includes the option of tele-operation. Contact your Kinova representative for more details
about the KINOVA® Communicaon System.

KINOVA® Gripper adapter kit Installation Guide 16
Robotiq gripper
This section describes the features of the Robotiq gripper.
The gripper adapter provides a means to connect a Robotiq 85 mm 2-finger gripper to a Gen2
Ultra lightweight robot. The gripper is integrated mechanically and electronically with the robot
via the gripper adapter.
Figure 6: Robotiq 2-finger 85 mm gripper
When combined with the KINOVA® Communicaon System, the two gripper fingers can be
controlled along with the robot and devices on the gripper adapter using a single controller
device and adapter. This allows for grasping of objects (gripper opening has a width of 85 mm).

KINOVA® Gripper adapter kit Installation Guide 17
Installation
Kinova gripper removal
This section describes the procedure to remove the standard gripper from a Gen2 Ultra
lightweight robot.
Before you begin
Ensure that the arm is powered down before beginning. You will need a 2 mm hex
key, and the procedure will require touching the actuators; it is recommended that you
wear an anti-static wrist strap to protect against ESD damage to the actuator electronic
circuitry.
About this task
Removing the gripper is the first step to replacing a malfunctioning gripper or installing a
different type of end effector. This procedure requires about 10 minutes to complete.
Procedure
1. Locate the last actuator at the end of the robotic arm.
2. Remove the plastic ring covering the actuator to expose the aluminum ring on either side
of the actuator. You will see two sets of six evenly-spaced screws, one on each side of the
actuator.
3. Remove the six screws on the output side of the actuator (the side toward the gripper).
Note: Make sure to preserve the screws. You will need them to attach the gripper adapter,
and also if you want to reattach the Kinova gripper later on.
Note: Removing the screws on the other (input) side of the actuator will detach the last
actuator from the arm shell. This is not necessary for removal of the gripper.
4. Gently pull the gripper away from the wrist.
Note: Do not pull too hard. There is a flex cable connecting the last actuator to the gripper,
and you might break the cable if you pull too hard.
5. Detach the flex cable from the Kinova gripper. There may be glue holding the cable in place -
remove the glue, then pull out the small tabs on the side of the connector to loosen the cable.
Pull the cable free from the connector to fully disconnect the gripper from the flex cable.
Note: Keep the other end of the flex cable connected to the last actuator on the arm. You
will need this later to connect the new gripper.
Installing the gripper adapter
This section describes the procedure to install the gripper adapter on the robot.
Before you begin
It is assumed that you have already removed the standard gripper that was previously
mounted on the robot before starting.
About this task
This procedure allows you to install the gripper adapter onto the Gen2 Ultra lightweight
robot. To install the gripper adapter, it will be necessary to:
• mechanically secure the gripper adapter on the robot
• electrically connect the gripper adapter to the last actuator of the robot using a flex cable

KINOVA® Gripper adapter kit Installation Guide 18
Procedure
1. Bring the open bottom end of the gripper adapter (opposite from the gripper) close to the
end of the robot.
2. On the last actuator of the robot, locate the flat flex cable should already be connected to
the exposed face of the last actuator on the robotic arm. (This would previously have been
connecting the last actuator to the standard gripper)
3. Locate the flex cable connector on the inside face of the gripper adapter.
4. Connect the free end of the flex cable to the flex cable connector inside the gripper adapter.
Pull open the tabs on the side of the connector, insert the end of the cable, and then close the
tabs to secure the cable in the connector.
Note: Ensure the blue side of the flex cable is not facing up in the cable connector. If the
cable is inserted the wrong way you may damage the gripper and gripper adapter.
5. With the flex cable connected, slide the shell on the bottom of the gripper adapter over the
exposed end of the last actuator.
Note: Be careful not to pinch the flex cable.
6. The shell of the gripper adapter has six holes going around in a circle corresponding to the
threaded holes on the actuator. Align the two sets of holes and insert the six screws loosely.
7. Torque the screws more tightly in sequence, following the ordering indicated by the star
pattern:
Note: Apply no more than 0.5 N·m (0.74 ft-lb) of torque to the actuator.
What to do next
Install the Robotiq gripper.
Install a Robotiq gripper on the gripper adapter
This section describes the procedure to install a Robotiq 2-finger 85 mm gripper on the
gripper adapter.
Before you begin
This procedure assumes that you have already installed the gripper adapter on the robot.
You will need:
• four M5 X 40 Socket Head Cap Screws
• a 3 mm hex key

KINOVA® Gripper adapter kit Installation Guide 19
About this task
This procedure describes the installation of a 2-finger 85 mm Robotiq gripper on the
gripper adapter. This mechanically mounts the gripper on the gripper adapter and
integrates the gripper with the robot in terms of electrical power and control. The gripper
adapter has 4 mounting holes corresponding to the bolt pattern on the gripper. The
gripper adapter interface also has ten spring-loaded pins to mate with a contact plate
on the inside of the Robotiq gripper. This electrical interface is for electrical supply and
controls.
Procedure
1. Align the interface surface of the Robotiq gripper with the interface surface of the gripper
adapter such that the holes are aligned with the correct reference orientation.
Figure 7: Gripper adapter interface
Figure 8: Robotiq gripper inner face
Note: There is a positioning hole on the gripper adapter interface which corresponds to
a positioning pin on the gripper. Ensure that the pin lines up properly with the hole for the
correct orientation.
Note: With the screw holes and positioning pin aligned, the electrical interface pins and
their contact points will also be aligned.
2. From the front face of the gripper, insert the four M5 X 40 screws, tightening each one in
sequence until they are all snug (do not overtighten).
What to do next
For your personal safety, it is strongly recommended that you read the user
documentation for the Robotiq gripper before use.

KINOVA® Gripper adapter kit Installation Guide 20
Installing the video adapter
This section describes the mounting of the video adapter.
Before you begin
You will want to analyze your particular setup to determine the most convenient location
to mount the video adapter. The mounting location needs to be close to that of the arm
arm support to allow for a video cable connection to the robotic arm mounted in the arm
support.
Note: The video adapter must be installed with the connectors facing down (+/-) 15° to
protect against water ingress.
About this task
The video adapter can be mounted with four M5 screws to a flat surface through pre-
drilled holes on the mounting flanges of the adapter.
Procedure
1. Drill four holes in a flat mounting surface using the mounting hole pattern of the video
adapter mounting flanges as a guide.
Figure 9: Video adapter flange mounting holes (measurements in mm)
2. Secure the video adapter to the surface using four M5 screws (and nuts, if applicable).
3. One of the mounting holes has an exposed grounding connection. Connect this to ground.
4. Connect the video cable from the robotic arm base to the power / video in connector of the
video adapter.
5. Connect the video out RCA connector to your video monitor.
Viewing the video adapter output
This section describes how to view the video output.
Before you begin
You will need a monitor or television with an RCA composite input.
This manual suits for next models
1
Table of contents
Popular Control Unit manuals by other brands

Bosch
Bosch Denoxtronic 2.1 Product description

Midea
Midea SMK-D140HHN1-3 manual

Allen-Bradley
Allen-Bradley ControlLogix 1756-OB16D installation instructions

Keysight
Keysight U4421A Hardware and Probing Guide

Lutz-Jesco
Lutz-Jesco PENTABLOC operating instructions

ON Semiconductor
ON Semiconductor LV8548MCSLDGEVB quick start guide