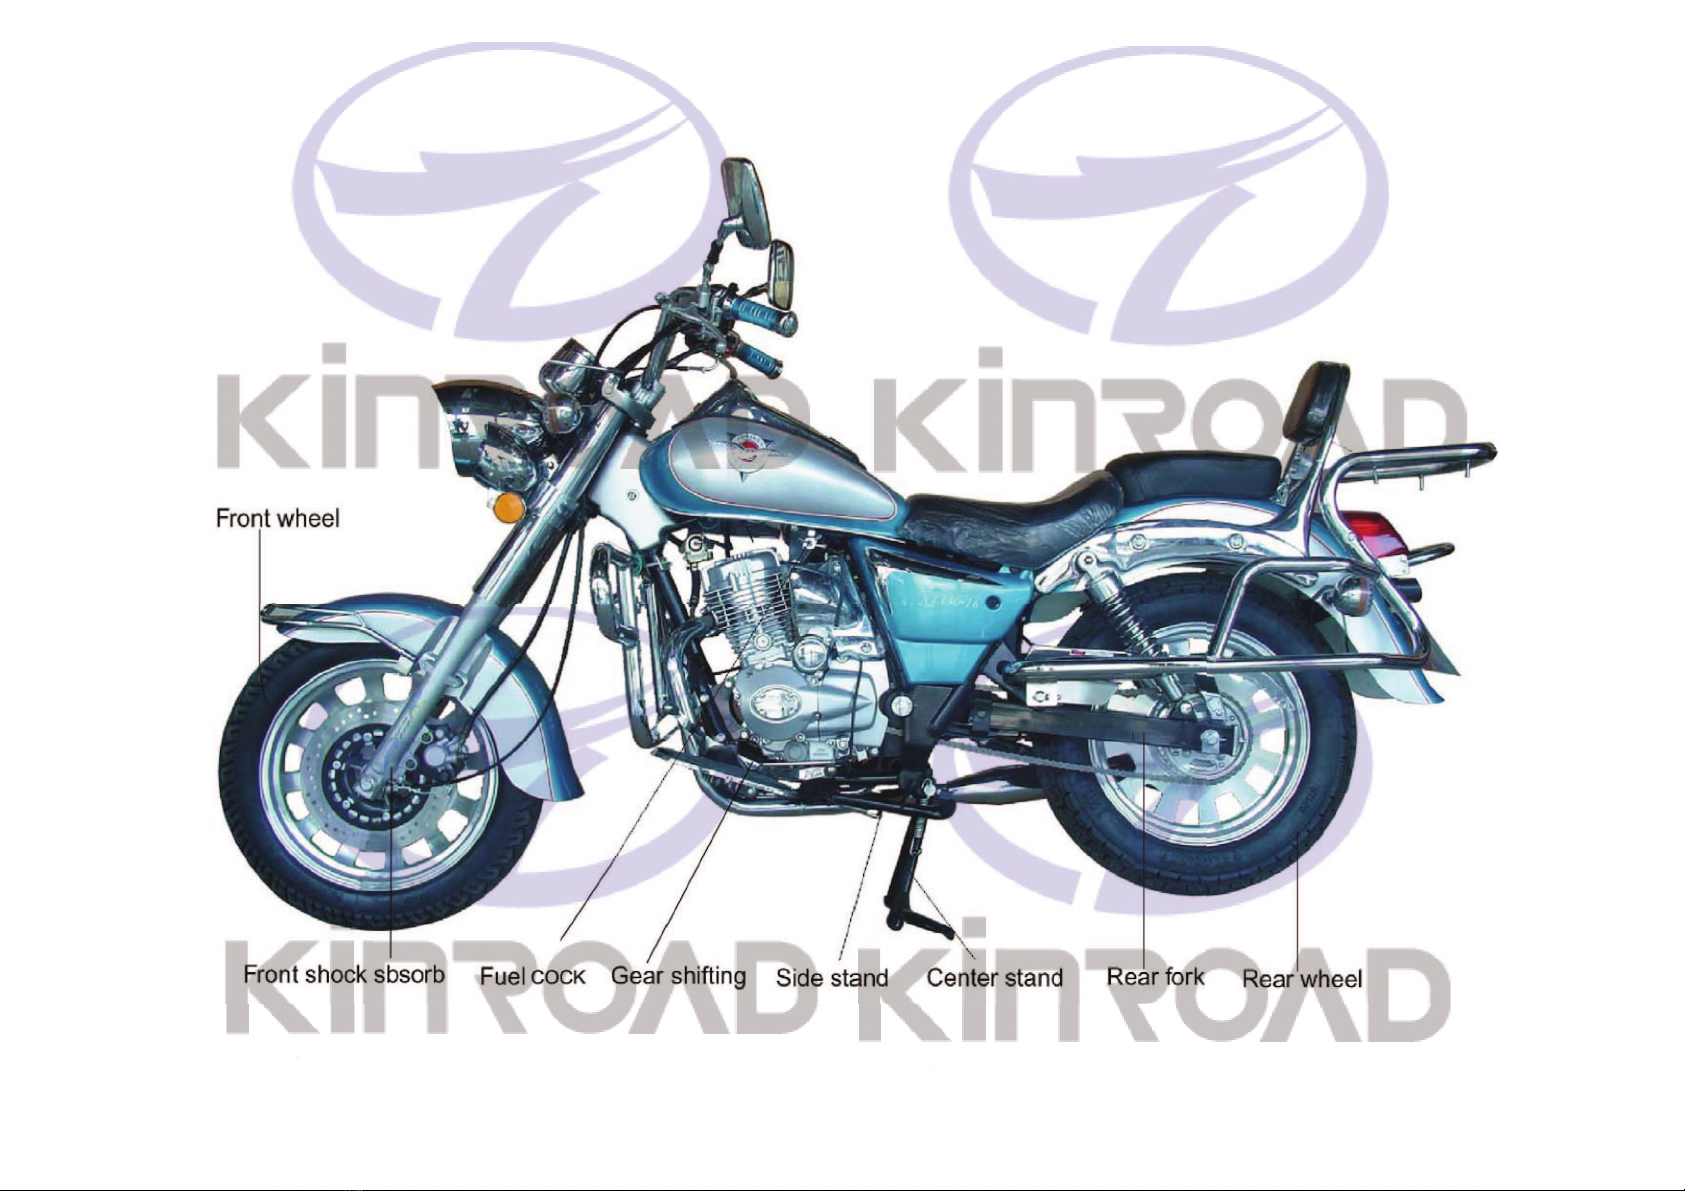
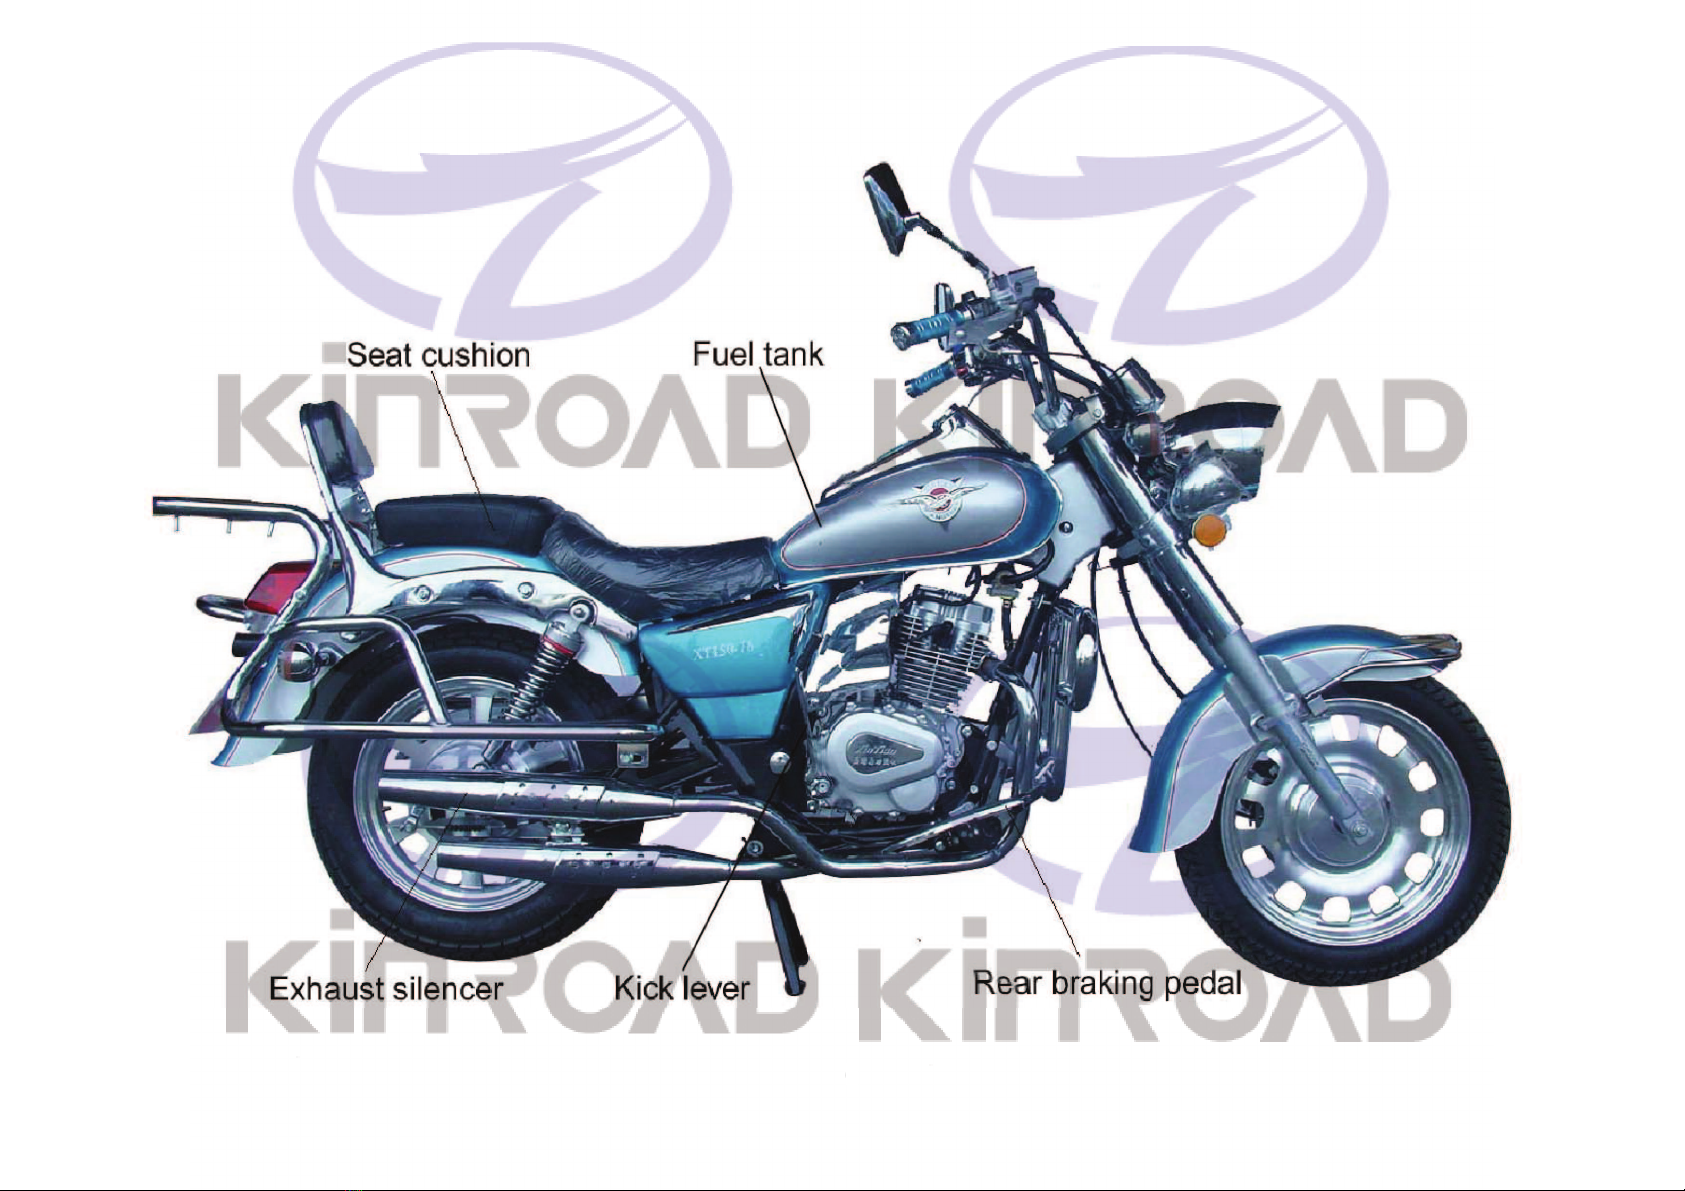
Kinroad XT125-16 User manual

1
ĉSAFE DRIVE
Rules for Safe Drive
Check must be conducted,bef ore starting the engine,to prevent mishaps and damage to components.
Only the qualified person who has passed the drive examination with a drive license is permitted to drive the
vehicle but not anybody else without a drive license.
Full preoccupation is required during drive, paying attention to the follow ing points to avoid any possible
hurt to you by other motor ized vehicles:
Do not drive too close to other vehicles;
Never contend for lane.
Strictly observe the local traffic rules.
As driving at overspeed is the cause of many accidents. Do not drive at a speed that the actual situation does
not permit.
Particular care should be exercised at the level crossing of roads, entrance and exit of parking lot or on the
autonobile lane.
During drive, grasp the left handlebar by the left hand and the throttle twist grip by the right hand,with feet
on the footrests.
1
Rules for
S
S
S
S
S
S
a
a
a
a
a
a
a
f
f
e
D
D
D
D
D
D
D
r
r
r
r
r
r
r
i
i
i
i
i
i
i
v
v
v
e
e
e
e
e
e
e
Check must be conducted,bef ore starting the engine,to prevent mishaps an
d
d
d
d
d
d
d
d
d
d
amage to components.
Onl
y
the
q
ualified
p
ersonwho has
p
assed the drive examination with a drive license is
p
ermitted to drive
ehicle but not anybody else withouta drive license.
Full preoccupation is required during drive, paying attention to the follow ing points to avoid any possi
urt to you by other motor ized vehicles:
Do not drive too close to other vehicles;
Never conte
n
n
n
n
d
d
d
d
d
d
d
f
f
f
f
f
f
f
o
o
o
o
o
o
r
r
r
r
r
r
r
l
l
l
l
l
l
l
ane.
Strictl
y
o
o
o
o
o
o
o
bb
b
b
b
b
b
s
s
s
s
s
erve the local traffic ru
l
l
l
e
e
e
e
e
e
s
s
s
s
s
s
.
As dri
v
v
v
v
v
v
v
i
i
n
n
n
n
n
n
n
g
g
g
g
g
g
g
a
a
a
a
t ov
e
e
e
e
e
e
rr
r
s
s
s
s
p
p
p
p
e
e
e
e
e
e
d
d
d
d
d
d
i
i
i
i
i
s
t
t
t
t
h
h
h
h
h
h
h
e
e
e
e
e
e
e
c
c
c
c
c
c
c
a
a
a
a
a
a
a
u
u
u
u
u
u
s
s
s
s
s
s
s
e
e
of
m
m
m
m
m
m
m
a
a
a
a
a
a
n
n
n
n
n
n
n
y
accidents. D
o
o
o
o
o
o
o
n
n
n
n
n
n
n
o
o
o
t drive
a
a
a
a
a
a
a
t
t
t
t
a
a
s
s
s
s
p
p
p
p
p
p
p
e
e
e
e
e
e
e
e
e
e
e
e
e
e
d
d
d
d
d
d
t
t
t
t
t
h
h
h
h
h
h
h
a
a
a
a
a
a
a
t
t
t
t
t
t
t
t
t
t
t
t
t
t
h
h
h
h
h
h
h
ee
e
e
e
e
e
act
u
u
u
a
a
a
a
a
a
a
l
l
l
l
l
l
l
situation d
ot permit.
Particu
l
l
l
l
l
l
a
a
a
a
a
a
a
r
c
c
c
c
c
c
c
a
a
a
a
a
a
re should
b
b
b
b
b
b
b
e
e
e
e
e
e
e
e
x
x
x
x
ercised a
t
t
t
t
t
t
t
t
t
t
t
t
h
e
e
e
e
e
e
e
level crossing o
f
f
f
f
f
f
r
r
r
r
r
o
a
a
a
a
a
a
a
d
d
d
d
d
d
d
s, entrance
a
a
a
a
a
n
d
d
d
d
d
exit of pa
r
r
r
r
r
r
r
k
k
k
k
k
k
k
i
n
n
n
n
n
n
n
g
g
g
g
g
g
lot or on
u
t
o
n
o
bil
e
l
a
n
e
.
During drive, grasp
t
t
t
t
t
t
t
h
h
h
h
h
e
e
e
e
e
e
e
l
l
l
l
l
l
e
e
e
e
f
f
f
f
f
t
t
t
t
t
t
h
h
h
h
h
h
h
an
d
d
d
d
lebar by the left hand and the throt
t
t
t
t
l
l
l
l
l
l
l
e
e
e
e
e
e
t
t
t
t
t
t
t
w
w
w
w
w
w
w
i
i
i
s
s
s
s
s
s
t
t
t
t
t
t
g
g
g
g
g
g
g
r
r
r
r
r
r
i
i
i
i
p
p
p
p
p
p
p
b
b
b
b
b
b
b
y
y
y
y
y
y
y
t
h
h
h
h
e right hand,with f
n the footrests.

2
Protective wear
1.Protective wear such as helmet with protective mask, dustproof glasses and gloves should be worn during
drive for the sake of personal safety.
2.Loose clothes are not suitable for motorcycle drive or ride as they may get caught on the operating lever
,kick ,footrest or wheel, resulting in danger.
Modification of the vehicle
Caution:
Any unauthorized modification of the vehicle or replacement of the original parts can not ensure driving
safety and is illicit. The user must observe the regulations of the traffic conrtol authorities, We are not responsible
for any vehic le with unauthorized modification.
2
Prot
e
e
e
e
e
e
e
c
c
t
t
t
t
t
t
t
i
i
i
i
i
i
i
v
v
v
v
v
v
v
e wear
1.Protective
w
w
w
w
w
w
w
e
e
e
e
e
e
e
a
r
r
r
s
u
u
u
u
u
u
u
ch
a
a
a
a
a
a
s
s
s
h
h
h
h
h
h
e
l
l
l
l
l
l
l
me
t
t
w
w
w
w
w
w
w
i
i
i
i
i
i
i
th protective mask, dustproo
f
f
f
f
f
g
g
g
g
g
g
g
l
l
l
ass
e
e
e
e
e
e
e
san
d
d
d
g
g
g
l
l
l
l
l
l
o
o
o
o
o
o
v
v
v
v
v
v
e
e
s sh
o
o
o
o
o
o
o
u
u
u
u
u
u
u
l
l
l
l
l
l
d
d
d
d
be worn dur
ive for the sake of personal safety.
2.Loose clothes are not suitable for motorc
y
cle drive or ride as the
y
ma
y
g
et cau
g
ht on the o
p
eratin
g
le
kick ,footrest or wheel, resulting in danger.
Modification of the vehicle
Caution:
Any una
u
u
u
u
u
u
u
t
t
t
t
t
t
t
h
h
h
h
h
h
h
o
o
o
o
o
o
rized mod ification of
t
t
t
t
t
t
t
h
h
h
h
h
h
h
e
e
e
e
e
e
v
v
v
v
v
v
ehicle or replaceme
n
n
n
n
n
n
n
t
t
t
t
t
t
t
o
o
o
o
o
o
o
f
f
f
f
f
f
f
the original parts ca
n
n
n
n
n
n
n
n
n
n
n
n
n
n
o
o
o
o
o
o
t ensure driv
fety and
i
i
i
i
s
s
s
s
s
s
s
i
i
i
i
i
i
i
l
l
l
l
l
l
l
l
l
l
l
l
l
i
i
i
i
i
c
c
c
c
c
c
c
i
i
i
i
i
i
i
t
t
t
t
t
.
.
.
.
.
T
T
T
T
h
h
h
h
h
h
h
e
e
e
e
e
e
e
user mus
t
t
o
o
o
o
o
o
o
b
b
b
b
b
b
b
s
s
s
s
s
s
s
e
e
e
e
e
e
rve th
e
e
e
e
r
r
r
r
r
r
e
e
e
e
e
e
e
gulations of th
e
e
e
e
e
e
e
t
t
t
r
r
r
r
r
r
r
a
a
a
a
a
a
a
f
f
f
f
f
f
f
f
f
f
f
ic co
n
n
n
n
n
n
n
r
r
r
r
r
r
t
t
t
t
o
o
o
l
l
a
a
a
a
a
u
u
u
u
t
t
t
t
t
t
t
h
h
h
h
h
h
h
or
i
i
i
i
t
t
t
t
t
t
t
i
i
i
i
i
i
i
e
e
e
e
e
e
e
s
s
s
s
s
s
s
,
,
,
,
,
W
W
W
WW
W
W
e ar
e
e
e
e
e
e
e
n
n
n
n
n
n
n
o
o
o
o
t res
ponsi
r an
y
vehi
c
c
c
c
c
c
l
e
e
e
e
e
e
e
with unauth
o
o
r
r
r
r
r
r
r
i
i
i
i
i
i
ze
d
d
d
d
d
d
d
modifica
t
t
i
i
i
i
i
i
i
o
o
o
o
o
o
n
n
n
.
.
.

3
ĊMAIN DATA
Item 125 type 150 type Item 125 type 150 type
Overall length 2260mm 2260mm Cylinder bore x stroke 56.5h49.5 62h49.5
Overall width 885mm 855mm Compression ratio 9.2:1 9.2:1
Overall height 1150mm 1150mm Output,max 7.8kw/8500r/min 8.7kw/8500r/min
Wheelbase 1515mm 1515mm Torque,max 8.2N.m/7000r/min 9.2N.m/7000r/min
Dead weight 136kg 136kg Idling speed 1500r/minf100r/min 1500r/minf100r/min
Payload 150kg 150kg Displacement of cylinder 124.0 ml 149.0 ml
Front wheel 110/90-16 110/90-16 Spark plug D8TC D8TC
Rear wheel 130/90-15 130/90-15 Spark plug gap 0.6~0.8mm 0.6~0.8mm
Speed,max 80km/h 80km/h Gap of air valve
Inlake valve:0.05mm Inlake valve:0.05mm
Braking distance İ7m(30km/h) İ7m(30km/h) Exhaust valve:0.08mm Exhaust valve:0.08mm
Climbability ı18eı18eGround clearance 130mm 130mm
Capacity of gasoline
k
14L 14L Ignition means CDI CDI
Transmission ratio
1 st gear 2.769 2nd gear 1.778 3rd gear 1.333
4th gear 1.083 5th gear 0.960
Final reduction 2.733
3
It
em
12
12
12
12
5 t
5 t
5 t
5 t
yp
e 1
e 1
e 1
e 1
e 1
50 type Item
12
12
12
12
12
5 t
5 t
5 t
5 t
5 t
5 t
yp
yp
yp
e 1
e 1
e 1
e 1
e 1
e 1
e 1
50 type
Overall length 2260mm 2260mm Cylinder bore x stroke
56
.5
h
49
.5
62
h
49.5
Overall width 885mm 855mm Co
mp
ression ratio
9.2:1
9.2:1
Overall height 1150mm 1150mm Output,max
7.8kw/8500r
/min
r
r
8.
7k
w/
85
00
r
/m
r
r
Wheelbase 1515mm 1515mm Torque,max
8.
2N
.m
/7
00
0r
/m
in
0r
0r
9.
2N.m/7000r
/m
0r
0r
Dead we
ig
ht 136k
g 1
36
kg
Idli
ng
sp
eed
1500r
/min
r
r
f
100r
/min
0r
0r
15
00r
/min
r
r
f
100r
Payload 150kg 150kg Displ
acement of cylinder
124.0 ml
14
9.
0 m
l
Front wheel
11
11
11
11
11
11
11
0/
0/
0/
0/
0/
0/
90-1
6 1
6 1
6 1
6 1
6 1
6 1
6 1
10
10
10
10
10
10
/90-16 Spark plug
D8
D8
D8
D8
D8
D8
TC
TCTC
TC
TC
TC
TC
TC
D8TC
Rear whee
l 1
l 1
l 1
l 1
l 1
l 1
l 1
30/90-15 13
0/
0/
0/
0/
0/
0/
0/
90
90
9090
90
90
-1
-1
-1
-1
-1
5 S
pa
rk
pl
ug
ga
p
0.6~0.8mm
0.
6~0.8mm
Speed,ma
x 8
x 8
x 8
x 8
x 8
x 8
x 8
0k
m/
m/
m/
h 8
h 8
h 8
h 8
h 8
h 8
h 8
0k
0k
0k
0k
0k
0k
0k
m/
m/
h
h
h
h
h
h
h
Ga
p o
f air valve
Inlake valve:0.
05
05
05
05
05
05
05
mm
mm
mm
mm
mm
mm
mm
In
In
In
In
In
In
In
la
la
la
ke
va
lv
e:
0.
05
Braking dista
nc
nc
nc
nc
nc
e
e
e
e
e
e
e
İ
İ
7m(30k
m/
m/
m/
m/
m/
h)
h)
h)
h)
h)
h)
h)
İ
7m(30k
m/
m/
m/
m/
m/
m/
h)
h)
h)
h)
h)
h)
h)
Ex
ha
us
t v
al
ve
:0
:0
:0
:0
:0
:0
:0
.0
.0
.0
.0
.0
.0
.0
8m
8m
8m
8m
8m
8m
8m
m
Ex
Ex
Ex
Ex
ha
ha
ha
ha
ha
ha
ha
ust v
al
ve
:0
.0
Climbabili
ty
ı
18
eı
eı
eı
eı
eı
eı
eı
18
e
Gr
ound cleara
nc
nc
nc
nc
nc
nc
nc
e
e
e
e
e
13
13
13
13
13
13
13
0m
0m
0m
0m
0m
0m
0m
m
m
m
m
m
m
m
130mm
Capacity of
ga
ga
ga
ga
ga
ga
ga
so
so
so
so
so
li
li
li
li
li
li
li
ne
ne
ne
ne
ne
ne
14
14
14
14
14
14
14
L 1
L 1
L 1
L 1
L 1
L 1
L 1
4L
4L
4L
4L
4L
4L
4L
Ignition means
CD
CD
CD
CD
CD
CD
CD
I
CD
I
Transm
is
si
on ra
ti
o
1 st gea
r 2
r 2
r 2
r 2
r 2
r 2
r 2
.7
.7
.7
.7
.7
.7
.7
.7
69
69
69
69
69
69
69
2nd gear 1.778
3r
3r
3r
3r
3r
3r
3r
d g
d g
d g
d g
d g
d g
d g
ea
ea
ea
ea
ea
ea
ea
r 1
r 1
r 1
r 1
r 1
r 1
r 1
.333
h gear 1.083 5th gear 0.960
nal reduction 2.733

4
III.PARTS & SUBASSEMBLIES
4

5
5

6
6

7
IV.OPERATION
Fuel Cock
1.Fuel filling
The capacity of the fuel tank is 4.5L.Leadless gasoline of
No.90or above or low-lead gasoline is required for the
motorcycle.To fuel the vehicle,support it by the main stand,
open the lock cover of the fuel tank and fill fuel throug h the
opening.
Operation of the fuel cock
ON:With the handle of the fuel cock to
“ON”position,the fuel circuit is through for fuel supply.
OFF:With the handle of the fuel cock fo “OFF”
position,the fuel circuit is cut off without supply.
RES: With the handle of the fuel cock to “RES” position, the
fuel is supplide from the reserve.(Note:The reserved fuel can
only be used when the normal supply is run
out,) In this case,refueling should be carried
out as soon as possible; for there is only
somel.0L of fuel reserve for use.
7
1.Fuel filling
The capacity of the fuel tank is 4.5L.Leadless gasoline of
90or above or low-lead gasoline is required for the
torcycle.To fuel the vehicle,support it by the main stand,
n the lock cover of the fuel tank and fill fuel through the
ning.
Operation of
t
t
t
t
h
h
h
h
h
h
h
e
e
e
e
e
e
e
f
f
f
f
f
f
f
u
u
u
u
u
u
e
e
e
l
l
l
l
l
l
cock
ON:With
t
t
t
t
t
t
h
h
h
h
h
h
h
e handle of the
f
f
f
f
f
f
u
u
u
u
u
u
e
e
e
e
e
e
e
l cock to
N”positio
n
n
n
n
n
,
t
t
t
t
h
h
h
h
h
h
h
e fuel
c
c
c
c
c
c
i
i
i
i
r
r
r
r
r
c
c
c
c
u
u
i
i
i
t
t
t
t
i
i
i
i
i
i
i
s
s
s
s
t
t
t
t
h
h
h
h
h
h
h
r
r
r
r
r
r
r
o
o
o
o
o
o
u
u
u
u
u
u
g
g
g
g
g
g
g
h
h
h
h
h
h
h
ff
f
f
f
f
f
o
o
o
o
o
o
o
r
r
r
r
r
r
r
f
f
f
f
f
f
ue
l
l
l
l
l
l
l
s
s
s
s
s
s
s
u
u
u
u
u
u
pply.
O
FF
:
W
i
i
i
i
i
i
t
h
h
h
h
h
h
h
t
h
e
h
a
n
d
l
e
o
f
f
f
t
t
t
t
t
t
h
h
h
h
h
h
h
e
e
e
e
e
f
f
f
f
u
e
l
c
o
c
k
k
k
k
k
k
f
o
“
O
FF”
ition,the
f
f
f
f
f
f
f
u
u
u
u
u
u
e
l
l
l
l
l
c
c
c
ircuit is cut
o
o
o
o
o
o
f
f
f
f
f
f
f
f
f
f
f
f
w
w
w
w
w
w
w
i
i
i
i
i
i
i
t
t
t
t
hout su
p
p
p
p
p
p
p
l
l
l
l
l
l
y
y
y
y
y
.
S: With the handle of the fuel cockto “RES” position, the
l is supplide from the reserve.(Note:The reserved fuel can
o
o
o
o
o
o
o
nly be us
e
e
e
d
d
d
d
d
d
d
w
w
w
w
w
w
w
h
h
h
h
h
h
h
en the no
r
r
r
r
r
r
r
m
m
m
m
m
m
a
a
a
a
a
l
l
l
l
l
l
supply is
o
o
o
o
o
o
ut,
)
)
)
)
)
)
)
I
I
I
I
I
I
I
n
n
n
n
n
n
n
t
h
h
h
h
h
h
h
i
i
i
i
i
i
s
c
c
c
c
c
c
a
a
a
a
a
se
,
,
,
,
r
e
e
e
e
e
e
f
f
f
f
f
f
u
u
u
u
u
u
e
e
e
e
e
e
e
l
l
l
l
l
l
l
i
i
i
i
i
i
n
g
g
g
g
g
g
g
s
s
s
s
s
s
h
h
h
h
h
h
ould be car
out
a
a
a
a
a
a
a
s
s
s
s
s
s
s
o
o
o
o
o
o
o
o
o
o
o
o
n as
p
p
p
p
p
p
p
o
o
o
o
o
o
o
s
s
s
s
s
s
s
s
s
s
s
s
s
i
i
i
i
i
i
b
b
b
b
b
b
b
l
l
l
l
l
l
l
e; for there is o
somel.0L of fuel reserve for use.

8
En
g
ine Startin
g
Warnin
g
:Never star
t
the en
g
ine in a closed
p
lace o
r
warehouse o
r
warehouse a
s
the
exhausted
g
a
s
from the vehicle contains toxic
carbon monoxide.
1.Se
t
the ke
y
o
f
the i
g
nition switch to
“ON”
p
osition.
2.Ascertain the neutral
p
osition,where it
should
b
e dis
p
la
y
ed.
3.Ascertain the amount o
f
fuel in the tank,
4.Se
t
the fuel coc
k
handle to “ON”
p
osition.
ƾT
o
star
t
a cold en
g
ine;
1.Pull u
p
the choke
b
a
r
o
f
the carburetor
(
to
close the choke
)
.
2.Rotate the throttle twist
g
ri
p
by
1/8to
1/4turn.
3.Start the en
g
ine
by
the electric o
r
the kick
startin
g
s
y
stem.
4.Sli
g
htl
y
turn the throttle twist
g
ri
p
to
increase the s
p
ee
d
o
f
the en
g
ine so a
s
to
war
m
u
p
the en
g
ine.
5.Turn the carbureto
r
choke
b
a
r
downward
to full
y
o
p
en the choke whe
n
the en
g
ine is
sufficientl
y
warme
d
u
p
.
ƾCaution:
The engine can only be started after the
neutral position is ascertained.Otherwise
accident will happen.
Unnecessary idle running(especia lly at a
high speed) is harmful to the engine.
ƾProcedures for stopping the engine:
1.Release the throttle twist grip to slow
down the engine.
2.Turn to the neutral position.
3.Se
t
the i
g
nition switch ke
y
to
“OFF”
p
osition.
4.Set the fuel cockhandle to “OFF”
position.
Switches on Ri
g
ht Handle bar
8
Warnin
g
:Never
s
s
s
s
s
s
t
t
t
t
t
t
t
a
a
a
a
a
a
a
r
r
r
r
r
r
t
the en
g
g
g
g
g
g
in
e
e
e
e
e
e
i
i
i
i
i
i
i
n
n
n
n
n
n
n
a closed
c
e
o
r
w
a
r
e
h
o
u
s
e
o
r
w
a
r
e
h
o
u
s
e
a
s
t
h
e
austed
g
a
s
f
rom the vehicle contains toxic
bon monoxide.
1.
S
e
t
the ke
y
o
f
the i
g
i
nition switch to
N”
p
osition.
2
.Ascertain the neutral
p
o
sition,where it
u
l
d
b
e
d
i
s
p
l
a
y
e
d
.
3.Ascertain the amount o
f
fuel in the tank,
4
.Se
t
the fuel
c
c
c
c
c
c
o
o
o
o
o
o
o
c
c
c
c
c
c
c
k
k
k
k
k
k
k
h
h
h
h
h
h
h
an
d
d
d
le to
“
“
“
“
O
O
O
O
O
O
O
N
N
N
N
N
N
N
”
”
””
”
”
”
p
p
p
p
p
p
p
o
oo
o
o
o
o
s
s
s
s
s
s
i
i
i
i
i
tion.
ƾ
T
o
star
t
a
c
c
c
o
o
o
o
o
o
o
l
l
l
l
l
l
l
d
d
d
d
d
d
en
g
ine
;
1.Pull u
p
p
p
p
p
p
u
u
t
t
t
t
t
t
h
h
h
h
h
h
h
e choke
b
a
r
o
f
the
c
c
c
c
c
c
a
a
a
a
a
a
a
r
r
r
r
r
r
r
b
b
b
b
b
b
b
u
u
u
u
u
u
u
r
r
r
r
r
r
r
e
e
e
e
e
e
e
t
t
t
t
t
t
o
o
o
o
o
r
r
(
(
(
(
(
(
(
t
t
t
t
t
t
o
o
o
o
o
o
o
close th
e
e
e
e
e
e
e
c
c
c
c
c
c
c
h
h
h
h
h
h
h
o
o
o
o
o
o
o
k
k
k
k
k
k
k
e
e
e
e
e
e
)
)
)
)
)
)
.
.
2
.
R
o
t
a
t
e
e
e
e
e
e
e
t
t
t
t
t
t
t
h
h
h
h
h
h
h
e
t
hr
o
t
t
l
e
e
e
t
t
t
t
t
t
t
w
w
w
w
w
w
w
i
i
i
i
i
i
s
s
s
s
s
s
t
t
t
t
t
t
t
g
g
g
r
r
r
i
i
i
i
i
i
i
g
g
p
p
p
p
p
p
by
1
/
8
t
t
t
t
t
t
t
o
1/4
t
u
rn
.
3.Start the
e
e
e
e
e
e
n
g
g
g
g
g
g
i
i
i
i
i
i
n
n
n
n
n
n
n
e
by
t
h
h
h
h
h
e
e
e
e
e
e
e
l
l
l
e
e
e
e
e
e
ctric o
r
t
t
t
t
t
t
h
h
h
h
h
h
h
e
e
e
e
e
e
k
k
k
i
i
i
i
i
c
c
c
c
c
c
c
k
startin
g
s
y
ste
m
m
m
m
m
m
m
.
.
.
.
.
4
.Sli
g
i
htl
y
l
l
turn t
h
h
h
h
h
h
h
e
t
t
t
t
t
t
t
h
h
h
h
h
h
h
h
r
r
r
r
r
r
o
o
o
o
o
o
o
t
t
t
t
t
t
t
t
t
t
t
l
l
l
l
e
e
e
e
e
e
e
t
t
t
t
t
t
t
w
w
w
w
w
w
w
i
i
i
i
i
i
i
st
g
ri
g
g
p
to
increase the s
p
ee
d
o
f
the en
g
ine so a
s
to
war
m
u
p
u
u
the en
g
ine.
5
5
5
5
5
5
5
.Tu
r
r
r
r
r
r
r
n
n
n
n
n
n
n
t
h
h
h
h
h
e
e
e
e
e
e
e
c
a
a
a
a
a
a
r
b
u
r
r
e
e
e
e
e
e
e
t
t
t
t
t
t
o
o
o
o
o
o
o
r
r
r
r
r
r
r
c
h
o
o
o
o
o
o
k
k
k
k
k
k
k
e
e
e
b
a
r
d
ownw
to
f
f
f
f
f
f
f
u
u
u
u
u
u
u
l
l
l
l
l
l
l
l
l
l
l
l
y
y
y
y
y
y
y
l
l
l
l
o
o
o
o
o
o
o
p
p
p
p
p
p
o
o
en the
c
c
c
c
c
c
h
h
h
h
h
h
h
o
o
o
o
o
o
o
k
k
k
k
k
k
k
e whe
n
the en
g
ine
sufficientl
y
l
l
warme
d
u
p
u
u
.
ƾ
Caution:
The engine can only be started after
neutral
p
osition is ascertained.Otherw
accident will happen.
Unnecessary idle running(especia lly a
h
h
i
i
i
i
i
i
i
g
g
g
g
g
g
g
h
h
h
h
h
h
h
s
s
s
s
s
s
s
p
p
p
p
p
p
p
e
e
e
e
e
d
d
d
d
d
d
d
)
)
i
i
s
h
h
h
h
h
h
a
r
r
r
r
r
m
m
m
m
m
m
m
f
f
f
f
f
f
f
uu
u
u
u
u
u
l
l
l
l
l
l
t
t
t
t
t
t
o the engine.
ƾ
ƾ
ƾ
ƾ
ƾ
ƾ
ƾ
Procedures for stoppin
g
g
g
g
g
g
g
tt
t
t
t
t
t
h
h
h
h
h
h
h
e
e
e
e
e
e
e
e
e
ngine:
1
1
1
1
1
1
1
.
R
R
e
e
e
e
l
l
l
l
l
l
e
e
e
e
e
e
a
a
a
a
a
a
a
s
s
s
s
s
s
e
e
e
t
t
t
h
h
h
h
h
h
h
e
e
e
e
e
e
e
t
t
t
t
t
t
t
h
hh
h
h
h
h
r
r
r
r
r
r
r
o
o
o
o
o
o
o
t
t
t
t
t
t
t
t
t
le t
w
w
w
w
w
w
w
i
i
i
i
i
i
i
s
s
s
s
s
s
s
t grip to sl
down t
h
h
h
h
e
e
e
e
e
e
e
e
e
e
e
e
e
n
n
n
n
n
n
g
g
g
g
g
g
g
i
i
i
i
i
i
i
n
n
n
n
n
n
n
e.
2.T
u
u
r
r
r
r
r
r
n
n
n
n
n
n
t
o
o
o
o
o
o
o
t
t
t
he neutra
l
l
l
l
p
p
o
o
o
o
o
o
s
s
s
s
s
s
s
ition.
3
.
S
e
e
e
e
e
e
e
t
t
t
t
t
t
h
h
h
h
h
h
h
e i
g
g
g
g
g
g
g
i
n
n
n
n
n
n
n
i
i
i
i
i
i
i
t
t
t
t
t
t
t
i
i
i
i
i
i
on switch ke
y
“
“
“
“
“
“
“
O
O
O
O
O
O
O
F
F
F
F
F
F
F
F
F
”
”
”
”
”
”
”
p
p
p
p
p
p
p
osit
i
i
i
i
i
i
on.
4
.
S
e
t
t
h
e
f
u
e
l
c
o
c
kh
a
ndl
e
t
o
“OF
position.

9
Electric start button
The electric start button is located below the right handlebar.When
the ignition switch is set in “ON” position and the engine is in the
neutral position, push the button to start the engine
Light switch
The front light switch has three positions,
And “ƽ”(a white point).
When the switch is in this position,the front head
light button ,tail and meter lights are all lit up.
When the switch is in this position,the tail, betraying and meter
Iights are lit up.
“ƽ”When it is in this position. The front illuminator, tail, betraying and
meter lights are all off.
9
El
e
c
t
ri
c
s
s
s
s
s
s
s
t
a
a
a
a
a
a
a
r
r
r
r
r
r
r
t
t
t
b
u
t
t
o
n
The elec
t
t
t
t
t
t
t
r
r
r
r
r
r
r
i
c
c
c
c
s
s
s
s
s
s
tart butto
n
n
n
n
n
n
n
is
l
l
l
l
l
l
l
o
o
cated be
l
l
l
l
l
l
o
o
o
o
o
o
o
w
w
t
t
t
t
t
he right handlebar.
W
W
W
W
W
W
W
h
h
h
h
h
e
e
e
e
e
e
n
n
n
n
n
n
ignition s
w
w
w
w
i
i
i
i
i
i
i
t
t
t
t
t
t
t
c
c
c
c
c
h
i
i
i
i
i
i
i
s
s
s
e
e
e
e
e
e
t i
n
n
n
n
n
n
n
“
O
O
O
O
O
O
O
N
N
N
N
N
N
N
”
”
”
”
”
”
”
po
s
s
s
s
s
s
s
i
i
i
i
i
i
t
t
t
t
t
t
i
i
i
i
i
i
i
on and the engine is in t
h
h
h
h
h
h
e
e
e
e
e
e
tral position, push the
b
b
b
u
t
t
t
t
t
on to start the engine
Light switch
The front light switch has three positions,
g
An
d
“
ƽ
”(a white
p
oint).
t
he switch is in this position,the front head
W
hen t
t
ton ,tail and meter lights are all lit up.
light but
e
n
t
t
t
t
t
t
t
h
h
h
h
h
h
h
e
e
e
e
e
e
e
s
s
s
s
s
s
w
w
w
w
w
i
i
i
i
i
i
i
tch is in t
h
h
h
h
h
h
h
i
i
i
i
i
i
i
s
s
s
p
p
p
p
p
oo
o
o
o
o
o
s
s
s
s
s
i
i
i
i
i
t
t
t
t
t
ion,the tail, betraying and m
e
e
e
e
e
e
e
t
t
t
t
t
t
t
e
e
e
e
e
e
r
r
r
r
r
r
r
Whe
I
ights are
l
l
i
i
i
i
i
i
i
t
t
t
t
t
t
t
u
u
u
u
u
p.
“
ƽ
”
Wh
e
e
e
e
e
e
n
n
n
n
n
n
it is in
t
tt
h
h
h
h
h
h
h
i
i
i
i
i
i
s
s
s
p
p
p
p
o
o
o
o
o
o
s
s
s
s
s
i
i
i
i
i
i
i
t
t
t
t
i
i
i
i
i
i
o
o
o
o
o
o
o
n
n
n
n
n
n
n
.
TTT
T
T
T
T
h
h
h
h
h
h
h
e
e
e
e
e
e
e
f
f
f
f
f
f
f
r
r
r
r
r
r
r
o
o
o
o
nt
i
i
i
i
i
i
i
l
l
l
l
l
l
l
u
u
u
u
u
u
u
minator, tail, bet
r
r
r
r
r
r
a
a
a
a
a
a
y
y
y
y
y
y
y
in
g
and
meter lig
h
h
h
h
h
h
t
s
s
s
s
s
s
s
a
a
a
a
a
a
a
realloff.

10
Switches on Lef
t
Handle bar
1. Headlights dimmer button
Positi on,Headligh is in high beam.
Positi on, Headligt is in low beam.
2. turning light switch
position,Left
position,Right
3.Horn button
press this button for horn
10
S
w
i
t
c
c
c
c
c
c
c
h
h
h
h
h
h
h
e
e
e
e
e
e
e
s
o
n
L
L
L
L
L
L
L
e
e
e
e
e
e
e
f
f
f
f
f
f
f
t
t
t
t
t
t
f
f
f
f
f
f
f
H
H
H
H
H
H
H
a
a
a
a
a
n
n
n
n
n
n
n
d
d
d
d
l
e
b
a
a
a
a
a
a
a
r
r
r
r
r
r
1
. Headlights di
m
m
m
m
m
m
m
m
m
m
m
m
m
e
e
e
e
e
e
e
r
r
b
b
b
b
b
b
b
utton
iti on,Headligh is in high beam.
o
iti on, Headligt is in low beam.
o
. turning light switch
position,Left
p
position,Right
p
.
H
o
rn
b
u
t
t
o
o
o
o
o
o
o
n
n
n
n
n
n
n
p
ress th
i
i
s
s
s
s
s
s
s
b
b
b
b
b
b
b
u
u
u
u
u
u
u
t
t
t
t
t
t
t
t
t
t
t
t
o
o
o
o
n f
o
o
o
o
o
o
rr
r
r
r
r
h
h
h
h
o
o
r
r
n
n
n
n
n

11
Gear Shifting
A non-c
y
clin
g
mode o
f
g
ea
r
shiftin
g
is em
p
lo
y
ed o
f
this
motorc
y
cle
ƽThe throttle must
b
e closse
d
b
efo
r
the
g
ea
r
shiftin
g
ever
y
time, Shifin
g
the
g
ea
r
b
efore closin
g
the condition o
f
b
ackin
g
it fo
r
fou
r
times.
ƽThe s
p
ee
d
shiftin
g
p
edal must
b
e o
p
erate
d
suitabl
y
.
ƽSte
pp
in
g
on the
g
ea
r
shiftin
g
p
edal is forbided whe
n
drivin
g
to
p
revent dama
g
in
g
the clutch whe
n
chan
g
in
g
the
g
ea
r
abru
p
tl
y
.
N
OTE
(
N
)
N
eutral
g
ea
r
(
1
)
1th
g
ea
r
(
2
)
2nd
g
ea
r
(
3
)
3rd
g
ea
r
(
4
)
4th
g
ea
r
(
5
)
5th
g
ea
r
Points for Attention durin
g
Drive
1.Avoid unnecessar
y
idlin
g
o
f
the en
g
ine an
d
it is not allowed. I
n
p
articular.to have it id lin
g
a
t
a hi
g
h s
p
eed.
Othe
r
wise it will dama
g
e com
p
onen ts seriousl
y
.
2.Shif
t
to the low s
p
ee
d
g
ea
r
whe
n
feeliin
g
tha
t
the
p
owe
r
is not stron
g
enoush on climbin
g
.
3.I
t
is forbidden to us
e
the front
b
rake onl
y
o
r
to coas
t
by
the neutral
g
ea
r
es
p
eciall
y
whe
n
descendin
g
o
r
drivin
g
a
t
hi
g
h s
p
eed.
4.On braking. Narrow the throttle. and then apply the brake
11
Gear S
h
h
h
h
h
h
h
i
i
i
i
i
f
f
f
f
f
f
f
t
t
t
t
t
t
t
in
g
g
g
g
g
A no
n
n
n
n
n
n
n
-
-
-
-
-
-
-
c
y
y
y
y
y
y
c
c
c
c
c
c
lin
g
mode
o
o
o
o
o
o
f
f
f
f
g
g
g
g
g
g
g
e
e
e
e
a
r
shiftin
g
g
g
g
g
g
g
i
s
s
s
s
s
s
s
em
p
m
m
l
o
y
e
d o
f
this
torc
y
cle
ƽ
T
h
e
t
t
t
t
t
t
t
h
h
h
h
h
h
h
r
o
t
t
t
t
l
l
l
l
l
l
l
e
e
e
e
e
e
e
m
m
m
m
m
m
u
s
t
t
t
t
t
t
t
b
b
b
b
b
b
b
e
e
e
e
e
e
e
c
c
c
c
c
c
c
l
l
l
l
l
l
o
s
s
e
d
d
d
d
d
d
d
b
b
b
b
b
b
b
e
f
o
r
t
h
e
g
e
a
r
s
hif
t
in
g
ever
y
r
r
time, S
h
h
h
h
h
h
h
i
i
i
i
i
i
i
f
f
f
f
f
f
f
i
i
i
i
i
i
n
n
n
n
n
n
n
g
g
g
g
g
g
g
t
t
t
t
h
h
h
h
h
e
e
e
e
e
e
e
g
g
g
g
g
g
g
e
e
e
e
e
e
a
a
a
a
a
a
a
r
r
r
r
r
r
b
b
b
b
b
b
b
e
e
e
e
e
f
f
f
f
f
f
f
ore closin
g
the condition o
f
b
ackin
g
it fo
r
fou
r
u
u
times.
ƽ
The s
p
ee
d
shiftin
g
p
edal must
b
e o
p
o
o
e
rate
d
suitabl
y
.
ƽ
Ste
pp
in
g
o
n the
g
ea
r
shiftin
g
p
edal is forbided whe
n
d
rivin
g
to
p
revent
d
ama
g
in
g
the clutch whe
n
chan
g
in
g
the
g
ea
r
a
bru
p
u
u
tl
y
l
l
.
TE
(
N
)
N
eutral
g
ea
r
(
1
)
1
th
g
ea
r
(
2
)
2
nd
g
ea
r
(
3
)
3
rd
g
ea
r
(
4
)
4
th
g
ea
r
(
5
)
5
th
g
ea
r
P
oints for
A
A
A
A
A
A
t
t
t
t
t
t
t
t
t
t
t
t
t
e
e
e
e
e
e
e
n
n
n
tion durin
g
Drive
1.Avoid
u
u
u
u
u
u
n
n
n
n
n
n
n
n
n
n
n
n
n
ecessar
y
idlin
g
o
f
the
e
e
e
e
e
e
e
n
n
n
n
n
n
n
g
g
g
g
g
g
g
i
i
i
i
i
i
i
n
n
n
n
n
n
n
e
e
e
e
e
e
e
a
a
a
a
a
a
n
d
i
t is not allowe
d
d
d
d
d
d
d
.
I
I
I
I
I
n
p
articular.to have it i
d
d
d
d
d
d
d
l
l
l
l
l
l
i
i
i
i
i
i
n
n
n
n
n
gg
g
g
g
g
g
n
n
a
a
a
a
a
t
a
hi
g
i
h s
p
e
h
e
r
wise it
w
w
w
w
w
w
w
i
i
i
i
i
i
i
ll dama
g
g
g
g
g
g
e
e
e
e
e
e
c
c
o
o
o
m
m
m
m
m
m
m
p
p
p
p
p
p
m
m
m
m
o
o
o
o
o
o
o
n
n
n
n
n
n
n
e
e
e
e
e
e
nn
t
t
t
t
t
t
t
s
s
s
s
s
s
s
ss
s
s
s
s
s
e
e
e
e
e
e
e
r
r
r
rr
r
r
i
i
i
i
i
i
i
o
o
o
o
o
o
usl
y
y
y
y
y
.
.
.
.
.
2
.
S
h
i
f
t
f
f
t
t
t
t
t
t
o
o
o
o
t
t
t
t
t
t
t
h
h
h
h
h
h
h
e low s
p
ee
d
g
ea
r
w
w
w
w
w
w
h
h
h
h
h
e
e
e
e
e
e
e
n
n
n
n
n
n
f
eeliin
g
t
h
h
h
h
h
h
h
a
t
the
p
owe
r
is
n
n
n
n
n
o
t
t
t
t
t
t
s
t
t
t
t
t
t
r
o
o
o
n
n
n
n
n
n
n
g
g
g
g
e
e
e
e
n
n
n
oush on c
l
l
l
i
i
i
i
i
m
m
m
m
m
m
m
b
b
b
b
b
b
b
i
i
i
i
i
i
n
g
.
3.I
t
is f
o
o
o
o
o
r
r
r
r
r
r
r
b
b
b
b
b
b
i
i
i
i
i
i
i
d
d
d
d
d
d
d
d
d
d
d
d
e
e
e
e
e
n
n
n
n
n
n
n
t
t
t
t
o
o
o
o
o
o
o
u
u
u
u
s
s
s
s
s
e
e
e
e
e
t
t
t
t
t
t
t
h
h
h
h
h
h
h
e
f
f
f
f
f
f
r
r
r
r
r
r
o
n
n
n
n
n
t
t
t
t
t
t
t
b
b
b
b
b
b
rake onl
y
y
y
y
y
y
y
l
l
o
o
o
o
o
r
r
r
r
r
r
to coas
t
by
the
n
n
n
n
n
e
u
u
u
u
u
u
u
t
t
t
t
t
t
t
r
r
r
r
r
a
a
a
a
a
l
l
l
g
g
g
e
e
e
e
e
a
a
a
a
a
r
r
r
e
e
e
e
e
e
e
s
s
s
s
s
s
s
p
p
p
p
p
p
p
e
e
e
e
e
e
e
c
c
c
c
c
c
i
i
i
i
i
i
a
a
a
a
l
l
l
l
l
l
l
l
l
l
l
l
y
l
l
w
w
w
w
w
w
w
h
h
h
h
h
h
e
n
desc
e
e
e
e
e
e
e
n
n
n
n
n
d
d
d
d
d
d
d
in
g
o
r
driv
hi
g
i
h
s
p
e
e
d
.
4.On braking.
N
N
N
N
N
N
N
ar
r
r
r
r
r
o
o
o
o
o
o
w
w
w
w
w
w
w
th
e
e
e
e
e
e
e
th
r
r
r
o
o
o
o
o
o
ttle.
a
a
a
n
n
n
n
n
n
n
d
d
d
d
d
d
d
t
t
t
t
t
h
h
h
h
h
h
h
e
n
n
n
n
n
n
n
apply the brake

12
V.Checkin
g
,Ad
j
ustm
-
ent and Maintenance
M
ac
hi
ne
Oil
Ch
ec
ki
n
g
ƾThe vehicle should be checked for
machine oil before drive by sup-porting
it with the
Main stand on a flat ground.The oil
livel should be between the upper and
lower
Lines of the oil gauge. Which is not
screwed into the filling orif ice.
ƾHigh quality 4-stroke machine oil.
Class SE or SD in API classifi-cation.of
SAE15W-40 in viscosity will help
maintain a long service life or the
engine.In case those are not available,a
substitute suitable for the ambient
temperature of application should be
selected according to the table on the
right side.
R
enewa
l
o
f
M
ac
hi
ne
Oil
Machine oil
p
la
y
s a ver
y
im
p
ortant
role in the normal o
p
eration o
f
the
en
g
ine an
d
fo
r
this reason,it is necessar
y
to chec
k
the motorc
y
cle fo
r
machine oil
p
eriodicall
y
an
d
renew the oil once
ever
y
800-1,000km o
f
drivin
g
by
the
follow in
g
p
rocedures.
Remove the screw
p
lu
g
from the
b
ottom o
f
the hot en
g
ine to drain of
f
all
old oil.
Was
h
the oil filter scree
n
clea
n
an
d
remount it reall
y
to
p
osition.T hen fill in
0.8L fres
h
machine oil an
d
star
t
the
en
g
ine fo
r
idle runnin
g
2-3 minutes.
Le
t
the en
g
ine sto
p
fo
r
1-2 minutes
an
d
chec
k
to see whethe
r
the oil level is
in
b
etwee
n
the u
pp
er an
d
lower line
s
o
f
the oil
g
au
g
e.
Do not us
e
an
y
machine oil o
f
a
differen
t
g
rade than the s
p
ecifie
d
one to
12
a
c
h
i
n
e
O
il
C
h
e
c
k
k
k
k
k
k
i
i
i
i
i
i
n
g
ƾ
The vehicle should be checked for
chine oil before drive by sup-porting
w
i
t
h
t
h
e
M
ain stand on a flat ground.The oil
l should be between the upper and
e
r
L
ines of the oil
g
g
g
g
g
g
g
a
aa
a
a
a
uu
u
u
u
u
u
g
g
g
g
g
g
g
e
e
e
e
e
e
e
.
W
W
W
W
W
W
W
h
h
h
h
i
i
i
i
c
h
h
h
h
h
h
i
i
i
i
i
i
i
s
s
s
s
s
s
n
n
n
n
n
n
n
o
o
o
o
o
o
o
t
t
t
t
t
t
ewed into th
e
e
e
e
e
f
f
f
f
f
f
f
i
i
i
i
i
i
i
l
l
l
l
l
l
l
l
l
l
l
l
l
l
i
i
i
i
i
i
i
n
g
orif ice.
ƾ
H
i
g
h
q
u
u
u
u
u
u
u
a
a
a
a
a
a
a
l
l
l
l
l
l
i
i
i
i
i
i
t
y
4-stroke machi
n
n
n
n
n
n
n
e
e
e
e
e
e
e
o
o
o
o
o
o
o
i
i
i
i
i
i
i
l
l
l
l
l
l
l
.
ss SE or
S
S
S
S
S
S
S
D
D
D
D
D
D
D
i
i
i
i
i
i
i
n
n
n
A
A
A
A
A
A
P
P
P
P
I
I
I
I
c
c
c
c
c
c
c
lassifi-cat
i
i
o
o
oo
n
n
n
n
n
n
n
.
o
o
o
o
o
o
o
f
f
f
f
f
f
f
E15W-40
i
i
i
i
i
i
i
n
n
n
n
n
n
n
v
v
v
v
v
v
v
i
i
i
s
s
s
s
c
c
c
c
c
c
c
o
o
o
o
o
s
s
s
s
i
i
i
i
i
i
i
t
t
t
t
t
y
y
y
y
y
y
y
w
w
w
i
i
i
i
l
l
l
l
l
l
l
l
l
l
l
l
h
h
h
h
h
h
h
elp
ntain a
l
l
l
l
l
l
o
o
o
o
o
o
o
n
g
g
g
g
g
g
g
service
l
l
i
i
i
i
i
i
i
f
f
f
f
f
f
f
e
o
o
o
r the
ine.In case t
h
h
h
h
h
h
o
o
o
o
o
o
o
s
s
e
a
a
a
a
a
a
r
r
r
r
r
r
r
e
e
e
e
e
e
e
n
o
o
o
o
o
o
o
t
t
t
t
t
t
t
a
v
v
v
v
v
v
ailab
l
l
e
e
e
e
e
e
,
,
,
,
,
a
a
a
a
a
a
a
stitute suitable
f
f
f
f
f
f
f
o
o
o
o
o
o
o
r
r
r
r
r
r
r
the am
b
b
b
b
i
i
i
i
i
e
e
e
e
e
e
n
n
n
n
n
n
n
t
t
t
t
t
t
t
m
p
erature of a
p
p
lication should be
ected according to the table on the
ri
g
ht sid
e
e
e
e
e
.
R
R
R
R
R
R
R
e
e
e
e
e
e
e
n
n
n
n
n
n
n
e
w
w
w
w
w
w
w
a
a
a
a
a
a
l
l
l
l
l
l
l
o
o
o
o
o
o
o
f
f
f
f
f
f
f
M
M
M
M
M
M
M
a
a
a
a
a
a
a
c
c
c
c
hi
ne
O
il
M
M
M
M
M
M
M
a
a
a
a
a
c
c
c
h
h
h
h
h
i
i
i
i
n
n
n
n
n
e
e
e
e
e
e
e
o
o
o
o
o
o
o
i
i
i
i
i
i
l
l
l
l
l
l
p
la
y
s a ver
y
r
r
i
m
p
m
m
ort
role in the normal o
p
o
o
e
ration o
f
e
n
g
ine an
d
fo
r
this reason,it is necess
t
o
c
h
e
c
k
t
h
e
m
o
t
o
r
c
y
c
l
e
f
o
r
m
a
c
hin
e
p
eriodicall
y
l
l
an
d
renew the oil o
e
ver
y
r
r
800-1
,
000km o
f
drivin
g
by
f
ollow in
g
p
roce
d
ures.
R
emove the screw
p
l
u
g
u
from
b
o
o
o
o
o
t
t
t
t
t
t
t
t
t
t
t
t
t
o
o
o
o
o
o
o
m
m
m
m
o
o
o
o
f
f
f
t
t
t
h
h
h
h
h
h
h
h
e
e
e
e
e
e
e
hot en
g
ine to drain of
f
f
f
o
o
l
l
l
l
l
l
d
d
d
o
il
.
W
a
s
h
the oil
f
f
f
f
i
i
i
i
i
l
l
l
l
l
l
l
t
t
t
t
t
t
e
e
e
e
e
e
r
r
r
r
r
r
r
s
s
s
s
s
s
s
cree
n
clea
n
remoun
t
t
t
i
i
t
t
t
t
t
t
r
r
r
r
r
e
e
e
e
e
e
a
a
a
a
a
a
a
l
l
l
l
l
l
l
l
l
l
l
l
y
y
y
y
y
y
y
l
l
l
l
l
l
l
l
t
t
t
t
t
t
o
o
o
o
o
o
o
p
p
p
p
p
p
p
os
i
i
i
i
i
i
i
tt
t
t
i
i
i
i
i
i
i
o
o
o
o
o
o
n.T hen fil
0
0
0
0
0
.
8
L fres
h
m
m
m
m
m
m
a
a
a
a
a
a
a
c
c
h
h
h
h
ine oi
l
l
l
l
l
l
l
an
d
s
tar
t
e
e
e
e
e
n
n
n
n
n
n
g
g
g
g
g
g
g
i
i
i
i
i
i
n
n
n
n
n
n
n
e
e
e
e
e
e
e
f
f
f
f
f
f
f
o
o
o
o
r
r
r
r
r
r
r
i
i
i
i
i
i
d
d
d
d
l
l
l
l
l
e
e
e
e
e
e
e
runnin
g
2
-
-
-
-
3
3
3
3
3
3
3
minutes.
L
e
e
e
e
e
e
e
t
t
t
t
t
t
t
h
h
h
h
h
e
e
e
e
e
e
en
g
ine s
t
t
t
t
o
o
o
o
o
o
o
p
o
o
o
oo
o
f
f
f
f
f
f
f
o
r
1
-2 minu
a
n
d
c
c
c
c
c
c
h
h
h
h
h
h
h
e
c
c
c
c
c
k
k
k
k
k
k
k
t
o
s
e
e
w
w
w
w
w
w
w
h
h
h
h
h
h
h
e
t
t
t
h
h
h
h
h
h
h
e
e
e
e
r
t
h
e
o
il l
e
v
e
i
n
b
b
b
b
b
b
b
e
e
e
e
e
t
w
e
e
e
e
e
e
e
e
n
n
n
n
t
t
t
t
t
h
h
h
h
h
h
h
e
u
p
p
p
p
p
p
p
p
p
p
p
p
p
p
u
u
e
e
e
e
e
e
e
r
a
n
d
l
o
w
e
r lin
e
the o
i
i
i
i
i
i
l
l
l
g
g
g
g
a
a
a
a
a
u
u
u
u
g
g
g
u
u
u
e.
D
o not us
e
a
n
y
nn
machine oil o
d
ifferen
t
n
n
g
rade than the s
g
g
p
e
cifie
d
one

13
avoid machinery failure.
13
id machi
n
n
n
n
n
n
n
e
e
e
r
r
r
r
r
r
r
y
y
y
y
y
y
y
f
f
f
f
f
f
f
a
a
a
a
ilur
e
e
e
e
e
e
e
.
.

14
Cl
ean
i
ng o
f
mac
hi
ne o
il
t
an
k
Check-up o
f
Spark Plug.
1.Drain off all the run –in machine oil from
the oil tank.
2.Dismount the related parts.
3.Wash clean all the related parts.
4.Fill in the required oil.
ˆThis job should not be done by untrained
persons but shall be done at an authorized service
center.
1.Remove the cap of spark plug and screw off
the spark plug by the plug wrench.
2.Clean the spark plug all aroud or replace it
if it is corroded or there is too much deposit on it.
3.Regulate the gap of the spark plug to 0.6-
0.7mm.
4.The spark plug of the designated type
should be used. The applicable type of spark plug:
NHSP LD D8TC made in China.
14
Cl
ea
n
n
n
i
i
i
i
i
i
i
n
n
n
n
n
n
n
g
g
g
g
g
g
g
o
f
m
m
m
m
m
m
m
a
a
c
c
c
c
c
c
h
h
h
h
h
h
i
i
i
i
i
i
n
n
n
n
n
n
e
e
e
e
e
e
e
o
o
o
o
o
o
o
i
i
i
i
i
i
i
l
l
l
l
l
l
l
n
k
C
C
C
C
C
C
C
h
h
h
h
h
h
ec
k
k
k
k
k
k
-u
p
p
p
p
p
p
p
o
o
o
o
o
o
o
f
f
f
f
f
f
f
S
S
S
S
S
S
p
a
a
a
r
r
r
r
r
r
r
k
k
k
k
k
k
k
Plug
1.Drain o
f
f
f
f
f
f
f
f
f
f
f
f
f
f
a
a
a
a
a
a
l
l
l
l
l
t
t
t
t
t
t
t
h
h
h
h
h
h
h
e
e
e
e
e
e
e
ru
n
n
n
n
n
n
n
–
i
i
i
n
n
n
n
n
n
n
mac
h
h
h
h
h
h
i
i
i
i
i
i
i
n
n
n
n
n
n
n
e
e
e
e
o
i
i
i
i
i
l
l
l
l
l
l
l
from
oil tank.
2
.Dismount the related
p
arts.
3.Wash clean all the related parts.
4
.Fill in the required oil.
ˆ
This job should not be done by untrained
sons but shall be done at an authorized service
ter.
1
1
1
1
1
1
.
.
.
R
R
R
e
e
e
e
e
e
m
m
m
m
m
m
m
o
o
o
o
o
o
o
ve
t
t
t
t
t
t
t
h
h
h
h
h
h
h
e
c
c
c
c
c
a
a
a
a
a
a
a
p of s
p
p
p
p
p
p
p
a
a
a
a
a
a
a
r
r
r
r
r
r
k
k
k
k
k
k
k
p
p
p
p
p
p
l
l
l
l
l
u
u
u
u
u
u
u
g and screw
the spark p
l
l
l
l
l
l
l
u
u
u
u
u
u
u
g
g
g
g
g
g
g
b
b
b
b
b
b
b
y
y
y
y
y
y
the
p
p
p
p
p
l
u
u
u
u
g
g
g
g
g
g
g
w
w
w
w
w
w
w
r
r
r
r
r
r
r
ench.
2.Clean the s
p
ark
p
lu
g
all aroud or re
p
lac
if it is corroded or there is too much deposit on it
3.Regulate thegap of the spark plug to 0
0
.
7
mm
.
4.The spark plug of the designated t
should be use
d
d
d
.
.
.
.
.
T
T
h
h
e
e
e
a
a
a
p
p
p
p
p
p
p
p
p
p
p
p
p
p
p
licable type of spark pl
NH
S
P
P
P
P
P
P
L
LL
L
L
L
L
D
D
D
D
D
D
D
D
8
T
C
ma
d
e in
C
C
C
C
C
C
C
h
h
h
h
h
h
h
i
i
i
i
i
i
n
n
nn
n
n
n
a
a
a
a
a
a
.
.
.
.

15
Check-up & Cleaning of Air Filter
Take out the air filter and check if it is contaminated.
Dismounting:
Remove the right side cover,take out the screw and disassemble the air filter.
Cleaning:
Wash the filter in clean washing oil and wipe it dry with dry cloth.
Soak it in clean machine oil,squeeze it dry and fit it back to position.
Recommended oil:15W/40QE
Caution:
The air filter element for use must be intact or the enine will suck in dust and dirt, resulting in a shorter service
life of the engine.
Water should be prevented from entering into the filter in washing the vehicle.
The filter shall neve
r
b
e cleane
d
with
g
asoline o
r
an
y
othe
r
a
g
en
t
o
f
a low i
g
nition
p
oint.
15
Che
c
c
c
c
c
c
c
k
k
k
k
k
k
-
-
-
-
-
-
-
u
u
u
u
u
p
p
p
&
C
C
C
C
C
C
C
l
e
e
e
e
e
e
e
a
a
a
nin
g
g
g
g
g
g
o
o
o
o
o
o
o
f
f
f
f
f
A
A
A
A
A
A
A
ir Filter
Take out the air filter an
d
d
d
d
c
h
h
h
h
eck if it is contaminated.
D
ismounting:
R
emove the right side cover,take out the screw and disassemble the air filter.
Cleaning:
Wash the filter in clean washing oil and wipe it dry with dry cloth.
Soak it in clean machine oil,squeeze it dry and fit it back to position.
R
ecommende
d
d
d
d
o
o
o
o
o
o
o
i
i
i
i
i
i
l
l
l
l
l
l
l
:
:
:
:
:
1
1
1
1
1
1
1
5
5
5
5
5
5
W
W
W
W
W
W
W
/
/
/
/
4
4
4
0
Q
Q
Q
E
E
E
E
E
E
Caution:
The air
f
f
f
f
f
f
f
i
i
i
i
i
i
l
t
t
t
t
t
t
t
e
e
e
e
e
e
r elem
e
e
e
e
e
e
n
n
n
n
n
n
t
t
t
t
f
f
o
o
o
o
r
r
r
r
u
u
u
u
u
u
s
s
s
s
e
m
m
m
m
m
m
m
u
u
u
u
u
u
u
s
s
s
s
s
s
s
t
t
t
t
t
t
t
b
b
b
b
b
b
b
e
e
e
e
e
e
e
i
i
i
i
i
i
nta
c
c
c
c
c
t
t
t
t
o
o
o
o
o
o
o
r the enine will
s
s
s
s
s
s
s
u
u
u
u
u
u
u
c
c
c
k in d
u
u
u
u
u
u
s
s
s
s
s
s
t
t
t
t
t
a
a
n
n
n
n
d
d
d
d
d
d
d
d
d
d
d
d
d
i
i
i
i
i
i
i
r
r
r
r
r
r
t
t
t
t
t
t
,
r
r
r
r
r
r
e
e
e
e
s
s
s
s
s
s
s
u
u
u
u
u
u
u
l
l
l
l
l
l
l
t
t
t
t
t
t
t
i
i
i
i
i
n
n
nn
n
n
n
g
g
g
g
g
g
g
in
a
a
a
a
a
a
a
s
s
s
s
s
s
s
horter serv
of the en
g
g
g
g
g
g
g
i
n
n
n
n
n
n
n
e
e
e
e
e
e
e
.
Water sh
o
o
o
o
o
o
o
u
u
u
l
l
l
l
l
d
d
d
d
d
d
d
be prevent
e
e
e
e
e
e
e
d
d
d
d
d
d
d
f
r
r
r
r
r
r
r
o
o
o
o
o
m enterin
g
g
g
g
g
g
g
i
n
n
n
n
n
n
t
t
t
t
t
t
t
o the filter in was
h
h
h
h
h
h
h
in
g
g
g
g
g
g
g
the vehicle.
e
fil
t
e
r
s
h
a
ll n
e
e
e
e
e
e
v
v
v
v
v
v
e
r
b
b
b
b
b
b
e
e
e
e
e
e
e
c
c
c
c
c
l
e
a
a
a
a
a
a
a
n
n
e
d
d
d
d
d
w
i
t
h
g
g
g
g
g
g
a
a
a
a
a
a
a
s
s
s
s
s
s
s
o
o
o
o
o
o
l
l
l
l
l
l
l
i
i
n
e
e
e
e
e
e
e
o
r
a
n
y
n
n
o
t
h
e
r
a
g
e
n
t
n
n
o
f
a
l
l
l
l
l
l
l
o
o
o
o
o
o
o
w
i
i
i
i
i
g
g
g
g
g
g
g
i
i
i
ni
t
i
o
n
n
n
n
n
n
p
o
i
i
i
i
i
n
n
n
n
n
n
t
.

16
Adjustmen
t
o
f
Throttle Cable
Make sure that the adjust ing nut of the throttle
cable and locking nut work normally.
Check to see if the throttle twist grip is with the
required free operating movement.
The required free operating movement:2-6mm.
If the grip can not be so moved freely.turn the
adjust ing nut to ensure it.
After adjustment, start the engine and check for
the free operating movenent again,Repeat the
adjustment if necessary until it is as required.
Adjustmen
t
o
f
Carburetor
Caution:
The adjust ing procedures of idling speed:
1.Support the vehicle by a stand.
2.Adjust the idling speed by the throttle stop
screw(1) to 1500f150rpm.
Caution:
Do not try to cover up any trouble of other parts of the
carburetor by adjust ing the idling speed. In case of
any abnormality with the carburetor,it has to removed
by your dealer.
Adjust ment of id ling speed shall be made only when
the cold engine is warmed up or 10 minutes after the
motorcycle is stopped from driving.
16
Adj
u
u
u
u
u
u
u
s
s
t
t
t
t
t
t
t
m
m
m
m
m
m
en
t
o
o
o
f
f
f
f
f
f
f
T
T
T
T
T
T
T
h
h
h
h
h
h
h
r
o
t
t
l
e
e
e
e
e
e
C
C
C
C
C
C
C
a
a
a
a
a
a
b
l
e
M
ake sure that t
h
h
h
h
h
h
h
e
e
e
e
e
a
a
a
a
a
a
d
d
d
d
d
d
j
j
j
j
j
u
u
u
u
u
u
u
s
s
s
s
s
s
t
t
t
t
t
t
i
i
i
n
n
n
n
n
n
n
g
g
g
g
g
g
n
n
n
n
n
n
n
u
u
u
u
u
u
u
t
t
t
t
t
t
t
of the throttle
le and locking nut work normally.
Check to see if the throttle twist grip is with the
uired free operating movement.
The required free operating movement:2-6mm.
I
f the grip can not be so moved freely.turn the
ust ing nut to ensure it.
After adjustmen
t
t
,
,
,
,
,
,
s
s
s
s
s
s
s
t
t
t
t
t
t
t
a
a
a
a
a
a
a
r
r
r
rr
t
t
t
t
t
t
t
t
t
t
t
t
t
t
h
h
h
h
h
h
e
e
e
e
e
e
e
e
e
e
n
n
n
n
n
n
n
g
g
g
g
g
g
g
i
i
i
i
i
i
n
n
n
n
n
n
n
e
e
e
e
e
e
e
a
a
a
a
a
a
a
nd check for
free oper
a
a
a
a
a
a
t
t
t
t
t
t
i
i
i
i
i
i
i
n
n
n
n
n
n
n
g
g
g
g
g
g
g
movenent again,
R
R
R
R
R
R
R
e
e
e
e
e
e
e
p
p
p
p
p
p
e
e
e
e
e
e
at the
ustment if
n
n
n
n
n
n
n
e
e
e
e
e
e
c
c
c
c
c
c
essary until it is as r
e
e
e
e
e
q
q
q
q
q
q
q
u
u
u
u
u
u
u
i
i
i
i
i
i
i
r
r
r
r
r
r
r
e
e
e
e
e
e
e
d
d
dd
d
d
d
.
.
.
.
.
Adj
u
u
u
u
u
u
u
s
s
s
s
s
s
s
t
t
t
t
t
t
t
m
m
m
m
m
m
m
e
e
e
e
n
n
n
n
n
n
n
t
o
f
f
f
f
C
C
a
r
r
r
r
r
r
r
bbb
b
b
b
b
u
u
u
u
u
u
u
r
r
r
eto
r
r
r
r
r
C
aution:
The ad
j
ust in
g
g
g
g
g
g
p
p
p
p
p
p
p
ro
c
c
c
c
c
e
e
e
e
e
e
e
d
d
d
d
d
d
d
u
u
u
u
r
r
r
r
r
r
r
es
o
o
o
o
o
o
o
f
f
f
i
d
d
d
d
d
d
l
l
l
l
l
i
i
i
i
i
i
n
n
n
n
n
n
g
g
g
g
g
g
sp
e
e
e
e
e
e
e
e
e
d
d
d
d
d
d
d
:
1.Support the veh
i
i
i
i
i
i
i
c
l
l
l
l
l
l
l
e
b
b
b
b
b
b
b
y
y
y
y
y
y
y
a
a
a
a
a
a
s
s
s
s
s
t
t
t
t
t
t
a
a
a
a
a
a
a
n
n
n
n
n
n
n
d
d
d
d
d
d
d
.
2
.Adjust the idlin
g
s
p
eed b
y
the throttle sto
p
ew
(
1
)
to 1500
f
150rpm.
Caution:
Do not try to cover up any trouble of other parts of
carburetor by adjust ing the idling speed. In case
an
y
abnorma
lit
y
with the carburetor,it has to remo
by your dealer.
Adjust ment of id ling speed shall be made only w
the cold en
g
ine is warmed u
p
or 10 minutes after
motorcycle is st
o
o
o
o
o
o
p
p
p
p
p
p
p
p
p
p
p
p
e
e
e
d
d
f
f
r
r
r
o
o
o
o
m
m
m
m
m
driving.

17
Check-up & Adjustmen
t
o
f
Air Valv
e
Gap
Noise will stem from too big gap of the air valve. However if there is too small gap or even no gap at all,
closing of the valve will be hindered, which will cause burn of the valve and output drop. Therefore, the air valve gap
must be checked periodically.
The gap of the air valve should be inspected and adjusted with a cold engine by the follow ing procedures:
1.Remove the caps of the central hole and the top hole (the ignition timing observation hole)in the left crankcase
cover.
2.Remove the caps of the two air valves on the cylinder head.
3.Insert the “T” key into the central hole of the crankcase cover, jam it against the nut of the flying wheel and
then turm the flying wheel clockwise nutil the engraved “T” mark on the flying wheel alin\gns with the engraved line
on the top of the crankcase cover.Swing the rocking arm slightly.A loose rocking arm(which indicates the existence
of clearance) shows that the piston is in the upper stop position of the compressing t\stroke, where the valve can be
adjusted. A tight rocking arm means thar the piston is in the lower stop position of the compressing stroke, In this
case, continuously turn the “T” key clock wise for 360 degrees until the alignment of those engravd marks, where the
valve can be adjustd,Afterwards, check the valve gap by inserting a feeler in between the valve adjust ing screw and
the end of the valve.
The specified air valve gap :0.05mm for the intake and exhaust valves respecively.
Brake Checking
(1) pull up the front and rear brakes respectively and check for wear of the brake shoes. If the mark “Ƹ” on the
brake drum cover aligns with that “Ƹ” on the brake cam, it means that the brake shoes are already worn to the limit
and have to be replaced.
(2) Replacement should be carried out at a designated service center and it is recommended that the parts made
by our company are used therein.
17
heck-
u
u
u
u
u
u
p
p
p
p
p
p
p
& Ad
j
j
j
j
j
ust
m
m
m
m
m
m
m
e
e
e
e
e
e
e
n
n
n
n
n
n
n
t
t
t
t
t
t
t
o
o
o
o
o
o
o
ff
f
f
f
ff
A
A
A
A
A
A
A
i
i
i
i
i
i
i
r
r
r
r
r
r
r
Valv
e
Gap
N
oise
w
w
w
w
w
w
w
i
i
i
i
l
l
l
l
l
l
l
l
l
l
l
l
l
stem
f
f
f
f
rom too
b
b
b
i
i
i
g
g
g
g
g
g
g
g
g
g
g
g
g
g
a
a
a
a
a
a
a
p of the a
i
i
i
i
i
i
i
r valve. Howeve
r
r
r
r
r
r
r
i
i
i
i
i
f
f
f
f
f
f
f
t
h
h
h
h
h
h
h
e
r
r
r
r
e
e
e
i
i
i
i
s
s
s
too small
g
g
g
g
g
g
a
a
a
a
a
a
a
p
p
p
p
p
p
p
or eve
n
n
n
n
n
n
o gap at
clo
sin
g
of th
e
e
e
e
e
e
v
v
v
v
v
v
v
a
a
a
a
a
a
l
l
l
l
ve w
i
i
i
i
l
l
l
l
l
l
l
l
l
b
b
b
b
b
b
b
e hi
n
n
d
d
d
d
d
er
e
e
e
e
e
d
d
d
d
d
d
d
, which
w
w
w
w
i
i
i
i
i
i
i
l
l
l
l
l
l
l
c
c
c
ause burn of the
v
v
v
v
v
v
v
a
a
a
a
a
a
a
l
v
v
v
v
v
v
e
e
e
e
a
a
a
a
a
n
n
n
n
n
n
n
d
d
d
d
o
o
o
o
o
o
o
u
u
u
u
u
u
t
t
t
t
p
p
p
p
u
t
t
t
t
t
d
d
d
d
d
d
d
r
o
o
o
o
o
o
o
p
p
p
p
p
.
T
T
T
T
T
T
T
h
h
h
h
h
h
h
erefore,
t
t
t
h
h
h
h
h
h
h
eair valve
ga
st be chec
k
k
k
k
k
k
e
e
e
e
e
e
e
d
d
p
p
p
p
p
p
p
e
e
e
e
e
riodicall
y
y
y
y
y
y
y
.
The gap of
t
t
h
h
h
h
h
h
h
e
e
e
e
e
e
e
air
v
v
v
v
a
a
a
a
a
a
a
l
v
v
v
v
v
v
e s
h
h
h
h
h
h
h
o
o
o
o
u
u
u
u
u
u
u
l
l
l
l
l
d
d
d
d
d
d
d
b
b
b
b
b
b
e in
s
s
s
s
s
p
p
p
p
p
p
p
e
e
e
e
e
e
cted and adjusted with a co
l
l
l
l
l
l
d
d
d
d
d
d
e
e
e
e
ng
i
i
i
i
i
i
i
n
n
n
n
n
n
n
e
e
e
e
e
e
e
b
b
b
b
b
b
b
y t
h
h
h
h
h
h
h
e
e
e
f
f
f
f
f
f
o
o
o
o
o
o
o
l
l
l
l
l
l
l
l
l
l
l
l
l
o
o
o
o
o
o
o
w
w
w
w
w
w
i
i
i
i
i
i
n
g
g
g
g
g
g
g
p
p
p
p
p
p
rocedures:
1.Remove the ca
p
s o
f
f
f
f
f
f
t
t
t
t
t
t
t
h
h
h
h
h
h
h
e
e
e
e
e
e
e
c
c
c
c
c
c
e
e
e
e
e
e
e
n
n
n
n
n
n
t
t
t
t
t
r
r
r
r
r
a
l
l
l
l
l
l
h
h
ole and the to
p
hole
(
the i
g
nition timin
g
o
b
b
b
b
b
b
b
s
s
s
s
s
s
e
e
e
e
r
r
r
r
r
v
v
v
v
v
a
a
a
t
t
t
t
t
i
i
i
o
o
o
o
o
o
o
n
n
n
n
n
n
n
h
h
h
h
h
h
h
o
l
l
e
)
in the left crankc
er.
2
.Remove the caps of thetwo air valves on the cylinder head.
3.Insert the “T” ke
y
into the central hole of the crankcase cover,jam it a
g
ainst the nut of the fl
y
in
g
wheel
the
n turm the flying wheel clockwise nutil the engraved “T” mark on the flying wheel alin\gns with the engraved
li
on
the top of the crankcase cover.Swing the rocking arm slightly.A loose rocking arm(which indicates the existe
nc
of
clearance) shows that the
p
iston is in the u
p
p
er sto
p
p
osition of the com
p
ressin
g
t\stroke, where the valve can
b
adj
usted. A tight roc
k
k
k
k
k
i
i
i
i
i
i
i
n
n
n
n
n
n
g
g
g
g
g
g
g
a
a
a
a
a
a
r
r
r
r
r
r
m
m
m
m
m
m
m
m
e
e
e
e
a
a
a
a
a
a
a
n
n
n
n
n
n
n
s
s
s
s
s
s
t
t
t
t
t
t
t
h
h
h
h
h
h
h
a
a
a
a
a
a
r
r
r
r
r
r
r
the piston is in the lower stop
p
p
p
p
p
o
o
o
o
o
s
s
s
s
s
s
s
i
i
i
i
i
i
i
t
t
t
t
t
i
i
i
i
i
i
i
o
o
o
o
o
o
o
n
n
n
n
n
n
n
o
o
o
o
f
f
f
f
t
t
t
t
t
h
h
h
h
h
h
h
e
e
e
e
e
e
e
e
c
c
c
c
c
c
c
o
o
o
o
o
o
o
m
m
m
m
m
m
p
p
p
p
p
ressing stroke, In
th
cas
e, continuou
s
s
l
l
l
l
l
l
l
y
y
y
y
y
y
y
t
t
t
t
t
t
t
urn the “T” key clock
w
w
i
i
i
i
i
i
i
s
s
s
s
s
s
s
e
e
e
e
e
e
for 360 degrees until t
h
h
h
h
e
e
e
e
e
e
e
a
a
a
a
a
a
a
l
l
l
l
l
l
i
i
i
i
i
i
gnment of those eng
r
r
r
a
a
a
a
a
a
a
v
v
v
v
v
v
v
d
d
d
d
d
d
d
marks, where
th
val
ve can be
a
a
a
a
a
a
a
d
d
d
dd
d
d
j
j
j
j
j
j
j
u
u
std,Afterwards
,
,
,
,
c
h
h
h
h
h
h
h
e
e
e
e
e
e
e
c
c
c
c
c
k
k
k
k
k
k
k
t
t
t
t
t
t
t
h
h
h
h
h
h
h
e
e
e
e
e
e
e
v
v
v
v
v
v
a
l
l
l
l
l
l
v
v
v
v
v
v
v
e
e
e
e
e
e
e
g
a
p
b
y
insertin
g
a
a
a
a
a
a
a
f
f
f
f
f
f
f
eeler in between the
v
v
v
v
v
v
v
a
a
a
a
a
a
a
l
l
l
l
l
l
l
v
v
v
v
v
v
v
e
e
e
e
e
e
e
a
a
a
a
a
a
a
d
d
d
d
d
d
d
j
j
j
j
j
j
j
u
u
u
u
u
u
u
s
s
s
s
s
s
s
t in
g
screw
a
end of th
e
e
e
e
e
e
v
v
v
v
v
a
a
a
a
a
a
a
l
l
l
l
l
l
l
v
e
e
e
e
.
The spe
c
c
c
c
c
c
c
i
f
f
f
f
f
f
f
i
i
i
i
i
i
i
e
e
e
e
e
d
d
d
d
d
a
a
a
a
a
a
a
i
i
i
i
r
r
r
r
v
v
v
v
v
v
v
a
a
a
a
a
l
l
l
l
v
v
v
v
v
v
v
e
e
e
e
ga
p
p
p
p
p
p
:
:
:
:
0
0
0
0
0
0
0
.
0
0
0
0
0
0
0
5
5
5
5
5
5
5
mm for t
h
h
h
h
h
h
h
e
e
e
e
i
i
i
i
i
i
n
n
take and exhau
s
s
s
s
s
t
v
v
v
v
v
v
v
a
a
a
a
a
a
a
l
l
l
v
v
v
v
v
e
e
e
e
e
s
s
s
r
r
r
r
e
e
e
e
e
s
s
s
p
p
p
p
p
p
p
e
e
e
e
e
e
e
c
c
c
c
c
c
c
i
i
i
i
i
i
v
v
v
v
v
v
e
e
e
e
l
l
l
l
l
l
y
y
y
y
y
y
y
.
rake C
h
h
h
h
h
h
h
e
e
e
e
e
e
e
c
c
c
c
c
c
c
k
k
k
k
k
k
k
ing
(1) pull up t
h
h
h
h
h
h
e
e
e
e
e
e
e
fro
n
n
n
n
n
n
t
t
t
t
t
t
t
a
a
a
a
a
a
a
nd
r
r
r
r
r
r
r
e
e
e
e
e
a
a
a
a
a
r
r
r
r
r
r
r
b
b
b
b
b
b
r
r
r
r
a
k
k
k
k
k
k
k
es
r
r
r
r
r
r
r
e
e
e
e
e
e
e
spectively and check for w
e
e
e
e
e
e
a
a
a
a
a
a
a
r o
f
f
f
f
f
f
f
t
t
t
t
t
t
t
h
h
h
h
h
h
h
e
b
b
b
b
b
b
b
ra
k
k
k
k
k
k
k
e
e
e
e
s
s
s
s
s
s
h
h
h
h
h
h
h
o
o
o
o
o
o
o
e
e
e
e
e
e
e
s
s
s
s
s
s
s
. If
t
t
t
t
t
t
t
h
h
h
h
h
h
h
e
e
e
mark “
Ƹ
”
on
ke drum cover ali
g
ns wit
h
h
h
h
h
t
h
h
h
h
h
h
h
at
“
“
“
“
“
Ƹ
Ƹ
Ƹ
Ƹ
” on the brake cam, it means that the bra
k
k
k
k
k
k
k
e
e
e
e
e
s
s
s
s
s
s
h
h
h
h
h
o
o
o
o
o
o
o
e
e
e
e
e
e
e
s
s
s
s
s
s
are alread
y
worn to the li
have to be re
p
laced.
(2) Replacement should be carried out at a designated service center and it is recommended that the parts m
our company are used therein.

18
Adjustmen
t
o
f
Fron
t
Brake
(1) The front brake has a free operating
movement of 10-20mm as shown in the figure on the
right side.
(2) inspect the reseivoir capacity and refill if
necessary in order to maintain proper level in the
reservior.This should be the major project of your
regular inspection
(3) check the front brake lining for its worm
depth.if its worn depth is up to the limited mark,
replace the brake lining.if the lining doesn’t have
limited mark but a concave slot as the figure,replace
the lining while its worn depth up to the bottom of
concave slot.replacement of a pair of linings shall be
conducted sumultaneously despite only one of them
18
Adjus
t
t
t
t
t
t
t
m
m
m
m
m
m
m
e
n
n
n
n
n
n
n
t
t
t
o
o
o
o
f
Fro
n
n
n
n
n
n
n
t
t
t
t
t
t
t
B
B
B
B
B
B
B
rake
(
1
)
The
f
f
f
f
f
f
f
r
r
r
r
r
r
r
o
n
n
n
t
t
t
t
t
b
b
b
b
b
rake
h
h
h
h
h
h
as a f
r
r
r
r
r
r
e
e
e
e
e
e
e
e
e
e
e
e
e
e
o
o
o
o
o
o
o
p
p
p
p
p
p
erating
vement of 10-2
0
0
0
0
0
0
m
m
m
m
m
m
m
m
m
m
m
m
m
m
a
s
s
s
s
s
s
s
shown in
t
t
t
t
t
t
t
h
h
h
h
h
h
h
e
e
e
e
e
e
f
f
f
f
f
f
f
i
i
i
i
i
gure on the
ht side.
(
2
)
ins
p
ect the reseivoir ca
p
acit
y
and refill if
essary in order to maintain proper level in the
ervior.This should be the major project of your
ular inspection
(3) check the front brake lining for its worm
th.if its worn
d
d
d
d
d
d
d
e
e
e
e
e
e
p
p
p
p
p
p
t
t
t
t
h
h
h
h
h
is up to the
l
l
l
l
l
l
l
i
i
i
i
i
i
m
m
m
m
m
m
m
i
i
i
i
i
i
t
t
t
t
t
t
e
e
e
e
e
e
d mark,
lace the b
r
r
r
r
r
r
a
a
a
a
a
a
a
k
k
k
k
k
k
e linin
g
.if the linin
g
g
g
g
g
g
g
d
d
dd
d
d
d
oo
o
o
o
o
o
ee
e
e
e
e
s
s
s
s
s
s
n
n
n
n
n
n
n
’
’
’
t
t
t
t
t
t
have
ited mark
b
b
b
b
b
b
b
u
u
u
u
u
u
u
t
t
t
t
t
t
t
a
a
a
a
a
a
a
c
c
c
c
c
c
c
o
o
o
o
n
n
n
n
c
c
c
c
c
c
c
ave slot as
t
t
t
t
t
t
t
h
h
h
h
h
h
h
e
e
e
e
e
e
e
f
f
f
f
f
f
f
i
i
i
i
i
i
g
ure,r
e
e
e
e
p
p
p
p
p
p
p
lace
lining w
h
h
h
h
h
h
h
i
l
l
l
l
e
e
e
e
e
e
i
i
i
i
t
t
t
t
s
s
s
s
s
w
w
w
w
o
o
o
o
o
o
o
r
r
r
r
n
n
n
n
n
n
d
d
d
d
d
d
d
ept
h
h
h
h
h
h
u
p
p
p
p
p
p
p
t
t
t
t
t
t
o the bo
t
t
t
t
t
t
t
t
t
o
o
o
m
m
m
m
m
m
m
of
cave slot.re
p
p
p
p
p
p
p
la
c
c
c
c
c
c
c
e
e
e
e
e
e
ment of
a
a
a
a
a
a
a
p
p
p
p
p
a
a
a
a
a
a
i
i
i
i
i
i
i
r of lini
n
n
n
g
g
g
g
g
g
g
s
s
s
s
s
s
s
s
s
s
s
s
h
h
h
h
h
h
all be
ducted sumulta
n
n
n
n
n
n
n
e
e
e
e
e
e
o
o
o
o
o
o
o
us
l
l
l
l
l
l
l
y
y
y
y
y
y
y
d
d
d
d
d
d
d
es
p
p
p
p
p
p
p
i
i
i
i
i
t
t
t
e
e
e
e
e
o
o
o
o
o
o
o
n
n
n
n
l
l
l
l
l
l
l
y o
n
n
n
n
n
n
e
e
e
e
e
e
e
o
o
f them

19
is worn.
19
w
o
r
n
.

20
Adjustment o
f
Rea
r
Brake
ƾThe vehicle should be supported by the main stand for check.
(1) The rear brake pedal has a free operating movement of 20-30mm as
shown in the figure on the right side.
(2) To make adjustment, turn the rear brake adjust ing nut clockwise to
reduce snd counter clock wise to increase the free operating movement of the
brake pedal.
Adjustment of Chain
1.When regulation is needed. Ioosen the rear axle nut
2.Turn the chail adjust ing nuts
on the left and right sides to adjust the tension of the chain and to align the marking of
the chain adjuster with the engraved lines in the similar position, on both sides.
3.Tighten the lock nut and rear axke nut by a torque of 35-50Nm.
4. Repetitively check the tension of the chain.
5.When the rear wheel is changed in position and the chain adjusted, the free
operating movement of the rear brake pedal will be affected, which, therefore,
should be checked thereafter and also regulated if necessary
2
0
djust
m
m
m
m
m
e
e
e
e
e
e
e
n
n
n
n
n
n
n
t
t
t
t
t
t
t
o
o
o
o
o
f
f
f
R
R
R
R
R
R
e
e
e
e
e
e
a
a
a
a
a
a
a
r
r
r
r
r
r
r
B
B
B
B
B
B
B
r
r
r
r
r
r
r
a
a
a
a
a
a
a
kk
k
k
k
k
k
e
e
e
e
e
e
e
The vehicle
s
s
s
s
s
s
s
h
h
h
h
h
h
o
o
o
o
o
o
o
u
l
l
l
l
l
l
l
d
d
d
d
d
d
d
b
b
b
b
b
b
b
esu
p
p
p
p
p
p
p
p
p
p
p
o
o
o
o
r
r
r
r
t
t
t
t
t
t
t
e
e
e
e
e
e
d
d
d
d
d
d
d
b
y
y
y
y
y
y
y
t
t
t
he
m
m
m
m
m
m
m
ain
s
s
s
tan
d
d
d
d
d
d
f
f
f
f
f
f
f
o
o
o
o
o
o
r
r
r
r
r
r
r
ch
e
e
e
e
e
e
c
c
c
c
c
c
c
k
k
k
k
k
k
k
.
orted by the
(
1
)
The rear
b
b
b
b
b
r
a
a
a
a
a
k
e
e
e
e
e
e
p
p
p
p
p
p
p
e
e
e
e
e
e
d
d
d
d
a
a
a
a
a
a
a
l
l
l
h
h
h
h
h
h
h
a
a
a
a
a
a
a
s a free
o
o
o
o
o
o
o
p
p
p
p
p
p
e
e
e
e
e
r
a
a
a
a
t
t
i
n
n
g
g
g
g
g
g
g
m
m
m
m
m
m
m
o
o
o
o
o
o
o
v
v
v
v
v
v
ement of 20-30mm
al has a free
wn in the figure on the right side.
(2) To make adjustment, turn the rear brake adjust ing nut clockwise
turn the rear
red
uce snd counter clock wise to increase thefree operating movement of
t
to increase the
ke pedal.
djustment of Chain
1.When re
g
ulation is needed. Ioosen the rear axle nut
2
.Turn the chail
a
a
a
a
a
a
a
d
d
d
d
d
d
d
j
j
j
j
j
j
j
u
u
u
u
u
u
u
s
s
s
s
s
s
t
t
t
t
t
i
i
i
i
i
i
i
n
n
n
n
n
n
n
g
g
g
g
n
u
u
u
t
t
t
t
t
t
s
s
s
s
s
s
s
on
the left a
n
n
n
n
n
n
d
d
d
d
d
d
r
r
r
r
r
i
i
i
i
i
i
i
g
h
h
h
h
h
h
t
t
t
t
t
t
t
s
s
s
s
i
i
i
d
d
d
d
d
d
e
e
e
e
e
e
e
s to ad
j
us
t
t
t
t
t
t
t
t
t
h
h
h
h
h
h
h
e
e
e
e
e
e
tension of the chai
n
n
n
n
aa
a
a
a
a
a
n
n
n
n
n
n
n
d
d
d
d
d
d
d
t
t
o alig
n
n
n
n
n
t
t
t
t
t
t
t
he marking
t the tension
chain adj
u
u
u
u
u
u
u
s
t
t
t
t
t
t
t
e
e
e
e
e
e
r
r
r
r
r
r
w
w
w
w
w
w
w
i
i
i
i
t
t
t
t
h
h
h
h
h
t
t
t
t
t
h
h
h
h
e
e
e
e
e
e
engr
a
a
a
a
a
a
v
v
v
v
e
d
d
d
d
d
d
d
l
l
l
l
l
l
l
i
i
i
i
nes in th
e
e
e
e
e
e
e
s
s
s
s
s
i
i
i
i
i
i
m
m
m
m
m
m
m
i
i
i
i
i
i
l
l
l
l
l
l
l
a
a
a
a
a
a
r
r
r
r
p
p
p
p
p
p
p
o
o
o
o
o
o
o
si
t
t
t
t
t
t
t
i
i
i
i
i
i
o
o
o
o
n, on bo
t
t
t
t
h
h
h
h
h
h
h
s
s
s
s
s
s
s
ides.
d lines in the
3.Ti
g
hten
t
t
t
t
t
t
h
h
h
e
e
e
e
e
e
l
l
l
l
l
l
o
o
ck nut a
n
n
n
n
n
n
n
d
d
d
d
d
d
d
r
e
e
e
e
e
e
e
ar axke n
u
u
u
u
u
u
t
t
t
t
t
t
t
b
b
b
b
b
b
y
y
y
y
y
y
y
a tor
q
q
q
q
q
q
u
u
u
u
u
e
o
o
o
o
o
o
o
f
f
f
f
f
f
f
35-50N
m
m
m
m
m
m
.
r axke nut by
4
. Repetitiv
e
e
e
e
e
e
l
l
l
l
l
l
y
y
y
y
y
y
y
c
h
h
h
h
h
h
h
e
e
e
e
e
e
e
c
c
c
c
c
c
c
k
k
k
k
k
k
th
e
e
e
e
e
e
e
t
t
t
e
e
e
e
e
e
n
n
n
n
n
n
s
s
s
s
s
s
s
i
i
i
i
i
i
i
o
o
o
o
o
o
n
n
n
n
n
n
n
o
f
f
t
t
t
t
t
t
t
h
h
h
h
h
h
e
c
c
c
c
c
c
c
h
a
a
a
a
a
a
a
i
i
i
i
i
i
i
n.
nsion of the
5.When the rear w
h
h
h
h
h
h
h
e
e
e
e
e
e
e
e
e
e
e
e
e
e
l
l
l
l
i
i
i
i
i
i
s
s
s
s
s
s
c
c
c
c
c
c
c
h
h
h
h
h
h
h
a
a
a
a
nged in
p
p
p
p
p
p
p
o
o
o
o
o
o
o
s
s
s
s
s
ition an
d
d
d
d
d
d
t
t
t
t
t
t
t
h
h
h
h
h
h
h
e
e
e
e
e
e
e
chain adjusted, the f
changed in
ope
ratin
g
movement of the rear brake
p
edal will be affected, which, therefo
r
brake pedal
uld be checked thereafter and also regulated if necessary
Table of contents
Other Kinroad Motorcycle manuals