KISAN Newton 3 User manual

Newton 3
USER MANUAL

02
Thank you for purchasing KISAN product, NEWTON3.
Read this operation manual thoroughly before using the product.
Follow this operation manual to ensure the safe and proper use of the product
and to prevent any physical/material damage.
The contents of this manual could be changed without notice.
The actual product may differ from the contents of this manual.
Any part of our product shall not be reproduced for commercial purpose
without our permission.

Precaution
When inserting banknotes
To use the product safely
To maximize the durability of the product
Daily Checkup
Appearance
Front Part
Rear Part
Control Screen Display
Specifications
Operation of Function
Main Menu
Display the Detail Counting Result
Mode Setting
Batch Setting
Error & Guide
Simple Trouble shooting guide 1/2/3
Reject Reason List
Guide for Components
Contents
03

When inserting banknotes
Do not insert banknotes severely damaged, wet or mixed with alien substances.
Make sure that no other foreign substances enter the product including your hands
and hair, when inserting and counting banknotes.
Straighten the folds or corners of banknotes before insertion.
Banknotes should be properly arranged and put on the hopper as shown below.
04

To use the product safely
DO NOT place the product near heat sources such as a stove or a heater.
DO NOT try to disassemble or repair the product by yourself.
Such attempts may cause accidents.
DO NOT place heavy objects or liquid containers, such as a beverage can, on the product.
DO NOT apply excessive force to the product.
DO NOT try to open or operate the product by force.
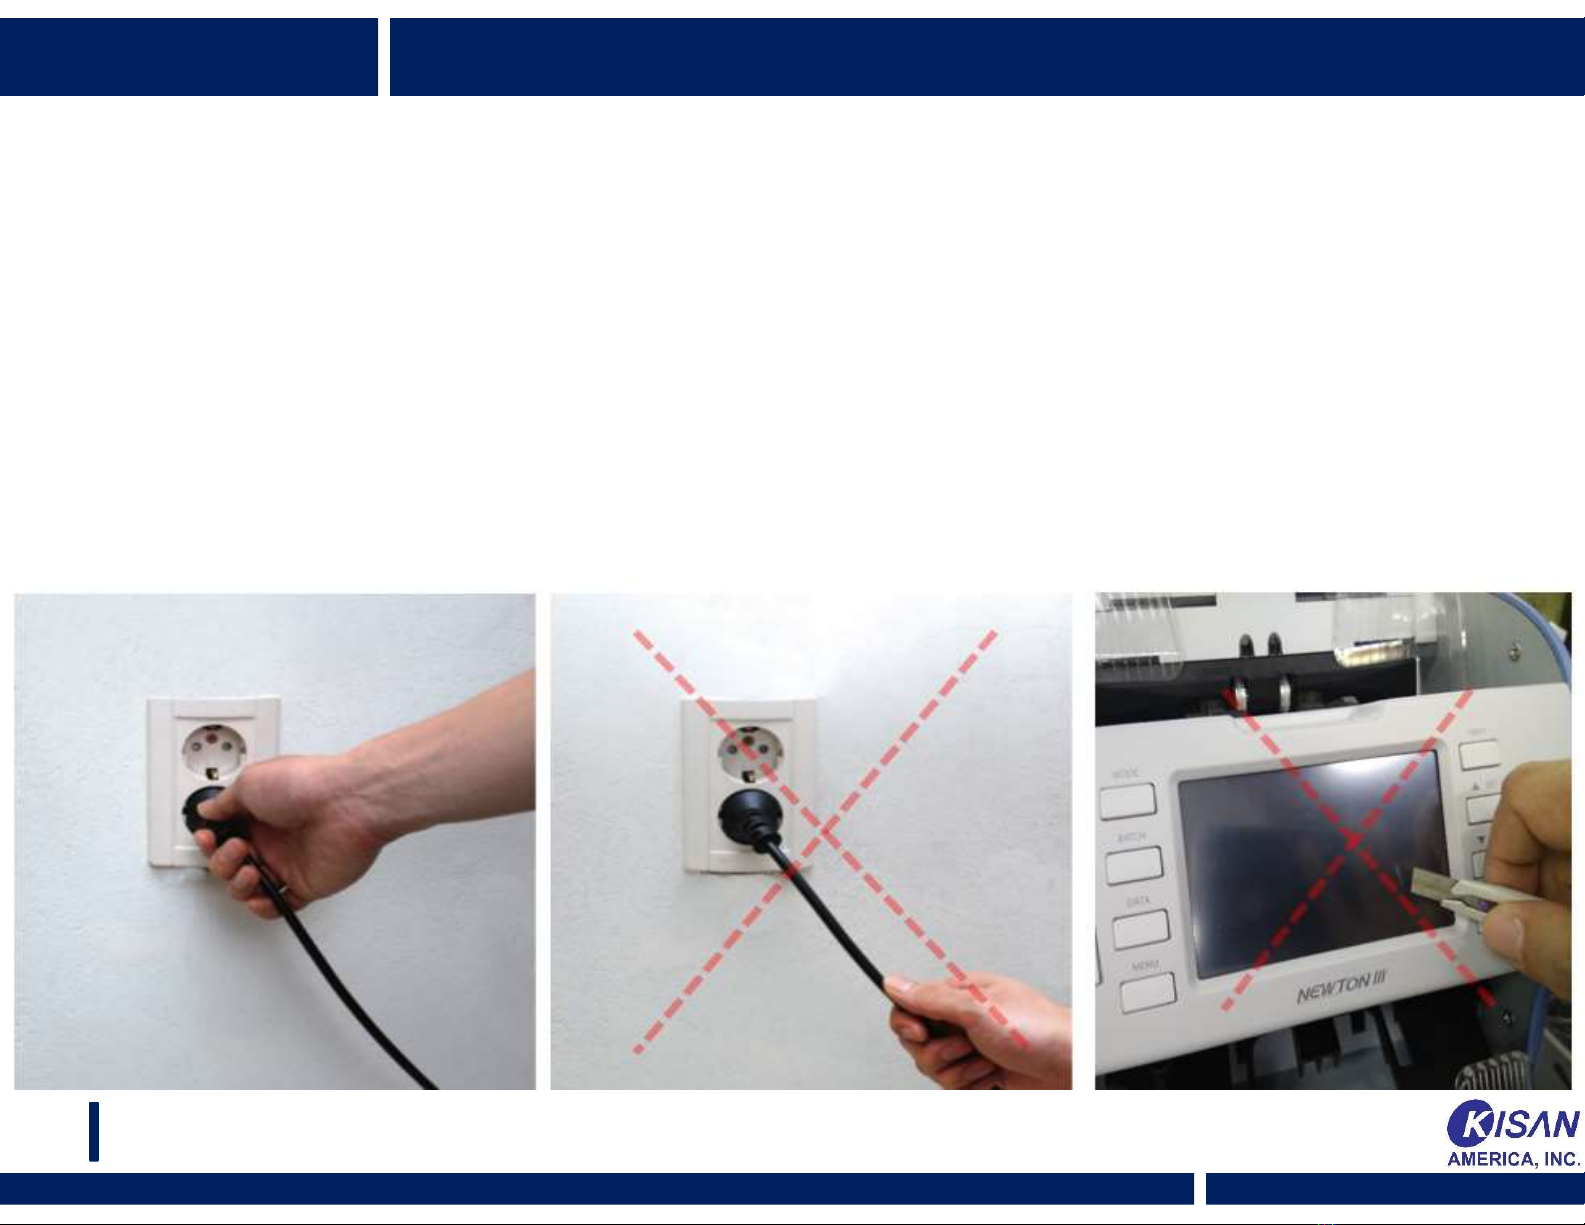
Make sure to apply proper grounding, using the plug.
Short-circuit may cause electric shock.
Make sure to shut its power off before putting your hands inside the product
for such purposes as replacing a fuse or checking the components.
DO NOT unplug the product holding its electric cord.
Such action may cause electric shock or fire.
05

To maximize the durability of the product
DO NOT expose the product to the direct rays of the sun for a long period.
DO NOT place the product in a dusty space make sure that the product stays free
of dusts or foreign substances , also do not place the product on an unstable
or shaky place.
Keep and use the product under the optimal conditions as follows
- Temperature : 10 ~ 35 ℃( For use ) / - 10 ~ 45℃( For storage )
- Humidity : 20 ~ 90 % RH
DO NOT press the LCD screen or control keys with sharp objects such as a pen or a pin.
For the safekeeping of a long period, lay its cover over the product.
06

Daily Checkup
Remember to shut off the power and unplug the product during the checkup.
DO NOT use chemicals when removing dust from the product.
The use of chemicals may cause discoloration and deterioration.
Under long-term use, such foreign substances as dust may stick to the
sensor, causing errors.
To prevent this, use a brush to remove any foreign substances from
the sensor.
07

Front Part
Hopper guide moves from
side to side and adjustable
by the size of banknotes
Stacker is an area where
banknotes are taken out upon
the operational completion
Reject stacker is an area
where the rejected
banknotes are taken out
Hopper is an area where
the banknotes to be placed
USB host port
is linked to the A-type USB Dust pocket removes dusts
collected during the operation
08

Printer Port : COM1
is linked to the printer
Display port : COM2
is linked to the external display
LAN/DEBUG port
is linked to Ethernet
Power switch
turns the power on/off
Power connector
110-220V power inputted
Rear Part
09

Operation Button
A Newton3 can be operated by two users with two different settings and parameters.
START/STOP Button
LCD Screen
Control / Screen Display
Operation Button
START/STOP Button
10

Specifications
Mode : Mix/Auto , Count , Face/Orient , Denom , Serial No , etc
Speed : 1000 ~ 1200 notes/min - Value Counting , Serial Number Detecting
1000 ~ 1500 notes/min – Free Counting
Capacity : 600 notes – Hopper / 200 notes – Stacker / 100 notes - Reject pocket
OS : Linux
Display : 4.3” TFT Color Touch Screen LCD
Port : USB, LAN, Serial port
Sensor : CIS / MR / UV / IR / Ultrasonic
Dimension : 12.2” x 13.4” x 13.4” (W x D x H)
Weight : 26.5 lbs.
Power Supply : 100~240V AC , 50/60Hz
11

Operation of Function
When the machine is powered on, the screen will be displayed as above.
( The settings in the screen may differ from actual one. )
Touch the icon on the screen or press the button on the side of each icon to
select a menu.
Do not use sharp objects such as a pen for touching the icons on the screen.
MODE
BATCH
DATA
MENU
PRINT
▲
SET
▼
ADD
C
COUNT 100
USD 10,000
12
2617HEJ776

Button Short Press Long Press
MODE Switching Mode (Auto->Mix->Denom->Free) Switching to the mode settings screen
BATCH Switching batch value(10->20->50->100->150->200) Switching to batch value setting screen
DATA Count Result/Total/History , SerialNumber Switching to the Check-Log screen
MENU Counting Speed change Switching to the SETUP screen
PRINT Counting Print
▲SET Changing denomination at DENOM mode
▼ADD Changing ADD mode or not
C Count clear /Cencel
START/STOP Counting Start/Stop/Jam path clear
MODE
BATCH
DATA
MENU
PRINT
▲
SET
▼
ADD
C
Main Menu
COUNT 100
USD 10,000
13
2617HEJ776

ICON Screen Touch
Switching the country currency
Switching to Time Setup Screen
Switching to Reject Reason Screen
Switching to detail counting result Screen
COUNT
USD 10,000
14
2617HEJ776

Display the Detail Counting Result
: If you want to see more detail breakdown , Touch the screen after counting .
MODE
BATCH
DATA
MENU
PRINT
▲
SET
▼
ADD
C
Button Short Press
PRINT Print the counting information / Serial Number
▲SET Display Off Old & New / PAGE UP
▼ADD Dsiplay On Old & New / PAGE DOWN
C Backward
START/STOP Switching to Main Screen
Screen Screen Touch
Display the counting information by denomination
Display the information of denomination
Display the serial Number
Detail
Banknote
Serial No.
15

Mode Setting
: If you want to change the specific mode , Long Press the “MODE” button .
MODE
BATCH
DATA
MENU
PRINT
▲
SET
▼
ADD
C
Button Short Press
C Changing Cancel / backward
START/STOP Apply the new mode /
Switching to Main Screen
Screen Screen Touch
Counts only one denomination initially counted
Shows total amount and number of banknotes when
mixed denominations are counted together.
Counts the total number of banknote without
recognition of denomination
On/Off the Add/Counterfeit/Serial Number
Auto
Mix
Free
Add / CF /
SN
16

Batch Setting
: If you want to change the specific batch value , Long Press the “BATCH” button .
Button Short Press
C Changing Cancel / backward
START/STOP Apply the new mode /
Switching to Main Screen
Screen Screen Touch
All Number
Key Input the number of batch
MODE
BATCH
DATA
MENU
PRINT
▲
SET
▼
ADD
C
17

Trouble. When there is a lot of Pre-processing image error
Solution 1. Remove dust on the CIS.
Solution 2. Check the GAP of insert module using Test-Note
Solution 3. Adjust the GAP for insert module.
(- direction or + direction , P1.1 See picture below)
Solution 4. Check the skew using Test-Note. & newton APL
Solution 5. Update the currency SW again using USB.
Trouble. When there is a lot of denomination recognizing error(Reference F1.2)
Solution 1. Remove dust on the CIS.
Solution 2. Check the image using Test-Note.
Solution 3. If the image is abnormal, Try CIS calibration
Solution 4. Update the currency SW again using USB.
Simple Trouble shooting guide1
18

Trouble. When there is in case of a continuous " Check CIS " message
Solution 1. Remove dust on the CIS.
Solution 2. Update the FPGA SW again using USB
Solution 3. Update the APL SW again using USB
Solution 4. Update the DSP SW again using USB
Trouble. When alert window does not disappear after removal of JAM
Solution 1. Try again open/close Main Cover & Back Cover
Solution 2. Update the Mecha SW again using USB
Solution 3. Replace the IR sensor PCB
Simple Trouble shooting guide 2
19

Simple Trouble shooting guide 3
Check Reject Image
Setup -> Option -> 1st page -> Mark the Reject Image
When the error screen appears.
Screen touch “R” -> Banknote -> Image
20
This manual suits for next models
1
Table of contents
Other KISAN Cash Counter manuals