KitchenAid KWB110 User manual

KWB110
INSTRUCTIONS
INSTRUCTIONS
INSTRUCCIONES
W10591298A_ENv7.indd 1 4/7/14 2:50 PM

2
WAFFLE BAKER INSTRUCTIONS
USA: 1.800.832.7173
Canada: 1.800.807.6777
WELCOME TO THE WORLD OF KITCHENAID.
We’re committed to helping you
create a lifetime of delicious meals for
family and friends. To help ensure the
longevity and performance of your
appliance, keep this guide handy. It will
empower you with the best way to
use and care for your product. Your
satisfaction is our #1 goal. Remember
to register your product online at
www.kitchenaid.com or by
mail using the enclosed
Product Registration Card.
Join us in the kitchen at www.kitchenaid.com.
KitchenAid.com
KitchenAid.ca
W10591298A_ENv7.indd 2 4/7/14 2:50 PM

3
English
WAFFLE BAKER INSTRUCTIONS
PROOF OF PURCHASE & PRODUCT REGISTRATION
Model Number _______________________________________________________________________
Serial Number _______________________________________________________________________
Date Purchased ______________________________________________________________________
Store Name _________________________________________________________________________
Always keep a copy of the itemized sales receipt showing the date of purchase of your
Wafe Baker. Proof of purchase will assure you of in-warranty service. Before you use
your Wafe Baker, please ll out and mail your product registration card packed with the
unit, or register online at www.kitchenaid.com. This card will enable us to contact you in the
unlikely event of a product safety notication and assist us in complying with the provisions
of the Consumer Product Safety Act. This card does not verify your warranty. Please
complete the following for your personal records:
WAFFLE BAKER SAFETY
Important safeguards.......................................................................................... 4
Electrical requirements ...................................................................................... 5
PARTS AND FEATURES
Wafe Baker parts .............................................................................................. 6
Control panel features........................................................................................ 7
OPERATING THE WAFFLE BAKER
Using the Wafe Baker....................................................................................... 8
Canceling a baking timer countdown............................................................... 11
TIPS FOR GREAT RESULTS
Recipe tips ........................................................................................................ 11
Baking and serving tips ..................................................................................... 12
CARE AND CLEANING....................................................................................... 12
TROUBLESHOOTING......................................................................................... 13
RECIPE
Banana Macadamia Wafes with Toasted Macadamia Butter ........................... 14
WARRANTY AND SERVICE............................................................................... 15
TABLE OF CONTENTS
W10591298A_ENv7.indd 3 4/7/14 2:50 PM

4
WAFFLE BAKER SAFETY
WAFFLE BAKER SAFETY
IMPORTANT SAFEGUARDS
When using electrical appliances, basic safety precautions should always
be followed, including the following:
1. Read all instructions.
2. Do not touch hot surfaces. Use handles or knobs.
3. To protect against electrical shock, do not immerse cord, plugs, or Wafe Baker
in water or other liquids.
4. Close supervision is necessary when any appliance is used by or near children.
5. Unplug Wafe Baker from outlet when not in use and before cleaning. Allow
to cool before putting on or taking off parts.
6. Do not operate any appliance with a damaged cord or plug, or after the appliance
malfunctions, or is dropped or damaged in any manner. Return appliance to the
nearest Authorized Service Facility for examination, repair, or electrical or
mechanical adjustment.
7. The use of attachments not recommended or sold by KitchenAid may cause re,
electric shock, or injury.
8. Do not use outdoors.
9. Do not let cord hang over edge of table or counter, or touch hot surfaces
10. Do not place on or near a hot gas or electric burner, or in a heated oven.
W10591298A_ENv7.indd 4 4/7/14 2:50 PM

5
English
WAFFLE BAKER SAFETY
WAFFLE BAKER SAFETY
Electrical requirements
11. When nished baking wafes, press the On/Off button to turn the Wafe Baker
off, then remove plug from outlet.
12. Do not use appliance for other than intended use.
13. This product is designed for household use only.
SAVE THESE INSTRUCTIONS
Voltage: 120 VAC
Frequency: 60 Hz
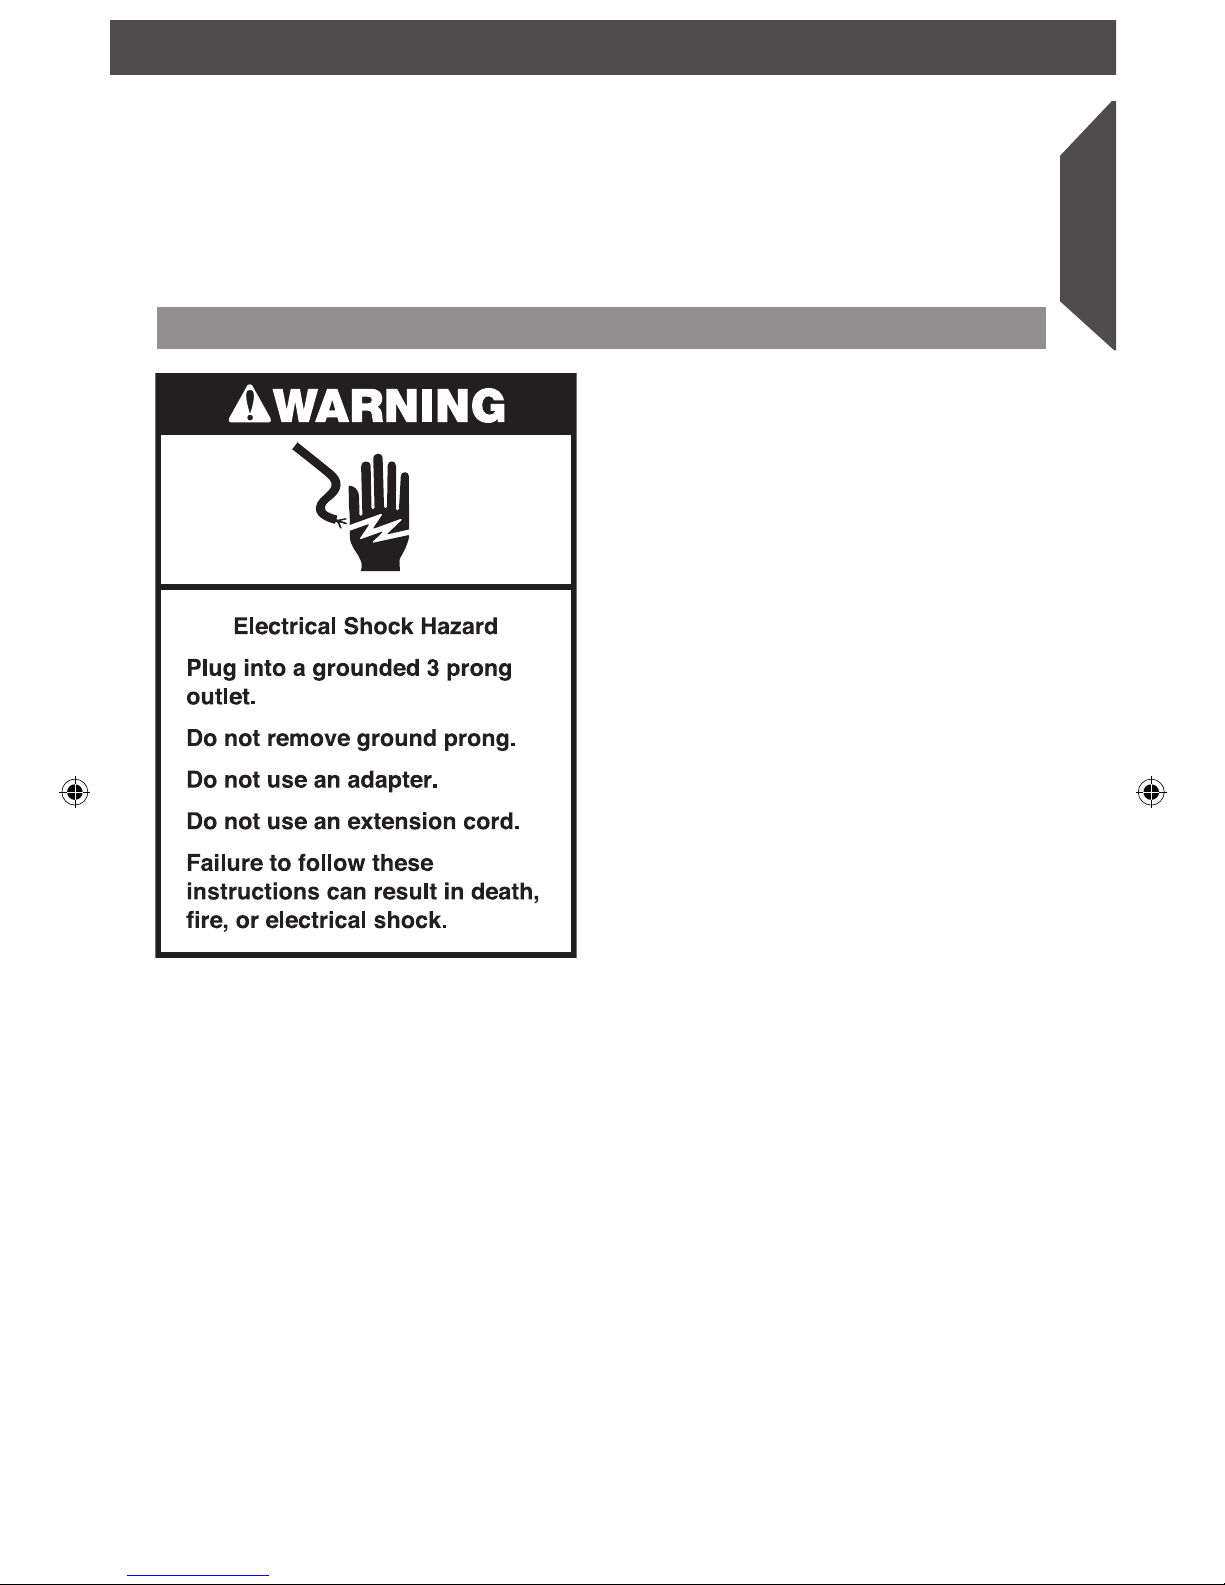
NOTE: This Waffle Baker has a 3 prong
grounded plug. To reduce the risk of
electrical shock, this plug will fit in an outlet
only one way. If the plug does not fit in the
outlet, contact a qualified electrician. Do
not modify the plug in any way.
A short power-supply cord is provided to
reduce the risk resulting from becoming
entangled in or tripping over a longer cord.
Do not use an extension cord. If the
power-supply cord is too short, have a
qualified electrician or serviceman install
an outlet near the appliance.
W10591298A_ENv7.indd 5 4/7/14 2:50 PM

6
PARTS AND FEATURES
Wafe Baker parts
Heavy-duty
base
Ceramic wafe
plates
Commercial
design
baking unit
Handle
Handle
Control
panel
W10591298A_ENv7.indd 6 4/7/14 2:50 PM

7
English
PARTS AND FEATURES
PARTS AND FEATURES
Control panel features
Baking timer
display
Start button
Power/Preheat
indicator light
Timer adjustment
dial
Reset button
Power On/Off
button
Dial
thermometer
(on top of lid)
Control
panel
W10591298A_ENv7.indd 7 4/7/14 2:50 PM

8
Using the Wafe Baker
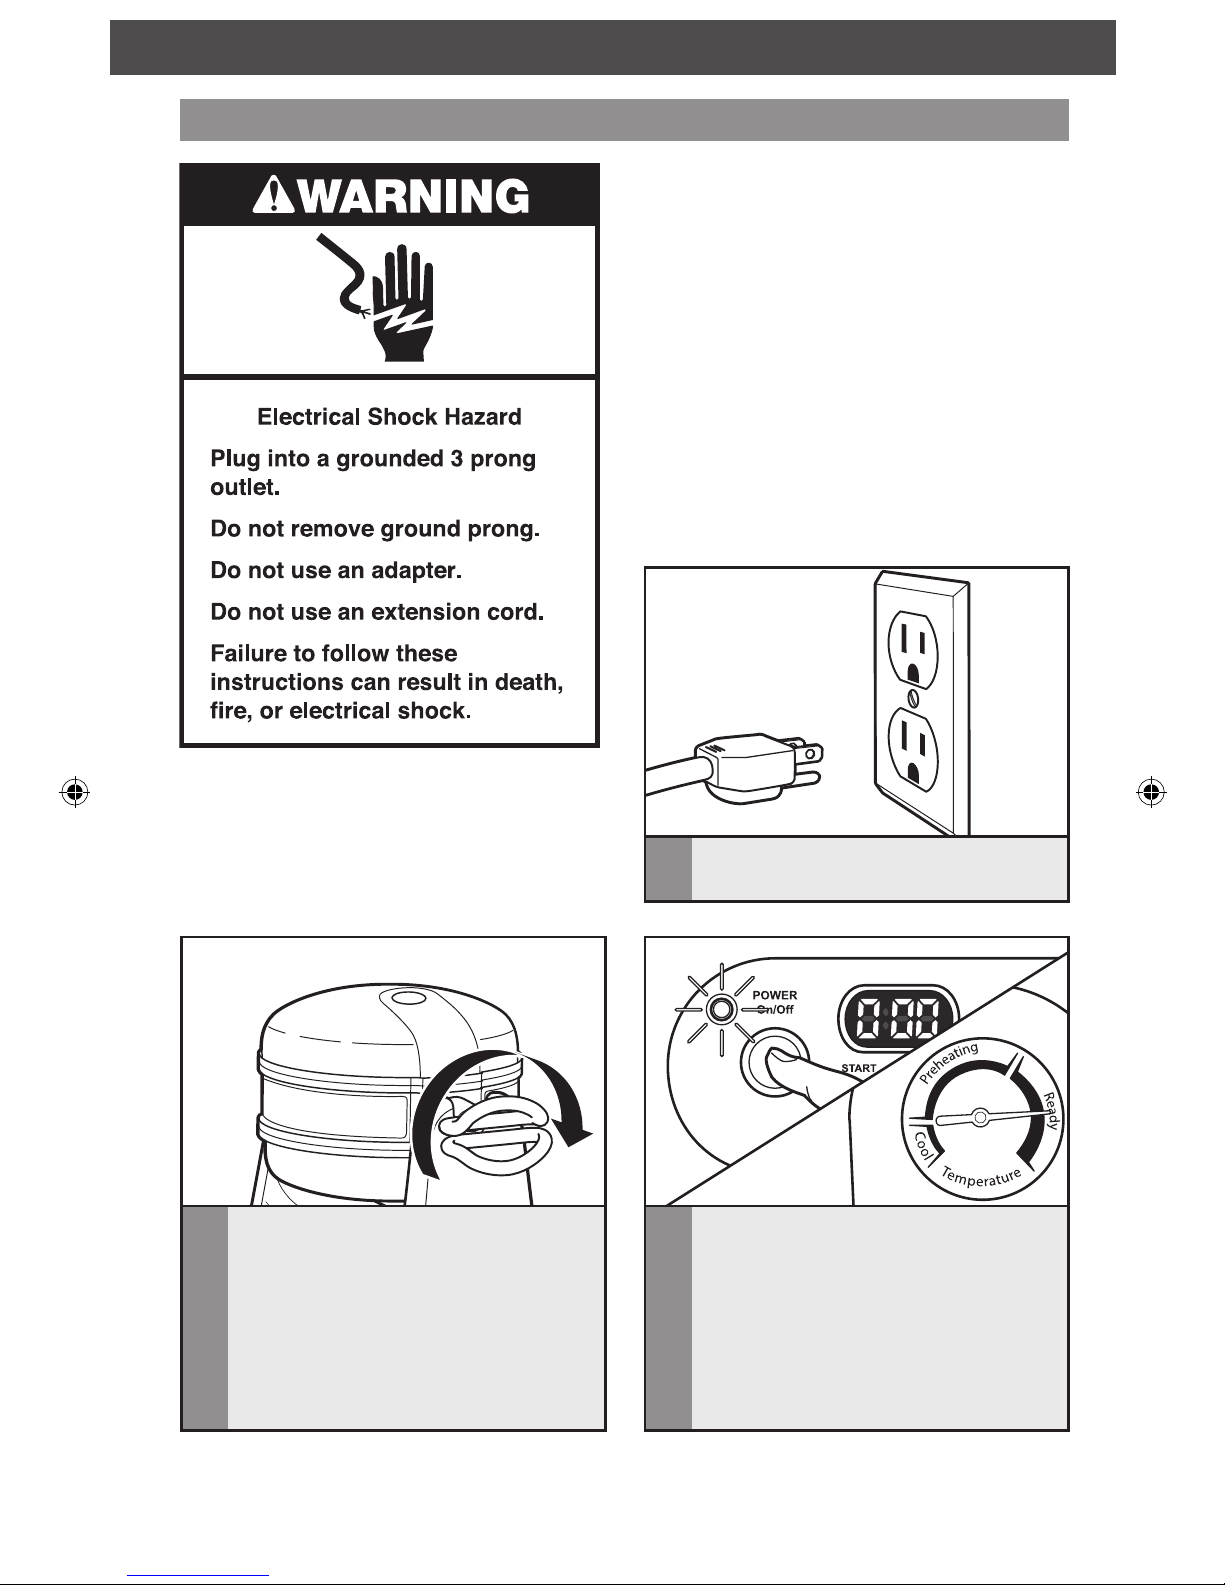
1Plug the Waffle Baker cord into
a grounded 3 prong outlet.
2Rotate the baking unit so the lid with
the dial thermometer faces upwards.
Before first use:
Before using the Waffle Baker for the first
time, clean the waffle plates with a warm,
sudsy cloth, then wipe with a damp cloth.
Dry thoroughly with a soft cloth. See “Care
and Cleaning” section for more details.
IMPORTANT: Steam is produced during
every baking cycle and condensation may
form on the baker lids. This is normal.
NOTE: Always use the handles to rotate
the baking unit and open the baking lids.
OPERATING THE WAFFLE BAKER
3Press the POWER On/Off button to
turn the unit on. The indicator light will
flash and the Waffle Baker will begin
pre-heating. When the Waffle Baker has
reached operating temperature, a tone
will sound and the indicator light will
stop flashing and glow continuously. The
needle on the dial thermometer will be
in the “ready” range.
W10591298A_ENv7.indd 8 4/7/14 2:50 PM

9
English
OPERATING THE WAFFLE BAKER
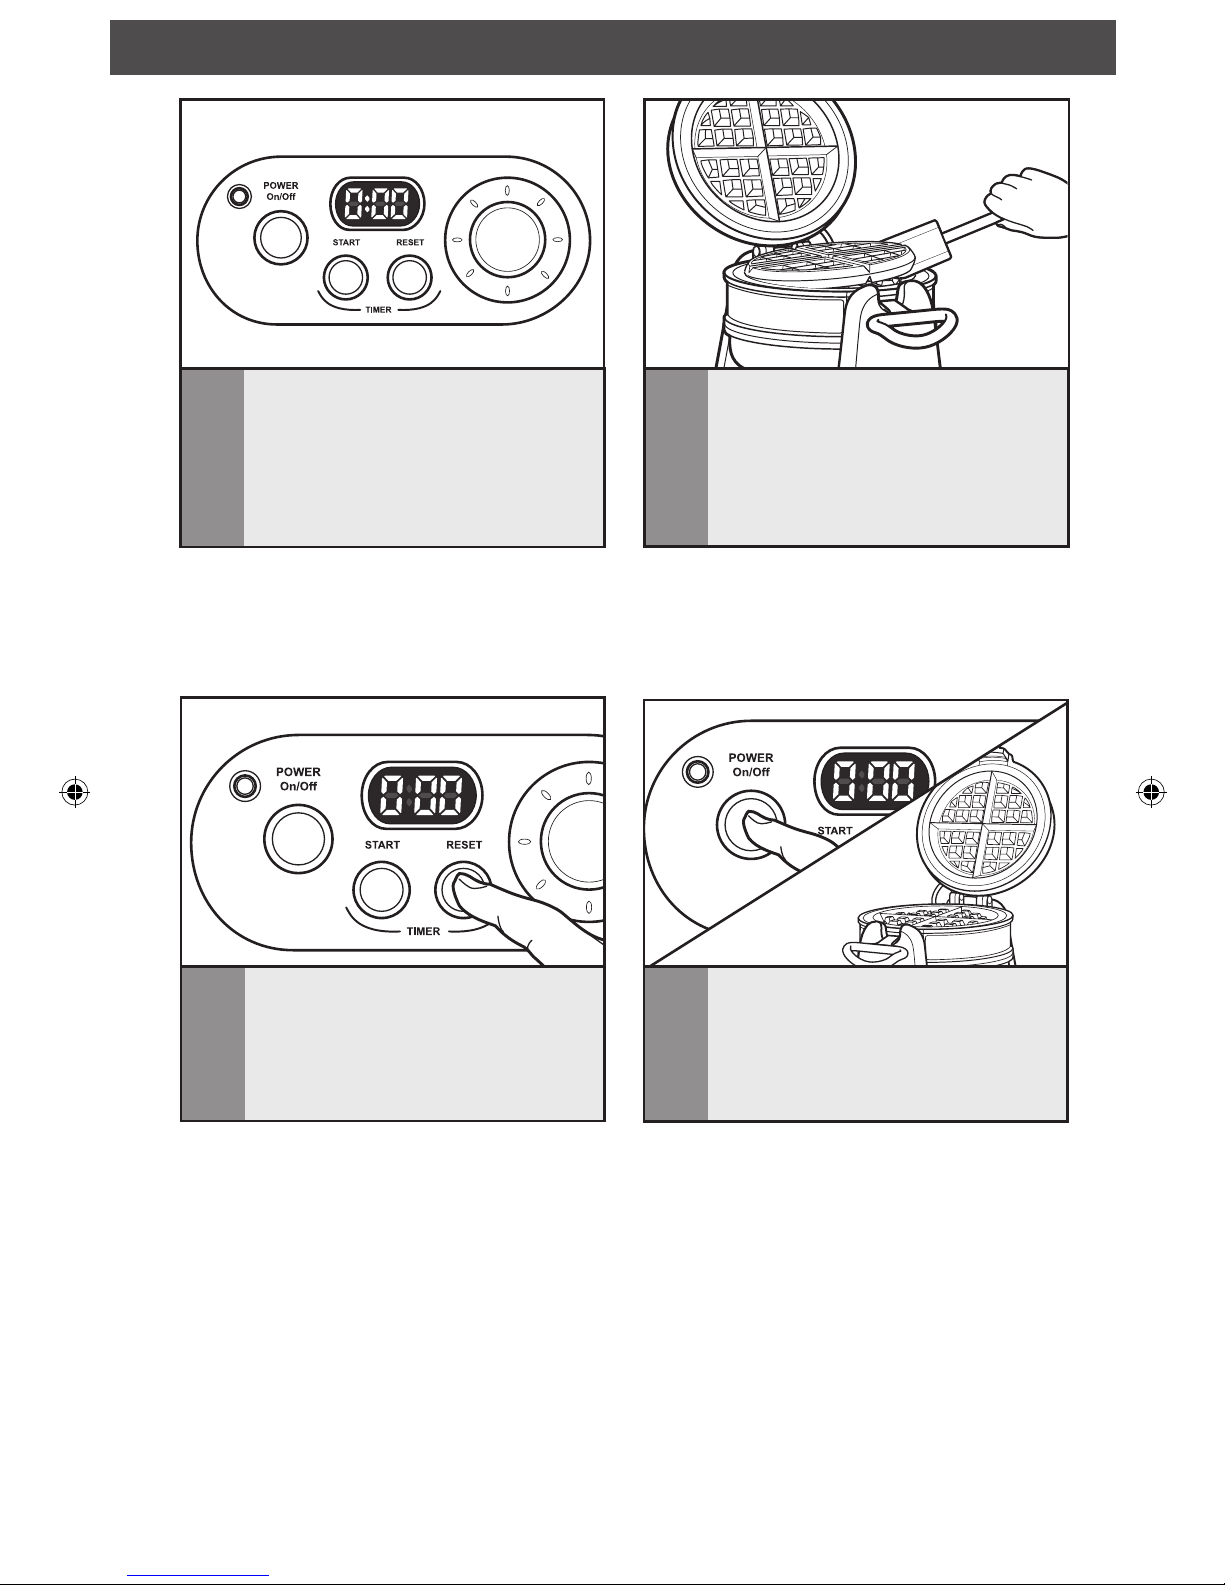
6Fill the waffle plate evenly, so that batter
almost covers the peaks of the waffle
grid.
NOTE: Whether baking one or two waffles,
always rotate the baking unit after filling
a waffle plate. This coats both the upper and
lower waffle plates with batter and ensures
the finest consistency.
5Lift the top handle to open the lid. Make
sure the lid is securely seated against the
base before releasing the handle so that
the unit does not rotate unexpectedly
when the handle is released.
4Set the baking time by turning the timer
adjustment level to the desired time.
Longer baking will produce darker,
crispier waffles. For your first waffles, a
good starting time is 3 minutes (3:00).
9Press and hold the START button for
2-3 seconds to begin the baking timer
countdown.
NOTE: The Start button will not activate
a timer countdown unless the Waffle Baker
is fully pre-heated.
7Close the lid, and rotate the baking
unit so that the lid without the dial
thermometer faces upwards.
8If a second waffle is desired, open the
baker lid and fill the waffle plate evenly
with batter. Close the lid, and rotate the
baking unit so that the lid with the dial
thermometer faces upwards again.
TIP: Do not coat the wafe plates with
spray-on oils or shortenings; they will
produce a gummy build-up that will be
difcult to remove.
W10591298A_ENv7.indd 9 4/7/14 2:50 PM

10
OPERATING THE WAFFLE BAKER
11 Open the top lid and remove the
waffle using a non-metallic utensil. If
another waffle is in the Waffle Baker,
rotate the baking unit, open the second
lid, and remove the waffle. If making
more waffles, make sure to close the
lid to retain heat.
10 When the baking timer display reaches
zero, a series of tones will sound, the
baking timer display background will
turn red, and the timer will begin to
count up.
NOTE: Do not use metal utensils with the
Wafe Baker. Metal may scratch the ceramic
wafe plates. Wood or bamboo utensils are
recommended for best results.
12 To prepare more waffles, reset the
baking timer by pressing the RESET
button. The display background will
return to blue and the timer will revert
to the previous time set. Then, repeat
steps 4-11.
NOTE: Unless the baking timer is reset,
the Wafe Baker will automatically shut off
5 minutes after the timer reaches zero.
13 When baking is finished, press the
POWER On/Off button to turn the
baking unit off. Leave a baker lid open
to speed cooling of the baking unit.
W10591298A_ENv7.indd 10 4/7/14 2:50 PM

11
English
OPERATING THE WAFFLE BAKER
Canceling a baking timer countdown
1To cancel a timer countdown: Press the
RESET button. The baking timer display
will revert to the previous time set.
2To change the baking time and continue
baking, use the timer adjustment dial
to change the baking time, then press
the START button to begin a new timer
countdown.
NOTE: If a timer countdown is not started within 2 hours, the baking unit will automatically
shut off.
TIPS FOR GREAT RESULTS
Recipe tips
• Do not over-mix the batter. A few lumps
are ne. Smooth batters produce tough,
heavy wafes.
• If refrigerated in a tightly sealed
container, most batters will remain
fresh for one or two days. Stored
batter will usually thicken, so you
may have to add a little water or
milk and re-mix the batter before
using. Cold batter may require
additional baking time to reach
desired brownness.
• Wafes made from low-fat recipes can
be difcult to remove. If your wafes
tend to stick to the wafe plates, add
a little more butter or oil to the recipe.
Do not coat the wafe plates with
spray-on oils or shortenings, they will
produce a gummy build-up that will be
difcult to remove.
• Recipes that include butter, oil, or
eggs will produce crispier, more
easily browned wafes than recipes
without those ingredients.
• For exceptionally light wafes, try this:
when the recipe calls for eggs, separate
the eggs and blend the yolk into the batter.
In a separate bowl, beat the whites until
uffy, but not stiff, and carefully fold the
whites into the batter just before baking.
• For a hearty, full-grain avor, try using
whole grain our in place of white our.
• Buttermilk powder is a good substitute
for fresh buttermilk in wafe recipes and
is easy to keep on hand. Use powder
according to package directions.
W10591298A_ENv7.indd 11 4/7/14 2:50 PM

12
TIPS FOR GREAT RESULTS
Baking and serving tips
• Whether one or two wafes are being
prepared, always rotate the baking unit
after lling a wafe plate. This coats both
the upper and lower wafe plates with
batter and ensures the nest consistency.
• Don’t over-ll the wafe plates. Pour
the batter onto the center of the plate,
then evenly spread it out to the edges
using a soft spatula or the bottom of a
non-metallic ladle. The batter should
almost cover the peaks of the wafe grid.
• Use a pitcher instead of a ladle: it’s much
easier to pour batter than to ladle it.
• Close the baker lid immediately after
removing a wafe. This helps maintain the
proper baking temperature for additional
wafes.
• Wafes will lose their crispiness if stacked
or placed on a solid surface. For the best
results, keep wafes on a wire rack before
serving.
• When preparing multiple wafes for
serving, keep the nished wafes warm
by placing them in a 200° F (93° C) oven
for up to 15 minutes. Lay the wafes in
a single layer directly on the oven rack.
Wafes can also be warmed by placing
them into a pre-heated Wafe Baker for
1 minute.
• Extra wafes can be frozen with very
good results. Cool the leftovers in a
single layer on a wire rack, separate the
wafes with wax paper, and place them
in a plastic freezer bag or other airtight
container before putting them into the
freezer. When you’re ready to enjoy
them, lay frozen wafes in a single layer
directly on the oven rack and heat for 10
minutes at 300° F (150° C). Frozen wafes
can also be heated by placing them into
a pre-heated Wafe Baker for 2 1/2
to 3 minutes.
CARE AND CLEANING
1Open the baker lids and wipe the waffle
plates clean with paper towels or a
damp cloth.
2Wipe the exterior of the Waffle Baker
with a warm, sudsy cloth; then wipe
clean with a damp cloth and dry with a
soft cloth.
NOTE: Do not immerse the Wafe Baker in water. Do not use abrasive cleaners or scouring
pads.
IMPORTANT: Make sure the Wafe Baker is switched off, unplugged, and completely cool
before cleaning.
W10591298A_ENv7.indd 12 4/7/14 2:50 PM

13
English
TROUBLESHOOTING
1. If the baking timer display remains
dark and the Wafe Baker fails
to heat:
• Make sure the Wafe Baker is plugged into
a grounded 3 prong outlet. If it is, unplug
the Wafe Baker, then plug it back into
the same outlet again. If the baking timer
display remains unlit, check the fuse or
circuit breaker on the electrical circuit the
Wafe Baker is connected to and make
certain the circuit is closed.
2. If your wafes are thin or uneven,
with gaps and spaces:
• Always rotate the baking unit after lling
a wafe plate with batter. This coats both
the upper and lower wafe plates with
batter and ensures the nest consistency.
3. If your wafes are too light or dark:
• Increase the baking time if your wafes
are too light; decrease the time if your
wafes are too dark. The baking time can
be affected by many factors, including
recipe ingredients, batter temperature,
and ambient humidity.
4. If the problem cannot be xed with the
steps above, see the “Warranty and
Service” section.
Do not return the Wafe Baker to the
retailer. Retailers do not provide service.
IMPORTANT: Steam is produced during every baking cycle and condensation may form
on the baker lids. This is normal.
W10591298A_ENv7.indd 13 4/7/14 2:50 PM

14
RECIPE
WARRANTY AND SERVICE
Banana Macadamia Wafes with Toasted Macadamia Butter
WAFFLES
2 1/2 cups (590 ml) all-purpose flour
1 tsp. (5 ml) active dry yeast
1 tsp. (5 ml) granulated sugar
1/2 tsp. (2 ml) salt
1/2 tsp. (2 ml) nutmeg
1/2 tsp. (2 ml) ground ginger
1/2 cup (120 ml) water
1 1/2cups (355 ml) milk
1/2 cup (120 ml) butter or margarine, cut up
2 eggs
2 (30 ml) tbsp. brown sugar
1 1/3cups (307 ml) diced bananas
1/2 cup (120 ml) chopped dry roasted,
salted macadamia nuts
WAFFLES
In a large bowl, combine flour, yeast,
granulated sugar, salt, nutmeg, and ginger;
set aside.
In a medium saucepan, place water, milk,
and butter. Heat over low heat until mixture
is very warm (120 to 130° F [50-55° C]),
stirring frequently.
Add milk mixture to flour mixture; mix well.
Add eggs; mix well.
Cover with plastic wrap and refrigerate
overnight or let stand at room temperature
at least 1 hour until batter is light and
bubbly.
Add brown sugar, bananas, and nuts;
mix well.
Set preheated Waffle Baker timer to 3
minutes and 45 seconds. Spread 1 cup
(235 ml) batter into top side of Waffle
Baker. Close top; start timer and rotate
Waffle Baker. Fill second side, and rotate
Waffle Baker again.
When signal sounds, remove first waffle.
Remove second waffle. Repeat with
remaining batter. Serve with Toasted
Macadamia Butter.
BUTTER
1/3 cup (80 ml) softened butter
or margarine
2 tbsp. (30 ml) diced banana
2 tbsp. (30 ml) chopped dry roasted,
salted macadamia nuts
BUTTER
In a small bowl, mash together butter
and banana. Add nuts; mix well.
YIELD
5 Servings (1 waffle with 1 1/2 tbsp. [20 ml] butter per serving).
Per serving:
About 710 cal, 14 g pro, 66 g carb, 45 g total fat, 22 g sat fat, 175 mg chol, 640 mg sod.
W10591298A_ENv7.indd 14 4/7/14 2:50 PM

15
English
RECIPE
WARRANTY AND SERVICE
KitchenAid
®
Wafe Baker Warranty for the 50 United States,
the District of Columbia, Puerto Rico, and Canada
This warranty extends to the purchaser and any succeeding owner for Wafe Bakers operated
in the 50 United States, the District of Columbia, Puerto Rico, and Canada.
Length of Warranty: One Year Full Warranty from date of purchase.
KitchenAid Will Pay Hassle-Free Replacement of your Wafe Baker.
for Your Choice of: See the next page for details on how to arrange for service,
or call the Customer eXperience Center toll-free at
1-800-541-6390.
OR
The replacement parts and repair labor costs to correct
defects in materials and workmanship. Service must be
provided by an Authorized KitchenAid Service Center.
KitchenAid Will A. Repairs when Wafe Baker is used in other than
Not Pay for: normal single family home use.
B. Damage resulting from accident, alteration, misuse
or abuse.
C. Any shipping or handling costs to deliver your Wafe
Baker to an Authorized Service Center.
D. Replacement parts or repair labor costs for Wafe
Baker operated outside the 50 United States,
District of Columbia, Puerto Rico, and Canada.
DISCLAIMER OF IMPLIED WARRANTIES; LIMITATION OF REMEDIES
IMPLIED WARRANTIES, INCLUDING TO THE EXTENT APPLICABLE WARRANTIES
OF MERCHANTABILITY OR FITNESS FOR A PARTICULAR PURPOSE, ARE EXCLUDED
TO THE EXTENT LEGALLY PERMISSIBLE. ANY IMPLIED WARRANTIES THAT MAY
BE IMPOSED BY LAW ARE LIMITED TO ONE YEAR, OR THE SHORTEST PERIOD
ALLOWED BY LAW. SOME STATES AND PROVINCES DO NOT ALLOW LIMITATIONS
OR EXCLUSIONS ON HOW LONG AN IMPLIED WARRANTY OF MERCHANTABILITY
OR FITNESS LASTS, SO THE ABOVE LIMITATIONS OR EXCLUSIONS MAY NOT APPLY
TO YOU.
IF THIS PRODUCT FAILS TO WORK AS WARRANTED, CUSTOMER’S SOLE AND
EXCLUSIVE REMEDY SHALL BE REPAIR OR REPLACEMENT ACCORDING TO THE
TERMS OF THIS LIMITED WARRANTY. KITCHENAID AND KITCHENAID CANADA
DO NOT ASSUME ANY RESPONSIBILITY FOR INCIDENTAL OR CONSEQUENTIAL
DAMAGES. This warranty gives you specic legal rights and you may also have other rights
which vary from state to state or province to province.
W10591298A_ENv7.indd 15 4/7/14 2:50 PM

16
WARRANTY AND SERVICE
Arranging for Service after the Warranty Expires, or
Ordering Accessories and Replacement Parts
In the United States and Puerto Rico:
For service information, or to order
accessories or replacement parts, call toll-
free at 1-800-541-6390 or write to:
Customer eXperience Center,
KitchenAid Small Appliances,
P.O. Box 218, St. Joseph, MI 49085-0218
Outside the United States
and Puerto Rico:
Consult your local KitchenAid dealer or
the store where you purchased the Wafe
Baker for information on how to obtain
service.
For service information in Canada:
Call toll-free 1-800-807-6777.
Or write to:
Customer eXperience Centre
KitchenAid Canada
200 - 6750 Century Ave.
Mississauga, ON L5N 0B7
Hassle-Free Replacement Warranty –
50 United States, District of Columbia, and Puerto Rico
We’re so condent the quality of our
products meets the exacting standards
of KitchenAid that, if your Wafe Baker
should fail within the rst year of ownership,
KitchenAid will arrange to deliver an
identical or comparable replacement to
your door free of charge and arrange to
have your original Wafe Baker returned
to us. Your replacement unit will also be
covered by our one year limited warranty.
Please follow these instructions to receive
this quality service.
If your Wafe Baker should fail within the
rst year of ownership, simply call our
toll-free Customer eXperience Center at
1-800-541-6390 Monday through Friday.
Please have your original sales receipt
available when you call. Proof of purchase
will be required to initiate the claim. Give
the consultant your complete shipping
address. (No P.O. Box numbers, please.)
When you receive your replacement Wafe
Baker, use the carton and packing materials
to pack up your original Wafe Baker.
Hassle-Free Replacement Warranty – Canada
We’re so condent the quality of our
products meets the exacting standards of
the KitchenAid brand that, if your Wafe
Baker should fail within the rst year of
ownership, KitchenAid Canada will replace
your Wafe Baker with an identical or
comparable replacement. Your replacement
unit will also be covered by our one year
limited warranty. Please follow these
instructions to receive this quality service.
If your Wafe Baker should fail within the
rst year of ownership, take the Wafe
Baker or ship collect to an Authorized
KitchenAid Service Centre. In the carton
include your name and complete shipping
address along with a copy of the proof of
purchase (register receipt, credit card slip,
etc.). Your replacement Wafe Baker will
be returned prepaid and insured. If you
are unable to obtain satisfactory service
in this manner call our toll-free Customer
eXperience Centre at 1-800-807-6777.
Or write to us at:
Customer eXperience Centre
KitchenAid Canada
200 - 6750 Century Ave.
Mississauga, ON L5N 0B7
®/™ © 2014. All rights reserved. Used under license in Canada.
W10591298A_ENv7.indd 16 4/7/14 2:50 PM

17
USA: 1.800.832.7173
Canada: 1.800.807.6777
BIENVENUE DANS LE MONDE DE KITCHENAID.
Nous nous engageons à vous aider
à créer de délicieux repas pour votre
famille et vos amis, et ce durant tout
le cycle de vie de l’appareil. Pour
contribuer à la durabilité et à une
bonne performance de votre
appareil, conserver ce guide
à portée de main. Il vous permettra
d’utiliser et d’entretenir votre produit
de la meilleure manière qui soit.
Votre satisfaction est notre objectif
numéro 1. Ne pas oublier
d’enregistrer votre produit en ligne
sur www.kitchenaid.ca ou par courrier
à l’aide de la carte d’enregistrement
du produit ci-jointe.
Rejoignez-nous au coin cuisine sur www.kitchenaid.ca.
KitchenAid.com
KitchenAid.ca
W10591298A_FRv4.indd 17 4/7/14 2:49 PM

DU GAUFRIER INSTRUCTIONS
PREUVE D’ACHAT ET ENREGISTREMENT DU PRODUIT
Numéro de modèle ___________________________________________________________________
Numéro de série _____________________________________________________________________
Date d’achat _________________________________________________________________________
Nom du magasin _____________________________________________________________________
Toujours conserver une copie détaillée du ticket de caisse indiquant la date d’achat du gaufrier.
La preuve d’achat vous garantit le bénéce du service après-vente. Avant d’utiliser le gaufrier,
remplir et poster la carte d’enregistrement du produit fournie avec celui-ci, ou enregistrer le
produit en ligne sur www.kitchenaid.ca. Grâce à cette carte, nous pourrons vous contacter
dans l’éventualité improbable d’un avis de sécurité concernant le produit; ceci nous aidera
aussi à nous conformer aux dispositions de la Consumer Product Safety Act. Cette carte ne
conrme pas votre garantie. Veuillez remplir ce qui suit pour vos dossiers personnels :
TABLE DES MATIÈRES
SÉCURITÉ DU GAUFRIER
Consignes de sécurité importantes .................................................................. 19
Spécications électriques.................................................................................. 20
PIÈCES ET CARACTÉRISTIQUES
Pièces du gaufrier ............................................................................................. 21
Caractéristiques du tableau de commande ...................................................... 22
FONCTIONNEMENT DU GAUFRIER
Utilisation du gaufrier ....................................................................................... 23
Annulation du compte à rebours de la minuterie de cuisson ........................... 26
CONSEILS D’UTILISATION POUR DES RÉSULTATS IMPECCABLES
Conseils pour les recettes ................................................................................ 26
Conseils pour la cuisson et le service............................................................... 27
ENTRETIEN ET NETTOYAGE ............................................................................ 27
DÉPANNAGE ....................................................................................................... 28
RECETTE
Gaufres à la banane et aux noix de macadamia
avec beurre de macadamia grillé..........................................................................29
GARANTIE ET DÉPANNAGE............................................................................. 30
SÉCURITÉ DU GAUFRIER
18
W10591298A_FRv4.indd 18 4/7/14 2:49 PM

19
DU GAUFRIER INSTRUCTIONS
SÉCURITÉ DU GAUFRIER
CONSIGNES DE SÉCURITÉ IMPORTANTES
Lors de l’utilisation d’appareils électriques, il faut toujours observer certaines
précautions élémentaires de sécurité, y compris les suivantes :
1. Lire toutes les instructions.
2. Ne pas toucher de surfaces chaudes. Utiliser les poignées ou les boutons.
3. Pour se protéger contre tout choc électrique, ne pas immerger le cordon,
les prises ou le gaufrier dans de l’eau ou dans tout autre liquide.
4. Une surveillance attentive s’impose lorsqu’un appareil ménager est utilisé
par ou à proximité d’enfants.
5. Débrancher la prise lorsque le gaufrier n’est pas utilisé et avant le nettoyage.
Attendre que l’appareil ait refroidi avant d’installer ou de retirer des pièces.
6. Ne pas faire fonctionner un appareil si le cordon ou la prise est endommagé(e),
si l’appareil ne fonctionne pas correctement, s’il est tombé ou s’il est endommagé
d’une quelconque façon. Renvoyer l’appareil au centre de dépannage agréé le plus
proche pour examen, réparation ou réglage électrique ou mécanique.
7. L’utilisation d’accessoires non recommandés ou non vendus par KitchenAid
peut causer un incendie, un choc électrique ou des blessures.
8. Ne pas utiliser à l’extérieur.
9. Ne pas laisser le cordon pendre sur le côté d’une table ou d’un comptoir,
ou toucher une surface chaude.
Français
W10591298A_FRv4.indd 19 4/7/14 2:49 PM

SÉCURITÉ DU GAUFRIER
Spécications électriques
10. Ne pas placer sur ou près d’un brûleur électrique ou à gaz chaud, ou dans un four chaud.
11. Lorsque la cuisson des gaufres est terminée, appuyer sur le bouton On/Off
(marche/arrêt) pour éteindre le gaufrier, puis le débrancher de sa prise murale.
12. Ne pas utiliser l’appareil pour un autre usage que celui pour lequel il est conçu.
13. Ce produit est homologué UL pour un usage domestique et commercial.
14. Ce produit est conçu uniquement pour un usage domestique.
CONSERVEZ CES INSTRUCTIONS
Tension : 120 VCA
Fréquence : 60 Hz
REMARQUE : Ce gaufrier comporte une
prise à 3 alvéoles reliée à la terre. Pour
réduire le risque de choc électrique, cette
fiche ne peut être insérée dans une prise que
dans un seul sens. Si cette fiche ne convient
pas à la prise, contacter un électricien
qualifié. Ne pas modifier la prise de quelque
manière que ce soit.
Un cordon d’alimentation court est fourni
– ceci élimine le risque d’emmêlement ou
de trébuchement que peut susciter l’emploi
d’un cordon d’alimentation long.
Ne pas utiliser de câble de rallonge. Si le
cordon d’alimentation électrique est trop
court, faire installer une prise près de
l’appareil électroménager par un électricien
ou un technicien de service qualifié.
PIÈCES ET CARACTÉRISTIQUES
20
W10591298A_FRv4.indd 20 4/24/14 2:40 PM
Table of contents
Languages:
Other KitchenAid Bread Maker manuals