EnglishDeutsch
 logo
Brands
  1. Home
  2. •
  3. Brands
  4. •
  5. Kleenmaid
  6. •
  7. Grill
  8. •
  9. Kleenmaid Professional 3 Burner Series User manual

Kleenmaid Professional 3 Burner Series User manual

This manual suits for next models

2

Other Kleenmaid Grill manuals

Kleenmaid OCCCAB Product guide

Kleenmaid

Kleenmaid OCCCAB Product guide

Kleenmaid OCCDB Product guide

Kleenmaid

Kleenmaid OCCDB Product guide

Kleenmaid OCCTWB Product guide

Kleenmaid

Kleenmaid OCCTWB Product guide

Kleenmaid OCCPB Product guide

Kleenmaid

Kleenmaid OCCPB Product guide

Popular Grill manuals by other brands

Orbegozo GR 2300 instruction manual

Orbegozo

Orbegozo GR 2300 instruction manual

bora PT11 Operating and installation instructions

bora

bora PT11 Operating and installation instructions

Klarstein 10031664 manual

Klarstein

Klarstein 10031664 manual

Garland MWE3W Installation and operation manual

Garland

Garland MWE3W Installation and operation manual

Char-Broil 463722714 Product guide

Char-Broil

Char-Broil 463722714 Product guide

Nexgrill 720-0830HK Operating	 instruction

Nexgrill

Nexgrill 720-0830HK Operating instruction

Kenmore 415.16123800 Use and care guide

Kenmore

Kenmore 415.16123800 Use and care guide

Tucker Barbecues GTR Series Assembly, installation and operating instructions

Tucker Barbecues

Tucker Barbecues GTR Series Assembly, installation and operating instructions

Monogram ZGG540NCP1SS owner's manual

Monogram

Monogram ZGG540NCP1SS owner's manual

Equipex Sodir Savoy Operation manual

Equipex

Equipex Sodir Savoy Operation manual

Gaggenau VR 414 610 use and care manual

Gaggenau

Gaggenau VR 414 610 use and care manual

Miele KM 408-1 operating instructions

Miele

Miele KM 408-1 operating instructions

George Foreman GGR50B owner's manual

George Foreman

George Foreman GGR50B owner's manual

AOG T series quick start guide

AOG

AOG T series quick start guide

Gorenje TG2000CB Instruction manua

Gorenje

Gorenje TG2000CB Instruction manua

Weber Genesis Silver-B Permamount NG 051701 owner's guide

Weber

Weber Genesis Silver-B Permamount NG 051701 owner's guide

Glen SA 3037 user guide

Glen

Glen SA 3037 user guide

Stalgast 9730100 instruction manual

Stalgast

Stalgast 9730100 instruction manual

https://manuals.online logo
https://manuals.online logoBrands
  • About & Mission
  • Contact us
  • Privacy Policy
  • Terms and Conditions

Copyright 2026 Manuals.Online. All Rights Reserved.

For Your Safety
If you smell gas:
1. Shut off gas to the appliance
2. Extinguish any open flame.
3. Open lid.
4. If odour continues, immediately
call your gas supplier or your fire
department.
For Your Safety
1. Do not store or use gasoline or other
flammable vapours or liquids in the
vicinity of this or any other appliance.
2. An LPG cylinder not connected for use
shall not be stored in the vicinity of
this or any other appliance.
IMPORTANT:
• Kleenmaid Professional Series barbecues, roasting hoods, side
burners and trolleys are approved for OUTDOOR USE ONLY.
• Some optional products shown in these instructions may not
be included with your barbecue. Check with your Kleenmaid
dealer for confirmation of inclusions.
• Please read instructions thoroughly before assembling and
operating the barbecue, roasting hood, side burner and
trolley.
• Save this manual for future reference.
• Accessible parts may be very hot, keep young children away.
• Some foods produce flammable fats and juices. Regular
cleaning is essential. Attend an operating barbecue at all
times. Fat & grease fires are not covered by warranty.
• To ensure the maximum life of your appliance it must be kept
clean, dry and covered when not in use. Polyester barbecue
covers are an optional accessory that will ensure years of
trouble free operation.
Assembly, Installation & Operating Instructions
Outdoor Cooking Centres
2 Kleenmaid Professional - Outdoor Cooking Centres
Page Number Section Title
3 Precautions and Warnings
6Assembly Instructions
26 Operating Instructions
31 Cleaning and Maintenance
34 Specifications
37 Warranty Information
Guide to Symbols
Safety Warnings
Important information regarding your safety
Assembly Instructions
Help Guide
Operation Instructions
Cleaning and Maintenance
Tech Support
12
Replacement Parts
Dimensions and Specifications
Gas Cylinder Information
Table of Contents
Kleenmaid Professional - Outdoor Cooking Centres 3
We want you to enjoy your barbecuing
experience:-
Failure to follow the instructions and
observe the warnings provided in this
operating manual could result in serious
bodily injury or damage to property.
Note to Installer: This manual must remain
with the owner for future reference.
Precautions and Warnings
Section 1 - Precautions and Warnings
4 Kleenmaid Professional - Outdoor Cooking Centres
Important
• Some foods produce flammable fats and juices.
Regular cleaning is essential.
• Attend an operating barbecue at all times. Damage
caused by fat & grease fires is not covered by
warranty.
• When not in use keep Barbecue and Side Burner dry
and covered.
• Polyester covers are an optional accessory that will
ensure years of trouble free operation.
Caution: Electrical Warning
If your barbecue incorporates an electrical component,
such as a rotisserie, then it must be electrically
grounded in accordance with local codes. The electric
cord must be equipped with a three-prong (grounding)
plug for your protection against shock hazard and
should be plugged directly into a properly grounded
three-prong receptacle. Do not cut or remove the
grounding prong from this plug. Keep any electrical
supply cord and the fuel supply hose away from any
heated surfaces.
If an external electrical source is utilised, this outdoor
cooking appliance, when installed, must be electrically
grounded in accordance with the local codes or, in the
absence of local codes with the following:
AUST: Australian Standard AS: 5601
Warning
Contact your local municipality for any building
codes regulating the installation of outdoor barbecue
appliances. Outdoor installations must conform to
local codes or, in the absence of local codes, with the
following.
When using an LPG supply system in an enclosure,
ventilation must be provided. Gas vapour is highly
explosive and can cause serious bodily injury or
damage to property if allowed to accumulate in a
confined space and ignited.
This appliance must not be installed under or on
any combustible material. Minimum clearance from
combustible materials to all sides of the appliance is
450mm (18”).
The tempered glass viewing window is an optional
extra. Do not use window hood in the rain.
Kleenmaid Professional Series roasting hoods have
been designed and approved to have no more than
two burners operating on high. Exceeding this limit
will void the warranty.
For Your Safety
If you smell gas:
1. Shut off gas to the appliance
2. Extinguish any open flame.
3. Open lid.
4. If odour continues, immediately call your
gas supplier or your fire department.
For Your Safety
1. Do not store or use gasoline or other flammable
vapours or liquids in the vicinity of this or any
other appliance.
2. An LPG cylinder not connected for use shall not be
stored in the vicinity of this or any other appliance.
Important Lifting Instructions For Roasting
Hood
1. Lift the hood up into the upright position
2. With both hands placed approximately 150mm (6”)
in from the ends of the hood, grip the top of the
hood base section and pull the base upward and
forward (to disengage the rear hood tabs) See Fig
1.
3. Lift the base section up slightly then away from the
barbecue. See Fig 1A.
4. Bring your arms close to your body (to centralise
the weight)
5. Place the hood down on a clean surface.
When lifting heavy items - Always keep your back
straight and lift by bending your knees. Always
bring the weight of the item being lifted as close to
you body as possible.
Fig 1
Fig 2
Precautions and Warnings
Kleenmaid Professional - Outdoor Cooking Centres 5
Do Not
• Lean over barbecue when lighting.
• Leave cooking food unattended.
• Delay lighting burners after turning gas on.
• Spray or store aerosols in vicinity of barbecue
whilst in operation.
• Store combustible materials, gasoline or flammable
liquids or vapours within 450mm (18”) of barbecue.
• Use caustic based cleaning agents on the barbecue.
• Operate barbecue with any cover on.
• Use plastic or glass utensils on the barbecue.
• Operate barbecue in strong winds.
• Attempt to dismantle control valves.
• Attempt to dismantle or adjust regulator.
• Test for gas leaks with a naked flame.
• Store gas cylinder indoors, or in any enclosed area.
• Lay the gas cylinder down. (Always keep it upright)
• Use barbecues indoors.
• Expose hose to direct sunlight.
• Modify the construction of this appliance or the
size of any burner or valve orifice .
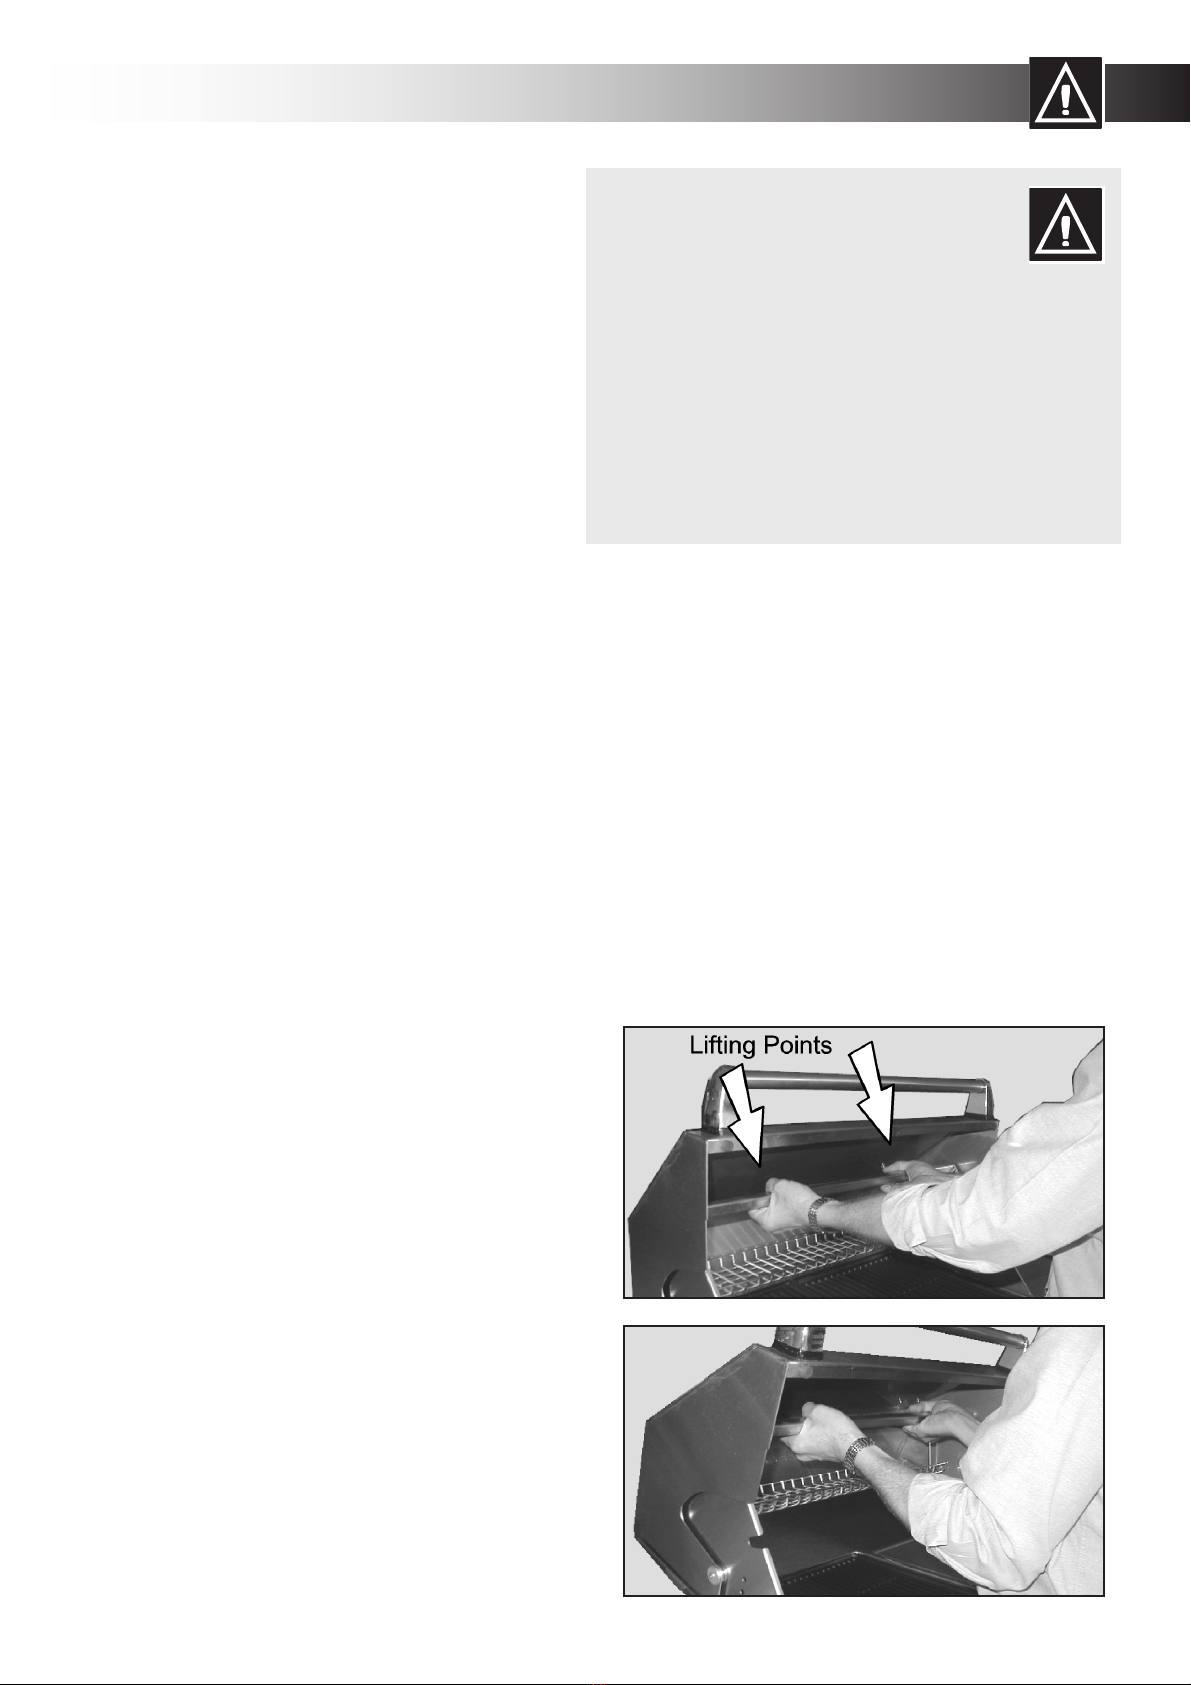
• Move the appliance during use.
• Obstruct any ventilation of barbecue or the
cylinder.
• Allow the flexible gas supply hose or any electrical
cord to come in contact with any heated surface of
the appliance.
• Allow children to operate this appliance.
• Operate Window - Roasting Hoods in the rain.
• Use charcoal or any other solid fuel in this
appliance.
• Disconnect any gas fittings while the appliance is
operating.
• Use a rusty or dented gas cylinder or cylinder with
a damaged gas valve.
• Fill the gas cylinder beyond 80% capacity.
Do
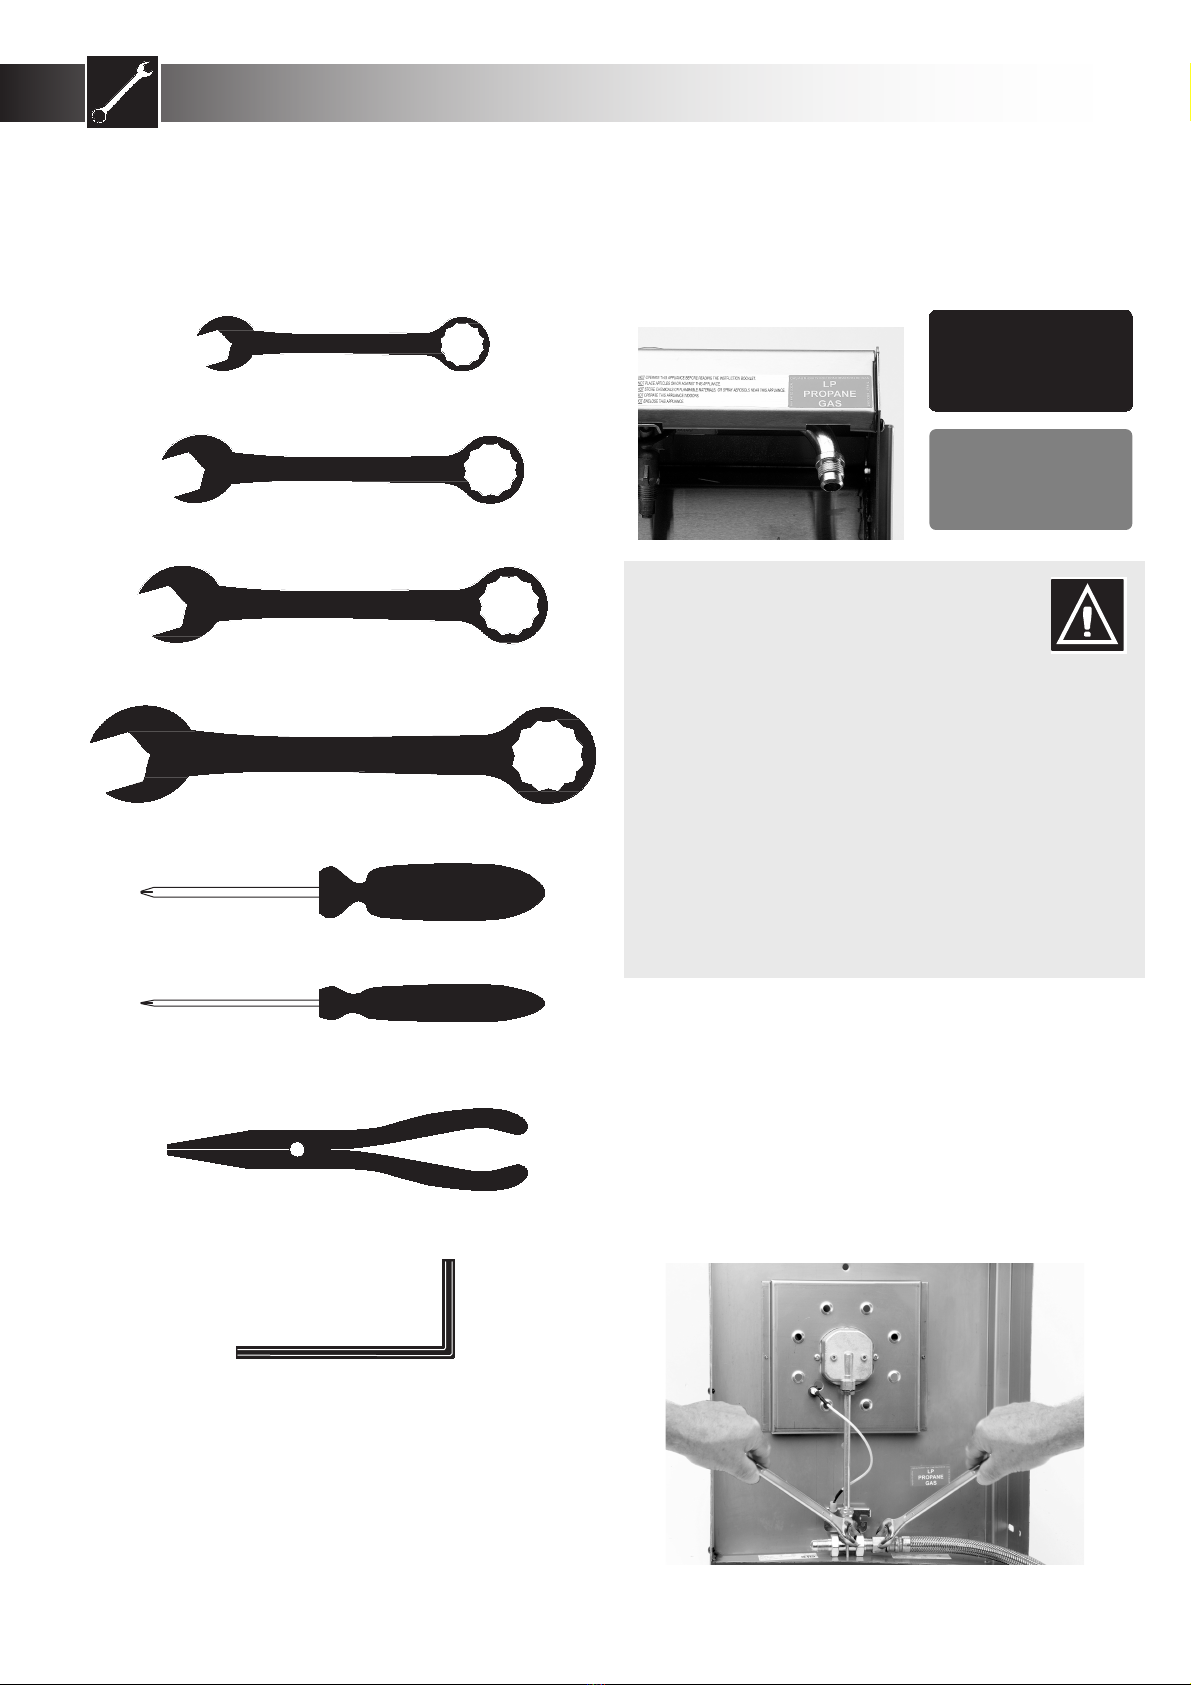
• Spanner tighten all gas fittings as per instructions.
• Check all gas hoses and line connections for
damage, cuts or cracks each time the appliance
is to be used. Always leak test with a solution of
soapy water.
• Check main opening, throat and venturi to each
burner and pilot flame tube regularly for insect
nests (eg. wasp, ants or spiders). Nests are
dangerous and must be cleaned out thoroughly.
• Visually check burner flames to confirm lighting.
• Clean glass window of roasting hood model
regularly.
• Use your barbecue only on a level surface.
• Attend barbecue whilst cooking food.
• Preheat the barbecue for up to 10 minutes.
• After cooking turn barbecue to high for up to 10
minutes to burn off excess grease.
• Let the barbecue cool before replacing any lid or
cover.
• Regularly replace foil material in Grease/Drip tray.
• Keep children away from barbecue at all times.
Accessible parts may be hot.
• Have the gas cylinder filled by an authorised LPG
supplier.
• Refer to this instruction manual if in doubt
concerning assembly, installation, or operation.
• Use protective gloves when handling hot
components.
• Close the gas cylinder valve after each use.
• Clean the grease/drip tray regularly and clean the
appliance at least twice annually.
• Always fully open the roasting hood or remove the
metal lid of the appliance before lighting.
• Carefully follow the instructions relating to the
hose/regulator connection.
• Keep the barbecue area free from combustible
materials, gasoline, flammable liquids or vapours.
Precautions & Warnings
• Should the appliance go out for any reason, turn off all control knobs and the cylinder gas valve. Wait
5 minutes before attempting to relight the appliance.
• If a grease or fat fire should occur, immediately turn off all control knobs and the gas cylinder valve
until the fire is out. Remove all food from the appliance.
• A leak test must be carried out prior to using the appliance for the first time and whenever the gas
cylinder is refilled or whenever the gas hose and regulator have been disconnected from the gas
cylinder or appliance.
6 Kleenmaid Professional - Outdoor Cooking Centres
2.1 Tools Required.
2.2 Gas Cylinder Safety, Connection And Gas Leak Testing Procedure.
2.3 Barbecue Assembly.
2.4 Side Burner Assembly.
2.5 Roasting Hood Assembly.
2.6 Optional Rotisserie Assembly
2.7 Stainless Steel Pedestal Trolley Assembly
2.8 Stainless Steel Cart Assembly
Care should be taken to assemble all body panels on a piece of cardboard or carpet to avoid
scratching the trolley panel surfaces. Remove protective plastic film from all surfaces before
assembling and using the appliance.
Before any assembly or installation is attempted check for damage. Your dealer or the distributor
must be notified of any problems immediately before proceeding.
Assembly Instructions
Section 2 - Assembly Instructions
Kleenmaid Professional - Outdoor Cooking Centres 7
Tools Required
You will need the following tools to assemble
your barbecue.
Important:
Always check the gas label on the appliance to
ensure that you have the correct gas configuration
For Your Safety
If you smell gas:
1. Shut off gas to the appliance
2. Extinguish any open flame.
3. Open lid.
4. If odour continues, immediately call your gas
supplier or your fire department.
For Your Safety
1. Do not store or use gasoline or other flammable
vapours or liquids in the vicinity of this or any
other appliance.
2. An LPG cylinder not connected for use shall not be
stored in the vicinity of this or any other appliance.
Note:
Always use the correct size spanner (wrench) to
tighten gas fittings. Ensure that all gas fittings
are spanner tightened and then leak tested before
continuing with operation of the appliance.
Assembly Instructions
Medium Phillips Head Screwdriver
19mm
19mm Spanner - Gas Inlet Connection
Pliers - Fitting circlips and burner retaining clips
Allen Key - 4mm - Supplied
M6 Mush Head Screws
10mm
10mm Spanner - M6 body nuts
13mm
13mm Spanner - castor bolts - Pedestal trolley
17mm
17mm Spanner - M8 body nuts & bolts on Pedestal trolley
Small Phillips Head Screwdriver
- Towel rack and grease tray fascia
Fig 1
Fig 2
NATURAL
GAS
REFER TO LOCAL
GAS AUTHORITY FOR CONFIRMATION OF GAS
TYPE IF IN DOUBT
LP
PROPANE
GAS
REFER TO LOCAL
GAS AUTHORITY FOR CONFIRMATION OF GAS
TYPE IF IN DOUBT
8 Kleenmaid Professional - Outdoor Cooking Centres
Important: Read Instructions Thoroughly
Before Commencing Assembly.
These products are part of a modular range. Some
options and assembly procedures will vary depending
on the model you have purchased. The ‘Quick
Assembly Reference’ will assist you in determining
the correct assembly procedure. Read the detailed
assembly instructions for each component thoroughly
before proceeding with assembly.
Professional Series 5 Burner Barbecue
Stainless Steel Trolley (Cart), Stainless Steel Roasting
Hood And Stainless Steel Side Burner.
1. Assemble the stainless steel trolley (cart).
2. Remove the short gas hose from the side burner
carton and fit to the gas inlet on the right hand
side of the barbecue.
3. Fit the barbecue frame to the stainless steel trolley.
Ensure that the short gas hose is fed through the
40mm hole in the side of the trolley.
4. Fit the side burner to the barbecue and connect the
short gas hose to the left-hand gas outlet of the
side burner.
5. Connect the long gas hose and regulator to the gas
inlet on the right hand side of the side burner.
6. Fit the burners, reflectors, vaporisers, and cooking
plates & grills to the barbecue.
7. Assemble the roasting hood.
8. Fit the roasting hood to the barbecue.
Professional Series 3 & 4 Burner Barbecue
Stainless steel pedestal trolley, stainless steel roasting
hood and stainless steel side burner.
1. Assemble the pedestal trolley.
2. Remove the short gas hose from the side burner
carton and fit to the gas inlet on the right hand
side of the barbecue.
3. Fit the barbecue frame to the cradle on the
pedestal trolley.
4. Fit the side burner to the barbecue and connect the
short gas hose to the left-hand gas outlet of the
side burner.
5. Connect the long gas hose and regulator to the gas
inlet on the right hand side of the side burner.
6. Fit the side shelf to the left - hand side of the
barbecue.
7. Fit the burners, reflectors, vaporisers, and cooking
plates & grills to the barbecue.
8. Assemble the roasting hood.
9. Fit the roasting hood to the barbecue.
Quick Assembly Reference
Kleenmaid Professional - Outdoor Cooking Centres 9
Gas Cylinder Safety Information
This appliance is designed to be used with a gas
cylinder not exceeding 10 kg.
The Gas cylinder must be constructed and marked in
accordance with specifications for LP Gas Cylinders.
The gas cylinder supply valve must be turned off when
the appliance is not in use.
Gas cylinders must be stored outdoors, out of reach
of children and must not be stored in a building,
garage or any other enclosed area.
The gas cylinder used must incorporate a safety collar
to protect the valve assembly.
Important:
When disconnecting and removing the gas cylinder for
the purpose of refilling, always observe the following
procedure.
Ensure that all gas control valves on the appliance and
the gas cylinder are turned off before disconnecting
the gas line from the cylinder.
Do not smoke or use a naked flame near the appliance
or gas cylinder while disconnecting the gas line
between the appliance and gas cylinder.
Remove the gas cylinder from the enclosure before
disconnecting the gas line from the appliance.
Tighten all connections before placing the gas cylinder
back in its enclosure.
The Gas Leak Testing Procedure should be conducted
every time the gas cylinder is refilled and reconnected
to the appliance - before using the appliance.
Regulator Connection (Fig 3 & 4)
1. Check that all control knobs are in the Off position.
2. Make sure the cylinder valve is off by turning the
valve knob clockwise.
3 Remove the protective cap from the cylinder if
present.
4. Leak test the connection with a soapy water
solution. (See Gas Leak Testing Procedure)
Hose and Regulator replacement must be a genuine
part specified for this appliance and is obtainable
from your nearest stockist.
Gas Leak Test Procedure
Use the following procedure to check for gas leaks.
Never use a naked flame to check for gas leaks.
1. In a small container, mix up a solution of water
and detergent or soap. Mix the solution well.
2. For LPG make sure that the gas supply valve on the
gas cylinder is turned on. For NG make sure that
the gas line is correctly fitted to the appliance.
3. Make sure that the gas control valves on the
appliance are all turned off.
4. Using a brush or spray bottle apply the solution to
the gas line and each join in the gas line including
the hose and regulator connection.
5. Bubbling of the solution will indicate that there is a
leak present.
6. Re-tighten or re-seal any joints that are leaking.
7. If a leak persists then contact your distributor or
the manufacturer for assistance. See Fig 5
Assembly Instructions
Fig. 5
Fig. 3
Fig. 4
Forming bubbles indicate
that a leak is present
10 Kleenmaid Professional - Outdoor Cooking Centres
Assembly Notes
Before any assembly or installation is attempted it is
important that you check for damage or missing parts.
Your dealer or the manufacturer must be notified of
any problems immediately before proceeding.
The main frame of the barbecue has been factory
assembled requiring only the following simple steps
for completion. Check the “Gas Type “ label attached to
barbecue and side burner to be certain this Gas Type
is the one required for your use eg. Propane / LPG or
Natural Gas. See Fig 2
Trolleys, roasting hoods and side burners are optional
so read this manual in conjunction with the manual
that comes with each accessory. Assemble the trolley
first before attaching any other components. Attach
the roasting hood last of all.
Assembly Procedure
Heat Reflectors, Burners And Vaporizers
The modular Vaporizer Grid system has been designed
to maximise the performance of your barbecue.
The reflectors fit between each burner. They reflect
heat from the burners, upwards to the cooking
surfaces.
The Vaporisers are designed to vaporise fats and
juices from the meat. One Vaporizer is fitted over
each burner that is located under the grill. The
Vaporizers reduce flare-ups and help to add that great
barbecue flavour.
Fitting The Heat Reflectors
Completely remove all of the plastic film from the
Reflectors. The tabbed ends of the heat reflectors
face forward to the front of the barbecue frame. The
tabs fit into the slots in the front end of the barbecue
(behind the control fascia). Key the tabs of the
Vaporizers into the lower slots (between the burners).
Key the tabs of each reflector into the slots. If slots are
partially covered with enamel, work the tabs until the
enamel clears. See Fig 8.
Fitting The Burners
Remove the retaining clips from the burners, then
fit the burners - open end first, over the brass stem
of the control valves at the front of the barbecue,
allowing the rear burner lug to locate into the cross-
lighting channel and corresponding hole in the
support panel at the rear or the barbecue. To secure
burners fit retaining clips (“R” shape) into burner lugs.
See Fig 9 & 10.
Fitting The Vaporizers
Remove the protective plastic film from each
Vaporizer and then fit the Vaporizers to the barbecue.
The tabbed ends of the Vaporizers face forward to the
front of the barbecue frame. The tabs fit into the slots
in the front end of the barbecue (behind the control
fascia). Key the tabs of the Vaporizers into the upper
slots. The vaporizers should be fitted to the same side
of the barbecue to which the grill is to be placed (they
will not work if fitted under the plate). If slots are
partially covered with enamel, work the tabs until the
enamel clears. See Fig 11 & 12.
How Many Vaporisers & Reflectors Are There
Model Vaporiser Reflector
3 Bnr 2 2
4 Bnr 3 3
5 Bnr 4 4
Assembly Instructions
Fig 6
Fig 7
Fig 8
Fig 12
Fig 11
Fig 6