Kleenmaid MWK200 Installation guide

Instructions for Use
and Warranty Details
MWK200
Stainless Steel Microwave
Cooking
Collection

the best you can own.
Congratulations on the purchase of your new Kleenmaid appliance. This
has been designed and manufactured to give you years of reliable performance.
the kleenmaid story.
More than one million Australians enjoy using Kleenmaid appliances daily. Selected because of
their unique design, outstanding performance, excellent quality and unquestionable reliability,
each one is value-for-money, 100 per-cent guaranteed and at the top of its class.
attention to detail.
We are proud of our reputation for product innovation and service excellence. By dealing direct, we
can ensure that you consistently receive a high standard of customer service.
Free delivery, dedicated customer service and after-sales service team plus free kitchen design and
planning seminars are just a few of the ways we are setting new benchmarks for customer service
and experience.
satisfaction guaranteed.
Your new appliance is covered by a written five-year parts and labour warranty,
guarantee, and a unique best value guarantee.
best results.
For best results, carefully read the enclosed instructions on how to install your new appliance.
Correct installation will avoid delays and unnecessary service calls.
This booklet provides you with comprehensive information to help you get to know the controls and
the features of your new appliance.
congratulations
no lemon
appliance

3
Contents
Environmental protection . . . . . . . . . . . . . . . . . . . . . .3
Installation . . . . . . . . . . . . . . . . . . . . . . . . . . . . . . . .4
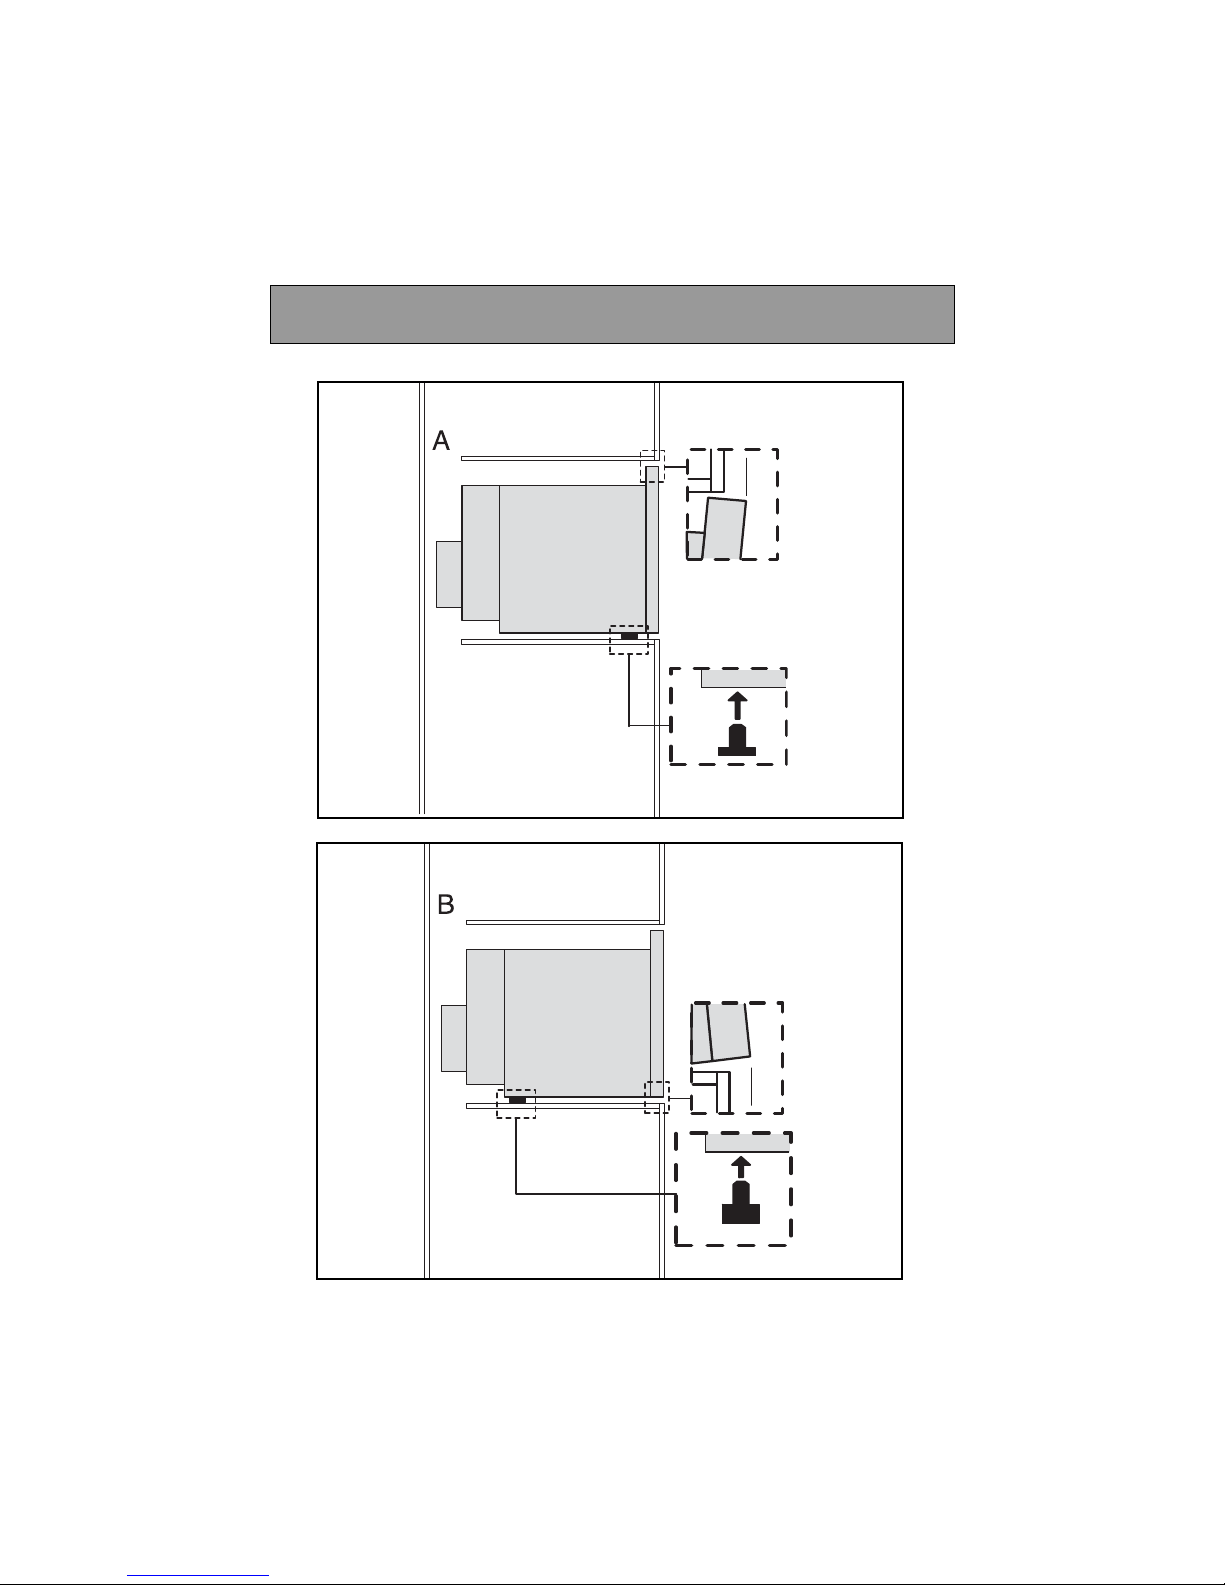
Building-in . . . . . . . . . . . . . . . . . . . . . . . . . . . . . . . .5
Warning . . . . . . . . . . . . . . . . . . . . . . . . . . . . . . . . . .7
General description . . . . . . . . . . . . . . . . . . . . . . . . . .8
The control Panel . . . . . . . . . . . . . . . . . . . . . . . . . . . .9
Setting the clock / Microwave power settings . . . . . . . . . . .10
The display . . . . . . . . . . . . . . . . . . . . . . . . . . . . . . .11
The selector knobs / Programming . . . . . . . . . . . . . . .12
Microwave programming . . . . . . . . . . . . . . . . . . . . . .13
The Duo Function . . . . . . . . . . . . . . . . . . . . . . . . . . .14
The grill and grill shelves . . . . . . . . . . . . . . . . . . . . .16
The grill function / Programming the grill . . . . . . . . . . .17
The microwave + grill function / Programming . . . . . . . . .18
The fan functions . . . . . . . . . . . . . . . . . . . . . . . . . . .19
Programming the fan function . . . . . . . . . . . . . . . . . .20
Programming the fan + microwave function . . . . . . . . .21
Security / Recommendations . . . . . . . . . . . . . . . . . . . .22
Troubleshooting guide . . . . . . . . . . . . . . . . . . . . . . .23
Care & cleaning . . . . . . . . . . . . . . . . . . . . . . . . . . . .24
After Sales Service . . . . . . . . . . . . . . . . . . . . . . . . . .24
Important safety instructions.
Read carefully and keep for future reference.
Environmental protection
This appliance's packaging material is recycable. Help recycle it and protect the environ-
ment by dropping it off in the municipal receptacles provided for this purpose.
Your appliance also contains a great amount of recycable material. It is
marked with this label to indicate the used appliances that should not be
mixed with other waste. This way, the appliance recycling organised by
your manufacturer will be done under the best possible conditions, in com-
pliance with European Directive 2002/96/EC on Waste Electrical and
Electronic Equipment. Contact your town hall or your retailer for the used
appliance collection points closest to your home.
We thank you for doing your part to protect the environment.

4
Installation
LOCATION
BEFORE CONNECTION
• According to the model, the microwave oven must be built in.or set on a work surface at least
850 mm above floor level.
• Place the oven on a flat and horizontal surface, away from any source of heat or steam.
•
Make sure that air may circulate freely around the oven.
•
Allow nothing to obstruct the ventilation louvers at the back of the appliance.
•
Make sure the electrical plug will be accessible after installation.
•
Check whether your oven has suffered any damage during transport (deformed door or
door seal, etc.). If you see any signs of damage, contact Kleenmaid before use.
•
Verify the power voltage. If there is a PERMANENT undervoltage (200-210 volts), consult your
electrical installer.
•
Your installation must be protected by a 15 Amp thermal fuse.
•
It is mandatory to use a power point with an earthed power point, connected in accor-
dance with current safety regulations.
•
In your electrical installation, provide a device that is accessible to the installer, capable of
separating the appliance from the mains power and whose contact opening is at least 3 mm
at all of the poles.
•
Never operate the oven if the supply cord and/ or its plug are damaged. In case of damage,
call in a qualified technician trained by the manufacturer.
ELECTRICAL CONNECTION

5
592
460
507
450 int
600 ext
850 mini
550 min
23
100 min
560 mini
16 min
60
Building-in
Inclusions

6
Building-in

7
Warning
• Your appliance is designed exclusively for the domestic purposes of defrosting, heating or
cooking foods. The manufacturer bears no responsibility in the case of improper usage.
• Only use utensils that are suitable for use in microwave ovens.
• To avoid deterioration of your microwave oven, never operate it empty or without the
turntable.
• Never tamper with the lock mechanism of your microwave oven; you could cause damage
requiring repair by an authorised technician.
• When heating food in plastic or paper containers, keep an eye on the oven due to the
possibility of ignition.
• It is not advisable to use metal recipients, forks, spoons, knives, metal ties or staples for
deep-freeze bags.
• The contents of feeding bottles and baby food jars should be stirred or shaken and the
temperature checked before consumption in order to avoid burns.
• Only allow children to use the oven without supervision when adequate instructions
have been given so that the child is able to use the oven in a safe way and understands
the hazards of improper use.
• Liquids and other foods must not be heated in sealed containers they are liable to explode.
• Eggs in their shell and whole hard-boiled eggs should not be heated in microwave ovens
since they may explode, even after microwave heating has ended.
• Microwave heating of beverages can result in delayed eruptive boiling, therefore care
must be taken when handling the container.
• For small amounts (one sausage, a single croissant, etc.), place a glass of water along-
side the food item.
• Time settings that are too long may dry out and burn the food. To avoid such incidents,
never use the same cooking times as those recommended for traditional ovens
.
• If smoke is observed, switch off or unplug the appliance and keep the door closed in
order to stifle any flames.
• The appliance is not intended for use by young children or infirm persons without
supervision.
•
Young children should be supervised to ensure that they do not play with the appliance.
•
WARNING : When the appliance is operated in the combination mode, children
should only use the oven under adult supervision due to the temperatures generated.

8
AUTO
M
/
C
General description
•THE TURNTABLE :
ensures equal cooking of food throughout with no need to stir or turn the dish.
- It may be used as a cooking platter.
- Rotation is controlled by the drive shaft and the wheel support.
- The turntable revolves in both directions.
- If it does not turn, verify that all components are properly positioned.
- For easy removal, wells are provided on either side.
•TURNTABLE OFF :
stops the turntable from revolving in order to use platters which require the entire oven
space.
•THE WHEEL SUPPORT :
Do not try to rotate the roller ring manually, as you could damage the drive system.
If it does not turn smoothly, make sure that there is nothing in the well beneath the
turntable.
TurntableDrive shaft Wheel
Support
Identification
label
Grill
Shelves

9
ADisplay window :
to simplify programming, the display
indicates : the time of day, the types of
food and functions, and the minutes /
seconds and weight programmed.
BThe top selector knob :
to choose the food type or function.
CThe bottom selector knob :
to choose the programme time or
weight.
D-E-F The “AUTO” keys :
automatically set the appropriate pro-
gramme time according to the weight
and the selected food type.
GThe MODE key M:
to choose the appropriate function,
with the selector knob .
HThe HOT AIR key :to cook as if with
a traditional oven, with or without micro-
wave power.
IThe DUO key :
for dual level reheating; to be used with
the steam effect plate stackers.
JThe PAUSE/CANCEL key :
to interrupt (press once) or cancel
a programme (press twice).
Also used to set the clock.
KSTOP-TURNTABLE key :
to stop the turntable from revolving.
LSTART key :
to start all programmes.
MDOOR OPEN button :
press this button to open the door
or stop the appliance.
The control panel
B
G
F
A
K
DE
C
H
J
I
1 2 : 3 0
2 0 0 ° C
L
M

10
POWER SETTING APPLICATION
Microwave power settings
DEFROST
To defrost all frozen food or to finish cooking
of delicate dishes or to cook very slowly.
SIMMER
To finish programmes begun with the HIGH
COOK power setting, for instance beans,
lentils, or dairy products.
(This power setting is available when you programme
the function using the mode Mkey.)
HEAT
To heat up all liquids and all fresh or frozen
pre-cooked dishes.
HIGH COOK
To cook vegetables, fish, poultry and soup.
When you select the type of food, the appropriate
power setting is automatically programmed.
Microwave output power : 900 W
After first plugging in your microwave oven or after a power outage,
the clock reads 00:00and the two dots flash.
To set the clock :
- Press the PAUSE / CANCEL key for 5 seconds.
"00:00"flashes, and a tone sounds requesting the hour be set.
- Turn the selector knob to display the correct time.
- Validate by pressing the PAUSE / CANCEL key .
Your clock is set.
00:00
12:00
00:00
Setting the clock

11
The display and the selector knobs guide you in your choice of :
the foods
the functions
DEFROST SIMMER REHEAT COOK
DUO GRILL FAN HEAT FAN HEAT
+ MICROWAVE + MICROWAVE
the 2 level grill
LOW GRILL HIGH GRILL
the weight for an AUTO programme
the length of the programme (or time of day)
the temperature for a fan cook programme
The food type or function being selected will flash in the display.
12:00
beverages
beef,
lamb
vegetables poultry frozen ready-made
dishes
fresh ready-made
dishes
pork, veal,
turkey
fish
The display
12:30
200°C
(Press ‘M’ key once,
then top selector
to access).

12
Programming
Your microwave oven is now plugged in and the clock is set.
Open the door. Set the dish inside, close the door. If the door is not properly shut, the appliance
will not operate.
•
3 beeps announce the end of a programme. The beeps are repeated every minute for 10 minutes
until you open the door.
•
If you think there is insufficient space for the dish to turn freely inside the oven, press the STOP
TURNTABLE key before or during the programme. (You may not stop the turntable during
a programme using the Duo function).
•
If there is an error in the programming, press the CANCEL key twice.
The selector knobs
The 2 selector knobs are used for the various programmes:
The first to select
- the food type
- the function
the second to programme
- the length of the programme
- the weight of the food
- the temperature °C
FUNCTION
FOOD TYPE
TIME
WEIGHT
TEMPERATURE

13
Automatic programming by food type
▼▼
Choose your food type with the selector knob
,
(eg. fresh ready-made dishes
).
▼▼
Press the key, choose your function with the selector knob
.
(eg. HEAT );
the appropriate microwave power setting for that food item
is programmed automatically.
▼▼
Set the desired programme length (eg. 7 min) with the selector knob
.
▼▼
Press start
.
Automatic programming by function
▼▼
Press
the MODE key,
choose the desired function with the selector kn
ob .
The SIMMER function is available in this programme.
▼▼
Set the desired programme length (eg. 5 minutes), with the selector knob
.
▼▼
Press start
.
M
M
Microwave programming
5:00
7:00
Available programmes :
Express programming
▼▼Set the desired programme length (eg. 2 minutes) with the selector knob .
▼▼Press start . The maximum power setting is programmed directly
for quick reheating.
2:00
Automatic programming by weight :
with the A U T O keys
, the programme length is calculated
automatically.
▼▼Choose the food type with the selector knob (eg. fish).
▼▼Press one of the microwaving keys , or (eg. COOK )
or press the key and choose your function with the selector knob .
Press the key again.
▼▼50g blinks;programme the weight of your food item using the selector knob
(eg. 500 g).
▼▼
Press start . The appropriate power level is programmed, the adequate pro-
gramme length is displayed automatically (eg. 7 min) and the programme begins.
M
M
500
7:00

14
The DUO
function enables you to heat up two plates at the same time, all the while
retaining full flavor due to the steam effect provided by the Duo plate stackers.
Just cover the plates, stack them one on top of the other, and place together on the center
of the turntable.
Use the Duo button together with the Duo plate stackers
.
The advantages of the plate stackers :
-
Food retains full flavour due
to the steam effect.
-
Dishes are heated evenly through-
out.
-
Drying out of food is minimized.
-
Programme time can be reduced.
- By preventing splattering, they
help keep your oven clean.
The Duo function can be used to heat up fresh or refrigerated dishes. Neither the
defrosting or heating of frozen products nor the cooking of dishes is recommended.
Care of your Duo plate stackers :
-
A sponge, hot water and liquid detergent are all you need to clean your plate
stackers. Do not use a metal scouring pad or scouring powder.
-
The Duo plate stackers are dishwasher-safe.
Do not use the DUO plate stackers with the grill, microwave + grill, fan
oven or microwave + fan oven functions as this could cause them irreversible
damage.
The DUO function : dual level reheating

15
Example : Heating up 2 plates of ravioli = 5 min
•
Cover the two plates with the Double Decker plate stackers, and place in the center of
the turntable.
•
Press the Duo key
,0000::0000flashes, is displayed.
Set the time with the selector knob , eg. 5 minutes 0055::0000is displayed.
Press start
, the Duo reheating function begins.
As a general rule :
•
For a dish made of a single ingredient such as mashed potatoes, peas, celery etc. :
2 plates of 200 g
3 / 4 min
•
For a mixed consistency dish such as frankfurters and beans, beef bourguignon,
ravioli, etc. :
2 plates of 300 g
5 / 6 min
The times indicated above are based on heating of refrigerated dishes, or room
temperature for canned goods.
The DUO function : dual level reheating
The Duo plate stackers with steam action :
2 plate stackers so that you can heat up two
fresh or refrigerated dishes at the same time.
The DUO plate stackers
réchauffage
cuisson
décongélation

16
The grill shelves :
2 removable shelves allow you to use the accessories on 4 different cooking levels.
The 4 insertion levels are available according to the type of cooking and type of food.
When using the Grill or Grill + Microwave functions, insert the glass tray or the grill inside
the glass tray into the lowest shelf level for deep dishes such as roasts, and into the 3rd
level for less thick foods such as chops or sausages.
When using the Fan cooking or Microwave + Fan cooking functions, insert the grill or glass
tray into the lowest level.
The grill and grill shelves
햵햵
햴햴
햳햳
햲햲
The grill :
may be used to toast, brown or grill.
Always place the grill in the glass dish.
Under no circumstances may the grill
be used with other metal containers
in the microwave, grill + microwave or
fan cooking + microwave functions.
However, you may heat food in an alumi-
nium tray by using a plate to separate it
from the grill.
The glass tray
you may cook dishes directly in the tray
or set the grill inside the tray when roas-
ting in order to catch drippings.

17
Programming the grill
Using the 2 level grill
▼▼Press the key, choose the HIGH GRILL or LOW GRILL
with the selector knob .
▼▼Set the desired programme length with the selector knob and press start .
M
The grill function
This function enables you to brown dishes such as gratins or meat. It may
be used before or after cooking, as called for in the recipe.
•2 grilling levels are available :
HIGH GRILL and LOW GRILL . As a rule, use the HIGH GRILL level to grill
meat and fish and the LOW GRILL level with the simultaneous microwave + grill
function for gratins and to brown delicate dishes.
•Place the grill in the glass tray and insert according to the food item you wish to grill.
•After grilling make sure to use an oven mitt to handle dishes, and remember to use only
ovenproof cookware such as ceramic dishes or heat resistant glass. Always allow the grill
to cool off 25 minutes before touching it.
•WARNING : certain exposed parts may heat up during use of the grill. Be sure to keep
children away.
The grill folds down for easy cleaning.
The folded down position is solely for cleaning the oven ceiling, not for use.

18
Automatic programming by the weight :
you enter only the weight of the food item and programming is automatic
▼▼Choose the desired food type with the selector knob eg. poultry.
▼▼Press the key. Select the microwave + grill function with the selector knob .
The microwave power level and the grill level are automatically adapted to your dish.
▼▼
Press the key, 50g flashes;programme the weight of your food item
with the selector knob eg. 1000 g.
▼▼
Press start ; the suitable time is displayed (eg. 22 min) and the
programme begins.
Automatic programming by the food type :
with the key
▼▼Choose your food type amongst the available categories with the selector knob ,
eg. turkey roast.
▼▼Press the key,
and then select the microwave + grill function with the selector
knob .
The microwave power level as well as the grill level are automatically
adapted to your dish
.
▼▼
Set the programme length with the selector knob , eg. 20 min.
▼▼
Press start
.
Programming by function :
with the key
▼▼
If your food item does not correspond to any of the available categories,
select the microwave + grill function with the key. An intermediate
microwave power level together with the high grill are programmed.
▼▼
Set the programme length with the selector knob , eg. 10 min.
▼▼
Press start
.
M
M
M
M
M
M
This function enables you to use the microwaves and grill simultaneously, for rapid cooking.
•To guarantee quality cooking results, the high or low grill level combined with an
inter- mediate microwave power level are automatically programmed.
The microwave + grill function
20:00
10:00
22:00
1000

19
The fan functions
•The cooking temperature may be set from
50°
-
250°C
by
5°
steps.
•Cooking time may be set from
0
-
90
by one minute steps.
•It is always preferable to set a minimal cooktime and extend if necessary; check the
browning of your dishes to avoid overcooking.
•Remember to always place your dishes on the grill inserted level 1 or 2 when using the
fan function or fan + microwave function .
This will ensure even heat distribution thereby providing optimal cooking results.
•Use only heat-resistant ovenware.
•Never use metal dishes when cooking with the fan + microwave function .
•Always use an oven mitt to remove your dish as it may become quite hot.
Pointers
2 convection cooking functions are available :
the fan function
•to cook and brown food just as in a traditional convection oven
the fan + microwave function
•to combine microwave power with fan cooking, for considerable time
savings.

20
Programming the fan function
Example : to bake an apple pie
Using your favorite recipe, set the pie dish on the grill inserted level 1 or 2.
Press the fan key
.
Programme
220°
with the selector knob
.
Programme
40
min with the selector knob
.
Press start , the turntable revolves, the oven light comes on.
➤
At the end of the cooktime, remember to use an oven mitt to remove the dish.
175°
40:00
220°
00:00
with the fan key
:
tailor the programme to your cooking needs : function / temperature / programme length.
▼▼
Press the fan key ,the corresponding symbol is displayed.
▼▼117755°°
flashes, requesting you programme the cooking temperature
eg. 200°, with the selector knob
.
▼▼
Wait until
0000::0000
flashes, requesting you set the length of the
programme, eg. 30 minutes, with the selector knob .
▼▼Press start , the programme begins.
200°
30:00
Table of contents
Other Kleenmaid Microwave Oven manuals

Kleenmaid
Kleenmaid MWK100 User manual

Kleenmaid
Kleenmaid MW4510 Installation guide

Kleenmaid
Kleenmaid MW4520 Installation guide

Kleenmaid
Kleenmaid MWG4512 Installation guide

Kleenmaid
Kleenmaid MWK100X User manual

Kleenmaid
Kleenmaid cooking MWG4512K Installation guide

Kleenmaid
Kleenmaid MWG4511 User manual

Kleenmaid
Kleenmaid MWK101X User manual

Kleenmaid
Kleenmaid cooking Installation guide

Kleenmaid
Kleenmaid MWK101X Owner's manual