Klementz NANOPRE User manual

NANOPRE
- USER MANUAL -

NANOPRE –User Manual
WWW.KLEMENTZ.FR
©
Copyright
2019
Klementz
.
All rights reserved
1
CONTENT
SAFETY INSTRUCTIONS ..................................................................................................................................................................2
CHECK LIST .....................................................................................................................................................................................2
MACHINE PRESENTATION ..............................................................................................................................................................3
QUICK START..................................................................................................................................................................................4
OVERVIEWS ...................................................................................................................................................................................5
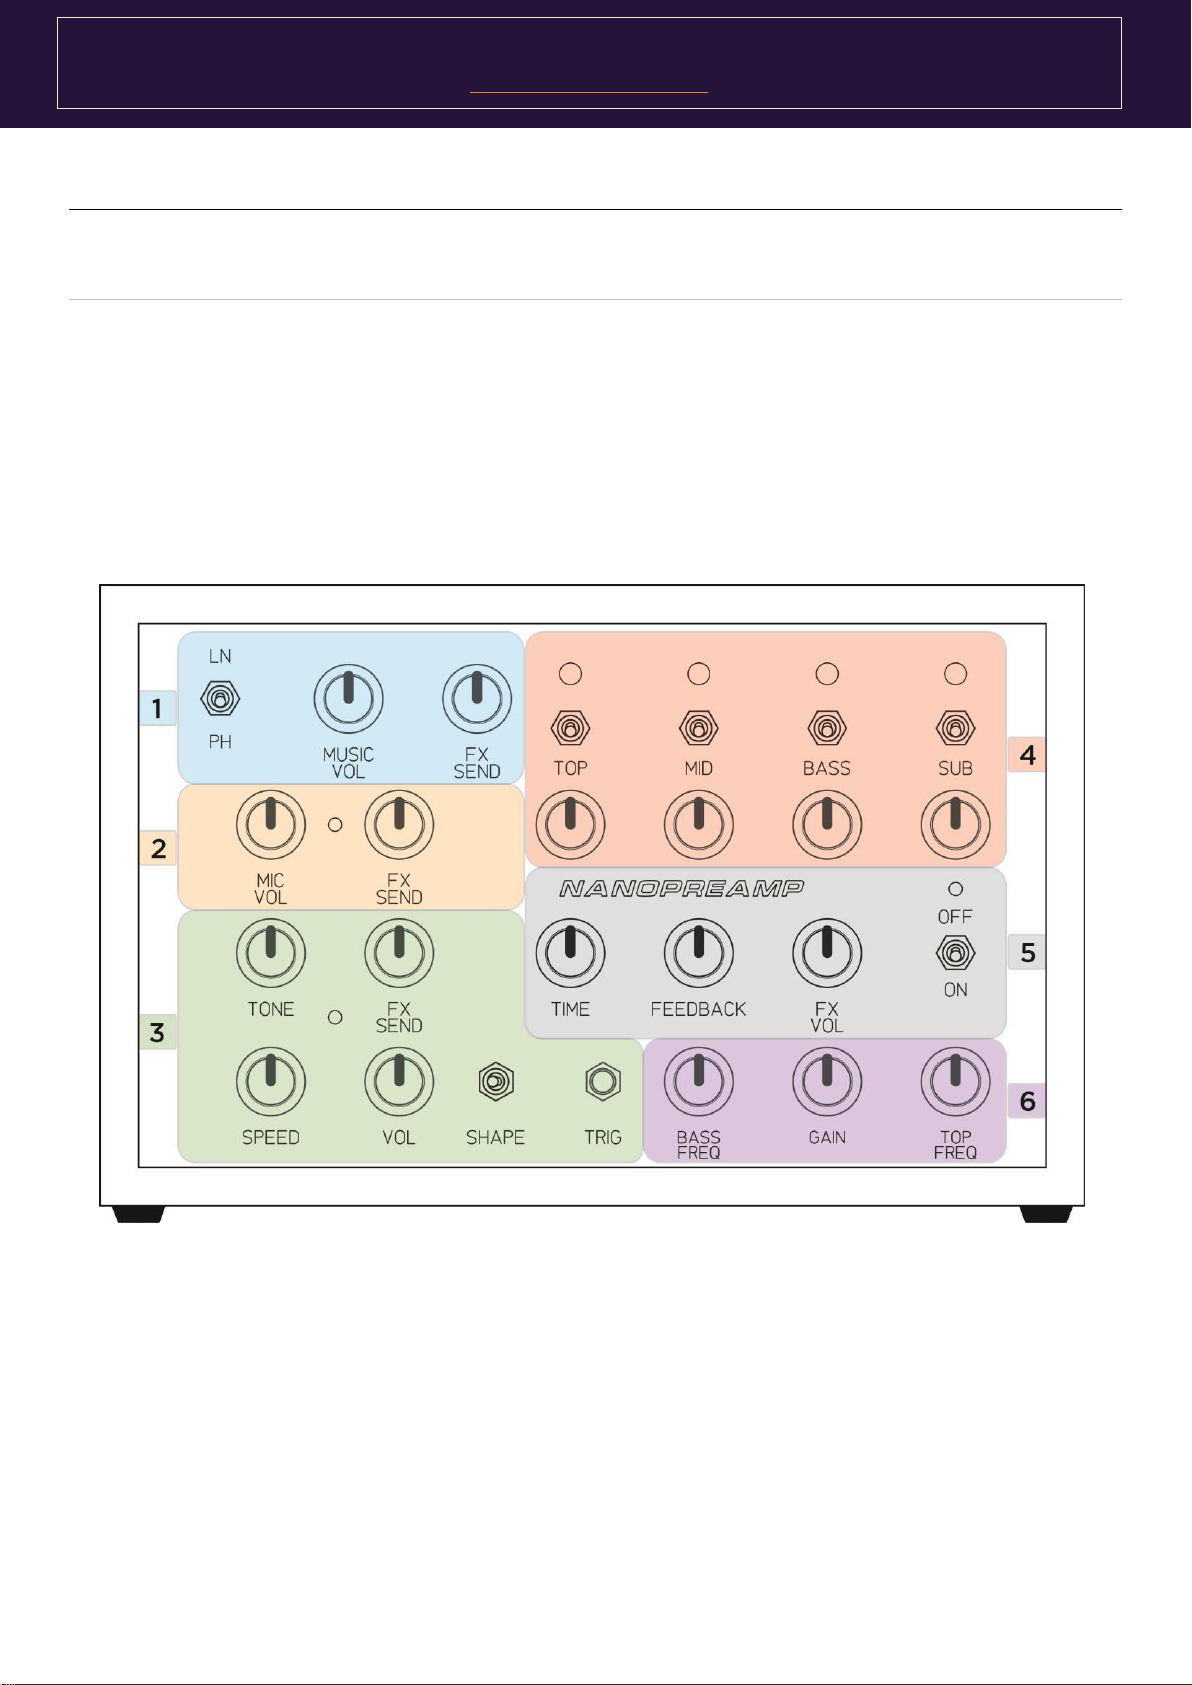
FRONT PANEL OVERVIEW ...........................................................................................................................................................5
BACK PANEL OVERVIEW .............................................................................................................................................................5
CONTROLS & USE...........................................................................................................................................................................6
FRONT PANEL FUNCTIONS &CONTROLS........................................................................................................................................6
BLOC 1 : PHONO / LINE PREAMPLIFIER ..................................................................................................................................7
BLOC 2 : MICROPHONE PREAMPLIFIER ..................................................................................................................................7
BLOC 3 : DUB SIREN...............................................................................................................................................................7
BLOC 4 : 4 WAY CROSSOVER ..................................................................................................................................................8
BLOC 5 : DUB DELAY ..............................................................................................................................................................8
BLOC 6 : EQUALIZER ..............................................................................................................................................................9
BACK PANEL FUNCTIONS &CONNECTORS ................................................................................................................................10
BLOC 1 : SEPARATED OUTPUTS & FULL RANGE OUPUT ........................................................................................................10
BLOC 2 : FX SEND & RETURN................................................................................................................................................11
BLOC 3 : EXTERNAL SIREN....................................................................................................................................................11
BLOC 4 : PHONO & LINE INPUTS ..........................................................................................................................................12
BLOC 5 : MICROPHONE INPUT .............................................................................................................................................12
BLOC 6 : POWER SUPPLY......................................................................................................................................................12
TYPICAL WIRING ..........................................................................................................................................................................13
INTERNAL SCHEMATIC .................................................................................................................................................................14
FREQUENCY RESPONSE................................................................................................................................................................15
MODIFICATIONS / CUSTOMIZATIONS ..........................................................................................................................................16
BEFORE OPENING ....................................................................................................................................................................16
OUPUT SETUP ..........................................................................................................................................................................18
GAIN EQ POTENTIOMETER SETUP ............................................................................................................................................19
TECHNICAL SPECIFICATIONS.........................................................................................................................................................20

NANOPRE –User Manual
WWW.KLEMENTZ.FR
©
Copyright
2019
Klementz
.
All rights reserved
2
SAFETY INSTRUCTIONS
1. Read these instructions.
2. Carefully keep these instructions.
3. Respect the warnings.
4. Follow all these instructions.
5. Do not use near a water source.
6. Clean only with a dry and clean cloth.
7. Don’t place near a heat source, that is near any equipment that produces heat.
8. Don’t use another Power Supply than the one that is provided with the purchase.
9. In case of lost or damage of the Power Supply, contact KLEMENTZ before using a new power supply.
10. Make sure that the Power Supply block is not getting trampled, neither on the transformer part, nor on the
cable or connector part.
11. Unplug this equipment during a thunderstorm or as soon as you have finished using it.
12. Please directly contact KLEMENTZ for any After Sale service. This is mandatory in case the equipment is
damaged : if the cable, the Power Supply or connectors of the equipment are damaged, if liquid has been
knocked over it or if objects have fallen on it, if it has been exposed to rain or humidity, if it does not work
correctly or if it has fallen.
13. Do not let the power supply block plugged in a socket when the equipment is not in use. The power supply
bloc is always powered even if the power switch of the unit is in OFF position. To completely disconnect
the machine, remove the power supply block from the mains plug.
14. In any setup case, leave a sufficient space for the equipment to cool properly. You can arrange other
equipment on the top and/or on the bottom of the unit, but some (like amplifiers) may cause a buzz or
generate too much heat, it may cause damage your equipment or degrade its performances.
15. In order to evaluate any risk of fire or electric chock, keep this equipment away from any source of
humidity and splash of any type. The equipment must also be kept away from any object filled with liquid
(bottled drinks, vase, …)
CHECK LIST
First of all, thank you from all the KLEMENTZ team for buying this NANOPRE.
These items are included in the box:
1 x NANOPRE
1 x POWER SUPPLY (16VAC/600mA)

NANOPRE –User Manual
WWW.KLEMENTZ.FR
©
Copyright
2019
Klementz
.
All rights reserved
3
MACHINE PRESENTATION
Le Nanopre est une machine Dub box complète. Originellement conçue pour tout amateur de
Reggae, de Dub ou de vinyles, il peut être utilisé pour transformer et améliorer n'importe quel type de
musique.
Pour une utilisation à la maison, en émission radio, en mix Live ou comme un vrai préamp Sound-
System, cette petite machine vous permettra de :
Séparer les différentes fréquences et instruments de la musique, augmenter, atténuer ou couper
individuellement chacune d'entre elles via l'isolateur interne 4-voies.
Utiliser un microphone externe, avec l'entrée XLR, les réglages de gain et d'envoi d'effet dédiés.
Utiliser un lecteur vinyle via l'entrée Phono, ou n'importe quelle autre niveau ligne, avec un
réglage dédié du Gain et d'envoi d'effet.
Ajouter de l'effet avec la Dub Siren interne (design exclusif, trouvable nulle part ailleurs).
Utiliser une Dub Siren externe ou toute autre machine génératrice de son (Effet, Sampleur, etc.)
en utilisant l'entrée "Ext. Siren"
Ajouter un effet d'écho sur n'importe quelle des sources ci-dessus en utilisant le Dub Delay
interne.
Ajouter un effet externe (de votre choix) sur n'importe quelle des sources ci-dessus (en utilisant
la fonction "Envoi d'effet" et "Retour d'effet")
Améliorer et donner une couleur au son de votre musique avec les filtres paramétriques internes.
Utiliser les 4 sorties séparées pour relier jusqu'a 4 amplificateurs différents, créant un vrai
système actif 4-voies.
Utiliser la sortie "Full Range" pour relier la machine à n'importe quel mixeur standard,
amplificateur ou moniteurs studio.
Dans la suite du document, chacune des fonctions sera détaillée séparément.

NANOPRE –User Manual
WWW.KLEMENTZ.FR
©
Copyright
2019
Klementz
.
All rights reserved
4
QUICK START
For a correct use of your NANOPRE, please read the instructions below:
1. This NANOPRE must be plugged into a LINE input of your mixer or preamp. An effect processor
can be plugged between your NANOPRE and the LINE input of your mixer, only if the input of
your effect processor is also a LINE type input. In any case, do not plug your NANOPRE in a
Microphone input or it may damage it. Please see the «
Typical wiring
» section for a more
detailed description of the possible wirings.
2. In you use the NANOPRE with a DJ mixer, a [MONO JACK 6.35mm] to [2 x RCA (Cinch)] is
necessary.
3. Before powering the NANOPRE, ensure that the Volume potentiometer is at the minimum
position. Put your NANOPRE on and progressively increase the volume until you have a sound.
4. Only use the provided power supply block.

NANOPRE –User Manual
WWW.KLEMENTZ.FR
©
Copyright
2019
Klementz
.
All rights reserved
5
OVERVIEWS
FRONT PANEL OVERVIEW
BACK PANEL OVERVIEW

NANOPRE –User Manual
WWW.KLEMENTZ.FR
©
Copyright
2019
Klementz
.
All rights reserved
6
CONTROLS & USE
FRONT PANEL FUNCTIONS & CONTROLS
The Nanopreamp is a machine composed of multiple features block. Each block is represented
on the front panel below.
A detailed description of each block is given below in this document.

NANOPRE –User Manual
WWW.KLEMENTZ.FR
©
Copyright
2019
Klementz
.
All rights reserved
7
BLOC 1 : PHONO / LINE PREAMPLIFIER
FUNCTIONS
USAGE
LN /PH
Switch used to select the main signal / music source :
In high position, the LINE input is selected (CD player, Laptop, or any
other line level source)
In low position, the PHONO input is selected (Turntable)
MUSIC VOL
Potentiometer setting the input level of the selected source (Phono or Line):
If it’s at the minimum (fully anti-clockwise), the volume is the lowest.
If it’s at the maximum, the volume will be higher.
FX SEND
Rotary potentiometer setting the level of effect send of the Music signal.
BLOC 2 : MICROPHONE PREAMPLIFIER
FUNCTIONS
USAGE
MIC VOL
Potentiometer setting the input level of the Microphone:
If it’s at the minimum (fully anti-clockwise), the volume is the lowest.
If it’s at the maximum, the volume will be higher.
FX SEND
Rotary potentiometer setting the level of effect send of the Microphone.
BLOC 3 : DUB SIREN
FUNCTIONS
USAGE
TONE
Rotary potentiometer allowing to set the pitch of the sound of the Dub Siren :
If it is at the minimum (fully anticlockwise), the pitch of the sound is low.
If it is at the maximum, the pitch of the signal is high.
FX SEND
Rotary potentiometer setting the level of effect send of the Dub Siren.
SPEED
Rotary potentiometer allowing setting the oscillation speed of the LFO.
If it is at the minimum (fully anticlockwise) the oscillation speed will be
low and the modulation will be slower.
If it is at the maximum, the oscillation speed will be fast and the
modulation will be fast as well.
VOL
Rotary potentiometer allowing setting the output volume of the Dub Siren.

NANOPRE –User Manual
WWW.KLEMENTZ.FR
©
Copyright
2019
Klementz
.
All rights reserved
8
SHAPE
Switch selecting the mode (modulation waveform) of the Dub Siren
TRIG
Push button triggering the sound output of the dub siren.
BLOC 4 : 4 WAY CROSSOVER
The Nanopreamp has an internal active filter composed of 4 ways: SUB / BASS / MID and TOP.
Each way of the active filter is constituted of the following elements:
-A volume potentiometer, with which the volume of a particular frequency band can be set
-A kill switch which allows enabling or disabling (mute) the output of a particular band.
-A signal LED
BLOC 5 : DUB DELAY
FUNCTIONS
USAGE
TIME
Rotary potentiometer allowing setting the time between two repeats.
When in minimum setting (fully anti-clockwise), the time between two
repeats will be very short and thus the repeat time will be fast.
If it is at the maximum, the repeat time will be long and thus repeat
speed will be slow.
FEEDBACK
Rotary potentiometer allowing setting the gain between each repeat.
When set at minimum (full anti-clockwise), there will be only one repeat.
When set at the maximum, the level will increase at each repeat.
FX VOL
Rotary potentiometer allowing setting the level of the effect return.
If it’s at the minimum (fully anti-clockwise), the volume is the lowest.
If it’s at the maximum, the volume will be higher.
ON/OFF
Switch used to enable or disable the internal dub delay:
When set in high position, the internal dub delay is not working (OFF)
When set in low position, the internal dub delay is powered (ON)

NANOPRE –User Manual
WWW.KLEMENTZ.FR
©
Copyright
2019
Klementz
.
All rights reserved
9
BLOC 6 : EQUALIZER
FUNCTIONS
USAGE
BASS FREQ
Rotary potentiometer allowing setting the targeted frequency in the SUB/BASS
frequency range :
If it is at the minimum, the targeted frequency range is in the SUB range.
If it is at the maximum, the targeted freq. range is in the BASS range.
GAIN
Rotary potentiometer allowing setting the gain of one of the two frequency
range.
During the build, this gain potentiometer is affected at the MID/TOP frequency
range, whose frequency is targeted by the TOP FREQ potentiometer.
In order to affect the GAIN potentiometer to the other frequency band
(SUB/BASS), please refer to the «
Modifications / Customizations
» section
below in this document.
TOP FREQ
Rotary potentiometer allowing setting the targeted frequency in the MID/TOP
frequency range :
If it is at the minimum, the targeted frequency range is in the MID range.
If it is at the maximum, the targeted freq. range is in the TOP range.

NANOPRE –User Manual
WWW.KLEMENTZ.FR
©
Copyright
2019
Klementz
.
All rights reserved
10
BACK PANEL FUNCTIONS & CONNECTORS
Tha rear panel is composed of multiple connectors, directly linked with certain functions from
the front panel.
A detailed description of all the connectors is given below.
The main wiring diagrams have a dedicated section later in this document.
BLOC 1 : SEPARATED OUTPUTS & FULL RANGE OUPUT
As the NANOPRE has an internal 4-way active filter, you can use the separated outputs of the
Nanopreamp in case of a multi-amplification system.
In case of a simpler setup, for recording or any other application where only a Complete, Full
range signal is needed, the Full Range output can be used..
FONCTIONS
UTILISATION
SUB
SUB separated output. Only the signal of the SUB output of the 4-way filter is
present on this output.
6.35mm Unbalanced MONO JACK type Connector.
BASS
BASS separated output. Only the signal of the BASS output of the 4-way filter
is present on this output.
6.35mm Unbalanced MONO JACK type Connector.

NANOPRE –User Manual
WWW.KLEMENTZ.FR
©
Copyright
2019
Klementz
.
All rights reserved
11
MID
MID separated output. Only the signal of the MID output of the 4-way filter is
present on this output.
6.35mm Unbalanced MONO JACK type Connector.
TOP
TOP separated output. Only the signal of the TOP output of the 4-way filter is
present on this output.
6.35mm Unbalanced MONO JACK type Connector.
FULL RANGE
This output is the sum of all the other outputs. A signal containing the integral
audio spectrum is present on this output.
6.35mm JACK type Connector
2 possibilités de sortie sur ce jack :
oSortie « double mono » asymétrique (STEREO JACK).
oSortie mono symétrique (TRS JACK).
La modification pour le passage d’une possibilité de sortie à l’autre est
expliquée dans le paragraphe «Modification / Personnalisation ».
BLOC 2 : FX SEND & RETURN
The Nanopreamp has an internal Delay module (DUB DELAY). However, it is possible to plug an
external effect module.
Its use can be coupled to the internal Delay (Internal delay in “On” positon). In case the internal
delay would be in the “OFF” position, only the external effect module will be active.
In all the cases, the effect return volume (internal and/or external) will be set by the same
potentiometer on the front panel, wich is “FX VOL” knob of the “Dub Delay” introduced in the previous
section.
FONCTIONS
UTILISATION
FX SEND
Output of the effect send. This output can be connected to the LINE input of
an external effect module.
6.35mm Unbalanced MONO JACK type Connector.
FX RETURN
Input to plug the output of the external effect module.
LINE type input.
6.35mm Unbalanced MONO JACK type Connector.
BLOC 3 : EXTERNAL SIREN
The Nanopreamp has an internal Dub Siren. However, you can add an External Dub Siren or any
other Sound Generator by connecting it to this Input.
In case the External Dub Siren is plugged on this input, the volume and the effect send of it will
be the controlled by the same potentiometers used to control the internal siren.
This input is a 6.35mm Unbalanced MONO JACK type Connector input.

NANOPRE –User Manual
WWW.KLEMENTZ.FR
©
Copyright
2019
Klementz
.
All rights reserved
12
BLOC 4 : PHONO & LINE INPUTS
Two audio sources, a Turntable / Recordsplayer or a CD Player (Laptop, or any other LINE type
source) can be plugged in the same time on the Nanopreamp. The switch in the front panel allowing
choosing one of these two sources.
FONCTIONS
UTILISATION
PH
Made by two Cinch (RCA) connectors and a GND pin to clip the ground wire,
this input is a PHONO type one and allows to connect a Turntable.
LINE
Made by two Cinch (RCA) conenctors, this input is a LINE type inupt and
allows you to connect any LINE type equipment (CD Player, Laptop, etc)
BLOC 5 : MICROPHONE INPUT
This 3-pin XLR Balanced connector is an input dedicated to use a Microphone.
There is no +48V power generator in the Nanopreamp, thus you cannot use a microphone which
needs a +48V voltage to operate.
BLOC 6 : POWER SUPPLY
The power supply connector is a BARREL 2.1 x 5.5 mm, allowing to plug the power supply bloc
provided with the Nanopreamp.
The power supply bloc is specifically designed for the Nanopreamp. Please refer to the end of
this document to see the exact specs.
NOTE
1. Do not connect another power supply block.
2. In case of doubt, please contact the KLEMENTZ team at the address give at the end of this
document.

NANOPRE –User Manual
WWW.KLEMENTZ.FR
©
Copyright
2019
Klementz
.
All rights reserved
13
TYPICAL WIRING

NANOPRE –User Manual
WWW.KLEMENTZ.FR
©
Copyright
2019
Klementz
.
All rights reserved
14
INTERNAL SCHEMATIC

NANOPRE –User Manual
WWW.KLEMENTZ.FR
©
Copyright
2019
Klementz
.
All rights reserved
15
FREQUENCY RESPONSE

NANOPRE –User Manual
WWW.KLEMENTZ.FR
©
Copyright
2019
Klementz
.
All rights reserved
16
MODIFICATIONS / CUSTOMIZATIONS
The user is not allowed to proceed to any tweaks or mods to the machine without the explicit
allowance or request from the builder, or it will void the warranty.
It is possible to customize and change the cut-off frequencies on request while ordering, and
later when the machine has been bought, please contact us.
However, we do propose 2 customization options that allow the user to change these few
configurations at any moment.
BEFORE OPENING
It is mandatory to strictly follow the method described below to avoid any damage to the unit while
changing the configuration:
STEP 1
Turn the machine Upside down and locate the 4 screws on the bottom of it. Then, gently unscrew these
screws and gently remove the bottom part of the unit, while taking care to remember the way it was set
before you removed it, and finally access the inside of the unit.
STEP 2
Locate the part of the machine where the modification is to be made, then remove the blue jumper(s), if
they’re glue together, remove the whole set of glued jumpers. Once they’re removed you can then
separate them and remove the glue.
Once the jumper(s) are removed, replace them to have the desired setup (according to the tables
below)
STEP 3
Once the jumpers are set into their sockets (ensure they’re pushed to the maximum), you can close
back the machine by reinserting the bottom side in the same way as it was before you removed it.

NANOPRE –User Manual
WWW.KLEMENTZ.FR
©
Copyright
2019
Klementz
.
All rights reserved
17
FULL RANGE SETUP OUTPUT
You can use the Full range output in 2 configurations, to allow different types of interfacing with
other equipment.
The two available setups are listed below:
JP3
SETUP
S*
Dual mono (Stereo jack Compatible)
M
Mono (TRS jack compatible)
* Default setup
Stereo Setup (dual mono)
Mono Setup (TRS compatible)

NANOPRE –User Manual
WWW.KLEMENTZ.FR
©
Copyright
2019
Klementz
.
All rights reserved
18
OUPUT SETUP
To reduce the number of output ways of the active filter of the unit, It is possible to mix them
together.
JP1
JP2
CONFIG
SUB
BASS
MID
TOP
-*
-*
4 Way*
SUB*
BASS*
MID*
TOP*
A
-
3 Way (2)
SUB + BASS
BASS
MID
TOP
B
-
3 Way (2)
SUB
BASS
BASS + MID
TOP
A
X
2 Way (1)
SUB + BASS
BASS
MID + TOP
TOP
*
Default Setup
-
Not Placed
X, A, B
Placed (On A or B)
3 way Setup (2)
2 way Setup (1)

NANOPRE –User Manual
WWW.KLEMENTZ.FR
©
Copyright
2019
Klementz
.
All rights reserved
19
GAIN EQ POTENTIOMETER SETUP
The gain potentiometer of the Parametric Equalizer can be set to control the gain of the
Sub/Bass Parametric or/and the gain of the Mid/Top Parametric:
JP1
JP2
GAIN SUB/BASS
GAIN MID/TOP
F
F
FIXED
FIXED
F*
V*
FIXED*
VARIABLE*
V
F
VARIABLE
FIXED
V
V
VARIABLE
VARIABLE
*
Default Setup
F
Placed on the F side (FIXED)
V
Placed on the V side (VARIABLE)
Fixed Sub/Bass Gain & Variable Mid/Top (2)
Variable Sub/Bass Gain & Fixed Mid/Top Gain (1)
Table of contents
Other Klementz Recording Equipment manuals