Klever Desk User manual

kleverdesk.co.nz
Klever Desk®
Electric Single Sided Desk
Quick Start Guide

kleverdesk.co.nz
2
Keep children and pets away from the electric high-adjustable desk during
the operation. Unplug the power cord during a thunderstorm or if you do not
intend to use the desk for long time.
Make sure desktop not touch the wall.
Ensure no obstacles in the desk’s path, and no objects above 20” under the
desk.
Working environment temperature 0-40ºC, keep products away from
corrosive gas, liquid and dusty objects.
It is strictly forbidden to disassemble the products privately to avoid that
the failure of the products or the damage to the human body caused by
electronic products, etc.
Although the product with anti-collision function, in order to avoid any
pinching, please ensures that hands or other parts of your body are in a safe
position during the operation. Anti-collision is not enabled during all resets.
Please read following instruction carefully before use the high-adjustable desk.
The company does not bear any warranty or liability for damage and human
injury caused by any abnormal operation.
It is necessary to be reset manually after initial installation or power off.
Caution

kleverdesk.co.nz
3
2
Parts
Part Name Qty
(PCS)
1Side Bracket 2
2Foot 2
3Column 2
4Adjustable Frame 1
5M6*10 Screw 8
6M6*16 Screw 8
Part Name Qty
(PCS)
8ST4.8*16 Tapping Screw 11
9ST3.5*16 Tapping Screw 4
10 Control Box 1
11 Handset 1
12 Power Cord 1
13 Extension Cable 2
14 Cable Clip 6
10
min

kleverdesk.co.nz
4
Installation
Set frame flat. Unfold columns and ‘click’ in place.
Step 1:
Unfold when laying down
Auto Click

kleverdesk.co.nz
5
M6*10 Screw
Installation
Place the side brackets on to the frame. Install the bracket screws and fasten
the frames pre-installed screws.
Step 2:
Avoid excessive tightening of screws
Fasten the screws

kleverdesk.co.nz
6
Line up the screw holes on the feet and columns. Fasten the screws.
Step 3:
Installation
Avoid excessive tightening of screws
Fasten the screws
M6*16 Screw

kleverdesk.co.nz
7
Check both sides of the desktop before placing the frame on the bottom
side of the top. Adjust frame to suitable width (it is suggested that the below
measurements are followed when setting the column spacing) and fasten screws.
Install the handset in a suitable position underneath desktop edge to avoid
interference with humans or chairs, display screen facing out and fasten screws.
Step 4:
Installation
Avoid excessive tightening of screws
ST4.8x16 Tapping Screw
ST3.5x16 Tapping Screw
Handset
980mm (1200 Worktop)
1260mm (1500 Worktop)
1360mm (1600 Worktop)
1560mm (1800 Worktop)

kleverdesk.co.nz
8
Installation
As shown in the below, connect related parts, including control box, handset,
extension cable and power cord etc. and fasten with cable clip.
Step 6:
Step 5: Install control box on underneath of desktop (see below diagram). Control box
must be installed flush and away from desk frame.
SMART neo
M2M1COMDC
HC AC
Positioning the Cable Clips
Handset
Control Box
ST3.5x16 Tapping Screw
Note: Cables are for illustrative
purposes only. Do not attach cables
until assembly is complete.

kleverdesk.co.nz
9
Initial Setup Procedure & Manual Reset
Risk of minor or moderate injury through crushing.
Collision Detection (ISP) is inactive during start-up and reset processes. This may lead to minor or moderate
injury through crushing. Ensure that no persons or objects are in the table’s range of motion.
NOTICE
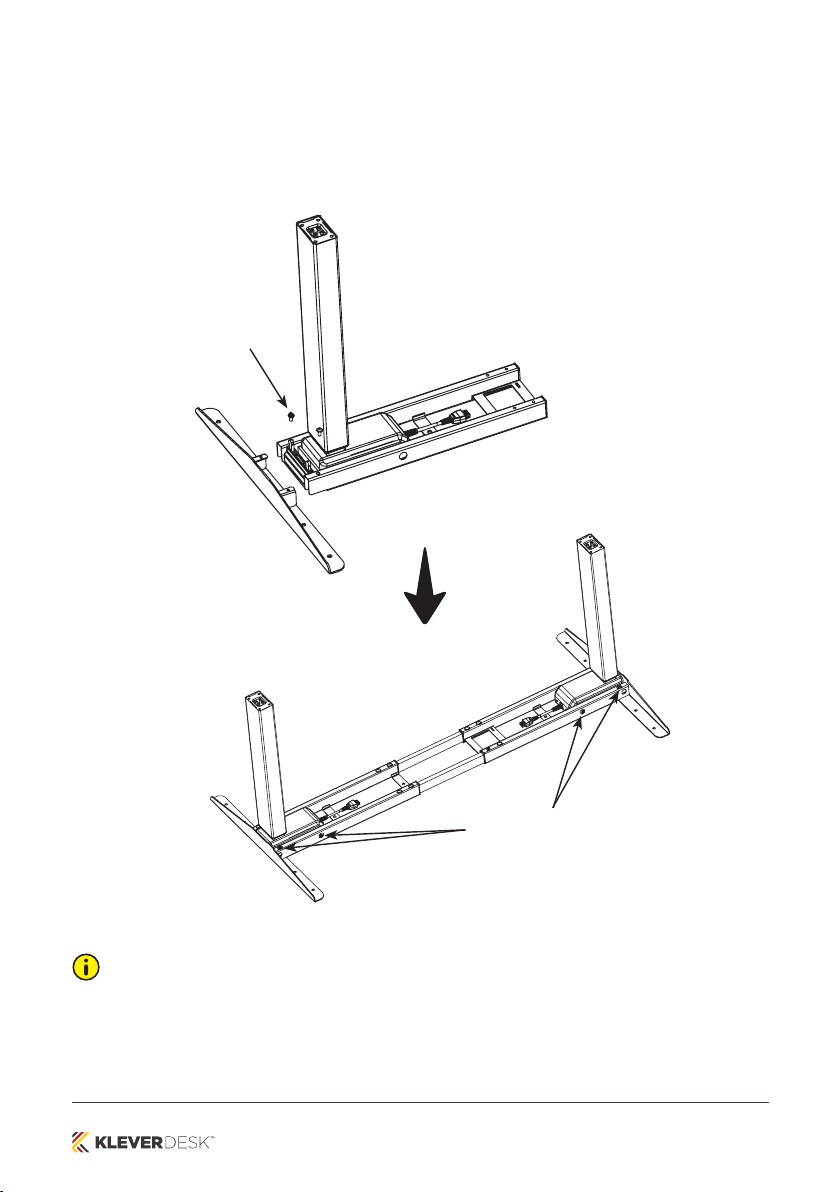
Operating the table system when it is not properly connected can damage the product.
• Ensure all Cables are properly connected
• Ensure that all required Actuators are ready to be operated
• Do not operate the Table System until it is properly connected
The Position Reset Procedure is used to align the position of the Actuators within the Table System. You must
perform a Position Reset Procedure before using the SMARTneo-2G for the first time.
It is possible to perform a Position Reset Procedure with all types of compatible User Interface. However, this
section describes performing a Position Reset Procedure for Table Systems controlled by a Hand Control with
an UP Key and DOWN Key (Comfort or Basic Hand Controls).
If your SMARTneo-2G is operated by a different User Interface, consult that product’s operating Manual for
instructions on performing a Position Reset Procedure.
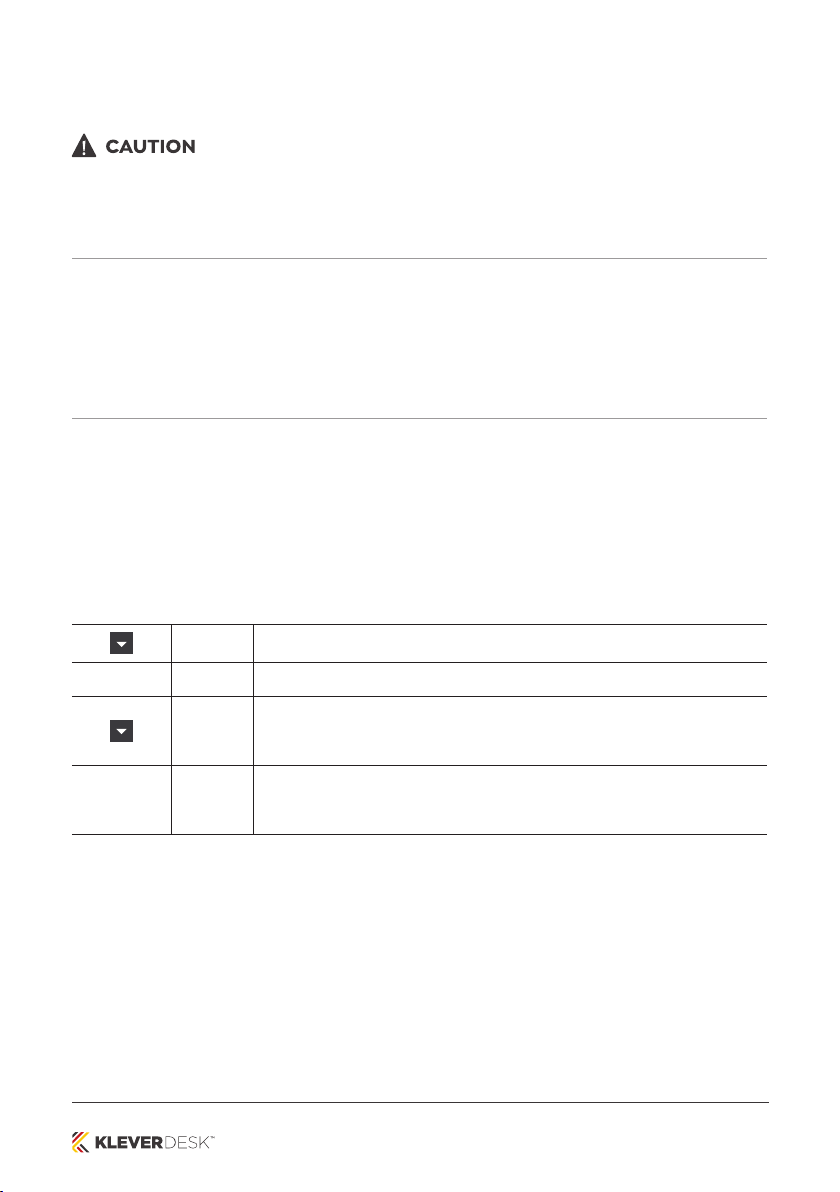
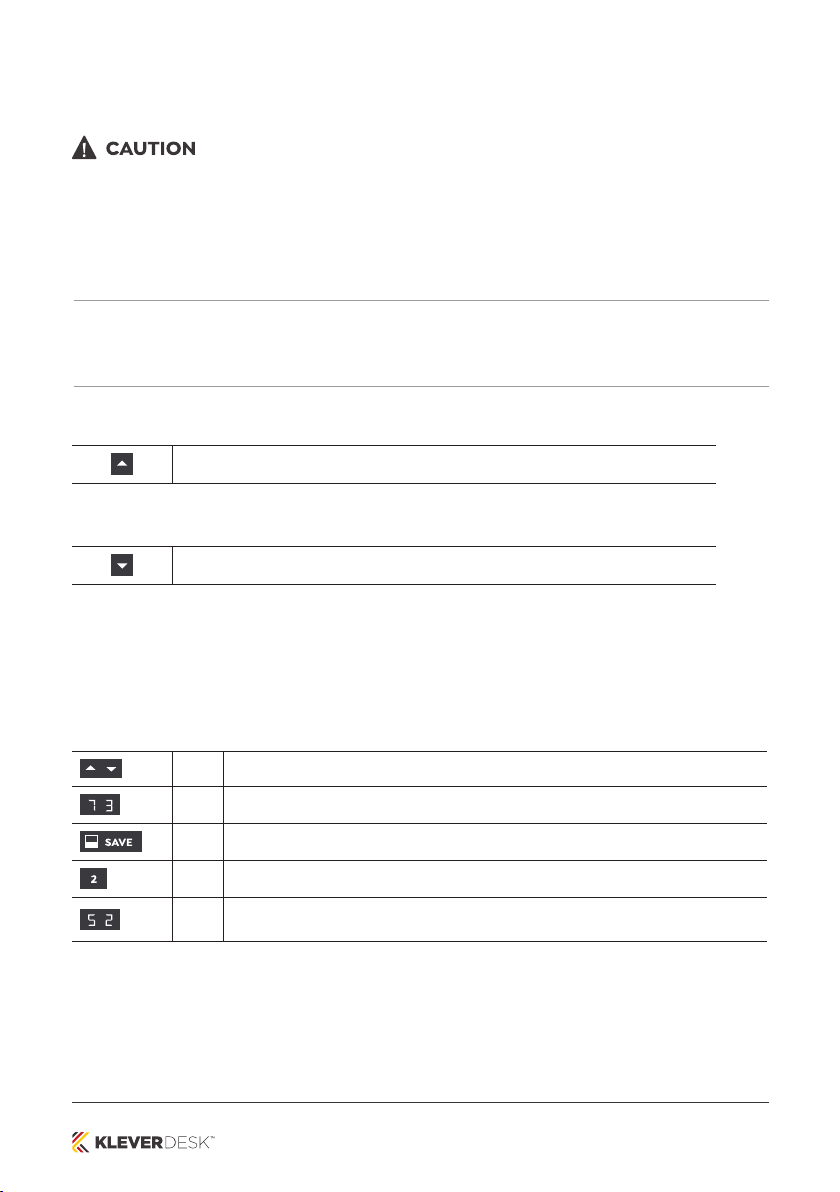
1. Press and hold the DOWN Key until the table stops at the lower position limit
2. Release the DOWN Key
3. Press and hold the DOWN Key again
> The table will move down slightly, then up again
4. Release the DOWN Key
> The Position Reset Procedure is complete.
INFO
If your SMARTneo-2G has been parameterized with additional stopping points (e.g. a Container Stop Position),
repeat Step 3 until the table has moved upwards again.

kleverdesk.co.nz
10
Adjusting the Table Top Height
Risk of minor or moderate injury through crushing
Your fingers may be crushed when you attempt to change the height of the table.
• Keep fingers away from moving parts
• Ensure that no persons or objects are in the table’s range of motion
INFO
The Table Top will move up or down until the UP or DOWN Key is released, or if a predefined stopping point
has been reached.
To move the Table Top UP:
Press and hold the UP Key until the desired height has been reached
To move the Table Top DOWN:
Press and hold the DOWN Key until the desired height has been reached
Saving a Memory Position
This function saves a set Table Top position. One Memory Position can be saved per Memory Position Key.
1. Move the table to the desired height
> The display shows the Table Top height (e.g. 73 cm)
2. Press the SAVE Key.
3. Press the Memory Position Key (e.g. 2)
The display shows S 2
> After about two seconds, the Table Top height is displayed again

kleverdesk.co.nz
11
Adjusting the Table to a Memory Position
1.
Press and hold the required Memory Position Key (e.g. 2).
> The Table Top will move until the saved Table Top height has been reached. If you
release the Key before the Memory Position is reached, the table will stop.
2. Release the Memory Position Key
> The display shows the Table Top height (e.g. 73 cm)
Factory Reset
1 2
Press and hold the following Keys for 3 seconds:
• Memory Position Keys 1 and 2
• UP Key
The display shows S and a number (e.g. S 4)
Press the DOWN Key until the display shows S 0.
The display shows S 0.
SAVE
Press the SAVE Key.
The SMARTneo-2G has now been reset to its factory settings. It is now in the same state as it was
during the first start-up.
Note - E70 will be displayed:
* Then power off and on control box from mains
* Display will show 000
* Then follow initial setup procedure

kleverdesk.co.nz
12
Container and Shelf Stop Positions
These features can limit the movement area of the Table Top (if e.g. a container is below the table or a shelf is
above it). Container Stop Positions become the new lowest end position, Shelf Stop Positions the highest.
INFO
Container Stop Positions can only be saved only in the lower half of the movement area, Shelf Stop Positions
in the upper half. You must set each position separately.
To Save a Container Stop or Shelf Stop Position:
1. Press the UP or DOWN Key to move the Table Top to the desired position.
SAVE 2.
Press and hold the SAVE Key for 10 seconds.
> The Container Stop / Shelf Stop Position is saved (Container Stop if you are
in the bottom half of the movement area, Shelf Stop if you are in the top half).
To Delete a Container or Shelf Stop Position:
1.
Press the UP or DOWN Key to move the Table Top to the top half (to
delete a Shelf Stop Position) or bottom half (Container Stop Position) of the
movement area.
SAVE 2.
Press and hold the SAVE Key for 10 seconds.
> The Container Stop / Shelf Stop Position is deleted (Container Stop if you
are in the bottom half of the movement area, Shelf Stop if you are in the top
half).

kleverdesk.co.nz
13
Error Messages on Display
Signal Message Required Actions
The display shows “Hot”.
Overheating protection has been
activated. Duty cycle possibly exceed.
Wait for the overheated components
to cool.
The display shows an
error number.
An internal error has occurred.
Read the table below to find the
correct response to the error code
shown.
Code Message Required Actions
E00 Internal Error Channel 1 Disconnect the Control Box from the Mains. Contact KLEVER for
further information.
E01 Internal Error Channel 2 Disconnect the Control Box from the Mains. Contact KLEVER for
further information.
E12 Defect Channel 1
Disconnect the Control Box from the Mains. Fix the external short
circuit. Ensure all cables are connected correctly. Reconnect the
system, then operate as normal.
E13 Defect Channel 2
Disconnect the Control Box from the Mains. Fix the external short
circuit. Ensure all cables are connected correctly. Reconnect the
system, then operate as normal.
E24 Over current Motor M1
Check that nothing is blocking the table’s range of movement.
Remove excess load from the table. Contact KLEVER for further
information.
E25 Over current Motor M2
Check that nothing is blocking the table’s range of movement.
Remove excess load from the table. Contact KLEVER for further
information.
E48 Over current Motor Group
Check that nothing is blocking the table’s range of movement.
Remove excess load from the table. Contact KLEVER for further
information.
E36 Plug detected in M1 Plug in the correct motor. Ensure all cables are connected correctly.
Perform a Factory Reset. Perform a Position Reset Procedure.
E37 Plug detected in M2 Plug in the correct motor. Ensure all cables are connected correctly.
Perform a Factory Reset. Perform a Position Reset Procedure.
E55 Sync Error, Motor Group Remove excess load from the table. Perform a Factory Reset.
Contact KLEVER.
E62 Stop due to power output
control
Check that nothing is blocking the table’s range of movement.
Remove excess load from the table. Contact KLEVER for further
information.
When a comfort hand control is installed, error messages are displayed on the digital panel.

kleverdesk.co.nz
14
E60 ISP Activated Release all Keys and wait for the Drive Back function to be
completed.
E61 Motor Replaced Plug in the correct motor. Ensure all cables are connected correctly.
Perform a Factory Reset. Perform a Position Reset Procedure.
E65 Over current while driving
Check that nothing is blocking the table’s range of movement.
Remove excess load from the table. Contact KLEVER for further
information.
E67 High Voltage Detected Disconnect the Control Box from the Mains. Contact KLEVER for
further information.
E70 Motor Configuration
Changed
Disconnect the Control Box from the Mains. Connect the Actuators
in the desired setup. Perform a Factory Reset. Perform a Position
Reset Procedure. Read Chapter 9, “Actuator Setup”, for advice on
changing Actuator types.
E71 Collision Sensor Defective Perform a Factory Reset. Contact KLEVER if the problem persists.
E72 Position Error (Middle
Switch*)
Disconnect the Control Box from the Mains. Wait for at least 20
seconds. Reconnect and perform a Position Reset Procedure.
E73 Middle Switch* Defective Disconnect the Control Box from the Mains. Contact KLEVER for
further information.
E81 Internal Error
Disconnect the Control Box from the Mains. Restart and per-form a
Factory Reset. Contact KLEVER for further information if the problem
persists.
E90
Cascading error (slave)
Check all connections. Attempt a Position Reset Procedure. If this
is not possible, disconnect all Control Boxes from the Mains and
try again. Contact KLEVER for further information if the problem
persists.
E91
E91
E93 Connection Error During
Cascading
Check all connections. Attempt a Position Reset Procedure. If this
is not possible, disconnect all Control Boxes from the Mains and
try again. Contact KLEVER for further information if the problem
persists.
NOTICE
Do not operate the table system if problems persist. Contact KLEVER for further information.
NOTICE
The Middle Switch is only fitted to certain versions of the SMARTneo-2G. Contact KLEVER if you are unsure
which version you have.

kleverdesk.co.nz
15
Intelligent System Protection
Intelligent System Protection (ISP) is KLEVER’s collision detection system. It aims to reduce the risk of system
damage when using KLEVER products. When a collision is detected, all Actuators stop immediately and
move back in the opposite direction for a few seconds (see 11.2.2 Drive Back Function). The SMARTneo-2G
features integrated collision detection via the Light Barrier function. No external sensors are required. The
following points must be observed regarding the ISP function.
• ISP sensitivity and ISP shutdown values depend on the complete system (mechanical and electronic
components). Contact KLEVER to determine the ISP suitability of your Table System.
• Ensure that a mechanical brake is integrated into the system. This should be effective during
downward movement of the table system.
• If no mechanical brake is installed, ISP shutdown sensitivity will be reduced when the table is loaded.
However, if there is no load on the table top, ISP will function properly without a brake.
• After ISP is activated, the next movement of the system can only be in the opposite direction.
• ISP shutdown values can be adjusted in the parameters of the SMARTneo-2G. Contact KLEVER for
further details.
Maintenance
The SMARTneo-2G is maintenance free for its entire service lifetime. If cleaning is required, wipe the housing
with a soft, dry cloth.
WARNING
Moderate risk of serious injury through electric shocks.
While cleaning or maintaining the SMARTneo-2G, liquid intrusion may lead to serious injury through electric
shocks.
• Do not allow any components to become wet during cleaning
• Only use a soft, dry cloth to clean the SMARTneo-2G
• Ensure components are placed away from areas where spillages are likely to occur
• Take care not to spill liquids onto or around the SMARTneo-2G

kleverdesk.co.nz
Other manuals for Desk
1
Table of contents
Other Klever Indoor Furnishing manuals