B
1
2
3
4
If you request a repair, please report the fault in as much detail
as possible. This will aid in knowing the problem and parts to
be used and repair time.
When you believe you need service.
About Repairs
Note in regard to use and carrier sense
When turning on the transmitter, the transmitter will scan for
a free frequency while the receiver scans for its paired
module. This is called 'carrier sense'.
WARNINGWARNING
In order to be able to do 'carrier sense' appropri-
ately, the location where power of the transmitter is
turned on should be as close as possible to where
the model will be operated.
Fail-safe is when the receiver loses the radio signal of the
transmitter, and the function keeps channel 2 (throttle) in an
optional position. The configuration is usually full brake or
neutral.
Fail-safe function
Configuration instructions
Turn on the transmitter and the receiver and verify operation.
On the transmitter, hold the throttle to the position you would like
it to be set to. While holding the position, press the setup button
on the receiver.
Hold the setup button on the receiver until the LED light goes off
and release the button. Fail-Safe setting is complete.
Please be sure to set the fail-safe.
If you change the position of the fail-safe
operation, please set again. We recommend
to set it again even if you modify the car
engine brake linkage.
KR-409S compatibility with conventional models
When changing your conventional receiver to the KR-
409S receiver, please note the following.
Check the operating range of each channel and re-adjust
the travel, steering, throttle high point and brake points on
your transmitter. For electric cars, ESC (speed controller)
should also be reset to your transmitter.
If you use it without checking these setting, the
servo may become damaged or may cause abnor-
mal behavior.
2.4GHz SS System
4channel Receiver KR-409S Instruction Manual
Please keep distance to the receiver site, due to noise
sources of the battery, motor, ESC, etc. If possible.
Also keep away power condensers and shotki diodes
that generate noise from the receiver antenna if
possible.
Antenna
For your safety, please note the handling and use of this product.
Our company cannot owe responsibility from the nature of the radio control models
And the customer assumes all responsibilities that result from this product being used.
●This product is manufactured for surface use radio controls. *Discontinue use for all other purposes.
Discontinue use in the event of a thunder storm. *There is danger of a lightening bolt striking the antenna of the transmitter.
●Discontinue use when consuming alcohol or medication that may hinder concentration or judgement.
*Unexpected accidents are caused with a judgement mistake.
●When rain and puddles are present, please discontinue use.
*There are times when water enters into the equipment and control will be lost.
●Only use the batteries specified in the instruction manual of the transmitter.
●To turn the system on, start by turning on the transmitter then the receiver.
To turn off the system, turn off the receiver first, then the transmitter in this sequence.
●Please be sure to use only our products for the transmitter and servos.
*Concerning the damage and the like, which is generated when combining products that are not our company's genuine products we do
not owe responsibility.
●Altering the transmission module is inhibited by law and is subjected to penal code violations. Resolution remodelling of all products may
result in the cause of a short and other accidents. In addition, if this product is altered we will refuse repair service.
●Please do not use this product inside an airplane, hospital, near any automatic control equipment, medical electrical machinery and
apparatus such as fire alarms. In addition with respect to the law, if this product effects other radio equipment and electronic equipment,
use must be discontinued at once.
The contents of this display show a possibility of death or where a serious injury may occur
or a highly substantial damaging accident may occur.
Warning
●Please avoid storage in a place of high temperatures and high humidity because it may cause the breakdown,
damage and deformation of the product.
●Please note when using with an engine model, place where exhaust and the waste oil will not come into contact with the product.
*In case of submerging in oil or water, please send it out for repair.
●This product's performance is designed for use in the shown specified usage which is based on this instruction manual
and the instruction manual of the transmitter which is used. When the instructions are not understood,
please contact our service department for advise.
●After verifying the safety of use, think of all the accidents possible and please enjoy with responsibility.
This displays shows the possibility or a substantially damaging accident which can cause
injury.
Attention
At this time we would like to thank you for purchasing the KR-409S.
This product has adopted the current 2.4GH z SS system that allows
the use of multiple channels without the need to search for an available open channel like the bands of a crystal
system. This product
corresponds to the transmitters that are sold by our company, listed below. Please read this instruction manual before using this product.
Also please read the instruction manual of the transmitter being used.
Technical Specifications
D.D.S. compatible Response Mode Compatible (ULTRA / ADVANCED / SUPER / NORMAL /
DD ADVANCED / DD HI SPEED / DD NORMAL) Fail safe system Number of Channels : 4CH
Power source : 4.8v-7.4V Size : 28x18.3x18.5mm Weight : 7.5 g
3 and 4: Channels 3 and 4 connect to
other devices.
2: Channel 2
Throttle servo or ESC are
connected.
1: Channel 1
Steering servo is connected.
B: Battery Channel
Battery is connected.
Name of Parts
LED Lamp
Set Up Button
Antenna
Please use plastic mounts and a plastic antenna tube.
Please do not use a metal antenna mount because it
will create noise and problems.
To protect the main antenna, insert the antenna into
the antenna tube.
Also please do not disconnect or cut the antenna.
This will cause loss of signal.
Antenna Installation Location
Caution
Please do not cut the antenna wire. You will receive less range.
Please place antenna away from receiver battery, ESC, motor
and silicon wires and any other noise source. The antenna wire
for the receiver requires special attention.
Antenna Tube
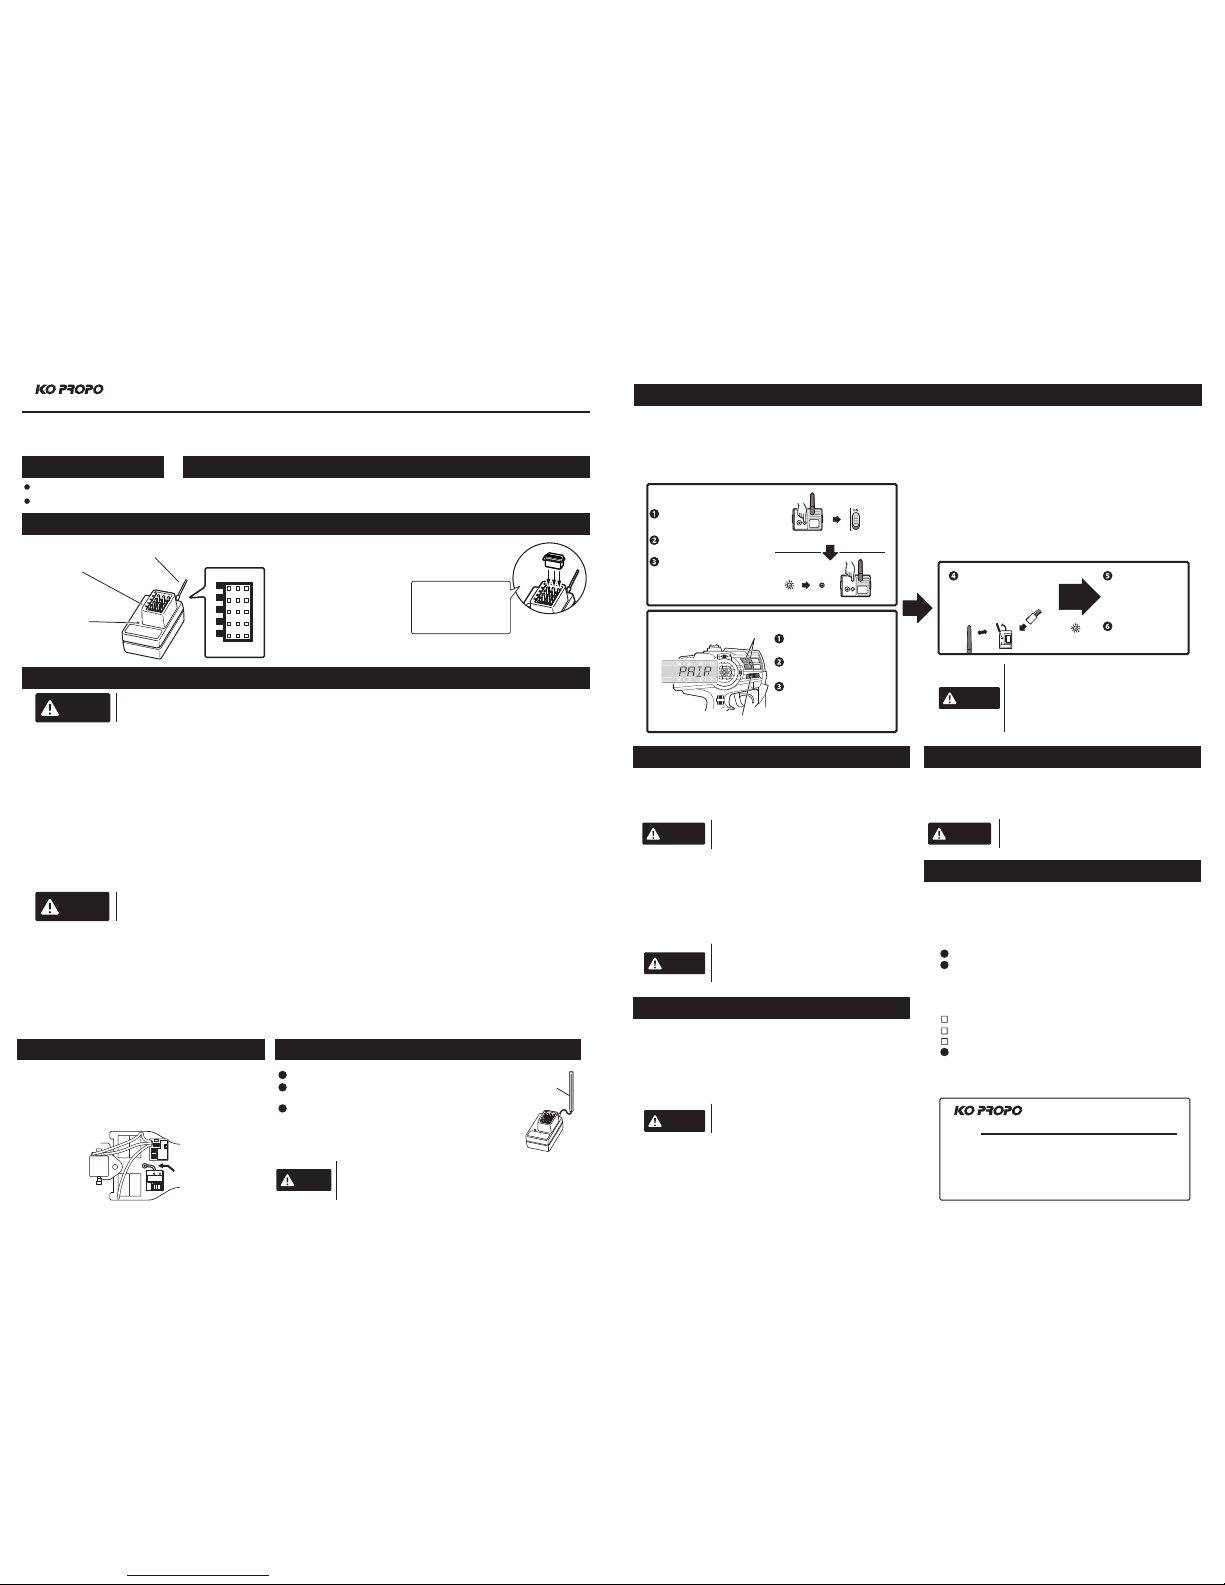
Pairing
When using the receiver for the first time, the receiver must
store the ID number of the module and 'pairing' of the receiver
and module is necessary. Pairing must be performed when the
module or transmitter that is used is changed. When multiple
receivers are used, each receiver must go through the pairing
process at least once.
1: Pairing mode for transmitter or RF module. The models differ
for each. Please refer to the manual of each model and the
figure on the left.
2: Prepare the transmitter or RF module when you are ready to
pair the KR-409S. (If you are using an electronic speed con-
troller in your car, make sure you have the power connected
and turned on when pairing.)
3: Hold the setup button on the KR-409S and turn on the
power. Once the LED is lit, release the button and pairing is
complete.
4: Once you've completed the pairing, turn off the power to the
receiver and transmitter and verify connection by turning the
system on again.
●If you are having difficulties pairing, make sure
that you are not around a wireless LAN or micro-
wave. If you are please move to a different
location and try again.
●After pairing is complete, Please turn off in the
order of receiver transmitter.
CAUTION
CAUTION
CAUTION
Transmitter EX-5UR
RF-Module RF-901S / RF-902S
Within 1m While Press
Button
Power On
Receiver is brought close to the
transmitter. While pressing the setup
button on the receiver, the receiver
power source is turned on. (When
power is turned on, the button is
released.)
LED lights up and you're
done.
If it is flashing or dim,
please try to set again.
After turning off the power
of the transmit ter and t he
receiver once, operation is
read
Receiver
LED
Illuminated
Forward Key
Back Key
Power switch
For EX-5UR
Hold the Forward and Back
keys down and turn on the
power switch.
'PAIR' will be displayed and
flashing on the LCD screen and
the buzzer will sound.
After about five seconds the
buzzer and flash of the 'PAIR'
on the LCD screen will end.
For RF-901S/RF-902S
While pressing the setup button,
transmitter ON.(Continue to
press the button)
Release Button,When LED
goes out.
Preparation Completed when
LED semi-illuminated.
(dark illumi-
nation)
While pressing
the but ton Transmitter ON
LED illuminates
(3 second s)
Goes Out
Release
Button
Corresponding
For electric
powered models. Installing the Antenna
Pairing Complete
Please refer to your manual once more and please inspect.
When you do not understand something, please inquire our
service department.
When inquiring to our service department about a breakdown,
please include as much detail as possible of the contents
mentioned below about your problem.
Name of products (battery, car, transmitter & motor) used.
When breaking down, usage condition and description of breakdown
condition.
Your address, name and telephone number.
When a repair is being requested, please be sure to send the
memo which includes the above mentioned contents in as
much detail as possible.
KONDO KAGAKU CO.,LTD.
Phone:+81-3-3807-7648
Web Site :www.kopropo.co.jp
4-17-7 Higashi-Nippori,Arakawa-ku,
Tokyo Japan 116-0014
B
1
2
3
4