Kobalt SGY-A11WH User manual

ITEM #0771595
MODEL SGY-A11WH
VARIABLE SHADE
AUTO-DARKENING
WELDING HELMET
Français p.11
Español p.21
1
AB16565
ATTACH YOUR RECEIPT HERE
Serial Number Purchase Date
Questions, problems, missing parts? Before returning to your retailer, call our customer
service department at 1-888-3KOBALT, 8:00 a.m.-8:00 p.m., EST, Monday-Friday.
kobalttools.com
Kobalt®is a registered trademark of LF, LLC.
All rights reserved.

TABLE OF CONTENTS
Instructions for Adjusting Head Band ........................................................................................ 8
Instructions for Changing The Batteries ................................................................................... 8
Instructions for Installing New Batteries .................................................................................... 9
Operating Instructions ...........................................................................................................................10
Care and Maintenance ..........................................................................................................................10
Safety Information .................................................................................................................... 3
Package Contents .................................................................................................................... 4
Disassembly Instructions for the Lens and Automatic Filter..................................................... 5
Reinstallation Instructions for the Lens and Automatic Filter.................................................... 6
Instruction for Adjusting Angle of Helmet .................................................................................. 7
Instructions for Adjusting Headgear .......................................................................................... 7
Troubleshooting .................................................................................................................................
11
Warranty ................................................................................................................................. 11
RECOMMENDEDSHADENUMBERS
WELDING PROCESS
Covered Electrode
MIG Plate Welding
MIG Sheet Metal
TIG
MAG
Arc Gouging
Plasma Cutting
Plasma Welding
2
PRODUCT SPECIFICATIONS
3.94in.× 3.64 in.
5.25in.×4.5in.×0.35in.
4
5-9 / 9-13 variable
Protectionupto16
Solarcell&replaceablebattery
Fullyautomatic
Inside & Adjustable dial
-5°C to 55°C (23°F to 131°F)
-10°C to 65°C (14°F to 149°F)
Nylon
610g
1/20,000ofasecond
0.15-0.80 of a second adjustable
Viewing Area
Filter Dimension
Light Shade Number
Dark Shade Number
UV/IR
Power Supply
Power On/Off
Light to Dark
Dark to Light (Delay Time)
Sensitivity
Operation Temperature
Storage Temperature
Helmet Material
Total Weight
Outside & Available
Grinding Function
Low Battery Warning Flash Yes
Arc Sensors 4
COMPONENT SPECIFICATIONS
kobalttools.com

• Wear impact-resistant, primary eye protection, safety glasses or goggles that meet current ANSI
• Avoid work positions that would expose unprotected areas of the body to sparks, spatter,
• The KOBALT welding filter should always be used with original KOBALT inner and outer
• Never place the helmet on or near hot surfaces.
• Keep helmet and all of its components out of the reach of children.
• Never open or tamper with the filter cartridge.
• The manufacturer is not responsible for modifications to the welding filter or the use of the filter
in any other manufacturer’s helmet.
• Failure to follow these warnings and operating instructions could result in severe personal
• The welding helmet is not suitable for overhead welding applications, laser welding or laser
• The recommended operating temperature range for the welding lens is -5°C to 55°C (23°F to
131°F ). Do not use this device beyond these temperature limits.
cover lenses. Protection could be compromised if unapproved modifications are made.
specifications at all times when using this welding helmet.
direct and/or reflection radiation. Use adequate protection if exposure cannot be avoided.
injury.
cutting applications.
SAFETY INFORMATION
Please read and understand this entire manual before attempting to adjust, operate
the product. If you have any questions regarding the product, please call customer service at
1-888-3KOBALT, 8 a.m. - 8 p.m., EST, Monday - Friday.
3
• If the helmet is not in use, make sure the grind/weld switch is on weld function.
NOTE: The headgear has been installed by the factory and the angle adjustment screw has been
set in position 3, which has the headgear the furthest away from the automatic filter.
To adjust the headgear so you are closer to the automatic filter, follow the
Instructions for Adjusting Headgear on page 7.
RR
kobalttools.com

QUANTITYDESCRIPTIONPART
2A Headband adjusting nut
2B Outside square washer 2C Inside square washer
2E Angle adjusting shaft
D1L,D2R 2 (L&R)Adjustable angle regulator
1F Headgear set 2G Filter frame bolt
1Outer protection lens 1Automatic filter
1Inner protection lensL
K
J
1Filter frame screw
2Filter frameH
I
2M Shade indicator fastener
2
2
2
2
1
N
O
P
Q
Shade indicator
Shade adjusting knob
Bag
Extra sweatbands
R Extra lenses
QUANTITYDESCRIPTIONPART QUANTITYDESCRIPTIONPART
PACKAGE CONTENTS
4
ABCD2R
D1L
E
G
H
I
F
JK
MNO
L
Q
P
R
kobalttools.com

DISASSEMBLY INSTRUCTIONS FOR THE LENS AND AUTOMATIC FILTER
5
2. Loosen the filter frame screw (I) by turning the screw
counterclockwise.
3. Lift the filter frame (H) and remove the automatic
filter (K) by turning it sideways and pulling it through
the filter frame.
4. Remove the protective film on the automatic filter (K).
1. Insert a finger into the semicircular hole and pull out on the
outer protection lens (J). Remove protective film from lens.
J
3
4
H
K
K
1
2
I
kobalttools.com

REINSTALLATION INSTRUCTIONS FOR THE LENS AND AUTOMATIC FILTER
1. Slide the automatic filter (K) through the filter frame and set
it back into the holding tray.
2. Lock the filter frame screw (I) by turning the screw clockwise.
Do not overtighten the nut or the threads may become stripped.
6
3. Place outer protection lens (J) back into the front of the
helmet by inserting one side of the lens into either side
slot and then bend the lens just enough that it will slip into
the other side slot.
1
K
H
3
J
2
I
kobalttools.com

7
INSTRUCTIONS FOR ADJUSTING HEADGEAR
INSTRUCTION FOR ADJUSTING ANGLE OF HELMET
1. Loosen one of the headgear adjusting nuts (A) by turning the
nut counterclockwise.
2. Slide the angle adjustment shaft (E) to either position 1 or 2.
3. Tighten the headgear adjusting nut down by turning it clockwise.
Do not overtighten the nut as the threads may become stripped.
4. Repeat steps 1 - 3 on the other headgear adjusting nut.
1. Loosen one of the headgear adjusting nuts (A) by turning the
nut counterclockwise.
2. Move the adjustable angle regulator (D1L and D2R) to the
desired pin.
3. Tighten the headgear adjusting nut down by turning it
clockwise Do not overtighten the nut as the threads may
become stripped.
4. Repeat steps 1 - 3 on other side of headgear.
2
E
1
2
3
1
A
3
A
1
A
D1L
kobalttools.com

8
INSTRUCTIONS FOR ADJUSTING HEAD BAND
INSTRUCTIONS FOR CHANGING THE BATTERIES
1. To loosen or tighten the head gear, push in on the knob on the
back of the head gear and turn clockwise to tighten or
counterclockwise to loosen.
2. To adjust the size of the head band, unsnap the latch and slide
the strap in to tighten or slide the strap out to loosen.
Then, snap the latch into the chosen slot.
1. Pull down on the battery cover to remove.
2. Using the stem on the battery cover. Place the stem into the slot
and push the top battery out by pushing back on the battery
cover and stem until the battery is pushed out far enough
to grab with your fingers.
3. Repeat step 2 to remove the bottom battery
2
1
1
I
NOTICE
Press the button and
turnleft to loosen.
Press the button and
turn right to tighten.
NOTICE
Press the button and
turn left to loosen.
Press the button and
turn right to tighten.
kobalttools.com
USES TWO CR2032
BATTERIES
USES TWO CR2032
BATTERIES
USES TWO CR2032
BATTERIES
2
3

9
INSTRUCTIONS FOR INSTALLING NEW BATTERIES
1. Use two CR2032 batteries
2. Insert the bottom battery into the bottom slot of the battery
holder with the positive (+) side facing down.
3. Insert the top battery into the top slot of the battery holder with
the positive (+) side facing up.
4. Reinstall the battery cover.
kobalttools.com
USES TWO CR2032
BATTERIES
USES TWO CR2032
BATTERIES
1
3
USES TWO CR2032
BATTERIES
2

OPERATING INSTRUCTIONS
2. On/off.
The solar unit automatically switches on when
exposed to light.
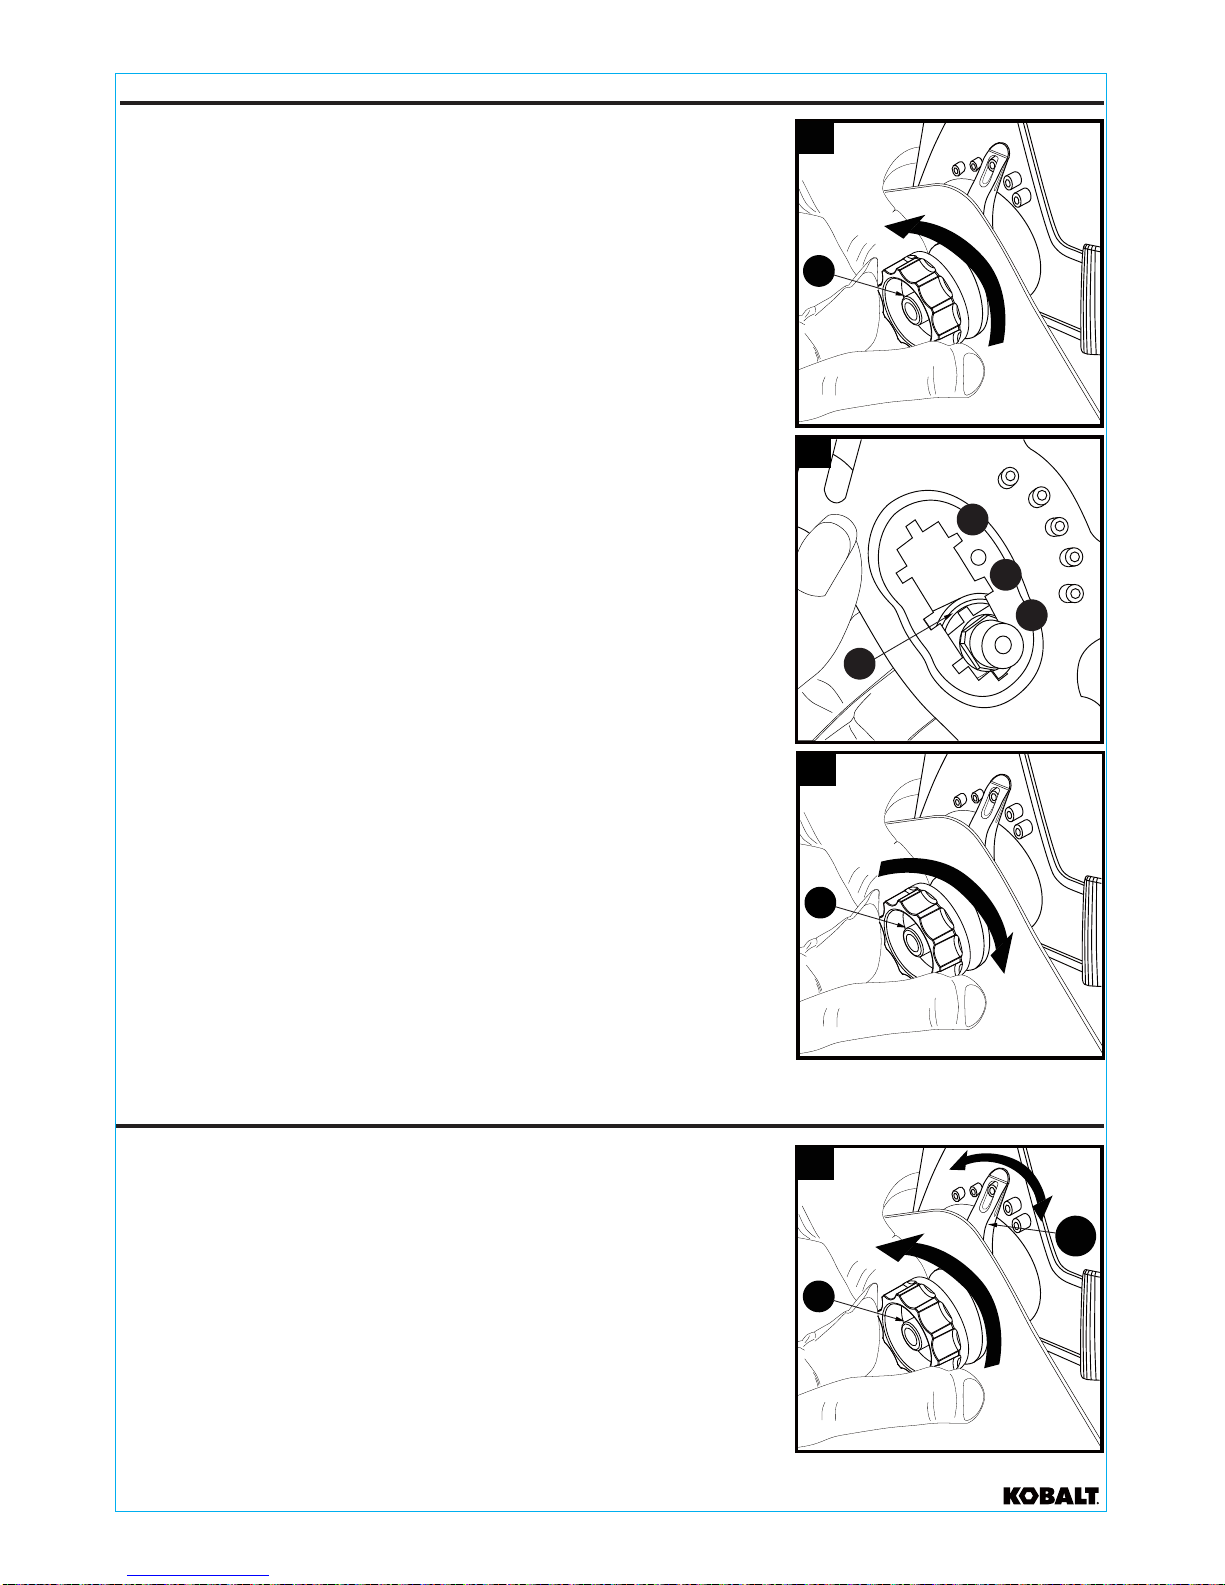
3. Select the shade number.
Five different shade numbers (9, 10, 11, 12 and
13) are available in the dark state. The shade
number can be selected by turning the shade
adjustment knob on the side of the helmet. The
shade setting is indicated by the arrow on the
switch.
4. Time delay selection.
By turning the delay selector knob on the top of the cartridge, the time taken from dark state
to clear state after welding is finished can be altered. This time delay range can be 0.15 - 0.8
seconds.
your individual requirements.
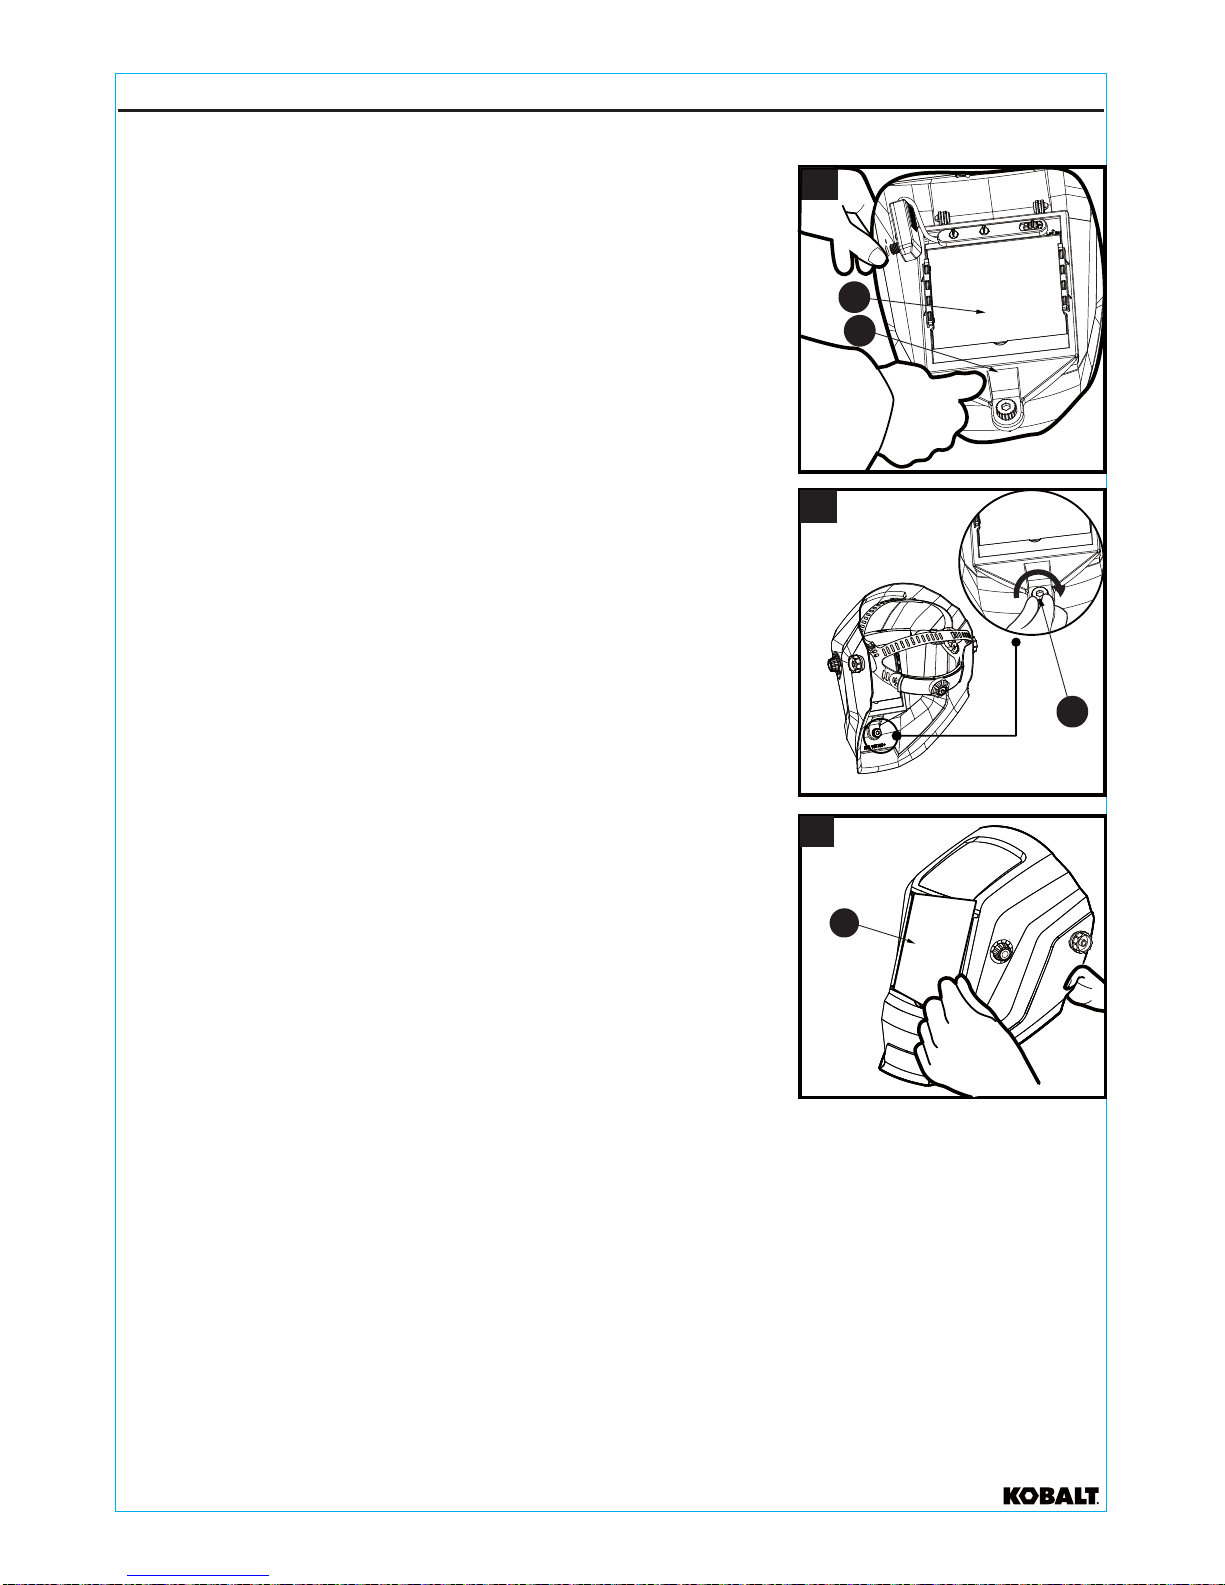
1. Adjust the welding helmet according to
Adjust the headband in both diameter and height.
Adjust the angle between the face and helmet
also. The recommended angle is 10° - 12°.
10° - 12°
1
approximately 0.15 second depending upon welding point temperature and shade setting.
This setting is ideal for tack welding or production welding with short weld cycles.
Turn to Min: This setting shortens the time delay after welding. The shortest setting is
Turn to Max:This setting lengthens the time delay to clear state from the dark state after
welding, with the longest delay being appoximately 0.8 seconds, depending upon welding
temperature and dark shade setting. This setting is ideal for high amperage welding where
there is a strong afterglow from the weld.
welding and welding in bright light conditions (lamp light or sunlight).
Turn to LO: The photosensitivity range is lower. This setting is suitable for high amperage
low amperage welding.
Turn to HI: This setting changes photosensitivity to a higher level. This setting is suitable for
5. Sensitivity selection.
6. Grind selection.
By turning the sensitivity selector knob on the top of the cartridge, the sensitivity to ambient
light change can be altered.
By switching the grind/weld switch to grind function, the helmet can be used during grinding.
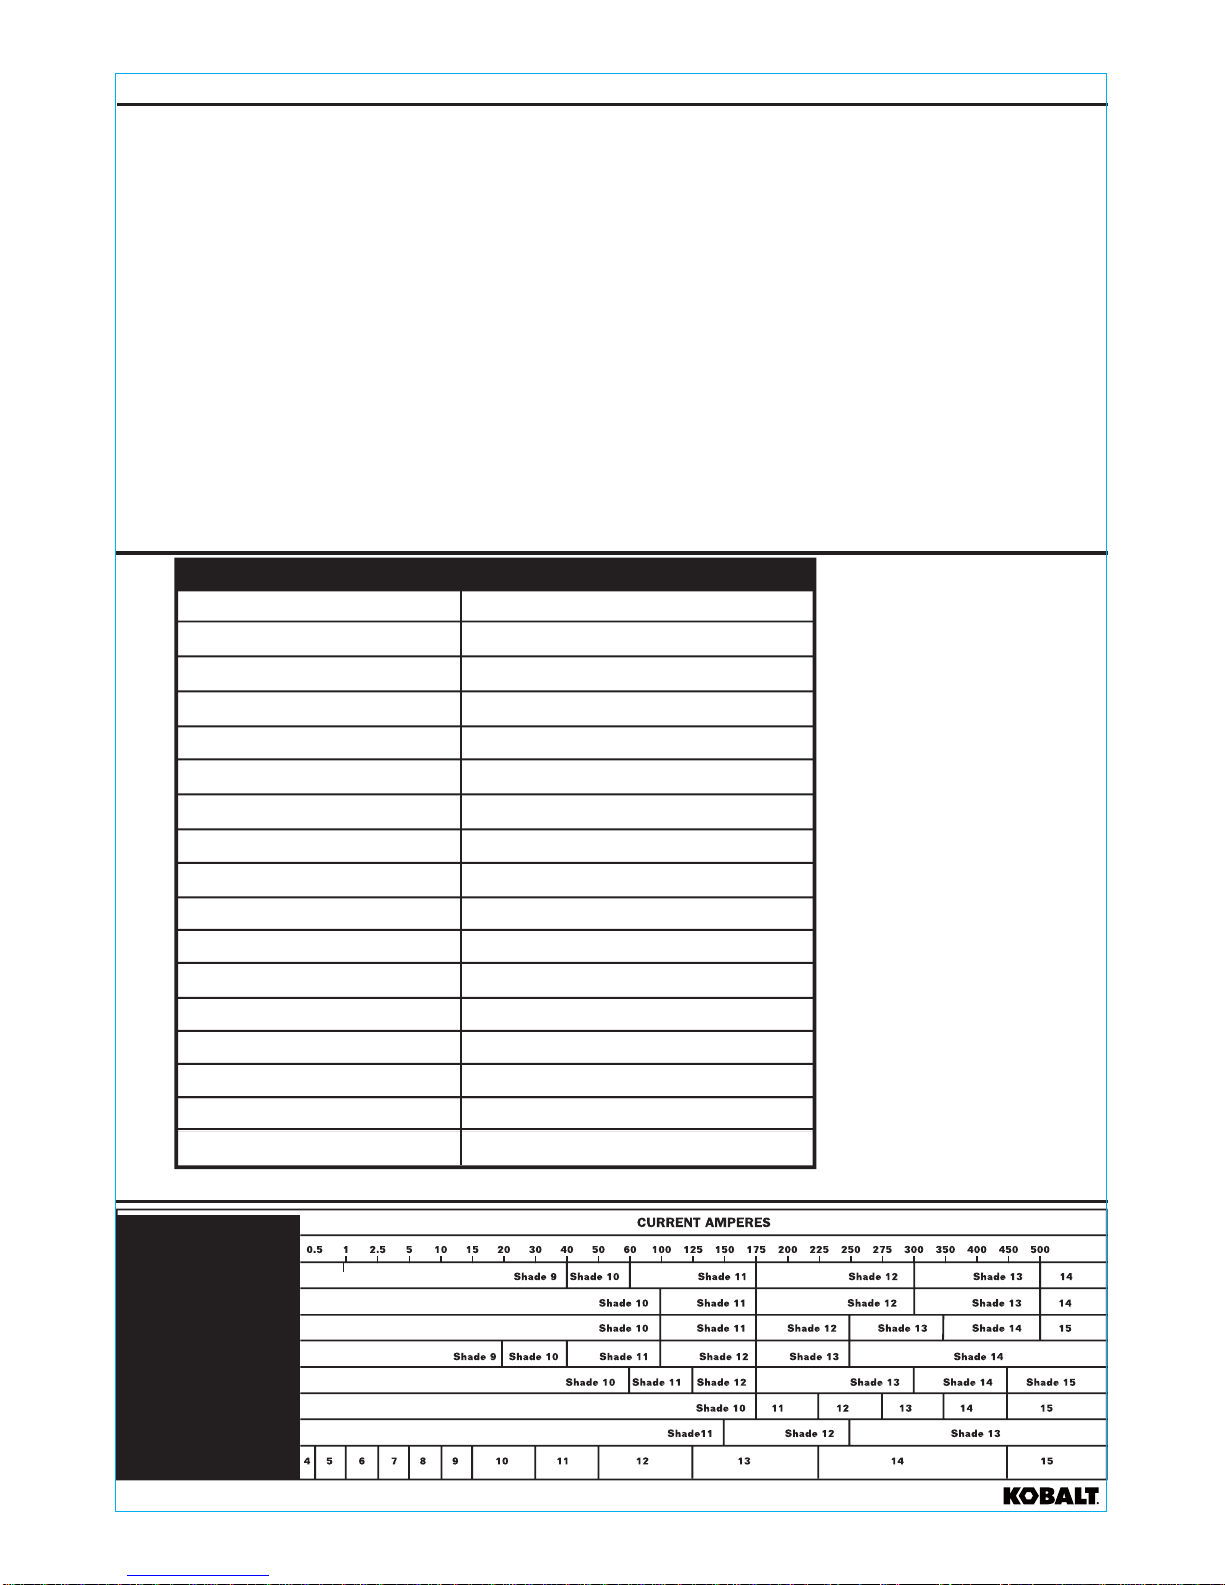
10
CARE AND MAINTENANCE
Clean the helmet with mild soap in lukewarm water.
Clean the welding filter with a clean, lint-free tissue or cloth.
Do not immerse in water.
kobalttools.com

If you are not completely happy with your purchase, simply return it along with your original sales
Three (3) year warranty:
receipt to the place of purchase. We’ll repair it, replace it or refund your money. See store for
details.This warranty does not cover product malfunctions or damages, which result from the
product being tampered with, misused or abused. The operating instructions must be followed;
failure to do so will void the warranty.The manufacturer is not responsible for any indirect damage,
which arises out of the use of the product.
WARRANTY
Poor vision. 1. The cover lens and filter cartridges
are not clean.
2. Lighting conditions are too low.
3. The shade number is not correct.
4. Battery is low.
5. Replace battery.
1. Make certain the cover lens and
filter cartridges are clean.
3. Make certain the shade number
is correct and properly adjusted.
4. Replace both batteries. Make
5. Pull out the covers on the
automatic filter and replace both
CR2032 batteries. After batteries
have been replaced, insert the
covers back on the automatic
filter.
sure the polarity of the batteries
is correct when installing them
2. Make sure that there is enough
light to activate the auto
darkening lens by holding it to
the light and switching between
the grinding mode and welding
mode.
TROUBLESHOOTING
PROBLEM POSSIBLE CAUSE CORRECTIVE ACTION
Irregular
darkening. 1.When assembling the headgear to
the helmet, if one bolt is on the
upside of the hole, another bolt is on
the downside of the hole.
Auto-darkening
flickers or does
not darken.
1. Front cover lens is soiled.
2. Photo sensors are dirty.
1. Adjust the headband bolts on
both sides to assure they are
both up or both down on the
hole.
1. Clean or replace the front
cover lens.
2. Wipe clean with a soft, lint-free
cloth.
If you have any questions regarding the product, please call customer service at 1-888-3KOBALT,
8 a.m. - 8 p.m., EST, Monday - Friday.
11
Printed in China
This warranty does not cover batteries.
Kobalt®is a registered trademark of LF, LLC.
All rights reserved. kobalttools.com

ARTICLE#0771595
MODÈLE SGY-A11WH
MASQUE DE SOUDEUR
À OBSCURCISSEMENT
AUTOMATIQUE AVEC
TEINTE VARIABLE
12
kobalttools.com
Des questions, des problèmes, des pièces manquantes? Avant de retourner l'article au
détaillant, communiquez avec notre service à la clientèle au 1 888 3KOBALT, entre 8 h et
20 h (HNE), du lundi au vendredi.
JOIGNEZ VOTRE REÇU ICI
Kobalt des marques de commerce
déposées de LF, LLC. Tous droits réservés.
®
Numéro de série Date d'achat

TABLE DES MATIÈRES
Consignes de sécurité............................................................................................................... 14
Contenu de l’emballage ............................................................................................................ 15
Instructions de démontage pour la lentille et le filtre automatique............................................. 16
Entretien ................................................................................................................................... 21
Dépannage................................................................................................................................. 22
Garantie ..................................................................................................................................... 22
Instructions pour la réinstallation de la lentille et du filtre automatique...................................... 17
Instructions pour le réglage du harnais...................................................................................... 18
Mode d’emploi............................................................................................................................ 21
Instructions pour le réglage de l’angle du masque .................................................................... 18
Instructions pour le réglage du serre-tête ..................................................................................19
Instructions pour le remplacement des piles.............................................................................. 19
Instructions pour l’installation des piles...................................................................................... 20
13 kobalttools.com
CARACTÉRISTIQUES DU PRODUIT
TEINTES RECOMMANDÉES
TIG
MAG
MÉTHODE DE SOUDAGE
Électrode enrobée
MIG (plaques)
MIG (tôle)
Gougeage à l’arc
Coupage à l’arc plasma
Soudage à l’arc plasma
INTENSITÉ DE COURANT
e t n i e Te t n i e Te t n i e Te t n i e T 9 e t n i e T
Teinte Teinte
Teinte
Teinte Teinte Teinte Teinte
Teinte Teinte Teinte
e t n i e Te t n i e T
Teinte
Teinte Teinte Teinte Teinte
Teinte
Teinte Teinte Teinte
Teinte
e t n i e Te t n i e Te t n i e T
10,00 cm x 9,30 cm
13,34 cm x 11,43 cm x 0,89 cm
4
Cellule solaire et pile remplaçable
Entièrement automatique
Nylon
610 g
Poids total
Extérieur et offert
en cas de piles faibles
Oui
Capteurs d’arc 4
COMPOSANTE CARACTÉRISTIQUES
Visière
Dimension du filtre
Alimentation électrique
Cadranderéglage
Sensibilité
Température de fonctionnement
Température de rangement
Matériau du masque

14
kobalttools.com
•
R
R
• Ce masque n’est pas prévu pour le soudage effectué au-dessus de la tête, ni pour le soudage
ou le découpage au laser.
• Les températures recommandées pour le fonctionnement du hublot de soudage sont de - 5 °C
à 55 °C (23 °F à 131 °F). N’utilisez pas cet appareil si les températures dépassent ces limites.
CONSIGNES DE SÉCURITÉ
Assurez-vous de lire et de comprendre l’intégralité de ce manuel avant de tenter de régler
ou d’utiliser le produit. Si vous avez des questions, veuillez communiquer avec notre
service à la clientèle au 1 888 3KOBALT, entre 8 h et 20 h (HNE), du lundi au vendredi.
• Ne portez pas ce masque sans porter également en tout temps une première protection des
yeux résistante aux chocs sous forme de lunettes ou de lunettes-masque de sécurité
satisfaisant aux normes ANSI.
• Évitez les positions de travail exposant les zones non protégées du corps à des étincelles, à
des projections ou à un rayonnement direct ou réfléchi. Utilisez un équipement de protection
adéquat si ce genre d’exposition ne peut être évité.
• Le filtre KOBALT pour le soudage devrait toujours être utilisé avec les lentilles extérieures
et intérieures KOBALT d’origine. Les modifications non autorisées pourraient compromettre
votre protection.
• Ne placez jamais ce masque sur une surface chaude ou à proximité d’une surface chaude.
• Gardez ce masque et ses composants hors de la portée des enfants.
• N’ouvrez ni ne manipulez jamais la cartouche du filtre.
• Le fabricant n’est pas responsable des modifications au filtre pour soudage ni de l’utilisation
de ce filtre dans un autre casque du fabricant.
• Ne pas tenir compte de ces avertissements et ne pas respecter le mode d’emploi peut
• Si vous n’utilisez pas le masque, assurez-vous que l’interrupteur meulage/soudage est placé à
soudage.
REMARQUE: Le harnais a été installé en usine et la vis servant à régler l’angle a été serrée à la
position 3, ce qui signifie que le harnais se trouve au point le plus éloigné du filtre
automatique. Pour rapprocher le harnais du filtre automatique, suivez les
instructions pour le réglage du harnais à la page 18.
entraîner des blessures graves.

QUANTITYDESCRIPTIONPART
2A Écrou de réglage du harnais
2B Rondelle à section carrée extérieure
2C Rondelle à section carrée intérieure
2E Tige de réglage de l’angle
Régulateur d’angle réglable
1F Harnais 2G Boulon du cadre du filtre
1
Lentille de protection extérieure 1Filtre auto-obscurcissant
1L
K
J
1Vis du cadre du filtre
2Cadre du filtreH
I
2M 2
2
2
2
1
N
O
P
Q
R
QUANTITÉDESCRIPTIONPIÈCE QUANTITÉDESCRIPTIONPIÈCE
CONTENU DE L’EMBALLAGE
15 kobalttools.com
Lentille de protection intérieure
Pièce de fixation de l’indicateur de teinte
Indicateur de teinte
Bouton de réglage de la teinte
Sac
Bandeau supplémentaire
Lentille supplémentaire
D1L,D2R 2 (L&R)
ABCD2R
D1L
E
G
H
I
F
JK
MNO
L
Q
P
R

INSTRUCTIONS DE DÉMONTAGE POUR LA LENTILLE ET LE FILTRE AUTOMATIQUE
16
2. Dévissez la vis du cadre du filtre (I) en la tournant
dans le sens contraire des aiguilles d’une montre.
3. Soulevez le cadre du filtre (H) et retirez le filtre
automatique (K) en le tournant, puis en le retirant du cadre.
4. Retirez la pellicule protectrice du filtre automatique (K).
1. Insérez un doigt dans le trou en demi-cercle et retirez la
lentille de protection extérieure (J). Retirez la pellicule
protectrice de la lentille.
J
kobalttools.com
3
4
H
K
K
1
2
I

1. Faites glisser le filtre automatique (K) à travers le cadre du
filtre, puis replacez-le dans le plateau de réception.
2. Verrouillex la vis du cadre du filtre (I) en tournant la vis dans le
sens horaire. Évitez de serrer excessivement l’écrou, car les
filets pourraient s’arracher.
17 kobalttools.com
3. Replacez la lentille de protection extérieure (J) sur la partie
avant du masque en insérant d’abord un côté de la lentille
dans l’une des fentes prévues à cet effet, puis en incurvant
la lentille suffisamment pour pouvoir insérer l’autre côté de
la lentille dans l’autre fente latérale.
3
J
INSTRUCTIONS POUR LA RÉINSTALLATION DE LA LENTILLE ET DU FILTRE AUTOMATIQUE
2
I
1
K
H

18 kobalttools.com
INSTRUCTIONS POUR LE RÉGLAGE DU HARNAIS
INSTRUCTIONS POUR LE RÉGLAGE DE L’ANGLE DU MASQUE
1. Desserrez l’un des écrous de réglage du harnais (A) en le
tournant dans le sens contraire des aiguilles d’une montre.
2. Placez l’axe de réglage de l’angle (E) à la position 1 ou 2.
3. Serrez l’écrou de réglage du harnais en le tournant dans le
sens des aiguilles d’une montre. Évitez de serrer
excessivement l’écrou, car les filets pourraient s’arracher.
4. Répétez les étapes 1 à 3 pour les autres écrous de réglage
du harnais.
1. Desserrez l’un des écrous de réglage du harnais (A) en le
tournant dans le sens contraire des aiguilles d’une montre.
2. Placez le régulateur d’angle réglable (D1L et D2R) sur la
goupille appropriée.
3. Serrez l’écrou de réglage du harnais en le tournant dans le
sens des aiguilles d’une montre. Évitez de serrer
excessivement l’écrou, car les filets pourraient s’arracher.
4. Répétez les étapes 1 à 3 pour l’autre côté du harnais.
2
E
1
2
3
1
A
3
A
1
A
D1L

19
kobalttools.com
INSTRUCTIONS POUR LE RÉGLAGE DU SERRE-TÊTE
1. Pour serrer ou desserrer le harnais, appuyez sur le bouton
situé à l’arrière et tournez-le dans le sens des aiguilles d’une
montre pour serrer le harnais ou dans le sens contraire pour
le desserrer.
2. Pour régler la taille du harnais, détachez le loquet et ramenez
la courroie vers l’intérieur pour serrer ou vers l’extérieur pour
desserrer. Verrouillez ensuite le loquet à la position choisie.
2
1
I
NOTICE
Press the button and
turn left to loosen.
Press the button and
turnright totighten.
NOTICE
Press the button and
turn left to loosen.
Press the button and
turn right to tighten.
INSTRUCTIONS POUR LE REMPLACEMENT DES PILES
1. Tirez sur le couvercle du compartiment à piles pour le retirer.
2. Utilisez la tige du couvercle du compartiment à piles. Insérez
la tige dans la fente et retirez la pile supérieure en poussant
sur le couvercle du compartiment à piles et sur la tige jusqu’à
ce que la tige soit suffisamment soulevée pour la saisir avec
vos doigts.
3. Répétez l’étape 2 pour retirer la pile inférieure
1
USES TWO CR2032
BATTERIES
USES TWO CR2032
BATTERIES
USES TWO CR2032
BATTERIES
2
3

20
INSTRUCTIONS POUR L’INSTALLATION DES PILES
1. Utilisez 2 piles CR2032.
2. Insérez la batterie inférieure dans la fente inférieure du
support de pile avec le côté positif (+) vers le bas.
3. Insérez la pile supérieure dans la fente supérieure du
compartiment à piles avec le côté positif (+) orienté vers le haut.
4. Replacez le couvercle du compartiment à piles.
kobalttools.com
USES TWO CR2032
BATTERIES
USES TWO CR2032
BATTERIES
1
3
USES TWO CR2032
BATTERIES
2
Table of contents
Languages:
Popular Welding Accessories manuals by other brands

Yeswelder
Yeswelder FP-5P-B Operator's manual

Miller Electric
Miller Electric R-115 owner's manual

FRONIUS
FRONIUS TransSynergic 4000 operating instructions

Miller Electric
Miller Electric OM-494 owner's manual

Sealey
Sealey PWH399 instructions

Abicor Binzel
Abicor Binzel ROBO Compact W600 Operating instruction