Kogan KADABBTTBLA User manual

<dd>
USER MANUAL

Safety Precautions
To achieve the utmost in enjoyment and performance, and in order to become familiar with the
radios features, please read this manual carefully before operation, this will assure you years of
faithful, trouble free performance and listening pleasure.
Important Notes
This safety and operating instruction should be retained for future reference.
The apparatus shall not be exposed to dripping or splashing and that no objects filled with
liquids, such as vases, shall be placed on apparatus.
Avoid installing the unit in locations described below:
oPlaces exposed to direct sunlight or close to heat radiating appliances such as
electric heaters.
on top of other stereo equipment that radiate too much heat.
oPlaces blocking ventilation or dusty places.
oPlaces subject to constant vibration.
oHumid or moist places.
No naked flame sources such as lighted candles should be placed on or near the unit;
The use of apparatus in moderate climates.
perate turning controls and switches as instructed in the manual.
Before turning on the power for the first time, make sure the power cord is properly
installed.
For safety reasons, do not remove any covers or attempt to gain access to the inside of the
product. Refer any servicing to qualified personnel.
Do not attempt to remove any screws, or open the casing of the unit; there are no user
serviceable parts inside, refer all servicing to qualified service personnel.

CAUTION: T REDUCE THE RISK F ELECTRIC SH CK D N T REM VE C VER ( R
BACK), N USER SERVICEABLE PARTS INSIDE, REFER SERVICING T QUALIFIED
SERVICE PERS NNEL.
DANGEROUS VOLTAGE
Dangerous Voltages, that may be of sufficient magnitude to constitute a risk of
electric shock to persons is present within this product’s enclosure.
ATTENTION
The owner’s manual contains important operating and maintenance instructions,
for your safety, it is necessary to refer to the manual.
ARNING: T BACKENT FIRE R SH CK HAZARD, D N T EXP SE THIS APPLIANCE
T DRIPPING R SPLASHING.
NOTE: This unit will become warm when used for a long period of time. This is normal and
does not indicate a problem with the unit.

Safety Information
Some Do’s and Don’ts on the Safe Use of Equipment
This equipment has been designed and manufactured to meet international safety standards
but, like any electrical equipment, care must be taken if you are to obtain the best results and
safety is to be assured.
DO read the operating instructions before you attempt to use the equipment.
DO ensure that all electrical connections (including the mains plug, extension leads and inter-
connections between the pieces of equipment) are properly made and in accordance with the
manufacturer’s instructions. Switch off and withdraw the mains plug before making or changing
connections.
DO consult with the Kogan customer support team if you are ever in doubt about the installation,
operation or safety of your equipment.
DON’T remove any fixed cover as this may expose dangerous voltages.
verheating will cause damage and shorten the life of the equipment.
DON’T allow electrical equipment to be exposed to dripping or splashing, or objects filled with
liquids, such as vases, to be placed on the equipment.
DON’T place hot objects or naked flame sources such as lighted candles or nightlights on, or
close to equipment. High temperatures can melt plastic and lead to fires.
DON’T listen to headphones at high volume, as such use can permanently damage your
hearing.
DON’T leave equipment switched on when it is unattended. Switch off using the switch on the
equipment and make sure that your family knows how to do this. Special arrangements may
need to be made for infirm or handicapped people.
DON’T continue to operate the equipment if you are in any doubt about if it’s working normally
or if it’s damaged in any way. Switch it off and withdraw the mains plug and consult your dealer.

ESD Remark: In case of malfunction due to electrostatic discharge just reset the product
(reconnection of power source may be required) to resume normal operation.
NOTE: Do not open any covers and do not repair yourself. Qualified personnel must carry out
repair work.

Contents
Safety Precautions...................................................................................................................................2
Safety Information..................................................................................................................................4
Package Content.................................................................................................................................8
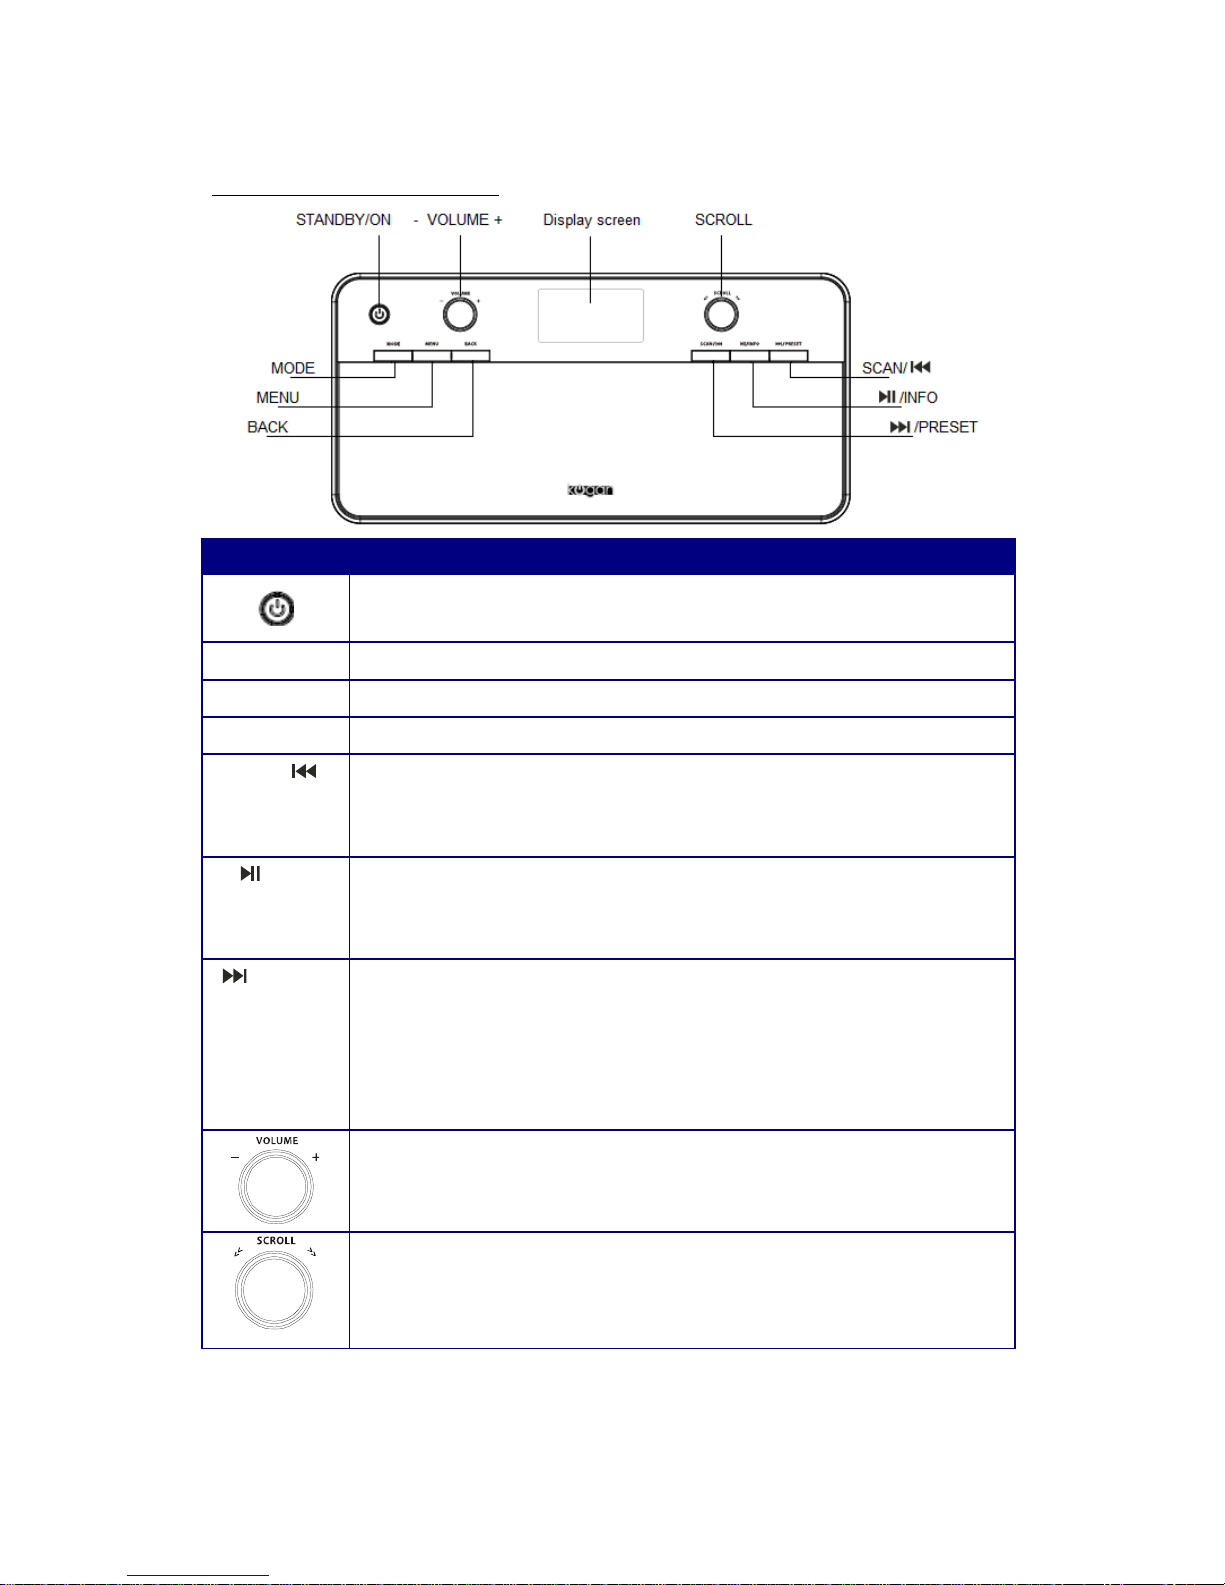
Unit Front Overview...........................................................................................................................9
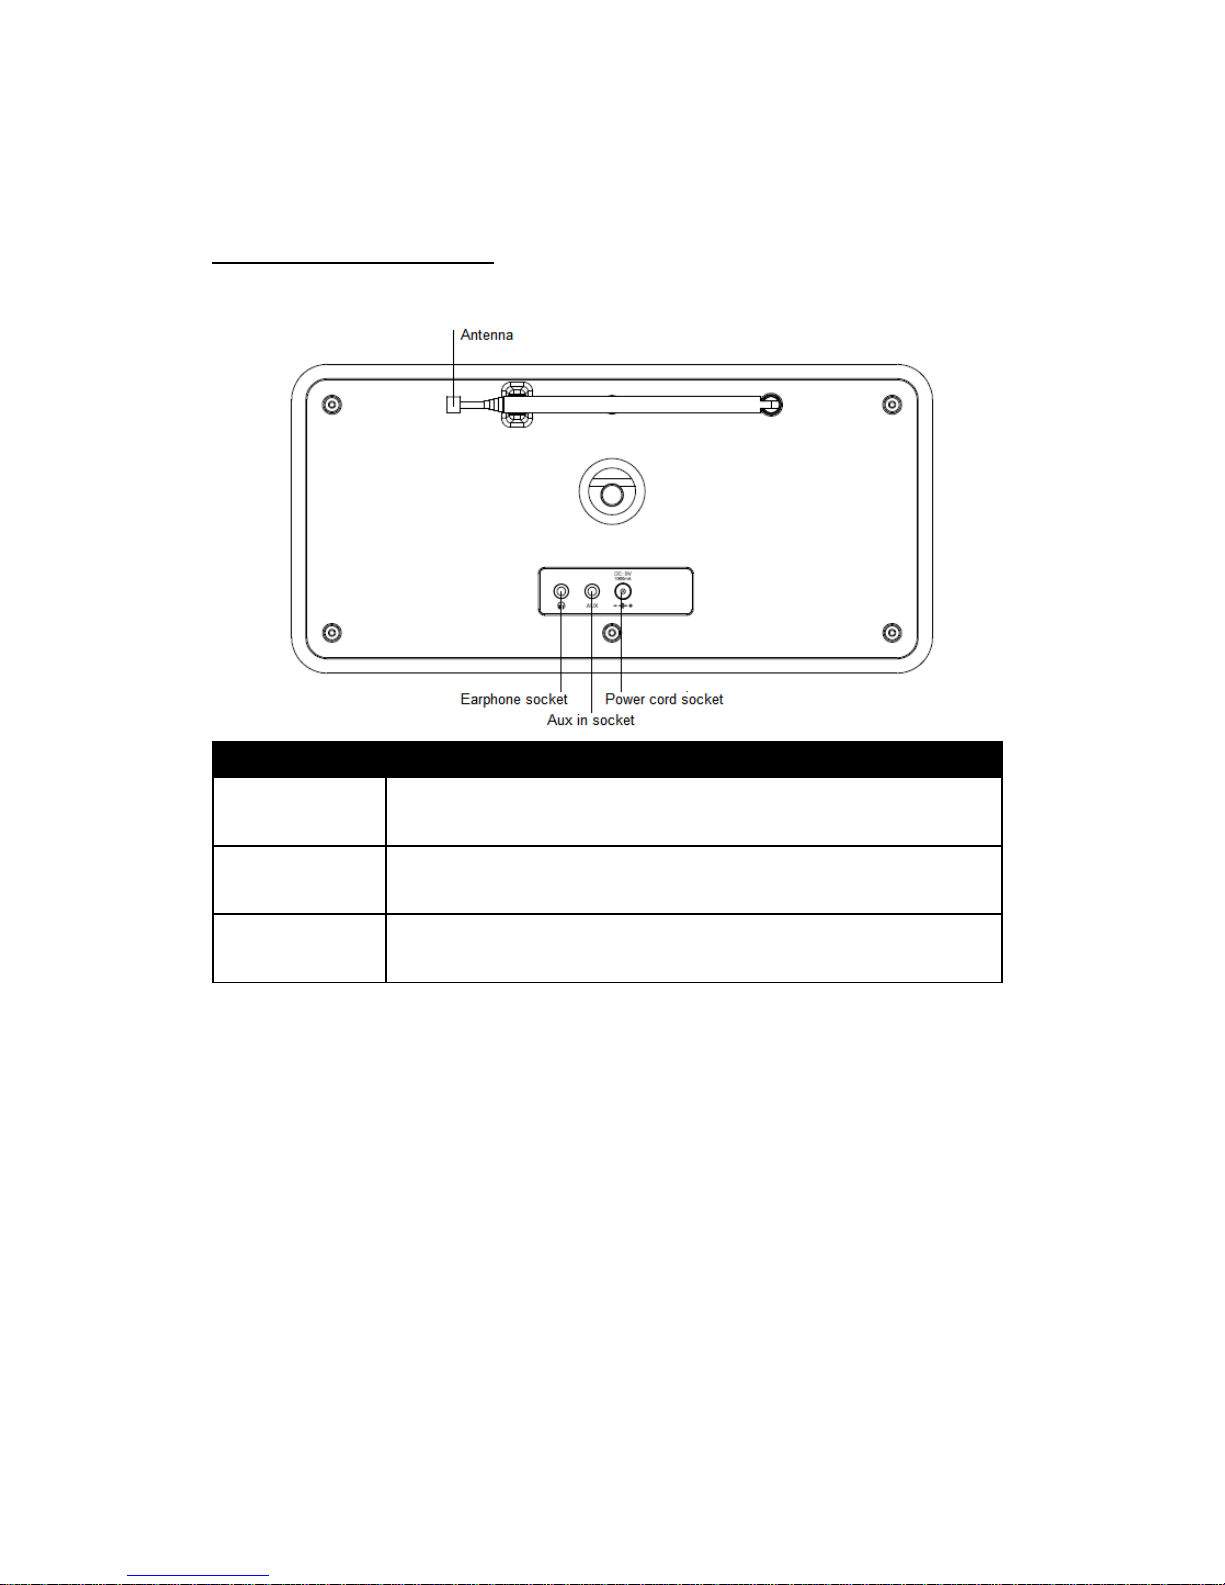
Unit Back Overview......................................................................................................................... 0
Internet Radio Quick Start Guide..........................................................................................................
What you need before you can use your Internet Radio..................................................................
Chapter Internet Mode...................................................................................................................... 2
. Turning on................................................................................................................................. 2
.2 Setup Wizard............................................................................................................................. 2
.3 Access Wireless Network.......................................................................................................... 4
.4 Local Stations............................................................................................................................ 4
.5 Choose a Station........................................................................................................................ 5
.6 Select a Station through Podcasts............................................................................................. 5
.7 Get Access Code and FAQ Solutions........................................................................................ 6
.8 Station Updates.......................................................................................................................... 6
.9 Add Station to ‘My Favourites’................................................................................................. 7
. 0 Add Station to ‘My Added Stations’...................................................................................... 9
Chapter 2 Music Player Mode.............................................................................................................20
2.2 Sharing Media with Windows Media Player ...........................................................................20
2.3 Play Shared Media.....................................................................................................................2
Chapter 3 DAB+ Mode........................................................................................................................23
3. Shift to DAB+ Mode.................................................................................................................23
3.2 Shift to Another DAB+ Station.................................................................................................23
3.3 Dynamic Label Segment (DLS)................................................................................................23
3.4 Manual Tune..............................................................................................................................24
3.5 Prune Invalid.............................................................................................................................24
3.6 DRC (Dynamic Range Control)................................................................................................24
3.7 To Change Station Order...........................................................................................................25
Chapter 4 FM Mode.............................................................................................................................26
4. General Operation.....................................................................................................................26
4.2 Scan Setting...............................................................................................................................26
4.3 How to Scan..............................................................................................................................26

4.4 Audio Setting.............................................................................................................................26
Chapter 5 Aux in.................................................................................................................................27
Convert to Aux in Mode...................................................................................................................27
Chapter 6 Bluetooth Mode ..................................................................................................................28
6. Shift to Bluetooth mode............................................................................................................28
6.2 Pairing with Bluetooth devices.................................................................................................28
Chapter 7 General Operations...............................................................................................................30
7. Setting Station Presets...............................................................................................................30
7.2 Selecting a Preset Station..........................................................................................................30
7.3 Sleep Function...........................................................................................................................30
7.4 Setting Clock.............................................................................................................................30
7.5 Setting Alarm.............................................................................................................................3
Chapter 8 System settings....................................................................................................................33
8. Equaliser....................................................................................................................................33
8.2 Network setup............................................................................................................................33
8.3 Language...................................................................................................................................34
8.4 Backlight....................................................................................................................................34
8.5 Factory Reset.............................................................................................................................34
8.6 Enter Setup Wizard....................................................................................................................34
8.7 Software Update........................................................................................................................35
8.8 SW Version and Radio ID.........................................................................................................36
Chapter 9 Specifications......................................................................................................................36

Package Content
What you can find inside of your package:
Main unit
and remote
control
AC Adapter

Unit Front Overview
Control All mode
Press to turn on/off radio
hen alarm sounds, press to turn alarm off
MODE Press to shift to another mode
MENU Press to enter menu options
BACK Press to go to previous page
SCAN/ DAB and FM mode: Press to scan stations
Music and Bluetooth mode:
Press to the previous song in the playlist, long press to rewind
/INFO Internet, DAB and FM mode: Press to browse station information
Music and Bluetooth mode:
Press to play/pause the currently selected song
/PRESET Internet, DAB and FM mode:
Press and hold to activate preset stations function; and short press to load preset
stations.
Music and Bluetooth mode:
Press to the next song in the playlist, long press to fast forward
Turn to adjust volume level
a. Turn to browse options, press to confirm.
b. FM mode: Turn to manually adjust frequency by 0.05MHz per step.
c. hen alarm is sounding, press to postpone the alarm

Unit Back Overview
Items Remark
Earphone
socket:
For inserting 3.5mm earphone.
AUX IN
socket:
For connecting the audio cable.
Power cord
Socket:
Connect to DC adapter.
Please use the power adapter provided by manufacturer only.

Internet Radio Quick Start Guide
hat you need before you can use your Internet Radio
Thanks for your buying! Before use it, you need to know the following:
ireless LAN Setting:
A broadband Internet connection.
•A wireless access point (Wi-Fi) connected to your broadband Internet, preferably via a
router.
•If your wireless network is configured to use Wired Equivalent Privacy (WEP) or Wi-Fi
Protected Access (WPA) data encryption then you need to know the WEP or WPA code
so you can get the Internet Radio to communicate with the network.
•For security reason, you may need to enter the Radio’s MAC address into your wireless
access point. To find the Radio’s MAC address, use menu items as follows:
Main menu System settings Network View settings MAC Address
To enter the MAC address into your wireless access point, you must read the
instructions supplied by the wireless access point.
Before you continue, make sure that your wireless access point is powered up and
connected to your broadband Internet. To get this part of the system working, reading the
instructions supplied by the wireless access point/router is highly recommended!

Chapter 1 Internet Mode
1.1 Turning on
. Connect DC adapter to your Internet Radio, extend antenna.
2. Press to switch on your radio, for initial use, a ‘Setup wizard’ appears on the display.
1.2 Setup izard
. Continue above step, press SCROLL to confirm ‘YES’ and then turn SCROLL to your
preferred ‘hour format’, press SCROLL to confirm.
2. Press SCROLL to confirm ‘Update from Network’, and then follow your radio’s instruction,
configure the following parameters:
•Timezone: select your local timezone.
•Daylight saving: On or Off
•lan region: Most of Europe/USA/ anada/Spain etc.
•SSID: In some cases radio may find more than one network.
Turn SCROLL to your network, press SCROLL to confirm.

Note: If your network is not configured to request a
password (WEP/WPA), radio will connect to the
network and display as left picture:
3. If a WEP/WPA key (password) is required, radio will ask you to input the WEP/WPA code
and display the password entry screen as follows:
Turn SCROLL to cycle through the alphanumeric character list, press SCROLL to select
an appointed character.
Note: WEP/WPA pass codes are case-sensitive.
If a wrong character is being input while entering your password, select ‘
’ to delete that character.
Note: a.> = Backspace.
b.> The method of select , or , while cursor point to , turn SCROLL
to select , then turn SELECT to select or in turn.
c.> Select will return to previous track.
d.> Radio will automatically save the WEP/WPA you’ve input, so you will not need to re-enter
these codes.
e.> After selected the final character of your password, turn SCROLL to , then press
SCROLL to confirm.

1.3 Access ireless Network
. After successfully ‘setup wizard’ as above picture, press SCROLL to confirm to exit, while
cursor point to < Internet radio >, press SCROLL to confirm.
2. While cursor point to < Station list >, press SCROLL to confirm.
3. Then refer to following section to choose stations. r if it fails to connect to network,
please follow:
a.
Check your Router, see it working normally or not;
b. Relocating your radio to a stronger signal position may be necessary!
c. Make sure your password is input correctly.
1 .4 Local Stations
•Make sure your radio connected to network.
•‘Local China’ is, which can be changeable according to your current location, for instance, it can be
local Germany, US, or local UK, etc. Simply, it’s a very easy way for you to find your local programs.
. To enter Local stations, press MENU < Station list > < Local China >, press SCROLL
to confirm.
2. Turn SCROLL to your favourite item, and then press SCROLL to confirm, and then step by
step to the program you desired.

1.5 Choos e a Station
Note: if any step is not consistent with this instruction menu, press BACK to move backward.
. To access this order, press MENU < Station list > < Stations >, then press SCROLL
to confirm.
2. There are five options available for you to choose a station as above photo.
• ‘LOCATION’ enables you to choose from the radio stations provided by any country which you
choose from a list.
a. While cursor point to < Location >, press SCROLL to confirm.
b. Turn SCROLL to the region you wanted, then press SCROLL to confirm.
c. Using the same method to choose country, station in turn, radio will perform loading.
• ‘GENRE’ enables you to choose stations according to their content, for example, lassic Rock, Sport,
News, etc.
Note: a. Some radio stations do not broadcast 24 hours a day, and some stations are not
always on-line.
b. If this station has on-demand content, that is, it gives an option of listening the old
programs which have already been broadcasted.
1.6 S elect a Station through Podcasts
1.To access to this order, press MENU < Station list > < Podcasts >, press
SCROLL to confirm, and then turn SCROLL to your favorite option.
2. Press SCROLL to confirm, and then step by step to your selecting program.

1.7 G et Access Code and FAQ Solutions
. Press MENU < Station list > < Help >, press SCROLL to confirm.
Note: at this step, you can also listening radio FAQ solutions.
2. While cursor point to < Get access code >, press SCROLL to confirm, then it will be
displayed.
3.
1.8 Station Updates
ccasionally, radio will tell you that it is receiving an updated station list. It does this
automatically and periodically, ensuring your radio always has the latest station directory
on-board.

1.9 A dd Station to ‘My F avourites’
1. Visit website: http://www.wifiradio-frontier.com
2. Click on the register link.
3. Create account login, you need an Access code to complete it, for how to get this
code, please refer to previous page.
Note: want to member login? Therefore save your registered ‘Email address’ and
‘Pass ord’.
4. You will able to take advantage of the various additional features and services offered
by the Frontier internet Radio Portal.
5. After above setting is done, in order to have your radio access your new settings, get
your radio power off for several minutes is necessary.
6. How to play ‘My favourites’? Your need two steps:
a. Press MENU < Station list > < My favourites >, press SCROLL to
confirm.
b. Turn SCROLL to your favorite option, and then press SCROLL to
loading…

Note: Your added ‘my favourites’ stations will shows up at ‘my favourites’ subdirectory. Doing a
‘factory reset’ cannot erase them.

1 . 10 Add Station to ‘My Added Stations’
Even though the Internet radio portal contains thousands of stations, you may want to listen
to stations not listed. You can add your own stations via the portal.
1. Visit website: http://www.wifiradio-frontier.com
2. Login as a member (at previous page, you registered).
3. You will able to take advantage of the various additional features and services offered
by the Frontier internet Radio Portal.
4. After above setting is done, in order to have your radio access your new settings, get
your radio power off for several minutes is necessary.
5. How to play ‘My added stations’? Your need two steps:
a.Press MENU < Station list > < My added stations >, then press
SCROLL to confirm.
b. Turn SCROLL to your favorite option, and then press SCROLL to
loading…

Note: Your added stations will show up at ‘my added stations’’subdirectory. Doing a ‘factory reset’
cannot erase them.
Chapter 2 Music Player Mode
2.1
Setting up a Music Server
•In order for your radio play music files from a computer, the computer must be set up to
share files or media.
•UPnP media sharing allows devices like this radio to play music from a shared media
library, navigating through tag menus such as Artist, Album or Genre.
•If you are running a suitable server system such as a PC with Windows Media Player10 or
later (WMP), and your music library is well-tagged, then it is recommended to use media
sharing.
•nly the UPnP server needs to be set up.
2.2 Sharing Media with indows Media Player
The most common UPnP server is Windows Media Player (10 or later). Alternatively, other
UPnP platforms and servers may be used. To set up WMP for media sharing, perform the
following steps:
1. Ensure that the PC is connected to the network.
2. Ensure that the radio is powered on and connected to the same network.
3. In WMP, add to media library about the audio files and folders you want to share with your
radio (Library > Add to Library…).
4. In WMP, enable media sharing (Library > Media sharing…).
5. Make sure your radio has accessed to the shared media by selecting it and clicking Allow.
You can also set a name for the shared media in Settings… Click OK to close the dialogue
Table of contents