Kogan KAIRNCLR22A User manual

2200W CORDLESS STEAM IRON WITH
RETRACTABLE STORAGE BASE
KAIRNCLR22A


•This appliance is not intended for use by persons (including children) with reduced
physical, sensory or mental capabilities or lack of experience and knowledge, unless
they have been given supervision or instruction concerning use of the appliance by
a person responsible for their safety.
•Children should be supervised to ensure that they do not play with the appliance.
•The iron must not be left unattended while it is connected to the supply mains.
•The plug must be removed from the socket-outlet before the water reservoir is filled
with water (for steam irons and irons incorporating means for spraying water).
•The filling or decalcifying or rinsing or inspection apertures that are under pressure,
must shall not be opened during use (for steam irons with pressurised
compartments only).
•The iron must only be used with the stand provided (for cordless irons).
•The iron must be used and rested on a flat, stable surface.
•When placing the iron on its stand, ensure that the surface on which the stand is
placed is stable.
•The iron is not to be used if it has been dropped, if there are visible signs of damage
or if it is leaking.
•If the supply cord is damaged, it must be replaced by the manufacturer, its service
agent or similarly qualified persons in order to avoid a hazard.
SAFETY AND WARNINGS

1. Spray nozzle
2. Fill cap opening
3. Steam control
4. Spray button
5. Steam burst
6. Temperature dial
7. Soft grip
8. Back support
9. Skirt
10. Water tank with MAX water level
indication
11. Calc-Clean button
12. Nano ceramic coating soleplate
13. Inside connector to iron
14. Iron storage lock
15. Power cord
16. Power charging base
17. Upper part of Power charging
base
18. Power indicator light
OVERVIEW

OPERATION
Indicator
light
Descale

Filling the Water Tank
Note: Yo ur appliance has been designed to be used with tap water. In areas with hard water,
scale build-up may occur. Therefore, it is recommended to use distilled or de-mineralised
water to prolong the lifetime of your appliance.
Note: Do not add perfume, water from tumble dryer, vinegar, magnetically treated water,
starch, descaling agents, ironing aids, chemically descaled water or other chemicals as they
may cause water spitting, brown staining or damage to your appliances.
1. Set the steam control to position 0. (Fig. 2)
2. Fill the water tank up to the MAX indication. (Fig. 3)
3. Close the fill cap opening.
Temperature Dial Guide (Fig. 4)
Instructions on Label
Type of Fabric
Temperature Dial
Nylon
Silk
MIN
MAX
Wool
Cotton
Linen
Note:
Do not use steam or burst of steam at a low temperature, otherwise hot water may leak
from the iron.

General Ironing
1. Consult the table on the previous page to set the temperature dial to the
appropriate setting for your garment.(Fig. 4)
2. Select a steam setting that corresponds to the temperature you have set. (Fig. 5)
3. Place the iron on its power charging base and connect to a power socket. (Fig. 6)
4. When the iron is first plugged in, the indicator lightwill flash red (Fig. 7-power
indicator light), indicating the iron's plate is heating up.The indicator light will turn
off when the plate is hot enough for ironing, so the iron can be removed from the
base to start ironing. (Fig. 8)
Spray Function
•Press the spray button to moisten the garment to be ironed(Fig. 9).This helps remove
stubborn creases.
Steam Burst Function
•Press and release the steam burst button for a powerful burst of steam (Fig. 10& 11).
•For optimal performance, it is recommended to press the button in 5-second
intervals.
Dry Ironing
•Set the steam control to position0 to iron without steam. (Fig. 2)
Note:
Ensure the base sits on a stable and level surface. It is recommended to place the base
on the soft part of the ironing board.

Regularly rinse the water tank with tap water. Empty the water tank after rinsing it.
Cleaning
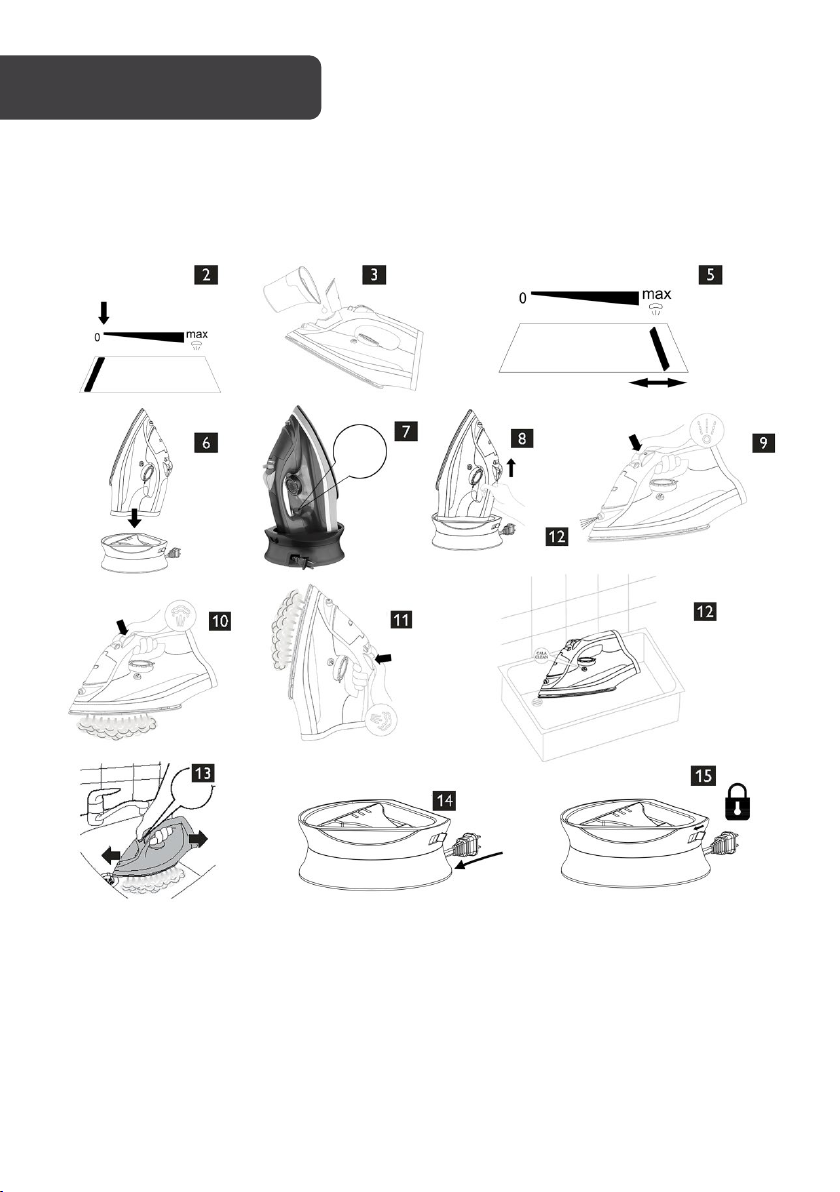
1. Set the steam control to 0, unplug the base and let the iron cool down. (Fig. 2)
2. Pour any remaining water out of the water tank.
3. Wipe flakes and any other deposits off the plate with a damp cloth and a non-
abrasive (liquid) cleaning agent.
DescaleFunction
To prolong the lifetime of your appliance and to maintain good performance, it should be
descaled once every two weeks. If the water in your area isvery hard (i.e. when flakes come
out of the plate during ironing), use this function more frequently.
1. Ensure the steam control is set to 0. (Fig. 2)
2. Fill the water tank to the MAX indication. (Fig. 3)
Do not pour vinegar or other descaling agents into the water tank.
3. Set the temperature dial to MAX.
4. Plug in the power charging base, put the iron on the base and let the iron heat
up.(Fig. 6)
5. Remove the iron when the power indicator light goes off. (Fig. 7)
6. Hold the iron over the sink. Press the Descale button and hold it. (Fig. 12)
7. Gently shake the iron while holding the steam control until all water in the water
tank has been used up. (Fig. 13)
8. Set the steam control back to 0. (Fig. 2)
CLEANING & CARE
Caution:
To keep the soleplate smooth, avoid hard contact with metal objects. Never use a
scouring pad, vinegar or other chemicals to clean the soleplate.
Caution:
While scale is flushed out, steam and boiling water also comes out of the plate.

After Descaling
1. Put the iron on the charging base and let the iron heat up to dry the plate.
2. Remove the iron from the base when the power indicator light goes off.
3. Move the iron gently over a piece of cloth to remove any water stains on the
soleplate.
Storage
1. Set the steam control back to 0. (Fig. 2)
2. Pour out any remaining water from the water tank.
Do not pour vinegar or other descaling agents into the water tank.
3. Unplug the power cord and retract it into the charging base(Fig. 14).
Remove iron from the power charging base when you retract the mains into the
base, as the soleplate could still be hot.
4. Put the iron on the power charging base. Lock the iron to its base. (Fig. 15)
5. Let the iron cool down before you store it.
The iron and charging base can be carried by the iron handle.

Problem
Possible cause
Solution
No steamproduced
Iron has cooled
Allow iron to heat up in base until
indicator light goes away
Steam control set to 0
Set the steam control to a right steam
setting which can produce the steam as
per above stated using methods.
Water tank empty
Fill water tank
Leaking
Low temperature (below
2)
Raise thermostat dial
Steam or steam boost
being used at low
temperature
Allow iron to heat up in base
Steam burst
functionhas been
overused
Allow iron to heat up in base and use
team burst function less
Water tank overfilled Do not fill beyond MAX level
Fill opening not closed
properly
Close fill opening properly
Flakes and
impurities coming
out
Iron has not been
descaled Descale as per Cleaning & Care
TROUBLESHOOTING

NOTES

Need more information?
We hope that this user guide has given you
the assistance needed for a simple set-up.
For the most up-to-date guide for your product,
as well as any additional assistance you may require,
head online to help.kogan.com
Table of contents
Other Kogan Iron manuals