Kogan KGN1080P46VAA User manual


16
17
18


Power cord
Remote control/batteries

Sound mode button
Favorite program button
Mute button
Channel list button
Sleep function button
NICAM function button
Information display button
Numeric buttons
Confirm button
Fast teletext buttons
Teletext size button
Teletext on/off button
Teletext cancel button
Volume adjusting button Channel select button
0
123
456
7 8 9
A/DTV
+
RC-TFG019
0
1 2 3
4 5 6
7 8 9
OK
P.MODE S.MODE I/II SLEEP
SOURCE MENU
INFO EXIT
MUTE
VOL CH
ASPECT
X
SIZE
SUBTITLE
TTX
CANCEL
AUTO
FAV
EPG
SUBPAGE
HOLD
REVEAL
INDEX
CH.LIST
ADD/ERASE
Power/Standby button
Picture mode button
Remote control indicator
Return channel button
Menu button
Signal source select button
Navigation buttons (Up, Down, Left, Right)
Menu exit button
Auto adjust button in VGA mode
Display mode select button
Favorite program add/delete button
Teletext hold button
Electronic program guide button
Teletext reveal button
Teletext subtitle button
Teletext subpage button
Teletext index button

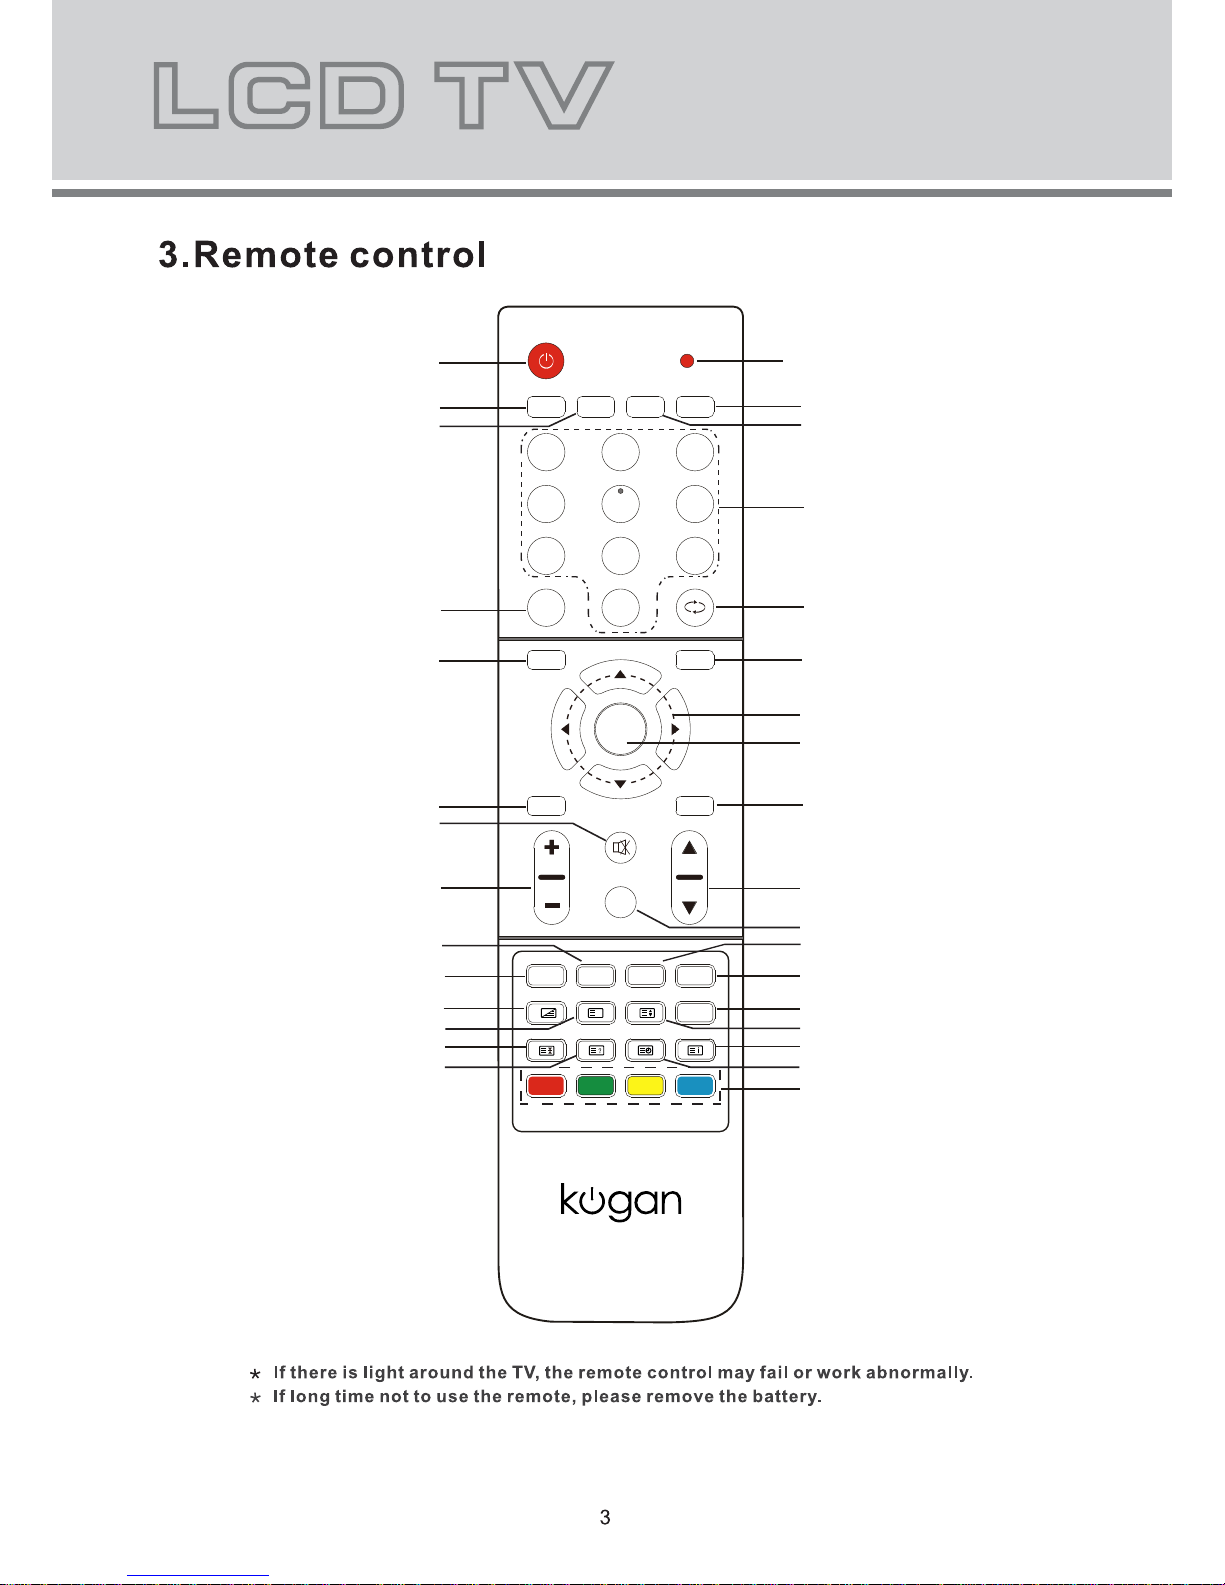
S.MODE: Sound mode button, setting the sound mode.
P.MODE: Picture mode button, setting the picture mode.
SLEEP: Sleep button, setting TV power off time.
I/II: Press the I/II button to choose a different audio channel.
ASPECT:
ADD/ERASE:
Press the ASPECT button to select the picture display ratio: 16:9 / 4:3.
INFO:
MUTE
Press the INFO button for information.
0,1-9: TV channel selection button.
SOURCE: Signal source selection button (TV/AV/S-VIDEO/YPBPR1/YPBPR2/VGA/HDMI1/HDMI2/HDMI3).
OK:
CH.LIST:
Confirm button, confirm all the changes and settings.
Press the EPG button for detailed information about the channel.
Press the CH.LIST button to display the channel list.
Press the SUBTITLE button to display the subtitle function.
INDEX: Press it once to display the index for all the teletext page.
CANCEL: Do not display the content of the page, but only the channel image. Press it again to display the content of the page again.
SIZE: Press it once to enlarge the content on the upper part of the page, and press it the second time to enlarge the content on the lower part of the
page, and the third time to resume normal display of all the contents on the page.
SUBPAGE: It is refer to the subpage of teletext page, i.e. subcode page. When it is pressed, the screen display the requirement of subpage code
entry. If there is no subpage, it will not be displayed. In most case, there is no subpage.
HOLD:
SUBTITLE:
Press it once to keep the display of the page, and press it again to exit hold state.
REVEAL: Press it once to display the hide text, press it again to close the display of hide text.
TTX: Press it to enter teletext state and display teletext page; press this button again, display both image and teletext page at the same time. If you
want to exit teletext state, press this button again.
Press the FAV button to start the “Favorite List” for selecting your favorite program.
Press the ADD/ERASE button to add or erase your favorite program.
AUTO: Press theAUTO button to auto adjust items in VGAmode.
Number buttons 0~9 on the remote control can be used to get to a certain page. “ ” button on the remote control can be used to display the content
of previous or next page. Press the RED, GREEN, YELLOW & BLUE buttons on the remote control, the page of relevant color displayed on the lower
part of the screen will be displayed.
FAST TEXT: The RED, GREEN, YELLOW & BLUE buttons are used for quick access to color coded pages transmitted by FAST TEXT broadcast.
Example:
RED selects CITY INFORMATION,
GREEN selects WEATHER INFORMATION,
YELLOW selects TV PROGRAMMING,
BLUE selects TRAVEL INFORMATION.

VOL CH MENU SOURCE
Remote sensor.
Power indicator.
Power on/off button.

ON/OFF
AC IN
TV
COAX
S-VIDEOY1 Pb1 Pr1 RL1 R1
C-VIDEOY2 Pb2 Pr2 LL2 R2
HDMI2 HDMI3
HDMI1
Power on/off button.
AC power input terminal.
Component video & audio input terminals (Y Pb Pr/L/R 1/2).
S-VIDEO input.
Composite video & audio input terminals (AV).
9. Coaxial audio signal out plug.
10.
11.
HDMI input.
USB SERVICE input (Serviceable only for updating the firmware).
USB
SERVICE
9
10 11

YPbPr
AV
ON/OFF
AC IN
TV
COAX
S-VIDEOY1 Pb1 Pr1 RL1 R1
C-VIDEOY2 Pb2 Pr2 LL2 R2
HDMI2 HDMI3
HDMI1
USB
SERVICE
S-VIDEO/AV use a common L/R in.

1. Turn on TV, then press OK button to start the wizard.
2. Press button to select your region, then press OK
button to confirm.
3. Connect antenna and press OK button to start channel
scan.
Initial SetupWelcome
Welcome to use the Wizard for
Initial Setup !!
Please press [OK] to start the
wizard.
Initial Setup
Please select your region:
Region
NSW/ACT
VIC
QLD
SA
WA
TAS
NT
Back Select Next EXIT Exit
Initial Setup
Back Select Next EXIT Exit
Channel Scan
First, please connect antenna.
Start channel scan now?
If you skip this step, the channel
scan could be performed in Menu.
Scan
Skip Scan
0%
Initial Setup
EXIT Cancel
Channel Scan
The channel scan may take a
while to complete.
Status:Scaning.
Analog Channels:0
Digital Channels:0
0%

1 VIDEO MENU
The image on the left depicts the video menu.
The definition of each option:
Picture Mode: Changes the picture mode in sequence:
Standard Mild Vivid User.
Brightness: Changes the value of brightness with the
key in the range of 0 to 100.
Contrast: Changes the value of contrast with the key
in the range of 0 to 100.
Saturation: Changes the value of saturation with the
key in the range of 0 to 100.
Sharpness: Changes the value of sharpness with the
key in the range of 0 to 7.
Colour Temperature: Changes the colour temperature in
sequence: Standard Warm User Cool, also R
Gain, G Gain, B Gain included in each item.
Advanced Video: Set the advanced video items.
DNR: Changes the Dynamic Noise Reduction in sequence:
Strong Auto Off Low Medium.
Black Level Extender: Changes the black level extender
to “On” or “Off”.
White Peak Limiter: Changes the white peak limiter to
“On” or “Off”.
CTI: Changes the CTI in sequence: Medium Strong
Off Low.
Flesh Tone: Changes the flesh tone to “On” or “Off”.
Adaptive Luma Control: Changes the adaptive luma
control to “On” or “Off”.
Blue Mute: Changes the blue mute to “On” or “Off”.
Back Light: Changes the value of back light with the
key in the range of 0 to 100.
Video
Picture Mode
Brightness
Contrast
Saturation
Sharpness
Advanced Video
Colour Temperature
Standard
50
52
55
3
OK Enter Select EXITExit
Colour Temperature Select EXITBack
B Gain
G Gain
R G
Colour Temperature
ain
Standard
3
-6
0
Advanced Video Select EXITBack
DNR
CTI
Flesh Tone
Blue Mute
Back Light
Adaptive Luma Control
White Peak Limiter
Black Level Extender
Auto
On
On
On
On
On
Medium
80

10
2 AUDIO MENU
The image on the left depicts the audio menu.
The definition of each option:
Sound Mode: Changes the sound mode in sequence:
Standard Pop Rock News.
Balance: Changes the value of balance with the key
in the range of -50 to +50.
Bass: Changes the value of bass with the key in the
range of 0 to 100.
Treble: Changes the value of treble with the key
in the range of 0 to 100.
Sound Surround: Changes the sound surround to “On”
or “Off”.
Auto Volume Control: Changes the auto volume control
to “On” or “Off”.
Audio OK Adjust Select EXITExit
Balance
Bass
Treble
Sound Mode Standard
Sound Surround Off
Auto Volume Control Off
0
50
50
Channel Scan EXITCancel
82%
Status:Scanning
Analog Channels:0
Digital Channels:0
Channels OK ScanSelect EXITBack
Channel Scan
Manual Scan
Channel Edit
Analog Channel Fine Tune
TV OK Enter Select EXITExit
Country RegionNSW/ACT
Channels
3 TV MENU
The image on the left depicts the TV menu.
The definition of each option:
Country Region: Changes the country region in sequence:
VIC, QLD, SA, WA, TAS, NT, NSW/ACT.
Channels: Press key to this position, then press
key to enter Channels submenu, the menu options include
Channel Scan, Manual Scan, Channel Edit and Analog
Channel Fine Tune.
Channel Scan: Press or OK button to enter channel scan.

11
Manual Scan: Press or OK button to enter Manual Scan
submenu. Select one of the following options: Digital
Manual Scan and Analog Manual Scan.
Analog Manual Scan EXITBack
Start Frequency (MHz)
Scan Down
Scan Up
47.00
Search for analog channels
Digital Manual Scan OK ScanEXITBack
RF Channel
Signal Level
9A
0
Start Frequerny (MHz)
0%
177.5
Digital manual scan channel.
Digital Manual Scan
Analog Manual Scan
Manual Scan OK Enter Select EXITExit
Digital Manual Scan: Press or OK button to enter Digital
Manual Scan.
Analog Manual Scan: Press or OK button to enter Analog
Manual Scan.
1 Digital DVB-4-1
2 Digital DVB-4-2
3 Digital DVB-4-3
900 Analog
901 Analog
Channel Edit OK Set Select EXITBack
Channel Number:
Channel Name:
Frequency
Sound system
Channel Skip
Channel Edit OK Set Select EXITBack
Off
I
Channel Edit: Press or OK button to enter Channel
Edit submenu. Press button to select the channel
and press OK button to enter.
You can edit the channel number, channel name and
frequency, select sound system (For ATV only), and
change the channel skip to “On” or “Off”.
901
77.25

12
Analog Channel Fine Tune: Press or OK button to enter
Analog Channel Fine Tune submenu. Press button
to select the channel and press OK button to enter.
Press button to search forwards and backwards to
improve reception if necessary.
900 55.8 MHz
901 60.5 MHz
Analog Channel Fine T OK Adjust Select EXITBack
Set EXITCancel
OK
Channel Number: 900
Channel Name:
Frequency: 55.8 MHz
4 SETUP MENU
The image on the left depicts the setup menu.
The definition of each option:
OSD Language: Changes the OSD language in
sequence as English, Spanish, French, German, Italian.
Screen Mode: Changes the screen mode in sequence
as 16:9, 4:3.
DPMS (For VGA only): Changes the DPMS to “On” or
“Off”.
Time Setup: Press key to this position, then press
key to enter Time Setup submenu, the menu options
include Time and Sleep Timer.
Time: Changes Auto Synchronization to “On” or “Off”.
Sleep Timer: Changes the sleep timer in sequence as
Off, 10 Minutes, 20 Minutes, 30 Minutes, 40 Minutes, 50
Minutes, 60 Minutes, 90 Minutes, 120 Minutes.
OK Enter Select EXITExit
Setup
Screen Mode
OSD Language
16:9
On
English
DPMS
Time Setup
Subtitle
Version Info
Reset Default
SelectEXITBack
Time Setup
Time
Off
Sleep Timer
OK Enter
Select EXITBack
Time
Auto Synchronization
2000/01/01
16:51:46
On
Date
Time

13
EXITBack
Setup
Soft Version: HKTF_HD ver 1.00
Hard Version: Antlia VER 1.01
Subtitle: Changes the Digital Subtitle to “Off” or “English”.
Version Info: Press or OK button to view the soft and
hard version.
Select EXITBack
Subtitle
Off
Digital Subtitle
Reset Default: Press to this position, then press
key to enter default password as “0000” to return to the
factory settings.
EXITBack
Password
EXITBack
Parental
5 PARENTAL MENU
This menu is used to set the block function.
Password: The initial password is “0000”.
EXITBack
Password
EXITExit
Parental OK Enter Select

14
Hotel Block: Press key to this position, then press
key to enter Hotel Block submenu, the menu options
include Hotel Lock and Max Volume.
Hotel Lock: Changes the hotel lock to “On” or “Off”.
Max Volume: Set the maximum volume level.
BackEXIT
Select
Enter
OK
Change Password
Clear All Blocks
Hotel Block
Program Block
Input Block
Parental
No Block
Restriction of Access
Program Block Back
Select EXIT
BackEXIT
Select
Hotel Lock
Max Volume
Hotel Block
On
100
Program Block: Press key to this position, then press
key to enter Program Block submenu, the menu option
includes Restriction of Access (No Block, Block G, Block
PG, Block M, Block MA, Block AV, Block R, Block All).
Input Block: Press OK button to block any input source.
EXIT
t
Set
OK
S-VIDEO
YPBPR1
YPBPR2
HDM 1I
TV
AV
VGA
1
2
3
4
5
6
7
HDMI 28
HDMI 3
9
Input BlockBack
Selec

15
Change Password: Change the parental password.
Clear All Blocks: To clear all the locks.
1.
Press SOURCE button to change from TV to other
available inputs.
2. Press button to select signal source.
3. Press OK button to confirm.
4. Press EXIT button to exit signal souce menu.
Cancel
Are you sure?
OK
EXIT
Confirm Password
New Password
Change Password Back
TV
Source
AV
YPBPR1
YPBPR2
VGA
HDMI 1
HDMI 2
HDMI 3
S-VIDEO

16

17

18
46 inch
16:9
1920 X 1080
430 cd/m
5000:1
8ms
16.7M
178 178
1018.08mm (H) X 572.67mm (V)
0.4613mm (H) X 0.1538mm (V)
YPbPr Input
Speaker (Built-in)
S-VIDEO 1 (4 pin DIN)
USB SERVICE Input
(For YPbPr, AV, S-VIDEO)
1 Service Input
2
1
3
3
1920x1080
< 230W
2 (10W, 12 Ohm)
pin
Table of contents
Other Kogan LCD TV manuals

Kogan
Kogan HDMI HD19 User manual

Kogan
Kogan 1080p26 User manual

Kogan
Kogan KGNFHD32KVAA User manual

Kogan
Kogan KGN1080P37VBA User manual

Kogan
Kogan 1080p37 User manual

Kogan
Kogan KALED55UHDZE User manual

Kogan
Kogan HDMI HD32 User manual

Kogan
Kogan KALCD19DVDAA User manual

Kogan
Kogan KGNPRO19VAA User manual

Kogan
Kogan HDMI KEVIN37 User manual

Kogan
Kogan KGN1080P47VAA User manual

Kogan
Kogan KGN1080P42VBA User manual

Kogan
Kogan KGNPRO26VAA User manual

Kogan
Kogan HDMI HD26 User manual

Kogan
Kogan HDMI 1080p47 User manual

Kogan
Kogan KGNFHDLED32VA User manual

Kogan
Kogan HDMI 1080p47 User manual

Kogan
Kogan KGN1080PPRO32VD User manual

Kogan
Kogan KALCD423DXA User manual

Kogan
Kogan KALED32SMTWB User manual