Kogan KATBL10A08E User manual

<d>ϭϬϬϴ
<d>ϭϬϭϲ
USER MANUAL

Quick guide
1.Device Layout
●Button Description
1. “-”Button: Volume down
2. “+”Button:Volume up
3. “ESC”: One key to return to the main interface
4. “SPEAKER”: Speaker hole
5. “MIC”: Recording hole
6.“ ”: Headphone jack
7. “ ”:USB interface to connect to a computer
8. “TF-CARD”: External F card socket
9. “ ” O G interface External disk / mouse / keyboard and 3G network card, etc
10. “ HDMI” Digital Media Output
11.“ ”:2.5MM DC5V 3A Charging port
12.“ ” he power button. Hold button down for three seconds to power on / off.
When already turned on, press for one second to lock screen and wake-up screen.
1

2. Equipment operator interface
2.1. he main interface description
Boot into the main interface , the default is the screen lock
Hold down the unlock small icon “ ”, drag to right, Will automatically unlock access to the system
main interface
Management software icon in the main screen
To add a shortcut: Drag the icon to the main menu interface interface you can add a shortcut.
Delete a shortcut: Long press on the main interface software icon, op of the screen Will appear
“ ” , Drag the software icon to “ ” , afrer Symbol turns red, Loosen the touch screen, You can
delete the software shortcuts
Press and touch-screen pop up: Select Wallpaper sources window, Can replace your
desktop wallpaper
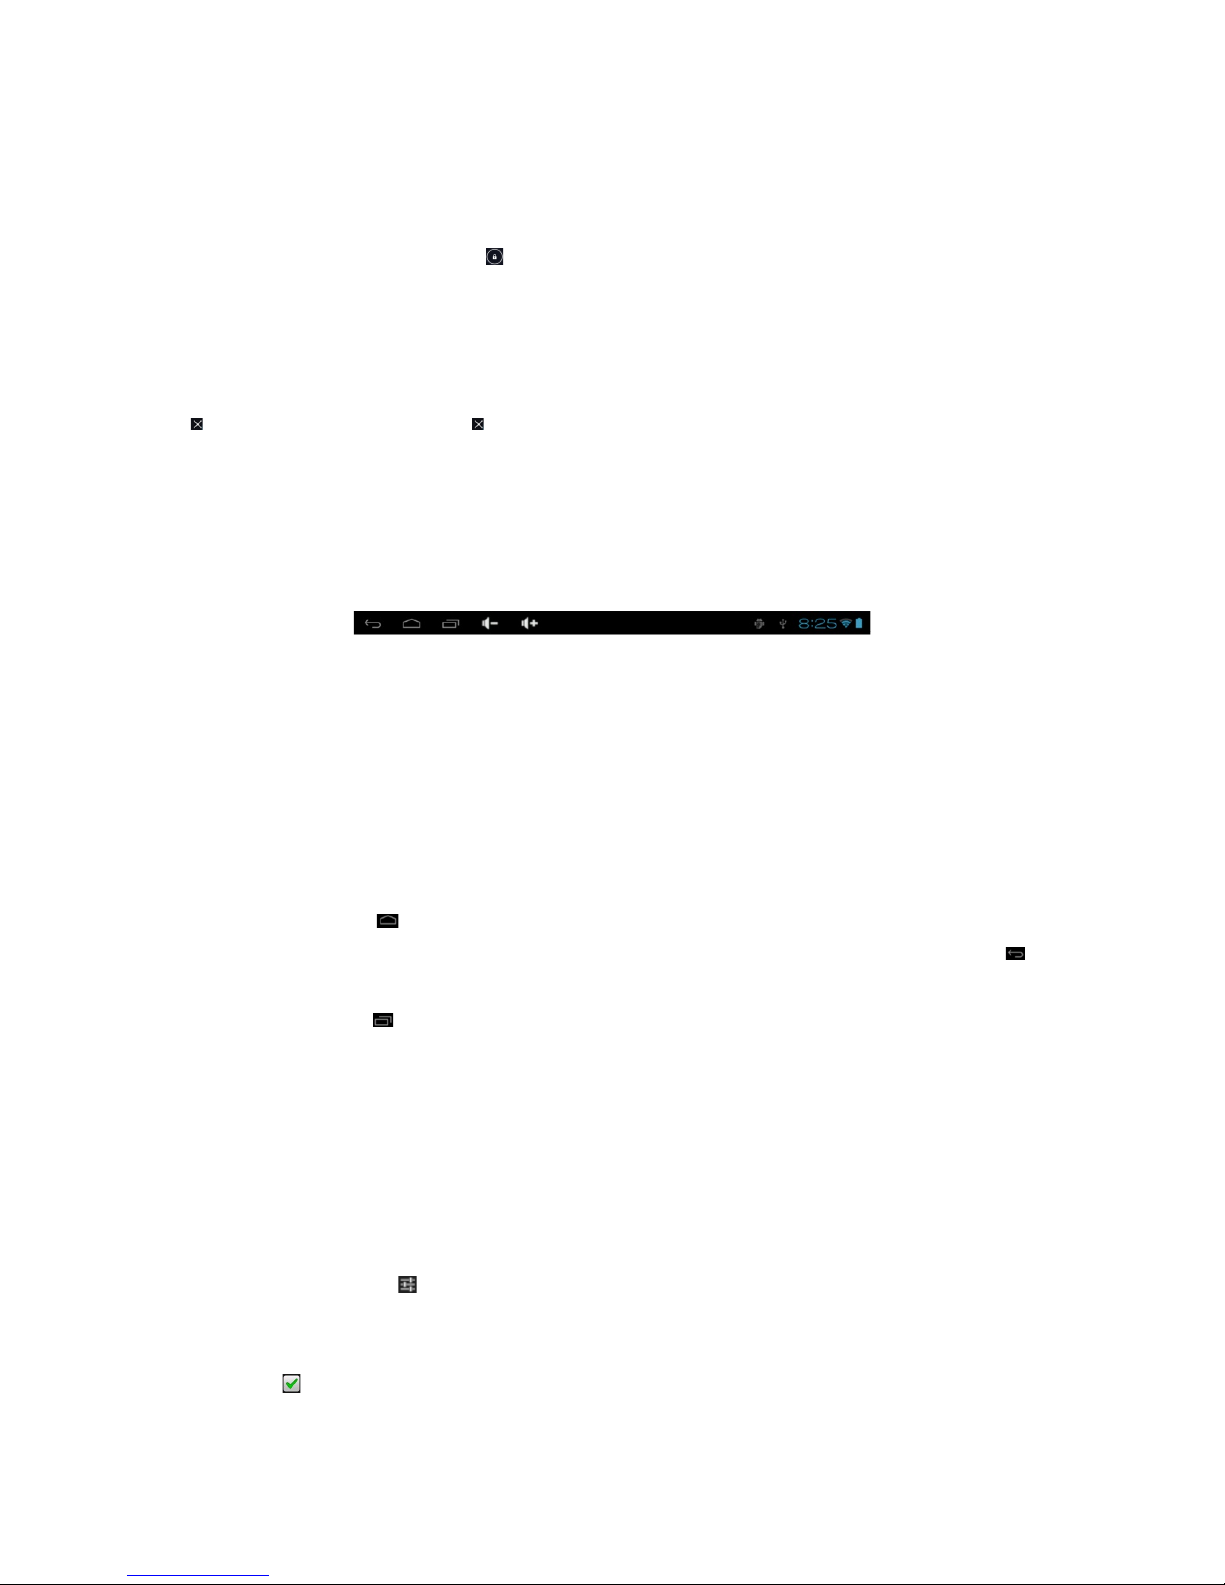
2.2. Description of Status Bar
he status bar at the bottom of the screen
From left to right are: ESC、HOME、asks window、Volume Up and Volume Down、USB connection
status、ime、the WiFi signal、Battery Information
2.3. Use the touch screen
he device is equipped with touch screen (capacitive ). Following description of the main touch
screen area, and describes how to use the touch screen are some tips
When you are on an interface screen, you can touch the upper left corner of the screen on the
main screen softkey “”, where you can return to the main screen
In different applications, by the upper – right corner of the touch screen to return softkey “ ” ,
You can return to the upper layer of its interface
Click the small icon “ ” , pop – up software running in the background.
Click the lower – right corner of the status bar, specific wifi, battery information, the USB
connection, and you can enter the settings
You can drag the page around to enter the Previous or Next in the page. If dragged to the widget,
you can enter into the selection of widgets. Hold finger down on the widget, then it can be moved
to the desktop
2.4. o switch input methods
In the input state Click “ ” Icon, where options to switch input methods should appear.
Click the "input method" into the select input method interface, Select the desired input method.
Some third-party software input methods need changes to settings in the language and
keyboard “ ” Selected to appear in the input method switch interface; if not canceled, it will
remain the default for this input method.
2

3. Equipment basic Settings
Set up: Click the Settings icon in the menu page “ ” to enter the setting interface
Press and hold the screen up or down pull to turn pages
• 3.1. Wireless settings
• 3.1.1. WIFI settings
Click the WIFI "ON" button in the Settings menu, which will launch WIFI. he right side of the
display area will display all nearby available WIFI networks.
Click on the desired WIFI network name, enter the correct password to connect to the Internet.
• 3.1.2. Bluetooth settings
Click on the Settings menu in Bluetooth “ ” , then enter the setting interface. he right side
of the display area will display all available Bluetooth devices.
• 3.1.3. Mobile network settings
Click the wireless network button “ ”, then enter the mobile network settings. Including
VPN , portable hot spot , mobile network.
Click on the " mobile network " button, enter the mobile network settings. Built – in module power
supply, data flow, data roaming is enabled , set after the opening of the mobile Internet
3.2. Sound Settings
Click the Settings menu “ ” to enter the setting interface, Can adjust the volume, change
default notification sounds, open and close touch tone and lock screen.
3.3. Display Settings
Click the Settings menu “ ”, which will go into the display settings interface. Here you can
adjust display brightness, change wallpaper, automatically rotate the screen, set screen saver
timing and alter font size.
3.4. Store information
Click the Settings menu “ ” where you can view the current store information
Click the upper right corner Symbol Appear USD computer is connected
• Click on the USD computer connection, Check the storage mode as shown in Figure:
- Media devices (M P)
- Camera (P P)
- a mass storage device
3.5. Battery Information
Click the Settings menu “ ” to view the current battery storage information
3

3.6. Application
Click the Settings menu “ ” Can see current downloads, all active procedures ,
management of the procedures, end programs that are running the uninstaller, etc.
3.7. Accounts and synchronization
Click the Settings menu “ ” where accounts can be added and edited.
3.8. Location-based services
Click the Settings menu “ ” to enter the setting interface
3.9. Security
Click the Settings menu “ ” to enter the setting interface, where you can set screen
security, ablet PC encryption, lock the SIM settings, make the password visible, device
management (non-electronic market application to install the license), the credentials are stored.
3.10. Language and input method
Click the Settings menu “ ” to enter the settings interface to change the
language, set spelling corrections and to set the input methods.
3.11. Backup and reset
Click the Settings menu “ ” to enter the settings interface. Here you can backup
application data, wifi passwords and other settings back ups to Google servers, Restore factory
settings, or clear all data on the ablet.
3.12. Date and ime
Click the Settings menu “ ” to enter the settings, where you can choose to
automatically determine the date and time (time) on the network. If not selected automatically
you can manually set the time and date, select your time zone, set the date and time format.
3.13. Accessibility
Click the Settings menu “ ” to enter the settings where you can make changes to
the services and systems, such as font size, automatically rotate the screen, voice password
recognition, touch and hold down delay, and installation of web scripting.
4

3.14. Developer Options
Click the Settings menu “ ” to enter the settings. USB debugging, Control the O G
USB communication with the computer and copy data, keep the wake-up state, allow simulation
of location, HDCP check, Desktop backup password, etc.
3.15.About ablet PC
Click the Settings menu “ ” where you can view information about the unit,
including the status information, Legal Information, Model, System version, Kernel version,
Version number, etc.
4. Software Installation and Management
4.1. APK Installer (application installation tool)
Native support for third-party applications is based on Android platform. Most applications can be
obtained from the network or copied from a memory/flash card. hen you can proceed to install
and use the applications.
Click “ ” Pop-up Apk installation options :Installation, management, and exit are the three
options
Install:Click Install, enter Apk installer interface Internal Me ory and SD Card corresponding to
the flash memory disk/card storage disk; o enter the disk, select the right side of the box APK
format installer, then click Install. Once the operation is complete, return to the main interface
and the installation is complete, the software will appear in the menu
Management: click management, access to third-party software interface
- Start: Run the software
- Export: export software to the SD card.
-Uninstall: uninstall the software
- Search: search for the software in the software store
- Cancel: to cancel the operation
Exit: back to the main interface
4.2. Explorer
Click on the main menu of " Explorer " icon to go into the management interface
Click on the "SD Card " or "Internal Memory " to expand the drop down folder to display all related
files. From here you can select the files for add, copy, paste , delete, edit.
5

5. commonly used application software and operations
5.1. Photo browser
• In the main menu, click on "image viewer" to go into the picture browser interface
• When in photo browsing state, swiping the picture will go to the next picture. Using two fingers,
pinch outwards to zoom in, or pinch inwards to zoom out.
5.2. Audio player
• In the main menu, click“ ” icon to go into the audio player
• When there is no music files in the music player list, opening the music player will automatically
display music files on the card which is already loaded into the playlist (natively supported audio
file formats: mp3, wav, midi,wma, etc.), the play list as shown above.
• Music playlist area: if there are a large number of songs, program or under the program page
on the touch screen
• Click your favorite songs into the audio player interface, audio songs.
[Note]: he audio player can only play audio files
5.3 Video player
• In the main menu, click “ ” icon to enter the video player interface
• Native support for video file formats: MKV, AVI, RM, RMVB, MP4, MOV, VOB, DA , FLV, 3GP.
• When there is no file list of video player, opening the video player will automatically show the
video files of the device memory card is loaded into the video playlist.
5.4. E-book
• Clicking the“ ” to enter the e-book reader.
• At this point you can read Flash, flash card, USB source, mobile hard disk X , PDF and other
e-book formats.
• You can read X , PDF format e-books online.
5.5 Web browser
• Click on the “ ” to enter the web browser
5.6 E-mail
• Click on the“ ” to go into Gmail, where you can create / log in to Gmail accounts, send and
receive Gmail messages.
• Click on“ ” to enter e-mail settings, where you can enter account email addresses and
passwords, set up a limited server, log into your mailbox to send and receive mail.
6

5.7 Google Map
• Click on the“ ” to enter GoogleMaps.
- Click the lower left corner of the touch screen zoom icon, you can zoom the screen.
- Search: Search by Place Names Map
- Route: Enter the starting point for the end of names, find driving directions
- Map mode: map, satellite, traffic are the three modes to choose from
- My Location: through the "My Places" source settings, find the current location of tablet.
- More: Google Map information
5.8 Calendar
• Click on the main menu“ ” to go into the calendar interface.
• In calendar mode, press and hold the screen to pull up or down to move between the months.
• Automatically adjusts the year when the month more than 12 months or less than in January.
• Enter the interface with the orange box“ ” for today's date. If you want to change the date
number, you can replace this inside the set time and date details, please refer to the Settings
section.
• Click on to go back to the main interface
7

6.Technical parameters:
Rockchip dual-core 1.6G the Cortex-A9 architecture 2 the CORE + 4 GPUs the spec
CPU Rockchip RK3066 (Dual Cortex A9 4D GPU)
O/S Android V4.1.1
CPU Speed 1.6GHZ
Memory Type DDRIII 1GB
Internal Memory Standard 8GB , can optional up to 16GB NAND Flash
Memory Expansion Micro SD/SDHC up to 32GB
Display Size 9.7 inch IPS 4:3 Capacitive 10-Point Multi-Touch-Screen
Display Resolution 1024x768 Pixels
WLAN Type IEEE 802.11b/g/n
Blue-tooth yes
Audio Input Mic
Audio Output Built-in speaker
Video Output High Speed HDMI, type C (mini), Supports 1080P and 720P
I/O Ports 1x DC In, 1x Headphone, 1x TF Card-Slot,
2x USB 2.0: 1 HOST, 1 OTG,1x HDMI Output
Audio support MP3/WMA/APE/FLAC/AAC/OGG/AC3/WAV
Video support Max.1920*1080 MKV(H.264 HP) AVI RM/RMVB FLV WMV9 MP4
Picture Max 8000x8000 JPEG BMP GIF PNG
eBook TXT,PDF,HTML,HTM,CHM,UMD
Dual Camera Front camera 0.3 megapixels. Rear camera 2.0 megapixels.
Browser Support high-speed Internet access and download the browser
OSD Menu
Languages
Multi Language
Online video Rockchip Built in youtube
Power rated DC 5V == 3A Max
Online Play Support HTML5 video play and Flash Player 11
Battery Type Lithium ion battery
Office Documents ToGO office software,support google Docs/ Word / Excel / PDF / PPT
etc.
Images JPG, BMP, PNG etc.
Battery Capacity 3.7V, 8000mAH
Battery power time Screensavers standby power consumption of only: 15MA, continuous standby 260H
The audio player (WIFI off): Approximately 15 hours;
video playback time (WIFI off): Approximately 6 hours,Visit the website (WIFI
turned on): about 5 hours
Dimension(L*W*H) 244*190.5*11(mm)
8

Weight 630g
Operating
Temperature
-5〜40℃
6. 1 Battery management and charging:
• First ensure the device's battery is fully charged.
Just use the corresponding models charger into the charging jack to enter the state of charge.
(Charger specifications are required according to the details printed of the back of the machine
screen, ensure that you use the correct charger!)
• During battery charging, the screen battery icon will scroll.
• When charging is completed, the screen battery icon will turn green and stop scrolling.
• o extend the life of the machine and battery, we recommend that you exhaust the balance of
battery power before recharging.
[Note]: (1) built-in polymer battery must be recharged regularly. Polymer battery over-
consumption caused by cell damage is not covered by product warranty
coverage. Please use the correct charger.
Note: The operating manual, instructions and pictures are for reference!
Product specifications, key definitions and appearances are subject to
change without notice!
State
Please be sure Kogan assumes or accepts no responsibility for personal
data, data backup, damage due to the misuse of software, hardware,
maintenance, battery replacement or other unforeseen circumstances caused
by loss and damage during use, nor anything caused by other indirect
damages. Meanwhile, we can not control the users of this manual, including
issues caused by misunderstanding of instructions, therefore, Kogan will not
cover accidental damage that may arise by the use of this manual, or for third
party claims arising as a result of using the product.
9
This manual suits for next models
1
Table of contents
Other Kogan Tablet manuals