Kogan KALED55SMTZA User manual


Table of Contents
Safety Instructions.............................................................................................................................3
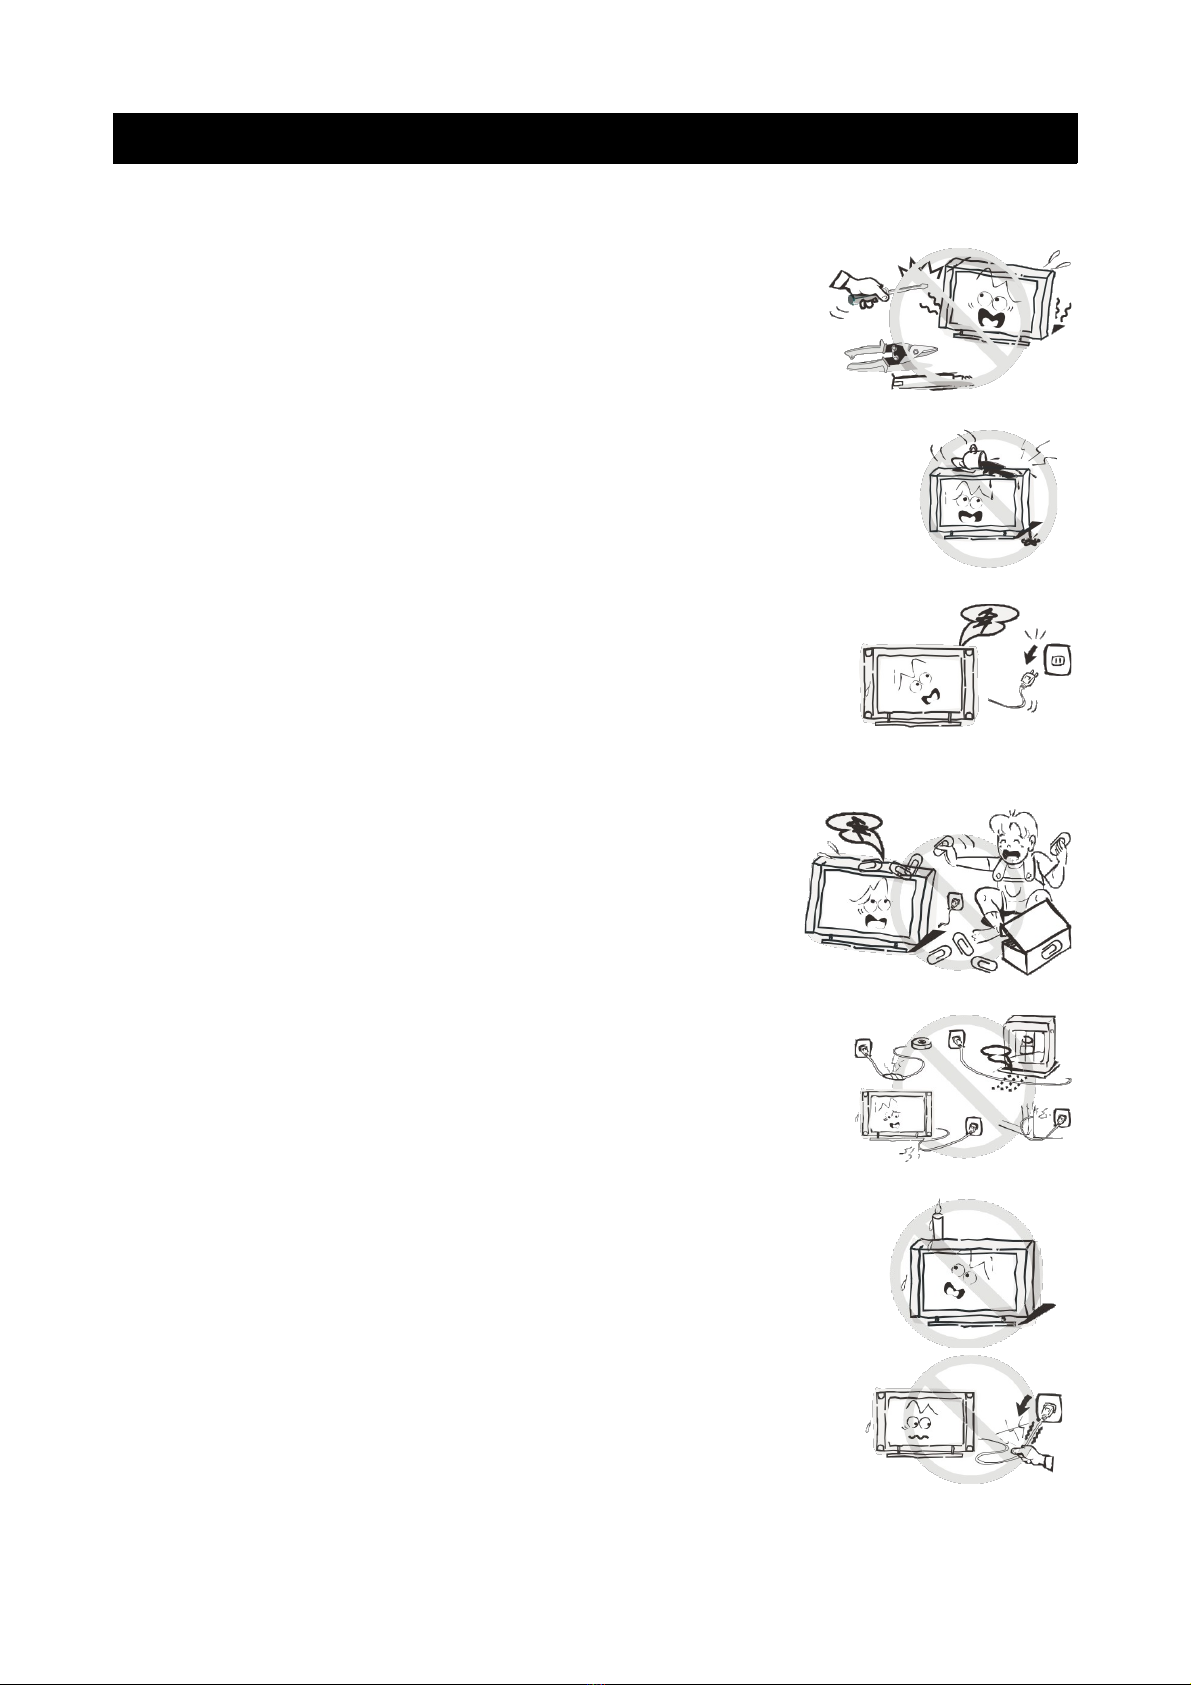
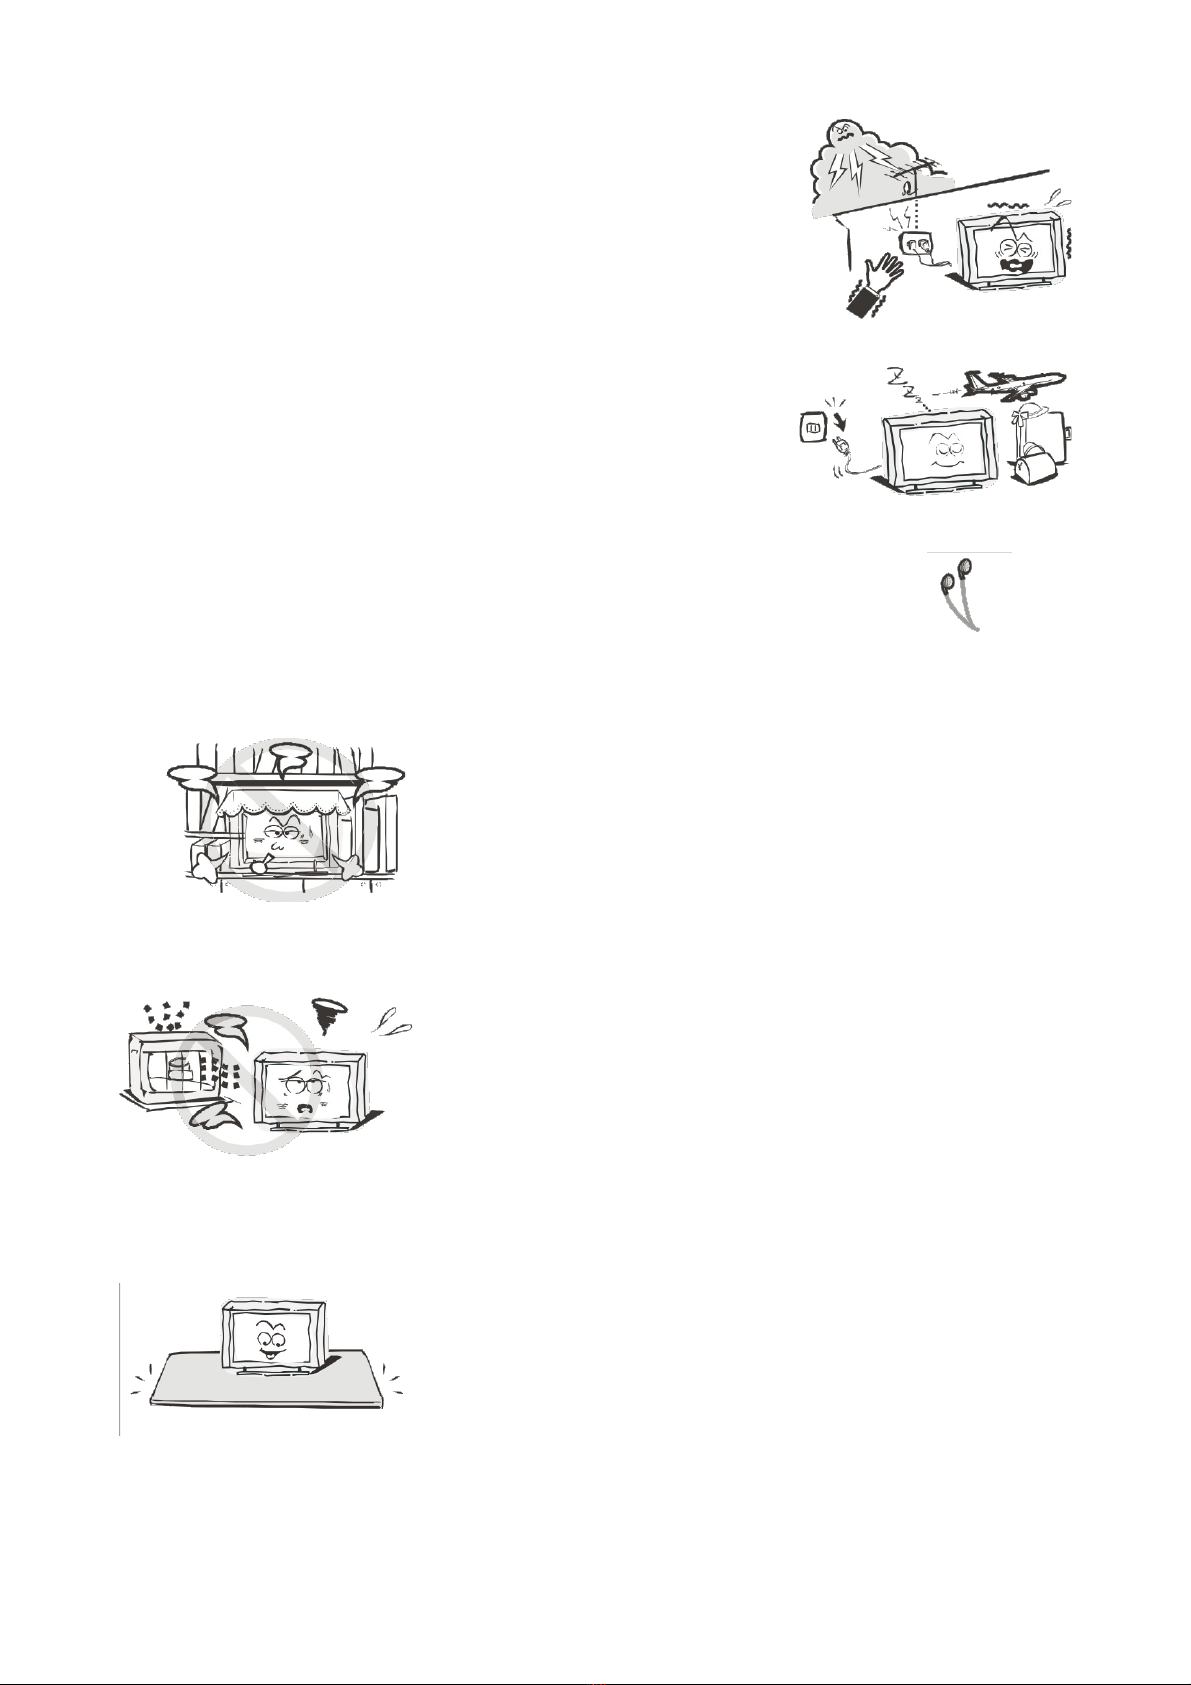
General Safety Instructions.......................................................................................................3
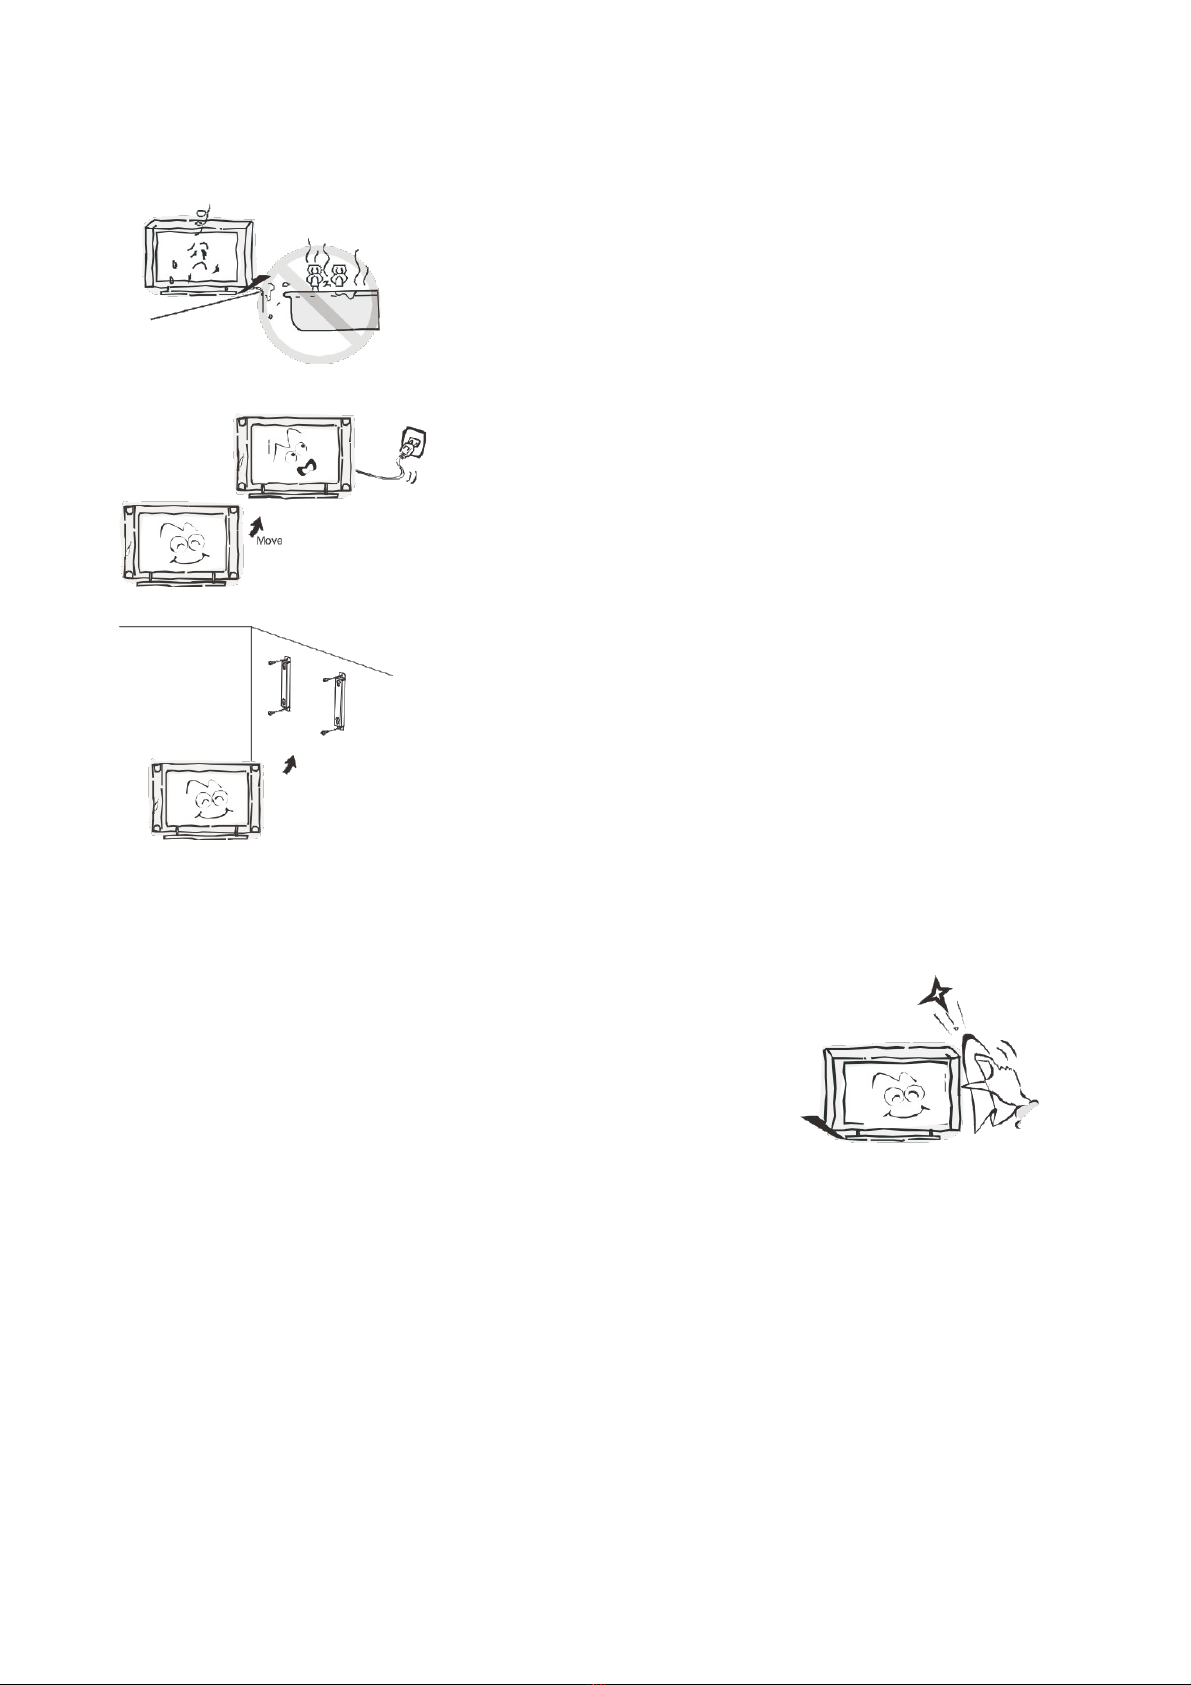
Installation........................................................................................................................................4
Cleaning............................................................................................................................................5
General Description..........................................................................................................................6
Specifications & Accessories........................................................................................................6
Specifications.................................................................................................................................6
Accessories......................................................................................................................................6
Assembling the Stan ......................................................................................................................7
Wall Mounting Instructions (optional).................................................................................7
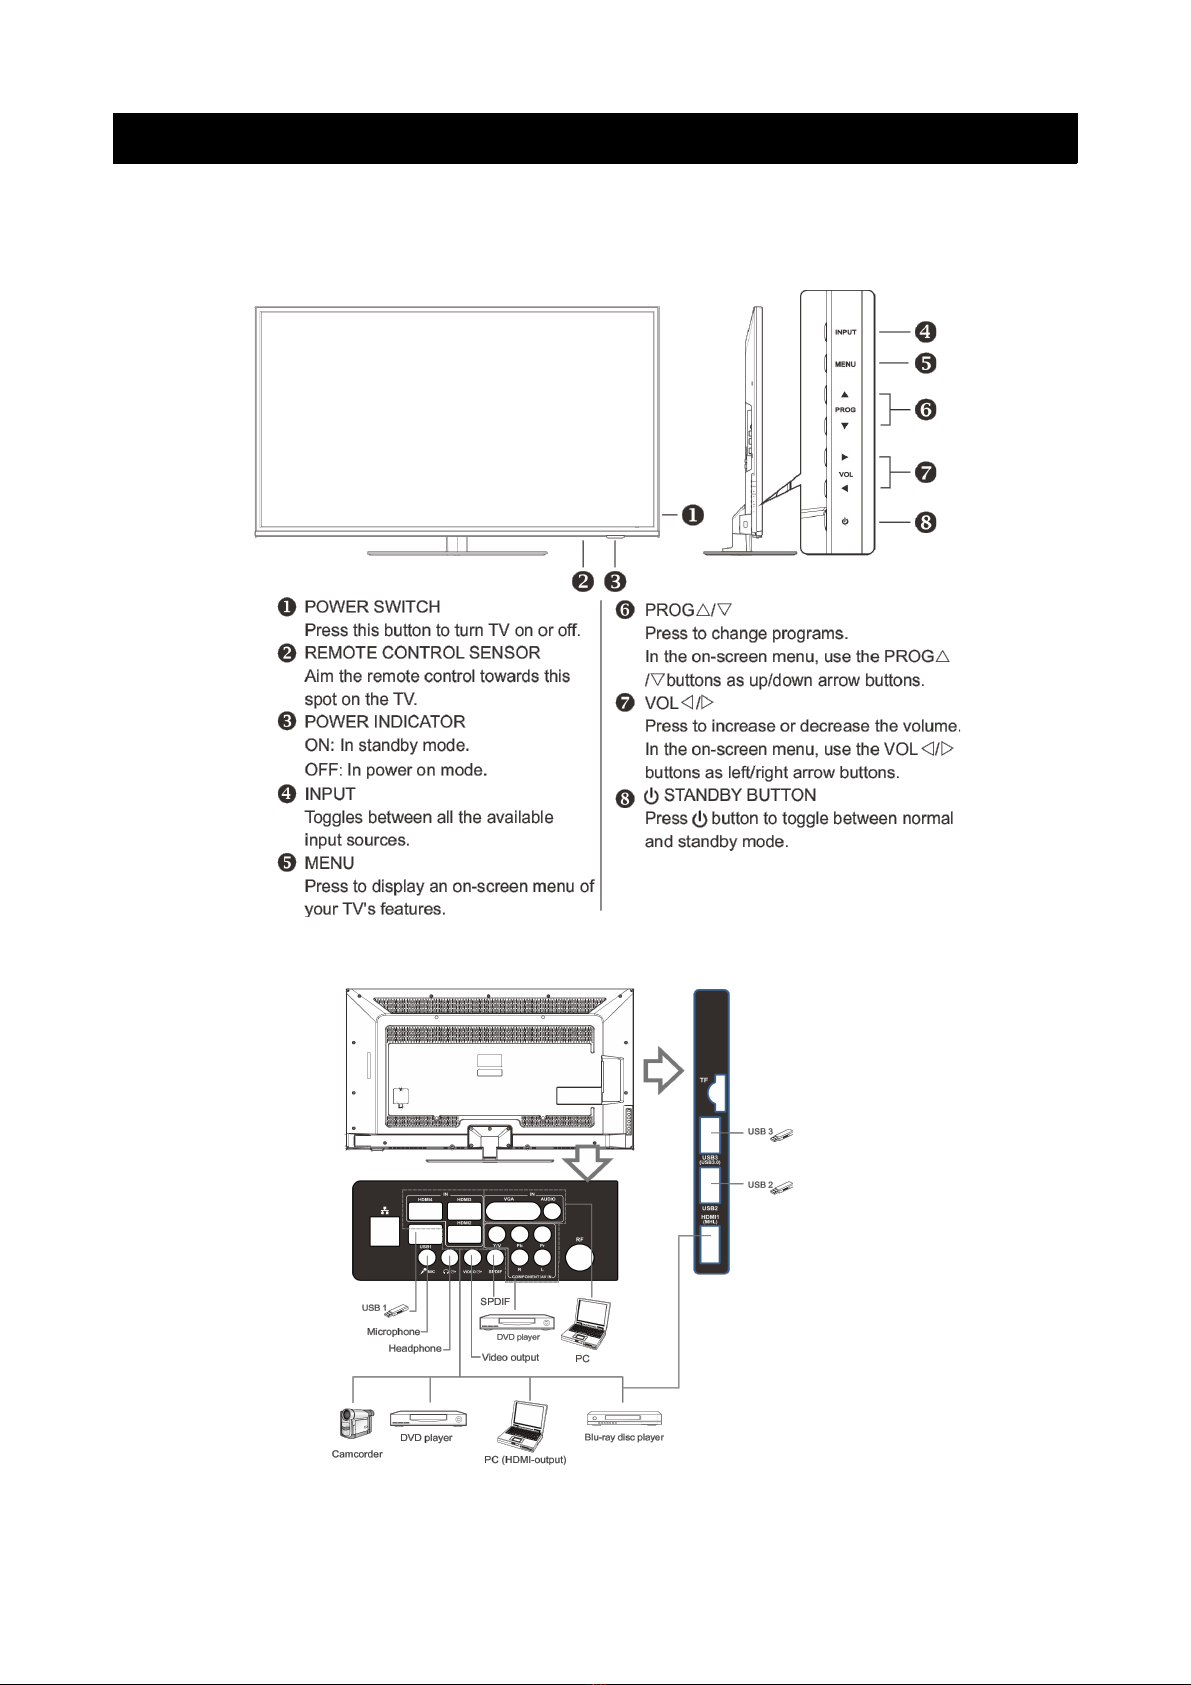
Overview...............................................................................................................................................8
Front Panel......................................................................................................................................8
Rear Panel........................................................................................................................................8
Remote Control.............................................................................................................................9
Installing Batteries in the Remote Control........................................................................12
External Connections......................................................................................................................12
Antenna Connections................................................................................................................12
VCR Connection...........................................................................................................................13
Camcor er Connection.............................................................................................................14
Connecting a DVD Player/Set-Top Box via HDMI.........................................................15
Connecting a Digital Au io System.....................................................................................16
Connecting a PC..........................................................................................................................17
Supporte Signals.......................................................................................................................17
Basic Operation.................................................................................................................................18
Turning the TV on or off...........................................................................................................18
Menu Operation ...............................................................................................................................19
Main interface................................................................................................................................19
Applications..................................................................................................................................20
Virtual Mouse...............................................................................................................................20
Menu System instruction ..............................................................................................................21
TV Menu...........................................................................................................................................21
Soun ................................................................................................................................................21
Image...............................................................................................................................................23
Program..........................................................................................................................................24
Input Source.................................................................................................................................26
Function..........................................................................................................................................27
Time.................................................................................................................................................29
PVR (Personal Vi eo Recor er)................................................................................................29
PVR File System..........................................................................................................................29
PVR Gui e.....................................................................................................................................30
DTV EPG (Electronic Program Gui e)................................................................................31
Digital Me ia Player........................................................................................................................32
Device an File Management.....................................................................................................32
Initialization Interface...............................................................................................................32
USB Support......................................................................................................................................33
Photos.............................................................................................................................................33
1

Music................................................................................................................................................36
Movie...............................................................................................................................................36
PIP.....................................................................................................................................................37
USB Support Character................................................................................................................38
Troubleshooting...............................................................................................................................39
2

Safety Instructions
General Safety Instructions
Risk of electric shock. DO NOT OPEN!
Do not attempt to service the television yourself, as
opening or removing the covers may expose you to
angerous voltage or other hazar s. Refer all servicing to
the Kogan customer support team.
To re uce the risk of fire or electric shock, o not expose this
pro uct to rain or moisture. The television shoul not be
expose to ripping or or splashing, an no liqui fille objects
such as vases shoul be place on the case.
In the event of smoke, strange noises or a strange smell from
the unit, you shoul follow these steps:
•Turn off the unit imme iately.
•Disconnect the power plug from the power outlet.
•Contact the Kogan customer support team. Never
attempt to make repairs yourself.
Never push objects of any kin into the set through the
cabinet slots as they may touch angerous voltage
points or short-circuit parts that coul result in a fire or
electric shock. Never spill any liqui s onto the set. Use
special caution in househol s where chil ren are
present. The television is not suitable for chil ren un er
4 years ol to operate.
Power supply cor s shoul be route safely to prevent
angers ue to amage cor s.
The mains plug is the main isconnect metho , so it shoul
be easily accessible an not be obstructe uring use.
To avoi fires, no nake flame sources such as lit can les or
burning incense shoul be place onto the casing of the
television.
Do not pull the plug out of a power outlet by pulling on the
power cable. Always grasp the plug an pull.
Never touch the plug with wet han s.
3

An outsi e antenna system shoul not be locate in the
vicinity of overhea power lines or other electric light or
power circuits.
When installing an outsi e antenna system, extreme
care shoul be taken to keep from touching such power
lines or circuits, as contact with them may be fatal.
Always turn the set off when it is not being use .
Unplug the television from the power outlet when it will
not be use for a long time or when there is an
electrical storm.
Never touch the antenna cable uring a lightning storm.
Excessive volume from earphones an hea phones can
cause permanent hearing loss. Always monitor the volume of
noise from these evices, especially when chil ren are using
them.
Installation
Ventilation shoul not be impe e or limite by
covering the ventilation slots with items such as
newspapers, tablecloths, curtains etc..
At least 10cm of space shoul be left aroun the
apparatus for sufficient ventilation.
The television shoul be situate away from heat
sources such as ra iators, heaters, stoves or other
pro ucts that pro uct heat.
Place the television in a position where the screen is
not expose to irect sunlight. It is best to have soft
in irect lighting while watching, an you shoul avoi
a completely ark viewing environment an
reflections to avoi eye fatigue.
Keep the pro uct away from high magnetic fiel s
(such as near an amplifier speaker) to avoi affecting
the tint.
Do not place the television on an unstable table, stan
or shelf. The set may fall, causing serious injury as well
as amage to the television itself.
If moving the television on a cart, move the unit with
care as su en stops an starts may cause the
television to overturn.
4

Do not place this television near water, for example
near a bathtub, wash bowl, kitchen sink, laun ry tub,
swimming pool or in a amp basement etc..
When moving the television to a warm location from
a col location, allow some time for any ew or
con ensation insi e the television to evaporate fully
before you turn the unit on.
To prevent injury, the television must be securely
attache to the floor/wall in accor ance to the
supplie installation instructions.
Cleaning
Unplug the television from the power supply before
cleaning. Do not use any liqui cleaners or harsh
chemicals. Use a soft, amp cloth.
5

General Description
•Zero X ra iation complies to green environment protection requirements.
•Connects irectly to PC to create a TV/monitor combo.
•MHL2.0
•An roi 4.2
•USB 3.0 support.
•16:9 wi escreen.
•Auto Tuning an Fine Tuning.
•HDMI input.
•Component compatible (480i; 480P; 576i; 576P; 720P; 1080i; 1080P)
•PC VGA
•Programmable sleep timer.
•Wi e range voltage input.
•No signal automatic power off.
1 x ANTENNA jack 4 x HDMI inputs
1 x computer PC-RGB input 3 x USB inputs
1 x component input 1 x CVBS input
1 x AV input 1 x SPDIF output
1 x hea phone output
Specifications & Accessories
Specifications
Mo el KALED55SMTZA
Display Screen Size 55” Diagonal
Maximum Resolution 1920 x 1080
Power Supply ~110-240V, 50/60Hz
TV Receive System PAL/SECAM: BG, DK, I DVB-T
Vi eo In PAL/NTSC/SECAM
Antenna Input Impe ance 75ohm unbalance
Soun Output 2 x 10W
Remote Power Input DC 3V (Two AAA batteries)
Power Consumption 120W
Stan by Power Consumption < 0.5W
Operating Temperatures 0C ~ 40C
Accessories
Remote Control
6

Assembling the Stand
Before attaching/ etaching the stan , be sure to turn the TV off.
Before performing any work, sprea cushioning out over the base area to lay
the TV on. This will prevent it from being amage .
Assemble the connection bracket, glass stan section an metallic gasket
together as shown below, then fasten with 4 self-tapping screws.
Fasten the assemble stan to the TV set an fix correctly as shown below.
Securing the TV Stand
Caution: Pulling, pushing or climbing on the TV may cause it to fall. Be careful to
ensure that chil ren o not hang on the TV or otherwise estabalise it, as oing
so may cause the TV to fall over, causing injury or even eath.
Wall Mounting Instructions optional)
How to mount the LED TV.
1. After etaching the stan , fasten 4 mounting screws into the 4 screw
holes on the rear cover, as shown below.
2. Fasten the wall mounting (not supplie ) with screws on the wall.
3. Carefully check the strength an integrity of the mount before releasing
the TV.
7

Overview
The buttons on the lower-right panel control your TVs basic features, inclu ing the on-screen
menu. To use the televisions more a vance features, you must use the remote control.
Front Panel
Rear Panel
8

Remote Control
9

10

11
Note:
Before turning off the main power, or turning off the power supply, you must
switch the television into stan by mo e by pressing the POWER button on
the remote control or on the television set itself.
Once the television is in stan by mo e, you may turn off the mains power
supply.

Installing Batteries in the Remote Control
Notes:
•One loa of batteries shoul last for 1 year un er normal use.
•If you o not inten to use the remote control for an exten e perio of
time, remove the batteries to avoi amage ue to leakage.
•Do not mix ol an new batteries together.
•Do not expose batteries to extreme heat such as sunshine, fire etc..
External Connections
Antenna Connections
Antenna input impe ance of this unit is 75ohm. VHF/UHF 75ohm coaxial cables
can be connecte to the antenna jack irectly. If the antenna cable is a 300ohm
parallel flat fee er cable, you nee to use the 300ohm/75ohm converter to
connect the antenna cable to the antenna jack. For etails, please refer to the
following images.
Antennas with 300ohm flat twin lea s Antennas with 75ohm roun lea s
12

VCR Connection
These instructions are assuming you have alrea y connecte your TV to an
antenna or other cable TV system. Skip step 1 if you have not yet connecte an
antenna.
Follow the instructions in Viewing a VCR or Camcor er Tape to view your VCR
tape. Each VCR has a ifferent back panel configuration. When connecting a
VCR, match the colour of the connection terminal to the cable.
1. Unplug the cable or antenna from the back of the TV.
2. Connect the cable or antenna to the ANT IN terminal on the back of the
VCR.
3. Connect an RF cable between the ANT OUT terminal on the VCR an the
ANT IN terminal on the TV.
4. Connect a component cable between the COMPONENT (Y, Pb, Pr) jacks
on the VCR player an the YPbPr jack on the TV.
5. Connect the au io cables between the AUDIO OUT jacks on the VCR an
the AUDIO R an AUDIO L jacks on the TV.
Note:
•Whenever you connect an external evice to your TV, make sure that the
power on the unit is turne off.
•When connecting an external evice, match the colour of the connection
terminals to the cable.
13

Camcorder Connection
The rear panel jacks on your TV makes it easy to connect a camcor er to your
TV. They allow you to view the recor ings without using a VCR player.
Each camcor er has a ifferent back panel configuration, so when connecting a
camcor er, match the colour of the connection terminal to the cable.
1. Connect a vi eo cable between the AV1 VIDEO jacks on the TV an the
VIDEO OUT jack on the camcor er.
2. Connect au io cables between the AUDIO L an AUDIO R jacks on the TV
an the AUDIO OUT jacks on the camcor er.
Note:
•Whenever you connect an external evice to your TV, make sure that the
power on the unit is turne off.
•When connecting an external evice, match the colour of the connection
terminals to the cable.
14

Connecting a DVD Player/Set-Top Box via HDMI
This connection can only be ma e if there is a HDMI output connector on the
external evice.
What is HDMI?
HDMI, or high- efinition multime ia interface, is a next-generation interface that
enables the transmission of igital au io an vi eo signals using a single cable
without compression.
Multime ia interface is a more accurate name for it, as it allows multiple
channels of igital au io (5.1 channels).
The ifference between HDMI an DVI is that the HDMI connection is smaller in
size, has HDCP (High Ban wi th Digital Copy Protection) co ing installe an
supports multi-channel igital au io.
Each DVD Player/Set-Top Box has a ifferent panel configuration.
Connect a HDMI cable between the HDMI1, HDMI2, HDMI3 or HDMI4 connector
on the TV an the HDMI connection on the DVD Player/Set-Top Box.
Note:
•Whenever you connect an external evice to your TV, make sure that the
power on the unit is turne off.
•When connecting an external evice, match the colour of the connection
terminals to the cable.
15

Connecting a Digital Audio System
The rear panel jacks on the TV make it easy to connect a Digital Au io System
to your TV.
5.1 CH au io is possible when the TV is connecte to an external evice
that supports 5.1 CH soun .
Connect a coaxial cable between the SPDIF jacks on the TV an the Digital
Au io Input jacks on the Digital Au io System.
When a igital au io system is connecte to the SPDIF terminal, ecrease the
gain (volume) on the TV, then a just the volume using the Digital Au io
System's volume controls.
16

Connecting a PC
Each PC has a ifferent back panel configuration.
The HDMI jacks o not support a PC connection.
1. Connect a D-Sub Cable between the VGA/PC IN connector on the TV an
the PC output connector on your computer.
2. Connect a PC Au io Cable between the PC AUDIO IN jack on the TV an
the Au io Out jack on the soun car on your computer.
You shoul set PC software before you connect a PC to your TV. (please refer to
“PC DISPLAY” settings)
Note:
•Whenever you connect an external evice to your TV, make sure that the
power on the unit is turne off.
•When connecting an external evice, match the colour of the connection
terminals to the cable.
Supported Signals
Input Mode Input Resolution Vertical Freq.
DTV DVB-T
Component
480i 60Hz
ATV PAL BG I DK 480p 60Hz
SECAM BG DK 576i 50Hz
CVBS PAL/NTSC/SECAM 576p 50Hz
720p 50/60Hz
Input Resolution Vertical Freq. 1080i 50/60Hz
PC/VGA
VGA 640x480 60Hz 1080p 50/60Hz
SVGA 800x600 60Hz
HDMI
480p 60Hz
XGA 1024x768 60Hz 576p 50Hz
SXGA 1280x1024 60Hz 720p 50/60Hz
1360x768 60Hz 1080i 50/60Hz
1080p 50/60Hz
17

Basic Operation
Turning the TV on or off
1. Insert the power cor into a power outlet.
2. If the TV is in stan by mo e, press the POWER
button on the remote control or on the bottom
panel of the TV.
3. Normal pictures will appear on the screen after about 15 secon s. If there
is no signal input, then “NO SIGNAL” will appear on the screen.
4. If temporary POWER off is require , press the POWER button on the
remote control or on the bottom panel of the TV.
5. If you want to completely switch off the power of the TV for an exten e
perio of time, unplug the power cor .
6. After switching the unit off, you shoul wait at least 5 secon s before
turning it on again.
Status Indication Lamp
ON: in stan by mo e
OFF: in power on mo e
Auto Power-off
•If there is no signal, the TV will automatically enter stan by mo e after 10
minutes.
•In VGA mo e, if there is no operation, TV will enter stan by mo e after 15
secon s.
Memory before turning TV off
The picture an soun settings, plus preset channels will be memorise at the
point when the TV is turne off. When the TV is starte up again, it will resume
with these settings.
18

Menu Operation
Main interface
You will enter the main menu irectly after the TV is turne on.
Arrow buttons: Select menu an the selecte menu's backgroun will be orange.
OK button: Enter the options which you've selecte .
INPUT button: You will enter the relevant function options irectly.
Those state icons at the top right function function as the following in turn:
1. A to home screen 2. All caps 3. Change wallpaper
4. Search 5. Setting 6. Mass storage
7. Wire
Note:
1. The first area as the photo shown will isplay the current vi eo images,
an it will isplay snowflake when there is no signal.
2. The secon area shows some small esktop plug-ins, select one an press
the OK button, you will enter the relevant application program.
3. The thir area is the entrance of the shortcut menu, select one an press
the OK button, you will enter the relevant shortcut options.
19
Other Kogan TV manuals

Kogan
Kogan KALED503DZA User manual

Kogan
Kogan KALED32XXXZA User manual

Kogan
Kogan KALCD39FHDXA User manual

Kogan
Kogan KALED55UHDZA User manual

Kogan
Kogan KALED19DVDA User manual

Kogan
Kogan KALED46BLSA User manual

Kogan
Kogan KALED19XXXA User manual

Kogan
Kogan KGNFHDLED22VBA User manual

Kogan
Kogan KALED32BRPA User manual

Kogan
Kogan KALED16XXXYA User manual

Kogan
Kogan Agora KALED553DSMTZA User manual

Kogan
Kogan KALED26DVDA User manual

Kogan
Kogan KALED50XXXZB User manual

Kogan
Kogan KALED55XXXTA User manual

Kogan
Kogan KULED26DVDYA User manual

Kogan
Kogan KGNFHDLEDH40VA User manual

Kogan
Kogan KALED22DVDA User manual

Kogan
Kogan KALED42XXXZA User manual

Kogan
Kogan KALED50XXXTA User manual

Kogan
Kogan KALED32SMTWA User manual