Kolin KWD-BLC-2088B User manual

MODEL: KWD-BLC-2088B
OWNER’S MANUAL
BOTTOM LOAD WATER DISPENSER
• KEEP THIS MANUAL IN GOOD CONDITION
• PLEASE READ THIS MANUAL CAREFULLY BEFORE USING THE PRODUCT
• THE IMAGE IS FOR REFERENCE ONLY, ACTUAL UNIT MAY DIFFER FROM THE IMAGE ABOVE

This appliance is suitable for use by individuals aged 8 years and above, as
well as those with reduced physical, sensory, or mental capabilities. However,
they must receive proper supervision or instruction on safe usage and be
aware of the associated hazards. Children should not be allowed to play with
the appliance, and user maintenance should always be conducted under adult
supervision.
To ensure the product's reliability, please make sure to connect the water dispenser
to a stable power supply using the provided power cord. Avoid using extension
cords or adapters, as they may pose a safety risk.
It is essential to follow the installation instructions provided in this manual.
Ensure the water dispenser is placed on a flat and stable surface, away from
direct sunlight and sources of heat.
Only use clean and potable water with the water dispenser. Regularly clean the
water tank and water faucets as instructed in the maintenance section of this
manual to ensure optimal water quality.
Do not use the hot water function of the dispenser to heat beverages other than
water. Never dispense boiling water directly into cups or containers, as it may
cause scalding or injury.
If you encounter any issues with the water dispenser, such as unusual noises,
leaks, or malfunctions, please contact our Kolin service hotline or authorized
dealers for professional support. Do not attempt to repair or disassemble the
unit yourself, as this may result in further damage or void the warranty.
The illustrations and information provided in this instruction manual serve as
references only. As part of our commitment to continuous improvement, we
may introduce enhancements and innovations to our products. Therefore, any
adjustments made to the product may differ from the illustrations or information
provided in this manual. Please refer to the actual product for the most
up-to-date features and specifications.
•
•
•
•
•
•
•
Thank you for choosing Kolin as your trusted brand for water dispensers. We appreciate
your confidence in our products. Before installing and using the water dispenser, we
kindly request you to carefully read and understand this instruction manual. This will
enable you to effectively utilize and operate the product to its fullest potential. We aim to
provide clear guidance and instructions for your convenience.
To Users
Important Safety Instructions

Safety Precaution
Product Features and Parts
Product Specification
Installation and Usage Methods
Proper Cleaning and Maintenance
Troubleshooting
01
Product Introduction 01
03
04
05
08
11

Safety Notices (Please be sure to abide).
WARNING: Incorrect installation and operation can cause serious personal
injury and property damage.
CAUTION: Please follow the instructions carefully. Pay attention to precau-
tions for installation, use, and maintenance.
PROHIBITION: Certain actions are strictly prohibited.
For your personal safety and the safety of your property, it is essential to follow the
safety guidelines provided in the manual to minimize the risk of property damage
and personal injury. Do not operate the product without reading and understanding
the manual. Failure to do so may result in issues and complications.
The product must be plugged into a grounded two-hole socket with a rated current of
more than 10A and a rated voltage of 230V~60Hz. Ensure the plug is fully inserted to
prevent overheating, poor contact, short circuits, or fire hazards.
If the product will not be used for an extended period (more than three days), disconnect
the power supply and water source, and drain any remaining water from the product.
Clean it before the next use.
To prevent electric shock or short circuits, keep the product, power cord, and plug away
from water or other liquids. Avoid touching the power cord or plug with wet hands or bare
feet.
Keep the product and power cord away from high temperatures, open flames,
moisture, smooth surfaces, or sharp edges to prevent damage, malfunctions, or fire
hazards.
In low ambient temperatures and voltages, the water heating time may be extended,
which is normal.
Clean the product with a soft, damp cloth. Avoid using gasoline or other organic
solutions, as they may cause discoloration or rust on the surface. Do not flush the
product with water.
WARNING
•
•
•
•
•
•
The Kolin Water Dispenser is designed to provide you with convenient access to cold,
hot, and room temperature water whenever you need it. Whether you're enjoying a
refreshing glass of chilled water, brewing a cup of tea or coffee with hot water, or simply
hydrating with room temperature water, this dispenser offers a reliable and efficient
solution.
Product Introduction
Safety Precautions
CAUTION
1

2
•
•
•
•
•
•
Precautions for Use:
When the product displays a water shortage indication, it means that the water
container needs to be refilled. Add water promptly to the container. If the water
container is not refilled, the pump will continue to operate for up to 6 minutes and
then automatically stop. Before replacing the water container, remember to turn off
the hot switch at the back of the product. Once the water has been replaced, you
can turn on the hot switch again.
Do not disassemble or modify the product without authorization. Operating the
product contrary to the manual instructions may result in damage not covered
under warranty.
This product is for indoor use only (e.g., shops, offices, restaurants, hotels, and
residences). Do not place it outdoors.
Do not place the product upside down while it is powered on or contains water.
To ensure optimal functioning and avoid potential damage, it is recommended to
refrain from moving or shaking the water dispenser once the water supply has
been established.
If the product heats up without water or fails to heat, please refrain from attempting
any maintenance or disassembly and instead contact our Kolin Hotline for
assistance.
After heating, the water from the hot water tap is scalding hot. Exercise caution to
prevent burns, especially to children.
In case of water leakage, immediately switch off the power and drain all water from
the product. Contact our Kolin hotline number or your local dealer for assistance by
professional service personnel. Do not attempt repairs yourself.
PROHIBITION
Do not obstruct the water faucet, preventing proper water flow, or cover the area
within 1cm below the faucet.
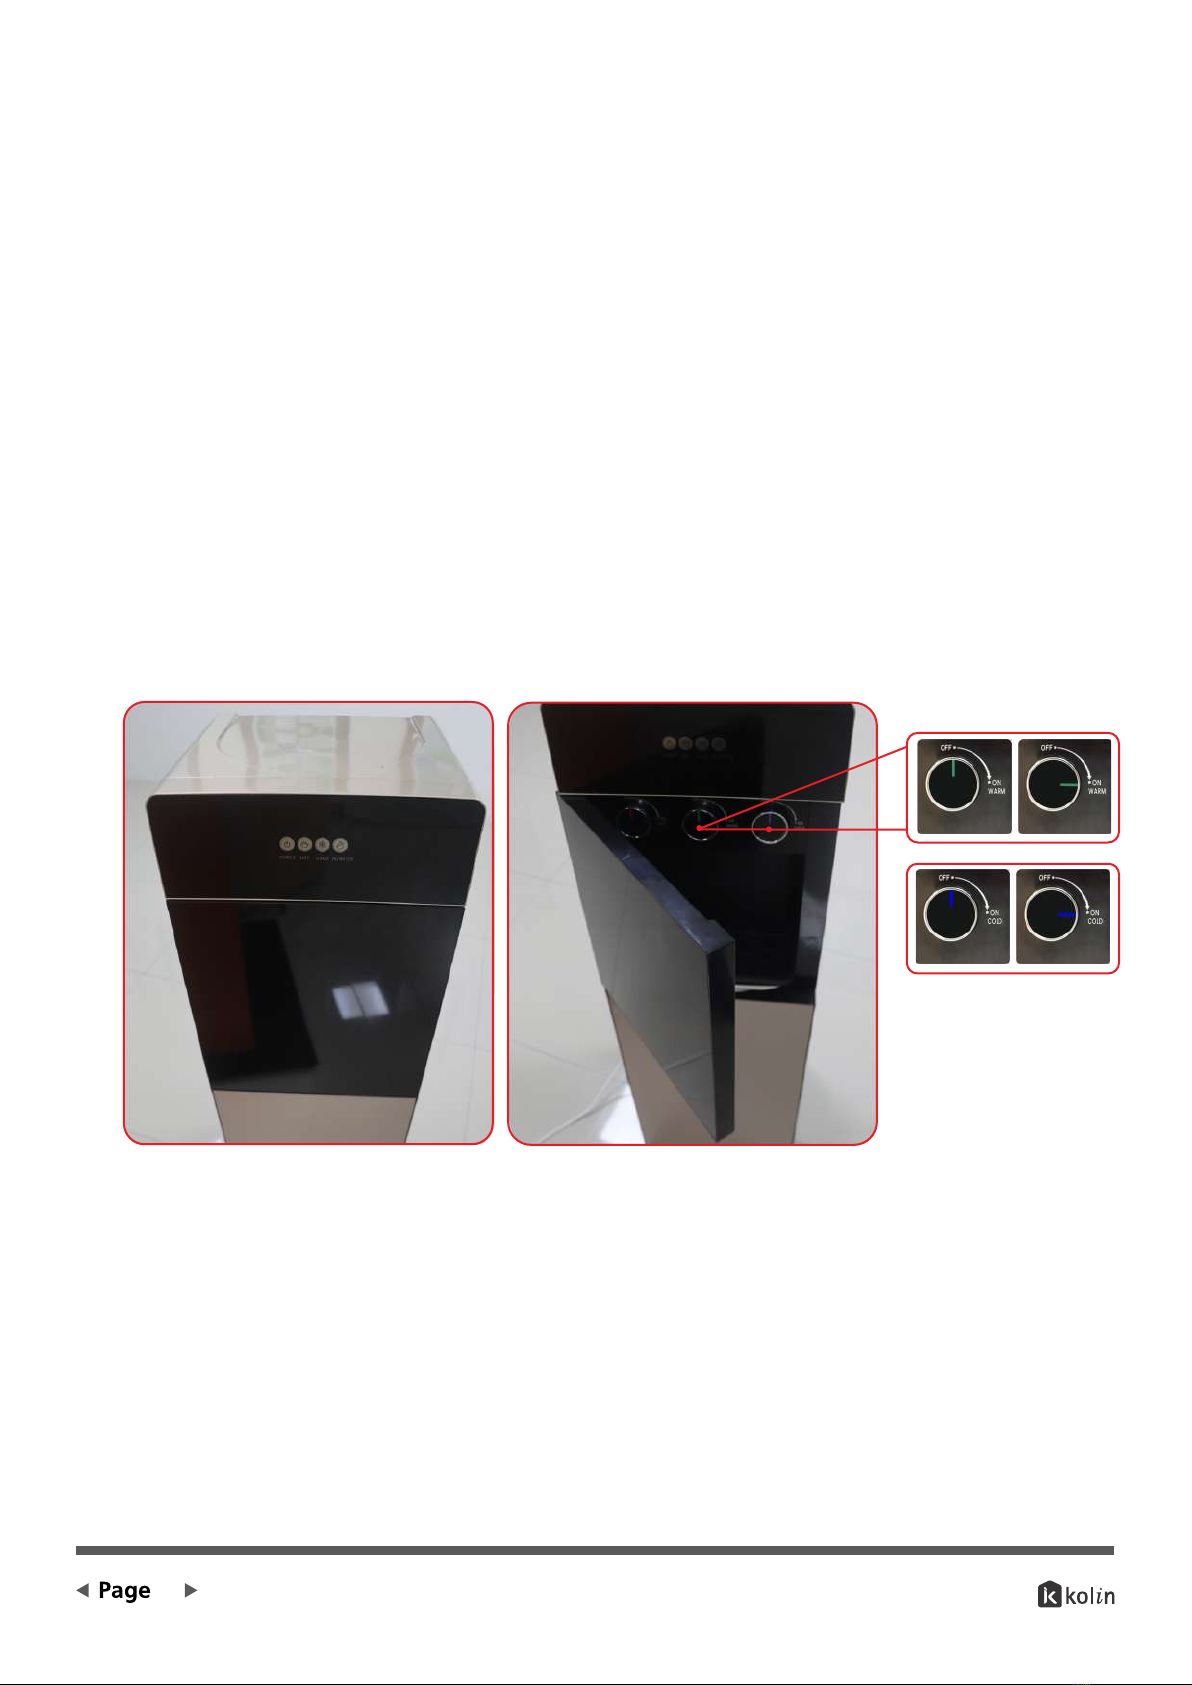
Do not start or stop the product by inserting or pulling out the power plug.
Do not use the product in environments with temperatures below 5°C. If the
ambient temperature is below 5°C, take anti-freezing measures such as heating or
using air conditioning to prevent pipe fittings from cracking due to frozen water,
which can lead to water and electrical leaks.
This product is not intended for use by individuals with physical disabilities, slow
reactions, or mental disorders, unless used safely under the guidance or
assistance of a responsible person. Unattended children and disabled individuals
are prohibited from using the product, and children should not play with it.
Place the product in a cool and dry area, away from direct sunlight. Maintain at
least a 10 cm gap between the product's back and the wall, and avoid placing
foam, cardboard, or other debris underneath to prevent electrical leakage. Do not
use the product outdoors or in areas with water splashing.
•
•
•
•
•
•
•

3
Product Features and Parts
Electrical Schematic Diagram
Heating and cooling-type water dispenser
Prior to usage, carefully examine the power cord and plug for any signs of damage.
If any damage is detected on the power cord, please contact our Kolin Hotline for
professional assistance to ensure safety and avoid potential hazards. It is crucial not
to modify the power plug or extend the power cord in order to prevent fire hazards.
•
Electrical Display Area
Upper Cover
Power Switch
Side Plate
Power Cord
Drain Valve
Plug
Rear Cover Plate
Upper Door
Hot Water Faucet
Warm Water Faucet
Cold Water Faucet
Water Disposal Pan
Container Cover
Lower Door
Bucket Position
Bottom Plate

Packing List
Water dispenser
1
Owner’s Manual
1
Function Heating and Cooling -Type Water
Dispenser
Rated
voltage/ frequency 230V~, 60Hz
Heating Power 550W
Water Heating Capacity 5.0L/ h 85 - 95℃
Cooling Power 80W
Water Cooling Capacity 2.0L/ h 5 - 10℃
Ambient Temperature 10℃- 38℃
Unit Dimension (WxDxH) 320x315x1005 mm
Net Weight 13.6 kg
Electric shock
Resistance Class I
Applicable Water
Quality Purified water
4
All parameters related to the product performance are the results under the standard
test, and will change with the different service conditions during the actual use.
Product Specification

Lorem ipsum
Position the water dispenser in an upright position.
Place the dispenser near a grounded wall outlet on a stable, horizontal surface.
Install it in a location protected from weather elements, especially direct sunlight.
Maintain a sufficient space of 10 - 20 cm behind the water dispenser for proper
ventilation.
•
•
•
•
2. Location:
3. Installation of the Water Round Container:
Fill a water container with purified water.
Place the water container in the lower compartment of the water dispenser.
Ensure that the water extraction pipe is properly inserted into the container.
•
•
•
Usage method:
WARNING
Do NOT use other liquids such as coffee, teas, juices, or beers. This unit is
designed for water dispensing only.
Do NOT use alternative containers. The water containers designed for
this dispenser are 3 and 5 gallons only.
Initial Set – up
•
•
Allow the unit to sit upright for 2 hours. This will reduce the possibility of a
malfunction in the cooling system due to handling during transportation.
After properly installing the water container in the dispenser and ensuring the
secure insertion of the water extraction pipe into the bucket, plug in the unit.
Installation and Usage Methods
Installation:
1. Unpacking of the Water Dispenser:
Remove the straps from the box, but avoid flipping it over or leaning it on its side.
Open the box and remove the upper protective cover of the packaging.
Lift the carton box vertically.
Remove any remaining protective components.
•
•
•
•
5

Dispensing Hot Water
Turn on the power switch (red) on the back of the product. The power lamp will be
on, and the water pump will start pumping water. Wait for 1 to 2 minutes. During
this time, the product will enter the water replenishment state, and the water
shortage indicator will light up. After the water replenishment, the heating function
will be automatically started.
During heating, the heating lamp will be red. When the water temperature
reaches the set temperature (85-95°C), the heating lamp will turn off. If the hot
water temperature goes below the predetermined temperature, the red light will
illuminate, and the heating system will automatically restart.
1. Open the upper door for the faucets (note that the door can be opened from
right to left).
2. Place a bottle, glass, pitcher, or pot beneath the hot water faucet (Red).
3. To dispense hot water, rotate the knob from off to on and adjust the flow
of water to the desired level. The maximum flow is achieved when the knob is
turned to the on position (refer to the picture below).
6
NOTE: Practice basic safety precautions when dispensing hot water, as the
maximum temperature can reach up to 95 °C.
4. Once the container is filled to the desired level, rotate the knob from on to off.
5. After use, close the magnetic door.

4. Once the container is filled to the desired level, rotate the knob from on to off.
5. After use, close the magnetic door.
Dispensing Cold & Normal Temperature
1. Open the upper door for the faucets (note that the door can be opened from
right to left).
2. Place a bottle, glass, pitcher, or pot beneath the cold water faucet (Blue) or
warm water (Green).
3. To dispense cold water, rotate the knob from off to on and adjust the flow of
water to the desired level. The maximum flow is achieved when the knob is
turned to the on position (refer to the picture below).
Turn on the cooling switch (green) located on the back of the water dispenser after
plugging it in. Once the cooling switch is turned on, the cooling system will activate,
and you will see the green LED indicator on the front panel illuminate. (Note that the
heating switch must be switched on in order to activate the cooling system and
pump). The green light will turn off when the water reaches the desired temperature
range of 5 - 10. If the cold water temperature exceeds the predetermined level, the
cooling system will automatically restart, indicated by the green light.
7
Replacing Empty Water Container:
When the water level in the container is low, the water shortage indicator light will
flash, serving as a reminder to replace the water. Before proceeding with the
water replacement process, it is essential to switch off the power at the back of the
dispenser by turning off the hot water switch.

1.
2.
3.
Use a soft cloth and warm, soapy water to clean the surfaces of the cabinet.
Wipe away any dust from the back of the dispenser to enhance efficiency.
To clean the water disposal pan, slide it forward and remove the cover. You can
either place the pan and cover in the dishwasher or wipe them clean with a soft
cloth and warm soapy water
8
Proper Cleaning and Maintenance
WARNING
Before cleaning, turn off the switch at the back of the machine and unplug it to
avoid any electrical hazards.
General Cleaning
This cleaning procedure should take less than 5 minutes to complete.
DO NOT use abrasive materials or chemical cleaners.
Cleaning Water Tanks
Regular cleaning of the water tanks is recommended every 3 months or whenever an
off-taste is detected to ensure optimal performance and water quality. Follow these
steps to clean the water tanks:
Follow these steps to replace the water container:
CAUTION: If the water container is not refilled, the pump will continue to operate
for up to 6 minutes and then automatically stop. Before replacing the water container,
remember to turn off the hot switch at the back of the product. Once the water has
been replaced, you can turn on the hot switch again.
Open the door of the water dispenser and position the filled water container at the
appropriate distance.
Remove the cap and extraction pipe from the empty water container, and securely
tap it onto the cap of the new filled water container to transfer the extraction pipe.
Insert the extraction pipe into the bottle, ensuring a proper and secure connection
for smooth water flow. Carefully place the water container into the water dispenser.
Turn on the hot water switch at the back of the dispenser, ensuring the extraction
hose is securely connected and the pump is functioning.
Close the magnetic door to secure the water container in place.
1.
2.
3.
4.
5.

A. In a clean bucket, mix 3 tablespoons of unscented household bleach or
vinegar with 1 gallon of tap water to create a sanitizing solution. Allow the
solution to sit for 30 minutes.
WARNING: Do not use strong bleach or harmful detergents.
B. Using a soft cloth soaked in the sanitizing solution, thoroughly wipe the water
container cover and the area surrounding the three faucets.
9
1. Removing Existing Water:
A. Turn off the heating and cooling switches on the back of the dispenser.
B. Disconnect the power plug from the wall outlet.
C. Gently rotate the dispenser 90° in either direction and carefully move it away
from the wall.
D. Disconnect the water container from the suction pump.
E. Place a large bucket with a capacity of approximately 2 gallons under the
dispenser's drain plug.
F. Remove the drain cap and rubber to allow hot water to be dispensed into the
bucket, followed by cold water.
CAUTION: Hot water will be dispensed first, so exercise caution.
G. Reassemble the drain rubber and cap securely after draining.
H. Use the cold faucet to drain any remaining water from the reservoir.
2. Sanitizing the Cover of Water Container and Faucets:
3. Sanitizing Storage Tanks:
Fill an empty water container with the prepared sanitizing solution.
Insert the suction pipe into the empty container.
Carefully insert the empty container into the designated space in the water
dispenser.
Close the cabinet door securely.
Plug the unit into a nearby power source.
Turn on the hot water switch located at the back of the dispenser.
Fill the empty storage tanks with the sanitizing solution.
Allow the solution to remain in the tanks for 10 minutes, then turn off the hot
water switch and unplug the power cord from the outlet.
Place a sturdy bucket beneath the dispenser's drain cap and drain the
sanitizing solution from the tanks.
Reinstall the drain cap securely after draining.
Use the cold and warm faucets to dispense any remaining sanitizing
solution into a pitcher for disposal.
A.
B.
C.
D.
E.
F.
G.
H.
I.
J.
K.

Other Maintenance Safety Precautions
NOTE:
•
•
•
•
Before performing any maintenance or service, please ensure that the power
switch is turned off, the power plug is unplugged, and keep a safe distance
from charged objects.
Avoid cleaning the water container with detergents or chemicals that may be
harmful to health.
After wringing dry, use a damp soft cloth to gently wipe off any dust or foreign
matter on the outer surface of the product, taking care to prevent water from
entering the interior.
It is recommended to conduct descaling every three months for optimal
performance.
Please note that these cleaning procedures are important for maintaining the
cleanliness and hygiene of the water dispenser. Regular maintenance and
cleaning will ensure the optimal performance and longevity of the product.Refer
to the manufacturer's guidelines for further instructions andsafety precautions.
10
4. Rinsing Storage Tanks:
Fill a water container with tap water and insert the suction pipe into the
container,ensuring that the extraction pipe securely connected.
Insert the water container securely to the designated space in the dispenser.
Close the cabinet door securely.
Plug the unit into a nearby power source.
Switch on the hot water switch located at the back of the dispenser to power on.
Allow the tap water to fill the empty storage tanks completely.
After 10 minutes, turn off the hot water switch and unplug the power cord
from the outlet.
Prepare a large bucket and place it beneath the drain plug.
Remove the drain stopper to drain any remaining water from the tanks.
Reinstall the drain cap securely after draining.
Activate the cold water faucet to dispense any remaining water from the
storage tanks.
The water dispenser is now ready for use. Simply plug it into a power source
and turn on the hot and cold switches to activate the pump, heating, and
cooling functions.
If a vinegar or chlorine taste is still detected, repeat the process by adding
another 2 gallons of clean water, drain the tanks, and retest the water quality.
Return the unit to its original position, replace the water container, and follow
the installation instructions provided in this manual under Installation and
usage methods.
A.
B.
C.
D.
E.
F.
G.
H.
I.
J.
K.
L.
M.
N.

Troubleshooting
11
During use, you may encounter the following situations, which are considered normal.
Please continue to use the product with confidence:
Problem Possible Cause Possible Solution
Poor cooling performance
Cooling switch turned off or
room temperature outside
specified range
Ensure cooling switch is
turned on and check room
temperature
Inadequate heating Heating switch turned off or
insufficient water in tank
Confirm heating switch is on
and ensure sufficient water
Cold water not cold
Cooling switch not turned on
Excessive cold water usage in
a short time
Turn on the cooling switch
Wait for a moment, and cold
water will be available again.
Hot water not hot
Heating switch not turned on
Excessive hot water usage in
a short time
Turn on heating switch
Wait for a moment, and hot
Water leakage Loose connection or
damaged water pipes
Check connections, tighten
as necessary, or replace
parts. Contact our Kolin
Service Hotline
Power failure Insecure power plug or
tripped circuit breaker
Ensure power plug is inserted
and check circuit breaker
status
No water supply
Extraction pipe not properly
connected
Ensure a secure connection
between the extraction pipe
and the water source.
Pump not working Water container not replaced
within the specified time
1. Promptly replace the water
container.
2. Ensure the extraction pipe
is properly connected.
3.Turn off the hot switch
button, then turn it on again
•
•
•
•
Minor noise may be heard from the heating tank and cooling tank during the
heating and cooling process.
The water shortage lamp indicates a low water level alarm. During this time,
heating and cooling functions will be temporarily disabled.
In the event of heating without water, the anti-heating device will automatically shut
off. To reset the device, please contact our Kolin Service Hotline for assistance.
If you experience any issues during use, please bring the product to an authorized
maintenance center. Before sending it for repair, you can check the list of common
reasons and try to resolve the issue:
If the problem persists or for any other concerns, please reach out to our Kolin Service Hotline for
professional assistance.

48
Company will not be liable for any issues
and problems caused by internet,
wireless router and smart devices. Please
contact the original provider to get further
help.
If you have any concerns, please contact us at the
following:
Customer hotline: (02) 8-852-6868
Text hotline: (0917)-811-8982
Email: customerservice@kolinphil.com.ph
Also, please like and follow us on our following social
media accounts:
Facebook: Kolin Philippines
Instagram: kolinphilippines
Youtube: kolinphilippines
.3,,
48
Page 12
KPII072023

Table of contents
Popular Water Dispenser manuals by other brands

kbice
kbice FDFD10501 User instructions

Hidrotermal
Hidrotermal MRS-4.5 Installation and maintenance manual

Erie water treatment
Erie water treatment IQSoft IQ-CS Installation & operating instructions

Bevi
Bevi Standup v1.0 installation guide

Glacier bay
Glacier bay VWD5446BLS Use and care guide

Midea
Midea YL1635T instruction manual

Aquasana
Aquasana OptimH2O AQ-RO3-R owner's manual

Griesbach
Griesbach Diamond H2O LINQ DLS-30-100 product manual

Hague Quality Water
Hague Quality Water MicroBoss II owner's manual

BWT
BWT Bewamat 50A Setting instructions

Nikken
Nikken PIMAG WATERFALL manual

Greenway Home Products
Greenway Home Products Polar PWD8975W specification