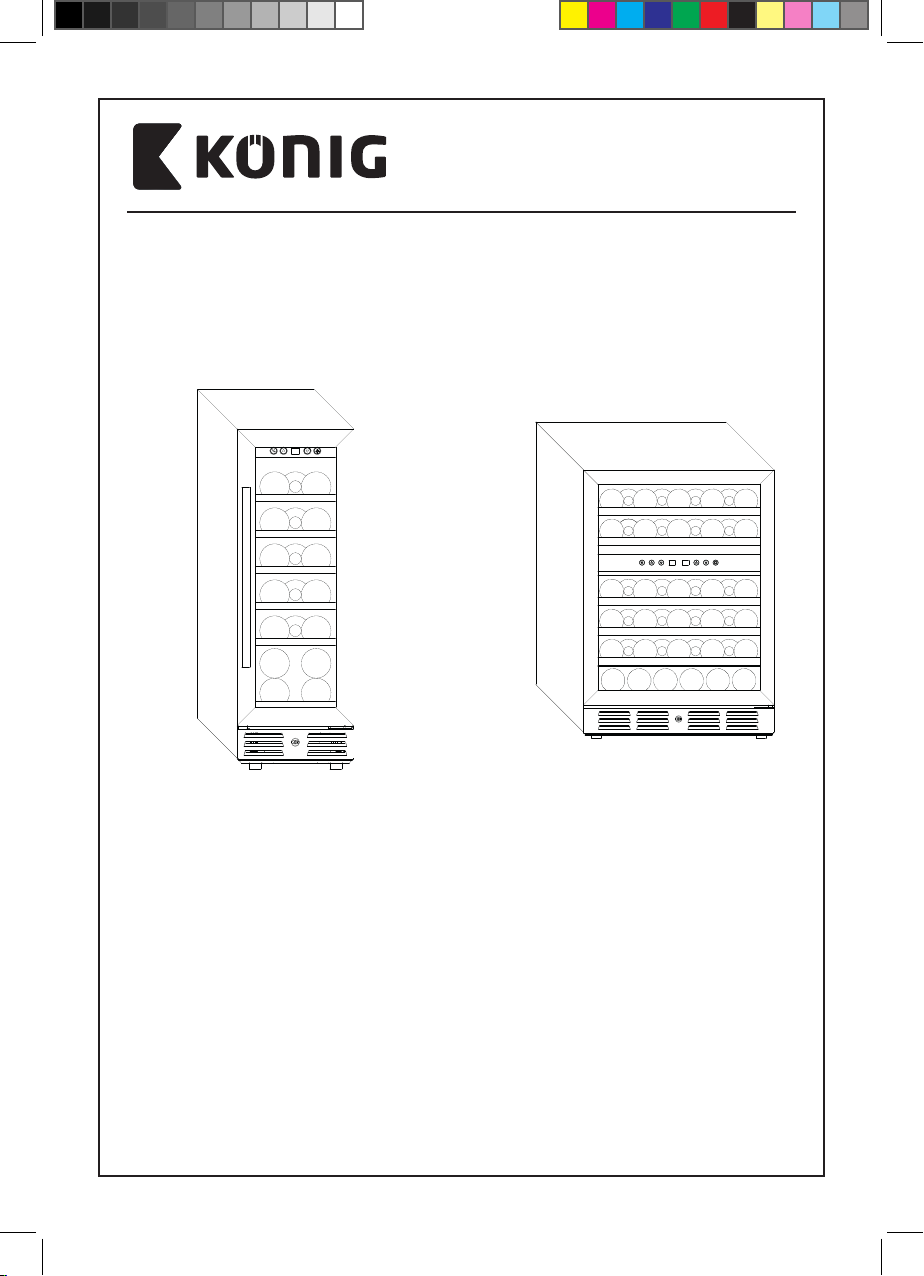
Konig KNWC01BK User manual

KNWC01BK KNWC02BK
KNWC01BK/
KNWC02BK
KNWC01BK_MAN_EN_B08_v02.indd 1KNWC01BK_MAN_EN_B08_v02.indd 1 5-9-2022 13:08:475-9-2022 13:08:47

Content
1. Your Wine Cooler 1
2. Technical Data 4
3. Safety Precautions 6
4. Important Precautions 6
5. Installation Instructions 7
6. Operating Your Wine Cooler 10
7. Care and Maintenance 10
8. Trouble Shootings 11
KNWC01BK_MAN_EN_B08_v02.indd 2KNWC01BK_MAN_EN_B08_v02.indd 2 5-9-2022 13:08:475-9-2022 13:08:47

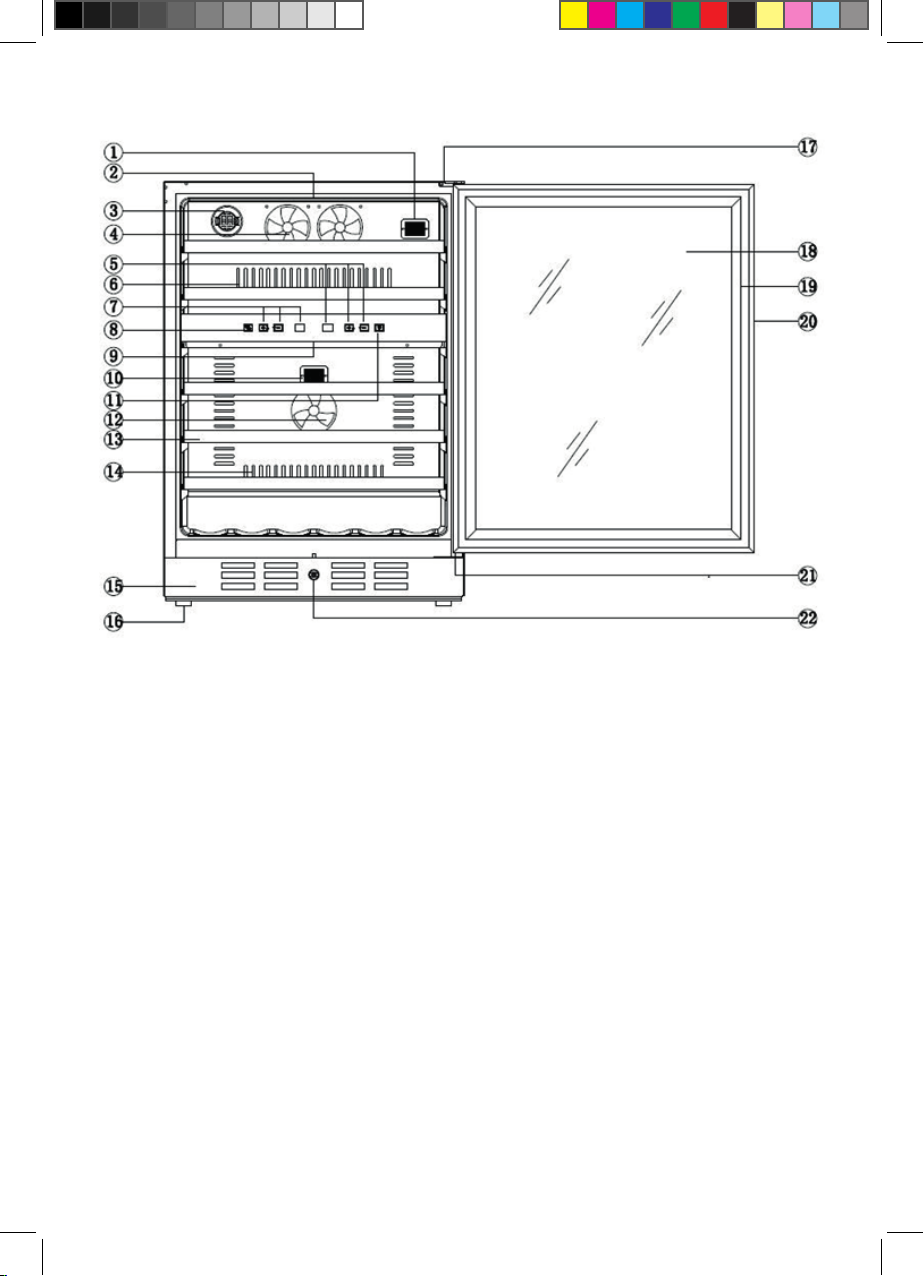
1. Right upper hinge
2. Light switch
3. Temperature setting
4. Temperature display
5. Temperature setting
6. Temperature unit switch
7. Light
8. Fan
9. Carbon lter
10. NTC point
11. Exhaust window
12. Shelf
13. Exhaust window
14. Foot
15. Door seal
16. Glass
17. Handle
18. Lower hinge
19. Lock
KNWC01BK
KNWC01BK_MAN_EN_B08_v02.indd 3KNWC01BK_MAN_EN_B08_v02.indd 3 5-9-2022 13:08:475-9-2022 13:08:47

1. Upper zone NTC point
2. Upper zone light
3. Carbon lter
4. Fan
5. Lower zone temperature
6. Exhaust window
7. Upper zone temperature
8. Temperature unit switch
9. Lower zone light
10. Lower zone NTC point
11. Light switch
12. Lower zone Fan
13. Shelf
14. Exhaust window
15. Exhaust window
16. Foot
17. Upper hinge
18. Glass
19. Door seal
20. Handle
21. Lower hinge
22. Lock
KNWC02BK
KNWC01BK_MAN_EN_B08_v02.indd 4KNWC01BK_MAN_EN_B08_v02.indd 4 5-9-2022 13:08:475-9-2022 13:08:47
KNWC01BK
Features
Electronic temperature controller with LED display
Adjustable thermostat Fan cooling without frost Wooden shelves
Black glass door Temperature range: 5-18°C One Temperature zone Wooden shelf board: 6 Bottling capacity:
19 (750ml) Color: black
Interior blue LED light
Technical specications
Voltage: 220-240VAC 50Hz Rated current: 0.7 A
Max Power: 90 W Led light power: 2 W Net Capacity: 58 L Refrigerant: R600a
Refrigerant Amount: 28 g
Energy Consumption: 107 kwh/year Protection Type: I
Climate Class: SN/N Noise level: ≤ 41db N.W./ G.W.: 29/ 31 kg
Product size: 295W x 820H x 570D mm Package size: 405Wx 945H x 676D mm
KNWC02BK
Features
Electronic temperature controller with LCD display
Adjustable thermostat Fan cooling without frost Wooden shelves
Black glass door
Temperature range: 5-10°C/10-18°C Two Temperature zones
Wooden shelf board: 5 Bottling capacity: 46 (750ml) Color: black
Interior blue LED light
Technical specications
Voltage: 220-240VAC 50Hz Rated current: 0.70 A
Max Power: 90 W Led light power: 4 W Net Capacity: 138 l Refrigerant: R600a
Refrigerant Amount: 28 g
Energy Consumption: 133 kwh/year Protection Type: I
Climate Class: SN/N Noise level: ≤ 41db N.W./ G.W.: 47/ 51 kg
Product size: 595W x 840H x 570D mm Package size: 725W x 972H x 686D mm
KNWC01BK_MAN_EN_B08_v02.indd 5KNWC01BK_MAN_EN_B08_v02.indd 5 5-9-2022 13:08:475-9-2022 13:08:47

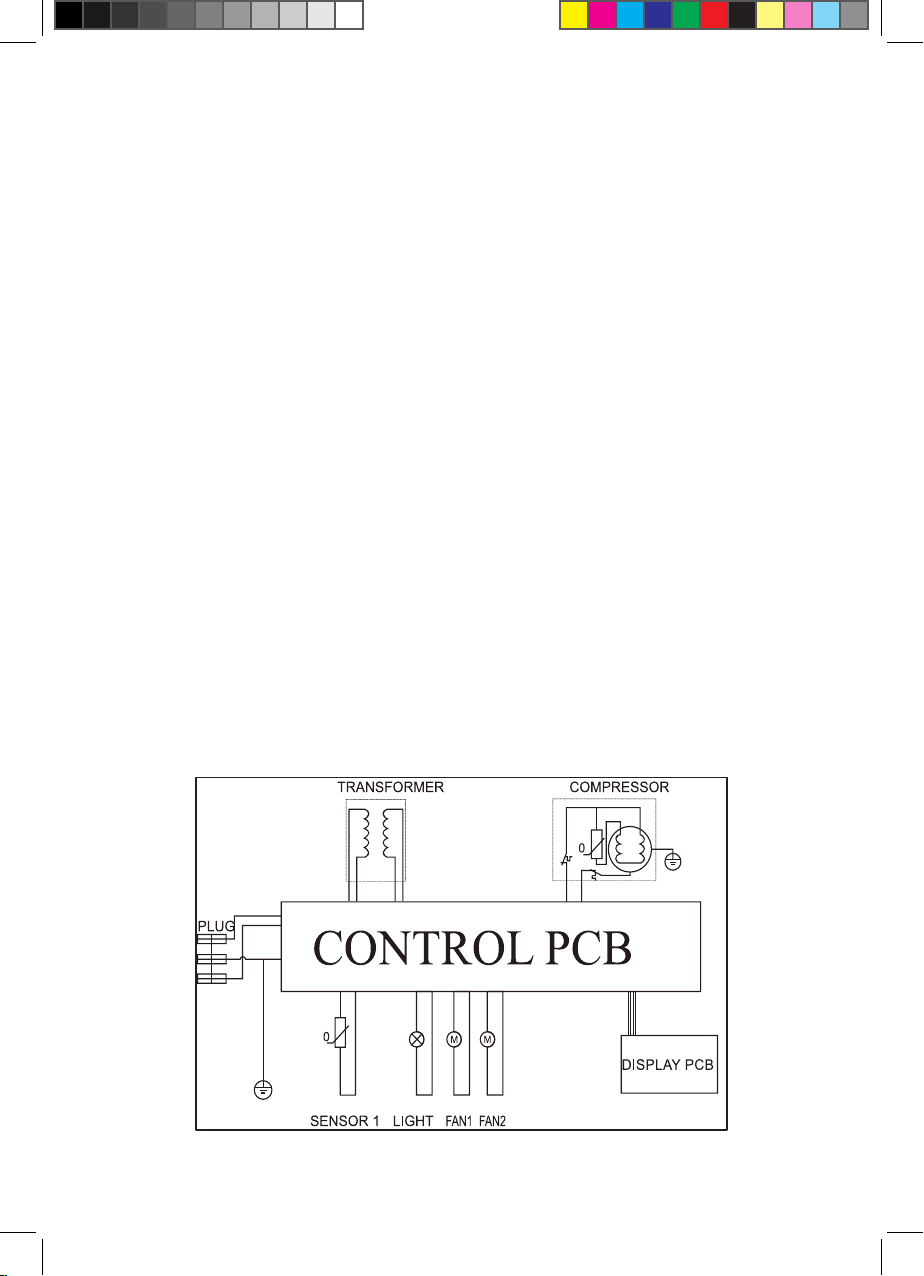
PLUG
CONTROL PCB
TRANSFORMERPTC HEATER COMPRESSOR
SENSOR 1
SENSOR 2 LIGHT
FAN1 FAN2 FAN3 FAN4 FAN5
DISPLAY PCB
Safety Precautions
WARNING To reduce the risk of re, electrical shock, or injury when using your appliance, follows these
basic precautions;
• PLEASE READ all instructions before installing, operating, or servicing the appliance.
• Danger and Warning: Failure to follow this safety statement will result in severe personal injury or death,
property or equipment damage.
• RISK OF CHILD ENTRAPMENT. Before you throw away your old refrigerator or freezer, take o the doors
and leave shelves in place so children may not easily climb inside. Keep children away from the wine
cooler, avoid them put ngers in air outlet on the kick plate.
• SHOCK HAZARD- Electrical Grounding required.
• Never attempt to repair or perform maintenance on the unit until the electricity has been disconnected.
• Never remove the round grounding prong from the plug and never use a two-prong grounding adaptor.
• Altering, cutting of power cord, removal of power cord, removal of power plug, or direct wiring can cause
serious injury, re or loss of property and life, and will void the warranty.
• Never use an extension cord to connect power to the unit.
• Always keep the working area dry.
Important Precautions
• Do not lift unit by door handle.
• Do keep the door closed before installing into cabinet.
• Be sure the kick-plate on the front bottom is free from obstruction. Obstructing free airow can cause the
unit to malfunction and will void the warranty.
• Allow unit temperature to stabilize for 24 hours before use.
• Do not block any internal fans.
• Use only genuine supplier’s replacement parts. Imitation parts can damage the unit, aect its operation or
performance and may void the warranty.
KNWC01BK_MAN_EN_B08_v02.indd 6KNWC01BK_MAN_EN_B08_v02.indd 6 5-9-2022 13:08:495-9-2022 13:08:49

Installation Instructions
Before using your wine cooler:
• Remove the exterior and interior packing
• Before connecting the appliance to the power outlet, let it stand upright for approximately 2 hours.
This will reduce the possibility of malfunction in the cooling system from handling during transportation.
• Clean the interior surface with lukewarm water using a soft cloth.
• Place your appliance on a oor that is strong enough to support the appliance when it is fully loaded.
• To level your appliance, adjust the front legs at the bottom of the appliance.
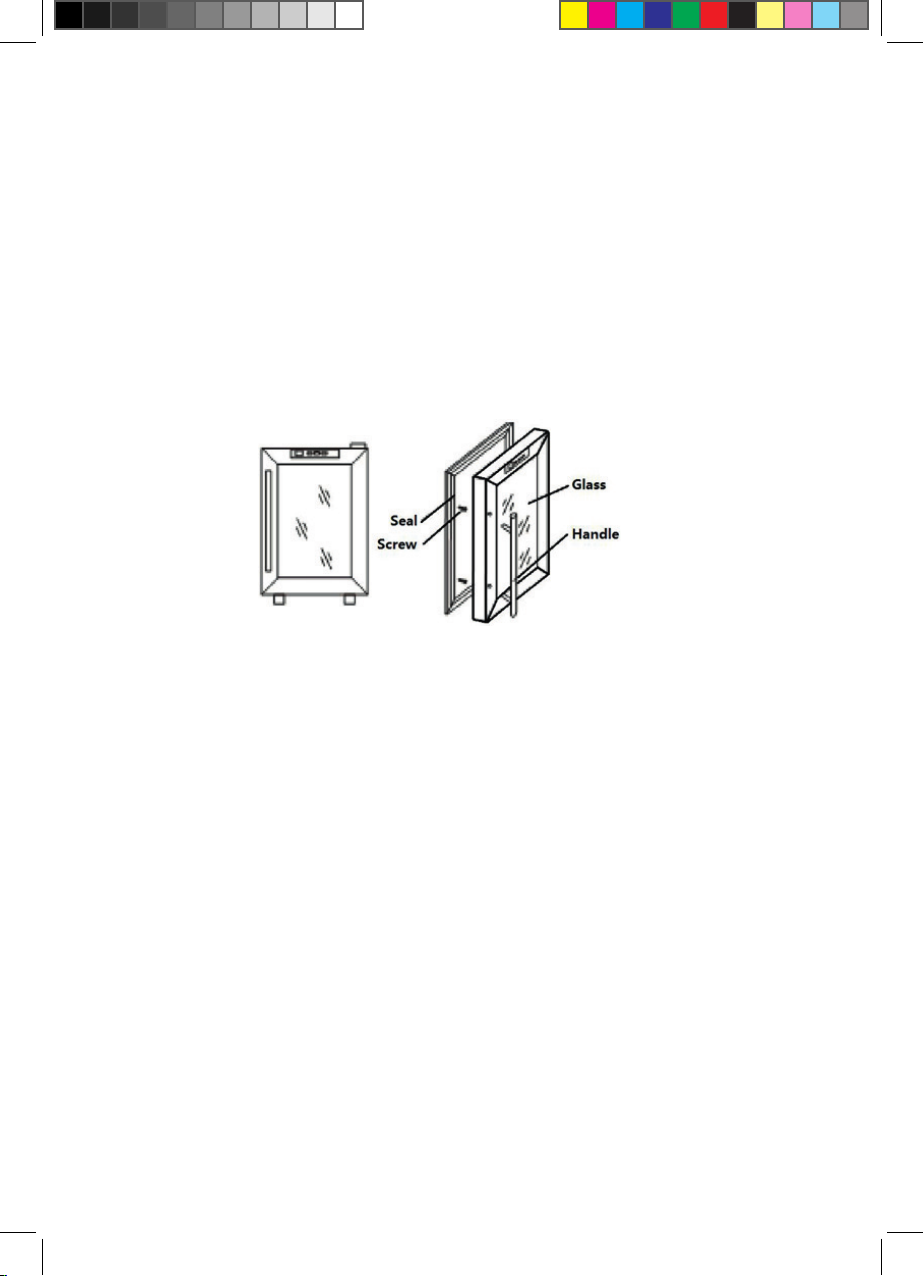
To install the door handle:
For shipment, the door handle has been stored inside of the unit binding to the wood shelves. To install the
handle, the door gasket should be gently pulled back where it covers the screw holes for the handle, then the
handle should be attached by screwing into place with the two screws which are packed in the box with this
Instruction Manual and other spare parts.
To reverse the door swing:
As you received your wine cooler, the door swings open at the left. If you wish to reverse the swing so that
the door opens from the right, it is most important to have at least one other person to help. It is very dan-
gerous to try to reverse the door swing by yourself, without anybody’s help the door might fall and the glass
might be broken, which is terribly dangerous.
For the model KNWC01BK: Now, unscrew the upper door hinge while the second person hold the door.
Remove the upper hinge and carefully lift the door off the bottom hinge. Unscrew the bottom hinge and
install it on the left side of the unit. Flip the door around so that the handle is on the right side and slip the
door over the bottom hinge. Reattach the door by screwing the top hinge into the holes provided on the
upper left surface of the unit. Make adjustments as necessary to be sure the door is aligned properly.
For the model KNWC02BK:Put the door off the upper hinge. Unscrew the upper hinge and install it on the
left side of the unit. Flip the door around so that the handle is on the right side and slip the door over the
upper hinge. Reattach the door by screwing the lower hinge into the holes provided on the lower left
surface of the unit. Make adjustments as necessary to be sure the door is aligned properly.
KNWC01BK_MAN_EN_B08_v02.indd 7KNWC01BK_MAN_EN_B08_v02.indd 7 5-9-2022 13:08:495-9-2022 13:08:49

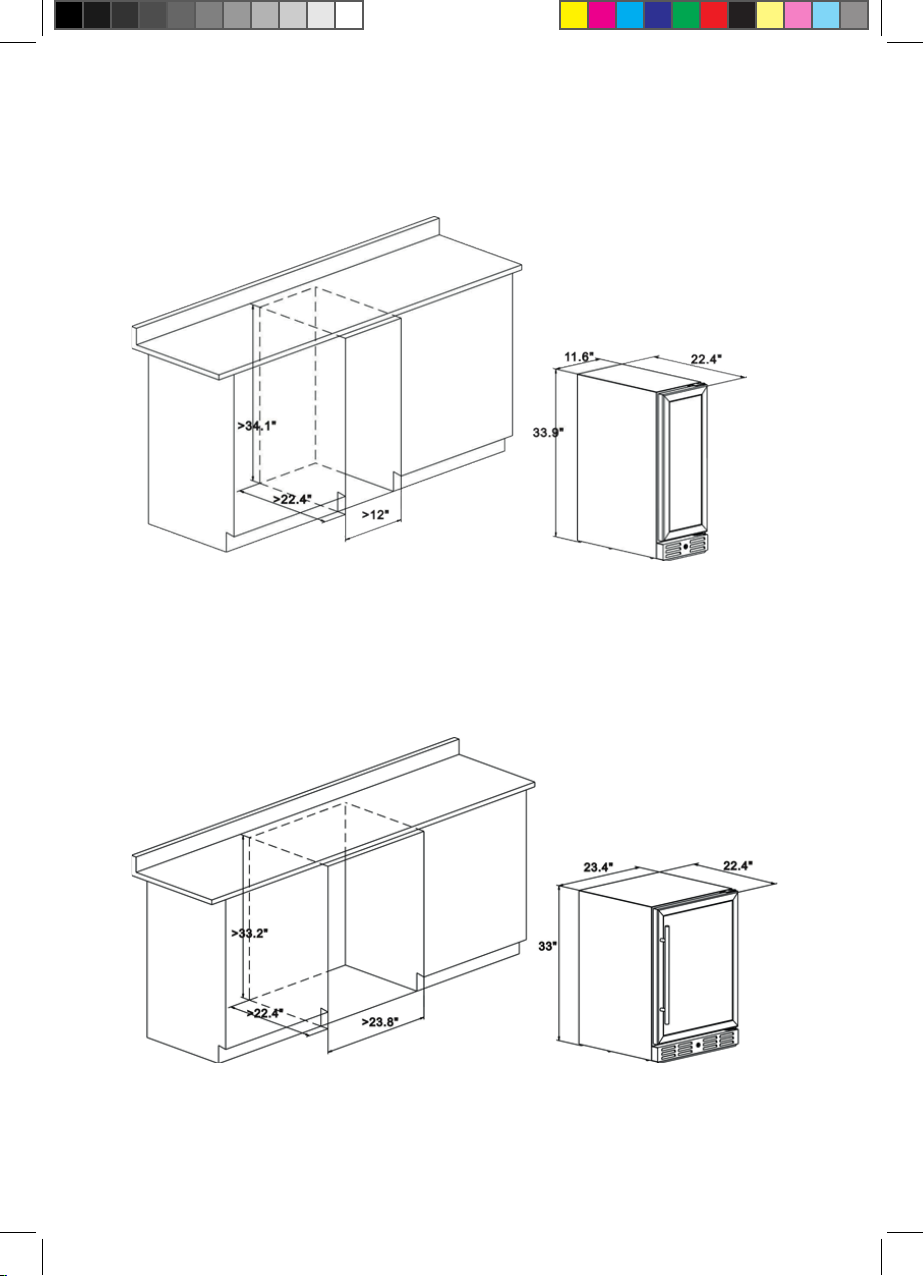
Suggest cabinet dimension:
KNWC01BK
KNWC02BK
KNWC01BK_MAN_EN_B08_v02.indd 8KNWC01BK_MAN_EN_B08_v02.indd 8 5-9-2022 13:08:495-9-2022 13:08:49

Spare parts details:
Operating Your Wine Cooler Control panel:
KNWC01BK
How to use the press-buttons on the Display Panel:
• To control the temperature, press UP or DOWN button. Each press would adjust the temperature by 1°C
between 5~18°C or 1°F between 40~66°F.
• To turn on or o the internal LED lighting, press LIGHT button on the right side.
• To switch the temperature display from Celsius Degree to be Fahrenheit Degree or vice versa, press C/F
button.
KNWC02BK
Spare parts Picture Use
Upper hinge To switch the door open from
right.
Bottom hinge To switch the door open from
right
Screw x 2 For the handle installation.
Gasket x 2 For the handle installation.
Key x 2 To lock the door.
Big rubber plug x 1 To cover the lock hole on the
top of door.
Round rubber plug
VWC7NBK01G and
VWC9NBK01G 2 pcs,
VWC15NBK01G 3 pcs)
To cover the holes on the left
front corner of the body.
• To control the upper zone temperature, press UP or DOWN button on the left side. Each press would adjust
the temperature by 1°C between 5~10°C or 1°F between 40~50°F.
• To control the lower zone temperature, press UP or DOWN button on the right side. Each press would
adjust the temperature by 1°C between 10~18°C or 1°F between 50~66°F.
• To turn on or o the internal LED lighting, press LIGHT button on the right side.
• To switch the temperature display from Celsius Degree to be Fahrenheit Degree or vice versa, press C/F
button.
KNWC01BK_MAN_EN_B08_v02.indd 9KNWC01BK_MAN_EN_B08_v02.indd 9 5-9-2022 13:08:545-9-2022 13:08:54

Care And Maintenance
Cleaning your wine cooler
• Unplug the wine cooler and remove the bottles.
• Wash the inside with warm water or baking soda solution. The solution should be about 2 tablespoons of
baking soda to a quart of water.
• The outside of wine cooler should be cleaned with mild detergent or warm water.
Moving your wine cooler
• Remove all the bottles.
• Securely tape down all loose items inside your wine cooler.
• Turn the leveling legs up to the base to avoid damage.
• Tape the door.
• Be sure the wine cooler stays in the upright position during transportation.
Trouble Shootings
You can solve many common wine cooler problems easily, saving you the cost of a possible service call. Try
the suggestion below to see if you can solve the problem before calling the service center.
PROBLEM POSSIBLE CAUSE
Wine cooler do not operate. Not plugged in using dierent voltage. The circuit
breaker tripped or a blown fuse.
Wine cooler is not cold enough. Check the temperature control setting. The door is
open too often. The door is not closed completely.
The door seal does not seal properly. The wine
cooler does not have the correct clearance.
The light does not work. Main control board does not work. PCB Problem.
There is some problem with the plug.
Vibrations. Check to assure that the wine cooler is leveled.
The wine cooler seems to make to much noise The wine cooler is not leveled. Check the fan.
The door will not close properly. The wine cooler is not leveled.
The doors were reversed and not properly installed.
The seal is weak.
The shaves out of position.
LED could not display. Main control board does not work. PCB Problem.
There is some problem with the plug.
LED display error. Weak quality of display. Temperature point is out o.
Buttons are not functional. Temperature controller panel is damaged.
KNWC01BK_MAN_EN_B08_v02.indd 10KNWC01BK_MAN_EN_B08_v02.indd 10 5-9-2022 13:08:545-9-2022 13:08:54

WARNING: This appliance can be used by children aged from 8 years and above and persons
with reduced physical, sensory or mental capabilities or lack of experience and knowledge if
they have been given supervision or instruction concerning use of the appliance
in a safe way and understand the hazards involved. Children shall not play with the appliance.
Cleaning and user maintenance shall not be made by children without supervision.
Correct disposal of this product
(Waste Electrical & Electronic Equipment, WEEE)
Your product is designed and manufactured with high quality materials and components which can
be recycled and reused. This symbol means that electrical and electronic equipment, at their end
of-life should be disposed of separately from your household waste.
Please dispose of this equipment at your local community waste collection/recycling center.
Service and support KNWC01BK Service and support KNWC02BK
Made in China. Imported into the EU by; NEDIS BV,
De Tweeling 28, 5215MC ’s-Hertogenbosch the Netherlands
König is a trademark licensed to NEDIS BV>
2022, NEDIS B.V
KNWC01BK_MAN_EN_B08_v02.indd 11KNWC01BK_MAN_EN_B08_v02.indd 11 5-9-2022 13:08:545-9-2022 13:08:54
KNWC01BK KNWC02BK
KNWC01BK/
KNWC02BK
KNWC01BK_MAN_EN_B08_v02.indd 12KNWC01BK_MAN_EN_B08_v02.indd 12 5-9-2022 13:08:545-9-2022 13:08:54

Innhold
1. Vinkjøleren din 1
2. Teknisk informasjon 4
3. Sikkerhetsforholdsregler 6
4. Viktige forholdsregler 6
5. Monteringsinstrukser 7
6. Bruk av vinkjøleren 10
7. Pleie og vedlikehold 10
8. Feilsøking 11
KNWC01BK_MAN_EN_B08_v02.indd 13KNWC01BK_MAN_EN_B08_v02.indd 13 5-9-2022 13:08:545-9-2022 13:08:54

1. Øvre høyre hengsel
2. Lysbryter
3. Temperaturinnstilling
4. Temperaturvisning
5. Temperaturinnstilling
6. Temperaturbryter
7. Lys
8. Vifte
9. Kulllter
10. NTC-temperatursensor-
punkt
11. Ventilasjonsgitter
12. Hylle
13. Ventilasjonsgitter
14. Støtteben
15. Dørtetningslist
16. Glass
17. Håndtak
18. Nedre hengsel
19. Lås
KNWC01BK
KNWC01BK_MAN_EN_B08_v02.indd 14KNWC01BK_MAN_EN_B08_v02.indd 14 5-9-2022 13:08:555-9-2022 13:08:55
1. NTC-temperatursensor-
punkt øvre sone
2. Lys øvre sone
3. Kulllter
4. Vifte
5. Temperatur nedre sone
6. Ventilasjonsgitter
7. Temperatur øvre sone
8. Temperaturbryter
9. Lys nedre sone
10. NTC-temperatursensor-
punkt nedre sone
11. Lysbryter
12. Vifte nedre sone
13. Hylle
14. Ventilasjonsgitter
15. Ventilasjonsgitter
16. Støtteben
17. Øvre hengsel
18. Glass
19. Dørtetningslist
20. Håndtak
21. Nedre hengsel
22. Lås
KNWC02BK
KNWC01BK_MAN_EN_B08_v02.indd 15KNWC01BK_MAN_EN_B08_v02.indd 15 5-9-2022 13:08:555-9-2022 13:08:55

KNWC01BK
Funksjoner
Elektronisk temperaturkontroll med LED-visning
Justerbar termostat Rimfri viftekjøling Trehyller
Svart glassdør Temperaturintervall: 5-18°C Én temperatursone Trehylle: Plass til 6 asker: 19 (750 ml) Farger:
svart
Indre blått LED-lys
Tekniske spesikasjoner
Spenning: 220-240 VAC 50 Hz Merkestrøm: 0,7 A
Maks eekt: 90 W LED-lyseekt: 2 W Netto kapasitet: 58 l Kjølevæske: R600a
Kjølevæskemengde: 28 g
Energiforbruk: 107 kwt/år Beskyttelsestype: I
Klimaklasse: SN/N Støynivå: ≤ 41 db N.W./ G.W.: 29/31 kg
Produktstørrelse: 295 B x 820 H x 570 D mm Pakningsstørrelse: 405 B x 945 H x 676 D mm
KNWC02BK
Funksjoner
Elektronisk temperaturkontroll med LCD-visning
Justerbar termostat Rimfri viftekjøling Trehyller
Svart glassdør
Temperaturintervall: 5-10°C/10-18°C To temperatursoner
Trehylle: Plass til 5 asker: 46 (750 ml) Farger: svart
Indre blått LED-lys
Tekniske spesikasjoner
Spenning: 220-240 VAC 50 Hz Merkestrøm: 0,70 A
Maks eekt: 90 W Led-lyseekt: 4 W Netto kapasitet: 138 l Kjølevæske: R600a
Kjølevæskemengde: 28 g
Energiforbruk: 133 kwt/år Beskyttelsestype: I
Klimaklasse: SN/N Støynivå: ≤ 41 db N.W./ G.W.: 47/ 51 kg
Produktstørrelse: 595 B x 840 H x 570 D mm Pakningsstørrelse: 725 B x 972 H x 686 D mm
KNWC01BK_MAN_EN_B08_v02.indd 16KNWC01BK_MAN_EN_B08_v02.indd 16 5-9-2022 13:08:555-9-2022 13:08:55

PLUG
CONTROL PCB
TRANSFORMERPTC HEATER COMPRESSOR
SENSOR 1
SENSOR 2 LIGHT
FAN1 FAN2 FAN3 FAN4 FAN5
DISPLAY PCB
Sikkerhetsforholdsregler
ADVARSEL
For å redusere risikoen for brann, støt eller skader ved bruk av kjøleren er det viktig å følge disse grunn-
leggende forholdsreglene.
• VENNLIGST LES alle instrukser før du monterer, bruker eller utfører service på kjøleren.
• Advarsel om fare: Hvis ikke disses sikkerhetsreglene følges, kan det føre til alvorlig personskade eller død,
skade på eiendom eller kjøleren.
• RISIKO FOR INNELUKKING AV BARN. Før du kaster et gammelt kjøleskap eller fryser, skal du ta av dørene
og la hyllene sitte i, slik at det ikke er lett for barn å komme seg inn. Hold barn unna vinkjøleren og unngå
at de stikker ngrene i luftuttaket på sparkeplaten.
• STØTFARE- Jording er påkrevd.
• Du må aldri prøve å reparere eller utføre vedlikehold på kjøleren før strømmen er frakoblet.
• Fjern aldri den runde jordingspinnen fra stikkontakten og bruk aldri en jordingsadapter med to pinner.
• Endring eller kutting av en strømledning, erning av en strømledning, erning av en stikkontakt eller
direkte kabling kan forårsake alvorlige skader, brann eller tap av eiendom og død. Det vil føre til at garan
tien blir ugyldig.
• Bruk aldri en forlengelseskabel for å tilføre strøm til kjøleren.
• Hold alltid arbeidsområdet tørt.
Viktige forholdsregler
• Ikke løft døren i håndtaket.
• Hold døren lukket før kjøleren monteres i skap.
• Påse at sparkeplaten nederst foran på døren ikke er tildekket og tilgjengelig. Hvis luftstrømmen hindres,
kan det føre til at kjøleren ikke fungerer, og det vil føre til at garantien blir ugyldig.
• La kjølerens temperatur stabilisere seg i 24 timer før bruk.
• Interne vifter må ikke blokkeres.
• Bruk kun originale reservedeler fra produsenten. Andre deler kan skade kjøleren, påvirke funksjonen og
ytelsen og kan føre til at garantien blir ugyldig.
KNWC01BK_MAN_EN_B08_v02.indd 17KNWC01BK_MAN_EN_B08_v02.indd 17 5-9-2022 13:08:555-9-2022 13:08:55
Monteringsinstrukser
Før du bruker vinkjøleren:
• Fjern den ytre og indre emballasjen
• Før kjøleren tilkobles strømmen, skal du la den stå oppreist i rundt 2 timer. Dette vil redusere muligheten
for feilfunksjon i kjølesystemet på grunn av håndtering under transport.
• Rengjør overatene inni kjøleren med lunkent vann og en myk klut.
• Sett kjøleren på et gulv som er sterkt nok til å holde den når den er full.
• For å sette kjøleren i vater justerer du den ved å skru på bena.
• Slik monterer du dørhåndtaket:
Under forsendelsen er dørhåndtaket oppbevart inni kjøleren, festet til trehyllene. For å montere håndtaket
skal tetningslisten trekkes forsiktig bakover der den dekker skruehullene til håndtaket. Så festes håndtaket
ved å skru det på plass med de to skruene som medfølger i esken med bruksanvisningen og andre reserve-
deler.
Slik omhengsler du døren:
Når du mottar vinkjøleren, har døren hengslene på høyre side og åpnes mot venstre. Hvis du vil omhengsle
døren, slik at hengslene sitter på venstre side, er det viktig at du har minst én annen person til å hjelpe deg.
Det er meget farlig å prøve å omhengsle døren selv, uten hjelp kan døren falle og glasset knuse, noe som er
svært farlig.
For modellene KNWC01BK: Skru av det øvre dørhengselet mens en annen person holder døren.
Fjern det øvre hengselet og løft forsiktig døren av det nedre hengselet. Skru av det nedre hengselet og
monter det på venstre side av kjøleren. Snu døren, slik at håndtaket nå er på høyre side og sett døren over
det nedre hengselet. Fest døren på nytt ved å skru det øvre hengselet fast i hullene øverst til venstre på
kjøleren. Foreta nødvendige justeringer for å sikre at døren sitter som den skal.
For modellen KNWC02BK:løft døren av det øvre hengselet. Skru av det øvre hengselet og monter
det på venstre side av kjøleren. Snu døren, slik at håndtaket nå er på høyre side og sett døren over det øvre
hengselet. Fest døren på nytt ved å skru det nedre hengselet fast i hullene nederst til venstre på kjøleren.
Foreta nødvendige justeringer for å sikre at døren sitter som den skal.
KNWC01BK_MAN_EN_B08_v02.indd 18KNWC01BK_MAN_EN_B08_v02.indd 18 5-9-2022 13:08:555-9-2022 13:08:55
Foreslåtte skapmål:
KNWC01BK
KNWC02BK
KNWC01BK_MAN_EN_B08_v02.indd 19KNWC01BK_MAN_EN_B08_v02.indd 19 5-9-2022 13:08:555-9-2022 13:08:55

Reservedelinformasjon:
Slik bruker du kontrollpanelet på vinkjøleren:
KNWC01BK
Slik bruker du trykknappene på skjermpanelet:
• Trykk på UP- eller DOWN-knappen for å kontrollere temperaturen. Hvert trykk justerer temperaturen med
1°C mellom 5~18°C eller 1°F mellom 40~66°F.
• Trykk på LIGHT-knappen på høyre side for å skru av og på LED-lyset inne i kjøleren.
• Trykk på C/F-knappen for å endre temperaturvisning fra Celsius til Fahrenheit og omvendt.
KNWC02BK
Reservedeler Bilde Bruk
Øvre hengsel For å omhengsle døren så den
åpnes mot høyre.
Nedre hengsel For å omhengsle døren så den
åpnes mot høyre.
Skrue x 2 For montering av håndtaket.
Underlagsskive x 2 For montering av håndtaket.
Nøkkel x 2 For å låse døren.
Stor gummiplugg x 1 For å dekke låsehullet øverst
på døren.
Rund gummiplugg
VWC7NBK01G og
VWC9NBK01G 2 stk.,
VWC15NBK01G 3 stk.)
For å dekke hullene foran til
venstre på kjøleren.
• Trykk på UP- eller DOWN-knappen på venstre side for å kontrollere temperaturen i den øvre sonen.
Hvert trykk justerer temperaturen med 1°C mellom 5~10°C eller 1°F mellom 40~50°F.
• Trykk på UP- eller DOWN-knappen for å kontrollere temperaturen i den nedre sonen.
Hvert trykk justerer temperaturen med 1°C mellom 10~18°C eller 1°F mellom 50~66°F.
• Trykk på LIGHT-knappen på høyre side for å skru av og på LED-lyset inne i kjøleren.
• Trykk på C/F-knappen for å endre temperaturvisning fra Celsius til Fahrenheit og omvendt.
KNWC01BK_MAN_EN_B08_v02.indd 20KNWC01BK_MAN_EN_B08_v02.indd 20 5-9-2022 13:08:555-9-2022 13:08:55
This manual suits for next models
1
Table of contents
Languages:


