KonzeSys KZ-VC6000 User manual

1
KZ-VC6000
ONLINE MULTIMEDIA INTERACTIVE RECORDING SYSTEM
USER MANUAL
KONZE SYSTEM TECHNOLOGY CO., LTD.
4F., No.134, Ln. 235, Baoqiao Rd., Xindian Dist., New Taipei City 231, Taiwan (R.O.C.)
Tel : +886-2-89121234 Fax: +886-2-89121099

2
Table of Contents
INTRODUCTION .................................................................................................................... 4
Features....................................................................................................................................................... 4
Package Contents........................................................................................................................................ 7
INSTALLATION ..................................................................................................................... 8
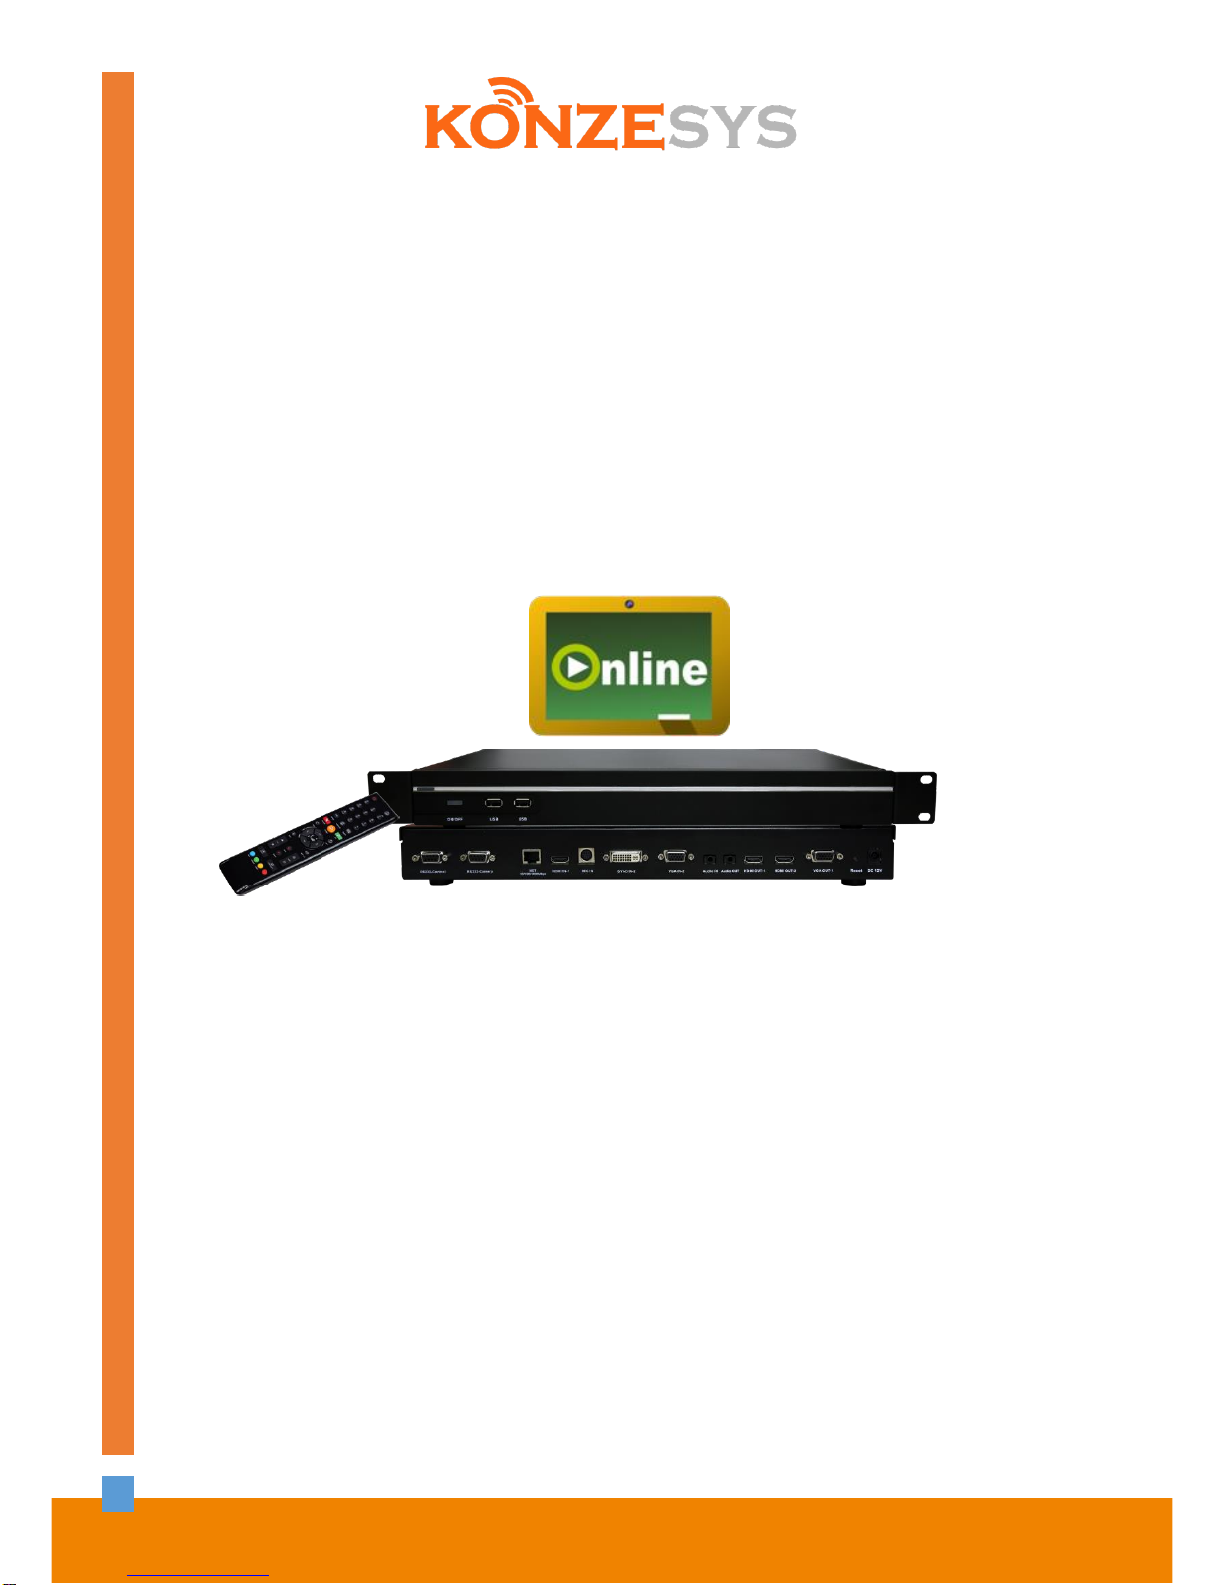
Getting Familiar with KZ-VC6000 ................................................................................................................. 8
Main System............................................................................................................................................ 8
MIC........................................................................................................................................................ 10
Remote Controller.................................................................................................................................. 10
Hotkeys.................................................................................................................................................. 13
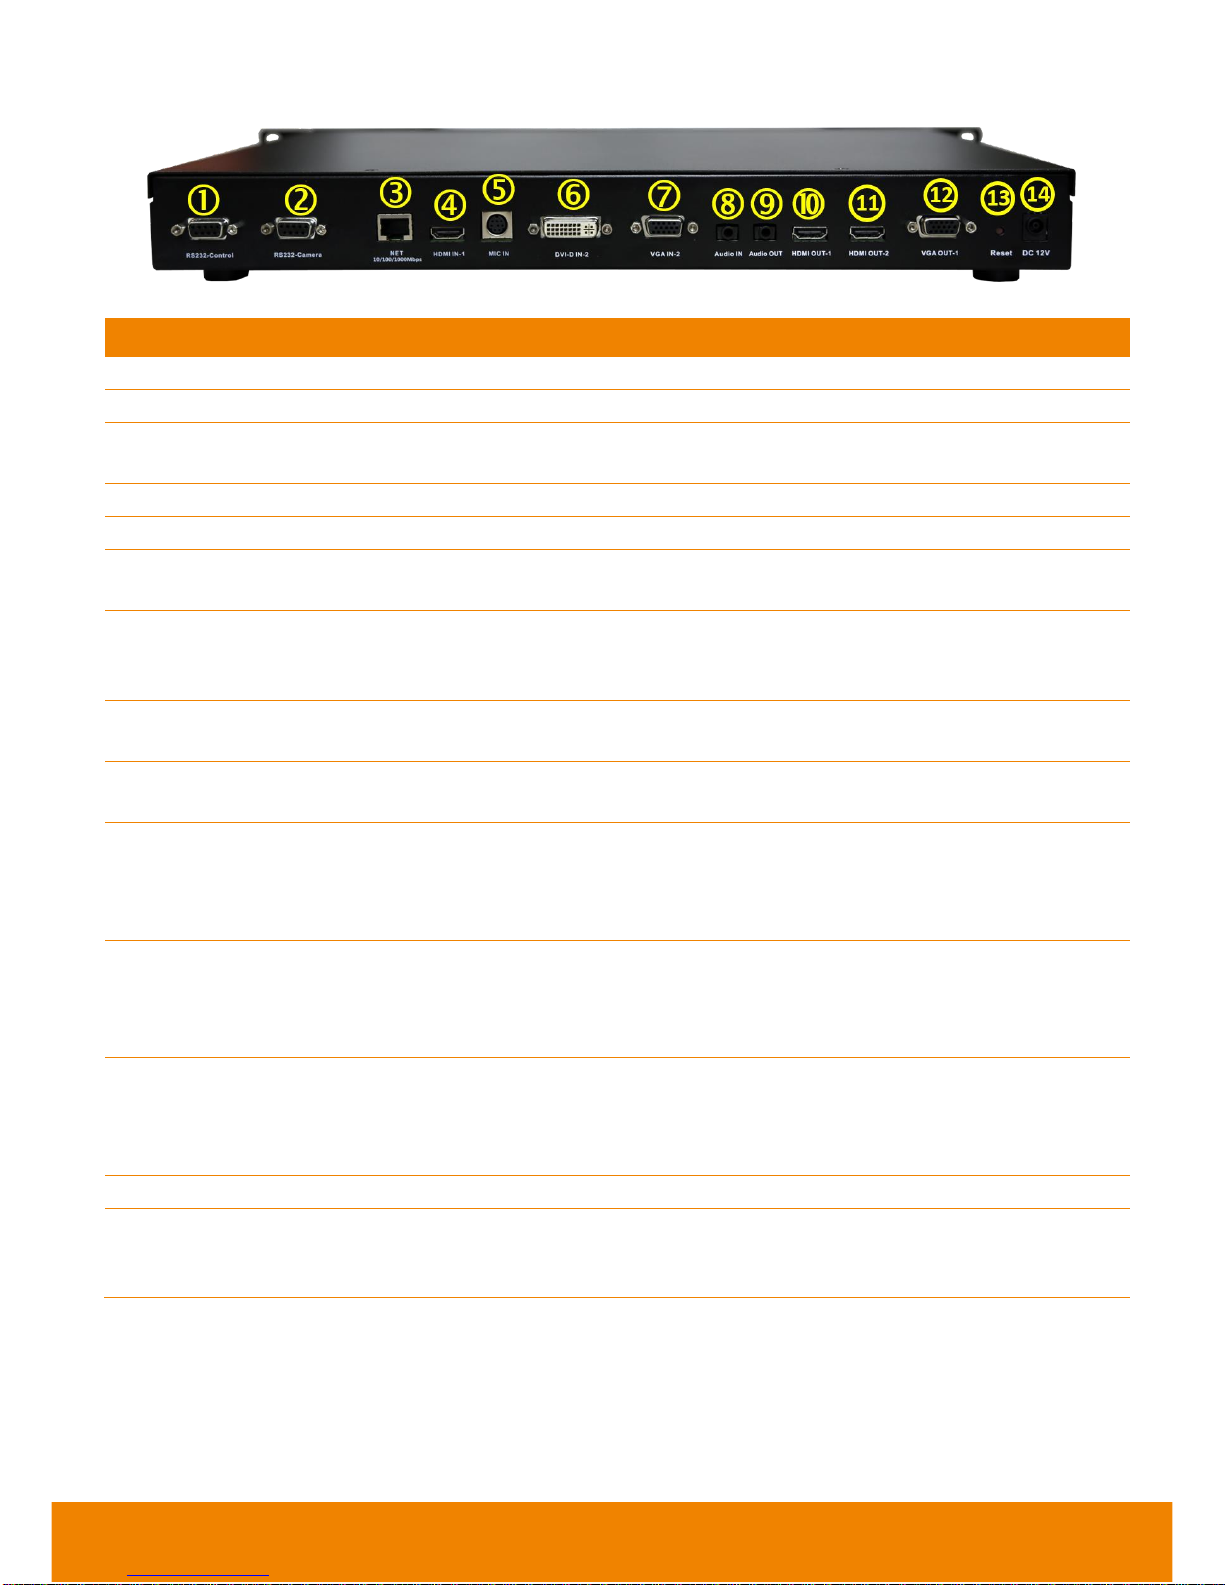
Connections ............................................................................................................................................... 14
Positioning the MIC .................................................................................................................................... 16
OPERATION ........................................................................................................................ 17
Before You Begin....................................................................................................................................... 17
Home Screen ............................................................................................................................................. 17
Configuration Icons................................................................................................................................ 17
WAN Address........................................................................................................................................ 18
Real-Time Clock .................................................................................................................................... 18
System Info............................................................................................................................................ 18
Dial............................................................................................................................................................. 19
Hang up the call..................................................................................................................................... 21
Video Layout.......................................................................................................................................... 21
Phonebook................................................................................................................................................. 22
Group..................................................................................................................................................... 22
New Site (Contact in Phonebook).......................................................................................................... 28
Contacts List.......................................................................................................................................... 30
Favorite.................................................................................................................................................. 31
Call History................................................................................................................................................. 32
General Setting .......................................................................................................................................... 34
Call Settings........................................................................................................................................... 34
System Settings..................................................................................................................................... 37
Administrator.......................................................................................................................................... 38
Monitor................................................................................................................................................... 42
Date and Time....................................................................................................................................... 43
Reset System ........................................................................................................................................ 46
License.................................................................................................................................................. 47
Default Layout........................................................................................................................................ 48
Video/Audio................................................................................................................................................ 49
Camera.................................................................................................................................................. 49
Microphone............................................................................................................................................ 51
Video/Audio Codecs .............................................................................................................................. 53
Network...................................................................................................................................................... 54
LAN Configuration.................................................................................................................................. 54
IPv6 ....................................................................................................................................................... 57
Firewall.................................................................................................................................................. 59
SIP......................................................................................................................................................... 60
SIP Configuration................................................................................................................................... 63
Gatekeeper............................................................................................................................................ 68
RTMP .................................................................................................................................................... 70
Test Utilities........................................................................................................................................... 71

3
WEB CONFIGURATIONS ..................................................................................................... 72
Using Online Web Control.......................................................................................................................... 72
Virtual Remote Controller ........................................................................................................................... 74
Managing Phonebook................................................................................................................................. 76
Edit and Save ........................................................................................................................................ 76
Download Phonebook Entries................................................................................................................ 77
Upload Phonebook Entries .................................................................................................................... 77
System Update........................................................................................................................................... 78
Update System...................................................................................................................................... 78
TROUBLESHOOTING .......................................................................................................... 79
Audio.......................................................................................................................................................... 79
Video/Display ............................................................................................................................................. 79
Network...................................................................................................................................................... 79
Others ........................................................................................................................................................ 81
SCENARIOS FOR LAN CONNECTION.................................................................................. 82
Public IP Configuration............................................................................................................................... 82
Private IP Configuration.............................................................................................................................. 83
H.460 Gatekeeper with Firewall Traversal.................................................................................................. 85
REMOTE CONTROL BATTERY SAFETY INFORMATION...................................................... 86
LIMITED WARRANTY .......................................................................................................... 87
Limitations of Warranty............................................................................................................................... 87
Disclaimer of Warranty............................................................................................................................... 87
Limitation of Liability................................................................................................................................... 88
Governing Law and Your Rights................................................................................................................. 88
FEDERAL COMMUNICATIONS COMMISSION STATEMENT (CLASS A)............................... 89
Class A ITE................................................................................................................................................ 89
CE Class A (EMC)...................................................................................................................................... 89
COPYRIGHT ........................................................................................................................ 90
Trademarks................................................................................................................................................ 90
Disclaimer .................................................................................................................................................. 90

4
Introduction
Thank you for choosing KZ-VC6000 which offers professional multimedia online interactive teaching /
learning experience in new cost performance benchmark.
KZ-VC6000 gives you the latest technologies; slim form factor, flexible integration options and
backward compatibility to most Virtual Classroom install bases. It makes any virtual interactive teaching
/ learning, business meetings and special events much more reliable, effective, and secure.
Features
Item
Specifications / Functionalities
Main Host
6-point MCU Recording Host (8 points maximum)
Microphone
ACCU flat sound pickup X1 (can be connected up to 4 ACCU flat sound
pickup Microphone)
Network Protocol
Supports H.323 protocol, SIP standards, SIP TLS, manual bandwidth
setting
connection bandwidth: 64Kbps ~ 4Mbps
RJ45 port (10/100/1000 Mbps)
Security
AES encryption;set up password to do system settings and distanced
management
User Interface
Single/Dual display supported; menus;
location display in conference
22 languages supported
Video Compression
Support H.264BP, H.264 HP, H.263+, H.263, H.261 Synchronous Video
sharing
Video Resolution
FHD1080p (1920 x 1080), HD720p (1280 x 720), SD480p (848 x 480), 4CIF
(704 x 576), CIF (352 x 288), SIF (352 x 240)
All resolutions are in 30fps
Sync. Video Resolution
HD1080p (1920 x 1080), WSXGA+ (1680 x 1050), SXGA (1280 x 1024),
WXGA (1280 x 768), HD720p (1280 x 720), XGA (1024 x 768), SVGA (800
x 600), D1 (720 x 480), VGA (640 x 480)
Output: HD1080p (1920 x 1080), 30fps maximum
Live Streaming Protocol
2 outputs maximum (People and Content) in RTMP
RTMP video compression standard: H.264 HP/BP
Video compression rate can be up to 8Mbps(i.e.: 720p:1Mbps、
1080i/p:6Mbps、1024×768:1Mbps、D1:800Kbps)
Audio Compression Standards: AAC-LC, Bit rate 64Kbps~
256Kbps(mono);28Kbps~512Kbps(stereo)
Audio sampling frequency: 48KHz
Rate controlling: CBR/VBR;
Layout Switching
Single, Dual, PNP, Multi-Display switching
Support
H.239/BFCP(real-time sharing of local and distanced content)

5
Item
Specifications / Functionalities
Video Inputs
HDMI x1
DVI-Dx1/VGA x1(for second source)
Video Outputs
HDMI x 2
VGAx1
Audio Spec. Characteristics
Echo suppression, Noise Elimination, AGC
Audio Compression Spec.
G.711, G.722, G.722.1, G.728, G.722.1C
Audio Inputs
KONZE ACCU Flat sound pickup microphone
DVI-D(HDMI)
3.5mm Line IN
Audio Outputs
HDMI, 3.5mm Line OUT
Serial control interface
RS232x2
Serial PTZ control protocol supports PELCO-D, PELCO-P, VISCA
Other Supported Standards
H.224, H.225, H.245, H.281, H.323 Annex Q, H.460, SRTP
Video Interactive Add-ons
Embedded local recording of video interactivities
Off-Line Recording supported
Adopt multi-streams recording
User can select different layouts while in playback and select one video
file output in certain layout ( *.mp4 or *.mov format)
Add-Ons
Speed Dial
Update by USB drive or Ethernet
Screen Saver, Automatic Shutdown, and Power Automatic Start settings
USB2.0 x2 in Front Panel (can be connected with mouse or USB drive)
Network Time Correction (NTP)

6
Item
Specifications / Functionalities
Online Software (Authorized Version for Mac and Windows System with
desktop sharing function)
On-Line APP (for iOS, Free)
OnLine APK (for Android, Free)
OnlineShare APP/APK (for iOS and Android, Free): a Virtual Remote
Control to the main host, practice real-time video share and photo
sharing to distanced attendants.
All the above software/APP/APK can support online video interactive
learning or conference with the main host.
OnlinePlayer (for Windows) can play recorded video clips with PCs or
laptops and convert video clips to MOV or MP4 format.
Online Web Control (webpage interface control tool) can practice
distanced monitoring, control the main hos and cameras, software
update, real-time problem solving, and contact export.
Live broadcasting to MyCloud Platform
SnapShot
Group Calling
Accessories
IR Remote Control, Power Adopter, Connection Cable
Power Supply
AC 100V ~ 240V,50/60HZ
Dimensions (L X W X H)
1U Case, 435 x 262.7 x 44.5 mm
Microphone: 131.9 x 118.6 x 25.5 mm
Weight
3.35 kg
Warranty and Maintenance
Online Interactive Host, Flat Microphone, and other accessories
1 year Warranty

7
Package Contents
The following items are included in the package. Please check if each item is available before using.
1
2
3
4
5
6
7
8
1. Main System
2. Back Panel Label
3. Microphone
4. Remote Control
5. Power Adapter
6. Power Cord
7. Mini Din 8 pin MIC Cable (5m)
8. AAA Batteries
The power cord will vary depending on the standard power outlet of the country where it is sold.

8
Installation
Getting Familiar with KZ-VC6000
The package of KZ-VC6000 includes Main System, MIC, and Remote Controller.
Main System
Front Panel:
Name
Function
(1) LED Indicator
Show you the status of your LAN connection.
Solid Green: LAN connection is successfully
Flash Green: Data transmission is processing through the LAN
connection.
(2) POWER Button
Press this button to turn on/off main system. Red: power off; Blue: power
on
(3) & (4) USB Port
Use to connect the USB storage for system log saving and FW upgrade.

9
Back Panel:
Name
Function
(1) RS232-CONTROL
For system control.
(2) RS232-CAMEAR
For Camera Control
(3) LAN Port
Use the RJ-45 Ethernet cable to connect an IP-based network to the LAN
port.
(4) HDMI IN-1
To connect a camera
(5) MIC IN
Receive audio signal from MIC device via a mini din 8 pin MIC cable.
(6) DVI-D IN-2
Using the DVI to HDMI connector to transfer the DVI to HDMI interface and
through the HDMI cable connects to the PC or NB.
(7) VGA IN-2
Connect the VGA cable to the VGA input port located on the back panel,
and connect the other end of VGA cable to a VGA input source (ex.
Document camera, Laptop or Desktop) to input video signal.
(8) AUDIO IN
Receive audio signal from an external audio source through the audio
cable.
(9) AUDIO OUT
Use to connect the main system to external speakers or amplifiers for
audio signal output.
(10) HDMI OUT-1
Connect an HDMI cable from the HDMI monitor to HDMI OUT-1. The
HDMI interface allows you to transmit both audio and video signals over a
single cable (HDMI cable). In dual display mode, the output screen
connected to this port will be set up to primary screen automatically.
(11) HDMI OUT-2
Connect the HDMI cable to the HDMI OUT-2 to connect the other end of
HDMI cable to a display device to output both video and audio signal. In
dual display mode, the output screen connected to this port will be set up
to secondary screen automatically.
(12) VGA OUT-1
Connect the VGA cable to the VGA output port located on the back panel,
and connect the other end of VGA cable to a display device to output video
signal. In dual display mode, the output screen connected to this port will
be set up to primary screen automatically.
(13) RESET Button
Press it to reboot the main system unit.
(14) POWER
Connect the power supply cord and adapter to the power port located on
the back panel. And connect the other end of the power cord to a suitable
power outlet.

10
MIC
Name
Function
(1) Mute
Mute/Unmute the Mic.
Blue: Unmute;
Red: Mute
(2) MIC OUT Port
Outputs audio signal from the MIC to main system.
(3) MIC IN Port
Receive audio signal from the second MIC and pass it through the MIC
OUT to the main system.
Remote Controller
The remote controller requires two “AAA” batteries (included). Make sure the batteries are installed
properly before using the remote controller.

11
Buttons
Functions
(1) Info
Press this button to display the call
statistics information.
(2) Power
Press this button to power on/off the
main system.
(3) Numeric Pad
Use to enter alphanumeric. Press
button and hold can switch between
numeric mode and alphanumeric mode.
(4) Keypad
In enter mode, press this button to
display the on-screen keyboard.
(5) Phonebook
Search contacts to make a call.
Add, edit, delete or create group contact
entries.
(6) Delete
Press this button to back delete one
character at a time.
(7) Call
Start a call.
(8) Home
Bring up the main screen.
(9) Hang up
End the call.
(10) Help
In Home menu and video screen mode,
press it to display on-screen help
information.
(11) Back
Return to previous OSD menu.
(12) Navigation
Buttons
(, , , )
a. Use these buttons to navigate
through the selections in OSD
menus or on-screen keyboard.
b. Pan and tilt the camera to adjust
the viewing.
c. Pan, tilt the zoomed in camera
image or captured image.
(13) Enter
a. Make a selection in OSD menus.
b. Accept incoming calls.
c. Display the site name and icon
during the meeting.
d. Auto Focus function(PTZ camera
only)
(14) Far/Near
Select to control either near site or far
site camera. The cam ctrl icon will
appear on the screen to indicate which
site’s camera you are controlling. The
cam ctrl icon will disappear after press
the Far/Near key 5 sec.

12
Buttons
Functions
(15) Input
Switch screen display between camera
screen and input source screen.
(16) Zoom +/-
Increase/decrease the camera zoom or
the captured image magnifications.
(17) Vol +/-
Increase/decrease the speaker volume.
(18) Mute
Mute/Unmute the MIC. The mute icon
will appear when the MIC is muted. The
mute icon will become translucent after
enabling 5 sec.
(19) Record
Start/Stop video recording. The video
recording can only be saved to a USB
flash drive when in / out of a
conference.
This button is also a hotkey to select
RTMP activation and Recording
functions
(20) Presentation
Share the content that comes from
either the VGA input source or the DVI
input source. The present icon will
appear on the screen when the
presentation function is enabled. The
icon will disappear after 5 sec.
(21) Layout
Change the screen layout.
(22) button
Support for virtual Interactive
Whiteboard., to display the IWB screen
for real-time interactive teaching in dual
display mode.
(23) Preset
a. Press and hold for 3 sec. to set the
position of the camera to a preset
from 0~99.
b. Press to move the camera to a
selected preset point number.
(24) Snapshot
Capture the camera. (Storage to USB
flash drive ONLY)
(25) Dual
a. Switch to dual display mode. This
splits the video and the other screen
(either from VGA or DVI source)
onto two separate monitors (two
monitors must be connected to use
the feature, one through HDMI and
one through VGA in-2 / DVI-D IN-2).
b. Press and hold can switch to OSD
menu between primary and
secondary screen.

13
Hotkeys
Record Button
Both on remote control and virtual remote control in Web Control, the record button is not only for
recording, but also for users to select various functions by one button.
1. Press “Record” button
2. Select Recording, RTMP, or Recording +
RTMP functionalities.
Recording: refers to do “local
Recording”. Please make sure the USB
drive or extended HDD is well connected
to KZ-VC6000
RTMP: it will activate RTMP streaming to
MyCloud platform. Please make sure
the settings of RTMP are done.
Recording + RTMP: to do local
recording and activate RTMP Streaming
at the same time.
“#” button
Press this button for 2 seconds, then the keypad will be switch for
English letter input instead of number input.
Preset button
1. Load presets: press it to load the
presets.
2. Save presets: press it for 2
seconds, then you can save the
current position of camera image
as a preset by input a number from
10~99,
1~9 are occupied for camera
control,
80 to enable auto-tracking
function of the camera,
81 to disable the auto-tracking
function of the camera
3. Then press “Enter” to confirm

14
Connections
Before making the connections, make sure all devices are powered off. Refer to the illustrated
connections below and also to the usermanual of the device you are connecting to KZ-VC6000 system.
Make sure all connections have been connected successfully before powering on the system.

15
Front Connections: USB Storage / Mouse connection (USB Ports)
KZ-VC6000 main system supports two USB2.0 interface for saving Video clips and snapshot photos.

16
Positioning the MIC
The best distance for MIC to receive audio signal is within 3m. The MIC can connect up to 4 in one
chain.
Single Microphone
Two Microphones

17
OPERATION
Connecting the camera, microphone, main system, display and power will be turned on automatically
while been plugged onto a power socket. Power button starts blinking blue light, an animation and
music will be displayed. In 30 seconds camera image and home screen appear on screen. Start
configuring KZ-VC6000 after the Homepage of the setting section.
Before You Begin
Basic Operation
Navigation buttons: Use the , , and buttons to move the selection on the remote
controller.
Enter button: Use the to confirm the selection on the remote controller.
Apply: Make the changed value to take effect.
Save: Accept the created value and save it to the system.
Cancel: Cancel the changed value and exit the present screen.
Home Screen
There are 2 selections divided on the Home screen: Call and Setting. Simply use the navigation
buttons to move between selections and press to confirm the selection. You can easily place a
call and select the site contact either in Dial, Phonebook or Call History. You can easily setup up the
system in General Setting, Video/Audio, and Network. The administrator can set a security
password to prevent changes made to the system setting and Online WebTool access.
Configuration Icons
Call include Dial, Phonebook and Call History
Setting include General Setting, Video/Audio and
Network.
Menu function is divided into 2 parts –Call and Setting.
Call function is included Dial, Phonebook and Call History.
Setting function is included General Setting, Video/Audio, and Network.

18
WAN Address
On the lower left corner of your home screen, you
can find current WAN IP address.
Real-Time Clock
On the lower right corner of your home screen,
you can find the current Date and Time once
system has been set up properly.
System Info
Press (Info) button to switch to system
information page.
The System Info shows you the relative
information about your KZ-VC6000 main
system including Site Name, Model name,
Maximum Allowable Sites, IP Address, MAC
Address and System Version.
Also, you can view call status while call is
connected.
1. Make a call.
2. When call is connected, press (Info)
button.
3. Select the call and you should see the
current call status.

19
Dial
Dial selection allows you to enter dial screen and
make a call.. Press button on the remote
controller has the same effect.
IP Address
Use the number keys on the remote
controller to enter the IP address or number
or SIP URL (SIP:username.password@host)
you want to call. Remote controller
supports alpha-numeric operation, press
numeric key multiple times to select the
alphabet or symbol.
[Note] Press button and hold can
switch between numeric mode(123) and
alphanumeric mode(ABC/123).
Call Type
KZ-VC6000 supports H.323 and SIP calls.
H.323 is commonly used to communication
to other videoconferencing room systems.
SIP is commonly used to communicate with
other VoIP devices. Use the button to
select which type of call type you want to
make then press to confirm.
[Note] H.322 and SIP call type can be
existed in a same conference call meeting.

20
Call Quality
For the Call Quality selection, enter the
desired call quality (or network bandwidth)
from the drop-down list (default or 64K up to
4M bit per second).
Select the “Call” on the Dial configuration
screen then press to make a call.
Make sure the network jack is plugged in and
network is working properly before making a
call; otherwise, the “Network Jack
Unplugged” information will appear. Click
“OK” to reconfirm the network connection.
Table of contents
Other KonzeSys Recording Equipment manuals