KonzeSys KZ-NP6000 User manual

1
KZ-NP6000
HD Broadcasting and Recording System
User Manual
(Taiwan) http://www.konzesys.com
Konzes System Technology Co., Ltd.
4F., No.134, Ln. 235, Baoqiao Rd., Xindian Dist., New
Taipei City 231, Taiwan (R.O.C.)
Tel : +886-2-89121234
Fax: +886-2-89121099
(China) http://www.konzesys.com.cn
Guangzhou Konze Electronic Technology Co., Ltd.
7/F, Building B, Dehui Business Building, No.12,
Meigui Road, Xinhua Street, Huadu District,
Guangzhou, 510800
Tel : +86-20-86031368/98
Fax: +86-20-86031368 ext: 827

KZ-NP6000 User Manual
2
Table of Contents
1. SPECIFICATIONS ..........................................................................................................................4
2. FEATURES......................................................................................................................................7
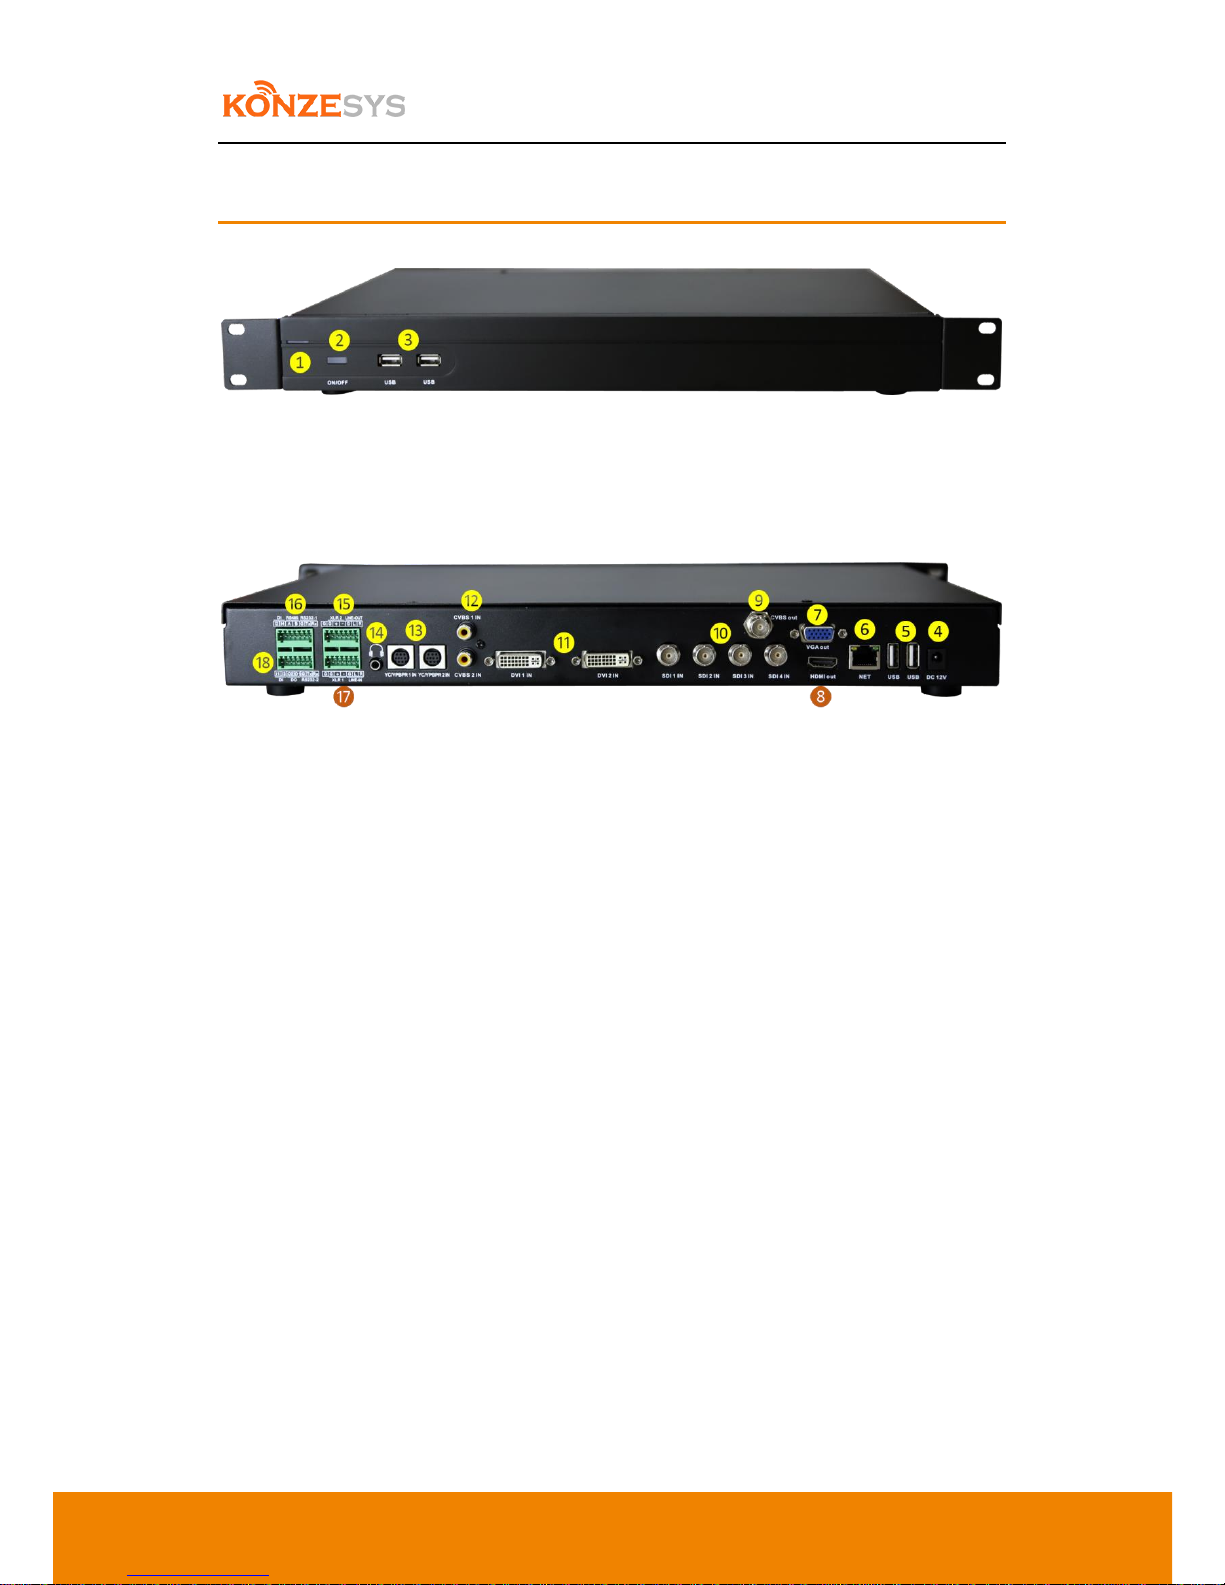
3. CONNECTIONS..............................................................................................................................8
4. STRUCTURE ..................................................................................................................................9
5. CONFIGURATIONS.....................................................................................................................10
5.1. Before Configuration.........................................................................................................10
5.2. Cables ................................................................................................................................10
6. FUNCTIONALITIES AND OPERATION....................................................................................11
6.1. MAIN INTERFACE........................................................................................................................12
6.1.1. Startup Screen...............................................................................................................12
6.1.2. Main Interface...............................................................................................................12
6.2. MONITORING INTERFACE .............................................................................................................13
6.3. VIDEO INPUTS CHANNEL..............................................................................................................15
6.3.1. Channel Interface..........................................................................................................15
6.3.2. Channel Configurations.................................................................................................17
6.3.2.1. Channel Settings......................................................................................................................17
6.3.2.2. PTZ...........................................................................................................................................19
6.3.2.3. Picture .....................................................................................................................................20
6.3.2.4. Encode.....................................................................................................................................21
6.4. PTZ CONTROL ...........................................................................................................................22
6.4.1. PTZ Control....................................................................................................................22
6.4.2. Meeting Control –Distanced Interaction .....................................................................23
6.5. DIRECTOR .................................................................................................................................24
6.5.1. Segmentation / Transform............................................................................................25
6.5.2. Subtitles / Sound...........................................................................................................26
6.5.3. Corner / OSD Info / Time / Add OSD............................................................................27
6.5.4. State ..............................................................................................................................29
6.5.5. Titles / Endings..............................................................................................................30
6.5.6. Manual Director / Auto Director ..................................................................................31
6.5.6.1. Manual Director:.....................................................................................................................31
6.5.6.2. Semi Auto:...............................................................................................................................31
6.5.6.3. Full Auto ..................................................................................................................................31
6.5.7. Movie Mode / Res Mode..............................................................................................32
6.6. 5. SYSTEM FUNCTIONALITIES ........................................................................................................33
6.6.1. Quick Start.....................................................................................................................33
6.6.2. Recording and Broadcasting Settings ...........................................................................33
6.6.2.1.Boot .........................................................................................................................................34
6.6.2.2. Encoding..................................................................................................................................35
6.6.2.3. Audio .......................................................................................................................................36

KZ-NP6000 User Manual
3
6.6.2.4. Recording.................................................................................................................................36
6.6.2.5. Time Record (Recording Schedules Settings) .........................................................................38
6.6.2.6. RTMP Stream...........................................................................................................................39
6.6.2.7. Quick Start Setting ..................................................................................................................40
6.6.2.8. TS Stream ................................................................................................................................41
6.6.2.9. Auto Track ...............................................................................................................................42
6.6.2.10. Strategy...............................................................................................................................44
6.6.3. System Configurations ..................................................................................................47
6.6.3.1. User Management...................................................................................................................47
6.6.3.2. Disk Management ...................................................................................................................48
6.6.3.3. Network Configuration ...........................................................................................................49
6.6.3.4. Network Test ...........................................................................................................................50
6.6.3.5. Dual Graphic Cards Settings....................................................................................................50
6.6.3.6. Control.....................................................................................................................................51
6.6.3.7. System Info..............................................................................................................................52
6.6.4. File Management..........................................................................................................53
6.6.5. Log in Settings (not available in this version)...............................................................53
7. FAQ................................................................................................................................................55
8. LIMITED WARRANTY................................................................................................................57
9. LIMITATIONS OF WARRANTY .................................................................................................57
10. DISCLAIMER OF WARRANTY..............................................................................................57
11. LIMITATION OF LIABILITY..................................................................................................58
12. GOVERNING LAW AND YOUR RIGHTS .............................................................................58

KZ-NP6000 User Manual
4
1. Specifications
Item
Specifications
Functionalities / Performance
System
Language
Chinese / English
User Interface
Graphic Menu Interface
Structure
Embedded Linux System Structure
Video
Inputs
SDI x4
DVI-I x2
Outputs
VGA x1
HDMI x1
CVBS x1
Display
Single, PNP, Multi-Screen display
Standards
PAL / NTSC standards
Max. Input Frame Rate
1080P@60P
Input Resolutions
HDMI/VGA:1024*768@60HZ~1920*1080@60HZ
(960*540;1024*576;1024*768;1280*720;1280*960;1600*900;1600*1
200;1920*1080)
3G/HD/SD-SDI:720x576-PAL, 720x480-NTSC, 720P@50/60,
1080P@25~1080P@60
Audio
Inputs
MIC XLR x2
Stereo Line In x1
Outputs
3.5mm Monitor x1
Stereo Line Out x1
Audio Coding
AAC
Recording
Audio and Video Recording Synchronization
Image
Video Output Format
MP4

KZ-NP6000 User Manual
5
Processing
and Storage
Video Coding Frame
Rate
1~30fps
Video Bit Rate
Adjustable, 48kbps~20Mbps
Audio Bit Rate
64K
Data Storage
Embedded SATA x1 ,Max. 3TB supported
IO
Inputs
4 Inputs(Max. 5V,Min. 0V)
Outputs
2 Outputs(Max. 5V,Min. 0V)
Comm.
Interface
RS485
1
RS232
2
RJ45
802.3ab/1G port x1
USB
2
Functionalities
Director
Video Preview / Live Broadcasting Monitoring / Preview Live
Broadcasting Monitoring / Video Switch / Audio Adjustment /
One-Button Switch-on / Title and Trailer / PTZ Operation / Special
Effect / Subtitles, OSD Information, Subscript Logo and so on
Broadcasting and
Recording
Real-time Broadcasting / Synchronous Recording / Distanced
Interactivities /Multi-Screen in Single-Stream / Multi-Screen in
Multi-Stream / Resource Mode and Movie Mode at the same time
While in movie director, resource mode will be working in
background.
Software upgrade
Internet Upgrade Supported
Upgraded by RS232
Storage
Embedded HD, Extended USB Drive
USB video export
SAMBA Share Download
FTP Video Download

KZ-NP6000 User Manual
6
Live Broadcasting
Protocol
Standard RTMP Protocol
RTSP Real-time Protocol
RTP Group Broadcasting
Single Streaming
Environment
Power Supply
DC12V / 2A
Temperature(℃)
-10℃-85℃in Well Ventilated Environment
Humidity
Below 85% RH
Weight(KG)
3KG GW,3.5KG with a HD
Dimensions(mm)
440mm x 270mm x 44.5mm (Height is standard 1U)

KZ-NP6000 User Manual
7
2. Features
Front:
(1). Status Indicator
(2). Power
(3). USB X 2: for Keyboard/ Mouse and USB flash drive
Rear:
(4). Power Supply: DC12V/2A
(5). USB1/2: for extended HDD, mouse, keyboard, and director platform
(6). NET : Ethernet Port
(7). VGA-OUT:: Up to 1920 X 1080 resolution display, to deliver director interface
(8). HDMI OUT: Up to 1920 X 1080 resolution display, to deliver PGM streaming
signal
(9). CVBS OUT: CVBS output
(10). SDI IN X 4: 4 SDI inputs, 3G-SDI, 1080P60 input supported
(11). DVI IN X 2: VGA / HDMI inputs, 1080P60 input supported
(12). CVBS IN X 2: 2 CVBS signals inputs
(13). YC/YPBPBR IN X 2:2 Color difference signals inputs
(14). Audio out
(15). LINE OUT
(16). RS485 / RS232-1: for extended equipment control
(17). LINE IN
(18). RS232-2:for extended equipment control

8
3. Connections

9
4. Structure

10
5. Configurations
5.1.Before Configuration
Prepare the following devices before configuration:
①LAN Cables and Router
②Power cable of NP6000, VGA and HDMI cables, Audio RCA input and output cables, SDI
cables.
③1080P23/30 cameras, computer, RCA Speakers, Monitoring earphone.
④Display requirements: VGA and HDMI ports embedded; 1920X1080 HD resolution
5.2.Cables
①All cables, including SDI, Audio, VGA, DVI, LAN, IO/RS485 control, power, and USB
mouse, should be connected to KZ-NP6000.
②Make sure power supply is correctly connected and press the “Power” button to
turn on KZ-NP6000. Please wait for 30 seconds and enter the director interface.
Then, you will be able to operate the whole system.
Note:
A. The VGA output refers to system interface of director, users can operate via
USB mouse which should be connected to the USB port of NP6000.
B. The HDMI-out refers to broadcasting streams (PGM1 or PGM2)
C. The default static IP is 192.168.100.66

KZ-NP6000 User Manual
11
6. Functionalities and Operation
There are 5 Modules in Main Interface:Monitoring Module, Input Channels, PTZ, Director
Functionalities, and System Functionalities.

KZ-NP6000 User Manual
12
6.1. Main Interface
6.1.1. Startup Screen
After connected to the power supply and then press the power button, the connected monitors
with VGA and HDMI will show the startup screen at the same time.
Startup screen graphic can be customized, such a function is located at SYSTEM SETTINGS /
SYSTEM INFO / ENGINEERING MODE.
The format of the startup screen graphic should be in JPG and at 1024*768 pixels resolution.
The size of the graphic should not above 128KB.
Graphic of the system interface should be in GIF format and at 200*100 pixels resolution.
Please note that the graphic of the interface should be at 72 DPI. While customizing the
graphics, the file names should not content Chinese or symbols.
6.1.2. Main Interface
It will take around 20 seconds to start up KZ-NP6000 and then you will be able to enter Main
Interface directly. At the same time, there will be a loading message shown up and then you
can start to operate the main interface.
There are 5 Modules in Main Interface:
1. Monitoring Module,
2. Input Channels,
3. PTZ
4. Director Functionalities
5. System Functionalities.

KZ-NP6000 User Manual
13
6.2. Monitoring Interface
There are 4 modules in Monitoring Interface;
Movie Mode: PGM and PVW Channels
Res Mode: PGM and PGM Channels, Audio Bar, Hot Keys of PGM and PGM2.
Movie Mode: PGM and PVW Channels
Res Mode: PGM and PGM2 Channels
A. Both Single and Res modes are in Movie format. These two modes support
layer superimposition functionalities: PIP, conversation mode, 2/3/4/6 displays and so
on. There are PGM (Live streaming video) and PVW (Stream Preview) channels.
There are PGM and PGM2 channels in Res Mode.
B. When in Auto Director module, both Single and Res modes only support PGM
image auto switching. When the Res Mode is in Manual Director mode, manual
display switch is supported (HDMI-Out output), which can switch the video streams
from PGM to PGM2 by clicking “Director Output” button.

KZ-NP6000 User Manual
14
C. In Movie Mode, user can manually select the PGM channels. The default
channel is PGM and click the list to select PGM2 to do manual
director.
D. Audio Bar can be shown in both Single and Res modes, which are two lines
located at between PGM and PVW in Movie mode, PGM and PGM2 in Res mode.
The main function is to adjust the volume of the audio output by clicking the icon
to adjust, turn on, or turn off the audio output.
E. In PG and PGM2 Channels, users can click the hot keys to execute following
actions:
TS Streaming
RTMP Streaming
Start Local Recording
Paulse Local Recording
Stop Local Recording
Note:
The server IP or TS broadcasting IP should be set up first in Recording
Settings unit before proceed live streaming.
F. The video image of PGM can be replaced by the video image of PVW by
clicking PVW area two times. Multiple layers combination are supported in PVW,
PGM, and PGM2. First of all, users should select PGM, PGM2, or PVW channel.
Then select the layout and select the video inputs to combine according to the
selected layout style.

KZ-NP6000 User Manual
15
6.3. Video Inputs Channel
There are 3 parts of Video Inputs Channel: Local Video Display, Local Playback Channel, and
Distanced Videos Display Channel.
There are 22 channels in each KZ-NP6000. Except 4 channels occupied by PGM, PVW, and
PGM2, there are more 18 video channels. The first page of 7 video channels indicates local
video inputs including local playback channel. The following chart refers to the default inputs
identifications.
SDI 1
Lecturer Close-Up
SDI 5
Blackboard Writing Close-Up
SDI 2
Lecturer Panorama
DVI-I x 2
Refers to DVI-I inputs
SDI 3
Student Panorama
SDI 4
Student Close-Up
Despite of 7 occupied inputs, each KZ-NP6000 can be connected to another 11 distanced video
and audio sources. The distanced sources can be switched to PGM, PVW, and even PGM2 to be
live streams and recorded locally. Such functions should be based upon 2 or more KZ-NP6000
systems installed and connected in a network.
6.3.1. Channel Interface
A. Full Screen: Click button to enlarge a certain video channel to full screen in main
interface.
B. Channel Titles: The default titles of video inputs channels are;
1st Channel
Lecturer Panorama
5th Channel
Blackboard Writing Close-Up
2nd Channel
Lecturer Close-Up
6th Channel
Lecturer’s Computer / Laptop (VGA or HDMI)
3rd Channel
Student Panorama
7th Channel
Local Video Playback

KZ-NP6000 User Manual
16
4th Channel
Student Close-Up
Each Channel title is editable, however, we suggest not to change these titles in case of
confusion.
Note: When in Live broadcasting or recording status, the certain PGM channel will be
shown in RED. If in preview status, the certain PVW channel will be shown in GREEN.
C. PTZ Control: If the connected camera is a PTZ camera, then click button at the
top of the certain channel to activate PTZ control. Then, users can
take advantage of PTZ control functionality in Channel Settings area.
Just click the certain channel you want to do PTZ control, then, the
function is active. The default active PTZ control channels are
Lecturer Close-Up and Student Close-Up channels.
D. Local Playback: The 7th channel named “FileVideo-1” refers to local playback channel.
Click button at the up-right corner of this channel to enter
channel configuration section. Click “Select Files” to select a file in
mp4 format from HDD or USB Drive. Click “Apply” and “OK” after
done the selection. Click to play the certain video clip and click
to stop playing the video clip. Local playback sources can be

KZ-NP6000 User Manual
17
switched to PGM Live broadcasting channel.
E. Audio Control: Click button at the top of each channel to turn on / off the audio.
Local and distanced audio sources are both supported.
6.3.2. Channel Configurations
There is a button at the up-right of each channel, which is for channel configurations
including Channel Settings, PTZ Settings, Image settings, and Encoding Settings.
6.3.2.1. Channel Settings
A. Chn Name: Chinese and English languages are supported. The number of digits are 6
digits for each channel name.
B. Source: Input source. i.e. Lecturer Panorama SDI 1 indicates the source of Lecturer
Panorama is from SDI 1.
C. Video Format: The format and bitrate of the source, i.e. 1080 P25
D. Disp Mode: Ratio or Full Screen. If the video image in PGM is not in full screen, then,

KZ-NP6000 User Manual
18
it can be edited in this section.
E. Enable PTZ: When PTZ control is activated, there will be a button at the left
buttom of the certain channel. The defaults are Lecturer Close-Up and
Student Close-Up channels.
F. DVI-I Input Source: There will be AUTO, HDMI, and VGA sources to be selected in
DVI-I settings.
G. Recycle: In “FileVideo_1” channel, there is a function named “Recycle” which indicates
to continuously play the video clip selected from USB drive or local HDD.

KZ-NP6000 User Manual
19
6.3.2.2. PTZ
A. Enable PTZ:To activate PTZ by checking the box.
B. Protocol: VISCA、PELCO-P、and PELCO-D protocols are supported
C. COM: RS48 and RS232 are supported
D. Baud Rate: 2400, 4800, and 9600 are supported for different PTZ cameras
E. Address Code: The address code should be the same as that in PTZ settings. “1”
for Lecturer Close-Up; “2” for Student Close-Up.
F. Speed: The speed of PTZ
G. Preset: To set up the presets from 1 to 8 presets, also including Big Close-Up,
Close-Up, Vista, Medium Shot, Close Shot and so on. The default presets are;
11
Big Close-Up
14
Medium Shot
12
Close-Up
15
Vista
13
Close Shot
H. PTZ Operation:
Click , , ,to control Up, Down, Left, and Right direction of
the camera.

KZ-NP6000 User Manual
20
Zoom: “+” and “-“ indicate to Zoom in or Zoom out of the lens.
Focus: “+” and “-“ indicate to focus on distanced and near object.
Iris: “+” and “-“ indicate to transfer Large and Small aperture
Note:
To make sure the PTZ control will be working accordingly, the connections of
cameras to KZ-NP6000 should be correct. Also, the PTZ protocol, COM, and
Address Code should be identical with camera settings.
6.3.2.3. Picture
As shown the above, this section is to configure Brightness, Contract, Chroma, and Saturation
of the video quality. Normally, there is no needs to do these settings.
Table of contents
Other KonzeSys Recording Equipment manuals